Next Level Racing FLIGHT STAND PRO User manual
Video Instruction: bit.ly/nlrbuild
INSTRUCTION MANUAL
TAKE IT TO THE SKIES
FLIGHT STAND
PRO
*ELECTRONICS NOT INCLUDED

2
support@nextlevelracing.com
YOUR
FLIGHT SIM
JOURNEY
STARTS
HERE
We know you’re eager to start flying! Take your time with the
instructions and follow this guide to assemble your product.
You’ll be setting yourself up for success by following the
instruction booklet to fully optimize your product.
@nextlevelracingOcial
@next_level_racing
@nextlvlracing
Next Level Racing
support@nextlevelracing.com
ASSEMBLY
VIDEO
bit.ly/nlrbuild
FOLLOW
US

3
Video Instruction: bit.ly/nlrbuild
TAKE IT TO THE SKIES
NEXTLEVELRACING.COM
4
support@nextlevelracing.com
WARNING
If you require any support with
your product please contact our friendly team at:
support@nextlevelracing.com
PRE-FLIGHT
CHECKS
WARNING
CHOKING HAZARD - Small parts not for children under 3 years
or any individuals who have a tendency to place inedible objects
in their mouths.
ASSEMBLY
VIDEO
bit.ly/nlrbuild
• Please do not use power tools for assembly as over tightening can damage parts.
• If you require further support, consult the installation video or contact us at support@nextlevelracing.com
• Keep your hands clear from any moving parts when unfolding the Flight Stand Pro to avoid injury.
• Do not force parts together.
• Avoid cross threading bolts.

5
Video Instruction: bit.ly/nlrbuild
IN THE
BOX *NOT TO SCALE
NOTE: Some Items Come With
Rust Resistant Coating
1 x MOUNTING BRACKET2 x ADJUSTMENT ARM 1 x SWIVEL MOUNTING BRACKET
1 x MOUSE PLATE1 x PEDAL PLATE 1 x FLIGHT PLATE
1 x CLAMP SPACER PLATE
1 x SWIVEL ARM 2 x PLASTIC CAPS 1 x FLIGHT DECK
PEDAL BRACKETS
4 x SQUARE WASHERS 1 x WHEEL CRADLE 1 x HOTAS MOUNTING BRACKET
2 x WHEEL CRADLE EXTENSION ARMS
1 x KEYBOARD ANGLE BRACKET
1 x KEYBOARD PLATE 1 x HOTAS SWIVEL BRACKET
1 x PRE-ASSEMBLED HOTAS PLATE
PRE-ASSEMBLED FLIGHT STAND PRO
(LEFT)
(RIGHT)

6
support@nextlevelracing.com
2 x M8 NY-LOCK NUTS
38 x M8 16mm SOCKETHEAD BOLTS
24 x M6 16mm SOCKETHEAD BOLTS
14 x M5 16mm SOCKETHEAD BOLTS
14 x M4 16mm SOCKETHEAD BOLTS 6 x M6 20mm COUNTERSUNK BOLTS
M8 ALLEN KEY
M6 ALLEN KEY
M5 ALLEN KEY
M4 ALLEN KEY1 x NLR KEYBOARD MAT 1 x NLR MOUSE PAD
2 x M8 70mm SOCKETHEAD BOLTS
16 x M8 55mm SOCKETHEAD BOLTS
26 x M8 FLANGE NUTS
24 x M6 FLANGE NUTS
14 x M5 FLANGE NUTS
14 x M4 FLANGE NUTS
58 x M8 WASHERS
24 x M6 WASHERS
14 x M5 WASHERS
14 x M4 WASHERS 10 x CABLE TIES
2 x M8 50mm LOW PROFILE BOLTS
5 x M8 20mm LOW PROFILE BOLTS
1 x M8(13mm) WRENCH
1 x M6-M5 WRENCH
1 x M6-M4 WRENCH 9 x M8 20mm KNOBS
1 x 14mm WRENCH
2 x M8 12mm RATCHET HANDLES
4 x CASTOR WHEELS
4 x HEIGHT ADJUSTABLE FEET

7
Video Instruction: bit.ly/nlrbuild
MOUNTING LOCATION DIAGRAMS page 8
Hotas Plate page 8
Flight Plate page 9
Mouse Plate page 10
Wheel Plate page 11
GENERAL ASSEMBLY page 12
Pedal Plate Distance Adjustment page 14
Pedal Plate Angle Adjustment page 14
Flight Deck Angle Adjustment page 15
Swivel Flight Arm Assembly page 15
Flight Arm Assembly page 18
Flight/Swivel Arm Adjustment page 19
Swivel Arm Function page 20
Optional: Clamp Spacer Plate page 20
Optional: Regular HOTAS Centre Pole page 20
Optional: Extended HOTAS Centre Pole page 22
HOTAS Centre Pole Height Adjustment page 25
HOTAS Centre Pole Angle Adjustment page 25
Keyboard Plate Installation page 25
Keyboard Plate Adjustment page 26
Wheel Cradle Installation page 27
KEY STEPS
8
support@nextlevelracing.com
MOUNTING LOCATIONS
NOT TO SCALE
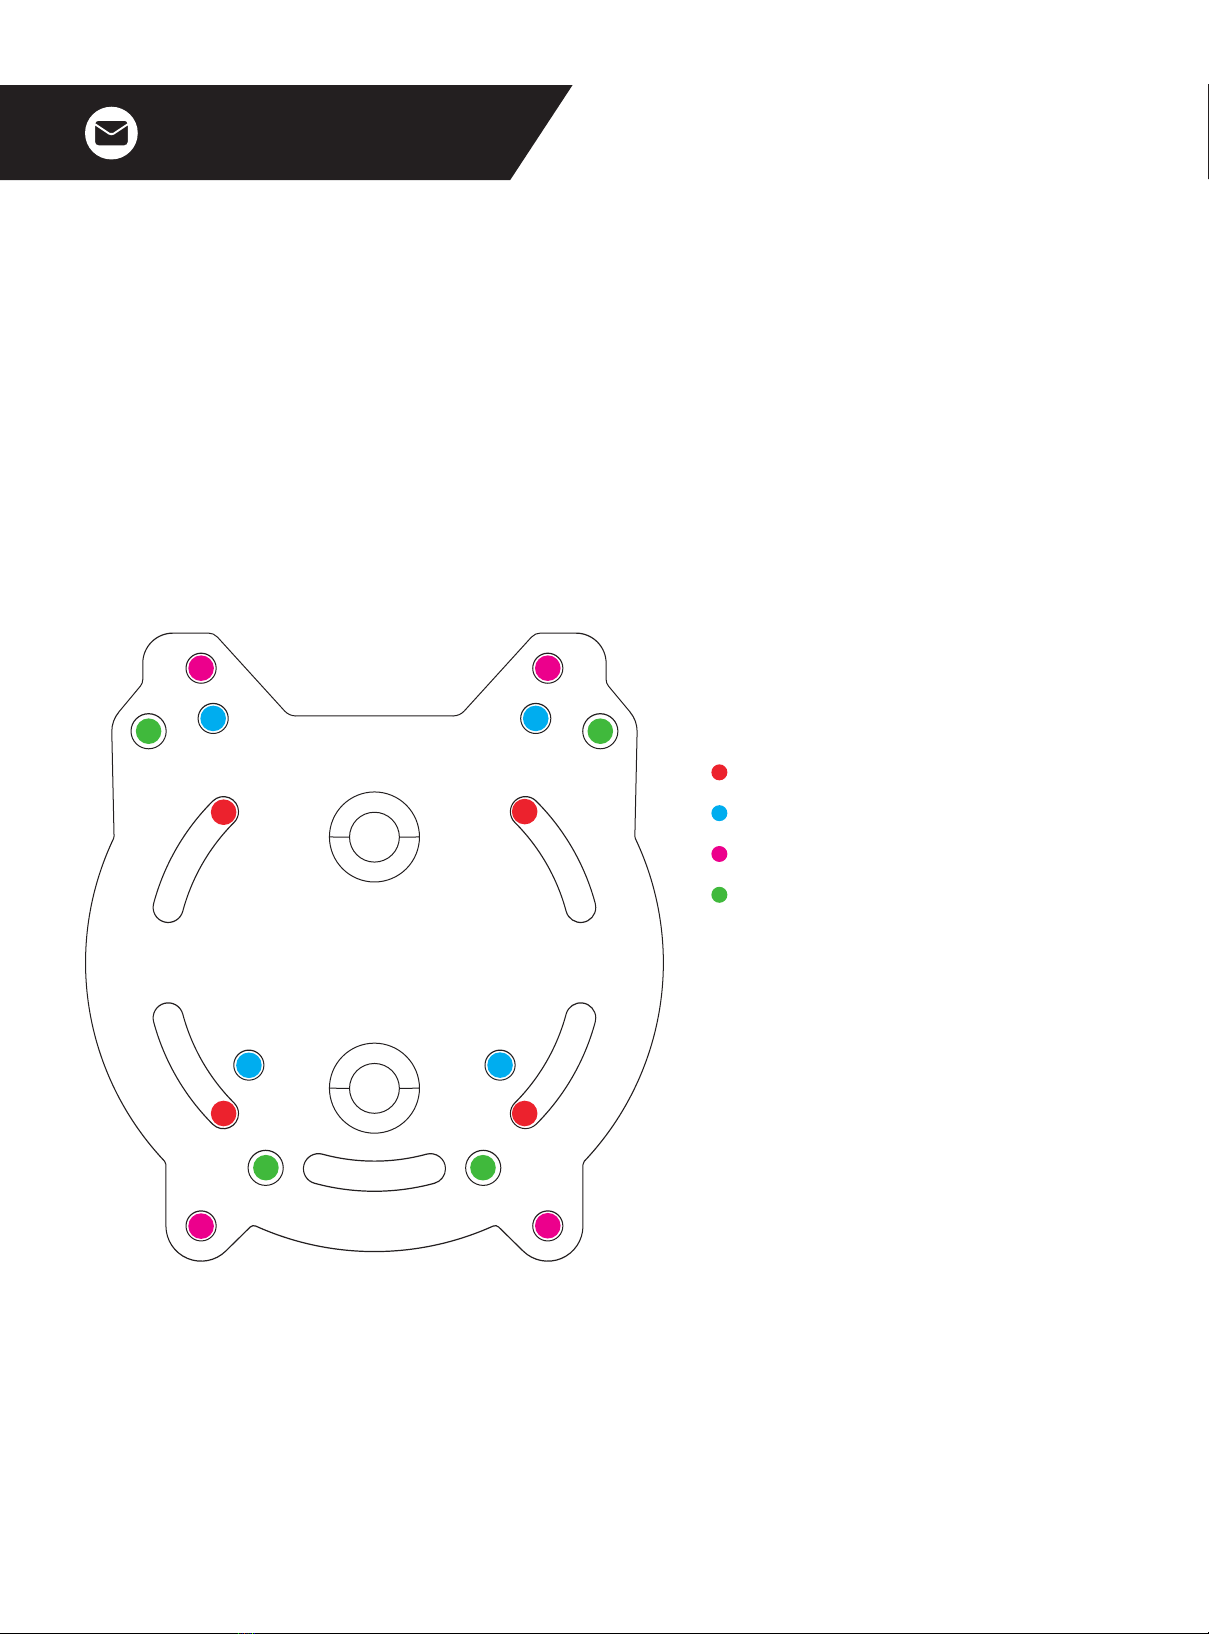
HOTAS PLATE
PRODUCT LEGEND:
TM HOTAS Warthog Stick / Winwing HOTAS Orion 2
VKB Gunfighter PRO MK.II
Virpil Mongoos T-50CM3 with WarBRD Base
Winwing Super Libra

9
Video Instruction: bit.ly/nlrbuild
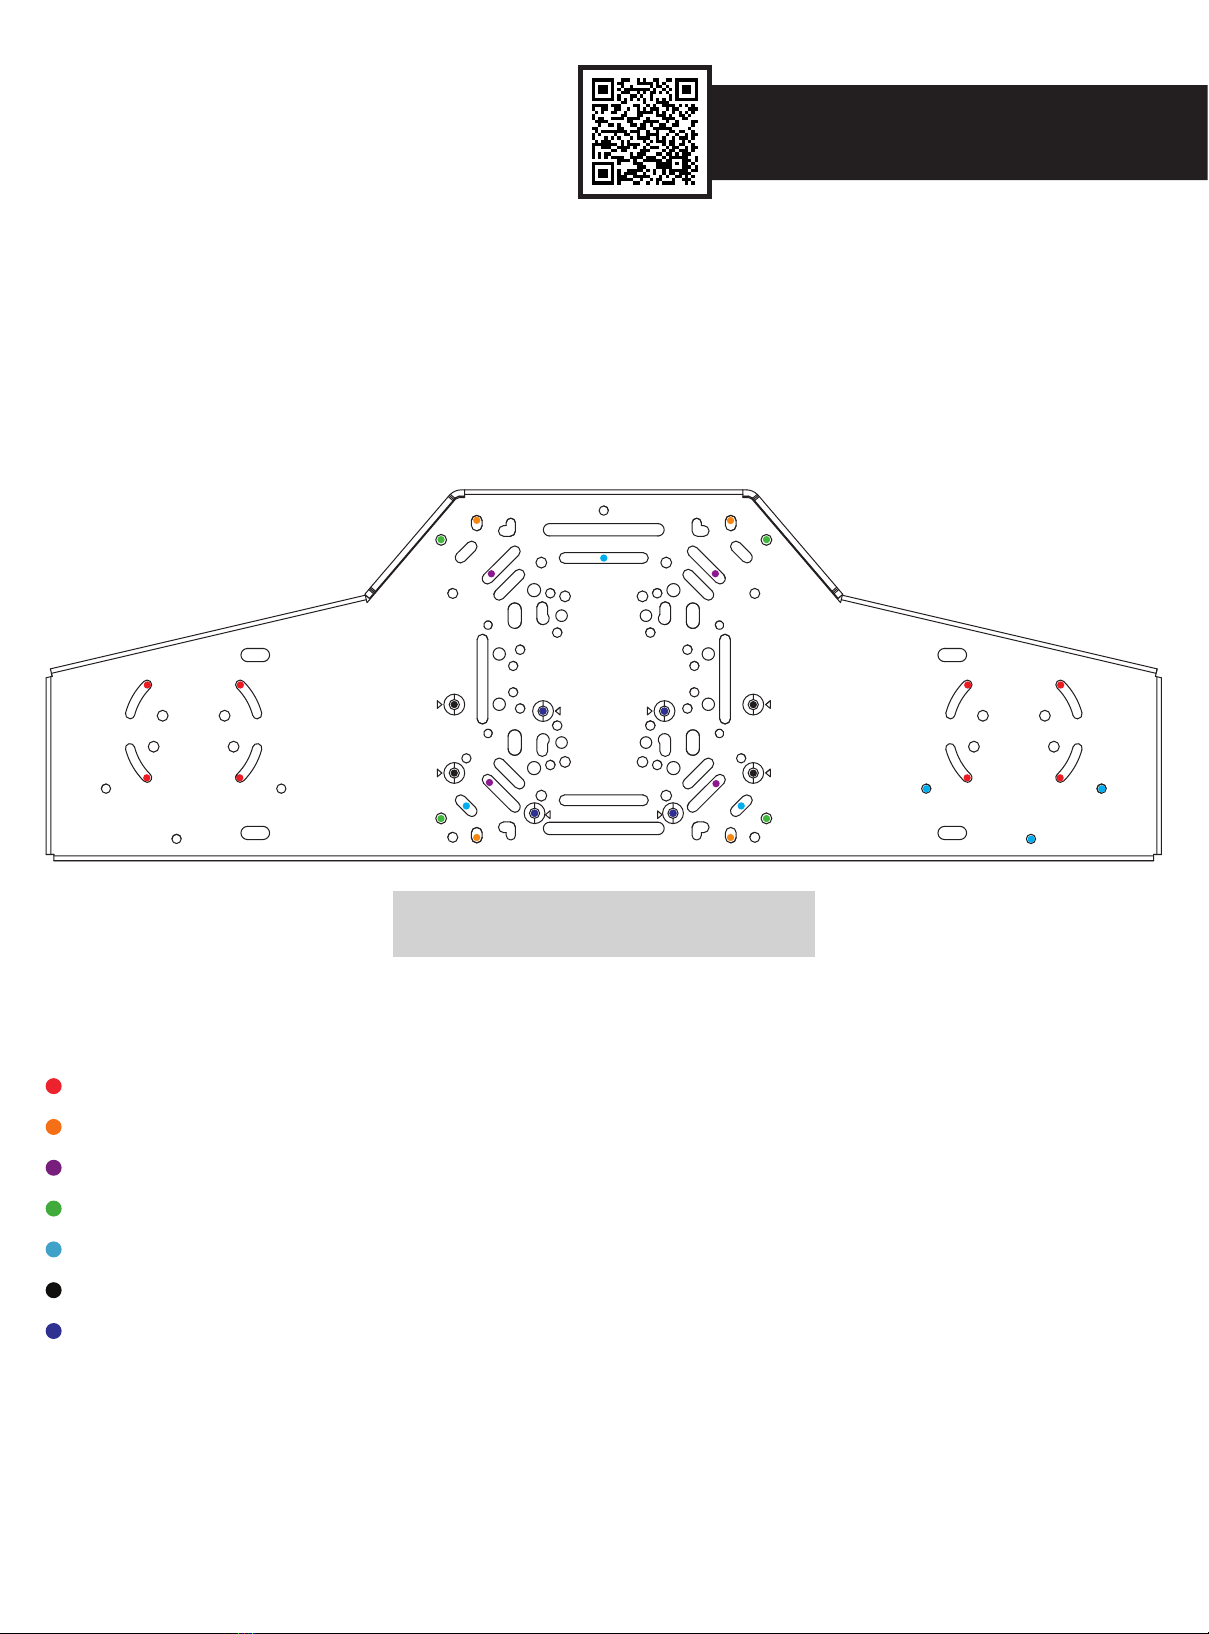
FLIGHT PLATE
NOT TO SCALE
PRODUCT LEGEND:
Logitech G X56 Throttle/HOTAS
Logitech G X52 Throttle/HOTAS
TMT.16000M / TCA Sidestick Airbus
TM HOTAS Warthog Stick / Winwing HOTAS Orion 2
TM HOTAS Warthog Duel Throttle / Winwing Orion 2 Throttle
TM TCA Quadrant Airbus Edition Throttle
TM TCA Throttle Quadrant Boeing Edition
TM TWCS Throttle
Turtle Beach VelocityOne Flightstick
Virtual Fly TQ3+
Virtual Fly TQ6+
Virtual Fly V3RNIO+
VKB Gladiator NXT
VKB Gunfighter PRO MK.II
Virpil Mongoos T-50CM3 with WarBRD Base
Virpil Mongoos T-50CM3 Throttle
Virpil Rotor TCS Plus Base
Winwing Gemini Throttle Base

10
support@nextlevelracing.com
NOT TO SCALE
MOUSE PLATE
PRODUCT LEGEND:
Logitech G X56 Throttle/HOTAS
Logitech G X52 Throttle/HOTAS
TM 16000M / TCA Sidestick Airbus
TM HOTAS Warthog Stick / Winwing HOTAS Orion 2
TM HOTAS Warthog Duel Throttle / Winwing Orion 2 Throttle
TM TCA Quadrant Airbus Edition Throttle
TM TCA Throttle Quadrant Boeing Edition
TM TWCS Throttle
Turtle Beach VelocityOne Flightstick
Virtual Fly TQ3+
Virtual Fly TQ6+
Virtual Fly V3RNIO+
VKB Gladiator NXT
VKB Gunfighter PRO MK.II
Virpil Mongoos T-50CM3 with WarBRD Base
Virpil Mongoos T-50CM3 Throttle
Virpil Rotor TCS Plus Base
Winwing Gemini Throttle Base
Honeycomb Bravo Throttle Quadrant
11
Video Instruction: bit.ly/nlrbuild
FLIGHT DECK
NOT TO SCALE
PRODUCT LEGEND:
TM HOTAS Warthog Stick/ Winwing Orion 2 HOTAS
Logitech G X56 Throttle/HOTAS
Logitech G X52 Throttle/HOTAS
Virtual Fly Yoko / Yoko+
Turtle Beach VelocityOne Yoke
Flight Stand Pro Clamp Spacer Plate
Flight Stand Pro HOTAS Mounting Bracket
NOTE : The hole patterns used on the middle section of the Flight Deck
are similar to those used on the Flight Plate. Please refer to the Flight
Plate Mounting diagram if mounting peripherals not listed below.
12
support@nextlevelracing.com
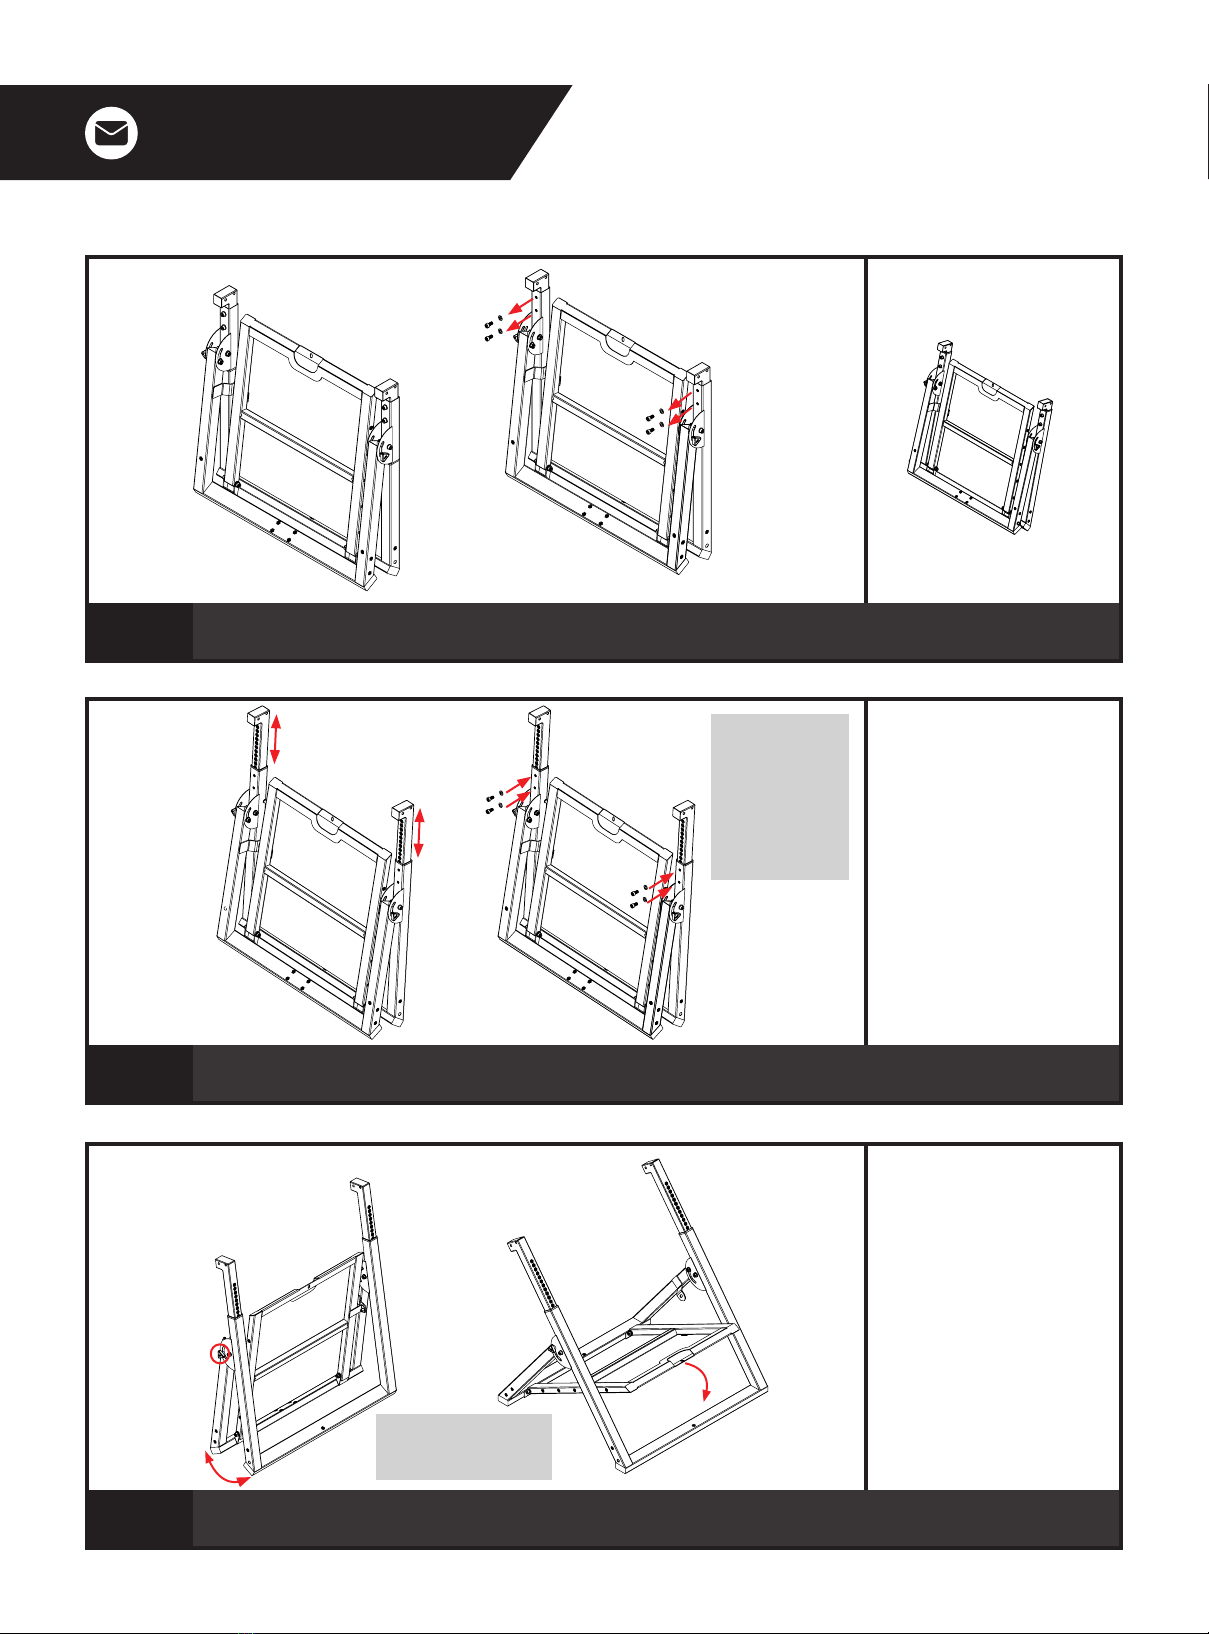
PARTS:
•• Pre-Assembled Flight Stand Pro
01
A) Cut the ties securing the Pre-Assembled Flight Stand Pro.
B) Uninstall the pre-installed M8 Bolts and Washers.
PARTS:
•• NIL
02
A) Extend the Vertical Posts to the desired height.
B) Install Bolts and Washers previously uninstalled in Step 01B.
PARTS:
•• NIL
03
A) Loosen the M8 Knobs on the pivot joint and extend the Flight Stand.
B) Align the slot on the Pedal Frame with the threaded insert on the Frame.
A) B)
A) B)
A) B)
WARNING: Keep hands
clear from moving parts to
avoid injury
Note: The Vertical
Posts should be
extended until a
minimum of 10
threaded inserts are
exposed to allow
installation of Flight
Arms in future steps.
13
Video Instruction: bit.ly/nlrbuild
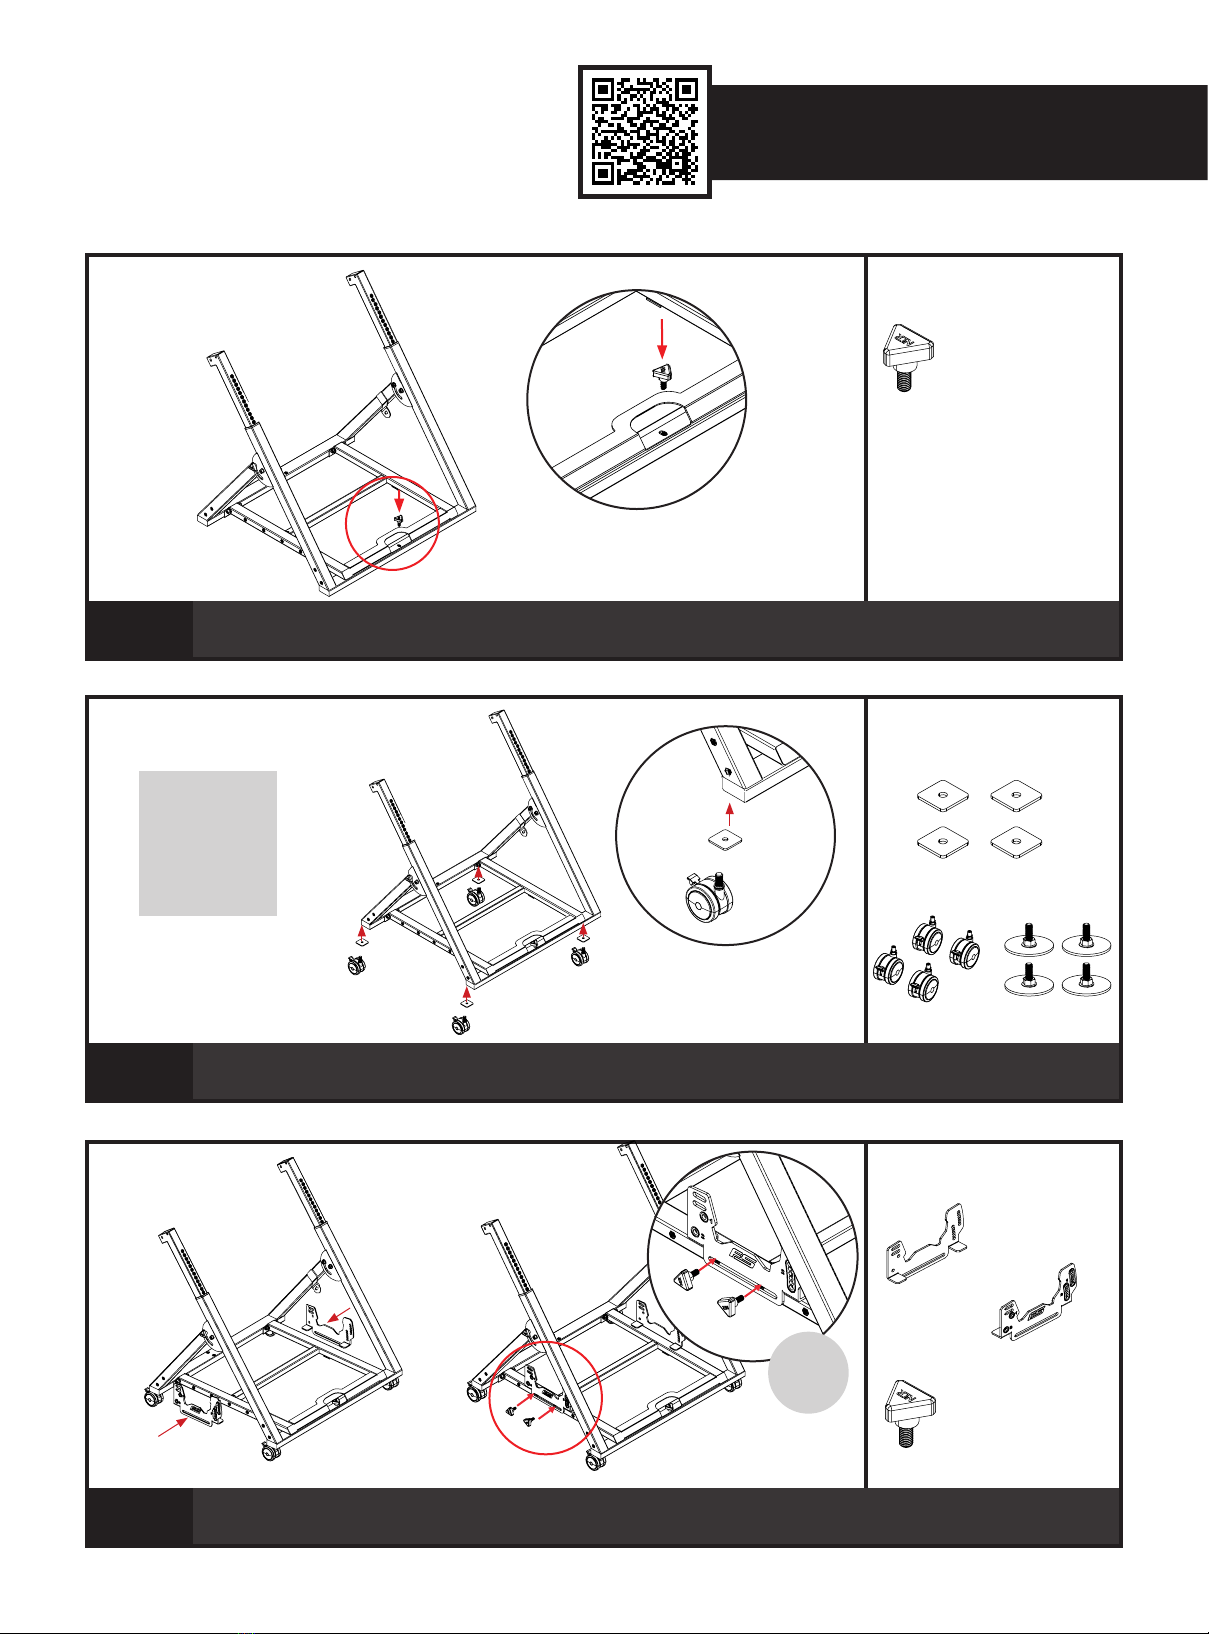
PARTS:
•• 1 x M8 20mm Knob
04
Secure the Pedal Frame with a M8 Knob.
PARTS:
•• 4 x M8 Square Washers
•• 4 x Castor Wheels/ Height
Adjustable Feet
05
Align the M8 Castor Wheels and Square Washers with the threaded inserts on the Frame and fasten
using the 14mm Wrench.
PARTS:
•• Pedal Brackets
•• 4 x M8 20mm Knobs
06
A) Align the slot on the Pedal Brackets with the threaded inserts on the Pedal Frame.
B) Bolt through and secure with 2 x M8 Knobs. Repeat on the other side.
(LEFT)
(RIGHT)
OR
A) B)
Repeat
on Other
Side
Note: If setting up
the Flight Stand on
uneven floors, it is
recommended to
install with the Height
Adjustable Feet to
stabilise the cockpit.

14
support@nextlevelracing.com
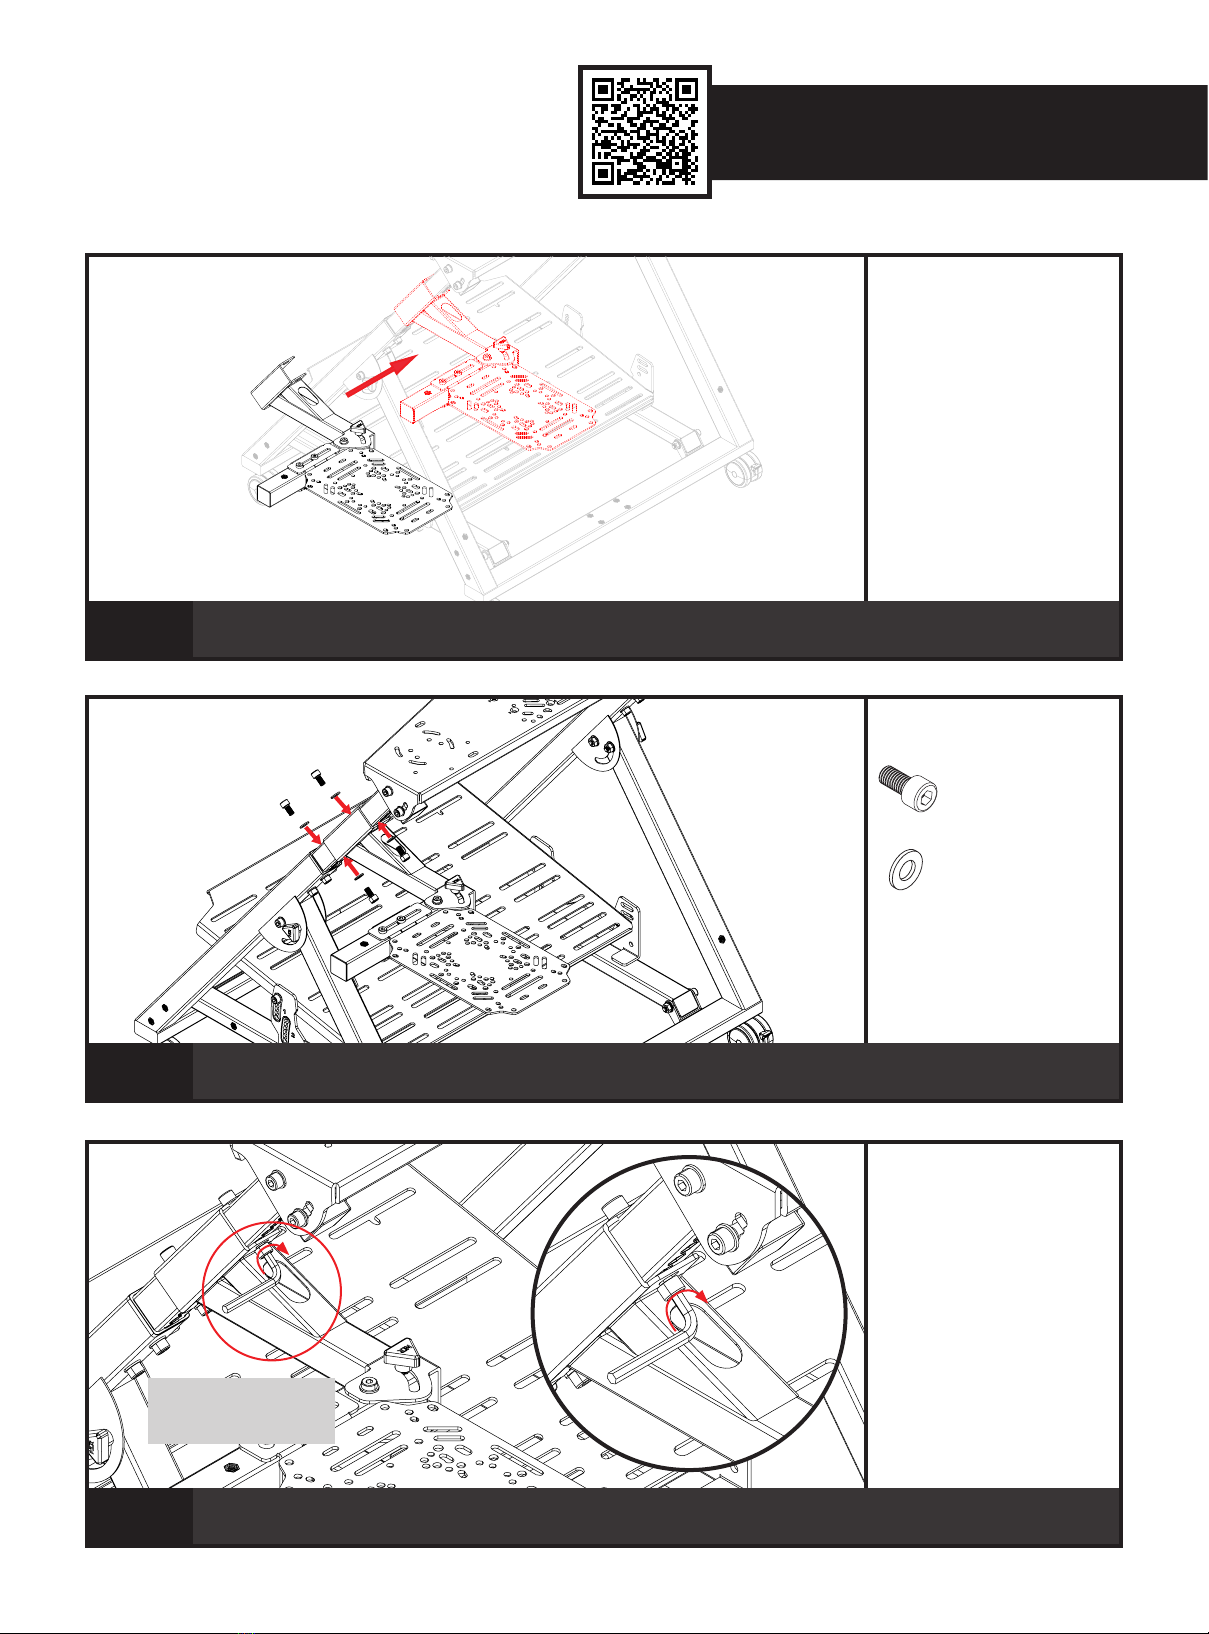
PARTS:
•• NIL
08
A) Uninstall the M8 Knobs securing the Pedal Brackets to the Pedal Frame.
B) Adjust to the desired position, re-install the M8 Knobs and tighten to secure.
PARTS:
•• 1 x Pedal Plate
•• 4 x M8 16mm Sockethead Bolts
•• 4 x M8 Washers
07
Align the threaded inserts on the Pedal Plate with the mounting holes on the Pedal Brackets. Bolt
through and secure with 4 x M8 Bolts and Washers.
PARTS:
•• NIL
09
A) Uninstall the front Bolts securing the Pedal Plate to the Pedal Brackets.
B) Adjust to the desired angle, re-install the Bolts and tighten to secure.
A) B)
PEDAL PLATE DISTANCE ADJUSTMENT
PEDAL PLATE ANGLE ADJUSTMENT
A) B)
Note: The threaded inserts
on the Pedal Plate should
be mounted into the
corresponding holes on the
Pedal Brackets.
PEDAL BRACKET
Hole Set 1
Hole Set 2

15
Video Instruction: bit.ly/nlrbuild
PARTS:
•• 1 x Flight Deck
•• 2 x M8 55mm Sockethead Bolts
•• 2 x M8 Washers
•• 2 x M8 Flange Nuts
10
Align the mounting holes on the Flight Deck with the through holes on the Vertical Posts. Bolt through
and secure with 2 x M8 Bolts, Washers and Flange Nuts.
PARTS:
•• 2 x M8 55mm Sockethead Bolts
•• 2 x M8 Washers
•• 2 x M8 Flange Nuts
11
A) Adjust the Flight Deck to the desired angle.
B) Bolt through and secure with 2 x M8 Bolts, Washers and Flange Nuts.
PARTS:
•• Swivel Mounting Bracket
•• Swivel Arm
•• 1 x M8 50mm Low Profile Bolt
•• 1 x M8 Washer
•• 1 x M8 Ny-lock Nut
12
A) Align the through hole on the Swivel Arm with the through hole on the Swivel Mounting Bracket.
B) Bolt through and secure with 1 x M8 Bolt, Washer and Ny-lock Nut.
SWIVEL FLIGHT ARM ASSEMBLY
B)A)
A) B)
FLIGHT DECK ANGLE ADJUSTMENT

16
support@nextlevelracing.com
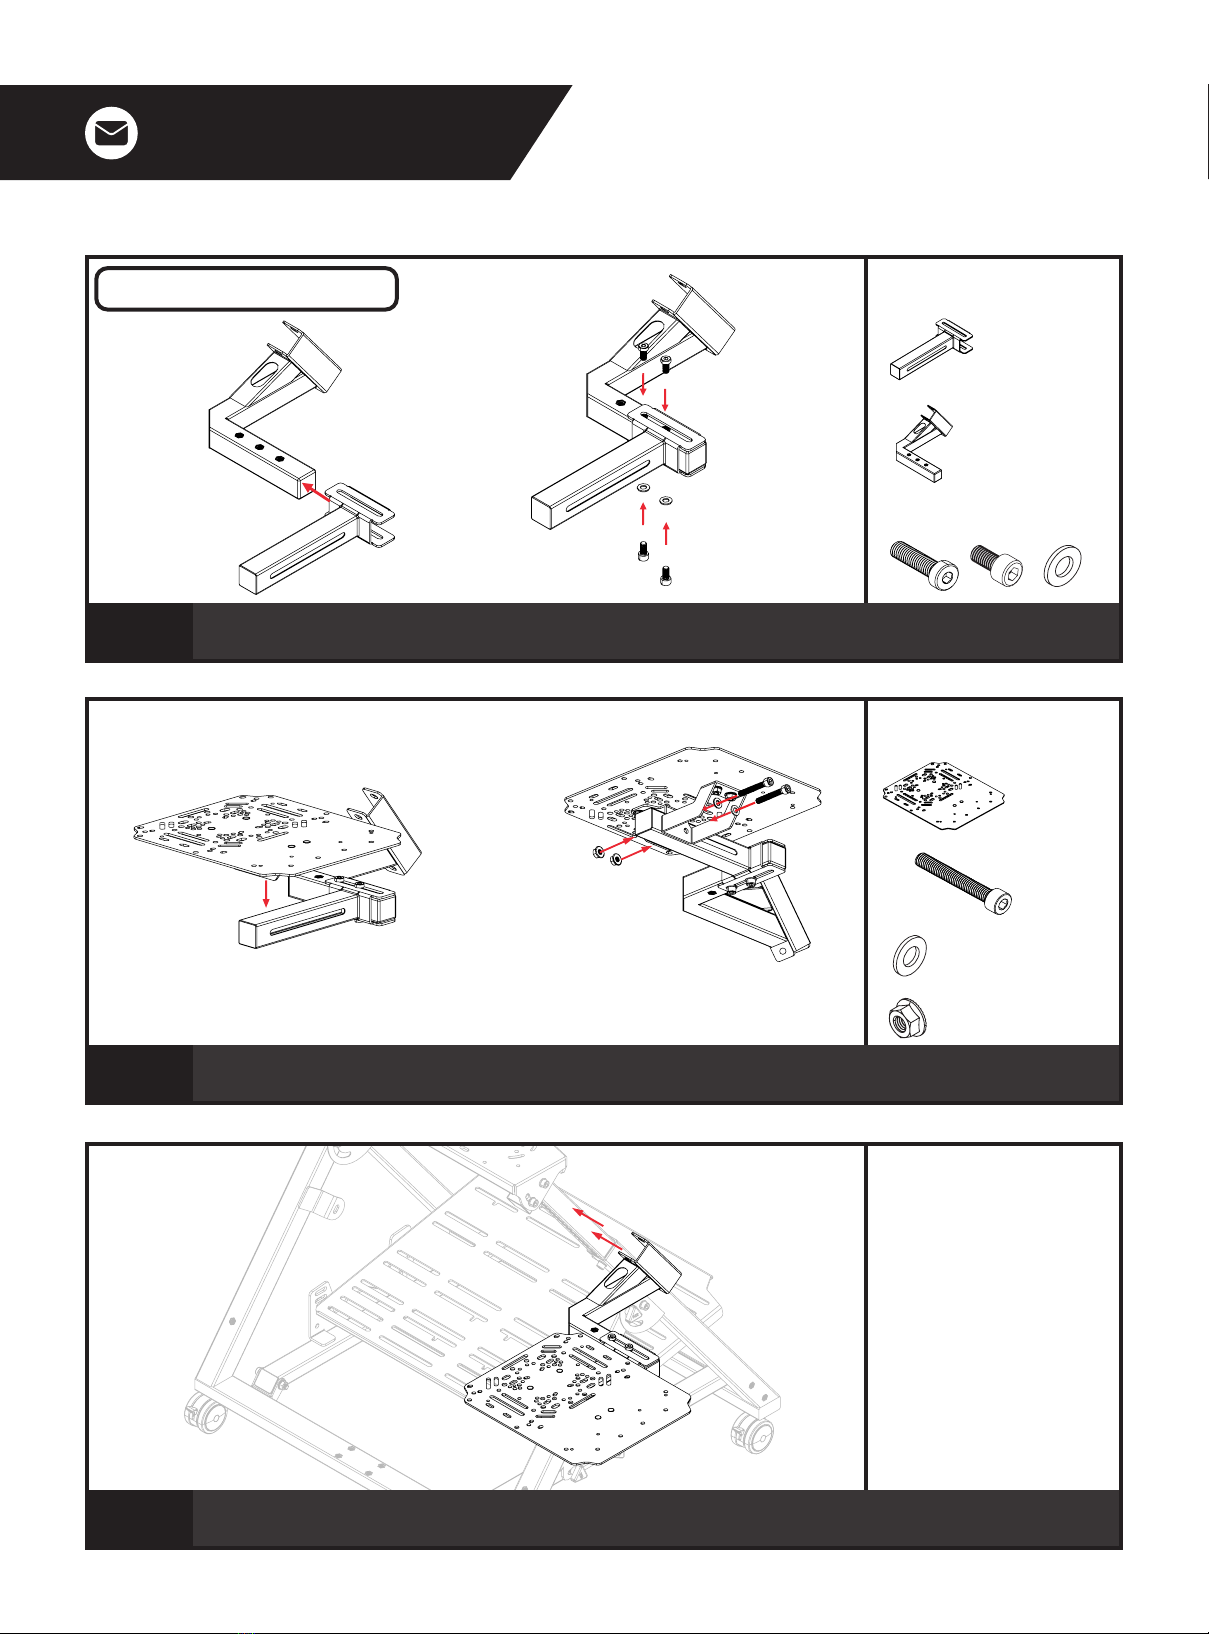
PARTS:
•• 2 x M8 20mm Knobs
•• 1 x Adjustment Arm
13
A) Bolt through the Swivel Mounting Bracket curved slots and secure with 2 x M8 Knobs.
B) Align the slots on the Adjustment Arm with the threaded inserts on the Swivel Arm.
PARTS:
•• 2 x M8 20mm Low Profile Bolts
•• 2 x M8 16mm Sockethead Bolts
•• 2 x M8 Washers
14
A) Bolt through and secure the top side with 2 x M8 Low Profile Bolts.
B) Bolt through and secure the under side with 2 x M8 Bolts and Washers.
PARTS:
•• 1 x Flight Plate
•• 2 x M8 55mm Sockethead Bolts
•• 2 x M8 Washers
•• 2 x M8 Flange Nuts
15
A) Align the mounting holes on the Flight Plate with the slots on the Adjustment Arm.
B) Bolt through and secure with 2 x M8 Bolts, Washers and Flange Nuts.
A)
A)
B)
B)
A) B)
17
Video Instruction: bit.ly/nlrbuild
PARTS:
•• NIL
16
Align the mounting holes on the collar of the Swivel Flight Arm Assembly with the threaded inserts on
the Vertical Posts.
PARTS:
•• 4 x M8 16mm Sockethead Bolts
•• 4 x M8 Washers
17
Bolt through and secure with 4 x M8 Bolts and Washers.
PARTS:
•• NIL
18
Tighten the bolts using the Allen Key.
Tip: Ensure the plastic cap is
not installed to allow for easy
rotation of the Allen Key.
18
support@nextlevelracing.com
PARTS:
•• 1 x Adjustment Arm
•• 1 x Mounting Bracket
•• 2 x M8 20mm Low Profile Bolt
•• 2 x M8 16mm Sockethead Bolt
•• 2 x M8 Washers
19
A) Align the slots on the Adjustment Arm with the threaded inserts on the Mounting Bracket.
B) Bolt through and secure the top side with 2 x Low Profile Bolts and the underside with 2 x M8 Bolts and Washers.
PARTS:
•• 1 x Mouse Plate
•• 2 x M8 55mm Sockethead Bolts
•• 2 x M8 Washers
•• 2 x M8 Flange Nuts
20
A) Align the mounting holes on the Mouse Plate with the slots on the Adjustment Arm.
B) Bolt through and secure with 2 x M8 Bolts, Washers and Flange Nuts.
PARTS:
•• NIL
21
Align the mounting holes on the collar of the Flight Arm assembly with the threaded inserts on the
Vertical Post.
FLIGHT ARM ASSEMBLY
A)
A)
B)
B)

19
Video Instruction: bit.ly/nlrbuild
PARTS:
•• 4 x M8 16mm Sockethead Bolts
•• 4 x M8 Washers
22
A) Bolt through and secure with 4 x M8 Bolts and Washers.
B) Tighten the Bolts using the provided Allen Key.
PARTS:
•• 2 x Plastic Caps
23
Install a Plastic Cap on the cut-out of the Flight Arm Assembly. Repeat on the other side.
PARTS:
•• NIL
24
A) Loosen the Bolts securing the Adjustment Arm to the Swivel Arm/Flight Arm, adjust to the desired position and tighten to secure.
B) Loosen the Bolts securing the Flight Plate/Mouse Plate to the Adjustment Arm, adjust to the desired position and tighten to secure.
Repeat
on Other
Side
A) B)
A) B)
FLIGHT/SWIVEL ARM ADJUSTMENT
Tip: Ensure the plastic cap is
not installed to allow for easy
rotation of the Allen Key.

20
support@nextlevelracing.com
PARTS:
•• NIL
25
Loosen the M8 Knobs securing the Swivel Arm to the Swivel Mounting Bracket. Swing the Swivel Arm
to the desired position and tighten the M8 Knobs to secure.
PARTS:
•• 1 x Clamp Spacer Plate
•• 4 x M6 20mm Countersunk Bolts
26
Align the threaded inserts on the Clamp Spacer Plate with the countersunk holes on the Wheel Plate.
Bolt through and secure with 4 x M6 Countersunk Bolts.
PARTS:
•• 1 x HOTAS Mounting Bracket
•• 4 x M6 20mm Countersunk Bolts
27
Align the threaded inserts on the HOTAS Mounting Bracket with the countersunk holes on the Wheel
Plate. Bolt through and secure with 4 x M6 Countersunk Bolts.
OPTIONAL: CLAMP SPACER PLATE INSTALLATION
(RECOMMENDED FOR CLAMP YOKES AND ACCESSORIES)
OPTIONAL: REGULAR HOTAS CENTRE POLE INSTALLATION
(RECOMMENDED FOR REGULAR HOTAS STICKS)
SWIVEL ARM FUNCTION
Note: The swivel feature is
recommended when using a Wheel
Cradle for ease of access.
Table of contents
Languages:
Other Next Level Racing Fitness Equipment manuals


Popular Fitness Equipment manuals by other brands


G-FITNESS
G-FITNESS AIR ROWER user manual

CAPITAL SPORTS
CAPITAL SPORTS Dominate Edition 10028796 manual

Martin System
Martin System TT4FK user guide

CIRCLE FITNESS
CIRCLE FITNESS E7 owner's manual

G-FITNESS
G-FITNESS TZ-6017 user manual

Accelerated Care Plus
Accelerated Care Plus OMNISTIM FX2 CYCLE/WALK user manual


