NI PCIe-8236 User manual

-~
ARTISAN
®
~I
TECHNOLOGY
GROUP
Your definitive source
for
quality
pre-owned
equipment.
Artisan Technology
Group
Full-service,
independent
repair
center
with
experienced
engineers
and
technicians
on staff.
We
buy
your
excess,
underutilized,
and
idle
equipment
along
with
credit
for
buybacks
and
trade-ins
.
Custom
engineering
so
your
equipment
works
exactly as
you
specify.
•
Critical
and
expedited
services
•
Leasing
/
Rentals/
Demos
• In
stock/
Ready-to-ship
•
!TAR-certified
secure
asset
solutions
Expert
team
ITrust
guarantee
I
100%
satisfaction
All
tr
ademarks,
br
a
nd
names, a
nd
br
a
nd
s a
pp
earing here
in
are
th
e property of
th
e
ir
r
es
pecti
ve
ow
ner
s.
Visit our website - Click HERE

USER GUIDE AND SPECIFICATIONS
NI PCIe-8236
GigE Vision Interface Device with Power over Ethernet
The NI PCIe-8236 (NI 8236) is a GigE Vision interface device for PCI Express (PCIe). The
NI 8236 supports Power over Ethernet (PoE). This document describes how to install and
configure the necessary hardware and software to use the NI 8236.
Note You must install all required software before installing the hardware.
To access NI 8236 documentation after installation, navigate to Start»All Programs»
National Instruments»Vision»Documentation.
The most recent versions of product documentation are available at ni.com/manuals. Visit
ni.com/updates for the latest version of NI 8236 software.
Contents
Required Components .............................................................................................................. 2
Optional Components ....................................................................................................... 2
Safety Information.................................................................................................................... 2
Electromagnetic Compatibility Guidelines .............................................................................. 3
Installing the Software.............................................................................................................. 4
Installing the Hardware ............................................................................................................ 4
Unpacking......................................................................................................................... 4
Installing ........................................................................................................................... 5
Confirming the Device is Recognized.............................................................................. 6
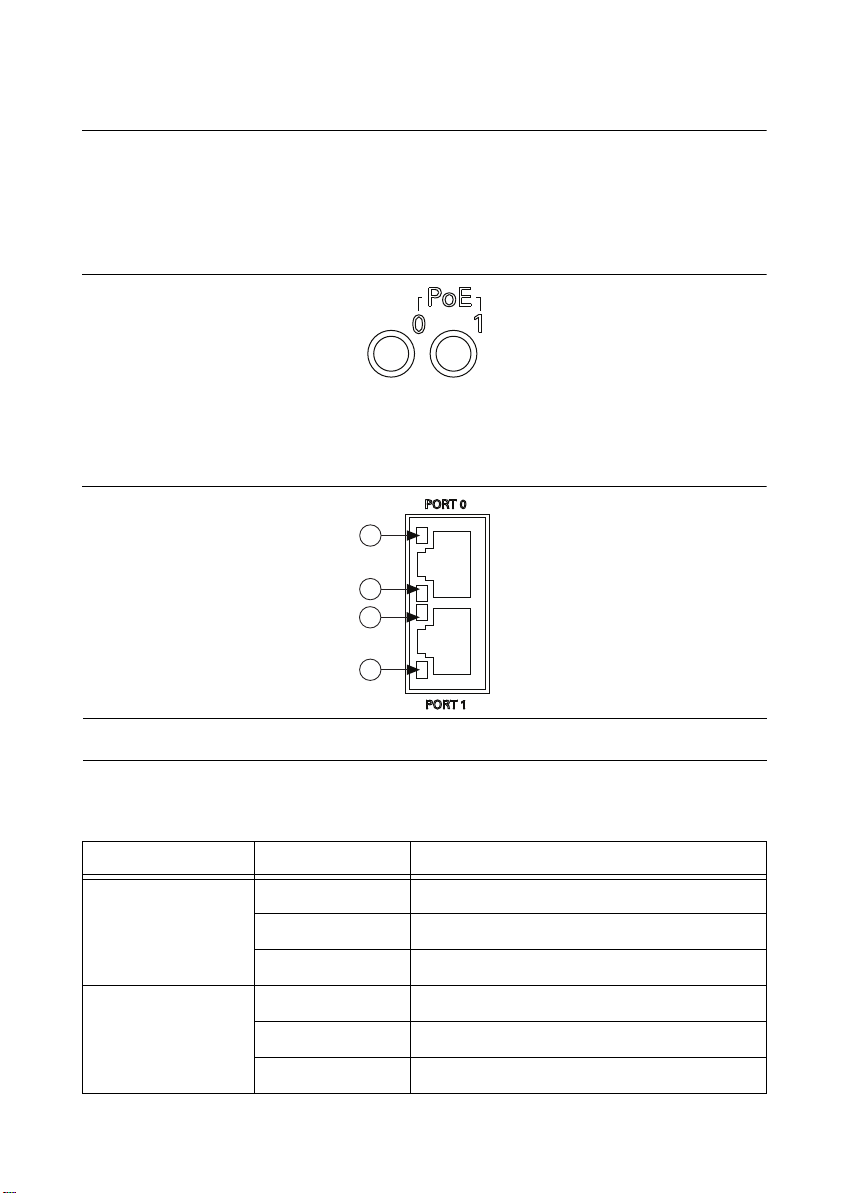
Ethernet Ports on the NI 8236 .................................................................................................. 7
Where Do I Go From Here? ..................................................................................................... 8
Specifications............................................................................................................................ 8
Gigabit Ethernet Interface ................................................................................................ 8
Power over Ethernet ......................................................................................................... 8
PCI Express Interface ....................................................................................................... 8
Power Requirements......................................................................................................... 9
Physical Characteristics.................................................................................................... 9
Environment .....................................................................................................................9
Safety ................................................................................................................................ 9
Electromagnetic Compatibility......................................................................................... 9
CE Compliance ................................................................................................................ 10
Environmental Management............................................................................................. 10
Where to Go for Support .......................................................................................................... 11

2|ni.com |NI 8236 User Guide and Specifications
Required Components
The following items are necessary to set up and use the NI 8236:
NI 8236 image acquisition device
GigE Vision camera
Shielded Ethernet cable
Computer running Microsoft Windows 7 (32-bit or 64-bit versions)/Vista (32-bit or 64-bit
versions)/XP (32-bit) with at least one available x4 or larger PCIe slot.
The following software packages:
– LabVIEW 2011 or later
– NI-IMAQdx 4.1 or later driver software, included with NI Vision Acquisition
Software February 2013
Optional Components
Available 4-pin ATX peripheral power connector on computer’s power supply for PoE
The following software packages:
– NI Vision Development Module
– NI Vision Builder for Automated Inspection 2012 SP1 or later
Safety Information
Caution The following paragraphs contain important safety information you must
follow when installing and operating the device.
Do not operate the device in a manner not specified in the documentation. Misuse of the device
may result in a hazard and may compromise the safety protection built into the device. If the
device is damaged, turn it off and do not use it until service-trained personnel can check its
safety. If necessary, return the device to National Instruments for repair.
Keep away from live circuits. Do not remove equipment covers or shields unless you are trained
to do so. If signal wires are connected to the device, hazardous voltages can exist even when the
equipment is turned off. To avoid a shock hazard, do not perform procedures involving cover or
shield removal unless you are qualified to do so. Disconnect all field power prior to removing
covers or shields.
Because of the danger of introducing additional hazards, do not install unauthorized parts or
modify the device. Use the device only with the chassis, modules, accessories, and cables
specified in the installation instructions. All covers and filler panels must be installed while
operating the device.

NI 8236 User Guide and Specifications |© National Instruments |3
This is a pollution degree 2 device. Do not operate the device in an explosive atmosphere or
where flammable gases or fumes may be present. Operate the device only at or below the
pollution degree stated in the specifications. Pollution consists of any foreign matter—solid,
liquid, or gas—that may reduce dielectric strength or surface resistivity. The following is a
description of pollution degrees.
• Pollution Degree 1—No pollution or only dry, nonconductive pollution occurs. The
pollution has no effect.
• Pollution Degree 2—Normally only nonconductive pollution occurs. Occasionally,
nonconductive pollution becomes conductive because of condensation.
• Pollution Degree 3—Conductive pollution or dry, nonconductive pollution occurs.
Nonconductive pollution becomes conductive because of condensation.
Clean the device and accessories by brushing off light dust with a soft, nonmetallic brush.
Remove other contaminants with a stiff, nonmetallic brush. The unit must be completely dry and
free from contaminants before returning it to service.
You must insulate signal connections for the maximum voltage for which the device is rated. Do
not exceed the maximum ratings for the device. Remove power from signal lines before
connection to or disconnection from the device.
Electromagnetic Compatibility Guidelines
This product was tested and complies with the regulatory requirements and limits for
electromagnetic compatibility (EMC) as stated in the product specifications. These requirements
and limits are designed to provide reasonable protection against harmful interference when the
product is operated in its intended operational electromagnetic environment.
This product is intended for use in industrial locations. There is no guarantee that harmful
interference will not occur in a particular installation, when the product is connected to a test
object, or if the product is used in residential areas. To minimize the potential for the product to
cause interference to radio and television reception or to experience unacceptable performance
degradation, install and use this product in strict accordance with the instructions in the product
documentation.
Furthermore, any changes or modifications to the product not expressly approved by National
Instruments could void your authority to operate it under your local regulatory rules.
Caution To ensure the specified EMC performance, operate this product only with
shielded cables and accessories.

4|ni.com |NI 8236 User Guide and Specifications
Installing the Software
Before installing the NI 8236 you must install the application software and device driver. Install
the software in the following order:
1. LabVIEW—Refer to the LabVIEW Release Notes for installation instructions for
LabVIEW and system requirements for the LabVIEW software. Refer to the LabVIEW
Upgrade Notes for additional information about upgrading to the most recent version of
LabVIEW.
After installation, documentation for LabVIEW is available by selecting Start»
All Programs»National Instruments»LabVIEW»LabVIEW Manuals.
2. NI-IMAQdx—Refer to the NI Vision Acquisition Software Release Notes on the NI Vision
Acquisition Software installation media for system requirements and installation
instructions for the NI-IMAQdx driver.
After installation, documentation for the NI-IMAQdx driver software is available by
selecting Start»All Programs»National Instruments»Vision»Documentation»
NI-IMAQdx.
3. (Optional) NI Vision Development Module—Refer to the NI Vision Development
Module Readme on the NI Vision Development Module installation media for system
requirements and installation instructions.
After installation, documentation for the NI Vision Development Module is available by
selecting Start»All Programs»National Instruments»Vision»Documentation»
NI Vision.
Installing the Hardware
This section describes how to unpack and install the device. You must install the software before
installing the hardware.
Caution Electrostatic Discharge (ESD) can damage this product. To prevent
damage, use industry-standard ESD prevention measures during installation,
maintenance, and operation.
Unpacking
The device ships in an antistatic package to prevent electrostatic discharge from damaging
device components. To avoid such damage in handling the device, take the following
precautions:
1. Ground yourself using a grounding strap or by touching a grounded object, such as the
computer chassis.
2. Touch the antistatic package to a metal part of the computer chassis before removing the
device from the package.
Caution Never touch the exposed pins of connectors.

NI 8236 User Guide and Specifications |© National Instruments |5
3. Remove the device from the package and inspect it for loose components or any other signs
of damage. Notify National Instruments if the device appears damaged in any way. Do not
install a damaged device in the computer.
Store the device in the antistatic package when not in use.
Installing
The following are general instructions for installation. Refer to the documentation provided by
your computer manufacturer for specific instructions and warnings.
1. Power off and unplug the computer.
Caution To protect yourself and the hardware from electrical hazards, the
computer must remain unplugged until the installation is complete.
2. Remove the computer cover to expose the expansion slots.
Caution Installing a PCIe device into any non-PCIe slot can damage both the
computer motherboard and the device. If you are unsure of the difference between
connector types, do not install the device. Refer to the documentation provided by
your computer manufacturer to determine the correct slot in which to install the
device.
3. Touch a metal part of the computer to discharge any static electricity that might be on your
clothes or body. Static electricity can damage the device.
4. Choose an unused x4 or larger PCIe slot, and remove the corresponding expansion slot
cover on the back panel of the computer.
5. Remove the device from the antistatic package and gently rock the device into the PCIe
slot. The connection may be tight, but do not force the device into place.
Note Check that the bracket of your device aligns with the hole in the back panel
rail of the computer chassis.
6. Secure the device mounting bracket to the back panel rail of the computer.
7. (Optional) Connect an available 4-pin peripheral ATX power connector from the
computer’s power supply to the PoE power input on the device. Refer to Figure 1 for the
location of the power connection.
8. Replace the computer cover.

6|ni.com |NI 8236 User Guide and Specifications
9. Connect an Ethernet cable to a GigE Vision camera, then connect the camera to the NI 8236
front panel. Refer to Figure 1 for the location of the Ethernet ports.
10. Plug in and power on the computer.
Figure 1. NI 8236 Connections and Indicators
Note The first time you start the development computer after installing the
hardware, allow several seconds for the drivers to load.
The NI 8236 is now installed and the camera is now connected.
Confirming the Device is Recognized
To confirm that the device is properly installed and the hardware is recognized, complete the
following steps:
1. Ensure a compatible GigE Vision camera is connected.
2. Select Start»All Programs»National Instruments»Measurement & Automation
Explorer to open Measurement & Automation Explorer (MAX).
3. Expand Devices and Interfaces.
4. Verify that the attached camera appears under Devices and Interfaces»NI-IMAQdx
Devices.
1 Gigabit Ethernet Ports
2 PoE Indicator LEDs
3 PoE Power Connection
1
3
2

NI 8236 User Guide and Specifications |© National Instruments |7
Ethernet Ports on the NI 8236
The NI 8236 provides two standard Gigabit Ethernet ports (Port 0 and Port 1) to acquire images
from GigE Vision cameras. The NI 8236 can power PoE-capable cameras when connected to
the power supply of the computer. When the NI 8236 is providing PoE, the LED that
corresponds to the port will be lit. Figure 2 depicts the PoE LEDs on the NI 8236.
Figure 2. PoE LEDs on the NI 8236
Each Ethernet port on the NI 8236 has two Ethernet LEDs that indicate the connectivity status
of the port. See Figure 3 for the location of these LEDs.
Figure 3. Ethernet LEDs on the NI 8236
Refer to Table 1 for information on what the status of an Ethernet LED indicates.
1 Port 0 Activity/Link LED
2 Port 0 Speed LED
3 Port 1 Activity/Link LED
4 Port 1 Speed LED
Table 1. Ethernet LED Status Definitions on the NI 8236
LED Status Definition
Activity/Link
Unlit No link has been established
Solid A link has been negotiated
Blinking Activity on the link
Speed
Unlit No link, or 10 Mbps link
Green 100 Mbps link
Amber 1,000 Mbps link
1
2
3
4

8|ni.com |NI 8236 User Guide and Specifications
Where Do I Go From Here?
The following documents and resources contain information you may find helpful as you use the
NI 8236 in an application.
•National Instruments Example Finder—LabVIEW contains an extensive library of VIs and
example programs. To access the NI Example Finder, open LabVIEW and select Help»
Find Examples.
•NI Developer Zone—Visit the NI Developer Zone at ni.com/zone for the latest example
programs, tutorials, technical presentations, and a community area where you can share
ideas, questions, and source code with developers around the world.
•NI Vision Builder for Automated Inspection Tutorial—Refer to the NI Vision Builder for
Automated Inspection Tutorial for information about basic vision techniques using
Vision Builder AI. If Vision Builder AI is installed, access the tutorial by selecting Start»
All Programs»National Instruments»Vision Builder AI»Documentation.
Specifications
The following specifications apply to the NI 8236 image acquisition device. These specifications
are typical at 25 °C, unless otherwise stated.
Gigabit Ethernet Interface
Standard ............................................................IEEE 802.3
10BASE-T, 100BASE-TX, 1000BASE-T
Number of ports ................................................ 2
Interface ............................................................RJ45
Speed.................................................................10, 100, 1000 Mbps
Power over Ethernet
Standard ............................................................IEEE 802.3af compatible
Supported power classes...................................0, 1, 2, and 3
Power output .....................................................15.4 W per port
Isolation ............................................................IEEE 802.3af compliant, Environment A
PCI Express Interface
PCI Express compliance ...................................1.1
Native link width ..............................................x4
Up-plugging link width availability..................x8, x16

NI 8236 User Guide and Specifications |© National Instruments |9
Power Requirements
+12 V ATX peripheral (PoE inputs) ................. 6.3 A peak, 4.1 A continuous
+12 V PCIe ....................................................... 0.34 A
+3.3 V PCIe ...................................................... 0.74 A
Physical Characteristics
Dimensions ....................................................... 11.1 cm ×16.8 cm (4.4 in. × 6.6 in.)
Weight............................................................... 150 g (5.29 oz)
Environment
The NI 8236 is intended for indoor use only.
Operating temperature ...................................... 0 °C to 55 °C
Storage temperature .......................................... –20 °C to 70 °C
Relative humidity ............................................. 5% to 90%, noncondensing
Pollution Degree ............................................... 2
Caution Do not use the NI 8236 for connection to signals within Measurement
Categories II, III, or IV.
Measurement Category..................................... I
Safety
This product is designed to meet the requirements of the following standards of safety for
electrical equipment for measurement, control, and laboratory use:
• IEC 61010-1, EN 61010-1
• UL 61010-1, CSA 61010-1
Note For UL and other safety considerations, refer to the product label, or visit
ni.com/certification, search by model number or product line, and click the
appropriate link in the Certification column.
Electromagnetic Compatibility
This product meets the requirements of the following EMC standards for electrical equipment
for measurement, control, and laboratory use:
• EN 61326-1 (IEC 61326-1): Class A emissions; Basic immunity
• EN 55011 (CISPR 11): Group 1, Class A emissions
• EN 55022 (CISPR 22): Class A emissions
• EN 55024 (CISPR 24): Immunity
• AS/NZS CISPR 11: Group 1, Class A emissions

10 |ni.com |NI 8236 User Guide and Specifications
• AS/NZS CISPR 22: Class A emissions
• FCC 47 CFR Part 15B: Class A emissions
• ICES-001: Class A emissions
Note In the United States (per FCC 47 CFR), Class A equipment is intended for use
in commercial, light-industrial, and heavy-industrial locations. In Europe, Canada,
Australia and New Zealand (per CISPR 11) Class A equipment is intended for use
only in heavy-industrial locations.
Note Group 1 equipment (per CISPR 11) is any industrial, scientific, or medical
equipment that does not intentionally generate radio frequency energy for the
treatment of material or inspection/analysis purposes.
CE Compliance
This product meets the essential requirements of applicable European Directives, as amended
for CE marking, as follows:
• 2004/108/EC; Electromagnetic Compatibility Directive
• 73/23/EEC; Low-Voltage Directive (safety)
• 89/336/EEC; Electromagnetic Compatibility Directive (EMC)
Note Refer to the Declaration of Conformity (DoC) for this product for any
additional regulatory compliance information. To obtain the DoC for this product,
visit ni.com/certification, search by model number or product line, and click
the appropriate link in the Certification column.
Environmental Management
NI is committed to designing and manufacturing products in an environmentally responsible
manner. NI recognizes that eliminating certain hazardous substances from our products is
beneficial to the environment and to NI customers.
For additional environmental information, refer to the Minimize Our Environmental Impact web
page at ni.com/environment. This page contains the environmental regulations and
directives with which NI complies, as well as other environmental information not included in
this document.

NI 8236 User Guide and Specifications |© National Instruments |11
Waste Electrical and Electronic Equipment (WEEE)
EU Customers At the end of the product life cycle, all products must be sent to
a WEEE recycling center. For more information about WEEE recycling centers,
National Instruments WEEE initiatives, and compliance with WEEE Directive
2002/96/EC on Waste and Electronic Equipment, visit ni.com/environment/
weee.
Where to Go for Support
The National Instruments Web site is your complete resource for technical support. At
ni.com/support you have access to everything from troubleshooting and application
development self-help resources to email and phone assistance from NI Application Engineers.
A Declaration of Conformity (DoC) is our claim of compliance with the Council of the European
Communities using the manufacturer’s declaration of conformity. This system affords the user
protection for electromagnetic compatibility (EMC) and product safety. You can obtain the DoC
for your product by visiting ni.com/certification. If your product supports calibration,
you can obtain the calibration certificate for your product at ni.com/calibration.
National Instruments corporate headquarters is located at 11500 North Mopac Expressway,
Austin, Texas, 78759-3504. National Instruments also has offices located around the world to
help address your support needs. For telephone support in the United States, create your service
request at ni.com/support and follow the calling instructions or dial 512 795 8248. For
telephone support outside the United States, visit the Worldwide Offices section of ni.com/
niglobal to access the branch office Web sites, which provide up-to-date contact information,
support phone numbers, email addresses, and current events.
⬉ᄤֵᙃѻક∵ᶧࠊㅵ⧚ࡲ⊩ ˄Ё RoHS˅
Ёᅶ᠋ National Instruments ヺড়Ё⬉ᄤֵᙃѻકЁ䰤ࠊՓ⫼ᶤѯ᳝ᆇ⠽䋼ᣛҸ
(RoHS)DŽ݇Ѣ National Instruments Ё RoHS ড়㾘ᗻֵᙃˈ䇋ⱏᔩ ni.com/
environment/rohs_chinaDŽ(For information about China RoHS compliance,
go to ni.com/environment/rohs_china.)

© 2013 National Instruments. All rights reserved.
374010A-01 Feb13
Refer to the NI Trademarks and Logo Guidelines at ni.com/trademarks for more information on National Instruments trademarks. Other
product and company names mentioned herein are trademarks or trade names of their respective companies. For patents covering National
Instruments products/technology, refer to the appropriate location: Help»Patents in your software, the patents.txt file on your media, or the
National Instruments Patents Notice at ni.com/patents. You can find information about end-user license agreements (EULAs) and third-party
legal notices in the readme file for your NI product. Refer to the Export Compliance Information at ni.com/legal/export-compliance
for the National Instruments global trade compliance policy and how to obtain relevant HTS codes, ECCNs, and other import/export data.

Artisan
Technology
Group
is
an independent supplier
of
quality pre-owned equipment
Gold-standard
solutions
Extend the life
of
your
critical industrial,
commercial, and military systems
with
our
superior service and support.
We
buy
equipment
Planning to
upgrade
your current
equipment? Have surplus equipment taking
up shelf space? We'll give it a
new
home.
Learn
more!
Visit us at artisantg.com for more info
on price quotes, drivers, technical
specifications, manuals, and documentation.
Artisan Scientific
Corporation
dba
Artisan
Technology
Group
is
not
an affiliate,
representative,
or
authorized
distributor
for
any
manufacturer
listed herein.
We're here to make your life easier.
How
can
we
help you today?
(217)
352-9330
Isales@artisantg.com Iartisantg.com
Table of contents
Other NI Recording Equipment manuals
Popular Recording Equipment manuals by other brands

Yamaha
Yamaha MDF3 owner's manual

Coomber
Coomber 6100 Series How-to guide

Mitsubishi Electric
Mitsubishi Electric DX-TL910U Installation and operation manual

Honeywell
Honeywell CIU 888 Configuration manual

Sony
Sony DNW-A25WS Brochure & specs

Mitsubishi Electric
Mitsubishi Electric DX-NT400E Operation manual