Niche C-BCH-0004 User manual

OPERATOR’S
MANUAL
LCD SMART BATTERY
CHARGER & MAINTAINER
15A (MAX) FOR 12V
7.5A FOR 24V
C-BCH-0004

■ Working in the vicinity of a lead-acid
battery is dangerous. Batteries generate
explosive gases during normal battery
operation. For this reason, it is of the
utmost importance that you follow the
instructions each time you use the charger.
■ To reduce the risk of battery explosion,
please follow these instructions and those
published by the battery manufacturer
and manufacturer of any equipment you
intend to use with this unit. Review all
cautionary markings on these products
and the engine.
■ Read all instructions before operating the
product. Failure to follow all instructions
listed below may result in an electric
shock, fire and/or serious injury.
TABLE OF CONTENTS
Safety Instructions........ 3
LCD Display and
Button Diagram................10
Charging
Instructions...............................11
Troubleshooting..............14
Maintenance............................14
Technical Data.....................15
IMPORTANT NOTICE: Please
read and save these instructions.
WARNING – RISK OF EXPLOSIVE GASES
2LCD SMART BATTERY CHARGER & MAINTAINER

niche-industries.com 3
IMPORTANT SAFETY INSTRUCTIONS:
■ DO NOT expose the charger to rain or snow. DO NOT submerge the
charger in water or use it when it is wet.
■ Use of an attachment not recommended or sold by the battery charger
manufacturer may increase the risk of a fire, an electric shock, or an
injury.
■ Pull the cord by the plug rather than by the cord when disconnecting
the unit from the power source.
■ DO NOT operate the charger with a damaged cord or plug, replace the
cord or plug immediately.
■ DO NOT operate the charger if it has received a sharp blow, it has been
dropped or otherwise damaged in anyway. Damage to the power cable,
the device or the charging cable increases the risk of an electrical
shock. For inspection and repair, take the charger to a qualified
technician.
■ DO NOT disassemble the charger. Incorrect assembly could result in
an electrical shock or fire.
■ To reduce the risk of an electric shock, unplug the charger from the
outlet before attempting any maintenance or cleaning. Turning off
controls will not reduce risk.
SAFETY INSTRUCTIONS

4LCD SMART BATTERY CHARGER & MAINTAINER
WARNING – RISK OF EXPLOSIVE GASES
Working in the vicinity of a lead-acid battery is dangerous. Batteries
generate explosive gases during normal battery operation. For this
reason, it is of the utmost importance that you follow the instructions
each time you use the charger.
PERSONAL PRECAUTIONS:
■ Consider having another person close by when working with a
lead-acid battery.
■ Have plenty of fresh water and soap in case battery acid encounters
eyes, skin or clothing.
■ Wear complete eye and clothing protection. Avoid touching eyes while
working with a battery.
■ If battery acid contacts skin or clothing, wash immediately with soap
and water. If acid enters the eye(s), flood eye(s) with running cold water
for at least 10 minutes and get immediate medical attention.
■ Never smoke or allow a spark or a flame in the vicinity of a vehicle
battery, engine, or a battery charger.
■ Take precautionary measures to avoid dropping a metal tool onto a
battery. It is possible that it will spark, or short circuit the battery or
other electrical parts that may cause an explosion.
SAFETY INSTRUCTIONS

niche-industries.com 5
■ Remove personal metal items such as rings, watches, bracelets, and
necklaces when working with a lead-acid battery. A lead-acid battery
can produce a short-circuit current high enough to weld a ring or the
like to metal, causing a severe burn.
■ Use charger for charging a lead-acid battery only. DO NOT use the
charger for charging dry-cell batteries that are commonly used with
home appliances. These batteries may burst and cause injury to
persons and damage property.
■ Never charge a frozen battery.
PREPARING TO CHARGE:
■ If a battery needs to be removed from the vehicle, make sure that the
grounded terminal is removed from the battery first. In order to avoid
causing an arc, ensure that all accessories in the vehicle are turned off.
■ Ensure that there is adequate ventilation in the area when the battery is
being charged.
■ Clean battery terminals. Be careful to keep corrosion away from the eyes.
■ Refer to the battery manufacturer’s instruction manual for all specific
charging instructions.
■ Determine the voltage of the battery by referring to the owner’s vehicle
manual. DO NOT use the battery charger unless the battery voltage
matches the output voltage rating of the charger.
SAFETY INSTRUCTIONS

6LCD SMART BATTERY CHARGER & MAINTAINER
CHARGER LOCATION:
■ Place charger as far away from the battery as the DC cable permits.
■ DO NOT place a charger directly above a battery that is being charged.
Gases from the battery will corrode and damage the charger.
■ DO NOT operate charger in an area with restricted ventilation.
■ DO NOT set the battery on top of the charger.
DC CONNECTION PRECAUTIONS:
■ To connect or disconnect the output clips safely, first turn off the
battery charger, second unplug the AC cord from the electrical outlet,
and finally connect or disconnect the DC output clips.
■ Attach the clips to the battery and to the chassis as indicated in
steps (e) and (f) on pages 7-8, and (b) through (d) on page 9.
SAFETY INSTRUCTIONS

niche-industries.com 7
FOLLOW THESE STEPS WHEN THE BATTERY IS
INSTALLED IN THE VEHICLE.
WARNING: A SPARK NEAR THE BATTERY MAY CAUSE AN
EXPLOSION. TO REDUCE THE RISK OF A SPARK NEAR THE BATTERY:
a. Position AC and DC cords to reduce the risk of damage by the hood,
the door, or any moving engine part.
b. Stay clear of fan blades, belts, pulleys, and other parts that can cause
injury to persons.
c. Check the polarity of the battery posts. POSITIVE (POS, P, +) battery
posts usually have a larger diameter than the NEGATIVE (NEG, N, -)
battery post.
d. Determine which battery post is grounded/connected to the chassis.
In most vehicles, the negative post is grounded to the chassis, follow
step (e). If the positive post is grounded follow step (f).
e. For negative grounded vehicles, connect the POSITIVE (red) clip from
the battery charger to the POSITIVE (POS, P, +) ungrounded battery
post. Connect the NEGATIVE (black) clip to the vehicle chassis or engine
block away from the battery. DO NOT connect the clip to a carburetor,
a fuel line, or to any sheet-metal body part. Connect the clip to a heavy
gage metal part of the frame or to the engine block.
SAFETY INSTRUCTIONS

8LCD SMART BATTERY CHARGER & MAINTAINER
f. For positive grounded vehicles, connect the NEGATIVE (black) clip from
the battery charger to the NEGATIVE (NEG, N, -) ungrounded battery
post. Connect the POSITIVE (red) clip to the vehicle chassis or to the
engine block away from the battery. DO NOT connect the clip to a
carburetor, to a fuel line, or to any sheet-metal body part. Connect the
clip to a heavy gage metal part of the frame or to the engine block.
g. Plug the AC cord from the charger into the electrical outlet.
h. When disconnecting the charger, turn off the charger first, disconnect
the AC cord, remove the clip from the vehicle chassis, and lastly,
remove the clip from the battery terminal.
i. See operating instructions for information on charging duration.
FOLLOW THESE STEPS WHEN THE BATTERY IS
OUTSIDE THE VEHICLE.
WARNING: A SPARK NEAR THE BATTERY MAY CAUSE AN
EXPLOSION. TO REDUCE RISK OF A SPARK NEAR THE BATTERY:
a. Check the polarity of the battery posts. POSITIVE (POS, P, +) battery
posts usually have a larger diameter than the NEGATIVE (NEG, N, -)
battery post.
SAFETY INSTRUCTIONS

niche-industries.com 9
b. Attach a 6-gauge AWG insulated battery cable that is at least 60 cm
(24 inch) long to the NEGATIVE (NEG, N, -) battery post.
c. Connect the POSITIVE (red) charger clip to the POSITIVE (POS, P, +)
post of the battery.
d. Position yourself and the free end of the cable as far away from the
battery as possible, then connect the NEGATIVE (black) charger clip to
the free end of the cable connected to the NEGATIVE terminal.
e. DO NOT face the battery when making the final connection.
f. Plug the AC cord from the charger into the electrical outlet.
g. When disconnecting the charger, always do so in reverse sequence of
the connecting procedure. Also break the first connection while as far
away from the battery as physically possible.
The supply cord cannot be replaced. If the cord is damaged the
appliance should be safely disposed.
Examine the battery charger regularly for damage, especially the
cord, plug and enclosure. If the battery charger is damaged, it must not
be used until it has been repaired.
SAFETY INSTRUCTIONS
10 LCD SMART BATTERY CHARGER & MAINTAINER
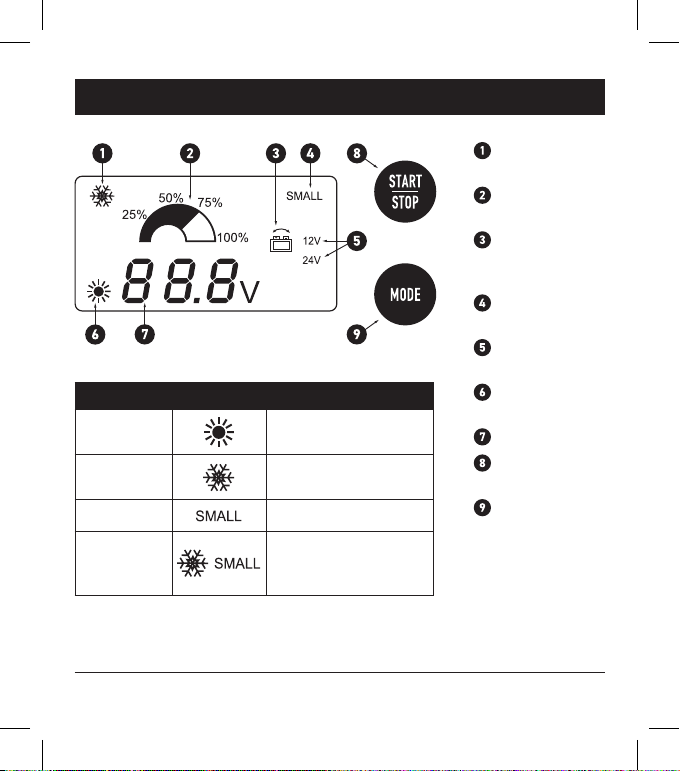
LCD DISPLAY AND BUTTON DIAGRAM
Winter mode
indicator
State of charge
indicator
Reverse polarity
or short circuit
indicator
Silent mode
indicator
12V/24V
indicator
Normal mode
indicator
Battery voltage
START/STOP
button
MODE change
button
Select Mode LCD Display Charging Status
Mode 1 Charging in normal
temperature
Mode 2 Charging in low
temperature
Mode 3 Charging in silent mode
Mode 4 Charging in low
temperature and
silent mode
niche-industries.com 11
CHARGING A BATTERY:
1. Ensure that the polarity connection is correct before plugging the
AC cord into the electrical outlet.
a. Position the red clip on the POSITIVE post connector.
b. Position the black clip on the NEGATIVE post connector.
c. Plug the AC cord into the electrical outlet.
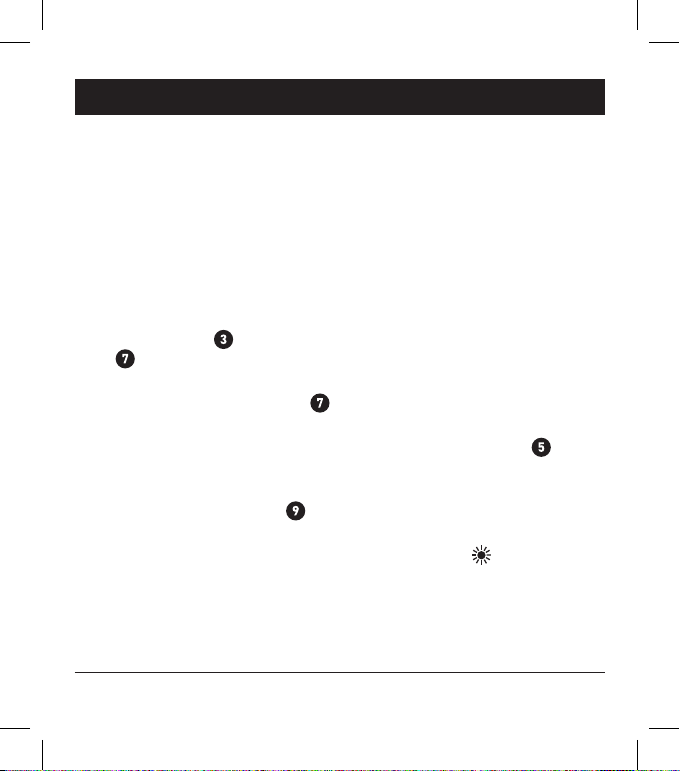
d. If the charger is connected incorrectly and there is reverse polarity
or a short circuit is detected, the wrong connection indicator will
start to flash, ( on diagram) and the battery voltage indicator
( on diagram) will display “Err”.
e. If steps (a-c) are connected correctly, the LCD panel will turn on and
display the battery voltage ( on diagram).
f. The charger will automatically select the correct charging voltage
based on the battery voltage type. The 12V or 24V symbol ( on
diagram) will be displayed on the LCD screen depending on the
battery type that is connected to the charger.
g. Press the MODE button ( on diagram) to select from the four
choices:
i. MODE 1 is the normal mode, when chosen the ( ) symbol will
be displayed on the LCD screen. This mode is recommended for
charging batteries in temperatures > 0°C.
CHARGING INSTRUCTIONS
12 LCD SMART BATTERY CHARGER & MAINTAINER
ii. MODE 2 is the winter mode, when chosen the ( ) symbol will
be displayed on the LCD screen. This mode is recommended for
charging batteries in temperatures < 0°C. However, the winter
mode can also be used on an AGM or a deep cycle battery even in
temperatures > 0°C.
iii. MODE 3 is the silent mode, when chosen the ( ) symbol
will be displayed on the LCD screen. This mode is recommended
for charging small capacity batteries with an output of 2A max.
During the silent mode, the fan turns off.
iv. MODE 4 is the winter ( ) and the silent ( ) mode
simultaneously.
h. After the mode has been selected, press the Start/Stop button
( on diagram) to initiate charging. Press the Start/Stop button
again to discontinue charging.
i. There are 6 auto selected charging stages:
i. SOFT START – when the battery is less than 11V (but more than
4.2V) the charger output is 1.5A.
ii. BULK 1 – when the battery is less than 13.6V (but more than
11V) the charger output is 15A.
iii. BULK 2 – when the battery is less than 13.9V (but more than
13.6V) the charger output is 7.5A.
iv. ABSORPTION – when the battery is less than 14.1V (but more
than 13.9V) the charger output is 5A.
CHARGING INSTRUCTIONS

niche-industries.com 13
v. FLOAT – when the battery is less than 14.3V (but more than
14.1V) the charger output is 2A. When the battery is fully
charged, the charger will automatically shut down and diagnose/
check the battery voltage, entering the maintain stage if the
battery voltage drops to 12.9V.
vi. MAINTAIN – the charger will automatically turn on if the battery
voltage drops below 12.9V. The battery charger will charge until
14.3V is reached with an output of 1.5A.
j. If the battery voltage indicator reads a voltage lower than 4.2V, the
LCD will display “LO,” and the charger will not charge the battery.
The battery charger considers anything lower than 4.2V to be a dead
battery.
k. The LCD display shows the battery state of charge by the percentage
on the battery bar. ( on diagram) The battery bar will flash as the
battery is being charged. The battery bar will increase as the battery
state of charge increases and will keep constant at 100% when it is
fully charged.
2. When DISCONNECTING the battery charger from the battery, first turn
off the charger, after that unplug the AC cord from the electrical outlet
and then disconnect the connection from the battery charger to the
battery.
NOTE: ALWAYS unplug the AC cord from the electrical outlet before
connecting (or disconnecting) the charger to (or from) the battery.
CHARGING INSTRUCTIONS

14 LCD SMART BATTERY CHARGER & MAINTAINER
3. TROUBLESHOOTING if the battery charger is not charging:
a. Make sure all connections are secured.
b. Ensure that the AC cord is plugged into a working electrical outlet.
c. Confirm charger cables are installed with the correct polarity
connections, and that all connections are clean and tight.
d. With the AC power removed and the engine off, check the charge
level of the battery with a DC meter or tester.
e. Take the battery to a qualified technician to ensure that the battery
state of charge has not fallen below the voltage level where it is too
low to charge.
4. MAINTENANCE:
a. When not in use, store the battery charger in a clean, dry, and
secured location – out of reach of children.
b. Coil up cords when not in use.
c. Clean the case and cords with a slightly damp cloth.
d. Clean any corrosion from the clips with a solution of water and
baking soda.
e. Examine the cords, and the unit for any damage after every use, and
replace if necessary.
WARNING: ALL OTHER SERVICE TO THE BATTERY CHARGER
SHOULD BE DONE BY A QUALIFIED TECHNICIAN ONLY.
TROUBLESHOOTING & MAINTENANCE

niche-industries.com 15
This appliance is not intended for use by persons (including children) with
reduced physical, sensory or mental capabilities, or lack of experience
of knowledge, unless they have been given supervision or instruction
concerning use of the appliance by a person responsible for their safety.
This product should not be disposed with other household wastes.
This product requires separate disposal collection for electrical
and electronic equipment.
Input Voltage 110-120VAC or 220-240VAC, 50Hz
Output Voltage 12V/24V (auto select)
Efficiency >75%
Charging Voltage MODE in Normal Temperature 12V/14.3V±0.2V;
24V/28.6V±0.2V
MODE in Cold Temperature 12V/14.7V±0.2V;
24V/29.4V±0.2V
Charging Current 15A (max) for 12V; 7.5A for 24V
Activated Voltage 4.2V for 12V battery, 16.5V for 24V battery
Back Drain Current <5mA
Environment Temp -20°C to +50°C
Battery Types 12V & 24V lead acid-batteries
(WET, MF, AGM and GEL)
Ingress Protection IP20
TECHNICAL DATA

niche-industries.com
Table of contents
Other Niche Batteries Charger manuals


