Sterling Power Portable Battery Charger B124 User manual
Sterling Power Products
Copyright
English
French
Deutsch
technology
4
D
:
U
L
R
A
A
T
I
B
G
I
L
E
D
:
:
D
C
I
E
M
S
A
I
G
N
N
Y
D
ProDigital
RoHS
compliant
Sterling Power Products Ltd.
www.sterling-power.com
www.sterling-power-usa.com
RoHS
compliant
INSTRUCTION MANUAL
MODEL STERLING POWER 12V LED BATTERY
CHARGER
INPUT: 230VAC 50Hz OUTPUT: 12VDC 2A / 4A
WARNING:
This charger is designed for indoor use only. Never expose this
product to rain or wet conditions.
Make sure you are using correct AC line voltage and all plugs
and sockets are in good order.
AC line voltage and all plugs and sockets are in good order.
Do not attempt to use the charger if it has been dropped or
damaged.
Never attempt to charge a damaged battery, frozen battery or
non-rechargeable battery.
Do not use the charger in a closed area or poorly-ventilated area.
The battery charger should be away from any heat source or
ignitable air, which would possibly cause explosion.
Don't replace the cord and plug.
If the battery charger does not work properly, don't attempt a to
repair it or open the case as there is high ( 230V ) internal
voltages and this may kill.
Keep the battery charger away from children and animals.
Disconnect the battery charger after turning off.
Before charging, check the battery type and maximum charging
voltage allowed. Or, get this information from battery supplier.
Use goggles while connecting or disconnecting the charger.
Do not operate this product in explosive atmospheres, such as
in the presence of flammable liquids, gases or dust. This could
result in serious injury.
Don't insert any metal items into the ventilator of the battery
charger.
To reduce risk of damaging the Battery, avoid dropping any
metal tools onto the battery.
Don't put the battery charger too close to the battery during
charging.
Read the IMPORTANT SAFETY INFORMATION section ENTIRE
at the beginning of this manual before setup or use of this
product.
Warning do not attempt to charge non rechargeable batteries
SPECIFICATIONS PARAMETERS
Simple specification :
Input voltage: 220---240VAC 50/60HZ
Input current: 0.4A RMS max.
Back drain current: <5 mA (No AC input)
Cut off voltage: 14.4V or 14.6V (+/-0.25V)
Charging current: 4A or 2A (+/-10%)
Ripple: 150mV max.
Battery type: 12V lead acid battery, Gel, AGM.10Ah----140Ah
Against dust and proof water grade: IP65
Audible noise: < 50dB (test from 500mm distance)
Your 100% satisfaction is our goal:
We know that every customer is unique. If you have a problem, a question
or comment please do not hesitate to contact us, even if the warranty period
is over.
Product warranties:
Each product manufactured by Sterling comes with a warranty of at least 2
years. This is counted from the date of purchase. Each product is
guaranteed against defects in materials or workmanship. We shall choose
to replace or repair the defective product during the warranty period.
The following provisions apply:
- Proof of purchase must be provided, otherwise the warranty period begins
on the date of manufacture of the object.
- Our warranty covers defects in materials and manufacturing. Damage
caused by neglect, abuse, accident, alteration, misuse, are not covered by
our warranty.
- The guarantee does not apply if the damage resulted from improper
repairs.
- The consumer is liable for shipping the product.
- Sterling Power shall return the product at the customer’s own expense.
If your product was damaged in transit, contact us quickly, we can solve
the problem.
This only applies for the transport organized by our company. It is best not
to throw away the original packaging.
All returns must be accompanied by a proof of purchase. If you don 't have
the evidence ask the seller from whom you purchased the equipment to
provide you with a new one.
To make a claim under warranty, check the phone number on the internet.
We will make best efforts to repair or replace the product, if defective,
according to the criteria of guarantee.
Guarantee
12v 4 amp d/c
Sterling Power Products
Copyright
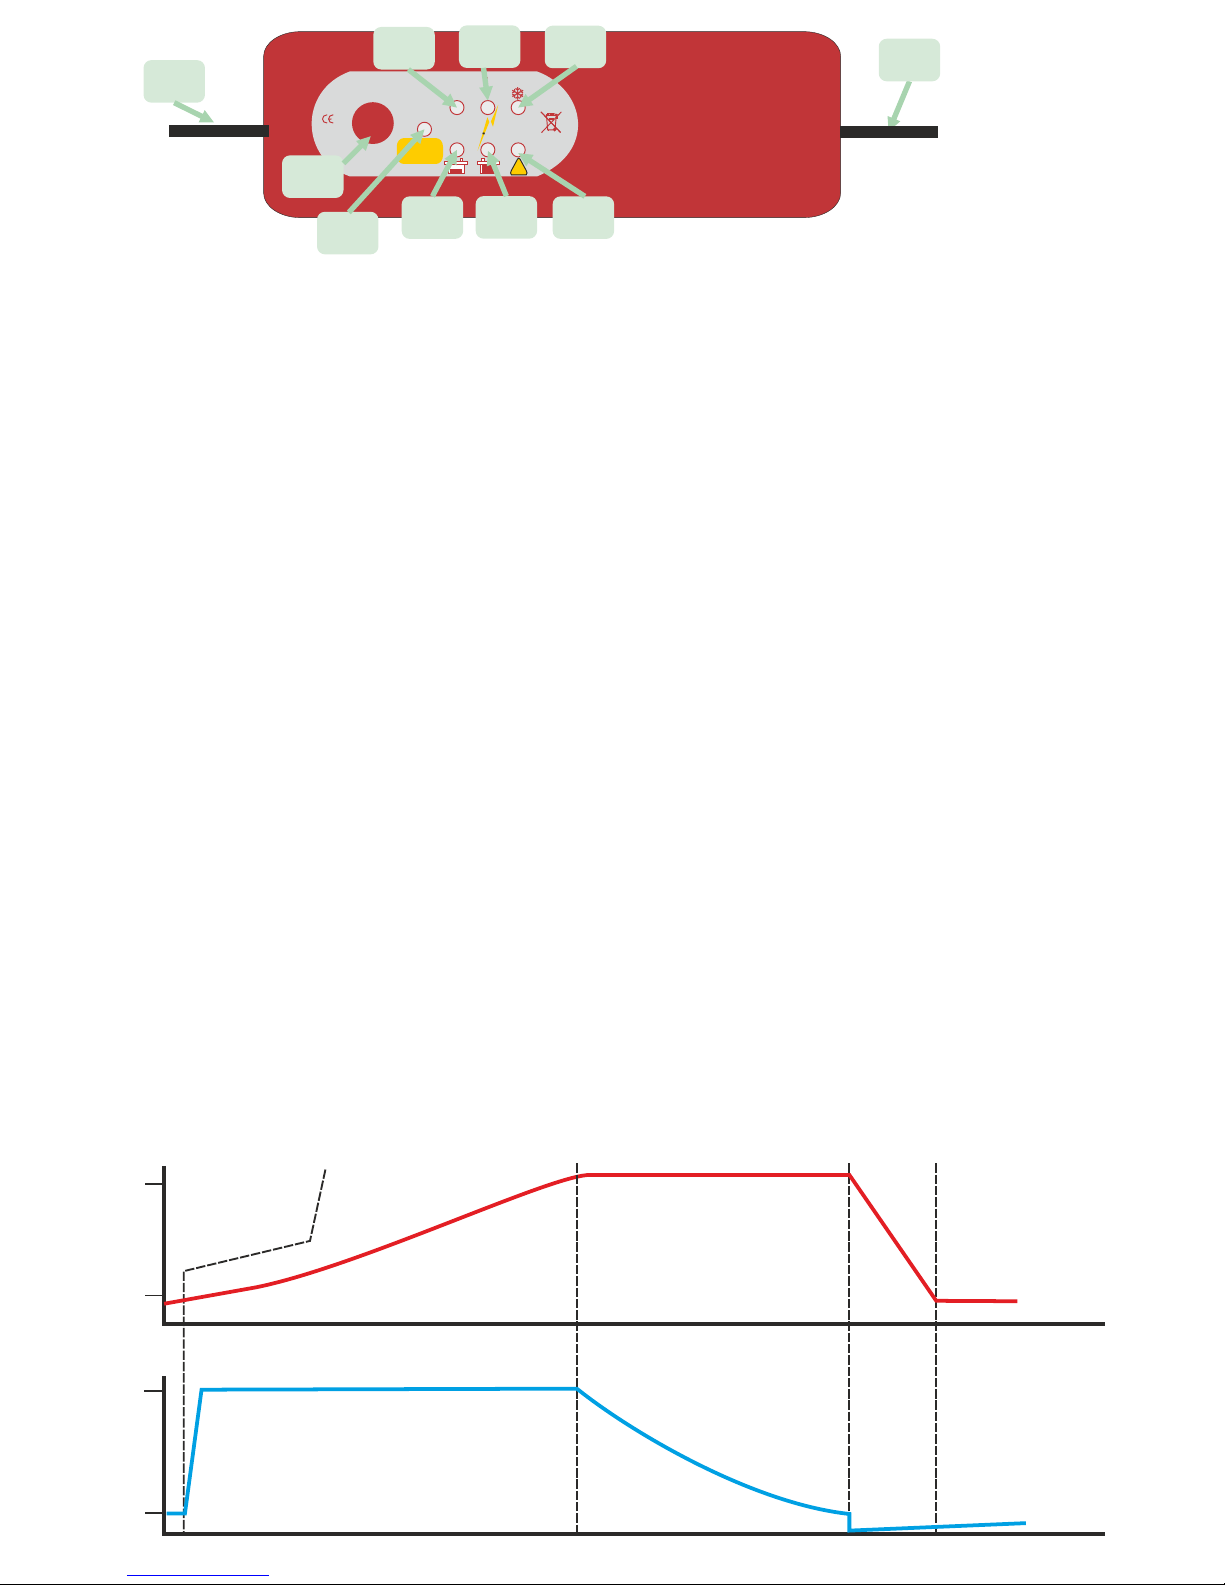
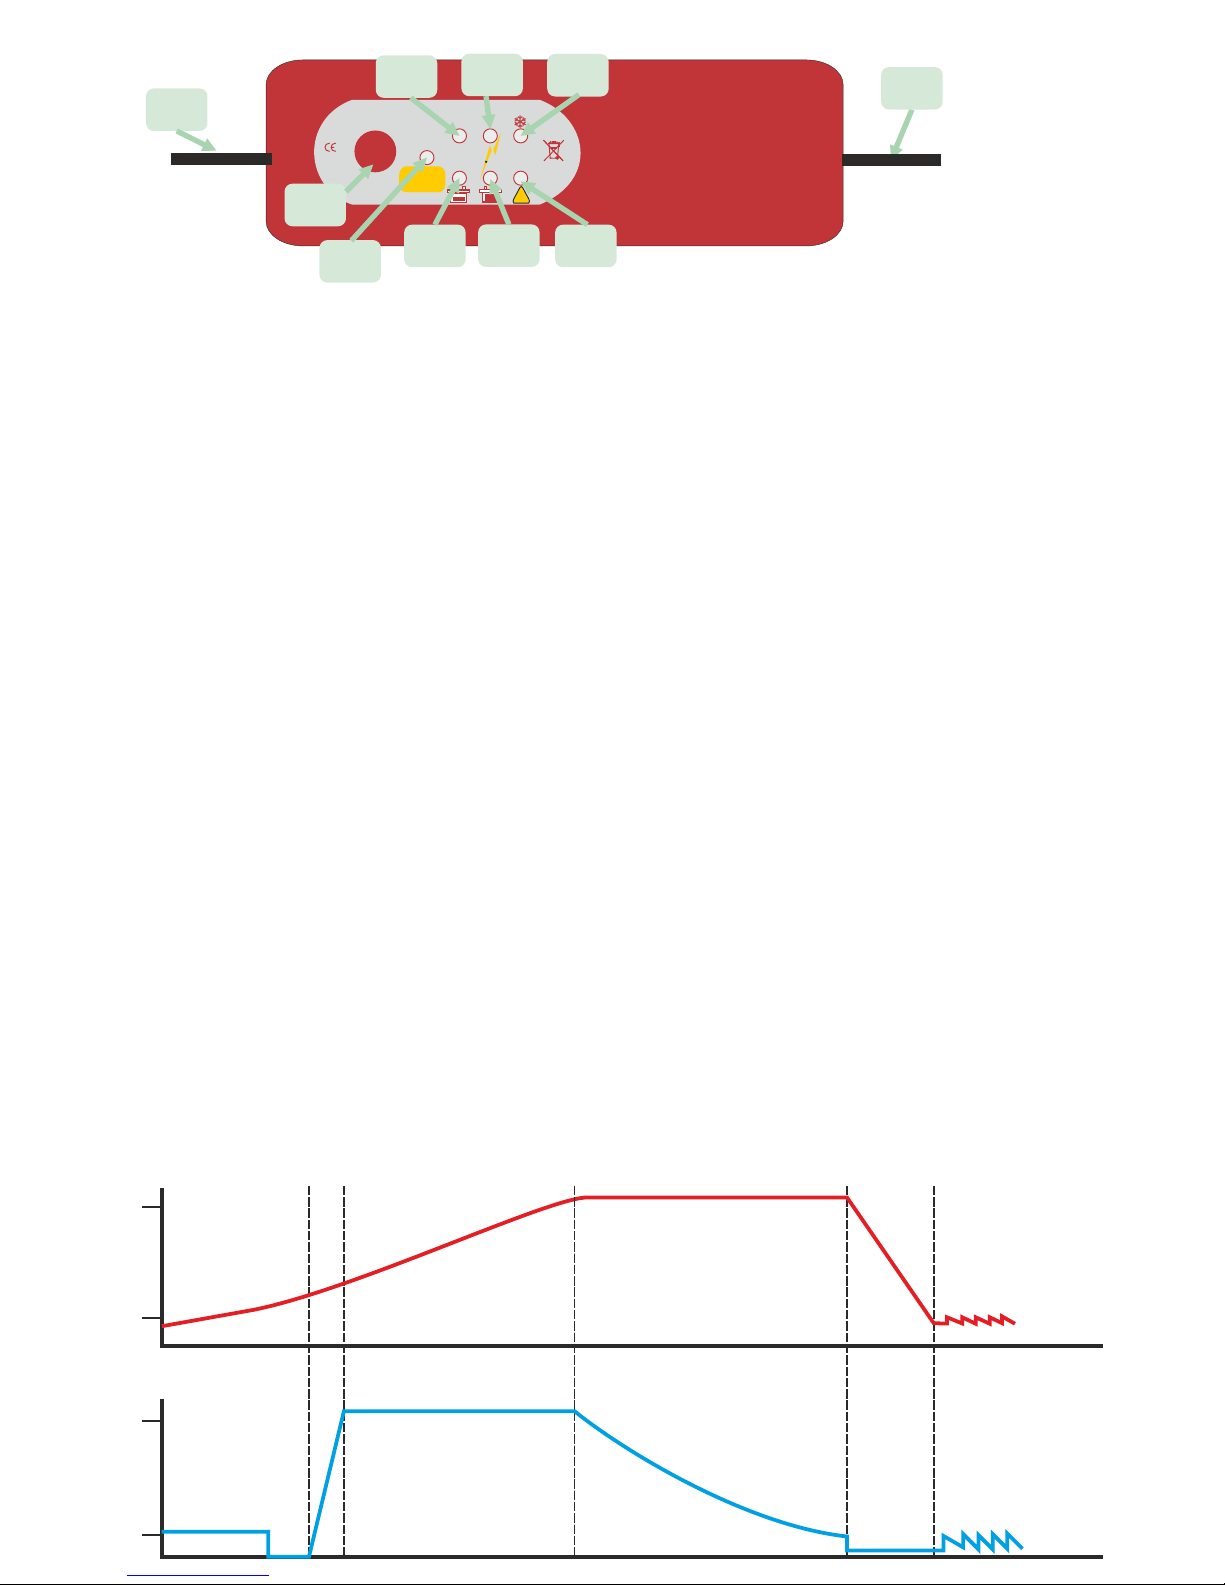
1) AC input ( high voltage ).
2) DC output cables to battery. Ensure red clamp to Positive and Black to Negative.
3) Mode select, this is for selecting which mode of charge you wish to have. The
options are: 1) (7) ½ power ( reducing power to charge small batteries i.e. motor bike
batteries etc. Less than about 20Ah ). 2) (8) Full power, giving the full 4A. 3) (9) Winter
Mode, this increases output charge voltage from 14.4V to 14.6V in order to
compensate for cold weather battery chemistry.
How to use mode select See below:
4) Battery fully charged,
5) Battery Fully charged.
6) Fault LED. There are 2 reasons why this LED would flash:
A) Reverse polarity on battery, check you have the red cable on the positive and the
black on the negative. Unit will not engage until this is correct.
B) Output short circuit. I.e. ensure that the DC output cables are connected to a battery
and not themselves (i.e. clipped together).
7) Unit set on 50% power. I.e. about 2A, may be required on small motor bike type
batteries (14.4V charge).
8) Unit on full charge power (4A) 14.4V.
9) Unit set on winter mode, this increases the charge voltage by 0.4V to compensate
for the cold weather chemistry adjustment.
10) Unit attached to mains power but no charging taking place.
Charger operation
Before connecting the 230V side ensure the cables are sound and not damaged.
Ensure electrical protection circuits.
1) Connect the battery charger to your battery, ensuring the battery voltage is within the
voltage ability of the unit i.e. 12V battery. Connect the charger to the 230V AC power.
Ensure that you are in a dry environment and no water can cause electric shock.
Connect the black to the negative terminal and the red to the positive terminal. In the
event of this being incorrect, I.e. reverse polarity then the fault LED will flash. This
indicates reverse polarity. Please fix the polarity in this case.
2) After connecting the 230V the unit needs a few seconds to determine things are
okay. If the test results determine that the battery is not 12V or is in such a bad state
then the fault light will flash (6). The charger will stop working. Assuming the charger
has determined that all is okay then LED 4 will come on and the 50% power LED 7
shall turn on. The mode can then be changed by using the mode button. To use the
mode button wait until LED 7 and 4 are on. Then, simply hold the mode button for 3
seconds then release. This will bump the 50% LED up to the 100% LED, then hold
again for 3 seconds and release. This will bump the LED up to the winter setting.
MODE1 (14.4V / 2A) 50% charge power for smaller batteries under 20Ah
This mode is fit for charging those small batteries with a capacity of less than 14AH.
This is the default safety setting. So, if required, no need to adjust mode. The 50% LED
7 will be on to show that you are in this mode. When the battery is full charged, then
LED4 will turn off and LED5 will come on and now a float voltage and current is
maintaining the battery.
MODE2 (14.4V / 4A) 100% power for larger batteries up to 140 Ah.
This mode is mainly applied for charging those batteries with Ah capacities larger than
20Ah in normal conditions. Before charging the battery, connects the output terminals
to the right polarity first and then select the desired mode by holding down the mode
button for 3 secs then release. This will then show LED8 on which indicates full
charging power of about 4A and 14.4V.
When the battery is full charged, LED4 will turn off and LED5 will turn on and now a
float voltage and current is maintaining the battery.
MODE3 (14.6V / 4A) Winter mode, increases voltages for colder charging
climates
This mode is established for charging those batteries with larger capacity of more than
20Ah in cold condition or charging some AGM batteries with capacity of more than
20Ah. Also, it is a good charging rate for open lead acid or traction batteries. Before
charging the battery connects the output terminals to the right polarity of battery first
and then use the Mode button to make the correct selection press. Simply wait until the
unit starts to charge ( as above instructions ) then hold the mode button for 3 seconds
then release it. This will move the LED from position LED7 - LED8. Hold the button for
another 3 seconds then release to move from LED8 - LED9. This is the required setting
for winter charge (small snow flake on label).
Rescue dead battery
When being connected to a battery and starting the charging course, the charger
detects the voltage of the battery automatically and then changes to pulse charging
mode if the voltage is within the range of 7.5V+/-0.5 to 10.5V+/-0.5. This pulse
charging course won’t stop until the battery voltage rises to 10.5V+/-0.5. Once this
point is arrived, the charger changes to the normal charging mode selected by the
user at the beginning and now the battery can be charged up fast and safely.
Through this method, most ‘dead’ batteries can be rescued.
Abnormality protection
Whenever LED 6 appears, one of the following abnormal occasions, such as: Short
circuit, battery voltage below 7.5V+/-0.5V, open circuit or reverse connection of the
output terminals, the charger will turn off the electronic switch and reset the system
immediately to avoid damage. If there is no further order received, the system will
remains in the standby state.
Temperature protection
During the charging course, if the charger is too hot for some reason, it will reduce
the output power automatically to protect itself from damaging.
Charging steps:
Constant Current Stage:The charger will begin charging with the
current selected or use a tacitly approved current 2A up to 14.4V for 12V battery.
During this stage the charging current is constant-current. It will turn to the next
charging stage under constant voltage.
Constant Voltage Stage:The battery charger outputs a constant
charging voltage of 14.4V for a 12V battery. During this stage the charge current is
constant-current. The charging current gradually decreases until ≤ 1A and turns to
the next charging stage (float).
Float Stage:The battery is fully charged and is ready for use. Chargers
will output a constant safe voltage. During float, the charger’s voltage shall drop to
approximately 13.0V for 12V battery.
4) After completing the charge then simply remove the 230V AC first then remove the
DC cables.
50 100
12V 4 Amp
Battery Charger
RoHS
compliant
STERLING
POWER
!
Power %
STAND
BY
MODE
9
10 456
78
3
21
14.4
Volts
13.0
4A
Amps
0.5A
Battery type, voltage
& safety state check
off battery cable
terminal connections
Main bulk charge mode
Constant current
Rapid charge
LED 4
Absorption mode
Constant Voltage
Finishing charge ensuring
maximum power returned
to battery LED 4
Float Mode LED 5
Battery charge complete.
Maintained float charge
indefinitely, keeping battery full.
Float max. 0.5A
< 1A

Sterling Power Products
Copyright
12v 4 amp d/c Deutsch
technology
4
D
:
U
L
R
A
A
T
I
B
G
I
L
E
D
:
:
D
C
I
E
M
S
A
I
G
N
N
Y
D
ProDigital
RoHS
compliant
Sterling Power Products Ltd.
www.sterling-power.com
www.sterling-power-usa.com
RoHS
compliant
INSTALLATIONS- UND BEDIENUNGSANLEITUNG
STERLING POWER 12V LED LADEGERÄT
EINGANGSSPANNUNG: 230VAC 50Hz
AUSGANGSSPANNUNG: 12VDC 2/4A
ACHTUNG:
Dieses Ladegerät ist nur für den Betrieb im Innenraum geeignet. Es
ist nicht gegen Feuchtigkeit, Wasser, Regen, etc. geschützt.
Stellen Sie sicher, dass die 230V Stecker und Steckdosen nicht
defekt oder beschädigt sind.
Verwenden Sie das Ladegerät nicht, wenn es beschädigt oder fallen
gelassen wurde.
Verwenden Sie das Gerät nicht in geschlossenen Boxen/Kästen oder
schlecht belüfteten Orten.
Das Ladegerät darf nicht neben wärmeausstrahlenden Geräten oder
in explosiver Luft verwendet werden. (z.B. auch nicht in
Maschinenräumen von Benzin- oder Gasmotoren).
Laden Sie niemals eine beschädigte, gefrorene oder nicht-
wiederaufladbare Batterien.
Ersetzen Sie niemals die 230V Leitung und den Stecker.
Sollte das Ladegerät nicht funktionieren, öffnen Sie niemals das
Gerät und versuchen Sie auch nicht, dieses selbst zu reparieren.
Hohe Spannungen können tödlich sein!
Stellen Sie sicher, dass Kinder und Tiere nicht in die Nähe des
Gerätes kommen.
Nach dem Laden entfernen Sie bitte die Kabel von der Batterie.
Vor dem Laden überprüfen Sie bitte den Batterietyp und die maximal
erlaubte Ladeschlussspannung. Falls diese Informationen nicht
vorhanden sind, fragen Sie den Hersteller Ihrer Batterie oder Ihren
Lieferanten der Batterie.
Benutzen Sie eine Schutzbrille, wenn Sie das Ladegerät
anschließen oder den Anschluss wieder entfernen.
Der Lüfter muss frei laufen können.
Um das Risiko von defekten Batterien zu minimieren, hantieren Sie
nicht mit metallischen Werkzeugen oder ähnlichem in der Nähe der
Batterien.
Beim Laden stellen Sie das Ladegerät NICHT direkt in die Nähe der
Batterien.
Lesen Sie die gesamte Anleitung, bevor Sie mit dem Betrieb des
Ladegerätes beginnen.
Das Gerät ist nur zum Laden von wiederaufladbaren Batterien
geeignet.
Spezifikationen:
Eingangsspannung: 220---240VAC 50/60HZ
Eingangsstrom: 0.4A RMS max.
Rückstrom: <5 mA (No AC input)
Ladeschlussspannung: 14.4V / 14.6V (+/-0,25V)
Ladestrom: 4A / 2A (+/-10%)
Restwelligkeit: 0,15V max.
Batterietyp: 12V Blei, GEL, AGM 5Ah----100Ah
Geräuschentwicklung: < 50dB (Entfernung: 50cm)
Ihre 100% Zufriedenheit ist unser Ziel:
Wenn Sie ein Problem, eine Frage oder einen Hinweis für uns haben, bitte
kontaktieren Sie uns, auch wenn die Garantiezeit abgelaufen ist.
Produktgarantie:
Jedes Sterling Produkt erhalten Sie mit einer 2 Jahres-Garantie. Diese
startet mit dem Kauf eines neuen Produktes. Dabei überlassen Sie uns, ob
wir das Produkt reparieren oder austauschen.
Bedingungen:
- Der Kauf muss durch eine Kopie der Rechnung / Quittung nachgewiesen
werden, ansonsten beginnt die Garantiezeit mit dem Herstellungsdatum.
- Unsere Garantie deckt alle Schäden des Gerätes selbst ab, welche durch
Material- oder Fabrikationsfehler entstanden sind. Schäden durch
Veränderung des Gerätes, nicht authorisierte Reparaturen,
Zweckentfremdung, falsche Handhabung, falschen Anschluss und Unfall
sind nicht abgedeckt.
- Der Kunde sendet das Gerät kostenfrei an uns zurück.
- Sterling Power sendet das reparierte / ausgetauschte Gerät auf Kosten
des Kunden zurück.
Hat das zurückgeschickte Gerät einen Transportschaden, bitte
informieren Sie uns innerhalb von 24Std. nach Erhalt der Ware. Ist der
Transport von Ihnen organisiert, kontaktieren Sie bitte Ihren Spediteur.
Bewahren Sie die Verpackung auf.
Wenn Sie diese Garantie in Anspruch nehmen möchten, überprüfen Sie
bitte unsere aktuelle Adresse und Telefonnummer auf unsere Webseite.
Diese Garantie ist unabhängig von der Ihnen gesetzlich zustehenden
Gewährleistung.
Garantie
Sterling Power Products
Copyright
50 100
12V 4 Amp
Battery Charger
RoHS
compliant
STERLING
POWER
!
Power %
STAND
BY
MODE
9
10 456
78
3
21
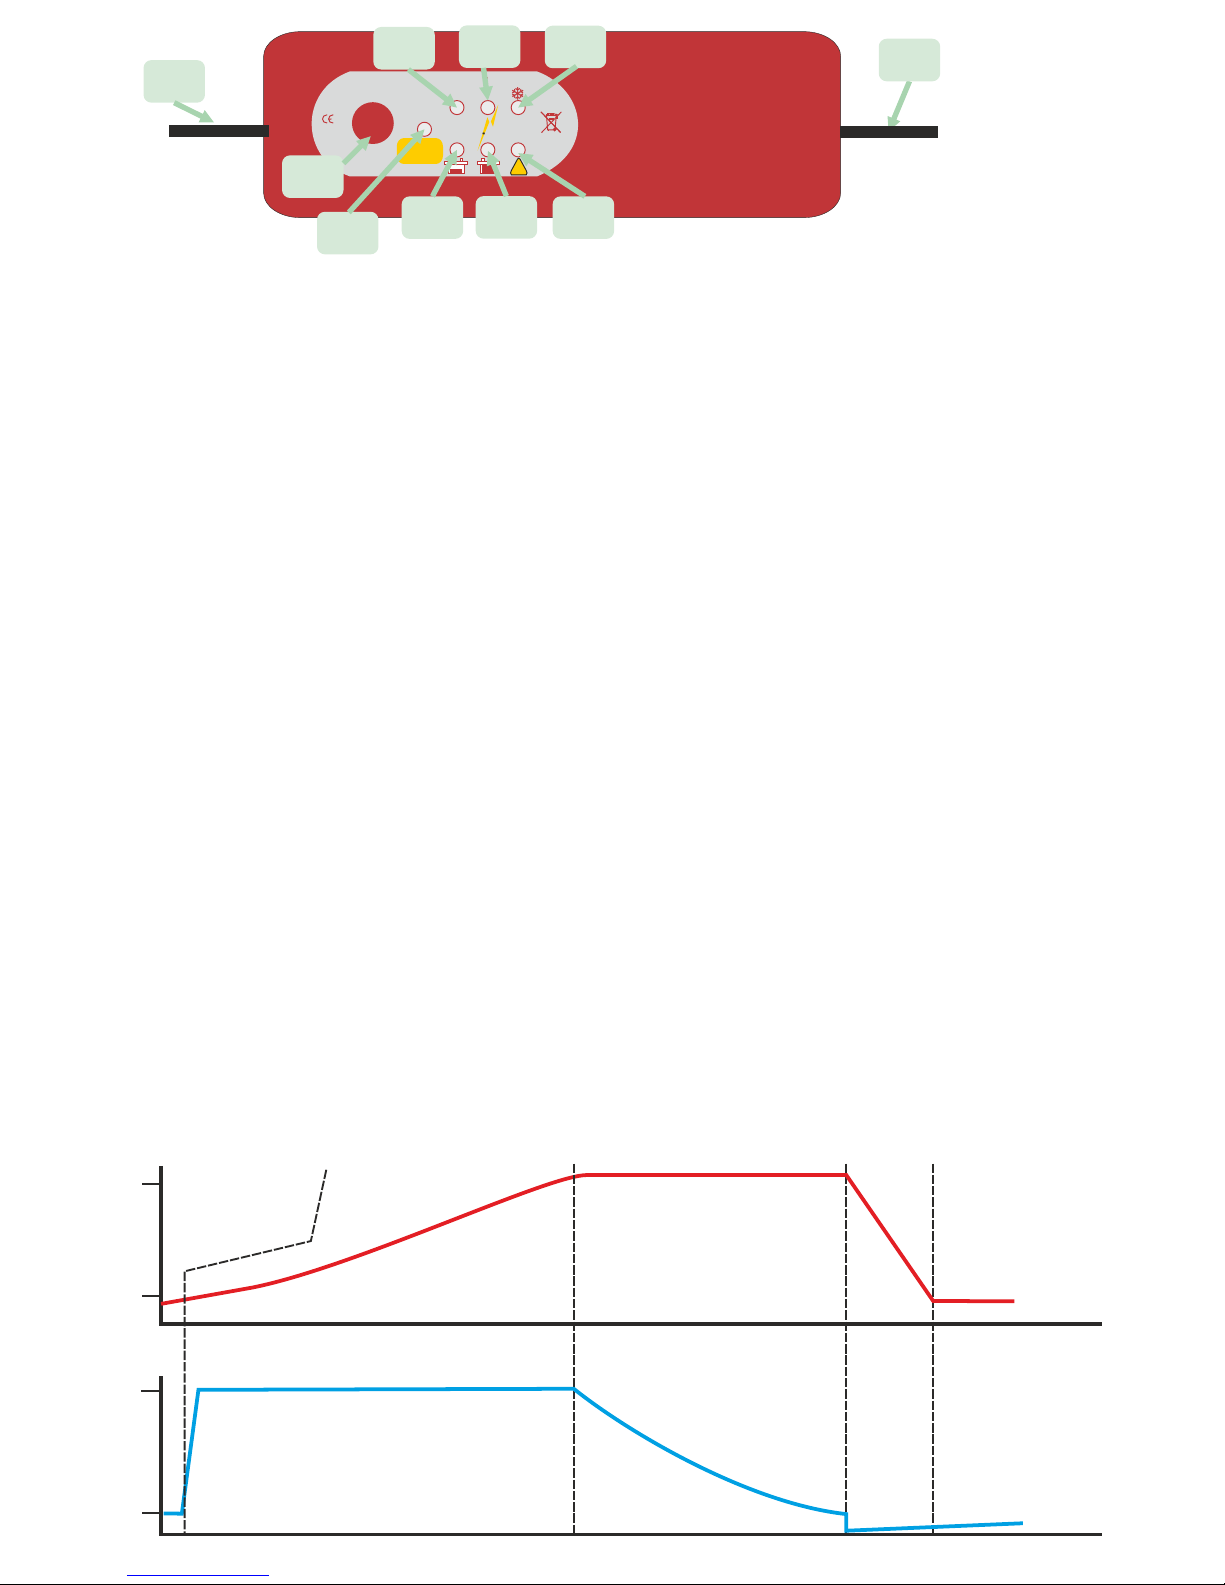
1) AC Eingang ( Hochspannung - 230VAC ).
2) DC Ausgang mit Krokodilklemmen.
3) Ampere Leistungs (MODE) Knopf: Durch drücken des Knopfes
kann die Leistung verändert werden: 2A / 4A / Wintermodus
4) Leere Batterie LED, Ladegerät arbeitet mit maximaler Leistung.
5) Erhaltungsladung LED, Batterien sind geladen.
6) Fehler LED.
6A) Polarität falsch. Überprüfen Sie die Anschlüsse.
6B) Kurzschluss am Ausgang. Überprüfen Sie die die Anschlusskabel.
7) 50% LED: Maximaler Ladestrom 2A
8) 100% LED: Maximaler Ladestrom 4A
9) Wintermodus LED: Ladeschlussspannung ist um 0,2V erhöht
10) Standby LED: Gerät ist im Standby Modus. Keine Ladung.
Anschlussanleitung
Bevor Sie das Ladegerät anschließen, überprüfen Sie die Kabel und Anschlüsse.
1) Verbinden Sie das Ladegerät mit den Batterien. Achten Sie auf die korrekte Verbindung. ROT = POSITIV , SCHWARZ = NEGATIV
2) Verbinden Sie das Ladegerät mit der 230V Steckdose. Achten Sie auch hier darauf, dass alles trocken ist.
3) Nachdem Sie die 230V Verbindung hergestellt haben, benötigt das Ladegerät einige Sekunden zur Analyse der Batterie und um die korrekte
Spannung einzustellen. Ist die Batterie keine 12V Batterie, leuchtet die Fehler LED 6.
4) MODE1 (14,4V / 2A) 50% Ladeleistung für Batterien bis 20Ah.
Dieser Modus ist für kleine Batterien gedacht. Die 50% LED 7 leuchtet.
MODE2 (14,4V / 4A) 100% Ladeleistung für Batterien bis 100Ah. Diese Modus muss durch drücken der Mode-Taste (3) eingeschaltet werden. Dazu
drücken Sie die Taste für ca. 3 Sek., bis die LED 8 (100%) leuchtet.
MODE3 (14,6V / 4A) Wintermodus. Wenn die Temperatur unter 10°C ist, kann dieser Modus für Batterien größer als 20Ah genutzt werden. Dabei
wird die Spannung um 0,2V erhöht. Zum Einschalten dieses Modus muss die Mode-Taste (3) 2 x für 3 Sek. gedrückt werden, bis die LED 9 leuchtet.
5) Ladestufen:
LED4 Maximal-/Ausgleichsladung: Das Ladegerät lädt mit dem maximal eingestellten Strom. Wird keine Auswahl getroffen, lädt das Gerät
mit 2A. Dieses ist eine Sicherheitsschaltung, da es sich um ein mobiles Gerät handelt. Ein Strom über 2A muss jedes Mal
wieder neu eingestellt werden! Anschließend hält das Gerät die maximale Spannung (14,4V bei 12V Batterien), bis der
Ladestrom unter 1A fällt. Dann schaltet es automatisch in die Erhaltungsladung.
LED5 Erhaltungsladung: Die Batterie ist geladen und kann genutzt werden. Solange das Ladegerät eingeschaltet und angeschlossen bleibt, wird
die Spannung 13,0V gehalten, um eine Selbstentladung zu verhindern.
6) Tiefentladene Batterien: Schließen Sie eine tiefentladene Batterie (Spannung: 7,5V - 10.5V) an, dann wird diese Batterie zuerst mit einer Pulsladung
geladen, bis die Spannung von ca. 11V erreicht ist, Dann schaltet das Gerät in den normalen Modus. Dadurch können viele tiefentladene Batterien
gerettet werden.
7) Überhitzungsschutz: Sollte das Ladegerät zu heiß werden, schaltet es automatisch in den 50% Modus zurück.
8) Zum Abschalten des Ladegerätes ziehen Sie zuerst den 230V Stecker aus der Steckdose.
Klemmen Sie anschließend die Kabel von der Batterie ab.
Batterietyp,
Spannungs-
& Sicherheits-Check
Hauptladung
Maximalstrom
Schnellladung
LED 4
Ausgleichsladung
Konstante Spannung
LED 4
Erhaltungsladung
LED 5
Batterieladung komplett
Spannung wird zeitlich
unbegrenzt gehalten.
Spannung
Strom
14.4
Volts
13.0
4A
Amps
0.5A Float max. 0.5A
< 1A
Sterling Power Products
Copyright
French
technology
4
D
:
U
L
R
A
A
T
I
B
G
I
L
E
D
:
:
D
C
I
E
M
S
A
I
G
N
N
Y
D
ProDigital
RoHS
compliant
Sterling Power Products Ltd.
www.sterling-power.com
www.sterling-power-usa.com
RoHS
compliant
MANUEL D’INSTRUCTION
CHARGEUR DE BATTERIES LED 6/12V STERLING
POWER
ENTREE: 230VAC 50Hz SORTIE: 12Vcontinu 2/4A
AVERTISSEMENT:
Ce chargeur est conçu pour une utilisation à l’intérieur
uniquement. Il ne faut pas exposer le chargeur à la pluie ou à un
environnement humide.
Assurez-vous que vous utilisez une alimentation de courant
alternatif en bon état, les prises doivent aussi être en bon état.
N’essayez pas d’utiliser ce chargeur s’il est endommagé.
Ne jamais tenter de recharger une batterie endommagée, une
batterie gelée ou une batterie non rechargeable.
Ne pas utiliser le chargeur dans une atmosphère fermée ou peu
ventilée.
Le chargeur de batterie doit être éloigné de toute source de
chaleur, d’air inflammable qui pourrait susciter une explosion.
Ne pas remplacer le cordon de liaison et la prise.
SI la chargeur ne fonctionne pas correctement n’essayer pas de
le réparer, d’ouvrir le boîtier, la tension utilisée (230V) peut tuer.
Placer le chargeur de batteries hors de portée des enfants et des
animaux.
Déconnecter le chargeur de batteries après utilisation.
Avant de commencer la charge, vérifier le type de batteries et la
tension de charge maximum autorisée. Vous pouvez obtenir
cette information par votre fournisseur de batteries.
Utiliser des lunettes protectrices lorsque vous branchez ou
débranchez le chargeur.
Ne pas utiliser ce produit en présence de gaz, de poussière, de
liquide explosif. Cela peut occasionner de graves accidents.
Ne pas introduire des objets métalliques dans le ventilateur du
chargeur de batteries.
Pour réduire le risque d’endommager la batterie ne pas déposer
d’objets métalliques sur la batterie.
Ne pas placer le chargeur trop près de la batterie pendant la
charge.
Lire toutes les recommandations de sécurité avant d’utilser ce
produit.
Avertissement: n’essayez surtout pas de recharger une batterie
non rechargeable.
PARAMETRES DU CHARGEUR
Tension entrée: 220---240VAC 50/60HZ
courant entrée: 0.5A RMS max.
courant de retour: <5 mA sans alimentation alternative)
Tension de coupure: 14.4V +/-0.25V or 14.7V +/-0.25V
Courant de charge: 4.2A+/-10% ou 2.5 ou 0.8A+/-10%
Type de batterie: 12V batterie acide-plomb, Gel, AGM 12AH----
140AH
Bruit: < 50dB (test à 500mm de distance)
Etat de charge: M2 4.2A (12.8V+/-0.25V)-> 3.0A(14.1V+/-0.25V)->
0.8A (14.4V+/-0.1V) ->
Notre but: votre satisfaction à 100%:
Nous savons que chaque client est unique, si vous avez un problème, une
question un commentaire, n’hésitez pas à nous contacter, même si la
période de garantie est terminée.
Garanties du produit:
Chaque produit fabriqué par Sterling est livré avec une garantie de 2 ans
comptée à partir de la date d’achat. Chaque produit est garanti contre les
défauts d’assemblage ou de fabrication, nous choisissons de réparer ou de
changer le produit défectueux pendant cette période.
Clauses de garantie:
- La preuve de la date de l’achat doit être fournie, sinon la garantie
commence le jour de la fabrication du produit.
- Notre garantie couvre les défauts de fabrication, les dommages causés
par une mauvaise utilisation, des négligences des abus ne sont pas
couverts.
- La garantie ne s’applique pas si les problèmes constatés résultent d’une
réparation inappropriée.
- Le client est redevable des frais d’envoi.
- Sterling Power prend en charge les frais du retour du produit.
Si le produit est endommagé pendant le transport contacter nous le plus
tôt possible, nous pouvons régler le problème. Ceci s’applique
uniquement pour les transports organisés par notre compagnie, il est
préférable de conserver le paquet.
Tour retour doit être accompagné par une preuve d’achat, si vous l’avez
égarée, demander à votre vendeur de vous fournir une nouvelle preuve.
.
Pour faire une réclamation pendant la période de garantie, vérifier le
numéro de téléphone sur internet, nous ferons tous les efforts pour
remplacer le produit s’il est défectueux suivant les règles définies par la
garantie
Garantie
12v 4 amp d/c
Sterling Power Products
Copyright
14.5
Volts
13.7
4A
Amps
0.5A
Etape de contrôle du
type de batterie,
des câbles,
de la sécurité du
montage
montée en tension
Mode charge à courant constant
charge rapide
LED 6 Mode absorption
Tension constante
fin de charge pour s’assurer
que la charge maximum
est fournie à la batterie.
LED 5
Test
Batterie
1) Entrée courant alternatif ( haute tension).
2) Câbles sortie courant continu vers la batterie. assurez-vous que la pince rouge est
connectée à la borne positive et la noire à la négative.
3) Mode select, permet de sélectionner le type de charge que vous souhaitez. Les
options sont: 1) (7) ½ puissance réduit la puissance par 2, pour charger les petites
batteries (moins de 14Ah) par exemple, les batteries moto. 2) (8) Puissance totale
fournit les 4A. 3) (9) Mode hiver, augmente la tension de charge en sortie de14,5V à
14.9V afin de compenser la variation des propriétés de la batterie due au froid.
Comment régler le mode: voir en dessous
4) Batterie en charge.
5) Batterie complètement chargée.
6) LED alarme de mauvais fonctionnement. Il y a 2 types de problèmes pour lesquels
la LED clignote:
A) Polarité inverse sur la batterie, vérifier que vous avez bien branché le câble rouge
sur la borne positive de la batterie et le câble noir sur la borne négative. L’appareil ne
fonctionne pas si ce branchement est incorrect.
B) Court circuit en sortie, vérifier que les deux pinces ne sont pas reliées.
7) Appareil en mode 50% puissance. Environ 2A, nécessaire pour les petites batteries
de moto (charge à 14.5V).
8) Appareil en pleine puissance de charge (4.2A) 14.5V.
9) Appareil en mode hiver, augmente la tension de charge de 0,4 volts pour s’adapter
au changement des propriétés de la batterie du au froid.
10) Appareil relié à la source de courant, mais ne charge pas de batterie.
Operations de charge. Avant de connecter le chargeur à la tension de 230V
assurez-vous que les câbles sont en bon état et que le circuit électrique est protégé
électriquement.
1) Connecter le chargeur à la batterie assurez-vous que la tension de la batterie est
en accord avec les possibilités du chargeur (12V).
Connecter le chargeur à la source de courant alternatif 220V, s’assurer que
l’environnement est sec, qu’aucune trace d’eau ne peut causer un choc électrique.
Connecter le câble noir à la borne négative de la batterie, le câble rouge à la borne
positive. Si ce montage est incorrect la LED d’erreur clignote, rectifier alors le montage.
2) Une fois la connexion à la tension de 230V réalisée l’appareil a besoin de quelques
secondes pour faire les vérifications. Si la batterie n’est pas de 12V ou si elle est en
très mauvais état, la LED erreur clignote (6), le chargeur arrête alors de fonctionner.
Si les tests sont bons, la LED 4 s’allume la puissance est à 50%, la LED 7 s’allume. On
peut changer ce réglage à l’aide du bouton mode. Pour utiliser le bouton mode
attendre que les LED 7 et 4 soient allumées, il suffit ensuite d’appuyer sur le bouton
pendant 3 secondes et de relâcher. On passe du mode 50% au mode 100%, si on
maintient de nouveau le bouton mode appuyé 3 secondes on passe alors au mode
hiver.
MODE1 (14.5V / 2A) Charge à 50%,pour les petites batteries moins de 14 Ah
Ce mode est utilisé par défaut, si vous en avez besoin, il est inutile de changer le
mode, la LED 7, 50% sera allumée. Quand la batterie est complètement chargée la
LED 4 s’éteint la LED 5 s’allume, une tension de floating est imposée à la batterie pour
la maintenir chargée.
MODE2 (14.5V / 4.2A) puissance 100% pour des batteries jusqu’à 130 Ah.
Ce mode est utilisé pour charger des batteries de plus de 14Ah dans des conditions
normales. Bien connecter les pinces aux bonnes polarité, et sélectionner le mode
100% en pressant le bouton mode pendant 3 Secondes et en le relâchant. La LED8
doit alors s’allumer, la charge s’effectue à 4,2A et 14,5V. Quand la batterie est
complètements chargée la LED 4 s’éteint la LED 5 s’allume, une tension de floating est
appliquée à la batterie pour la maintenir chargée.
MODE3 (14.7V / 4.2A) mode hiver, augmente la tension pour s’adapter aux
climats froids.
Ce mode est utilisé pour charger les batteries de plus de 14Ah quand il fait froid, on
peut aussi l’utiliser pour des batteries AGM de plus de 14 AH, pour des batteries plomb
ouvert ou des batteries de traction. Avant de commencer la charge bien placer les
pinces sur les bonnes polarités, utiliser le bouton mode pour déterminer la sélection.
Attendre que l’appareil commence la charge, comme ci-dessus, maintenir le bouton 3
secondes puis relâcher, la LED allumée doit passer de 7 à 8. Maintenir le bouton de
nouveau appuyé 3 Secondes, relâcher, la LED allumée doit passer de 8 à 9 (flocon
sur l’étiquette), ceci est le mode hiver.
Récupérer une batterie endommagée.
Lorsque le chargeur est connecté à une batterie le test de départ mesure la tension de
la batterie. Si cette tension est dans l’intervalle: 7.5V+/-0.5 à 10.5V+/-0.5 le chargeur
se place en mode pulse, ce mode pulse continue jusqu’à ce que la tension de la
batterie atteigne 10.5V+/-0.5. Ce but atteint, le chargeur reprend la charge normale
en utilisant le mode sélectionné par l’utilisateur au départ, la batterie peut maintenant
être chargée rapidement, cette méthode permet de récupérer des batteries
endommagées.
Protection en cas de situations anormales.
Chaque fois que le LED 6 s’allume une des situations anormales suivantes est
réalisée:
Court-circuit, tension de la batterie inférieure à 7,5V +/-0.5V, circuit ouvert ou erreur
de connexion en sortie. Le chargeur se coupe et ré-initialise le système pour éviter
des dégâts, sans autres instructions le système reste en attente.
Protection température
Pendant la charge, si la température du chargeur est trop haute, il réduit
automatiquement la puissance de sortie pour se protéger.
3)Etapes de charge:
Charge à courant constant: Le chargeur commence la charge avec le
courant choisi, jusqu’à ce que la tension de la batterie s’élève à 14,5V pour une
batterie de 12V. Pendant cette première période le courant de charge est constant.
L’étape de charge suivante est à tension constante.
Charge à tension constante: Le chargeur impose une tension
constante de 14.5V pour les batteries de 12V. Le courant de charge décroît
graduellement jusqu’à ce qu’il soit inférieur à 1A, on passe alors à l’étape suivante.
Etape de floating: La batterie est complètement chargée, elle est prête
à être utilisée, le chargeur impose une tension de sécurité, 13,2V pour des batteries
de 12V
‘4) Quand la charge est terminée commencer par débrancher l’alimentation 230V
puis débrancher les câbles reliant le chargeur à la batterie.
50 100
12V 4 Amp
Battery Charger
RoHS
compliant
STERLING
POWER
!
Power %
STAND
BY
MODE
9
10 456
78
3
21
Mode floating LED 4
La charge de la batterie est
terminée. Mode floating pour
maintenir la batterie
complétement
chargée.
Specifications Battery Load Tester.
Heavy duty leads and clamps.
125A test load.
Suitable for 1 x 12V battery per test, for
24-36V or larger simply split the battery
bank split down to 12V sections for test.
Battery from 200-1000 cold cranking
(CCA).
Battery from approx 30-140Ah rating.
Indicates extent of battery sulphation /
battery
condition.
Battery voltmeter.
High voltage load test safety trip at
13V.
Fast 10 second load tests (2 min wait
between tests).
Digital Battery Tester includes alternator and starter motor tests
What does the tester do?
Simply measuring battery voltage is not a true indication of the state of a battery. A battery test has 2 aspects to it:
There is the voltage of the battery (which is a rough indication if the battery is fully charged). Then, there is the ability
of the battery to hold and deliver the power it has stored. I.e the voltage could show the battery is fully charged but
the battery could be badly sulphated and useless. You need to test the voltage of the battery under a heavy load
condition.
The load test. Depending on the size of the battery, this product adds a very high load to the battery (125 A). The
battery should be able to deliver this load and hold the voltage up at the same time. If the battery is unable to deliver
the load (and sustain it for this time frame) then the battery is either defective or simply not fully charged when the
test was performed. This is why it is crucial to ensure the batteries are fully charged before the test is performed to
eliminate that possibility.
To test simply connect the unit to a 12V fully charger battery, adjust the CCA (cold cranking amps) on the screen up
to 999A, then press the load button and perform the 10 second test. The unit will inform you if the battery is good,
weak or bad.
The unit can also be used to measure the performance of the charging device (alternator / battery charger) - to
inform the user whether the charging device is good, weak or bad.
1000 amps cold cranking battery
140 amp hr battery
125 amp load
Digital battery tester
Size mm Weight Part number
280 L x 100 W x 120 D 630mm cable (handle to end of clamps) 1.1 kg DBT125
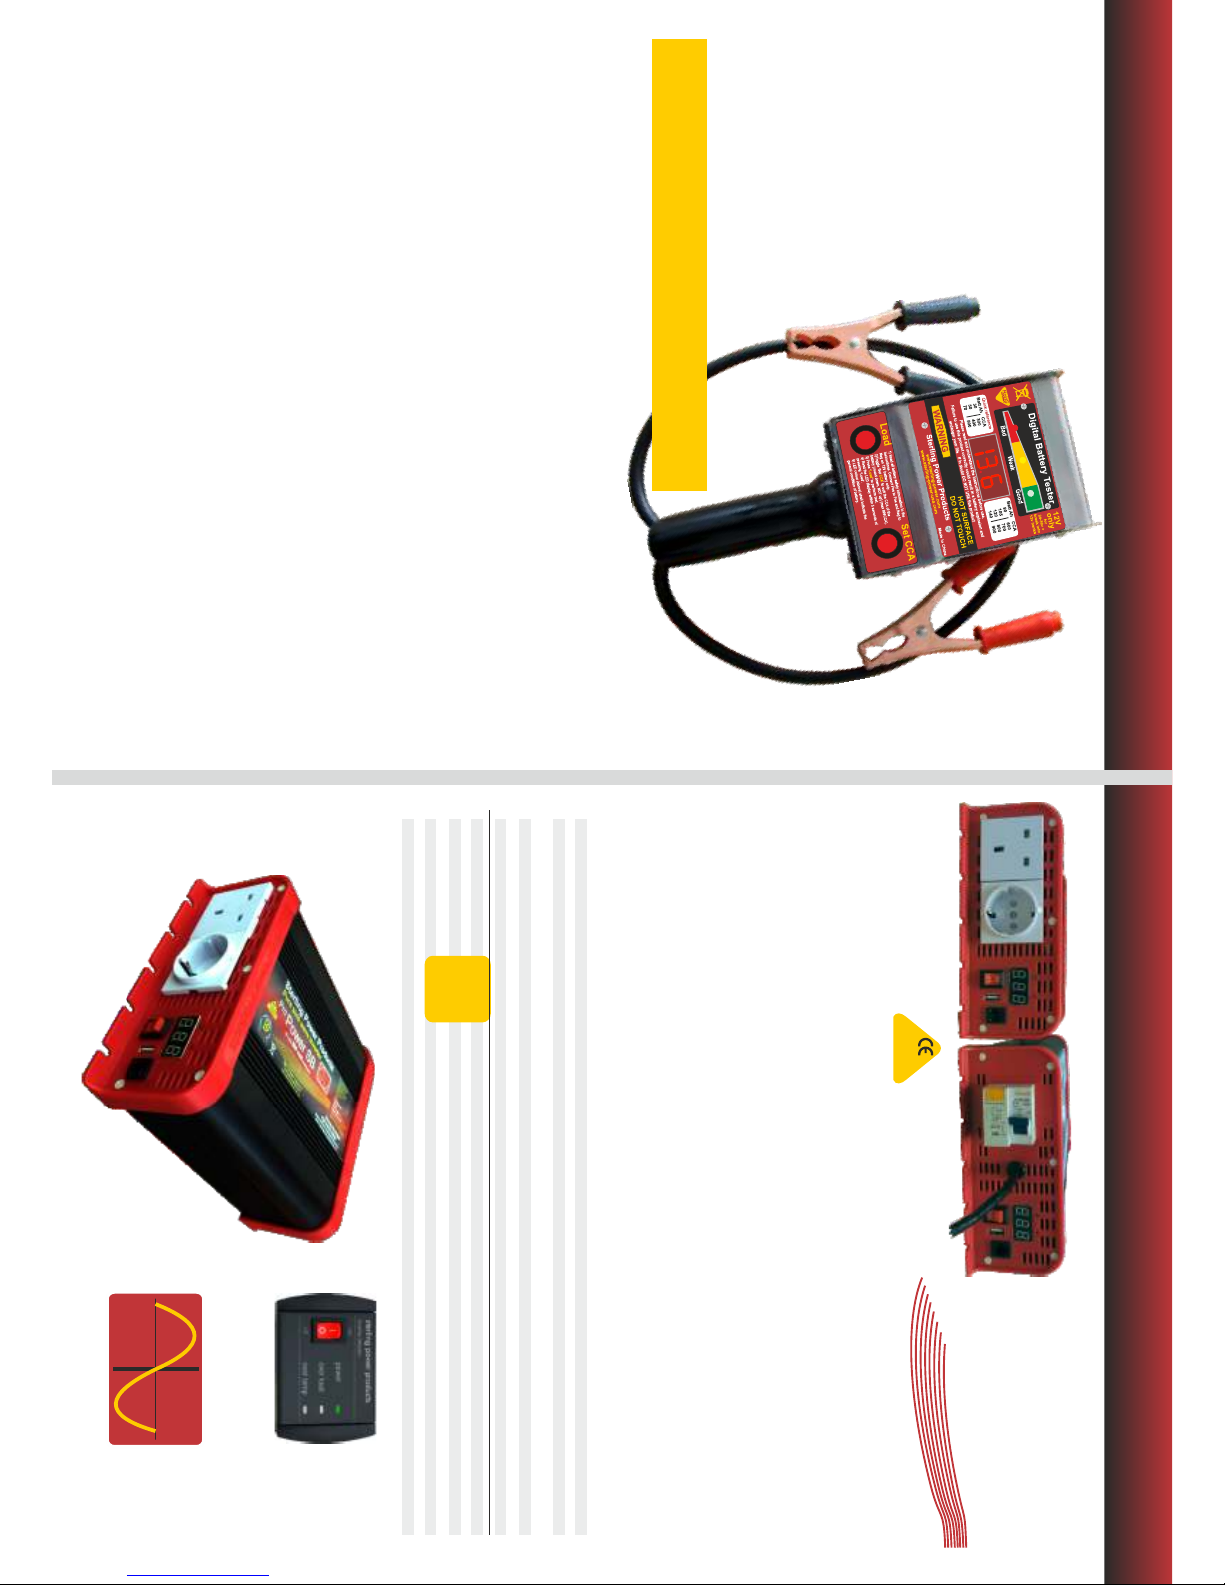
Pure Sine wave inverters with USB and RCD version
Pro Power SB (R)
Pure Sine Wave Inverters
- with Twin socket or built in RCD
- adjustable between Neutral Earth Bonding
Option 1
Twin socket
adjustable between
Centre tapped earth
and Neutral earth bonding
with USB charger
Optional remote control
Option 2
Pre-wired
RCD
Centre tapped earth &
Neutral earth bonded
with USB charger
Optional remote control
Model Centre tapped Earth Neutral earth bonded Remote Weight Size mm Cables Part number
12V 300 watt Twin sockets Interchangeable between both Optional extra 1.4 kg 190x85x210L 1m DC 8 mm ring SIB12300
12V 600 watt Twin sockets Interchangeable between both Optional extra 2.2 kg 190x85x250L 1m DC 8 mm ring SIB12600
12V 1000 watt Twin sockets Interchangeable between both Optional extra 2.0 kg 190x85x300L 1m DC 8 mm ring SIB121000
12V 1600 watt Twin sockets Interchangeable between both Optional extra 3.6 kg 190x85x300L 8 mm connection SIB121600
24V 300 watt Twin sockets interchangeable between both Optional extra 1.4 kg 190x85x210L 1m DC 8 mm ring SIB24300
24V 600 watt Twin sockets interchangeable between both Optional extra 2.2 kg 190x85x250L 1m DC 8 mm ring SIB24600
24V 1000 watt Twin sockets interchangeable between both Optional extra 2.0 kg 190x85x300L 1m DC 8 mm ring SIB241000
24V 1600 watt Twin sockets interchangeable between both Optional extra 3.6 kg 190x85x300L 8 mm connection SIB241600
12V 1000 watt with RCD Neutral earth bonded Optional extra 2.0 kg 190x85x300L 1m DC 8 mm ring SIBR121000
12V 1600 watt with RCD Neutral earth bonded Optional extra 3.6 kg 190x85x300L 8 mm connection SIBR121600
24V 1000 watt with RCD Neutral earth bonded Optional extra 2.0 kg 190x85x300L 1m DC 8 mm ring SIBR241000
24V 1600 watt with RCD Neutral earth bonded Optional extra 3.6 kg 190x85x300L 8 mm connection SIBR241600
Remote control ( fits all the above models ) 90x60x20 10 meter SWR
Pre-fitted
and wired
RCD option
with 1 meter
AC cable
RoHS
compliant
Pure
sine wave
output
Optional remote
with 10 metres cable
Range 300-1600 watt 12 & 24v
Rating Continuous

3A
6V & 12V
6A
6V & 12V
5A
6V & 12V
4A
12V
Charging RoHS
compliant
STERLING
POWER
12V 1 amp Battery Charger
Full
LED On Fault
Portable micro processor controlled chargers 230V AC 50 Hz only
Voltage DC Amperes AC Plug Size L x W x D mm Weight kg Part no
6 & 12 3 British 170 x 110 x 55 0.45 B123
6 & 12 3 Euro ( Schuko ) 170 x 110 x 55 0.45 E123
Portable micro processor controlled chargers 230V AC 50 Hz only
Voltage DC Amperes AC Plug Size L x W x D mm Weight kg Part no
6 & 12 4 British 160 x 60 x 45 0.6 B124
6 & 12 4 Euro ( Schuko ) 160 x 60 x 45 0.6 E124
Portable micro processor controlled chargers 230V AC 50 Hz only
Voltage DC Amperes AC Plug Size L x W x D mm Weight kg Part no
6 & 12 6 British 180 x 100 x 55 0.70 B126
6 & 12 6 Euro ( Schuko ) 180 x 100 x 55 0.62 E126
Portable micro processor controlled chargers 230V AC 50 Hz only
Voltage DC Amperes AC Plug Size L x W x D mm Weight kg Part no
6 & 12 5 British 180 x 100 x 55 0.62 B125
6 & 12 5 Euro ( Schuko ) 180 x 100 x 55 0.62 E125
6A 6V and 12V Battery charger Fully automatic microprocessor controlled.
ŸLED display, Can be set at 2A, 4A, or 6A for 6V and 12V batteries.
Ÿ2A Slow charge. For charging and maintaining small batteries. Charging
motorcycles, ATV, snowmobiles and lawn mower batteries.
Ÿ4A Medium charge. Self-adjusting charge rate. Ideal for everyday charging
needs and keeping your battery in peak condition.
Ÿ6A Fast charge. Charge monitor battery condition and adjusts charge rate
downwards to prevent battery damage. For cars, small trucks, motorcycles, lawn
mowers, other lead-acid and AGM batteries.
ŸAutomatically switches to float charger and maintenance when battery is fully
charged, battery rejuvenation pulse function. Includes de-sulphation protection.
ŸOverheat protection, short-circuit protection, reverse polarity protection, input
low voltage and over voltage protection.
5A 6V / 12V Battery charger: Fully automatic microprocessor controlled.
ŸLED display. Can be set at 1.2A, 2.5A, or 5.0A for 6V and 12V batteries.
ŸSuitable for all 100CCA-2000CCA lead-acid batteries.
ŸAutomatically switches to float charge and maintainer when battery is fully charged.
ŸBattery rejuvenation pulse function including de-sulphation protection.
ŸUser-friendly screen: LED displays charging status and error.
ŸOverheat protection, short-circuit protection, reverse polarity protection, input low voltage
and over voltage protection.
ŸCharges for car, RV, motorcycle and small engine batteries.
4A 12V Battery Charger: Fully automatic microprocessor controlled
ŸMicroprocessor controlled, ideal for 12V vehicles.
Ÿ5-stage intelligent charging characteristics.
ŸDe-sulphation protection
ŸGreat for WET, GEL, AGM and maintenance-free lead-acid batteries.
ŸWinter charging model can be chosen.
ŸContinuous maintenance charging function / battery rejuvenation pulse function.
ŸDiagnosis and rescue function for deeply discharged batteries as low as 7.5 V.
ŸConnection over-insulated charging clips or eyelets possible.
ŸSuitable for outdoor using, dustproof and splash-proof (IP 65).
ŸSafety functions including reverse polarity protection and short circuit.
ŸBattery capacity: 1.2 Ah-120 Ah.
3A 6V / 12V Battery charger: Fully automatic microprocessor controlled.
ŸLED display. Can be set at 1.2A, 2.5A, or 5.0A for 6V and 12V batteries.
ŸSuitable for all 100CCA-2000CCA lead-acid batteries.
ŸAutomatically switches to float charge and maintainer when battery is fully charged.
ŸBattery rejuvenation pulse function including de-sulphation protection.
ŸUser-friendly screen: LED displays charging status and error.
ŸOverheat protection, short-circuit protection, reverse polarity protection, input low voltage
and over voltage protection.
ŸCharges for car, RV, motorcycle and small engine batteries.
1A 12V Battery charger: Float charger and battery maintainer.
ŸLED display . User-friendly screen: LED indicates charging status, full, fault.
ŸFault diagnostic system.
ŸOver heat protection, short-circuit protection, reverse polarity protection.
ŸLow input voltage and over voltage protection.
ŸSuitable for use with long term storage off battery , ie lawn mower , boat. car ,over winter
Ÿconstant 13.9 volts
Small microprocessor controlled portable battery chargers
Inc battery maintenance, De-sulphation protection & battery rescue functions
Each model is available in Euro ( Schuko) or British socket,
simply select E or B in the part number ) Schuko
British
1A
12V
LED Flashing
Portable micro processor controlled chargers 230V AC 50 Hz only
Voltage DC Amperes AC Plug Size L x W x D mm Weight kg Part no
6 & 12 1 British 135 x50 x40 0.35 B121
6 & 12 1 Euro ( Schuko ) 135 x50 x40 0.35 E121
This manual suits for next models
1
Table of contents
Languages:
Other Sterling Power Batteries Charger manuals

Sterling Power
Sterling Power BBW1260 User manual

Sterling Power
Sterling Power Portable Battery Charger B121 User manual

Sterling Power
Sterling Power B127 User manual

Sterling Power
Sterling Power Pro Batt Ultra User manual

Sterling Power
Sterling Power Pro Batt Ultra User manual

Sterling Power
Sterling Power BB1224120 User manual

Sterling Power
Sterling Power BB1240 User manual

Sterling Power
Sterling Power BBWS1225 User manual

Sterling Power
Sterling Power Aquanautic 8A User manual

Sterling Power
Sterling Power BB1230 User manual


