Nidac 2 Series User manual
™PSC2
Combination Keypad & Prox Card Reader
“Series 2”
FEATURES
•Compatible with all NIDAC Presco controllers.
•Outputs Presco and wiegand data.
•Site code read from EM cards in wiegand mode is compatible with generic
EM wiegand prox readers.
•Reads HID 125kHz cards.
•Fully configurable for custom wiegand keypad modes.
•Uses long lasting tactile membrane with location pip on 5 key for visually
impaired users.
•Suitable for indoor usage only.
•Audible and visual (buzzer & LED) feedback of each key pressed and card
read.
•12V DC operation.
•17.5mm thin surfacemounting with hidden screws.
•Operating temperature range of 0ºC to 40ºC.
•5 year manufacturer’s warranty.
IMPORTANT DIFFERENCES BETWEEN THE PSC2 AND PSC16
•When used in wiegand mode the site code read from EM cards is different.
To make the Prove PSC2 read the same site code as the Presco PSC16
refer to the “Wiegand EM Card Proximity Reader Options” section and set
memory 060 to 121.
•Keypad (PIN) output in wiegand mode is defaulted to 4 bit burst for
enhanced compatibility with modern wiegand panels. To make the PSC2
output bit mode wiegand refer to the “Wiegand Keypad Options” section
and set memory 032 to 232.
•Standard 26 & 37 bit HID cards can be read, other HID formats will read
but the output of some cards may not match that of an HID reader.
SPECIFICATIONS
Voltage: 9V to 14V D.C.
Current: 150mA max.
Operating Temp: 0C to 50C.
Weight: 145 grams.
Dimensions: 126mm x 80mm x 17.5mm (H x W x D).
Read Range: Up to 20cm (8”).
Excitation Freq: 125 ± 5 KHz.
Keypad Output: Presco DTA, wiegand (up to 64 bit) or burst mode.
Prox Output: Presco DTA or wiegand.
Wiegand Output: Pulse width = 50s, pulse separation = 2ms.
Wiring Distance: PSC2 to Presco PAC controller = 1Km using unshielded
cable, 100max. return resistance on DTA line. To achieve
distances greater than 100m the PSC2 may require a
separate local power supply depending upon the thickness of
the cable used.
PSC2 to wiegand controller, shielded cable must be used.
Wire Gauge
Distance
Wire Gauge
Distance
22 AWG
150m (490 ft)
26 AWG
60m (195 ft)
24 AWG
100m (330 ft)
28 AWG
40m (130 ft)
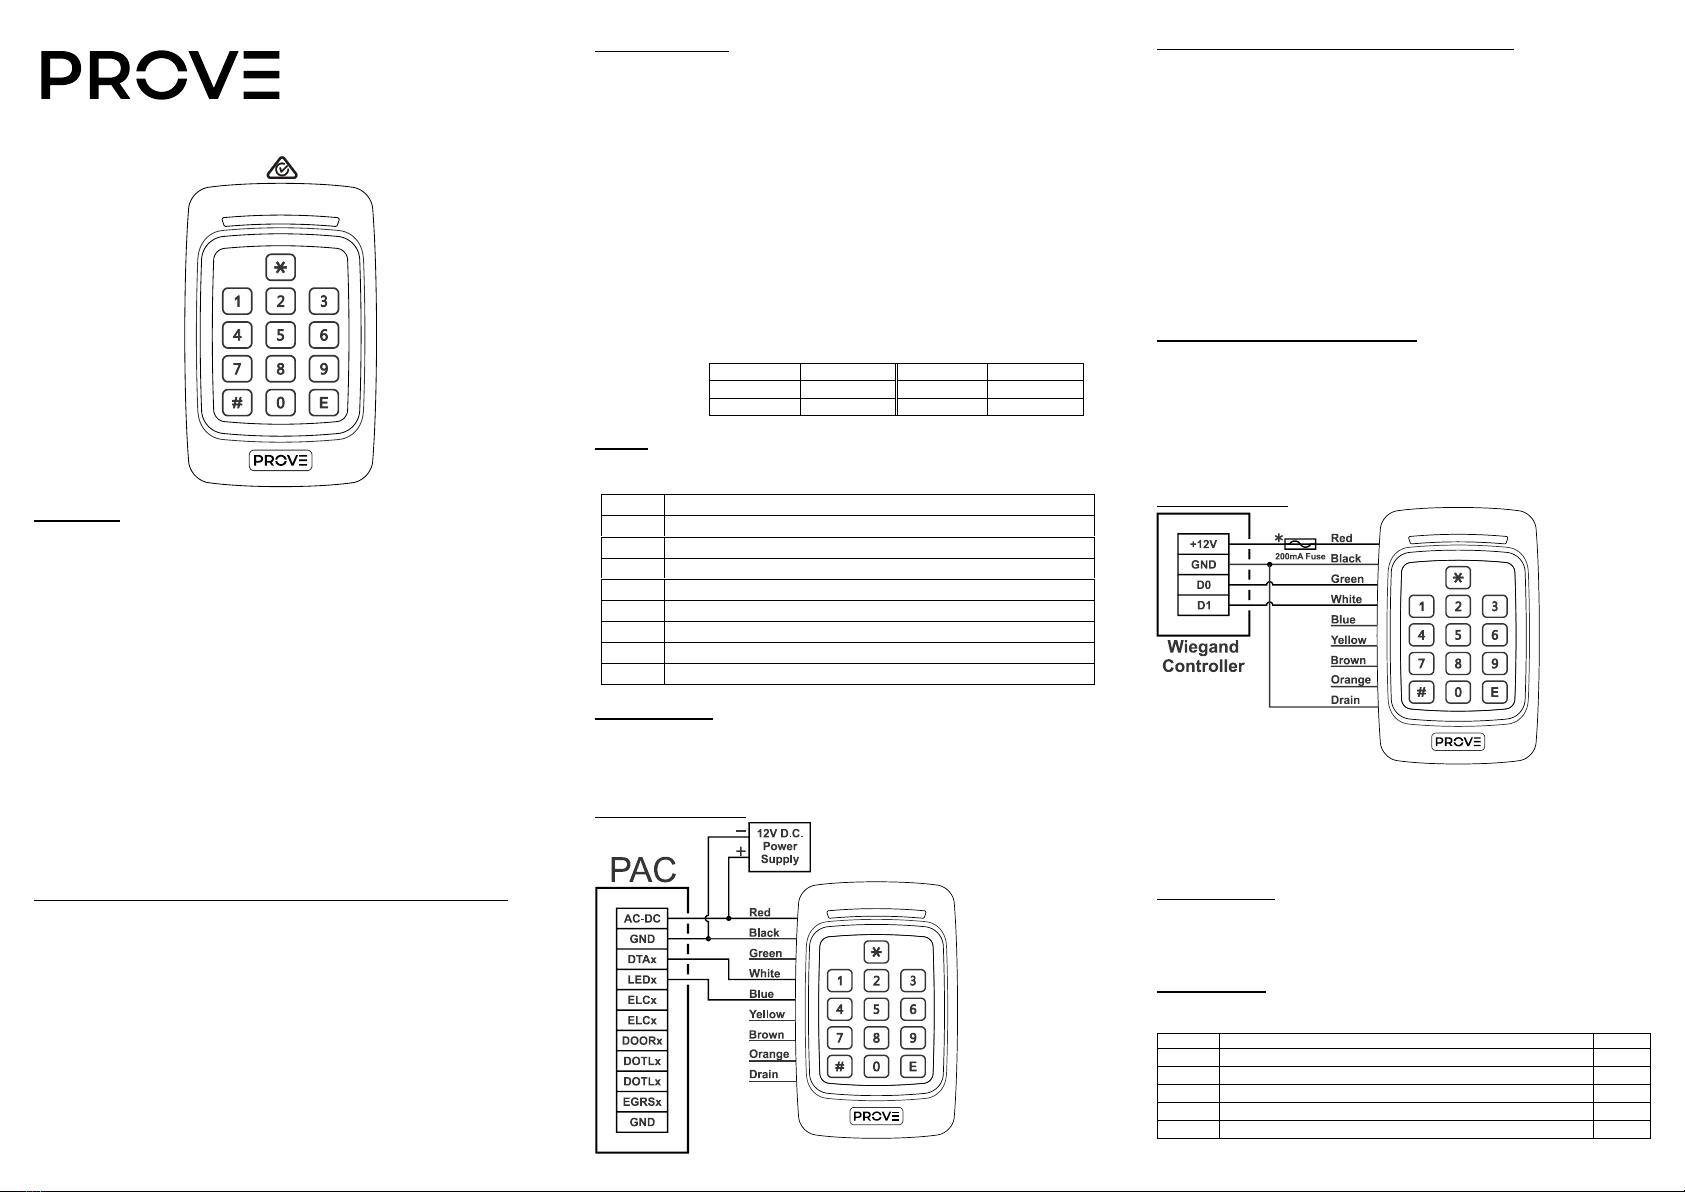
WIRES
There are 8 wires for the PSC2, not all will be needed for each installation. The
unused wires should always be terminated and left unconnected.
Black
0V (Ground).
Red
+12V D.C.
White
DTA (Presco data line) or D1 (Wiegand Data 1).
Green
D0 (Wiegand Data 0).
Blue
Blue LED control wire, +3V to +14V active.
Yellow
Blue LED control wire, 0V active.
Brown
Buzzer control wire, 0V active.
Orange
Connect to 0V (black wire) on power up to enter option setting mode.
Drain
Shield (in wiegandmode connect to earth/ground at controller).
INSTALLATION
1. Mark the location using supplied template and drill out required holes.
2. Remove the front fascia by inserting a wide flat bladed screwdriver into the
slot at the bottom of the unit and tilting the handle away from the front.
3. Attach the PSC2 to the wall using screws in the two oval mounting holes.
PSC2 TO PAC1 / PAC2
Programming Prox cards & tags into a PAC controller
To program a proximity card or tag into a PAC controller follow the same steps
as shown in the controller manual for programming a new user code. When it
comes to the stage to enter the user code simply present the card or tag to the
PSC2, or alternatively enter the 9 digit code for the proximity card, note that this
code may contain star (*) and hash (#) symbols and leading zeroes (0) do need
to be entered.
PAC1 Programming Example
This example uses a PAC1 controller, programming a momentary operation
proximity card or tag into memory location 001.
1. Put the PAC1 into program mode using the management code or button on
the PAC1.
2. Use the keypad on the PSC2 to open the memory location to store the Prox
card in * 001 1 E
3. Present the proximity card or tag to the PSC2.
4. Take the PAC1 controller out of program mode.
USING THE PSC2 WITH WIEGAND
The PSC2 can be used with any standard wiegand and most non-standard
wiegand controllers. The site (facility) code for the keypad can be set from the
keypad itself (refer to the Wiegand Keypad Options section) and the wiegand
data is fully configurable with up to 64 bits of data. The PSC2 also supports
controllers that require burst mode format wiegand.
To use the PSC2 in non burst wiegand mode, press the code then key. The
PSC2 can be set up to automatically send the code after a given number of key
presses by setting memory 007 (refer to the General Options section).
PSC2 TO WIEGAND
To change the LED colour from red to blue apply a negative signal (0 to 2V) to
the Yellow wire or a positive signal (2.5 to 28V) to the Blue wire.
To sound the buzzer apply a negative signal (0 to 2V) to the Brown wire.
* If a fused output for readers is not provided use a 200mA inline fuse to protect
the power supply from short circuiting if PSC2 wires are tampered with.
PSC2 OPTIONS
There are several options that can be set to alter the way in which the PSC2
behaves. These options fall into the 4 categories of General, Presco, Wiegand
Keypad and Wiegand EM Card Proximity Reader, all of these are explained
below.
General Options
These options set the functionality of the PSC2 independent of whether it is in
wiegand or Presco mode.
Memory
Function
Default
005
Force Presco or wiegand mode (1)
255
006
Key press timeout
10
007
Auto send key count (2)
0
200
Red LED brightness factor (3)
10
201
Blue LED brightness factor (3)
10

Revision 2
(1) - Force Presco or wiegand mode [Memory 005]
101 = Always in Presco mode.
202 = Always in wiegand mode.
All other values = Mode auto detected using white wire.
(2) - Auto send key count [Memory 007]
When this memory is set to a non-zero value the PSC2 will automatically send
the data after xkeys have been pressed, where x=value set for this memory.
Note: In Presco mode auto send is disabled if the first key pressed is a or .
(3) - LED brightness factor [Memories 200 & 201]
The red & blue LEDs can have their brightness individually set
1 = LEDs are at lowest brightness.
20 =LEDs are at full brightness.
Presco Options
These options set how the PSC2 operates when in Presco mode. It is unlikely
that these options will need to be changed.
Memory
Function
Default
010
Internal/External mode Presco keypad (4)
255
011
Process received DTA characters (5)
255
012
Presco proximity reader output format (standard or KC compatible) (6)
255
(4) - Internal/External mode Presco keypad [Memory 010]
101 = Internal mode keypad.
All other values = External mode keypad.
Note: When set to internal mode the two button Emergency () and One
Way Arm () features are enabled when used with a KC2 or KC6. This
setting has no effect when PSC2 is being used with a Presco PAC controller.
(5) - Process received DTA characters [Memory 011]
101 = Ignore all received DTA characters (PSC2 will not give beeps, warble, etc.
after final is pressed).
All other values = PSC2 will make beeps, warble, etc. for DTA characters
received after pressing the final key.
(6) - Presco proximity reader output format (standard PAC format or KC
compatible) [Memory 012]
101 = Presco output from the prox reader is 7 digit KC compatible as per a PIM
wiegand to Presco conversion (only works for 26 bit wiegand cards).
202 = Presco output from the prox reader is 7 digit KC compatible using the
lowest 7 digits of the 9 digit Presco PAC code.
All other values = Presco output from RFID is standard 9 digit PAC format.
Wiegand Keypad Options
These options set the format of the wiegand bit mode data sent by the keypad.
Up to 64 bits of data including a site code up to 32 bits can be configured.
Memory
Function
Default
020
Site code byte 3
0
021
Site code byte 2
0
022
Site code byte 1
0
023
Site code byte 0 (used for standard 8 bit site code)
1
024
Number of bits in site code (0 to 32)
8
025
Number of bits in user code (8 to 64)
16
026
Number of bits for start parity calculation (7)
12
027
Number of bits for end parity calculation (7)
12
028
Parity polarity (8)
2
029
Error handling (9)
255
032
Wiegand burst mode or bit mode (10)
255
033
Custom wiegand total number of bits (11)
255
034
Send LSB first (12)
255
035
Site code start bit number
255
036
User code start bit number
255
040
Default custom wiegand pattern byte 7 (13)
255
041
Default custom wiegand pattern byte 6 (13)
255
042
Default custom wiegand pattern byte 5 (13)
255
043
Default custom wiegand pattern byte 4 (13)
255
044
Default custom wiegand pattern byte 3 (13)
255
Memory
Function
Default
045
Default custom wiegand pattern byte 2 (13)
255
046
Default custom wiegand pattern byte 1 (13)
255
047
Default custom wiegand pattern byte 0 (13)
255
(7) - Number of bits for parity calculation [Memories 026, 027, 064 & 065]
Number of bits for parity calculation (0 = no parity bit, if the value is greater than
the total number of data bits (site code + user code bits) then it will use half the
total number of bits, for an odd number of bits the end parity will use 1 more bit).
(8) - Parity polarity [Memories 028 & 066]
0 = Start parity is Even, End parity is Even.
1 = Start parity is Odd, End parity is Even.
2 = Start parity is Even, End parity is Odd (default value).
3 = Start parity is Odd, End parity is Odd.
(9) - Error handling [Memory 029]
This memory specifies what information is sent via the wiegand interface when
a code entered is too large to be represented by the current wiegand format.
26 bit wiegand has a 16 bit user code which allows a max code number of 65535.
This memory determines what is sent when a number larger than this is entered.
101 = A code of 0 is sent.
202 = No information is sent, the keypad ignores the input.
All other values = The maximum allowable user code for thecurrentformat issent.
(10) - Wiegand burst mode or bit mode [Memory 032]
121 = 4 bit burst mode, , & keys data disabled.
202 = 8 bit burst mode, , & keys data enabled (= ).
212 = 8 bit burst mode, , & keys data disabled.
232 = bit mode (non burst) wiegand, default settings are for 26 bit.
All other values = 4 bit burst mode, , & keys data enabled (= ).
(11) - Custom wiegand total number of bits [Memory 033]
When this memory is set to a value from 8 to 64 it overrides the standard wiegand
format of start parity followed by site code then user code then end parity and
replaces it with a fully customisable format with a total number of bits (including
any parity bits) as specified in this memory.
Note that using this option requires a high understanding of wiegand data.
NIDAC will only offer limited support for this feature.
(12) - Send LSB first [Memory 034]
101 = LSB of data is sent first for both site and user code.
All other values = MSB of site and user code data sent first.
(13) - Default pattern bytes [Memories 040 to 047]
When the custom wiegand format is used by setting memory 033 then the data
in these memories is used to define the value for those bits not in use by the site
code, user code and parity bits. The data used starts from Bit 0 (LSB) in Default
Pattern byte 0 (memory 047), e.g. if the total number of bits is set to 24 then
Default Pattern bytes 2, 1 & 0 are used.
Wiegand EM Card Proximity Reader Options
These options set the format of the wiegand data sent by the PSC2 when it is in
wiegand mode and an EM RFID card or tag is being read.
Memory
Function
Default
060
26 bit wiegand EM card site code byte to use (14)
255
061
EM card custom wiegand format (15)
255
062
Number of bits in EM card site code (16)
8
063
Number of bits in EM card user code (16)
16
064
Number of bits for EM card start parity calculation (7)
255
065
Number of bits for EM card end parity calculation (7)
255
066
EM card parity polarity (8)
2
067
Data start bit from EM card for site code (17)
1
068
Data start bit from EM card for user code (17)
25
(14) - 26 bit wiegand EM card site code byte to use [Memory 060]
121 = Presco reader site code byte used.
202 = Alternate site code byte 2 used.
All other values = Generic EM reader compatible site code byte used.
(15) - EM card custom wiegand format [Memory 061]
101 = 34 bit wiegand (16 bit site code, 16 bit user code, even start & odd end
parity bits for 16 data bits each) using Presco data.
121 = 34 bit wiegand as above using alternate site code data bytes.
202 = Custom wiegand format as defined by memories 62 to 68.
All other values = Standard 26 bit wiegand`.
(16) - Number of bits in EM card site/ user code [Memories 062 & 063]
A maximum of 40 data bits can be set as a sum of these 2 memories. If the sum
exceeds 40 then the number of site code bits will be automatically reduced.
(17) - Data start bit from EM card [Memories 067 & 068]
There are 40 bits of data in an EM card organised as D00-D03, D10-D13, D20-
D23, D30-D33, D40-D43, D50-D53, D60-D63, D70-D73, D80-D83 and D90-D93.
Bit D00 is referred to as bit 1 for this memory and bit D93 as bit 40.
Ensure that when setting the start bit that there are enough bits after the start bit
for the number of bits set for the site or user code data.
SETTING OPTIONS VIA THE PSC2 KEYPAD
To set any of the above options the PSC2 first needs to be placed into option
setting mode, this is done by following the steps below:
1. Remove power from the PSC2.
2. Connect the Orange wire to 0V or hold down the key.
3. Reapply power.
4. Once the LED starts to double flash blue you are in option setting mode.
5. Disconnect the Orange wire or release the key.
6. The PSC2 will remain in option setting mode for 5 minutes from the last
option setting sequence attempted.
Setting an option memory value
<3 digit memory number> <1 to 3 digit value> .
Reset all option memories to factory defaults
whilst in option setting mode.
Exit Option Setting Mode
or wait 5 minutes after last option setting attempt.
NOTE: Remember to disconnect the orange wire from 0V so that the PSC2 will
not start up in option setting mode after a power cycle.
Set PSC2 keypad output to 26bit wiegand
<1 to 3 digit site code value>
Set PSC2 to read same EM card site code as PSC16
WARRANTY
NIDAC Pty Ltd will repair or replace this product if proven to be faulty (excluding
accidental or malicious damage) under the 5 year warranty offered from the date
of purchase.
As NIDAC Pty Ltd or its agents do not perform the final installation, inspection or
training in the use of this product, they cannot be held liable for injury, loss or
damage directly or consequentially arising from the use or misuse of this product.
Designed and manufactured by
NIDAC Pty Ltd
2 Cromwell Street
Burwood Victoria
Australia 3125
+61 3 9808 6244
www.nidac.com
This manual suits for next models
1
Other Nidac Card Reader manuals


Popular Card Reader manuals by other brands


NT-ware
NT-ware uniFLOW Release Station Configuration manual

Sony
Sony MRW62E-T2 operating instructions

CSL
CSL 304414 user manual

Infinite Peripherals
Infinite Peripherals INFINEA BLUEPAD quick start guide

Urban Factory
Urban Factory Connexion Kit user guide

Archos
Archos Jukebox Jukebox Multimedia quick start guide

GeoVision
GeoVision GV- DFR1352 installation guide

Omron
Omron FQ D30 Series instruction sheet

Rosewill
Rosewill RCR-IC001 user manual

Canyon
Canyon CNE-CARD2 quick guide

Simons Voss Technologies
Simons Voss Technologies SmartRelay3 SREL3 quick guide

Controlsoft
Controlsoft AC-1100-BK installation instructions