Nigos DVD-240 User manual

1
TABLE OF CONTENTS
1.
2.
3.
4.
5.
5.1
5.2
6.
6.1
6.2
6.3 HOLD
7. MAINTENANCE
8.
8.1 :
QUICK REFERENCE GUIDE
TECHNICAL SPECIFICATION
DESCRIPTION OF MOISTURE METER
TURNING METER ON / OFF AND AUTOCALIBRATION PROCEDURE
DEVICE SET-UP AND ADJUSTMENT FOR MEASUREMENT
9.1 Air temperature and relative humidity measurement procedure
WOOD DENSITY (TYPE) parameter setting
WOOD THICKNESS parameter setting
WOOD MOISTURE CONTENT MEASUREMENT
Timber MC measurement procedure
Veneer MC measurement procedure
function
AND BATTERY REPLACEMENT
APPENDIX
Appendix 1 Additional information regarding wood density and wood moisture content
8.2 Appendix 2: Wood density table
9. AIR TEMPERATURE AND RELATIVE HUMIDITY MEASUREMENT (OPTIONAL)
................................................................................................................... 2
................................................................................................................. 5
...................................................................................................... 6
.......................................................... 8
........................................................................ 10
................................................................................ 10
...................................................................................... 12
....................................................................................... 14
..................................................................................... 16
..................................................................................... 17
........................................................................................................................ 18
............................................................................................ 19
.......................................................................................................................................... 20
.... 20
............................................................................................. 21
................................................ 24
............................................ 25
DVD-240

DVD-240
2
1. Turning the meter ON
- Press the button briefly (back side untouched)
- Wait for autocalibration process to end and()
kal
to be displayed
0)0
1. QUICK REFERENCE GUIDE
0ff
HOLD
ON
OFF
UP/DOWN
mm
t
m
3
WOOD MOISTURE METER
kal
ON
OFF
ON
OFF
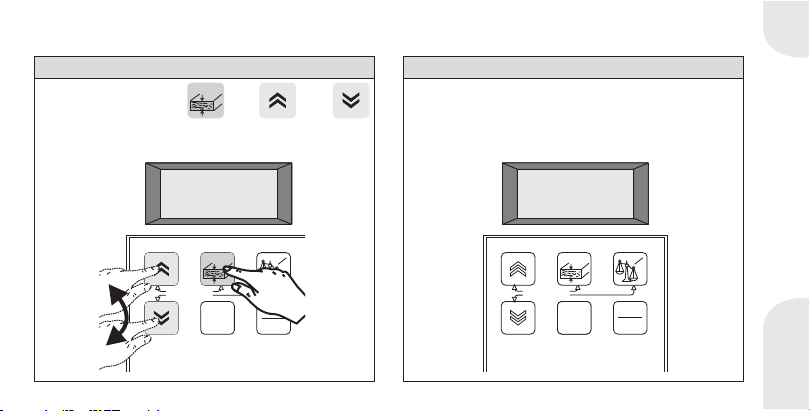
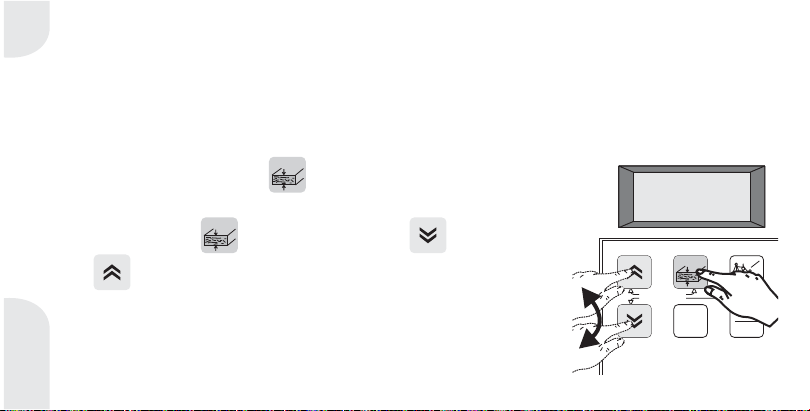
2. Wood density adjustment
- Press and hold button
to adjust timber density (given in t/ )m
3
t
m
3
; use and
)64
HOLD
ON
OFF
UP/DOWN
mm
t
m
3
WOOD MOISTURE METER
)64
t
m
3
DVD-240
3
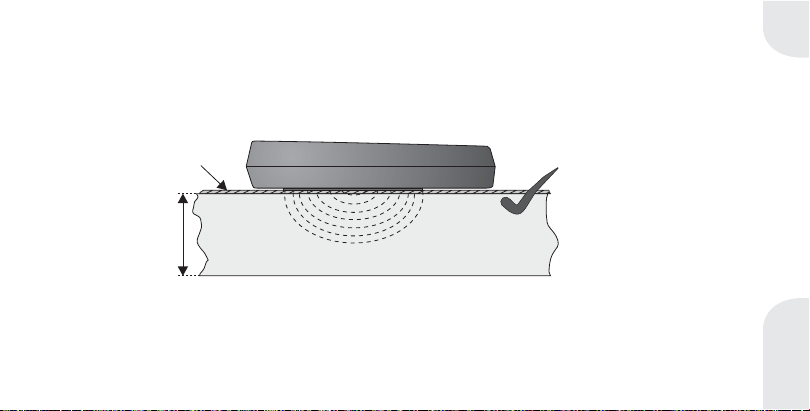
3. Wood thickness adjustment 4. Measurement - moisture content reading
- Gently press the back side of the meter on the flat
and smooth surface of wood sample "along fibers"
- Read the measured value on display (in %MC)
- Repeat the measurement in several points
- Press and hold button ; use and
to adjust wood thickness (given in mm)
mm
2#0
HOLD
ON
OFF
UP/DOWN
UP/DOWN
mm
t
m
3
WOOD MOISTURE METER
2#0
mm
)64
HOLD
ON
OFF
UP/DOWN
mm
t
m
3
WOOD MOISTURE METER
1%1
HOLD

DVD-240
4
5. Measurement - option HOLD
-
If needed, press briefly button to hold the
measured value displayed for later reading
- Press same button again to continue measuring
-
Press the button briefly
0ff
HOLD
HOLD
ON
OFF
UP/DOWN
mm
t
m
3
WOOD MOISTURE METER
0ff
ON
OFF
ON
OFF
6. Turning the meter OFF
HOLD
)64
HOLD
ON
OFF
UP/DOWN
mm
t
m
3
WOOD MOISTURE METER
&1
HOLD

DVD-240
2$0
HOLD
ON
OFF
UP/DOWN
mm
t
m
3
WOOD MOISTURE METER
DVD-240
5
2. TECHNICAL SPECIFICATION
GENERAL CHARACTERISTICS
Power supply
Operating conditions
Storage
Device dimensions W H
Sensor dimensions (W x H)
Weight
Display
(xxD)
9 V battery, Alkaline or NiCd Aku.
LCD, digital
80 x 140 x 40 (mm)
(mm)
T:550C;RH:590%
0
¸¸
¸¸T:-40 85 C;RH:5 90%
()
(42 x 78)
210 g
0
MEASUREMENT
Measurement resolution
Wood MC measurement range
Wood thickness range
Wood density range
0.1 %
(0.5 40) (mm)
(
(0 100) (%)
0.30 1.10) (t/m )
¸
¸
¸
3
OPEN
DVD-240
2$0
HOLD
ON
OFF
UP/DOWN
mm
t
m
3
WOOD MOISTURE METER
3. DESCRIPTION OF MOISTURE METER
1
4
5
68
7
6
DVD-240
2
3

7
Wood moisture content meter is made for
quick reading of wood moisture by simple pressing
on flat wooden surface.
There is a specially designed sensor plate on the
back side of the meter which measures wood MC
when pressed on the wood surface.
In order to achieve accurate measuring data using
this meter it is required to perform certain procedures
before measurement such as autocalibration and
basic parameter adjustments. Following chapters of
this manual will contain more information th
procedures.
DVD-240
Device is placed in the plastic case with large display
for indication of all measurement data and flat
keyboard for device control.
about ese
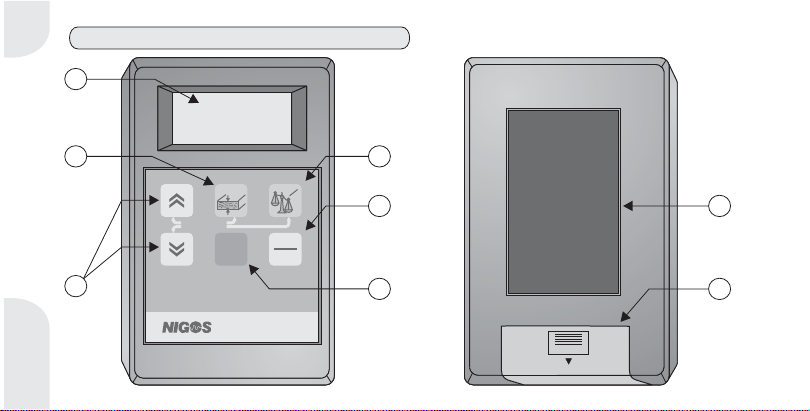
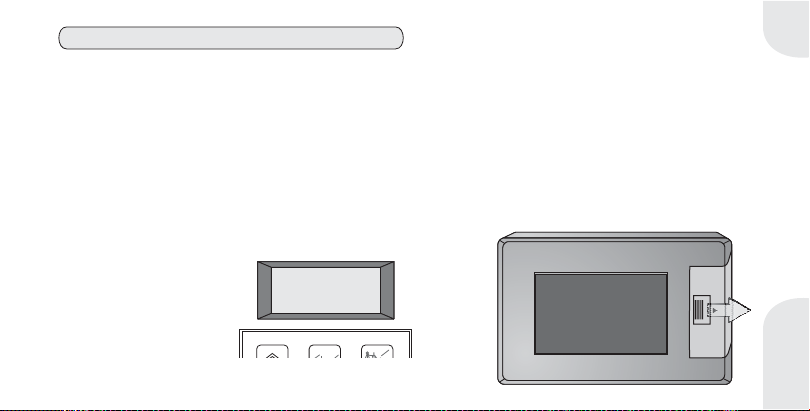
DVD-240 FRONT SIDE LAYOUT
LCD DISPLAY
WOOD THICKNESS
UP DOWN
WOOD DENSITY
ON / OFF
HOLD
DVD-240 BACK SIDE LAYOUT
SENSOR PLATE
1. displays:
- Measured moisture content
- Parameter values during set-up
- State and error massages
2. button
3. Buttons and used for increase or
decrease of value of selected parameter
4. button
5. Power button
6. button
7. measures moisture content when
pressed against smooth wood surface
8. Battery compartment
DVD-240

ON
OFF
8
4. TURNING METER ON / OFF AND AUTOCALIBRATION PROCEDURE
Turning the meter ON
It is essentially important to ensure that meter during autocalibration has
such position that sensor plate hangs free in the air, i.e. there is nothing
behind sensor plate blocking it! Do not hold fingers or other objects behind
sensor plate during autocalibration. Existence of any object near sensor
plate during autocalibration procedure can corrupt this process and result
in inaccurate measurement and measuring errors.
is performed with brief pressing on the button . Meter will perform certain additional
functions immediately after powering on. When the button is pressed, message
After a few seconds, when autocalibration procedure is finished, meter will
display: ,
kal
0)0
is displayed for few seconds.
During this time, meter is performing procedure, i.e. series of test-measurements
required for its adaptation to current operating conditions (ambient temperature, air humidity, etc).
which signals that it is ready for measurement or other adjustments.
Autocalibration procedure is performed each time the meter is powered ON,
which ensures reliability of measurement in all declared conditions.
DVD-240 AUTOCALIBRATION
0ff
HOLD
ON
OFF
UP/DOWN
mm
t
m
3
WOOD MOISTURE METER
kal
ON
OFF
DVD-240

9
ON
OFF
Turning meter OFF is performed with short pressing on the button .
Display will shortly display message
.
0ff
after which it will turn off.
When it is turned off, the meter does not consume energy from the
battery
If there is any doubt in measuring accuracy and possible error in autocalibration as a cause of false
measurement, autocalibration should be repeated by simple turning off and turning on the meter again.
Meter can detect large calibration errors itself. In this situation, after removing all objects away from back side
of the meter (so it "measures air"), message is displayed.
Ler
0ff
HOLD
ON
OFF
UP/DOWN
UP/DOWN
mm
t
m
3
WOOD MOISTURE METER
0ff
ON
OFF
DVD-240

10
5. DEVICE SET-UP AND ADJUSTMENT FOR MEASUREMENT
Correctly performed autocalibration upon powering the meter ON is not enough for accurate measurement.
It is required to set up the meter for specific type (i.e.. density) of timber as well as appropriate thickness of wooden
sample (board or veneer). This step during device set-up must not be forgotten because measured value greatly
depends on this parameter setting.
Once the parameters are set-up, they remain memorized and ready for use for next measurements (if the same
type of timber is tested), but parameter checking is suggested before each use.
Information regarding type of wood for MC measurement is given via for that type of wood.
That is why it is required to determine wood density in as precisely as possible. Wood density is most
commonly given as a table data for specific wood type (specie) when it is absolutely dry (with 0% MC).
Data regarding wood density of specific wood specie can be found in appendix of this manual, but other
reliable sources can be used.
Nondestructive portable moisture meter supports selection of WOOD DENSITY in range to
.
5.1 WOOD DENSITY (TYPE) parameter setting
WOOD DENSITY
DVD-240 0.30
1.10
t/
t/
t/
also
m
m
m
3
3
3
DVD-240
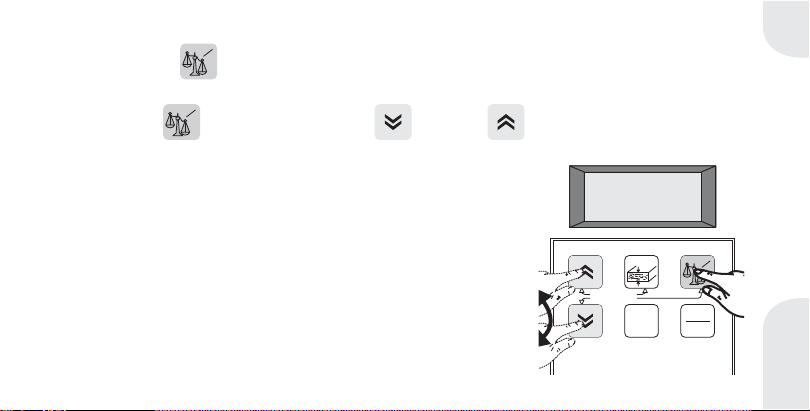
- ;
Press and hold button ( ). Device will display density value (in ) which was last enteredWOOD DENSITY
t/m
3
-
Holding the button pressed, press the buttons ( ) or ( ) to adjust desired value for
density. Long pressing on these buttons will provoke faster change of
parameter in desired direction;
- Release all buttons. After this, device will again display currently measured
wood moisture content.
DOWN UP
t
m
3
t
m
3
)64
HOLD
ON
OFF
UP/DOWN
mm
t
m
3
WOOD MOISTURE METER
)53
t
m
3
11
Wood density adjustment is performed in following way:
DVD-240
mm
mm
2#0
HOLD
HOLD
ON
OFF
UP/DOWN
UP/DOWN
mm
t
m
3
WOOD MOISTURE METER
3)0
mm
12
Second essential parameter for correct moisture content measurement is thickness of the wooden sample.
Measured MC value greatly depends on this parameter (especially when thinner samples are used - thinner than
15 mm), so it is required to determine the thickness as precise as possible. Value is entered in and in range
to .
5.2 WOOD THICKNESS parameter setting
mm
0.5 40 mm
- Press and hold pressed button ( ). Device will display
value (in mm) which was entered during last parameter set-up;
WOOD THICKNESS
- Keeping the button pressed, press the buttons ( )
or ( ) to adjust desired value.
DOWN
UP
Long pressing on these
buttons will provoke faster change of parameter in desired direction;
- Release all buttons. After this, device will again display currently measured
wood moisture content.
Thickness parameter setting is performed similar to wood density (type) parameter setting:
DVD-240

13
After these procedures, all needed parameters are loaded in meter's memory.
Once entered, these parameters remain stored in the memory and they are active until next adjustment.
In case there is no need to change these parameters frequently, it is enough just to check these values
before each measurement and proceed with measurement immediately.
DVD-240

14
6.
WOOD MOISTURE CONTENT MEASUREMENT
Wood moisture content measurement is main purpose f this device. Moisture content value is given in
percentage (%) and displayed on LC display.
Measurement process is very simple and comes to proper placing
of the meter on the surface of wooden sample and reading of displayed value.
P
-
o
(aside previously described adjustment)
roper placing of the meter on the surface of wooden sample means following:
longer side of sensor plate must be parallel to wood fibers
- wooden sample must be wider than sensor plate and entire surface of sensor plate must be laid on
wooden sample
OPEN
OPEN
DVD-240

15
Complete measurement procedure is performed in following way:
- Before the start of measurement turn the meter ON. Pay attention to autocalibration process which is performed
automatically immediately after powering the meter (chapter 4);
- Check parameter settings for and and correct the values if needed;
- Position the meter on the wooden sample (back side turned to sample), check if it is placed properly, gently press
the meter and take a reading.
It is recommended to take a reading in several points (if conditions allow it) to achieve best possible knowledge
of actual moisture content and its distribution throughout entire wooden sample.
After wood moisture content measurement is finished, turn the meter OFF in order to preserve battery.
WOOD DENSITY WOOD THICKNESS
DVD-240

16
-
-
6.1 Timber MC measurement procedure
For accurate MC measurement in timber boards following must be payed attention to:
Moisture distribution along depth of the board should be uniform (board surface must not be dried due to
exposure to direct sun light or during extensive drying. If necessary, cut the sample in half.
Place the board (sample) on wooden bars to avoid the influence of the ground on the measurement. Thick
piece of polystyrene (styropor) can be used instead of bars.
>50mm
DVD-240
17
Veneer MC measurement is very specific, so it is required to perform following preparation for accurate reading.
- Precisely determine sample thickness, because thickness parameter has great influence for thin samples.
- Place veneer sample on expanded polystyrene layer at least 50 mm thick (polystyrene does not influence
measuring!).
- Powering ON should be performed while meter is placed on the polystyrene layer (without veneer sample
beneath meter). Remove hands aside and avoid moving near the meter during autocalibration procedure.
- It is easure MC of multiple veneer layers (at least 3) with adequate thickness selection.
- In case veneer is already stacked, set the thickness to 40 mm (best is to avoid this kind of measurement).
6.2 Veneer MC measurement procedure
NOTES:
more accurate to m
>50mm
Polystyrene
Veneer
DVD-240

HOLD
HOLD
18
6.3
HOLD
function
HOLDFunction is very useful in cases where timber sample is partially unaccessible, so it is impossible to see the
display directly, but it is possible to reach the sample with the meter.
During measurement, after the meter is positioned properly and measurement conditions are stable, press
button. Meter will now freeze the measured value on the display, so it is readable even after the meter is
removed from the wooden sample.
Turning the "frozen" display OFF is performed in the same way like turning ON, with the press of the button .
DVD-240
7. MAINTENANCE AND BATTERY REPLACEMENT
Portable meter has plastic housing which under normal exploitation conditions provide necessary
mechanical firmness and protection. Rough manipulation, hitting and exposing the meter to extreme conditions
(high temperature, high humidity, offensive chemicals, high mechanical tensions, etc) should be avoided.
Do not open the device and perform unauthorized service because it can damage device and corrupt
measuring accuracy.
Do not place stickers or other materials on sensor plate because it will corrupt measuring accuracy.
Device is supplied by one standard 9V alkaline battery. It is placed inside the housing in separate battery com-
partment which can be accessed from the back side of device. When low battery is detected, "LO BAT" symbol
is displayed in upper left corner of the LC display.
Empty battery should be replaced with new one, same type.
DVD-240
19
kal
mm
t
m
3
1^9
LO BAT
DVD-240
OPEN
Table of contents
Other Nigos Measuring Instrument manuals


Popular Measuring Instrument manuals by other brands


Spirax Sarco
Spirax Sarco MTI10 Insertion Installation and maintenance instructions

ANDERSON-NEGELE
ANDERSON-NEGELE IZMSA operating manual

Leupold
Leupold GX-3 operating instructions

SPL-Laboratory
SPL-Laboratory Race Meter 2018 user manual

LaserLiner
LaserLiner PowerBright-Laser PBL P5 operating instructions

Drawell
Drawell DW-DI1500 user manual