Nikko Air RACE VISION 220 FPV User manual
14+
AIR
1.5V
(AA/LR6)
1.5V
(AA/LR6)
1.5V
(AA/LR6)
1.5V
(AA/LR6)
1.5V
(AA/LR6)
1.5V
(AA/LR6)
1.5V
(AA/LR6)
1.5V
(AA/LR6)
AB
D
E
G
H
J
I
F
C
TOY STATE INTERNATIONAL LIMITED
66 MODY ROAD, KOWLOON, HONG KONG
www.toystate.com
www.NikkoAir.com
Asst.
#22612
#22608
WHAT’S INCLUDED • WHAT’S INCLUDED • WHAT’S INCLUDED • WHAT’S INCLUDED •
WHAT’S INCLUDED • WHAT’S INCLUDED • WHAT’S INCLUDED • WHAT’S INCLUDED
FR DE ES
IT PT PL
NL
GB
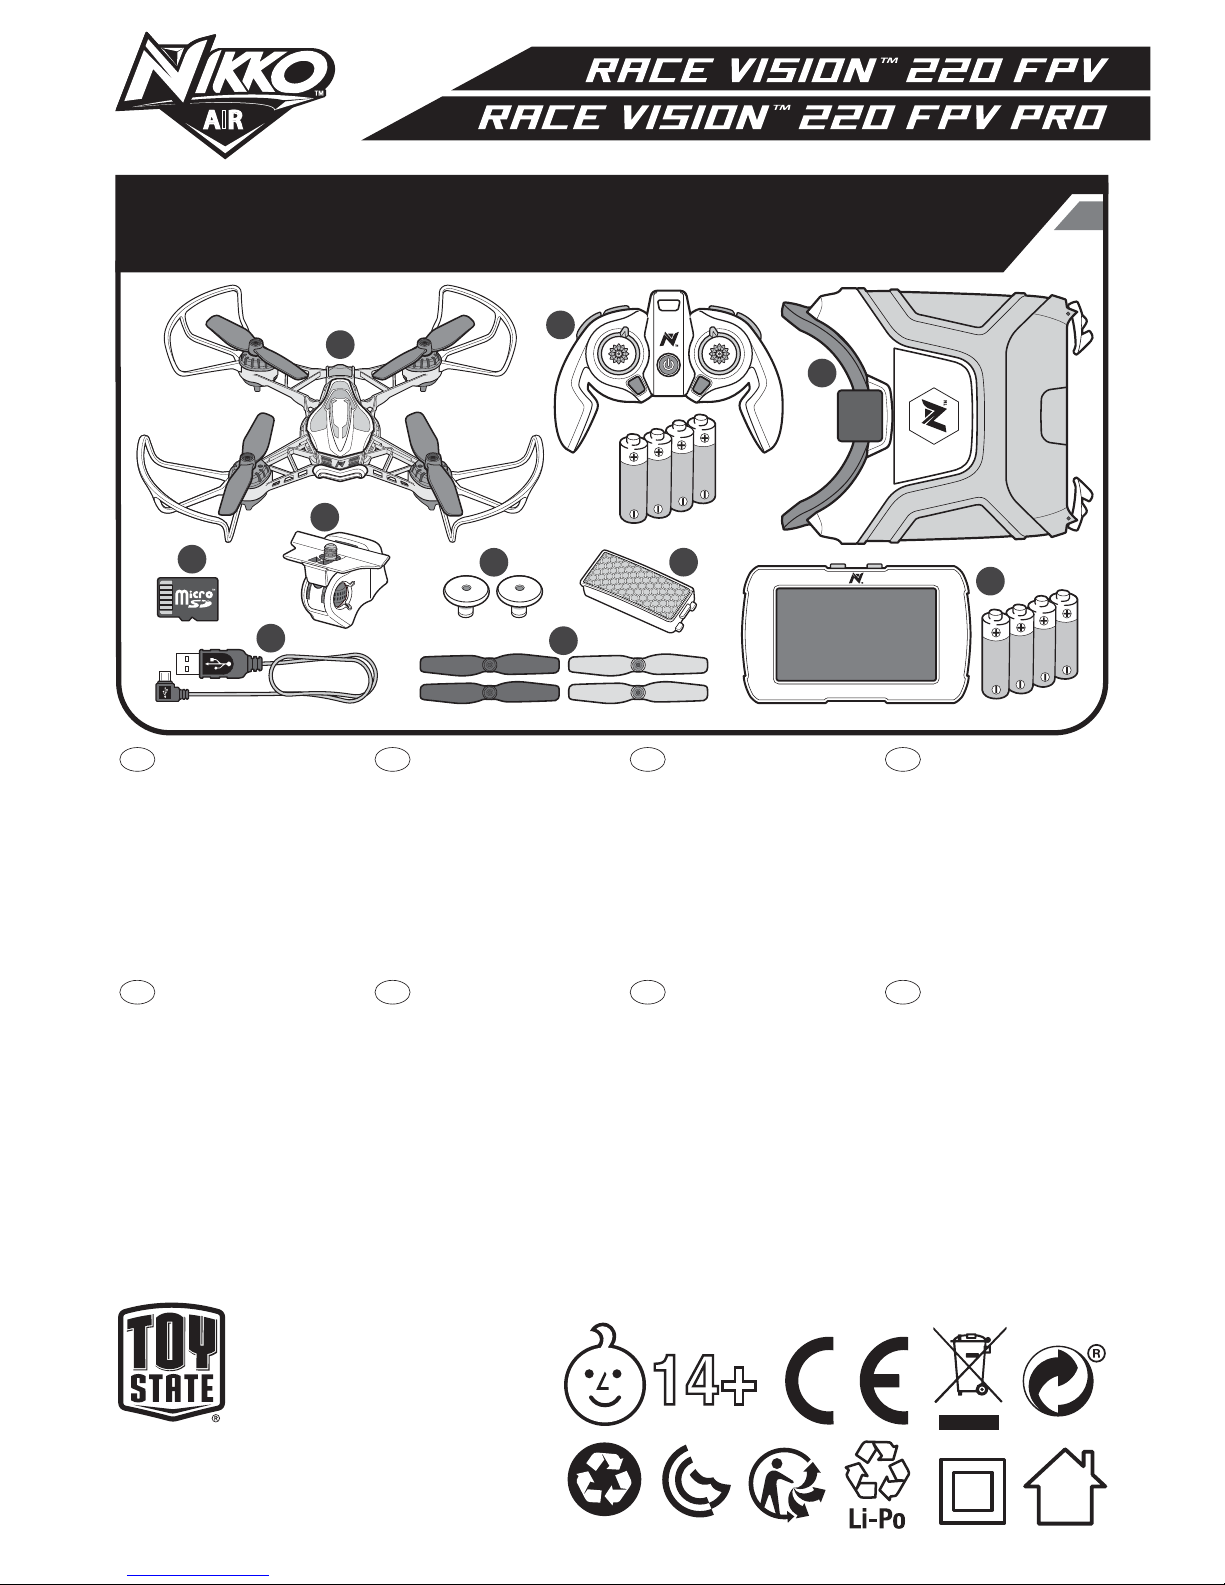
A. Drone
B. Controller + 4 AA batteries
C. FPV goggles
(included in #22608)
D. SD memory card
E. Screen holder
F. Joystick
G. Drone battery
H. USB charging cable
I. Replaceable propellers x 4
J. LCD screen + 4 AA batteries
A. Drone
B. Controller + 4 AA batteries
C. FPV goggles
(included in #22608)
D. SD memory card
E. Screen holder
F. Joystick
G. Drone battery
H. USB charging cable
I. Replaceable propellers x 4
J. LCD screen + 4 AA batteries
A. Drone
B. Controller + 4 AA batteries
C. FPV goggles
(included in #22608)
D. SD memory card
E. Screen holder
F. Joystick
G. Drone battery
H. USB charging cable
I. Replaceable propellers x 4
J. LCD screen + 4 AA batteries
A. Drone
B. Controller + 4 AA batteries
C. FPV goggles
(included in #22608)
D. SD memory card
E. Screen holder
F. Joystick
G. Drone battery
H. USB charging cable
I. Replaceable propellers x 4
J. LCD screen + 4 AA batteries
A. Drone
B. Controller + 4 AA batteries
C. FPV goggles
(included in #22608)
D. SD memory card
E. Screen holder
F. Joystick
G. Drone battery
H. USB charging cable
I. Replaceable propellers x 4
J. LCD screen + 4 AA batteries
A. Drone
B. Controller + 4 AA batteries
C. FPV goggles
(included in #22608)
D. SD memory card
E. Screen holder
F. Joystick
G. Drone battery
H. USB charging cable
I. Replaceable propellers x 4
J. LCD screen + 4 AA batteries
A. Drone
B. Controller + 4 AA batteries
C. FPV goggles
(included in #22608)
D. SD memory card
E. Screen holder
F. Joystick
G. Drone battery
H. USB charging cable
I. Replaceable propellers x 4
J. LCD screen + 4 AA batteries
A. Drone
B. Controller + 4 AA batteries
C. FPV goggles
(included in #22608)
D. SD memory card
E. Screen holder
F. Joystick
G. Drone battery
H. USB charging cable
I. Replaceable propellers x 4
J. LCD screen + 4 AA batteries
1.5V AA 1.5V AA
1.5V AA1.5V AA
1.5V AA
1.5V AA
1.5V AA
1.5V AA
MICRO USB
2
BATTERY INSTALLATION • BATTERY INSTALLATION • BATTERY INSTALLATION •
BATTERY INSTALLATION • BATTERY INSTALLATION • BATTERY INSTALLATION •
BATTERY INSTALLATION • BATTERY INSTALLATION
1
2
FR
DE
ES
IT
PT
PL
NL
GB
FR
DE
ES
IT
PT
PL
NL
GB
FR
DE
ES
IT
PT
PL
NL
GB
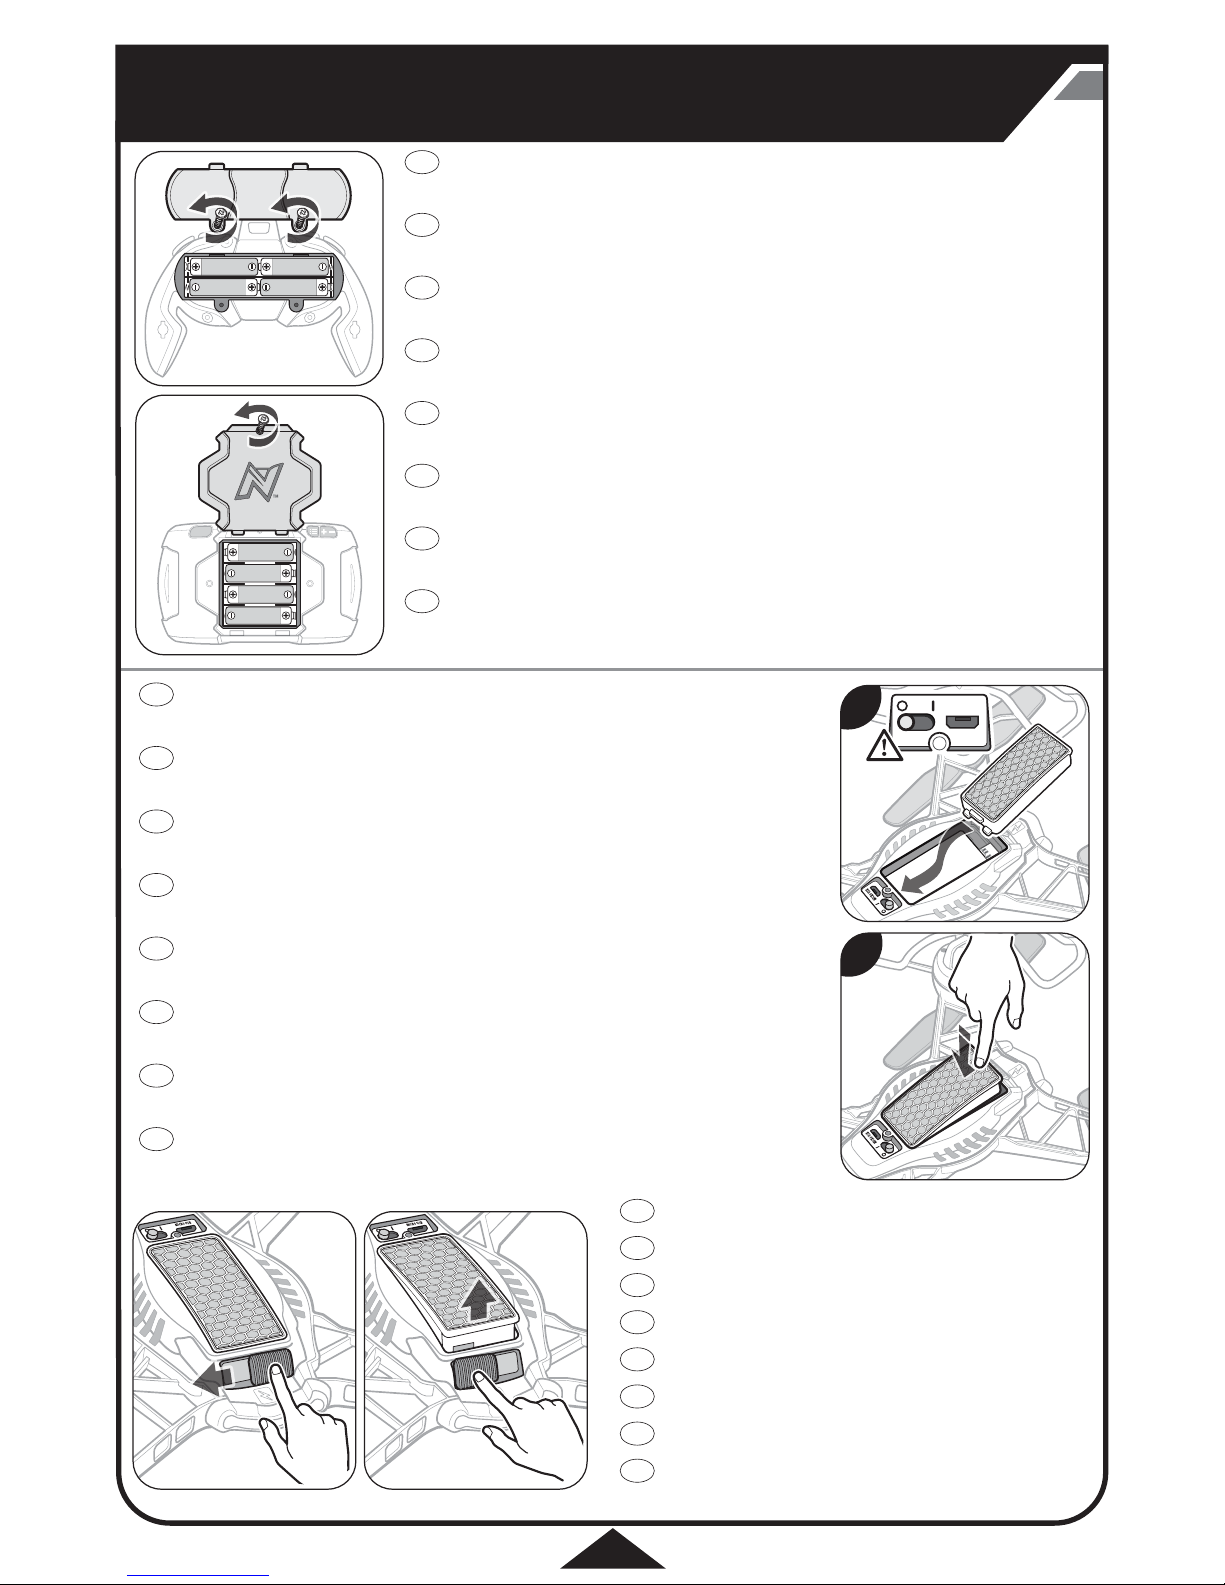
REMOVING THE BATTERY
• Slide the battery release tab to the left to disengage the battery from the drone.
REMOVING THE BATTERY
• Slide the battery release tab to the left to disengage the battery from the drone.
REMOVING THE BATTERY
• Slide the battery release tab to the left to disengage the battery from the drone.
REMOVING THE BATTERY
• Slide the battery release tab to the left to disengage the battery from the drone.
REMOVING THE BATTERY
• Slide the battery release tab to the left to disengage the battery from the drone.
REMOVING THE BATTERY
• Slide the battery release tab to the left to disengage the battery from the drone.
REMOVING THE BATTERY
• Slide the battery release tab to the left to disengage the battery from the drone.
REMOVING THE BATTERY
• Slide the battery release tab to the left to disengage the battery from the drone.
CONTROLLER & LCD SCREEN BATTERIES
Caution! Make sure they are in the o position (O) before inserting or removing the battery.
• Loosen the screws on the back of the controller and LCD screen with a Phillips screwdriver and insert batteries as shown.
• Replace door and tighten screws.
CONTROLLER & LCD SCREEN BATTERIES
Caution! Make sure they are in the o position (O) before inserting or removing the battery.
• Loosen the screws on the back of the controller and LCD screen with a Phillips screwdriver and insert batteries as shown.
• Replace door and tighten screws.
CONTROLLER & LCD SCREEN BATTERIES
Caution! Make sure they are in the o position (O) before inserting or removing the battery.
• Loosen the screws on the back of the controller and LCD screen with a Phillips screwdriver and insert batteries as shown.
• Replace door and tighten screws.
CONTROLLER & LCD SCREEN BATTERIES
Caution! Make sure they are in the o position (O) before inserting or removing the battery.
• Loosen the screws on the back of the controller and LCD screen with a Phillips screwdriver and insert batteries as shown.
• Replace door and tighten screws.
CONTROLLER & LCD SCREEN BATTERIES
Caution! Make sure they are in the o position (O) before inserting or removing the battery.
• Loosen the screws on the back of the controller and LCD screen with a Phillips screwdriver and insert batteries as shown.
• Replace door and tighten screws.
CONTROLLER & LCD SCREEN BATTERIES
Caution! Make sure they are in the o position (O) before inserting or removing the battery.
• Loosen the screws on the back of the controller and LCD screen with a Phillips screwdriver and insert batteries as shown.
• Replace door and tighten screws.
CONTROLLER & LCD SCREEN BATTERIES
Caution! Make sure they are in the o position (O) before inserting or removing the battery.
• Loosen the screws on the back of the controller and LCD screen with a Phillips screwdriver and insert batteries as shown.
• Replace door and tighten screws.
CONTROLLER & LCD SCREEN BATTERIES
Caution! Make sure they are in the o position (O) before inserting or removing the battery.
• Loosen the screws on the back of the controller and LCD screen with a Phillips screwdriver and insert batteries as shown.
• Replace door and tighten screws.
INSTALLING DRONE BATTERY
Caution! Make sure the drone is in the o position (O) before inserting or removing the battery.
1. Slide the battery in to place, prong end first.
2. Push downward on the back of the battery to connect.
INSTALLING DRONE BATTERY
Caution! Make sure the drone is in the o position (O) before inserting or removing the battery.
1. Slide the battery in to place, prong end first.
2. Push downward on the back of the battery to connect.
INSTALLING DRONE BATTERY
Caution! Make sure the drone is in the o position (O) before inserting or removing the battery.
1. Slide the battery in to place, prong end first.
2. Push downward on the back of the battery to connect.
INSTALLING DRONE BATTERY
Caution! Make sure the drone is in the o position (O) before inserting or removing the battery.
1. Slide the battery in to place, prong end first.
2. Push downward on the back of the battery to connect.
INSTALLING DRONE BATTERY
Caution! Make sure the drone is in the o position (O) before inserting or removing the battery.
1. Slide the battery in to place, prong end first.
2. Push downward on the back of the battery to connect.
INSTALLING DRONE BATTERY
Caution! Make sure the drone is in the o position (O) before inserting or removing the battery.
1. Slide the battery in to place, prong end first.
2. Push downward on the back of the battery to connect.
INSTALLING DRONE BATTERY
Caution! Make sure the drone is in the o position (O) before inserting or removing the battery.
1. Slide the battery in to place, prong end first.
2. Push downward on the back of the battery to connect.
INSTALLING DRONE BATTERY
Caution! Make sure the drone is in the o position (O) before inserting or removing the battery.
1. Slide the battery in to place, prong end first.
2. Push downward on the back of the battery to connect.

MAX.
5V 2.4A
60-180
60-180
mins.
3
CHARGING THE DRONE • CHARGING THE DRONE • CHARGING THE DRONE •
CHARGING THE DRONE • CHARGING THE DRONE • CHARGING THE DRONE •
CHARGING THE DRONE • CHARGING THE DRONE •
IT
PT
PL
NL
FR
DE
ES
GB
Caution! Make sure the drone is switched to the o position (O)
before charging.
1. Plug the USB cord into computer or USB power block (Max 5V 2.4 A).
2. Insert the charging port to drone.
Red light = charging
No light = charged
3. Once charged disconnect charging cord from the drone and power source.
Charging precautions
• After use allow drone to cool down to room temperature before charging.
• After charging battery pack will feel warm, this is normal.
1 2 3
• The toy is only to be connected to Class II equipment.
• Ce jouet ne doit être raccordé qu'à un appareil de
classe II.
• Das Spielzeug darf nur an Geräte der Klasse II
angeschlossen werden.
• El juguete sólo debe ser conectado al equipo de Clase II.
• Il giocattolo deve essere collegato solo ad un impianto
di Classe II.
• O brinquedo só deve ser ligado a equipamento de
Classe II.
• Het speelgoed mag alleen worden aangesloten op klasse
II apparatuur.
• Zabawkę należy podłączać wyłącznie do urządzeń
Klasy II.

ONE TOUCH STUNTS • ONE TOUCH STUNTS • ONE TOUCH STUNTS • ONE TOUCH STUNTS •
ONE TOUCH STUNTS • ONE TOUCH STUNTS • ONE TOUCH STUNTS • ONE TOUCH STUNTS
VARIABLE FLIGHT MODES • VARIABLE FLIGHT MODES • VARIABLE FLIGHT MODES • VARIABLE FLIGHT MODES •
VARIABLE FLIGHT MODES • VARIABLE FLIGHT MODES • VARIABLE FLIGHT MODES • VARIABLE FLIGHT MODES
THROTTLE STICK • THROTTLE STICK • THROTTLE STICK • THROTTLE STICK •
THROTTLE STICK • THROTTLE STICK • THROTTLE STICK • THROTTLE STICK
DIRECTIONAL STICK • DIRECTIONAL STICK • DIRECTIONAL STICK • DIRECTIONAL STICK •
DIRECTIONAL STICK • DIRECTIONAL STICK • DIRECTIONAL STICK • DIRECTIONAL STICK
VARIABLE SPEEDS • VARIABLE SPEEDS • VARIABLE SPEEDS • VARIABLE SPEEDS •
VARIABLE SPEEDS • VARIABLE SPEEDS • VARIABLE SPEEDS • VARIABLE SPEEDS
CROSS AXIS ROLLS EXÉCUTION DE
ROULEAUX AUTOUR
D'UN AXE TRANSVERSAL
ROLLEN ÜBER DIE
QUERACHSE
ROLLII INCROCIATIGIROS EN EJE
CRUZADO
ROLA SOBRE O EIXO DWARSAS ROLLEN BECZKI PO PRZEKĄTNEJ
FLIPS/ROLLS EXÉCUTION DE SAUTS
PÉRILLEUX/ROULEAUX SALTOS/ROLLEN CAPOVOLTE/ROLLIIGIROS/BUCLES GIRA/ROLA SALTO MAKEN/ROLLEN PRZEWROTY/BECZKI
360˚ SPINS TOURNOIEMENTS
À 360º
360º UMDREHUNGEN GIRI A 360ºGIROS EN 360° RODA A 360º 360º DRAAIEN WIROWANIE 360º
FUNNEL TURN VIRAGES INCLINÉS
À 360°
STEILE UMDREHUNG GIRI A IMBUTOGIROS EN EMBUDO CURVA COM
INCLINAÇÃO
TRECHTERVORMIG
DRAAIEN
PĘTLE POZIOME
PO ELIPSIE
2 STEP FLIPS/ROLLS 2 ÉTAPES EXÉCUTION
DE SAUTS PÉRILLEUX
/ROULEAUX
2 STUFEN SALTOS
/ROLLEN
2 PASSI CAPOVOLTE
/ROLLII
2 PASOS GIROS
/BUCLES
2 PASSOS GIRA/ROLA 2 STEPS SALTO MAKEN
/ROLLEN
2 KROK PRZEWROTY
/BECZKI
LIFTS THE DRONE OFF
THE GROUND. THE
FURTHER YOU PUSH
THE STICK THE FASTER
THE DRONE LIFTS
LIFTS THE DRONE OFF
THE GROUND. THE
FURTHER YOU PUSH
THE STICK THE FASTER
THE DRONE LIFTS
LIFTS THE DRONE OFF
THE GROUND. THE
FURTHER YOU PUSH
THE STICK THE FASTER
THE DRONE LIFTS
LIFTS THE DRONE OFF
THE GROUND. THE
FURTHER YOU PUSH
THE STICK THE FASTER
THE DRONE LIFTS
LIFTS THE DRONE OFF
THE GROUND. THE
FURTHER YOU PUSH
THE STICK THE FASTER
THE DRONE LIFTS
LIFTS THE DRONE OFF
THE GROUND. THE
FURTHER YOU PUSH
THE STICK THE FASTER
THE DRONE LIFTS
LIFTS THE DRONE OFF
THE GROUND. THE
FURTHER YOU PUSH
THE STICK THE FASTER
THE DRONE LIFTS
LIFTS THE DRONE OFF
THE GROUND. THE
FURTHER YOU PUSH
THE STICK THE FASTER
THE DRONE LIFTS
THE FURTHER YOU
PUSH THE STICK THE
FASTER THE DRONE
WILL FLY IN THAT
DIRECTION
THE FURTHER YOU
PUSH THE STICK THE
FASTER THE DRONE
WILL FLY IN THAT
DIRECTION
THE FURTHER YOU
PUSH THE STICK THE
FASTER THE DRONE
WILL FLY IN THAT
DIRECTION
THE FURTHER YOU
PUSH THE STICK THE
FASTER THE DRONE
WILL FLY IN THAT
DIRECTION
THE FURTHER YOU
PUSH THE STICK THE
FASTER THE DRONE
WILL FLY IN THAT
DIRECTION
THE FURTHER YOU
PUSH THE STICK THE
FASTER THE DRONE
WILL FLY IN THAT
DIRECTION
THE FURTHER YOU
PUSH THE STICK THE
FASTER THE DRONE
WILL FLY IN THAT
DIRECTION
THE FURTHER YOU
PUSH THE STICK THE
FASTER THE DRONE
WILL FLY IN THAT
DIRECTION
HIGH SPEEDHIGH SPEED HIGH SPEED HIGH SPEED HIGH SPEED HIGH SPEED HIGH SPEED HIGH SPEED
MID SPEEDMID SPEED MID SPEED MID SPEED MID SPEED MID SPEED MID SPEED MID SPEED
LOW SPEEDLOW SPEED LOW SPEED LOW SPEED LOW SPEED LOW SPEED LOW SPEED LOW SPEED
POWER ON/OFFPOWER ON/OFF POWER ON/OFF POWER ON/OFF POWER ON/OFF POWER ON/OFF POWER ON/OFF POWER ON/OFF
TRIM ADJUSTMENTTRIM ADJUSTMENT TRIM ADJUSTMENT TRIM ADJUSTMENT TRIM ADJUSTMENT TRIM ADJUSTMENT TRIM ADJUSTMENT TRIM ADJUSTMENT
CHANNEL SELECTORCHANNEL SELECTOR CHANNEL SELECTOR CHANNEL SELECTOR CHANNEL SELECTOR CHANNEL SELECTOR CHANNEL SELECTOR CHANNEL SELECTOR
MANUAL MODE -
MANUAL FLYING
MANUAL MODE -
MANUAL FLYING
MANUAL MODE -
MANUAL FLYING
MANUAL MODE -
MANUAL FLYING
MANUAL MODE -
MANUAL FLYING
MANUAL MODE -
MANUAL FLYING
MANUAL MODE -
MANUAL FLYING
MANUAL MODE -
MANUAL FLYING
NIKKO MODE - GREAT
FOR BEGINNERS
NIKKO MODE - GREAT
FOR BEGINNERS
NIKKO MODE - GREAT
FOR BEGINNERS
NIKKO MODE - GREAT
FOR BEGINNERS
NIKKO MODE - GREAT
FOR BEGINNERS
NIKKO MODE - GREAT
FOR BEGINNERS
NIKKO MODE - GREAT
FOR BEGINNERS
NIKKO MODE - GREAT
FOR BEGINNERS
ADVANCED MODE -
STABILIZED
ADVANCED MODE -
STABILIZED
ADVANCED MODE -
STABILIZED
ADVANCED MODE -
STABILIZED
ADVANCED MODE -
STABILIZED
ADVANCED MODE -
STABILIZED
ADVANCED MODE -
STABILIZED
ADVANCED MODE -
STABILIZED
4
FLIGHT CONTROLS • FLIGHT CONTROLS • FLIGHT CONTROLS • FLIGHT CONTROLS •
FLIGHT CONTROLS • FLIGHT CONTROLS • FLIGHT CONTROLS • FLIGHT CONTROLS
1
2
MICRO USB
5
SYNCING CONTROLLER TO DRONE • SYNCING CONTROLLER TO DRONE •
SYNCING CONTROLLER TO DRONE • SYNCING CONTROLLER TO DRONE •
SYNCING CONTROLLER TO DRONE • SYNCING CONTROLLER TO DRONE •
SYNCING CONTROLLER TO DRONE • SYNCING CONTROLLER TO DRONE
GB
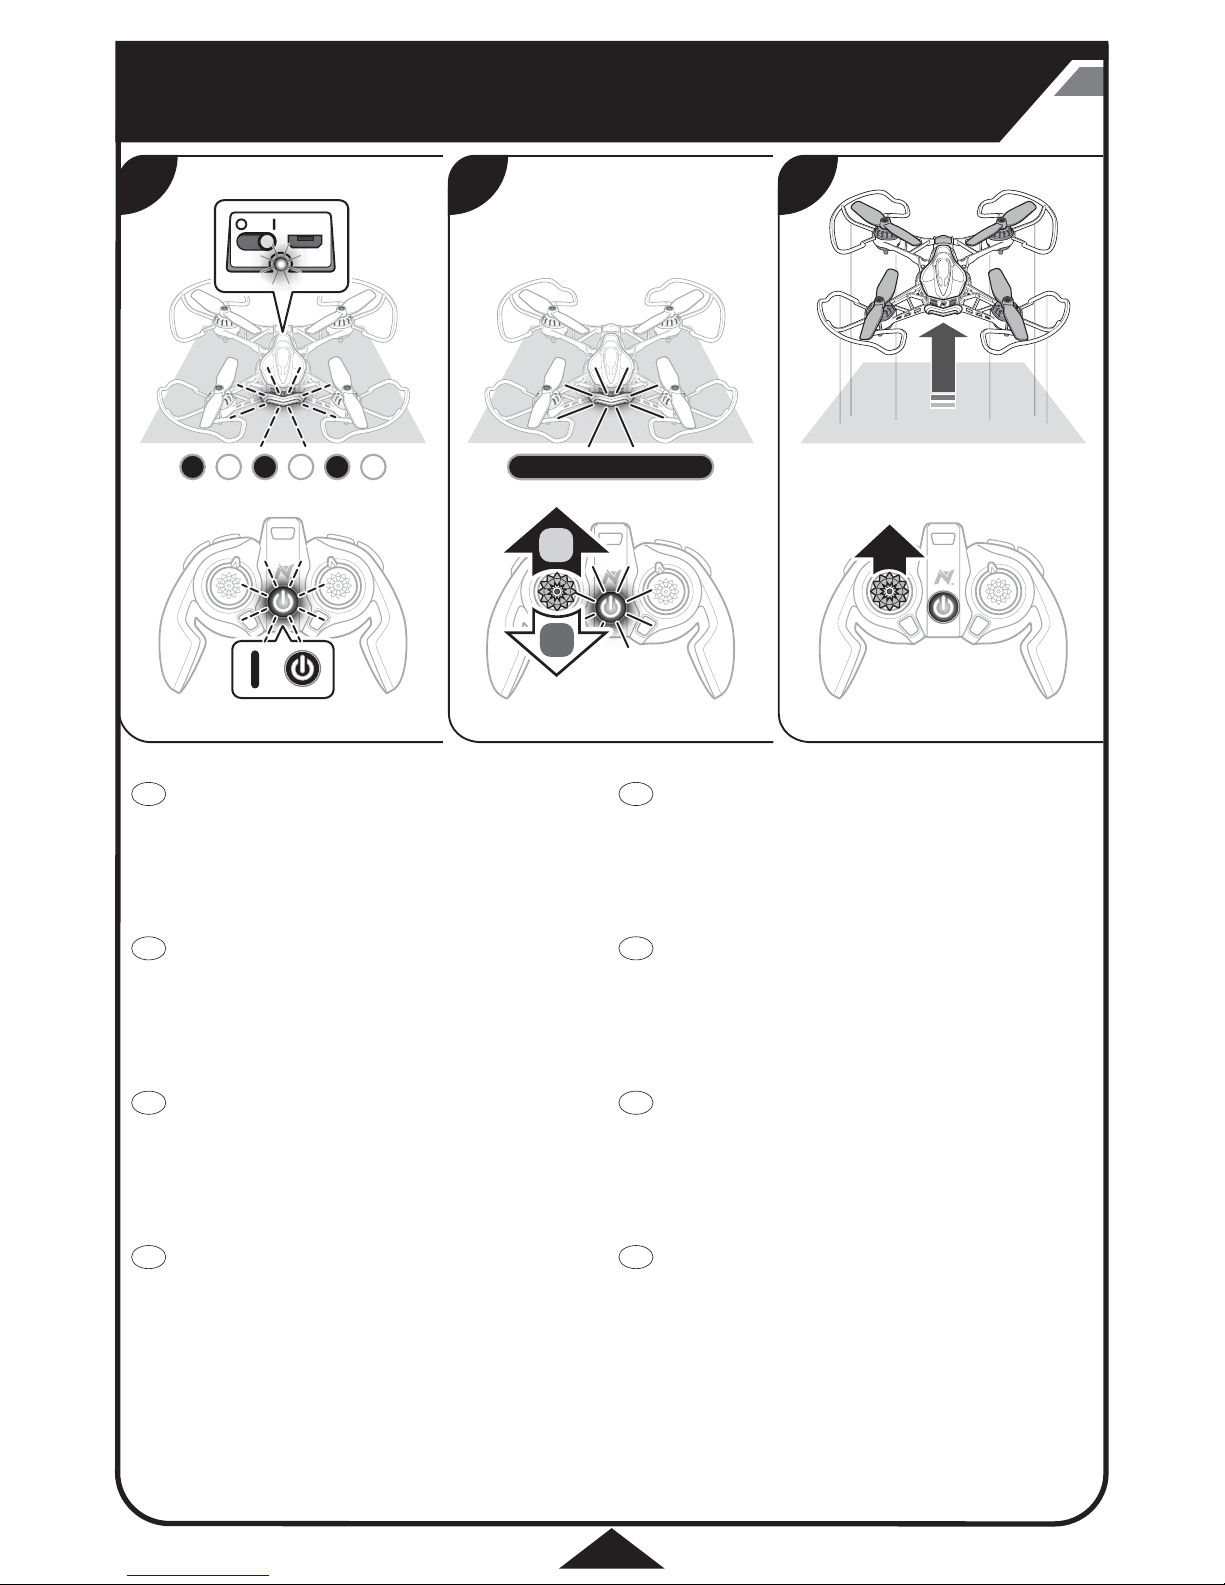
1. Turn on remote, light will blink. Turn on the drone (I) light will blink rapidly.
Place drone on a flat surface.
2. Push throttle stick upward, then downward. The light on controller
and drone will turn solid.
3. The controller and drone are now synced. Gently push the throttle upward to
lift off the ground.
NOTE
• If you don’t fly within 5 seconds of syncing the drone or if you collide with an
object the drone will disarm .
• You need to sync the controller to the drone. Follow steps 1-3 above.
21 3
FR
DE
ES
IT
PT
PL
NL

75%
50%
100%
6
VARIABLE FLIGHT MODES • VARIABLE FLIGHT MODES • VARIABLE FLIGHT MODES •
VARIABLE FLIGHT MODES • VARIABLE FLIGHT MODES • VARIABLE FLIGHT MODES •
VARIABLE FLIGHT MODES • VARIABLE FLIGHT MODES •
• Adjust the flight controls to match your skill level.
• It’s best to start in Nikko Mode + Speed 1 until you have mastered flying.
• Adjust the flight controls to match your skill level.
• It’s best to start in Nikko Mode + Speed 1 until you have mastered flying.
• Adjust the flight controls to match your skill level.
• It’s best to start in Nikko Mode + Speed 1 until you have mastered flying.
• Adjust the flight controls to match your skill level.
• It’s best to start in Nikko Mode + Speed 1 until you have mastered flying.
GB
FR
DE
ES
• Adjust the flight controls to match your skill level.
• It’s best to start in Nikko Mode + Speed 1 until you have mastered flying.
• Adjust the flight controls to match your skill level.
• It’s best to start in Nikko Mode + Speed 1 until you have mastered flying.
• Adjust the flight controls to match your skill level.
• It’s best to start in Nikko Mode + Speed 1 until you have mastered flying.
• Adjust the flight controls to match your skill level.
• It’s best to start in Nikko Mode + Speed 1 until you have mastered flying.
IT
PT
PL
NL

360
RZR
R
ZL L
R
R
ZL
360
2x2x
ZR
L
7
ONE TOUCH STUNTS • ONE TOUCH STUNTS • ONE TOUCH STUNTS • ONE TOUCH STUNTS •
ONE TOUCH STUNTS • ONE TOUCH STUNTS • ONE TOUCH STUNTS • ONE TOUCH STUNTS •
GB
FR
DE
ES
IT
PT
PL
NL
• FLIPS/ROLLS
• FLIPS/ROLLS
• FLIPS/ROLLS
• FLIPS/ROLLS
• FLIPS/ROLLS
• FLIPS/ROLLS
• FLIPS/ROLLS
• FLIPS/ROLLS
• CROSS AXIS ROLLS
• CROSS AXIS ROLLS
• CROSS AXIS ROLLS
• CROSS AXIS ROLLS
• CROSS AXIS ROLLS
• CROSS AXIS ROLLS
• CROSS AXIS ROLLS
• CROSS AXIS ROLLS
• FUNNEL TURN
• FUNNEL TURN
• FUNNEL TURN
• FUNNEL TURN
• FUNNEL TURN
• FUNNEL TURN
• FUNNEL TURN
• FUNNEL TURN
• 2 STEP FLIPS/ROLLS
• 2 STEP FLIPS/ROLLS
• 2 STEP FLIPS/ROLLS
• 2 STEP FLIPS/ROLLS
• 2 STEP FLIPS/ROLLS
• 2 STEP FLIPS/ROLLS
• 2 STEP FLIPS/ROLLS
• 2 STEP FLIPS/ROLLS
• 360˚ SPINS
• 360˚ SPINS
• 360˚ SPINS
• 360˚ SPINS
• 360˚ SPINS
• 360˚ SPINS
• 360˚ SPINS
• 360˚ SPINS
Caution! Before using the stunt button, make sure to y at least 6 feet (2m) in the air with at least 6 feet clearance in all directions.
Caution! Before using the stunt button, make sure to y at least 6 feet (2m) in the air with at least 6 feet clearance in all directions.
Caution! Before using the stunt button, make sure to y at least 6 feet (2m) in the air with at least 6 feet clearance in all directions.
Caution! Before using the stunt button, make sure to y at least 6 feet (2m) in the air with at least 6 feet clearance in all directions.
Caution! Before using the stunt button, make sure to y at least 6 feet (2m) in the air with at least 6 feet clearance in all directions.
Caution! Before using the stunt button, make sure to y at least 6 feet (2m) in the air with at least 6 feet clearance in all directions.
Caution! Before using the stunt button, make sure to y at least 6 feet (2m) in the air with at least 6 feet clearance in all directions.
Caution! Before using the stunt button, make sure to y at least 6 feet (2m) in the air with at least 6 feet clearance in all directions.

8
FPV SCREEN CONTROLLER MOUNT • FPV SCREEN CONTROLLER MOUNT •
FPV SCREEN CONTROLLER MOUNT • FPV SCREEN CONTROLLER MOUNT •
FPV SCREEN CONTROLLER MOUNT • FPV SCREEN CONTROLLER MOUNT •
FPV SCREEN CONTROLLER MOUNT • FPV SCREEN CONTROLLER MOUNT
1. Insert the locking tab on the controller mount into the slot on the controller .
2. Press down firmly until the mount is flush to the controller.
3. Turn the controller over. Lock the mount in position by turning the tab
counterclockwise.
MAKE SURE THE LOCKING TAB IS SECURE IN THE UPRIGHT POSITION
BEFORE ATTACHING THE FPV SCREEN.
321
GB
FR
DE
ES
IT
PT
PL
NL

9
FPV SCREEN • FPV SCREEN • FPV SCREEN • FPV SCREEN • FPV SCREEN • FPV SCREEN •
FPV SCREEN • FPV SCREEN
1. Insert Micro SD card into FPV screen.
2. To remove the SD card push on the SD card slot
to eject from FPV screen.
3. Use a SD card reader to retrieve the images
(card reader not included).
Gently rotate the angle of the camera up or downward.
Gently rotate the angle of the camera up or downward.
Gently rotate the angle of the camera up or downward.
Gently rotate the angle of the camera up or downward.
Gently rotate the angle of the camera up or downward.
Gently rotate the angle of the camera up or downward.
Gently rotate the angle of the camera up or downward.
Gently rotate the angle of the camera up or downward.
1. Insert Micro SD card into FPV screen.
2. To remove the SD card push on the SD card slot
to eject from FPV screen.
3. Use a SD card reader to retrieve the images
(card reader not included).
1. Insert Micro SD card into FPV screen.
2. To remove the SD card push on the SD card slot
to eject from FPV screen.
3. Use a SD card reader to retrieve the images
(card reader not included).
1. Insert Micro SD card into FPV screen.
2. To remove the SD card push on the SD card slot
to eject from FPV screen.
3. Use a SD card reader to retrieve the images
(card reader not included).
1. Insert Micro SD card into FPV screen.
2. To remove the SD card push on the SD card slot
to eject from FPV screen.
3. Use a SD card reader to retrieve the images
(card reader not included).
1. Insert Micro SD card into FPV screen.
2. To remove the SD card push on the SD card slot
to eject from FPV screen.
3. Use a SD card reader to retrieve the images
(card reader not included).
1. Insert Micro SD card into FPV screen.
2. To remove the SD card push on the SD card slot
to eject from FPV screen.
3. Use a SD card reader to retrieve the images
(card reader not included).
1. Insert Micro SD card into FPV screen.
2. To remove the SD card push on the SD card slot
to eject from FPV screen.
3. Use a SD card reader to retrieve the images
(card reader not included).
21
GB
FR
DE
ES
GB
1. Line up the hole on bottom of the LCD screen to the red screw on controller
mount.
2. Place LCD screen on mount. Spin tightening ball on controller mount to secure
LCD screen in place. Spin ball until screen is securely attached.
1. Line up the hole on bottom of the LCD screen to the red screw on controller
mount.
2. Place LCD screen on mount. Spin tightening ball on controller mount to secure
LCD screen in place. Spin ball until screen is securely attached.
1. Line up the hole on bottom of the LCD screen to the red screw on controller
mount.
2. Place LCD screen on mount. Spin tightening ball on controller mount to secure
LCD screen in place. Spin ball until screen is securely attached.
1. Line up the hole on bottom of the LCD screen to the red screw on controller
mount.
2. Place LCD screen on mount. Spin tightening ball on controller mount to secure
LCD screen in place. Spin ball until screen is securely attached.
1. Line up the hole on bottom of the LCD screen to the red screw on controller
mount.
2. Place LCD screen on mount. Spin tightening ball on controller mount to secure
LCD screen in place. Spin ball until screen is securely attached.
1. Line up the hole on bottom of the LCD screen to the red screw on controller
mount.
2. Place LCD screen on mount. Spin tightening ball on controller mount to secure
LCD screen in place. Spin ball until screen is securely attached.
1. Line up the hole on bottom of the LCD screen to the red screw on controller
mount.
2. Place LCD screen on mount. Spin tightening ball on controller mount to secure
LCD screen in place. Spin ball until screen is securely attached.
1. Line up the hole on bottom of the LCD screen to the red screw on controller
mount.
2. Place LCD screen on mount. Spin tightening ball on controller mount to secure
LCD screen in place. Spin ball until screen is securely attached.
FR
DE
ES
IT
PT
PL
NL
GB
FR
DE
ES
IT
PT
PL
NL
MICRO SD CARD • MICRO SD CARD • MICRO SD CARD • MICRO SD CARD •
MICRO SD CARD • MICRO SD CARD • MICRO SD CARD • MICRO SD CARD
CAMERA ADJUSTMENT • CAMERA ADJUSTMENT • CAMERA ADJUSTMENT • CAMERA ADJUSTMENT •
CAMERA ADJUSTMENT • CAMERA ADJUSTMENT • CAMERA ADJUSTMENT • CAMERA ADJUSTMENT
ATTACHING SCREEN TO CONTROLLER • ATTACHING SCREEN TO CONTROLLER • ATTACHING SCREEN TO CONTROLLER • ATTACHING SCREEN TO CONTROLLER •
ATTACHING SCREEN TO CONTROLLER • ATTACHING SCREEN TO CONTROLLER • ATTACHING SCREEN TO CONTROLLER • ATTACHING SCREEN TO CONTROLLER
IT
PT
PL
NL

1.5V 1.2V
3
5732MHz
x33
4
5769MHz
x44
5806MHz
5
x55
5843MHz
6
x66
B
x1x1
x1x1
10
USING FPV SCREEN • USING FPV SCREEN • USING FPV SCREEN • USING FPV SCREEN •
USING FPV SCREEN • USING FPV SCREEN • USING FPV SCREEN • USING FPV SCREEN
• Press 1 for picture.
• Press and hold for 3 seconds to record video. Press button again to end recording.
• Press 1 for picture.
• Press and hold for 3 seconds to record video. Press button again to end recording.
• Press 1 for picture.
• Press and hold for 3 seconds to record video. Press button again to end recording.
• Press 1 for picture.
• Press and hold for 3 seconds to record video. Press button again to end recording.
• Press 1 for picture.
• Press and hold for 3 seconds to record video. Press button again to end recording.
• Press 1 for picture.
• Press and hold for 3 seconds to record video. Press button again to end recording.
• Press 1 for picture.
• Press and hold for 3 seconds to record video. Press button again to end recording.
• Press 1 for picture.
• Press and hold for 3 seconds to record video. Press button again to end recording.
• There are multiple channels to allow multiple pilots to fly at once.
• Each channel has a different color that illuminates the rear light of the drone.
• Channel selection must be made before flight.
1. Press the “B” on the controller to select a channel.
2. Press the video channel button until you see image on screen and/or the color
dot in the FPV screen matches the LED on the drone.
ON/OFF • ON/OFF • ON/OFF • ON/OFF • ON/OFF • ON/OFF • ON/OFF •
ON/OFF
PICTURES & VIDEO • PICTURES & VIDEO • PICTURES & VIDEO • PICTURES & VIDEO • PICTURES & VIDEO • PICTURES & VIDEO •
PICTURES & VIDEO • PICTURES & VIDEO
VIDEO CHANNEL • VIDEO CHANNEL • VIDEO CHANNEL • VIDEO CHANNEL • VIDEO CHANNEL • VIDEO CHANNEL • VIDEO CHANNEL •
VIDEO CHANNEL
ADJUST DISPLAY • ADJUST DISPLAY • ADJUST DISPLAY • ADJUST DISPLAY •
ADJUST DISPLAY • ADJUST DISPLAY • ADJUST DISPLAY • ADJUST DISPLAY
Push power button: to turn on or to turn off.
Push power button: to turn on or to turn off.
Push power button: to turn on or to turn off.
Push power button: to turn on or to turn off.
Push power button: to turn on or to turn off.
Push power button: to turn on or to turn off.
Push power button: to turn on or to turn off.
Push power button: to turn on or to turn off.
GB
FR
DE
ES
IT
PT
PL
NL
Adjust the brightness and contrast of the screen
using the + -.
Adjust the brightness and contrast of the screen
using the + -.
Adjust the brightness and contrast of the screen
using the + -.
Adjust the brightness and contrast of the screen
using the + -.
Adjust the brightness and contrast of the screen
using the + -.
Adjust the brightness and contrast of the screen
using the + -.
Adjust the brightness and contrast of the screen
using the + -.
Adjust the brightness and contrast of the screen
using the + -.
GB
FR
DE
ES
IT
PT
PL
NL
GB
FR
DE
ES
IT
PT
PL
NL
GB
FR
DE
ES
IT
PT
PL
NL
1. 2.
11
USING THE FPV GOGGLES • USING THE FPV GOGGLES • USING THE FPV GOGGLES •
USING THE FPV GOGGLES • USING THE FPV GOGGLES • USING THE FPV GOGGLES •
USING THE FPV GOGGLES • USING THE FPV GOGGLES
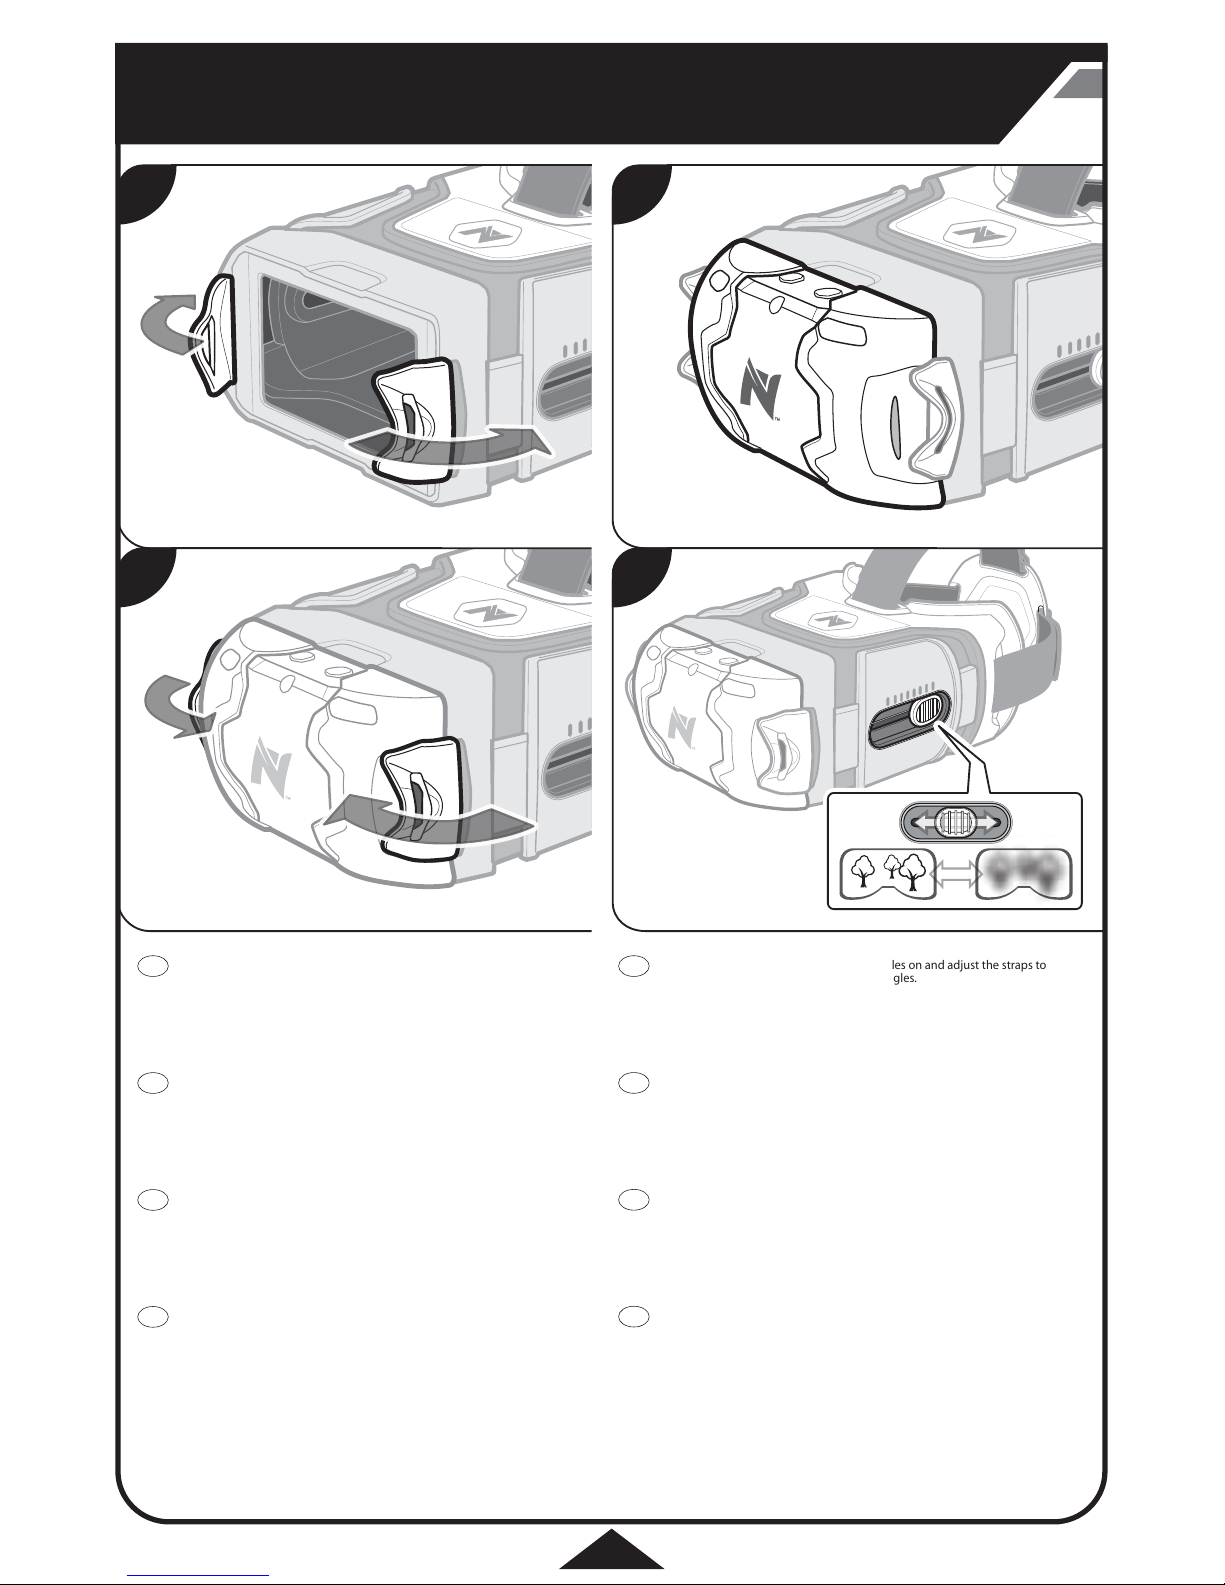
Before attaching the FPV screen, put the goggles on and adjust the straps to
ensure a secure fit. Once adjusted remove goggles.
1. Pull the red flaps on the front of the goggles to the open position.
2. With the buttons on the FPV screen facing upward, attach the screen to the
goggles.
3. Secure the red flaps around the screen. Make sure the flap is fully engaged to the
indent on the screen.
4. Adjust the focus using the slider on the side of the goggles.
GB
FR
DE
ES
IT
PT
PL
NL
21
43
A
A
A A
B
B
B B
12
REPLACING ROTORS • REPLACING ROTORS • REPLACING ROTORS • REPLACING ROTORS •
REPLACING ROTORS • REPLACING ROTORS • REPLACING ROTORS • REPLACING ROTORS
ALTERNATIVE PRO THUMBSTICKS • ALTERNATIVE PRO THUMBSTICKS •
ALTERNATIVE PRO THUMBSTICKS • ALTERNATIVE PRO THUMBSTICKS •
ALTERNATIVE PRO THUMBSTICKS • ALTERNATIVE PRO THUMBSTICKS •
ALTERNATIVE PRO THUMBSTICKS • ALTERNATIVE PRO THUMBSTICKS
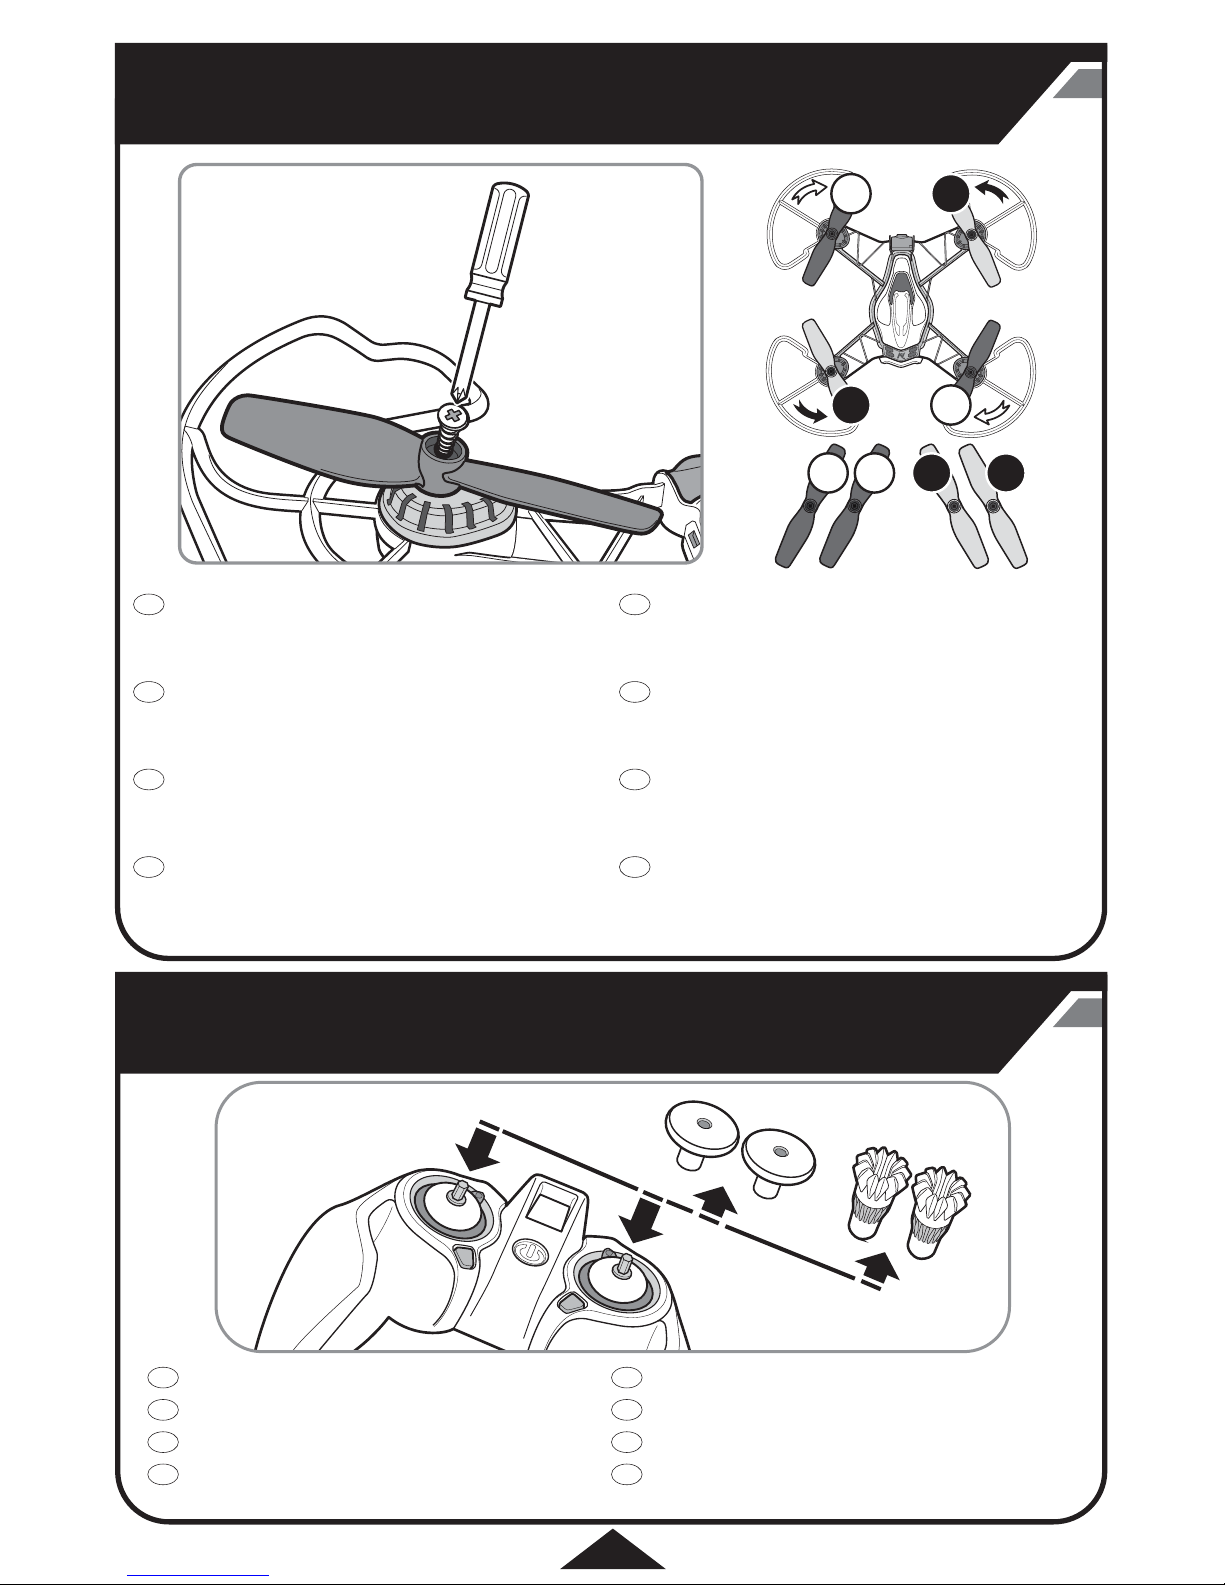
Make sure to use the correct replacement rotor, A or B. Markings are located on the
underside of blade.
1. Remove battery from drone.
2. Remove the small screw using Phillips Head screwdriver.
3. Replace damaged rotor with a new rotor with matching letter. Secure the rotor
and tighten screw.
Make sure to use the correct replacement rotor, A or B. Markings are located on the
underside of blade.
1. Remove battery from drone.
2. Remove the small screw using Phillips Head screwdriver.
3. Replace damaged rotor with a new rotor with matching letter. Secure the rotor
and tighten screw.
Make sure to use the correct replacement rotor, A or B. Markings are located on the
underside of blade.
1. Remove battery from drone.
2. Remove the small screw using Phillips Head screwdriver.
3. Replace damaged rotor with a new rotor with matching letter. Secure the rotor
and tighten screw.
Make sure to use the correct replacement rotor, A or B. Markings are located on the
underside of blade.
1. Remove battery from drone.
2. Remove the small screw using Phillips Head screwdriver.
3. Replace damaged rotor with a new rotor with matching letter. Secure the rotor
and tighten screw.
Make sure to use the correct replacement rotor, A or B. Markings are located on the
underside of blade.
1. Remove battery from drone.
2. Remove the small screw using Phillips Head screwdriver.
3. Replace damaged rotor with a new rotor with matching letter. Secure the rotor
and tighten screw.
Make sure to use the correct replacement rotor, A or B. Markings are located on the
underside of blade.
1. Remove battery from drone.
2. Remove the small screw using Phillips Head screwdriver.
3. Replace damaged rotor with a new rotor with matching letter. Secure the rotor
and tighten screw.
Make sure to use the correct replacement rotor, A or B. Markings are located on the
underside of blade.
1. Remove battery from drone.
2. Remove the small screw using Phillips Head screwdriver.
3. Replace damaged rotor with a new rotor with matching letter. Secure the rotor
and tighten screw.
Make sure to use the correct replacement rotor, A or B. Markings are located on the
underside of blade.
1. Remove battery from drone.
2. Remove the small screw using Phillips Head screwdriver.
3. Replace damaged rotor with a new rotor with matching letter. Secure the rotor
and tighten screw.
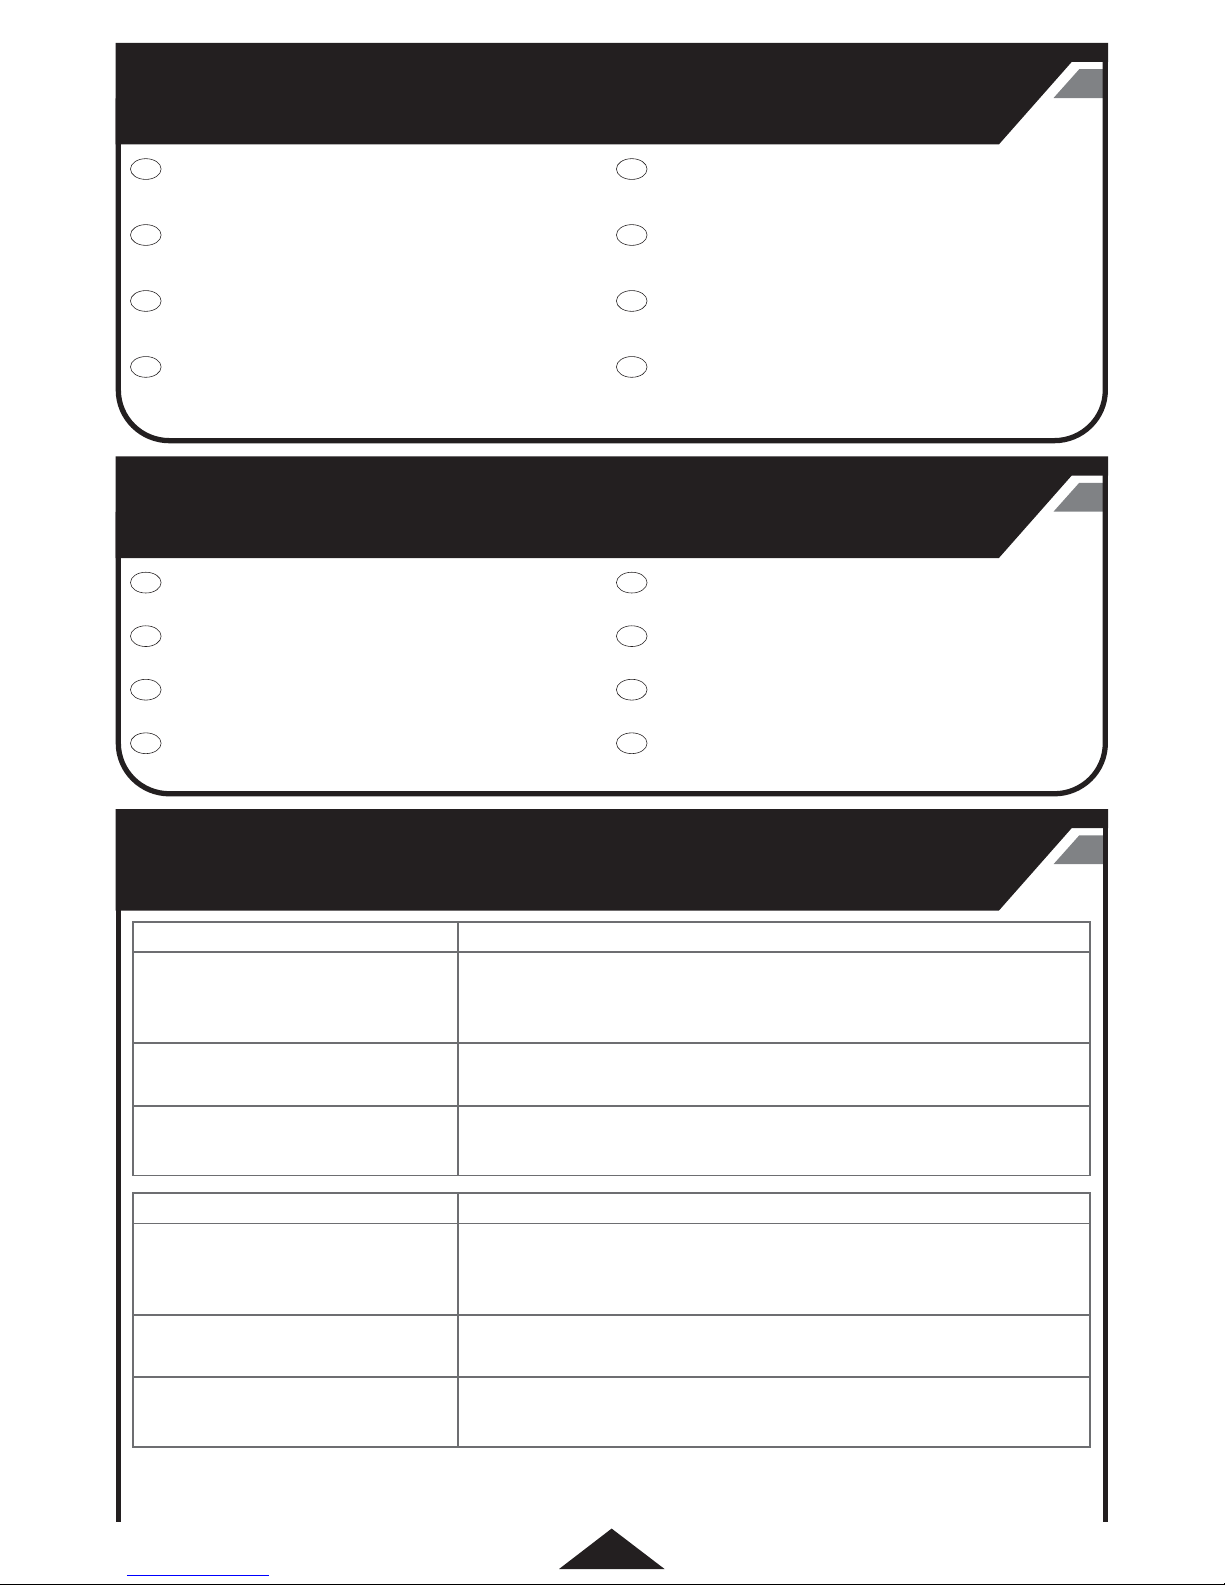
1. Lift joystick upward to remove .
2. Attach thumbstick to pole to replace.
1. Lift joystick upward to remove .
2. Attach thumbstick to pole to replace.
1. Lift joystick upward to remove .
2. Attach thumbstick to pole to replace.
1. Lift joystick upward to remove .
2. Attach thumbstick to pole to replace.
GB
FR
DE
ES
GB
FR
DE
ES
1. Lift joystick upward to remove .
2. Attach thumbstick to pole to replace.
1. Lift joystick upward to remove .
2. Attach thumbstick to pole to replace.
1. Lift joystick upward to remove .
2. Attach thumbstick to pole to replace.
1. Lift joystick upward to remove .
2. Attach thumbstick to pole to replace.
GB
FR
DE
ES
IT
PT
PL
NL

13
REMOVABLE BLADE GUARDS • REMOVABLE BLADE GUARDS • REMOVABLE BLADE GUARDS •
REMOVABLE BLADE GUARDS • REMOVABLE BLADE GUARDS • REMOVABLE BLADE GUARDS •
REMOVABLE BLADE GUARDS • REMOVABLE BLADE GUARDS
GB
FR
DE
ES
IT
PT
PL
NL
The blade guards are great for beginners and can be removed for experienced pilots.
1. Turn the drone over. Using a micro Phillips Head screwdriver, remove the 3
screws from the motor cover and set aside.
2. Remove the 2 screws inside the motor housing that hold the blade guard in place.
3. Pull the blade guard off the motor housing. Reassemble the motor cover and
tighten the 3 screws back in place. Complete these steps for all blade guards.
1
2

1
2
3
A
x1x1
A
x1x1
14
ADJUSTING THE TRIM • ADJUSTING THE TRIM • ADJUSTING THE TRIM •
ADJUSTING THE TRIM • ADJUSTING THE TRIM • ADJUSTING THE TRIM •
ADJUSTING THE TRIM • ADJUSTING THE TRIM
You may notice a “pull” in one direction when flying, this is known as drift. You
may need to adjust the trim to ensure best performance and eliminate drift.
1. With the drone on the ground and the throttle stick (left stick) set to lowest
position, press A to enter trim mode.
2. Quickly push the right stick in the opposite direction from the drift direction
and let it set back to the center.
3. Push A again to exit trim mode.
Do a test flight. If the drone still drifts, repeat steps 1 to 3.
NOTE
Adjust trim when the drone is landed not while flying.
GB
FR
DE
ES
IT
PT
PL
NL

15
DRL FLIGHT SIMULATOR • DRL FLIGHT SIMULATOR • DRL FLIGHT SIMULATOR •
DRL FLIGHT SIMULATOR • DRL FLIGHT SIMULATOR • DRL FLIGHT SIMULATOR •
DRL FLIGHT SIMULATOR • DRL FLIGHT SIMULATOR
CALIBRATING YOUR CONTROL WITH SIMULATOR • CALIBRATING YOUR CONTROL WITH SIMULATOR •
CALIBRATING YOUR CONTROL WITH SIMULATOR • CALIBRATING YOUR CONTROL WITH SIMULATOR •
CALIBRATING YOUR CONTROL WITH SIMULATOR • CALIBRATING YOUR CONTROL WITH SIMULATOR •
CALIBRATING YOUR CONTROL WITH SIMULATOR • CALIBRATING YOUR CONTROL WITH SIMULATOR
GB
FR
GB
FR
DE
ES
IT
PT
PL
NL
The DRL racing simulator allows new pilots to learn
how to y a racing drone.
• Practice the controls and perfect the basics before
taking ight in real life.
• Master your skills and race against your friends.
• Compete in actual DRL courses.
Learn more and download the simulator at:
www.NikkoAir.com
SYNC CONTROLLER TO SIMULATOR :
1. Using the USB charging cord, plug the USB into the computer and insert the charging port to the drone.
2. Turn on the power of the drone and the controller.
3. Arm the drone. Push “B”for 5 seconds until the rear lights of the drone turn green and fade on and o.
4. Follow the instructions in the simulator to nish setup.
5. To switch back to ying mode push “B”for 5 seconds until the rear lights of drone are blinking.
SYNC CONTROLLER TO SIMULATOR :
1. Using the USB charging cord, plug the USB into the computer and insert the charging port to the drone.
2. Turn on the power of the drone and the controller.
3. Arm the drone. Push “B”for 5 seconds until the rear lights of the drone turn green and fade on and o.
4. Follow the instructions in the simulator to nish setup.
5. To switch back to ying mode push “B” for 5 seconds until the rear lights of drone are blinking.
The DRL racing simulator allows new pilots to learn
how to y a racing drone.
• Practice the controls and perfect the basics before
taking ight in real life.
• Master your skills and race against your friends.
• Compete in actual DRL courses.
Learn more and download the simulator at:
www.NikkoAir.com

16
DE
ES
IT
PT
PL
NL
SYNC CONTROLLER TO SIMULATOR :
1. Using the USB charging cord, plug the USB into the computer and insert the charging port to the drone.
2. Turn on the power of the drone and the controller.
3. Arm the drone. Push “B”for 5 seconds until the rear lights of the drone turn green and fade on and o.
4. Follow the instructions in the simulator to nish setup.
5. To switch back to ying mode push “B” for 5 seconds until the rear lights of drone are blinking.
17
PROBLEM SOLUTION
• Make sure the battery is fully charged and power is on.
• Drone may be disarmed. Follow the syncing instructions to ensure the
controller is paired with drone.
The drone is unresponsive
• Make sure the drone and screen are on the same video channel.
• Drone blades may have been installed incorrectly. Make sure the correct
blade“A”or“B” was installed in the correct position.
The FPV screen only shows static
Blades spin but drone doesn’t y
properly
BETA FLIGHT • BETA FLIGHT • BETA FLIGHT • BETA FLIGHT • BETA FLIGHT • BETA FLIGHT •
BETA FLIGHT
GB
FR
DE
ES
IT
PT
PL
NL
BATTERY & REPLACEMENT PARTS • BATTERY & REPLACEMENT PARTS •
BATTERY & REPLACEMENT PARTS • BATTERY & REPLACEMENT PARTS •
BATTERY & REPLACEMENT PARTS • BATTERY & REPLACEMENT PARTS •
BATTERY & REPLACEMENT PARTS • BATTERY & REPLACEMENT PARTS
TROUBLE SHOOTING • TROUBLE SHOOTING • TROUBLE SHOOTING •
TROUBLE SHOOTING • TROUBLE SHOOTING • TROUBLE SHOOTING •
TROUBLE SHOOTING • TROUBLE SHOOTING
GB
FR
DE
ES
IT
PT
PL
NL
Beta Flight software allows you to customize your
controls. Learn more at:
www.NikkoAir.com
Beta Flight software allows you to customize your
controls. Learn more at:
www.NikkoAir.com
Beta Flight software allows you to customize your
controls. Learn more at:
www.NikkoAir.com
Beta Flight software allows you to customize your
controls. Learn more at:
www.NikkoAir.com
Beta Flight software allows you to customize your
controls. Learn more at:
www.NikkoAir.com
Beta Flight software allows you to customize your
controls. Learn more at:
www.NikkoAir.com
Beta Flight software allows you to customize your
controls. Learn more at:
www.NikkoAir.com
Beta Flight software allows you to customize your
controls. Learn more at:
www.NikkoAir.com
For replacement parts and accessories please visit:
www.NikkoAir.com
For replacement parts and accessories please visit:
www.NikkoAir.com
For replacement parts and accessories please visit:
www.NikkoAir.com
For replacement parts and accessories please visit:
www.NikkoAir.com
For replacement parts and accessories please visit:
www.NikkoAir.com
For replacement parts and accessories please visit:
www.NikkoAir.com
For replacement parts and accessories please visit:
www.NikkoAir.com
For replacement parts and accessories please visit:
www.NikkoAir.com

18
PROBLEM SOLUTION
• Make sure the battery is fully charged and power is on.
• Drone may be disarmed. Follow the syncing instructions to ensure the
controller is paired with drone.
The drone is unresponsive
• Make sure the drone and screen are on the same video channel.
• Drone blades may have been installed incorrectly. Make sure the correct
blade“A”or“B” was installed in the correct position.
The FPV screen only shows static
Blades spin but drone doesn’t y
properly
19
PILOTING TIPS • PILOTING TIPS • PILOTING TIPS • PILOTING TIPS • PILOTING TIPS •
PILOTING TIPS • PILOTING TIPS • PILOTING TIPS
GB
FR
DE
ES
IT
PT
PL
NL
• When the battery power is 20% the rear light on the drone will blink and you will feel a vibration in the controller
to signal power is low. When the power has reached 0% the drone will automatically land.
• Launch the drone with the tail LED pointed towards you.
• When learning to y in a dierent direction start by tapping the direction stick until you get a feel for the controls
• The controller range is 50m/165ft.
• Visit www.NikkoAir.com for more ying tips, instructions, and how to videos.

20
SAFETY PRECAUTION
• This drone is intended to be used only outdoors-NOT to
be indoors. RISK OF EYE INJURIES
• Start and fly only when the area is appropriate for the intended
use (free area, no obstacles) and only within direct visual
contact.
• Start and fly is strictly forbidden near high voltage poles
railway tracks, roads, swimming pools or open water.
•
Only operate under good visibility and clam weather conditions.
• Intended for children age 14 and older.
• Never fly in a place cluttered with obstacles.
• Operate the drone in a safe area away from people, pets,
cars, etc.
• Do not touch or try to pick up the drone when it is in
motion. Wait until it has stopped completely.
• Keep hair, fingers, face and loose clothing away from the
running rotors while the drone is switched on or while the
controller is operating.
• Do not drop or give impact to the drone and its
accessories.
• Do not change or modify anything on the drone.
• Never attempt to disassemble or modify the drone or its
accessories.
• Remove rechargeable batteries from the product before
charging.
OUTDOOR TOYS INTENDED FOR CHILDREN OVER 14 YEARS
OF AGE.
EN
• Only operate the drone and its accessories when fully assembled and in accordance with this manual!
• Keep the instructions manual for later reference.
• Before first use. Read the instruction manual together with your child.
• Operations and safe use must be explained (preferably by graphical illustrations).
• Flying the drone requires skill and children must be trained under the direct supervision of adult.
• Check if the drone is assembled as instructed. Assembly shall be performed under the supervision of adult.
ATTENTION!
Never fly without direct sight contact to your drone, you have to keep eye contact at all times. Controlling a drone through virtual reality
glasses is prohibited, if you are flying it alone and outside. You can control the drone with your glasses outside, if somebody else watches
out. There are no restrictions for the use of drones in closed rooms.
• If you oppose above security warning you can get in conflict with local law.
•
Make sure the batteries are inserted with correct polarity.
• Use only battery type(s) recommended.
• Do not attempt to short-circuit, charge, disassemble or heat
batteries.
• Do not dispose of batteries in fire or make them wet.
• Do not mix or use new and old or different types of batteries
together.
• Non-rechargeable batteries are not to be recharged.
• Rechargeable batteries are only to be charged by adult.
• B
attery replacement should be done in presence of an adult.
•
Remove batteries from the product for storage.
•
After use, be sure to turn the switch off. Failure to do so may
adversely affect batteries, resulting in disabled charged.
• Exhausted batteries are to be removed from the toy.
• Regularly examine for damage to the plug, enclosure and other
parts, in the event of any damage, the toy must not be used with
the transmitter charger until the damage has been repaired.
• For best performance, always use alkaline batteries only. To
remove the batteries, reverse the installation procedure.
NOTE: BATTERIES MUST BE RECYCLED OR DISPOSED PROPERLY.
Contact your local area office of solid waste management or other appropriate local agency for information.
DO NOT TOUCH THE RUNNING ROTORS.
HANDS, HAIR AND LOOSE CLOTHES SHALL BE KEPT AWAY FROM THE ROTORS.
CAUTION:
•
DO NOT START UP AND FLY WHEN PERSONS, ANIMALS OR ANY OBSTRUCTIONS ARE WITHIN THE FLYING RANGE OF THE
DRONE (FLYING RANGE:50m).
•
RISK OF EYE INJURIES: DO NOT FLY NEAR YOUR FACE TO AVOID INJURIES.
•
UNDER THE ENVIRONMENT WITH ELECTROSTATIC DISCHARGE, THE PRODUCT MAY MALFUNCTION AND REQUIRE USER TO RESET
THE PRODUCT.
14+
IMPORTANT! Carefully read the Owners Manual before play! Keep the Manual for later reference.
FEDERAL COMMUNICATIONS COMMISSION COMPLIANCE
MANUFACTURER’S NOTE
NOTE: This device complies with Part 15 of the FCC Rules. Operation is subject to the following two conditions:
(1) this device may not cause harmful interference, and
(2) this device must accept any interference received, including interference that may cause undesired operation.
Warning: Changes or modifications to this unit not expressly approved by the party responsible for compliance could void the userʼs authority to operate the
equipment. NOTE: This equipment has been tested and found to comply with the limits for a Class B digital device, pursuant to Part 15 of the FCC Rules.
These limits are designed to provide reasonable protection against harmful interference in a residential installation. This equipment generates, uses and can
radiate radio frequency energy and, if not installed and used in accordance with the instructions, may cause harmful interference to radio communications.
However, there is no guarantee that interference will not occur in a particular installation. If this equipment does cause harmful interference to radio or
television reception, which can be determined by turning the equipment off and on, the user is encouraged to try to correct the interference by one or more
of the following measures: - Reorient or relocate the receiving antenna.
- Increase the separation between the equipment and receiver.
- Connect the equipment into an outlet on a circuit different from that to which the receiver is connected.
- Consult the dealer or an experienced radio/TV technician for help.
• Modifications not authorized by the manufacturer may void users authority to operate the device.
• This drone and all accessories need to be periodically examined for potential hazards and any potentially hazardous parts be repaired
or replaced.
• In the interest of better quality and value, we are constantly improving and updating our products.
• Consequently, pictures in this instruction sheet may sometimes differ from the model enclosed.
• You are advised to retain the packaging for future reference as it contains important information.
Other manuals for RACE VISION 220 FPV
1
This manual suits for next models
1
Table of contents
Other Nikko Air Drone manuals


