Nikko Super Octane User manual

11
11
1
Super OctaneSuper Octane
Super OctaneSuper Octane
Super Octane RDC-080010
English /Français /EspañolEnglish /Français /Español
English /Français /EspañolEnglish /Français /Español
English /Français /Español
PRINTED IN MALAYSIA
IMPRIME EN MALAISIEIMPRIME EN MALAISIE
IMPRIME EN MALAISIEIMPRIME EN MALAISIE
IMPRIME EN MALAISIE
IMPRESO EN MALASIAIMPRESO EN MALASIA
IMPRESO EN MALASIAIMPRESO EN MALASIA
IMPRESO EN MALASIA
CONTENUCONTENU
CONTENUCONTENU
CONTENU
Repair and Parts DepartmentRepair and Parts Department
Repair and Parts DepartmentRepair and Parts Department
Repair and Parts Department
Monday to Friday 8:30AM-Monday to Friday 8:30AM-
Monday to Friday 8:30AM-Monday to Friday 8:30AM-
Monday to Friday 8:30AM-
5:30PM Central Time5:30PM Central Time
5:30PM Central Time5:30PM Central Time
5:30PM Central Time
Repair:(800)736-4556
Parts:(800)776-4556
Fax:(972)578-7059
e-mail:[email protected]
CAUTION: ELECTRIC TOYCAUTION: ELECTRIC TOY
CAUTION: ELECTRIC TOYCAUTION: ELECTRIC TOY
CAUTION: ELECTRIC TOY
Not recommended for children under 8 yearsNot recommended for children under 8 years
Not recommended for children under 8 yearsNot recommended for children under 8 years
Not recommended for children under 8 years
of age. As with all electric products, precau-of age. As with all electric products, precau-
of age. As with all electric products, precau-of age. As with all electric products, precau-
of age. As with all electric products, precau-
tions should be observed during handlingtions should be observed during handling
tions should be observed during handlingtions should be observed during handling
tions should be observed during handling
and use to prevent electric shock.and use to prevent electric shock.
and use to prevent electric shock.and use to prevent electric shock.
and use to prevent electric shock.
Input: 120 vac, 60 HZ 6W only.Input: 120 vac, 60 HZ 6W only.
Input: 120 vac, 60 HZ 6W only.Input: 120 vac, 60 HZ 6W only.
Input: 120 vac, 60 HZ 6W only.
Output: 12 VDC, 300mAOutput: 12 VDC, 300mA
Output: 12 VDC, 300mAOutput: 12 VDC, 300mA
Output: 12 VDC, 300mA
ATTENTION PARENTSATTENTION PARENTS
ATTENTION PARENTSATTENTION PARENTS
ATTENTION PARENTS
It is recommended that this toy and all acces-It is recommended that this toy and all acces-
It is recommended that this toy and all acces-It is recommended that this toy and all acces-
It is recommended that this toy and all acces-
sories be periodically examined for potentialsories be periodically examined for potential
sories be periodically examined for potentialsories be periodically examined for potential
sories be periodically examined for potential
hazards and that any potentially hazardoushazards and that any potentially hazardous
hazards and that any potentially hazardoushazards and that any potentially hazardous
hazards and that any potentially hazardous
parts be repaired or replaced.parts be repaired or replaced.
parts be repaired or replaced.parts be repaired or replaced.
parts be repaired or replaced.
©NIKKO
z
"Warning! use under the direct supervision of an adult."Warning! use under the direct supervision of an adult.
"Warning! use under the direct supervision of an adult."Warning! use under the direct supervision of an adult.
"Warning! use under the direct supervision of an adult.
KEEP THE DISPLAYBOX AND THE MANUAL FOR FU-KEEP THE DISPLAYBOX AND THE MANUAL FOR FU-
KEEP THE DISPLAYBOX AND THE MANUAL FOR FU-KEEP THE DISPLAYBOX AND THE MANUAL FOR FU-
KEEP THE DISPLAYBOX AND THE MANUAL FOR FU-
TURE REFERENCE.TURE REFERENCE.
TURE REFERENCE.TURE REFERENCE.
TURE REFERENCE.
Use Ni-Cd battery pack(9.6V) and charger for this model.Use Ni-Cd battery pack(9.6V) and charger for this model.
Use Ni-Cd battery pack(9.6V) and charger for this model.Use Ni-Cd battery pack(9.6V) and charger for this model.
Use Ni-Cd battery pack(9.6V) and charger for this model.
z
z
z
zz
zz
z
zz
zz
z
FEATURESFEATURES
FEATURESFEATURES
FEATURES
zz
zz
zBATTERY REQUIREMENTSBATTERY REQUIREMENTS
BATTERY REQUIREMENTSBATTERY REQUIREMENTS
BATTERY REQUIREMENTS
ATTENTION: JOUET ELECTRIQUE
Non recommandé pour les enfants de moins de 8 ans. Comme avec tous les appareils électriques, des précautions doivent être
observées pendant la manipulation et l’emploi pour éviter toute décharge électrique.
Entrée: secteur 120 V, 60 Hz, 6 W seulement
Sortie: 12 V c.c. 300mA
PARENTS ATTENTION
Il est recommandé de vérifier périodiquement l’absence de risque potentiel sur ce jouet et tous les accessoires, et de réparer ou
remplacer les pièces potentiellement dangereuses.
Département Réparation et pièces Lundi au vendredi, de 8h30 à 17h30, heure centrale
Réparations: (800) 736-4556Réparations: (800) 736-4556
Réparations: (800) 736-4556Réparations: (800) 736-4556
Réparations: (800) 736-4556
Pièces: (800) 776-4556Pièces: (800) 776-4556
Pièces: (800) 776-4556Pièces: (800) 776-4556
Pièces: (800) 776-4556
Fax: (972) 578-7059Fax: (972) 578-7059
Fax: (972) 578-7059Fax: (972) 578-7059
Fax: (972) 578-7059
Transmitter:1 x 9V(006P)battery
1 x NI-CD or NI-MH rechargeable battery pack(9.6 V)
Vehicle:
2 Channel digital proportional system2 Channel digital proportional system
2 Channel digital proportional system2 Channel digital proportional system
2 Channel digital proportional system
Rear wheel differential gearRear wheel differential gear
Rear wheel differential gearRear wheel differential gear
Rear wheel differential gear
Front & rear suspensionsFront & rear suspensions
Front & rear suspensionsFront & rear suspensions
Front & rear suspensions
Système proportionnel numérique à 2 canauxSystème proportionnel numérique à 2 canaux
Système proportionnel numérique à 2 canauxSystème proportionnel numérique à 2 canaux
Système proportionnel numérique à 2 canaux
Engrenage de différentiel sur les roues arrièreEngrenage de différentiel sur les roues arrière
Engrenage de différentiel sur les roues arrièreEngrenage de différentiel sur les roues arrière
Engrenage de différentiel sur les roues arrière
Suspensions avant et arrièreSuspensions avant et arrière
Suspensions avant et arrièreSuspensions avant et arrière
Suspensions avant et arrière
• Lire attentivement ce mode d’emploi avant de commencer à utiliser ce jouet.• Lire attentivement ce mode d’emploi avant de commencer à utiliser ce jouet.
• Lire attentivement ce mode d’emploi avant de commencer à utiliser ce jouet.• Lire attentivement ce mode d’emploi avant de commencer à utiliser ce jouet.
• Lire attentivement ce mode d’emploi avant de commencer à utiliser ce jouet.
• Attention! A utiliser sous la supervision directe d’un adulte.• Attention! A utiliser sous la supervision directe d’un adulte.
• Attention! A utiliser sous la supervision directe d’un adulte.• Attention! A utiliser sous la supervision directe d’un adulte.
• Attention! A utiliser sous la supervision directe d’un adulte.
• CONSERVER LA BOITE D’EXPOSITION ET LE MANUEL POUR TOUTE REFERENCE ULTERIEURE.• CONSERVER LA BOITE D’EXPOSITION ET LE MANUEL POUR TOUTE REFERENCE ULTERIEURE.
• CONSERVER LA BOITE D’EXPOSITION ET LE MANUEL POUR TOUTE REFERENCE ULTERIEURE.• CONSERVER LA BOITE D’EXPOSITION ET LE MANUEL POUR TOUTE REFERENCE ULTERIEURE.
• CONSERVER LA BOITE D’EXPOSITION ET LE MANUEL POUR TOUTE REFERENCE ULTERIEURE.
• Utiliser une batterie Ni-Cd (9,6 V) et un chargeur pour ce modèle.• Utiliser une batterie Ni-Cd (9,6 V) et un chargeur pour ce modèle.
• Utiliser une batterie Ni-Cd (9,6 V) et un chargeur pour ce modèle.• Utiliser une batterie Ni-Cd (9,6 V) et un chargeur pour ce modèle.
• Utiliser une batterie Ni-Cd (9,6 V) et un chargeur pour ce modèle.
CARACTERISTIQUES
zz
zz
z
zz
zz
z
zz
zz
z
PILE/BATTERIEPILE/BATTERIE
PILE/BATTERIEPILE/BATTERIE
PILE/BATTERIE
Emetteur: 1 pile 9 V (006P)
Véhicule: Une batterie rechargeable NI- CD (9,6 V) ou Batterie
rechargeable Ni-MH (9,6 V)
Sistema proporcional digital de 2 canales.Sistema proporcional digital de 2 canales.
Sistema proporcional digital de 2 canales.Sistema proporcional digital de 2 canales.
Sistema proporcional digital de 2 canales.
Engranaje diferencial en las ruedas traserasEngranaje diferencial en las ruedas traseras
Engranaje diferencial en las ruedas traserasEngranaje diferencial en las ruedas traseras
Engranaje diferencial en las ruedas traseras
Suspensión frontal y traseraSuspensión frontal y trasera
Suspensión frontal y traseraSuspensión frontal y trasera
Suspensión frontal y trasera
Por favor lea atentamente las instrucciones antes de empezar a operar.Por favor lea atentamente las instrucciones antes de empezar a operar.
Por favor lea atentamente las instrucciones antes de empezar a operar.Por favor lea atentamente las instrucciones antes de empezar a operar.
Por favor lea atentamente las instrucciones antes de empezar a operar.
¡Aviso! Úselo bajo la supervisión directa de un adulto.¡Aviso! Úselo bajo la supervisión directa de un adulto.
¡Aviso! Úselo bajo la supervisión directa de un adulto.¡Aviso! Úselo bajo la supervisión directa de un adulto.
¡Aviso! Úselo bajo la supervisión directa de un adulto.
GUARDE LA CAJA Y EL MANUAL PARA REFERENCIAS FUTURAS.GUARDE LA CAJA Y EL MANUAL PARA REFERENCIAS FUTURAS.
GUARDE LA CAJA Y EL MANUAL PARA REFERENCIAS FUTURAS.GUARDE LA CAJA Y EL MANUAL PARA REFERENCIAS FUTURAS.
GUARDE LA CAJA Y EL MANUAL PARA REFERENCIAS FUTURAS.
En este modelo hay que usar paquetes de pilas de Ni-Cd (9,6 V) y su cargador respectivo.En este modelo hay que usar paquetes de pilas de Ni-Cd (9,6 V) y su cargador respectivo.
En este modelo hay que usar paquetes de pilas de Ni-Cd (9,6 V) y su cargador respectivo.En este modelo hay que usar paquetes de pilas de Ni-Cd (9,6 V) y su cargador respectivo.
En este modelo hay que usar paquetes de pilas de Ni-Cd (9,6 V) y su cargador respectivo.
z
z
z
z
CARACTERÍSTICAS
zz
zz
z
zz
zz
z
zz
zz
z
PILAS USADASPILAS USADAS
PILAS USADASPILAS USADAS
PILAS USADAS
PRECAUCIÓN: JUGUETE ELÉCTRICO
No recomendado para niños de menos de 8 años de edad. Al igual que con todos los productos eléctricos, para evitar un
shock eléctrico, se deben observar precauciones especiales al manipular y usar este juguete.
Entrada: Solamente 120 V.CA, 60 Hz, 6 W.
Salida: 12 V. CC, 300mA.
ATENCIÓN PADRES
Se recomienda que este juguete y todos sus accesorios sean examinados periódicamente para tratar de encontrar peligros
potenciales provocados por piezas que necesiten ser reparadas o cambiadas.
Departamento de Reparación y Repuestos Lunes a viernes 8:30 AM – 5:30 PM Hora Central
Reparaciones: (800) 736-4556Reparaciones: (800) 736-4556
Reparaciones: (800) 736-4556Reparaciones: (800) 736-4556
Reparaciones: (800) 736-4556
Repuestos: (800) 776-4556Repuestos: (800) 776-4556
Repuestos: (800) 776-4556Repuestos: (800) 776-4556
Repuestos: (800) 776-4556
Fax: (972) 578-7059Fax: (972) 578-7059
Fax: (972) 578-7059Fax: (972) 578-7059
Fax: (972) 578-7059
e-mail: [email protected]
Transmisor: 1 batería de 9 V (006P)
Vehículo: Un paquete de pilas recargables de NI-CD (9,6 V) o
Paquete de pilas recargables de Ni-MH (9,6 V)

22
22
2
ATTENTIONATTENTION
ATTENTIONATTENTION
ATTENTION
Chargez uniquement des batteries rechargeables nickel-
cadmium. D’autres types de batterie pourront éclater et
blesser des personnes ou provoquer des dégâts.
Ne laissez pas le chargeur ou la batterie devenir humides
ou mouillés.
Une charge excessive peut endommager la batterie; aussi,
respectez le temps de charge.
Ne rechargez pas à température élevée et n’approchez pas
la batterie d’une flamme.
Vérifiez régulièrement que la batterie ne fuit pas.
Retirez la batterie du véhicule quand elle est épuisée.
N’essayez jamais de charger une batterie non-rechargeable.
La batterie rechargeable doit être retirée du véhicule avant la
charge.
Ne démontez pas le chargeur ou la batterie.
Ne chargez pas la batterie quand elle est encore chaude
après l’utilisation. Attendez qu’elle refroidisse pour la re-
charger.
La batterie Ni-Cd doit être chargée sous la supervision d’un
adulte.
En débranchant la fiche ou les connecteurs, ne tirez pas sur
le cordon ou les fils (ils pourraient être endommagés).
Utilisez uniquement la batterie recommandée ou une
batterie de qualité égale.
Household outlet
HOW TO RECHARGINGHOW TO RECHARGING
HOW TO RECHARGINGHOW TO RECHARGING
HOW TO RECHARGING
Charger
* The newly purchased Ni-Cd battery pack(9.6V)is not charged. Recharge before starting.* The newly purchased Ni-Cd battery pack(9.6V)is not charged. Recharge before starting.
* The newly purchased Ni-Cd battery pack(9.6V)is not charged. Recharge before starting.* The newly purchased Ni-Cd battery pack(9.6V)is not charged. Recharge before starting.
* The newly purchased Ni-Cd battery pack(9.6V)is not charged. Recharge before starting.
RECHARGERECHARGE
RECHARGERECHARGE
RECHARGE Prise murale
* Une batterie Ni-Cd (9,6 V) neuve n’est pas chargée.* Une batterie Ni-Cd (9,6 V) neuve n’est pas chargée.
* Une batterie Ni-Cd (9,6 V) neuve n’est pas chargée.* Une batterie Ni-Cd (9,6 V) neuve n’est pas chargée.
* Une batterie Ni-Cd (9,6 V) neuve n’est pas chargée.
Chargez-la avant l’utilisation.Chargez-la avant l’utilisation.
Chargez-la avant l’utilisation.Chargez-la avant l’utilisation.
Chargez-la avant l’utilisation.
Chargeur
CARGA DE LAS PILASCARGA DE LAS PILAS
CARGA DE LAS PILASCARGA DE LAS PILAS
CARGA DE LAS PILAS
* Los paquetes de pilas de Ni-Cd nuevos (9,6 V) no están cargados.* Los paquetes de pilas de Ni-Cd nuevos (9,6 V) no están cargados.
* Los paquetes de pilas de Ni-Cd nuevos (9,6 V) no están cargados.* Los paquetes de pilas de Ni-Cd nuevos (9,6 V) no están cargados.
* Los paquetes de pilas de Ni-Cd nuevos (9,6 V) no están cargados.
Cárguelos antes de usarlos.Cárguelos antes de usarlos.
Cárguelos antes de usarlos.Cárguelos antes de usarlos.
Cárguelos antes de usarlos.
Tomacorriente
1. Join the connector of the charger to the connector of the Ni-
Cd battery pack (9.6 V).
2. Plug the charger into an electrical outlet.
3. Recharge for about 4-5 hours.
4. When the recharging is over, plug out the charger from the
electrical outlet and detach the connectors.
Ni-Cd battery pack (9.6 V)
CAUTION:CAUTION:
CAUTION:CAUTION:
CAUTION:
When detaching the plug or connectors, don’t pull theWhen detaching the plug or connectors, don’t pull the
When detaching the plug or connectors, don’t pull theWhen detaching the plug or connectors, don’t pull the
When detaching the plug or connectors, don’t pull the
cords or wires(as they can be severed).cords or wires(as they can be severed).
cords or wires(as they can be severed).cords or wires(as they can be severed).
cords or wires(as they can be severed).
The Ni-Cd battery pack should be recharged under theThe Ni-Cd battery pack should be recharged under the
The Ni-Cd battery pack should be recharged under theThe Ni-Cd battery pack should be recharged under the
The Ni-Cd battery pack should be recharged under the
supervision of an adult.supervision of an adult.
supervision of an adult.supervision of an adult.
supervision of an adult.
Use only the recommended battery or battery of equalUse only the recommended battery or battery of equal
Use only the recommended battery or battery of equalUse only the recommended battery or battery of equal
Use only the recommended battery or battery of equal
quality.quality.
quality.quality.
quality.
Never let the charger or battery pack get wet or damp.Never let the charger or battery pack get wet or damp.
Never let the charger or battery pack get wet or damp.Never let the charger or battery pack get wet or damp.
Never let the charger or battery pack get wet or damp.
Charge only nickel cadmium type rechargeableCharge only nickel cadmium type rechargeable
Charge only nickel cadmium type rechargeableCharge only nickel cadmium type rechargeable
Charge only nickel cadmium type rechargeable
batterybattery
batterybattery
battery.Other types of battery may burst causing injury to.Other types of battery may burst causing injury to
.Other types of battery may burst causing injury to.Other types of battery may burst causing injury to
.Other types of battery may burst causing injury to
persons and damage.persons and damage.
persons and damage.persons and damage.
persons and damage.
Over charging can damage the bat tery pack so observeOver charging can damage the bat tery pack so observe
Over charging can damage the bat tery pack so observeOver charging can damage the bat tery pack so observe
Over charging can damage the bat tery pack so observe
the prescribedthe prescribed
the prescribedthe prescribed
the prescribed
recharging time.recharging time.
recharging time.recharging time.
recharging time.
Do not recharge in high temperatures or bring the batteryDo not recharge in high temperatures or bring the battery
Do not recharge in high temperatures or bring the batteryDo not recharge in high temperatures or bring the battery
Do not recharge in high temperatures or bring the battery
pack near a flame.pack near a flame.
pack near a flame.pack near a flame.
pack near a flame.
Do not recharge the battery pack while it is still heatedDo not recharge the battery pack while it is still heated
Do not recharge the battery pack while it is still heatedDo not recharge the battery pack while it is still heated
Do not recharge the battery pack while it is still heated
after use. Wait until it cools to recharge.after use. Wait until it cools to recharge.
after use. Wait until it cools to recharge.after use. Wait until it cools to recharge.
after use. Wait until it cools to recharge.
Do not take the charger or battery pack apart.Do not take the charger or battery pack apart.
Do not take the charger or battery pack apart.Do not take the charger or battery pack apart.
Do not take the charger or battery pack apart.
Chech the battery regularly for leakage.Chech the battery regularly for leakage.
Chech the battery regularly for leakage.Chech the battery regularly for leakage.
Chech the battery regularly for leakage.
Remove empty battery from the vehicle.Remove empty battery from the vehicle.
Remove empty battery from the vehicle.Remove empty battery from the vehicle.
Remove empty battery from the vehicle.
Never try to charge non-rechargeable batteryNever try to charge non-rechargeable battery
Never try to charge non-rechargeable batteryNever try to charge non-rechargeable battery
Never try to charge non-rechargeable battery..
..
.
Removable battery which can be recharged must be re-Removable battery which can be recharged must be re-
Removable battery which can be recharged must be re-Removable battery which can be recharged must be re-
Removable battery which can be recharged must be re-
moved from the vehicle prior to charging.moved from the vehicle prior to charging.
moved from the vehicle prior to charging.moved from the vehicle prior to charging.
moved from the vehicle prior to charging.
1. Raccorder le connecteur du chargeur au connecteur de la batterie Ni-Cd
(9,6 V).
2.Brancher le chargeur sur une prise électrique.
3.Recharger 4 à 5 heures.
4.La charge terminée, débrancher le chargeur de la prise électrique et
déconnecter les connecteurs.
Batterie Ni-Cd (9,6 V)
1. Conecte el conector del cargador con el conector del paquete de pilas de Ni-Cd (9,6 voltios)
2. Enchufe el cargador en un tomacorriente eléctrico domiciliario.
3. Cargue la batería alrededor de 4 a 5 horas.
4. Cuando haya terminado de cargar, desenchufe el crgdor del tomacoriente y separe los conectores.
Paquete de batería de Ni-Cd
(9,6 voltios)
Cargador

33
33
3
PRECAUCIÓNPRECAUCIÓN
PRECAUCIÓNPRECAUCIÓN
PRECAUCIÓN Nunca trate de cargar pilas o baterías no recargables.
Las pilas que se pueden sacar del vehículo deben ser
sacadas para efectuar su carga.
No desarme el cargador o el paquete de pilas.
No recargue el paquete de pilas mientras todavía está
caliente luego de haber estado en uso. Antes de
recargarlo espera hasta que se enfríe.
El paquete de pilas de Níquel Cadmio debe recargarse
bajo la supervisión de un adulto.
Al separar enchufes y conectores no tire los alambres o
cordones (ya que puede cortar los conductores).
Use sólo las pilas o baterías recomendadas o de calidad
similar.
Cargue sólo pilas de níquel cadmio del tipo recargables.
Otros tipos de pilas o baterías pueden reventar hiriendo a per-
sonas y causando daños.
No permita que el cargador o el paquete de pilas se
humedezca o moje.
El cargar en exceso las pilas terminará dañándolas por lo
tanto cárguelas sólo el tiempo indicado.
No efectúe la carga de las pilas en un lugar con temperatura
elevada ni coloque el paquete de pilas cerca de una llama.
Compruebe frecuentemente que no hayan fugas en las pilas.
Saque las pilas descargadas del vehículo.
PULL
PUSH
TURN OVER TRANSMITTER
TURN OVER
RIGHT HANDED LEFT HANDED
44
44
4
3. How to install the batteries
Transmitter
To remove the battery lid, press the point marked OPEN and
pull the lid downward.
One 006P9V) battery
* Dispose old batteries separately from other rubbish.
Battery lid
Install battery making sure that + and – poles are positioned
properly.
3. Installation de la pile/batterie
Emetteur
Pour retirer le couvercle du logement pile, appuyez sur le
point marqué OPEN et tirez le couvercle vers le bas.
Une pile 006P(9 V)
* Jetez les piles anciennes séparément des autres
déchets.
Couvercle du logement pile
Installez la pile en respectant les polarités + et -.
3. Colocación de las pilas
Transmisor
Para sacar la tapa de la pila, presione el punto marcado OPEN
(Abrir) y tire la tapa hacia abajo.
Una pila 006P(9V)
* Elimine las pilas gastadas separadas de la basura
corriente.
Tapa de las pilas
Instale las pilas confirmando que los polos + y - están bien
orientados.
BEFORE YOU STARTBEFORE YOU START
BEFORE YOU STARTBEFORE YOU START
BEFORE YOU START
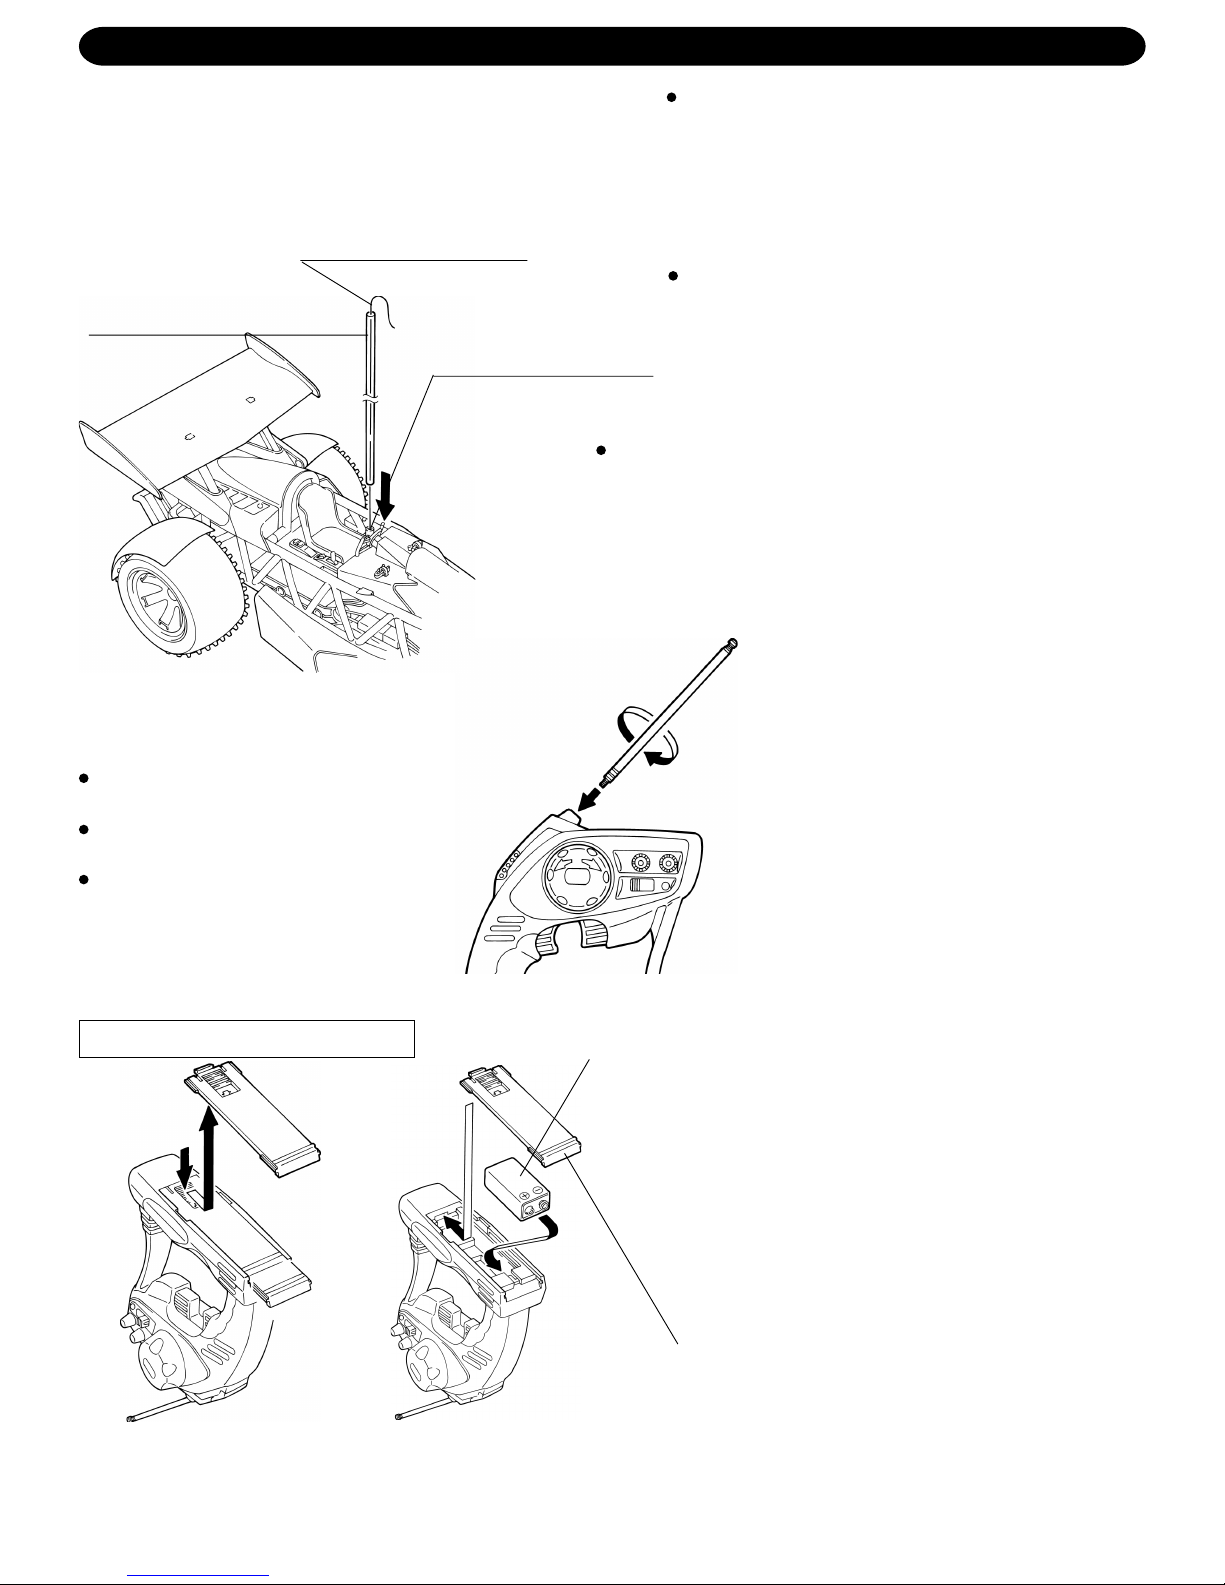
1. How to install antenna tube
Antenna tube
Antenna wire
Antenna tube holder
Pass the antenna wire through the antenna tube and
insert into the antenna tube holder.
If the antenna tube cannot be successfully inserted into
the antenna tube holder, hold the root of the antenna
wire with fingers of one hand and extend the wire with
fingers of the other hand.
Note: Be careful not to pull the antenna wire too hard.
2. How to install transmitter antenna
Place the transmitter antenna into the antenna
holder and screw it in clockwise.
Do not install the antenna extended.
If the antenna is not screwed in securely, the
vehicle may not move at your control.
Screw the antenna securely.
AVANT LE DEMARRAGEAVANT LE DEMARRAGE
AVANT LE DEMARRAGEAVANT LE DEMARRAGE
AVANT LE DEMARRAGE
1. Installation du tube d’antenne
Tube d’antenne
Fil d’antenne
Passez le fil d’antenne dans le tube d’antenne et
insérez ce dernier dans le support tube d’antenne.
Si le tube d’antenne ne peut pas être inséré
correctement dans le support de tube d’antenne,
tenez la base du fil d’antenne d’une main et étendez
le fil de l’autre main.
Note: Ne tirez pas trop fort sur le fil d’antenne.
2. Installation de l’antenne de l’émetteur
Placez l’antenne d’émetteur dans le support
d’antenne et vissez-la dans le sens horaire.
N’installez pas l’antenne dépliée.
Si l’antenne n’est pas vissée fermement, le véhicule
peut ne pas se déplacer à la commande. Vissez-la
fermement.
ANTES DE COMENZARANTES DE COMENZAR
ANTES DE COMENZARANTES DE COMENZAR
ANTES DE COMENZAR
1. Instalación del tubo de la antena
Tubo de la antena
Alambre de la antena
Base del tubo de la antena
Support de tube d’antenne
Pase el alambre de la antena por el tubo de la antena e
insértelo en la base del tubo de la antena.
Si el tubo de la antena no se puede insertar en la base,
sostenga con una mano el tubo de la antena por el lado que se
inserta en la base y con la otra mano extienda el alambre.
Nota: Tenga cuidado y no tire muy fuerte el alambre de la
antena.
2. Instalación de la antena del transmisor
Coloque la antena del transmisor en la base
de la antena y atorníllela en el sentido del
movimiento de los punteros del reloj.
No instale la antena extendida.
Si la antena no queda bien atornillada, es posible
que el vehículo no se mueva bajo su control.
Atornille bien la antena.

55
55
5
Vehicle Make certain both Transmitter Switch and Vehicle Switch are in the “OFF” position.Make certain both Transmitter Switch and Vehicle Switch are in the “OFF” position.
Make certain both Transmitter Switch and Vehicle Switch are in the “OFF” position.Make certain both Transmitter Switch and Vehicle Switch are in the “OFF” position.
Make certain both Transmitter Switch and Vehicle Switch are in the “OFF” position.
11
11
1. Slide the ON/OFF switch under the vehicle to OFF. Lift the battery compartment’s tab and slide the cover in the
direction of the arrow marked on it. Then lift open the cover.
2..
..
.
VEHICULE Vérifiez que les interrupteurs de l’émetteur et du véhicule sont tous les deux coupés (OFF).Vérifiez que les interrupteurs de l’émetteur et du véhicule sont tous les deux coupés (OFF).
Vérifiez que les interrupteurs de l’émetteur et du véhicule sont tous les deux coupés (OFF).Vérifiez que les interrupteurs de l’émetteur et du véhicule sont tous les deux coupés (OFF).
Vérifiez que les interrupteurs de l’émetteur et du véhicule sont tous les deux coupés (OFF).
1. Glissez l’interrupteur marche-arrêt du véhicule sur OFF.
2. Soulevez l’ergot du logement batterie et glissez le couvercle
dans le sens de la flèche dessus. Puis soulevez le couvercle
pour l’ouvrir.
VEHÍCULO
Asegúrese que tanto el interruptor del vehículo como el del transmisor están en la posición “OFFAsegúrese que tanto el interruptor del vehículo como el del transmisor están en la posición “OFF
Asegúrese que tanto el interruptor del vehículo como el del transmisor están en la posición “OFFAsegúrese que tanto el interruptor del vehículo como el del transmisor están en la posición “OFF
Asegúrese que tanto el interruptor del vehículo como el del transmisor están en la posición “OFF
(Desconexión)”(Desconexión)”
(Desconexión)”(Desconexión)”
(Desconexión)”
1. Deslice la palanca del interruptor ON (Conexión)/ OFF
(Desconexión) y póngala en la posición OFF.
2. Levante la lengüeta del compartimiento de las pilas y deslice
la cubierta hacia la dirección de la flecha marcada en ella.
Luego, levante y abra la cubierta.
3..
..
. Insert the battery pack in the compartment with the
connector’s side down and away from the vehicle’s connec-
tor, but inside the vehicle’s frame.
Battery pack
4..
..
. Close the cover and snap it shut.
5. Attach the battery pack’s connector to the vehicle’s match-
ing connector.
Do not force them. They fit together only one way.
3. Insérez la batterie dans le logement, le côté connecteur vers
le bas et éloigné du connecteur du véhicule, puis dans le cadre
du véhicule.
Batterie
4. Refermez le couvercle en l’emboîtant.
5. Raccordez le connecteur de la batterie à celui du véhicule.
Ne forcez pas sur les connecteurs. Ils ne se connectent que
dans un sens.
3. Inserte el paquete de pilas en el compartimiento de las pilas
con el lado del conector hacia abajo y separado del conector del
vehículo pero dentro del chasis.
Paquete de pilas
4. Cierre la cubierta y haga enganchar la cerradura.
5. Conecte el conector del paquete de pilas con el respectivo
del vehículo. No los fuerce. Ellos pueden conectarse de una
sola manera.
Vehicle’s connector Connectors
Connecteur du véhicule Connecteurs
Conectores
Fahrzeuganschluss
Table of contents
Other Nikko Motorized Toy Car manuals

Nikko
Nikko TP7770H User manual

Nikko
Nikko 120125 Morph nator User manual

Nikko
Nikko ST-39803 User manual

Nikko
Nikko 94134 User manual

Nikko
Nikko Invader User manual

Nikko
Nikko ST-40800 User manual

Nikko
Nikko RDC-160022 User manual

Nikko
Nikko RDC-140003 User manual

Nikko
Nikko TRANSFORMERS AUTOBOT OPTIMUS PRIME User manual

Nikko
Nikko VaporizR User manual


