Nikon SMZ460 User manual

実体顕微鏡
Stereoscopic Microscope
SMZ460/SMZ445
使用説明書
Instructions
M446 J/E 07.2.NF.1


3
目次/Contents
本書の警告/注意マークについて .................................................................................5
必ず守ってください。......................................................................................................6
警告 ..............................................................................................................................6
■ 各部の名称と使い方 ...................................................................................................8
■ 検鏡手順 ................................................................................................................... 10
■帯電防止 ................................................................................................................... 10
表:総合倍率と実視野 ....................................................................................................9
Warning/Caution Symbols Used in This Manual .........................11
Be sure to always follow these guidelines. ..................................12
WARNING ..........................................................................................12
■Nomenclature and Using ..............................................................14
■Operating Procedure...................................................................... 16
■Antistatic Feature ................................................................................. 16
Table: Total Magnification and Real Field ..............................................15


5
警告
注意
この度は、ニコン製品をお買い上げいただき、まことにありがと
うございます。
この使用説明書は、システム実体顕微鏡をご使用の方のために書
かれたものです。
ご使用前によくお読みになり、正しくお使いくださいますようお
願いいたします。
•本書の内容の一部、または全部を無断で複写、転記することを禁止
します。
•本書の内容については、将来予告なしに変更することがあります。
•本書の内容については万全を期しておりますが、万一不可解な点や、
誤り、お気付きの点がございましたら、購入先にご連絡くださいま
すようお願いいたします。
•本書に掲載されている製品の中には、ご購入いただいたセットに含
まれないものがある場合もあります。
•同時にお使いになる製品がある場合は、その製品の使用説明書も合
わせてお読みください。
•本書で指定していない使い方をされた場合、装置の安全性が損なわ
れる恐れがあります。
本書の警告/注意マークについて
本製品は安全性に十分配慮して設計、製造されています。しかし、誤った使
い方をしたり、注意事項を守らないと、人体や家財に損害を与える事故が起
こる可能性もあります。製品をご使用になる前に、本使用説明書をよくお読
みになり、製品を正しくお使いください。また、使用説明書は捨てたりせず、
いつでも見ることができる場所に備え付けておいてください。
本書では、次のようなマークを使って、「安全のために特に注意すべき事柄」
を目立たせています。このマークの付いた指示は必ずお守りください。
マーク 内容
このマークの付いた指示を守らないと、死亡または重傷
を負う可能性があることを示します。
このマークの付いた指示を守らないと、怪我をしたり、
周辺の家財に損害を与える可能性があることを示します。

6
必ず守ってください。
警告 本製品は、顕微鏡観察の目的にのみ使用してください。その他の目的
には使用しないでください。
1. 設置場所
設置の際は、以下の点にご注意ください。
•温度0〜40℃、湿度80%以下の場所に設置してください。高温多湿の場所
に設置すると、レンズにカビが発生したり、結露し、性能劣化や故障の原因
になります。
•振動の少ない場所に設置してください。
•水平に設置してください。
•ホコリ、ゴミの少ない場所に設置してください。
2. 取扱いはていねいに
本製品は精密光学機器のため、取扱いには十分注意し、衝撃を与えないように
してください。
3. 分解しない
分解は、故障の原因になります。本使用説明書に記載されていない部分の分解
は、決して行わないでください。異状に気付いた時は、ご購入先にご連絡くだ
さい。
4. レンズの清掃
レンズには、ホコリ、指紋などを付けないでください。像の見えを悪化させま
す。レンズが汚れてしまったら、下記の手順に従い、清掃してください。
•ホコリはブロアなどを使用してエアーで飛ばしてください。それでも取れな
い場合は、柔らかい毛筆(刷毛)で払うか、ガーゼで軽く拭き取ってくださ
い。
•指紋または油脂類の汚れの場合のみ、無水アルコール(エチルアルコールま
たはメチルアルコール)を柔らかい清潔な木綿布か、レンズティッシュまた
はガーゼにわずかに含ませてから軽く拭いてください。
ただし、一度使用した場所で二度は拭かないでください。

7
必ず守ってください。
•無水アルコールは引火性が高いので、取扱いや火気に十分注意してくださ
い。
•無水アルコールは、製造元の取扱い注意に従って扱ってください。
5. 塗装部分の清掃
塗装部分、プラスチック部分、印刷部分には有機溶剤(アルコール、エーテ
ル、シンナーなど)を使用しないでください。変色や印刷文字のはがれの原因
となります。汚れのひどい場合は、中性洗剤を薄めてガーゼに少量含ませ、軽
く拭いてください。
6. 保管
湿気が少なく、カビの発生しにくい場所に保管してください。
ホコリがたまらないよう、ビニールカバーなどをかけて保管してください。
7. 定期点検
本機の性能維持のため、定期点検をお勧め致します。定期点検については、ご
購入先にご相談ください。

8
図は SMZ460 です。
接眼レンズ
10X、15X、20Xがあります。
視度調節リング
左右両眼にあり、ズーミング
観察時のピントのズレを調節
します。
鏡体
アーム
鏡体クランプねじ
鏡体をアームに固定します。
ステージプレート
観察する試料によって、黒色
と乳白色の両面を使い分け
ます。帯電防止仕様のプレー
ト(ESDステージプレート)
もあります。
ズームノブ
回すと観察倍率が最低倍
率〜最高倍率まで連続的
に変倍します。倍率はノブ
に表示されています。
フォーカ スノブ
左右のフォーカスノブを
同方向に回すと、鏡体を
載せているアームが上下
し、試料にピントを合わせ
ることができます。左右
別方向に回すと、ノブのト
ルク調整ができます。
アーム取付けねじ
アームの取付け高さを2
段階に変えられます。
クレンメル(別売り)
取付け穴
クレンメル(試料押さえ)
を取り付けることができ
ます。
スタンドC-PSC
各種スタンドが用意され
ています。
上下動スライダ
各部の名称と使い方

9
ハロゲン照明装置用
アーム取付けねじ穴
アームの左右両側にあり、フ
レキシブルアーム(G-EIA)
やエピアームを取り付ける
ことができます。
接眼レンズ傾斜角
SMZ445:水平より45゜
SMZ460:水平より60゜
6V10Wハロゲン照明装置
取付け穴
6V10Wハロゲン照明装置
(G-LS)を取り付けること
ができます。
六角棒レンチ収納部
付属の六角棒レンチ
を差し込みます。
六角棒レンチ(大)
支柱
アーム取付けねじ用。
スタンドに付属。
アース用ジャック
後述の項目「帯電防
止」を参照してくださ
い。
接眼レンズ
補助 作動 10X 15X 20X
機種名 対物 距離 視野数 21 視野数 14 視野数 12
レンズ [mm]
総合倍率 実視野 総合倍率 実視野 総合倍率 実視野
[mm] [mm] [mm]
-100 7 〜 30X 30 〜 7 10.5 〜 45X 20 〜 4.7 14 〜 60X 17.1 〜 4
SMZ460 0.5X 181 3.5 〜 15X 60 〜 14 5.3 〜 22.5X 40 〜 9.3 7 〜 30X 34.3 〜 8
0.7X 127.5 4.9 〜 21X 42.9 〜 10 7.4 〜 31.5X 28.6 〜 6.7 9.8 〜 42X 24.5 〜 5.7
-100 8 〜 35X 26.3 〜 6 12 〜 52.5X 17.5 〜 4 16 〜 70X 15 〜 3.4
SMZ445 0.5X 181 4 〜 17.5X 52.5 〜 12 6 〜 26.3X 35 〜 8 8 〜 35X 30 〜 6.9
0.7X 127.5 5.6 〜 24.5X 37.5 〜 8.6 8.4 〜 36.8X 25 〜 5.7 11.2 〜 49X 21.4 〜 4.9
総合倍率と実視野
10
検鏡手順
1. 試料を載物板上に載せます。
2. 双眼鏡筒の視度補正環を両方とも回して、視度補正環の端面を黒い刻線に合わせ
ます。
3. 両接眼レンズをのぞき、双眼鏡筒を動かして、両視野が一つの円になるように眼
幅を調節します。
4. ズームノブを回して、最大倍率に合わせます。
5. 焦準ハンドルを操作してピント合せをします。
試料と鏡体下部との間隔を、前もって約100mmにしておくと、ピント合せが容
易です。
6. ズームノブを最低倍率に合わせます。
7. 左右の視度補正環を交互に回し、左右眼別々にピント合せをします。
8. 4.〜 7. の操作を繰り返してピントの確認をすると、変倍しても鮮明な像が得ら
れます。
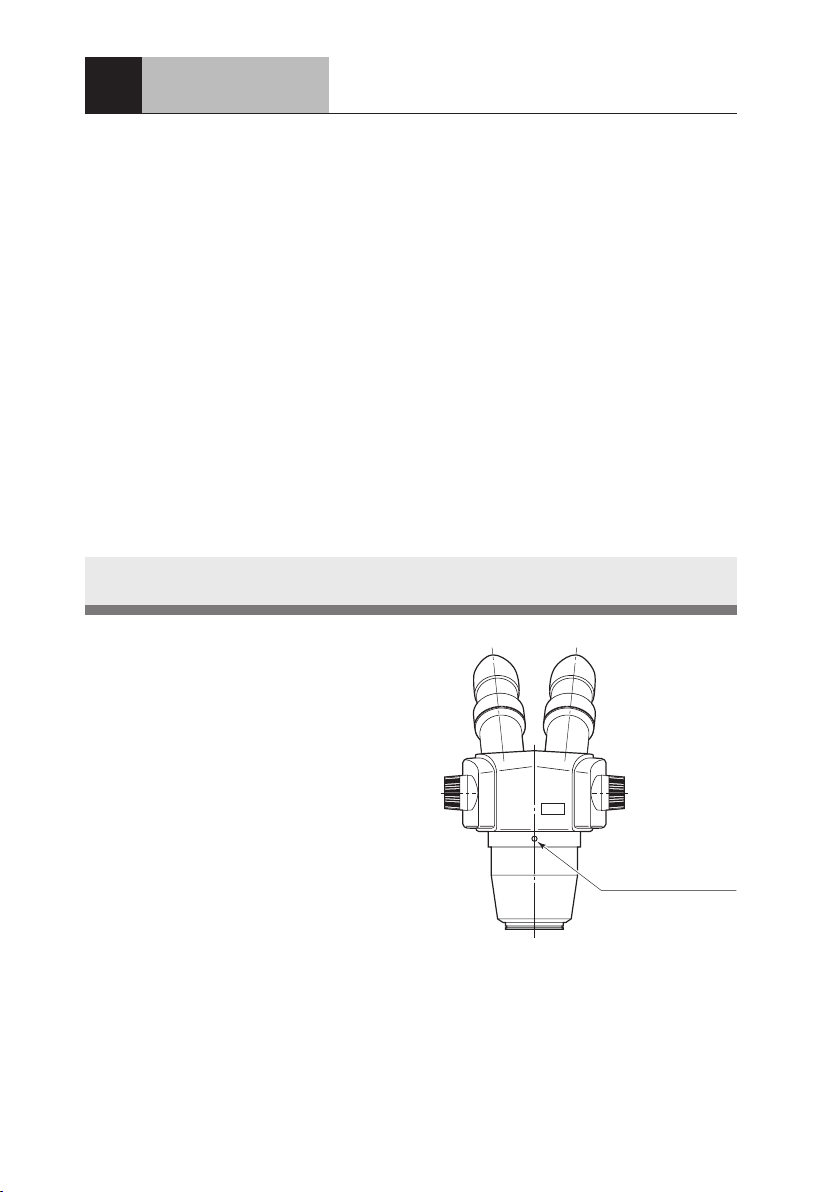
帯電防止
SMZ460、SMZ445、およびスタ
ンドC-PS/C-PSCは帯電防止仕様で
す。静電気に弱い試料を観察すると
きに有効です。
鏡体背面にはアース端子用タップ
(M4、長さ 6mm 以下のビス用)、ス
タンド支柱背面にはアース用ジャッ
ク(φ4mmのバナナプラグ用)が
あります。必要に応じ、これらを使用
してアースをとってください。
アース端子用タップ
This manual suits for next models
1
Table of contents
Languages:
Other Nikon Microscope manuals

Nikon
Nikon LABOPHOT2-POL User manual

Nikon
Nikon Eclipse Ti-E User manual

Nikon
Nikon Ee1078 User manual

Nikon
Nikon SMZ1000 User manual

Nikon
Nikon ECLIPSE Ti2-U User manual

Nikon
Nikon Eclipse L200 User manual

Nikon
Nikon 50i User manual

Nikon
Nikon SMZ-1 User manual

Nikon
Nikon eclipse E200 User manual

Nikon
Nikon LABOPHOT-2 User manual

Nikon
Nikon SMZ745T User manual

Nikon
Nikon A1+ User manual

Nikon
Nikon Eclipse L200A User manual

Nikon
Nikon Eclipse TS100 User manual

Nikon
Nikon T1-FM User manual

Nikon
Nikon Elcipse TE2000 User manual

Nikon
Nikon Eclipse LV100DA-U User manual

Nikon
Nikon A1 User manual

Nikon
Nikon Eclipse TE300 User manual

Nikon
Nikon Elcipse TE2000 User manual


