Ningbo BIO-06A User manual

PelPal Biofeedback Therapy Device
(Biofeedback Probe Model: BIO-06A
Wireless Charging Cradle Model:MWCC-01A)
Instructions for use
2020-07-01 revised Version:V1.4 Document No:MD-E1-04
Ningbo MedKinetic Medical Device Co., Ltd

— 1—
Table of Contents
Company information ......................................................................................................................................... 1
Indications for Use .............................................................................................................................................. 1
Safety warnings and precautions ........................................................................................................................ 1
Chapter 1 PelPal device and accessories............................................................................................................. 3
1.1 List of included parts ................................................................................................................................. 3
1.2 Key components........................................................................................................................................ 3
1.3 Biofeedback probe .................................................................................................................................... 4
1.4 Wireless charging cradle ........................................................................................................................... 4
1.5 Android App .............................................................................................................................................. 5
Chapter 2 Directions For Use .............................................................................................................................. 7
2.1 Preparing the device for the first use........................................................................................................ 7
2.2 Charging the device................................................................................................................................... 8
2.3 Turning the device on and off ................................................................................................................. 10
2.4 Initiating the biofeedback training.......................................................................................................... 11
2.5 Performing the biofeedback training ...................................................................................................... 13
Chapter 3 Product Maintenance....................................................................................................................... 15
3.1 Cleaning................................................................................................................................................... 15
3.2 Device storage......................................................................................................................................... 15
3.3 Waste Disposal ........................................................................................................................................ 16
Chapter 4 Fault analysis and troubleshooting................................................................................................... 17
Chapter 5 Therapy scope, indications, and contraindications .......................................................................... 18
5.1 Therapy scope ......................................................................................................................................... 18
5.2 Indications ............................................................................................................................................... 19
5.3 Contraindications .................................................................................................................................... 19
Chapter 6 Product warranty.............................................................................................................................. 19
Chapter 7 Electromagnetic compatibility.......................................................................................................... 22
Chapter 8 Technical Specifications.................................................................................................................... 25
Chapter 9 FCC Statement ................................................................................................................................. 27

— 2—
Dear Customers:
Thank you for choosing our product.
For your convenience, please read the instructions carefully and follow all instructions. If you
experience any problems during the device use, please contact us by phone or mail, using the
information below.
Contact Us:
Name of Registrant: Ningbo MedKinetic Medical Device Co., Ltd.
Address: Lushan West Road, 167-8, Ningbo Free Trade Zone (South), 315806 Ningbo, China
Phone: +86 574 86808886
Email: PELservice@medkinetic.com
Website: www.medkinetic.com/products/PEL
USA Authorized Representative
MedKinetic LLC
Address: 420 S Madison Ave, Suite 206, Pasadena, CA 91101, USA
Phone: +1 626-497-9441
Email: PELservice@medkinetic.com

— 1—
Company information
The customer service center at Ningbo MedKinetic Medical Device Co., Ltd can provide help
to customers who encountered problems while using the product. Please go to
http://www.medkinetic.com for support. In addition, customers can keep up-to-date with the
latest product developments through the website of Ningbo MedKinetic Medical Device Co., Ltd.
and download the required technical documents from the download center.
The conventions about the icons in the manual are as follows:
¤Tip: This icon mainly gives some information related to the text, and also gives users some
guidelines to help users better understand the content of the manual.
Scope of application
This manual provides the instructions for use of the biofeedback therapeutic device
produced by Ningbo MedKinetic Medical Device Co., Ltd.

— 1—
Indications for Use
The PelPal biofeedback therapy device is an Over-The-Counter Class II medical device
intended to treat constipation and fecal incontinence. It is to be used by adults only. This manual
will introduce the performance, operation methods and other safety information of the PelPal
device in detail. This is the best starting point for new users to start using and master the use of
BIO series biofeedback therapy devices.
The following symbols will be used throughout the manual:
Symbol
Meaning
Warning about a situation when if the device is used incorrectly it can result in death or
injury to the patient or user or damage to the equipment or other property
Attention indicates an important information

— 1—
Safety warnings and precautions
Precautions for use
Please read this manual carefully first and always follow the operating instructions.
•Please stay away from children and pets;
•
Don't use in lint, dust, bright light (including sunlight), etc;
•Children or people with disabilities need special supervision to use this instrument;
•Do not use for contraindication patients of this product;
•If you are pregnant or have menstrual cramps, please do not use this instrument;
•Please use the USB data cable provided by the manufacturer for charging;
•It is recommended to use an adapter that meets the G9706.1-2007 standard;
•If the instrument or charging cable is damaged, do not use it;
•Before charging, please ensure that the charger and product charging are dry;
•When the product or charger may be submerged in water, it can not be used for charging;
•Do not use other therapeutic instruments while using this machine;
•Do not use this product when you are drunk or unwell;
•Patients with malignant tumors, heart disease, severe hypertension, etc., please use with caution
(requires normal person supervision);
•Do not disassemble the internal components of the product without permission to avoid the
possibility of machine failure;
•Except for the repair technicians appointed by our company, the products must not be
decomposed, modified or modified. If you have any questions, please contact the dealer in time;
•Do not use a power supply other than the rated voltage to avoid fire or damage to the product;
•When unplugging the power cord, grasp the plug of the power cord instead of the wire;
•
Do not damage, excessively bend, pull, twist, or knot the power cord;

— 2—
•When the power cord is damaged, please do not dismantle and replace it privately, please contact
the dealer or qualified professional to replace and repair
•Do not use in strong electromagnetic radiation environments, such as portable communication
equipment other than mobile phones used in conjunction with this product;
•Do not use in an oxygen-rich environment;
•Do not use it at an altitude of more than 3000 meters;
•Do not forcefully pinch or break the biofeedback probe;
•The product cannot be used in the presence of flammable anesthetic gas mixed with air or
flammable anesthetic gas mixed with oxygen or nitrous oxide;
•The probe is scrapped. The probe contains lithium batteries. Please recycle according to the
scrapped battery. Please do not discard it in the environment.
•
Please do not use when the equipment performance changes.
It is prohibited to disassemble or modify the device or accessories
Turn off the device before removing the lead cable or pads
Unplug the USB power adapter from the power socket before using the device
Use only the provided USB power adapter for device charging, as using unapproved power adapter
can be dangerous
It is prohibited to use this device with accessories not supplied by manufacturer

— 3—
Chapter 1 PelPal device and accessories
1.1 List of included parts
Part name
Quantity
Biofeedback probe
1
Wireless charging cradle
1
USB charging cable
1
USB power adapter
Purchased separately
Instructions for Use
1
Android application software
Downloaded by user
1.2 Key components
The PelPal device consists of a biofeedback probe, a wireless charging cradle with a
protective cover and a USB data cable, an APP. as shown in Figure 1.1.

— 4—
protective
cover
Biofeedback
probe
USB data cable
wireless charging
cradle
Figure 1.1 Composition of PelPal device
1.3 Biofeedback probe
The biofeedback probe consists of a handle with sensors. The probe sensors are inserted in the
subject's anorectal area to detect the pressure of the rectum and anal sphincter when the subject
is performing a simulated defecation or clamping the anus, as shown in Figure 1.2.
Probe sensors
Probe indicator
Hall switch
Probe handle
Figure 1.2 Biofeedback Probe
1.4 Wireless charging cradle
The wireless charging cradle is used for storing and managing the probe charging before and after
— 5—
use, as shown in Figure 1.3.
Biofeedback probe
Probe switch
activation slot
Probe wireless
charging placement
slot
Hall swith
wireless
charging cradle
Figure 1.3 Wireless charging cradle
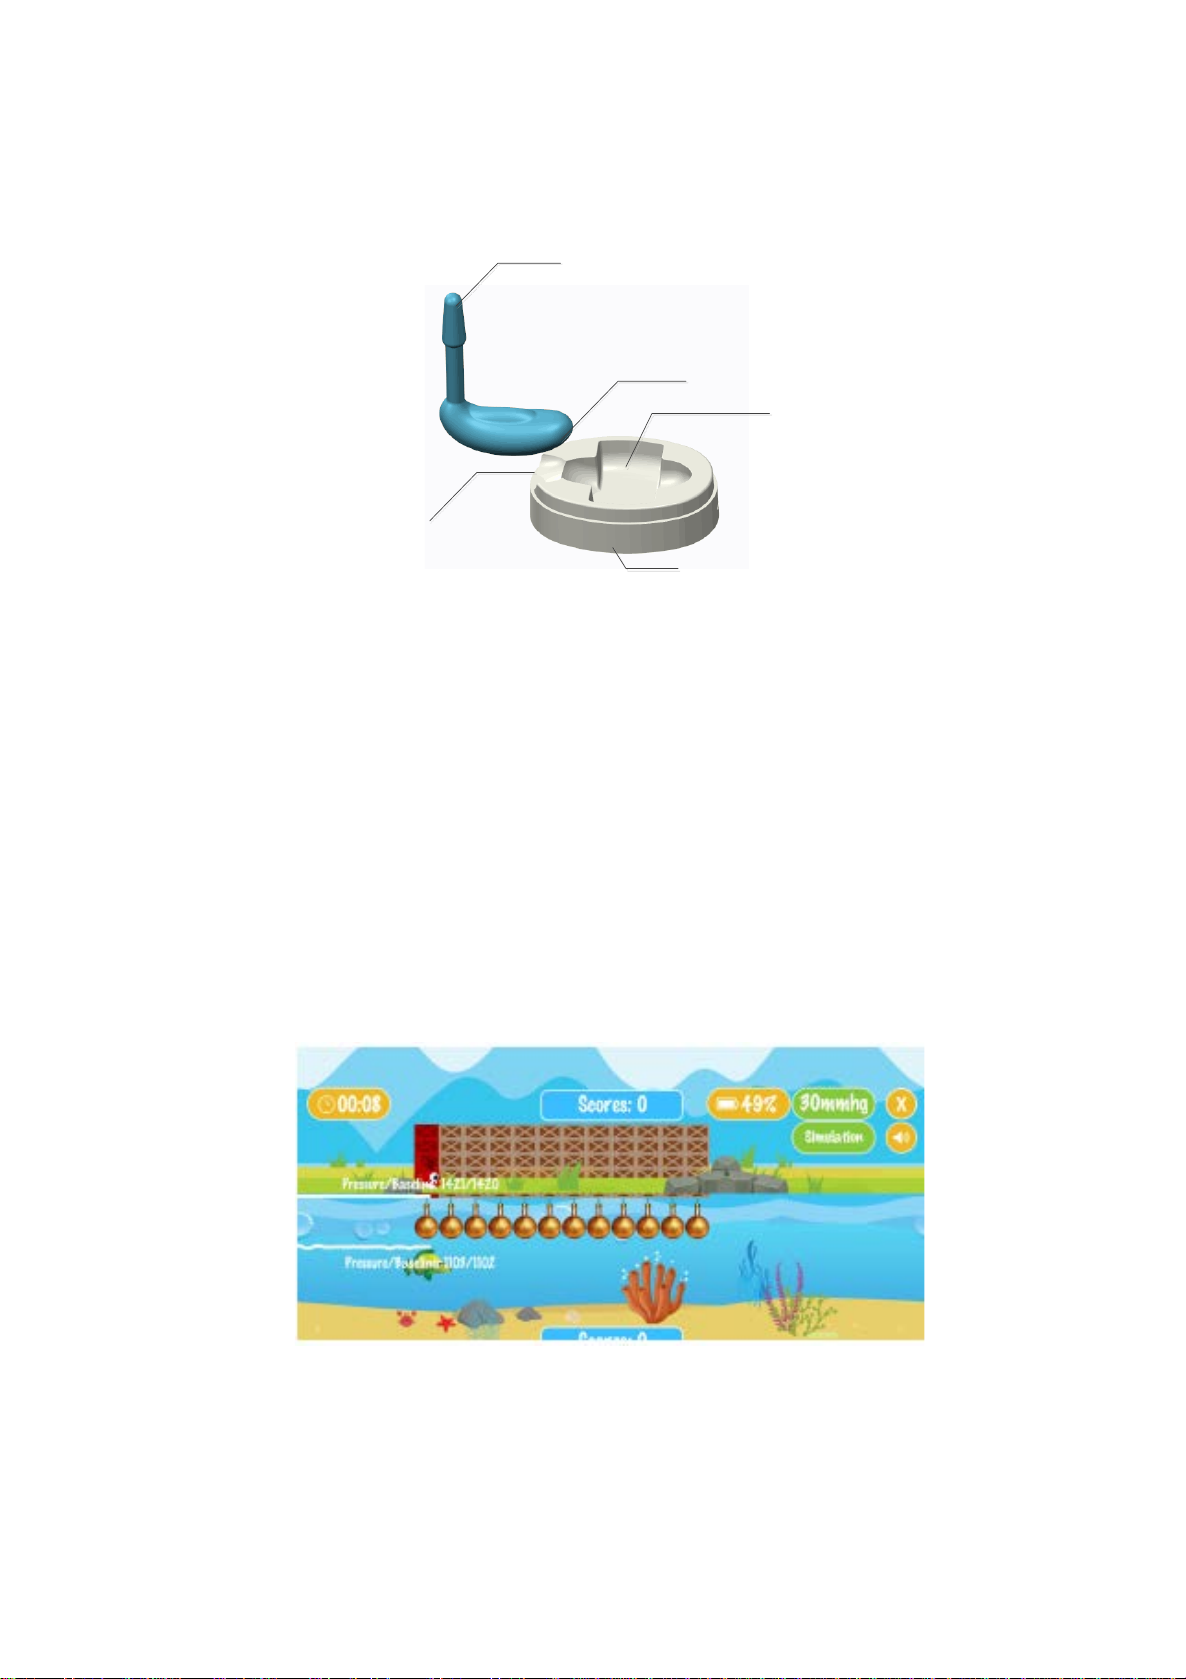
1.5 Android App
The app needs to be installed by the user on a smartphone with Android operating system.
The app is used to provide data interactive interface for subjects during biofeedback training. The
app provides two training modes, which are suitable for the rehabilitation of patients with
constipation and fecal incontinence. The training process uses a game playing interface, making
you feel relaxed and comfortable. The training interface is shown in Figure 1.4:
Figure 1.4 Biofeedback app training page

— 6—
If you need to know the past training achievements, you can browse the historical data on the
app software and watch the entire training process, which can provide you with rich information
for the next training.

— 7—
Chapter 2 Directions For Use
2.1 Preparing the device for the first use
●Open the product package, remove the product and accessories;
●open Biofeedback Protective cover on the wireless charging cradle, clean and stick the fixed
probe and the auxiliary sticker on the charging box;
●take out the charger and connect the USB data cable, connect the USB data cable mini port
to the USB data cable connection port on the wireless charging cradle, and the charger
Connect the other end to a 110V power socket;
●place the biofeedback probe into the charging slot (note that it is neatly placed). At this time,
the charging function is performed between the biofeedback probe and the wireless
charging cradle, and the charging status indicator flashes on the handle of the biofeedback
probe. , Steady green indicates full charge, and yellow flashing indicates charging. The first
full charge lasts about 2 hours. The description of the probe indicator is shown in Table 2.1
below:
Table 2.1 Description of the probe indicator status
Turn on,
Bluetooth
is not
connected
Bluetooth
is
connected
Data
transmission
is on
Data
transmissio
n is off
Charging charging is
completed
Low
battery
blue
off
off
off
off
slowflas
hing
steady
fast
flashing
green
flashes
slowly
steady
flash
off
off
off
-
●cleaning before use, washing and disinfecting see specific probe portion;

— 8—
●power the probe, by placing it in the slot on wireless charging cradle for about 5 seconds;
after activation, the probe indicator lights green;
●subject prepares before training;
●launch the Biofeedback application on the smartphone;
●register a username (first use), and logs in;
●in the selected training mode, connect the probe Bluetooth, And began to record the data
and set the data to zero;
●biofeedback probe is inserted into the anorectum, with the subject adjusting the posture;
●training was started and the training mode was entered. The subject adjusted the anorectal
simulation training action according to the mobile app content prompts , Training lasts about
30 minutes;
●after training, unplug the probe, disinfect, clean, dry, put back into the wireless charging
cradle for storage.
2.2 Charging the device
●Connect the USB data cable plug to the socket under the charger, and then insert the DC
connector into the USB data cable connection port of the probe wireless charging cradle.
●The biofeedback probe is placed in the charging slot on the probe wireless charging cradle,
as shown on Figure 2.1.

— 9—
Figure 2.1 Placing the probe into the charging slot on the wireless charging cradle.
●Insert the charger plug into the AC100 ~ 240V, 50 / 60Hz power socket, as shown on Figure
2.2.
Figure 2.2 Charger and USB data cable connection
●Once the charger is powered on, the charge indicator on the probe will light up.
●It takes about 2 hours to fully charge the battery. After the battery is fully charged, the
charging indicator on the probe is steady green.

— 10 —
2.3 Turning the device on and off
●The physical switch of the probe is a magnetic switch, which is located at the end of the
probe handle, as shown in the "magnetic switch" position.
●The other end of the USB data cable interface of the probe wireless charging cradle is the
probe switch activation slot, as shown on Figure 2.3.
USB data
cable
charging
interface
Probe switch
activation slot
Figure 2.3 Base of the wireless charging cradle
●Turning on the probe of the: Close the magnetic switch at the end of the probe handle to the
probe switch activation slot on the base of the wireless charging cradle. It takes about 5
seconds to activate the probe switch. When activated, the probe indicator is blue. Blinks, as
shown on Figure 2.4.
Caution
◆
The device does not work during charging
◆Use only the provide medical-grade power adapter
◆Do not bend or twist the power cord
◆
Keep the probe in the charging box to maintain its battery
capacity

— 11 —
Hall swith
Probe switch
activation slot
Probe indicator
Figure 2.4 The position of the activated magnetic switch is shown on the left. Theright is placed
●sensor is turned off when the. The operation mode is the same as when the probe is turned
on. When the probe is turned off, the indicator on the probe is off.
2.4 Initiating the biofeedback training
●When the probe is turned on, press the “BioFeedback” icon to proceed to the
biofeedback training login interface.
●For first time use, you need to register.
●After logging in, on the My Data page, click the menu in the upper left corner and select
"Training" from the pop-up menu, as shown in the operations on Figures 2.5 and 2.6 below:
Caution
◆
Do not pinch the probe to avoid damaging the sensors
◆
After use, turn off the device to prevent depleting the battery

— 12 —
Click training to select dual channels (constipation) and click to start (parameters are default)
Click the recording baseline and click “Start”
Figure 2.5 Sequence of operations
Figure 2.6 Training screen
●You could complete one training by default,which requires 30 obstacles,which takes about
30 minutes.

— 13 —
●Hold the probe handle, slowly insert the sensor part of the probe sensor into your anus, and
leave the probe handle outside the body. Please insert the sensor part of the probe
completely (if you feel discomfort when inserting, please use water-soluble lubricating fluid),
fix it, adjust the proper posture of the lying or sitting position, and then click the "start game"
button.
●Choose the right exercise position: Most people prefer sitting exercises, holding your phone
at your knees. If you feel uncomfortable with this position, try lying down and lying on your
side. For better results, set goals and keep exercising in the same position.
●During the simulated defecation, observe the movements of the two game characters, the
bird and the fish, to adjust the movement of each simulated defecation.
2.5 Performing the biofeedback training
●anorectal coordination training (functional constipation rehabilitation training)
You can inhale deeply and feel that the lower part of the thorax slowly expands to both sides.
Relax the abdominal muscles completely, then slowly expand the abdomen outward. At the same
time completely relax the anus and pelvic floor muscles. Facial expressions are relaxed and
natural. Then exhale slowly.
If you choose the functional constipation rehabilitation training mode, you need to do
defecation simulation during training. The character of the game bird on the mobile phone
represents the abdominal pressure, and the fish represents the anal pressure. The direction of
movement of the two characters indicates that you are simulating defecation Movement
coordination. The goal of each training control defecation is to let the birds fly over the obstacle
wall and let the fish sink to the bottom of the lake without touching the hook. Whenever the bird
hits the obstacle or the fish hits the hook, the corresponding obstacle will turn red. . Whenever

— 14 —
the birds and fish pass the obstacle, please relax and rest until the next time the birds and fish
are reminded 3, 2, 1 again, and then do a simulated defecation action.
●Anus contraction training (fecal incontinence rehabilitation training)
If you choose the fecal incontinence rehabilitation training module, you need to do anal
clamping (anal lift) during training. The game bird on the mobile phone represents anal pressure,
and the height of the bird flying represents training. Anal clamping pressure. The goal of enzyme
washing training to control the clamping of the anus (anus) is to let the birds fly over obstacles.
Whenever a bird hits an obstacle, the corresponding obstacle will turn red. Whenever the bird
passes the obstacle, please fully relax and rest until the next time the bird is reminded 3, 2, 1
again, then do anal clamping (anal lift).
Caution
◆
Please do not use this product for two or more people.

— 15 —
Chapter 3 Product Maintenance
3.1 Cleaning
Clean the probe before and after each use. Wipe the surface of the probe thoroughly with soft
cloth that is dampened with a warm cleaning solution, such as household soap or mild detergent,
which are recommended for cleaning hands and or lightly soiled kitchen items. Do not immerse
the probe in a cleaning solution. Finally, rinse the cloth in water, squeeze out the water, and wipe
the probe. Let the probe dry completely before placing it in the charging case.
3.2 Device storage
●Put the device in the cradle and put it in a safe place.
●Please do not place heavy objects on the product to make the product moisture-proof,
mouse-proof and stain-proof.
●Under storage conditions, it can be used immediately after being taken out.
Caution
◆
Don’t wash the probe with very hot water or harsh cleansing
agents or detergents (such as those containing bleach, benzene
or alcohol)
◆Don’t clean using strong pressure or abrasives
◆
Don’t place the probe in a microwave oven
◆
Don’t place the probe in a dishwasher
This manual suits for next models
1
Table of contents
Other Ningbo Medical Equipment manuals


Popular Medical Equipment manuals by other brands

Thought Technology
Thought Technology eVu TPS user guide

Otto Bock
Otto Bock 12K41 Instructions for use

Vatech
Vatech Smart Plus PHT-35LHS Technical manual
BeaconMedaes
BeaconMedaes Lifeline Installation, operation and maintenance instructions

Moog
Moog Enteralite Infinity manual

mk-dent
mk-dent AM1014 instruction manual


