Now you’re ready!
Choose a recipe from the Recipe Guide and keep this
Quick Start Guide nearby for reference.
6.
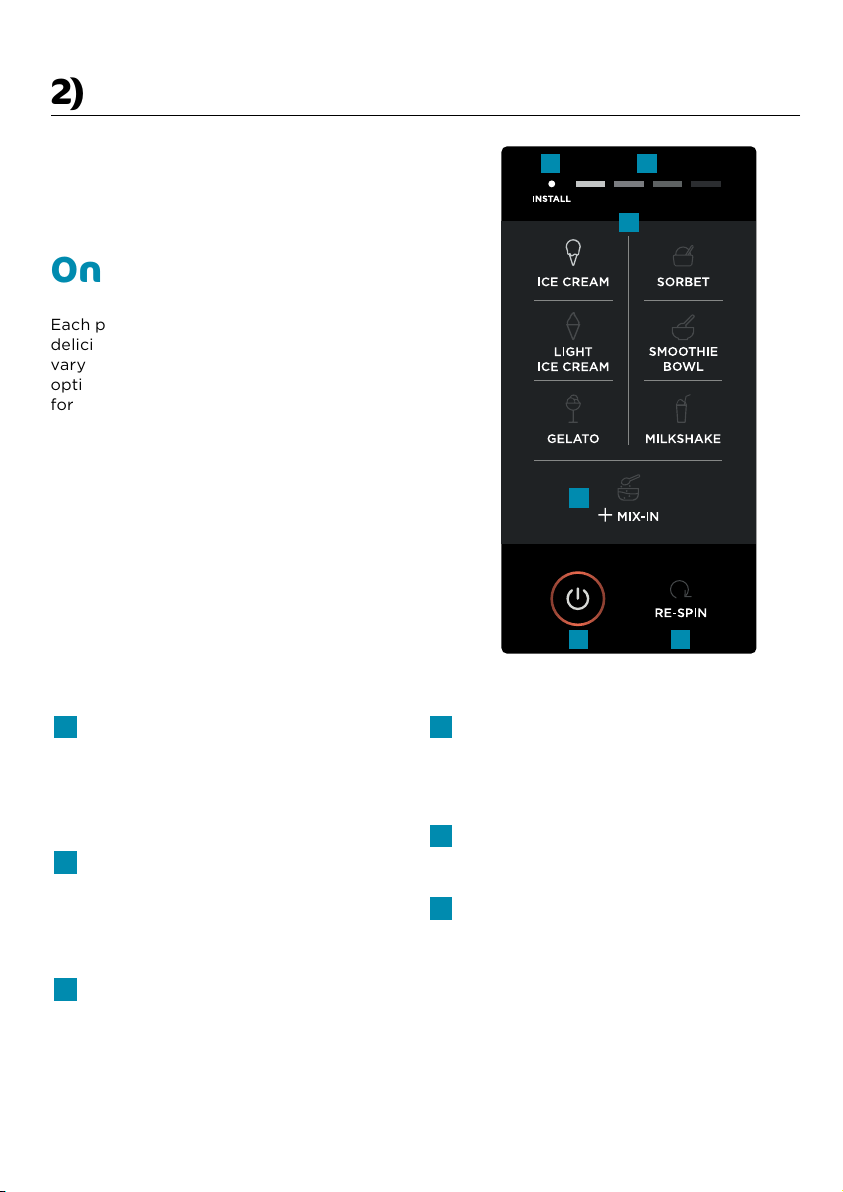
Choose program
Select a program and
processing will begin. When
complete, all 4 segments of
the progress bar will flash
twice and then turn o.
7.
Remove bowl
When the program ends,
hold the release button
on the left of the motor
base and twist bowl handle
clockwise to remove.
8.
Remove lid
Press the lid unlock
button and twist to
remove lid.
Bowl Release
Button
To remove the
outer bowl, hold
release button.
2.
Install tub
Remove lid from tub
and check that the
ingredients in the tub
have not been frozen
at an angle. Place
the tub containing
the frozen base in
the outer bowl.
3.
Install paddle
Press and hold the paddle latch
on the top of the outer bowl
lid, then insert the paddle in
the bottom of the lid. Release
the latch to secure the paddle.
Latch will be in the centre when
the paddle is correctly installed.
4.
Install lid
Position the tab of the
lid just slightly to the right
of the outer bowl handle
so the lines on the lid and
handle align. Rotate the
lid clockwise to lock.
3) Assembly 4) Processing
5.
Install outer bowl
After plugging in the unit, place the
outer bowl on the motor base with
the handle in the middle of the unit.
Twist handle to the right to raise the
platform and lock the bowl in place.
You will hear a click when the
bowl is correctly installed.
1.
Plug in unit
Make sure to plug in
the unit before assembly
and switch Power on
The unit will NOT recognise
the outer bowl and therefore
will not work if it is installed
before the unit is plugged in.
The paddle will feel loose
when installed. Turn the lid
upside down or give the
paddle a spin to be sure
it is secured.
NOTE
Make sure to plug in the unit before assembly. If the programs do not illuminate
when the power is turned on, make sure the unit is properly assembled. If the
install light is flashing, the outer bowl needs to be properly installed. If the install
light is steadily illuminated, the paddle needs to be properly installed.
NOTE
5) Disassembly & Cleaning
© 2021 SharkNinja Operating LLC.
NINJA is a registered trademark of SharkNinja Operating LLC.
NC300UK_QSG_MP_210526_Mv1
Remove tub & paddle
Lift the tub out of the outer bowl.
Rinse the outer bowl lid to remove any
sticky residue or pieces wedged in the
paddle. Then remove the paddle by
pressing the paddle latch on top of the lid.
All parts are dishwasher safe on the
top-rack and can also be hand-washed.