NIOX MINO User manual

ENGLISH
NIOX MINO®
User Manual

Remember
•Itisofvitalimportancetoadheretothespeciedoperatingconditions:
Ambienttemperature:+16to30°C
Humidity:20to60%RH(non-condensing)
•Mobilephonesandcordlessphonesmightinterferewiththeinstrument
andshouldthereforebekeptawayfromtheinstrument.Interference
couldmakeitimpossibletoperformameasurement.
•Whenwithinthespeciedoperatingconditionsitisrecommendedto
keep NIOX MINO®withinstalledSensorconnectedtoapoweroutlet
wheneverpossible.
•ItisrecommendedtoallowanewSensortobeconnectedfortwohours
beforetherstmeasurementisdone.
• It is recommended not to use NIOX MINO in the proximity of areas
wherevolatilesubstancessuchasorganicuidsordisinfectantsare
beingused.Specialattentionshouldbepaidtoaerosolsanddisinfection
baths(eitheropenvesselsorultrasonicbaths).
•AlwaysuseaNIOXMINOBag(closed)fortransportationandstorage
ofNIOXMINOwhenitisdisconnectedfromthepoweroutlet.(The
NIOXMINOBagissoldseparately.)
•Shelf-life-NIOXMINOinstrument:Minimum3yearsattimeofdelivery,
or3,000measurements.
NIOXMINOSensor:Maximum12monthsafteropeningpackageand
mountedinNIOXMINO,whichevercomesrst.
Note!
Thismanualisintendedformedicalcarepersonnelandforuse
whenteachingpatientshowtousetheNIOXMINOinstrument.
Toaidthis,ademonstrationmodeisavailableintheinstrument.
Pleaserefertothe"Demonstrationmode"section,page7.

1
Warning! ........................................................... 2
Intended use (Europe) ..................................... 2
Training requirements ..................................... 2
Presentation ..................................................... 3
Installation and set-up .................................... 4
Measurement ................................................... 5
EnterpatientID(optional)................................. 5
Perform FeNO measurement............................ 6
View stored results .......................................... 7
Ambient NO measurement ............................. 7
Demonstration mode ....................................... 7
Change settings ............................................... 8
Timeanddate................................................... 8
Soundvolume................................................... 8
Toplightintensity.............................................. 8
Bluetoothon/off................................................. 8
QCon/off.......................................................... 8
Information menu ............................................ 9
Turn off NIOX MINO®....................................... 9
General care ................................................... 10
Preventive inspections.................................... 10
ChangeSensor............................................... 10
ChangeNOscrubber...................................... 10
Disposalofused/expiredproducts.................. 11
Returnshipments........................................... 11
Support........................................................... 11
Limitedwarranty............................................. 11
Troubleshooting ............................................. 11
Alert codes...................................................... 12
Technical data ................................................ 13
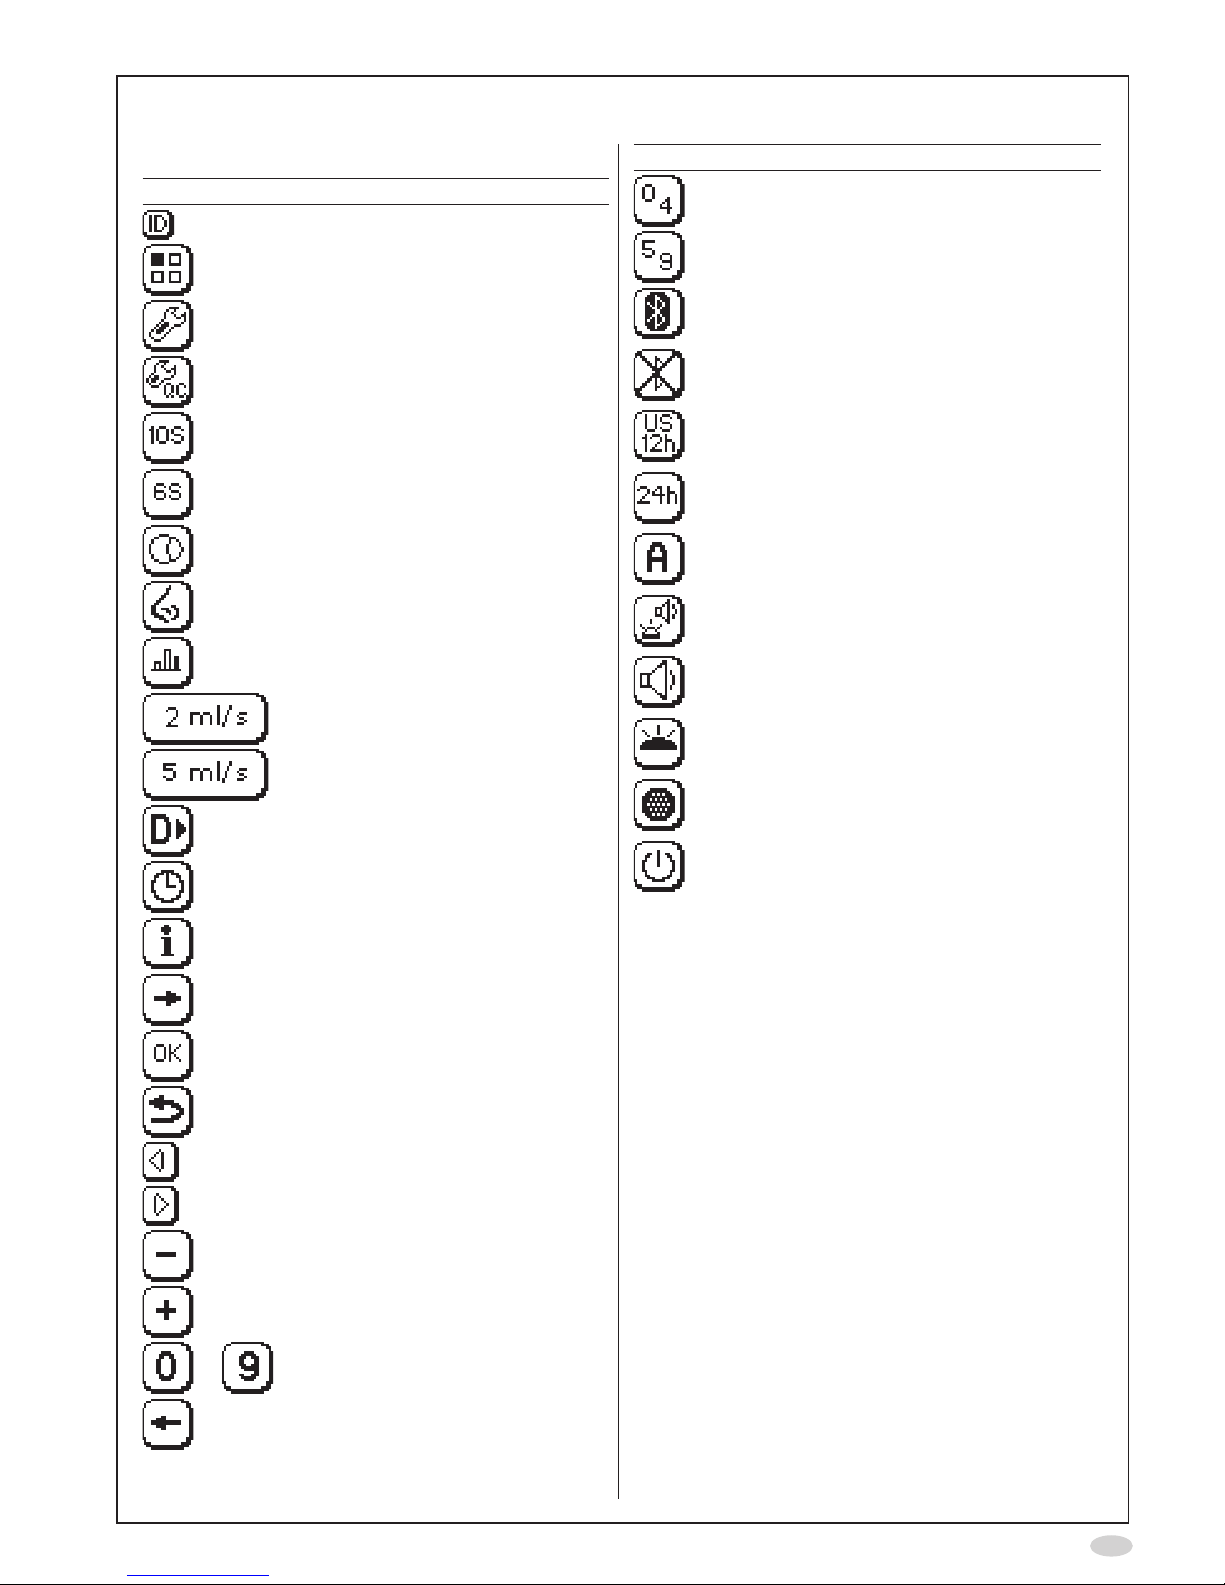
Display buttons and symbols.......................... 13
Symbolsexplanation....................................... 15
Backplate........................................................ 15
Baselabel...................................................... 15
Dimensionsandweight................................... 15
Electrical data................................................. 15
Noiselevel(standby)..................................... 15
Shelf-life.......................................................... 15
Operatingconditions....................................... 15
ExhaledNO-performancedata..................... 16
Linearity.......................................................... 16
Precision......................................................... 16
Accuracy......................................................... 16
Method comparison........................................ 16
Inhalation parameters..................................... 16
Exhalation parameters.................................... 16
Memory capacity............................................ 16
Transportandstorage..................................... 16
Patientlter(mouthpiece)............................... 16
Responsiblemanufacturer.............................. 16
NIOX MINO®parts
and accessories ............................................. 17
Connect NIOX MINO®to a PC using USB .... 18
NIOX®Panel .................................................... 18
Special6sFeNOmeasurement...................... 19
Nasal measurement........................................ 19
Cautions ......................................................... 19
Clinical documentation ................................. 20
Vigilance ......................................................... 20
Guidance and manufacturer's declaration .. 21
Electromagneticemissions............................. 21
UsermanualEPM-000110,version09,April2017,
for instruments with software version 20XX,
22XX and 23XX.Xcanbeanynumberbetween0
and9.Theversionnumberforyourinstrumentcan
beseenintheInformationmenu,seepage9.
Information in this document is subject to
change.Amendmentswillbemadeavailableby
CircassiaABastheyoccur.
•NIOXMINOisCE-markedaccordingtoInVitro
DiagnosticDeviceDirective98/79/ECand
approvedforclinicaluseinEECcountries.
•NIOXMINOis510(k)cleared,k101034,byFDA.
•NIOXMINOisRoHScompliant.
•Copyright©2017CircassiaAB,Uppsala,
Sweden.
•NIOXMINOandNIOXareregisteredtrademarks
ofCircassiaAB.
•CircassiaisaregisteredtrademarkofCircassia
Limited.
Table of contents

2
Warning!
• Handle the NIOX MINO®instrument as
statedinthismanual.Circassiaacceptsno
responsibilityfordamagedequipmentor
faultyresultsiftheequipmentisnothandled
accordingtothismanual.
•DonotuseadamagedNIOXMINOinstrument
ordamagedcomponents.
•Useonlythepowersupplyunitprovided.
•Keeptheinstrumentoutofwater.Ensure
thatnoliquidisspilledordrippedonthe
instrument.
• Do not heat or dispose of the instrument or
Sensorinre.Pleaserefertothe"Disposalof
used/expiredproducts"section.
•Takecarenottodroptheinstrumentorsubject
ittostrongimpact.
• It is recommended not to use NIOX MINO
intheproximityofareaswherevolatile
substancessuchasorganicuidsor
disinfectantsarebeingused.Specialattention
should be paid to aerosols and disinfection
baths(eitheropenvesselsorultrasonicbaths).
• NIOX MINO should not be used adjacent to or
stackedwithotherequipment.
•TheNIOXMINOSensorcontainschemicals
thatcouldbeharmfulifswallowed.
•Touchonlythegreycapwhenexchangingthe
Sensor.
•DonotcleantheSensor.Cleaningofthe
Sensorwithethanolorsimilardisinfectant
mightdestabilizeitforanon-predictabletime
period.
•KeeptheSensoroutofwater.Ensurethatno
liquidisspilledordrippedontheSensor.
•TheNOscrubbercontainspotassium
permanganateandshouldbedisposedofas
hazardouswasteinaccordancewiththelocal
wastedisposalregulations.
• Whenselectinganaccessoryforyour
NIOX MINO please keep in mind that an
accessorynotrecommendedbyCircassia
mayresultinlossofperformance,damageto
yourNIOXMINO,re,electricshock,injury
ordamagetootherproperty.Theproduct
warrantydoesnotcoverproductfailureor
damageresultingfromusewithnon-approved
accessories.Circassiatakesnoresponsibility
for health and safety problems or other
problems caused by the use of accessories
notapprovedbyCircassia.
•NomodicationoftheNIOXMINOinstrument
ortheSensorisallowed.
Also see Cautions page 19.
Intended use (Europe)
NIOX MINO®AirwayInammationMonitor
measuresFractionalExhaledNitricOxide(FeNO)
inhumanbreath.ThelevelofNitricOxideis
elevatedwheneosinophilicairwayinammation
ispresentanddecreasesasaresponsetoanti-
inammatorytreatment.TheFeNO concentration
in expired breath can be measured by NIOX MINO
withassurancethatsuchmeasurementsare
repeatableandaccordingtoguidelinesforNO
measurement established jointly by the European
RespiratorySocietyandtheAmericanThoracic
Society1.
Measurement of FeNO by NIOX MINO is a
quantitative,non-invasive,simpleandsafemethod
to measure the FeNO concentration in patients
withasthma-likeairwaysymptomsinorderto
establish and monitor the presence of eosinophilic
airwayinammation.
NIOXMINOissuitableforchildren,approximately
4-17years,andadults18yearsandolder.
FeNO measurements should be used as part
oftheregularassessmentandmonitoringof
asthma patients to improve the patient’s asthma
management.NIOXMINOshouldbeused
asdirectedintheNIOXMINOUserManual.
NIOXMINOmaynotbeusedwithinfantsorby
childrenapproximatelyundertheageof4,as
measurementrequirespatientcooperation.
1Am J Respir Crit Care Med 2005; 171: 912-930.
Training requirements
NIOX MINO should only be used as directed in this
manual,bytrainedphysicians,nurses,respiratory
therapistsandlaboratorytechnicians.“Trained”
statusisachievedonlyaftercarefulreadingofthis
manual.

3
Presentation
NIOX®Filter
Disposablepatientlterthatmustbe
exchangedbeforeeachmeasurement
session and patient
Display
NIOX MINO®instrument
Toplight
NIOX Panel PCbasedprogram
thatallowsthepatienttofollow
themeasurementonaPC
screen,seepage18.
Powersupplyunit
NOscrubber,
(page10)
OptionalPCconnection.
Cable(USB)orwireless
(Bluetooth)
NIOXMINOSensor,
(page10)
Mode screen
Standard
measurement mode
(page6)
Nasal measurement
mode
(page19)
Return
Special6s
measurement mode
(page19)
Ambient
measurement
(page7)
Demonstration mode
(page7)
Viewmeasurement
results(page7)
Settingsscreen
Controlledpower
off(page10)
NOscrubber
setup
(page10)
Bluetoothon/off
(page8)
Return
QCon/off
(page8)
Lightandsound
(page8)
Timeanddate
(page8)
Information
(page10)
Main screen Numberofremaining
measurements for
mountedSensor,or
PatientID(optional)
Bluetoothactivated,or
USBcableconnected
Mode status
SetID
(page5)
USB
connector
Strapholderfor
NIOX MINO Hand
Strap(optional
accessory)
4
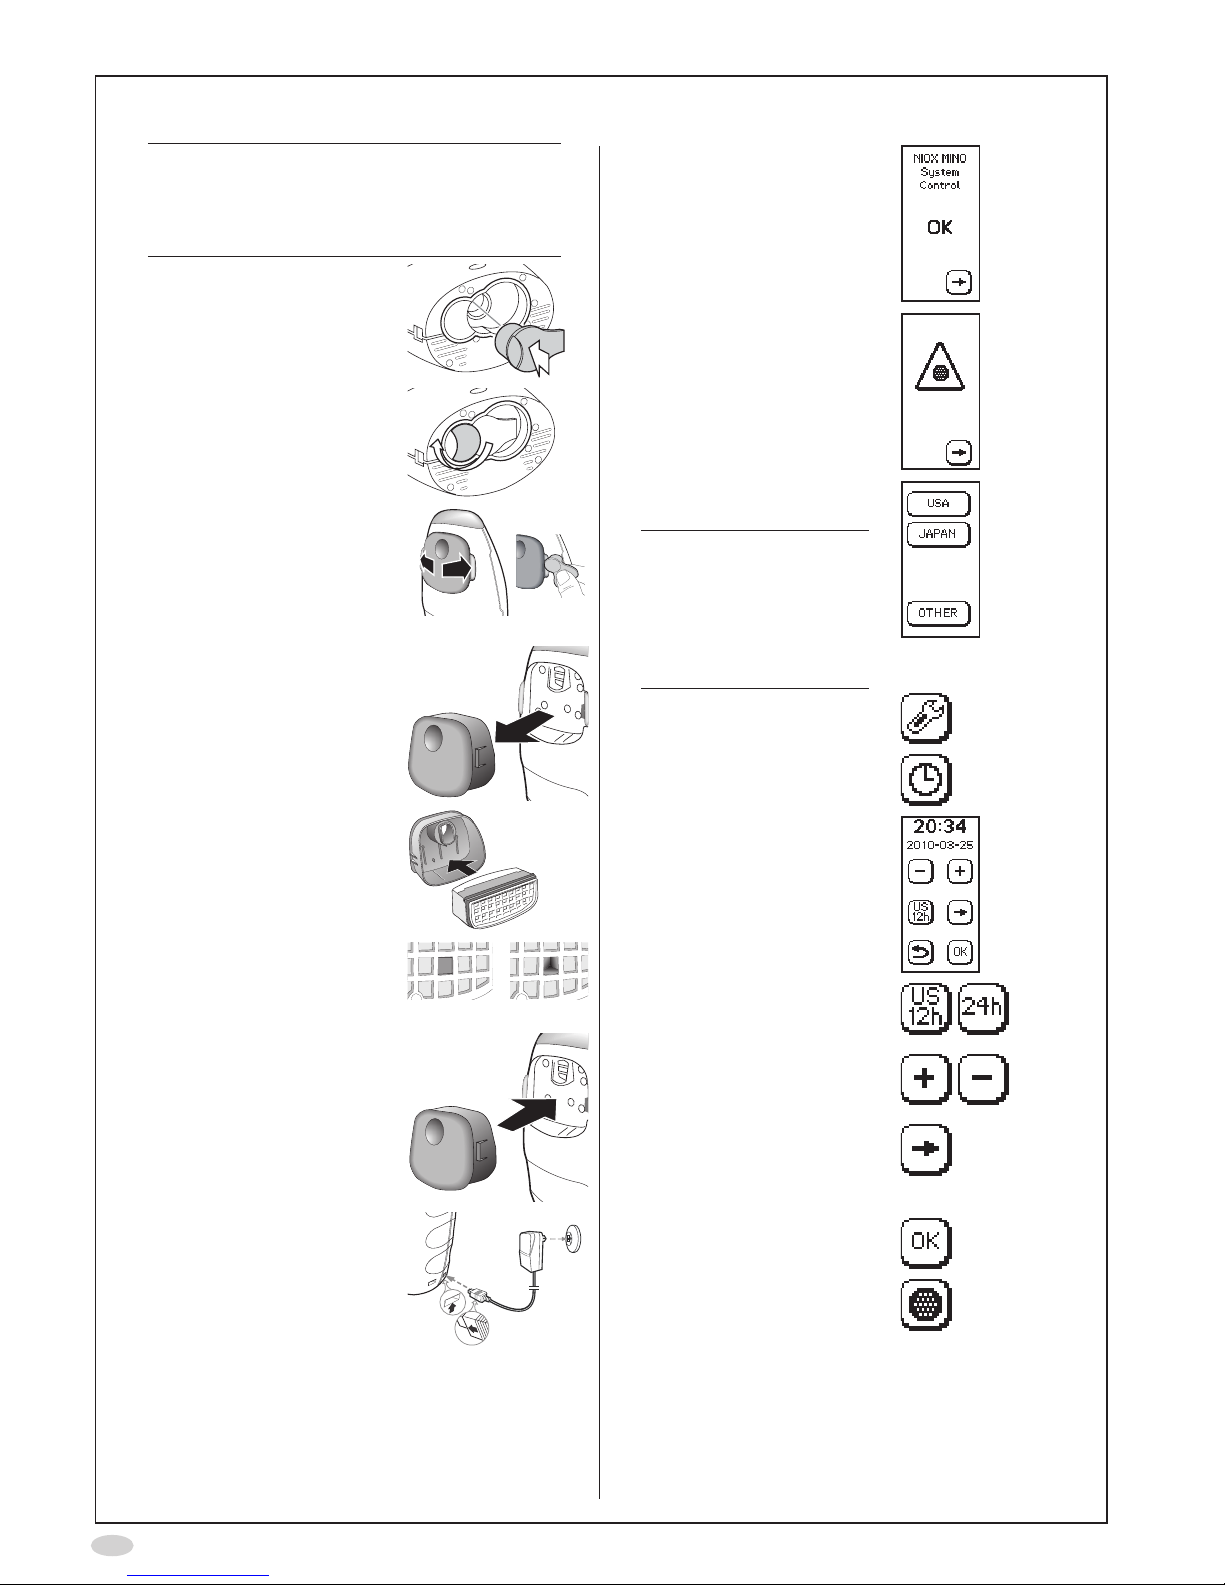
Installation and set-up
Caution!
BecarefulwhenopeningtheSensorcan.
Theinsideoftheopeninghassharpedges.
DonottouchorcleanthewhiteSensor
membrane
1. InserttheSensorintothe
compartment at the base
of the instrument
2. Turntheorangeswivel
until locked
3. Spreadthelatchesapart,
oneatatime,
(Optionally:Usethered
tooldeliveredwiththe
instrument to spread the
latchesapart)
...andcarefullypulloutthe
cover
4. Insertthenew
NOscrubberintothecover
Makesuretouseanew
NOscrubber,withan
unbroken hole
Unbroken Broken
5. Replacethecoverand
make sure it snaps in
place
6. Attachthepowersupply
unit to the instrument and
toapoweroutlet
7. Waitfortheinstrument
to start up and press the
Forwardbutton
8. Remindertoinsertanew
NOscrubber.Pressthe
Forwardbutton
9. SelectOTHERonthe
display
Note!
Thisscreenisonly
displayedatrststart-
upoftheinstrument.
TheJAPANiconisonly
availableforSW22XX
and23XX.
10.SelectSettings
11.SelectClock
12.Thetimeanddatesettings
areshown
13.Clickthetimeformaticons
tochangebetweenUS
andISOtimeanddate
14.Usetheplusandminus
buttons to set the time and
date
15.Selecttheforwardbutton
tochangebetweenhour,
minute,year,monthand
day
16.SelectOKtoacceptthe
changes
17.SelectNOscrubber
5
18.AgainselectNOscrubber
19.Inputthepasscode0000
usingthenumberbuttons
toconrmthatanew
NOscrubberisinstalled
20.SelectOKtoacceptthe
changes
21.Optional:Activate
Bluetoothforwireless
communicationwithPCor
connectaUSBcable,see
page18
22.SelectReturntogoback
to the Main screen
23.Allowtheinstrumentto
stabilize.
Note!
Stabilizationoftheinstrumentnormallymay
takeupto30minutesfollowingconnection
ofthepowersupplyunittothepoweroutlet.
However,itisrecommendedtoallowanew
NIOX MINO®Sensortobeconnectedfortwo
hoursbeforetherstmeasurementisdone.
Measurement
Dependingonwhatisshownonthedisplay,
proceedasfollows:
Stabilizationinprogress
Wait until ready
Instrument in sleep mode
Touchthedisplay
Readyforuse
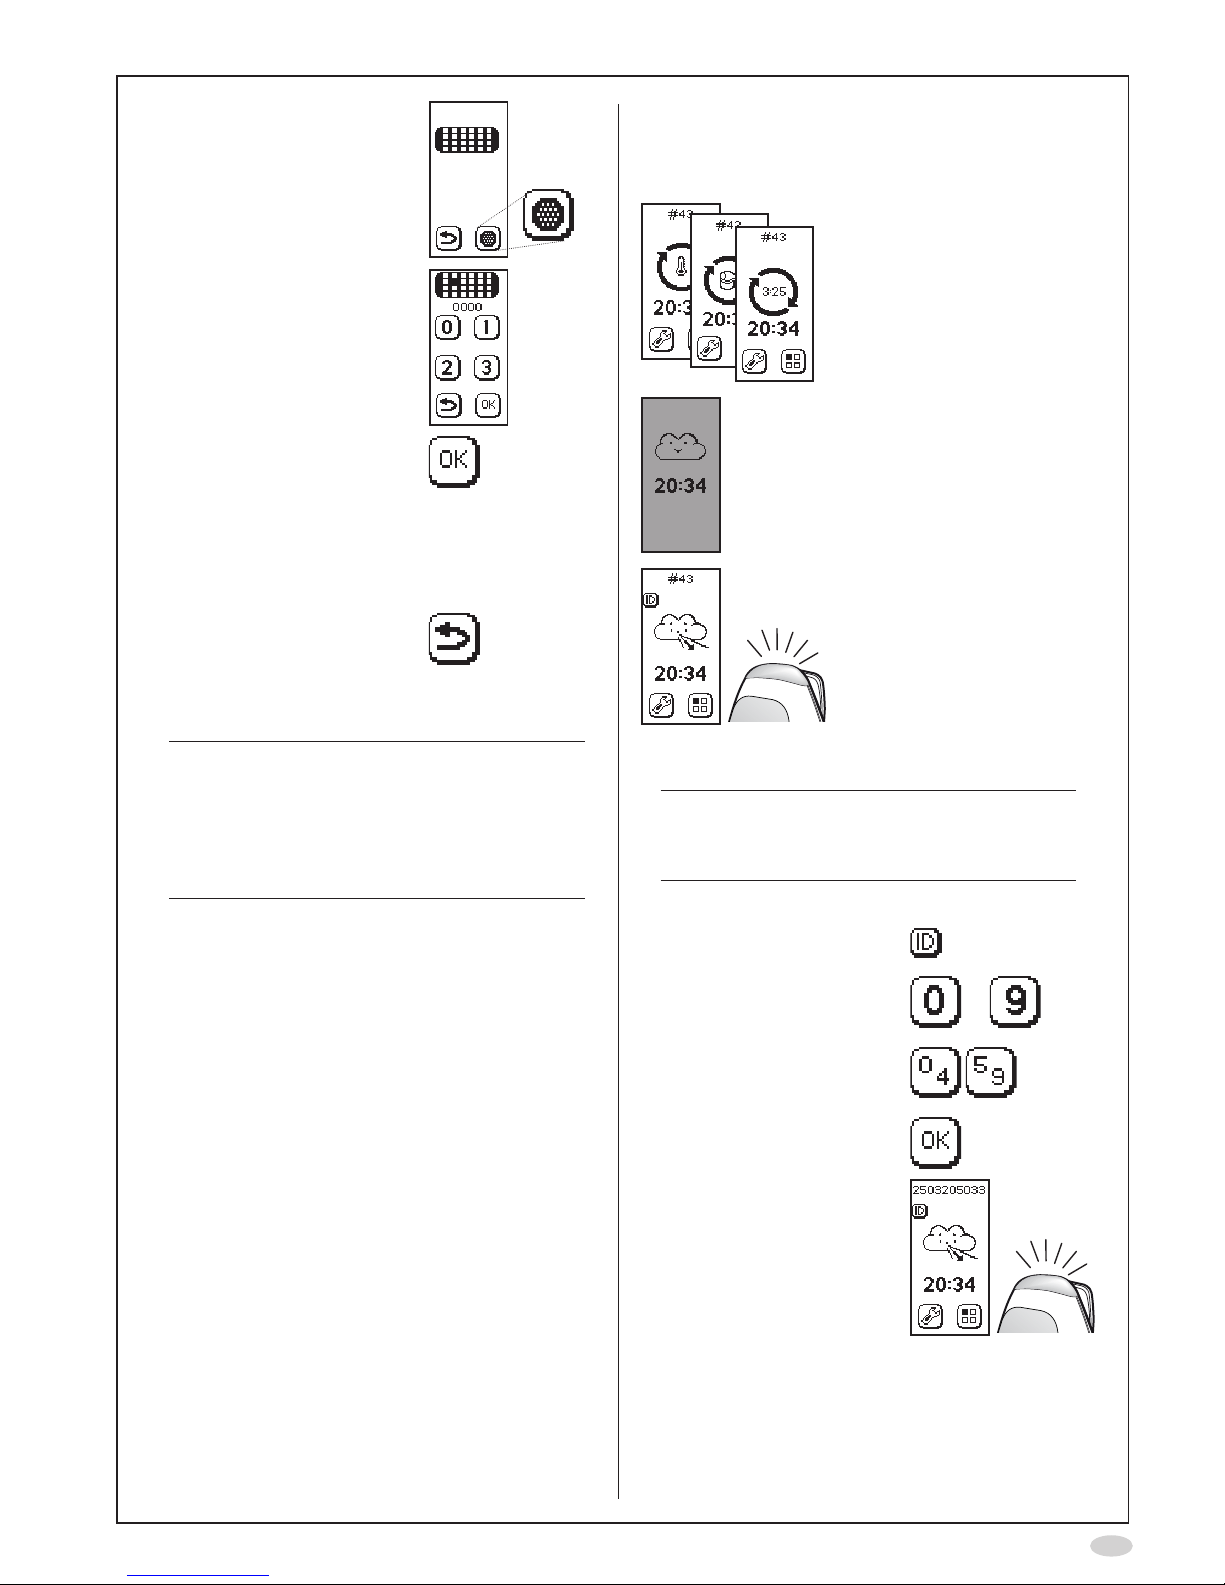
Enter patient ID (optional)
Note!
If Patient ID is used, it has to be entered
before each measurement (even if it is the
same patient).
InputapatientspecicIDnumber,upto10digits.
1. SelecttheIDbuttonon
the main screen
2. Inputthepatientspecic
IDusingthenumber
buttons to
Use the shift buttons to
changebetweendigits0
to4and5to9
3. SelectOKtoacceptthe
patient ID

6
Perform FeNO measurement
Make sure that the instrument is ready for measurement
(activatebypressingthedisplayifinsleepmode)
Choose one of three options in order to follow the measurement
Listen to the sound
signalsandviewthetop
light.
Look at
the display
usinga
mirror.
IftheoptionalPCbasedNIOX
Panelisused,lookatthePC
screen.(seepage18)
1. Emptylungs
2. Inhaledeeplythrough
theltertototallung
capacity
Thecloudonthedisplay
isinatedandthetop
lightisturnedoffwhile
you inhale
Thesun/cloudrises
Inhalation time is displayed by
buttons if meter is selected
3. Exhaleslowlythrough
thelteruntilthetoplight
and sound turns off
Continuoussoundand
steadylight=OK
Intermittenthigh
frequencysound
andickeringlight=
exhalation too hard
Intermittentlow
frequencysound
andickeringlight=
exhalationtooweak
4. Waitforresult
FeNO value
PatientID(ifentered)
Sequencenumber
(eachmeasurement
resultisgivena
uniqueidentication
number)
Important!
Alwaysattachanew
patientlterforeach
newpatient

7
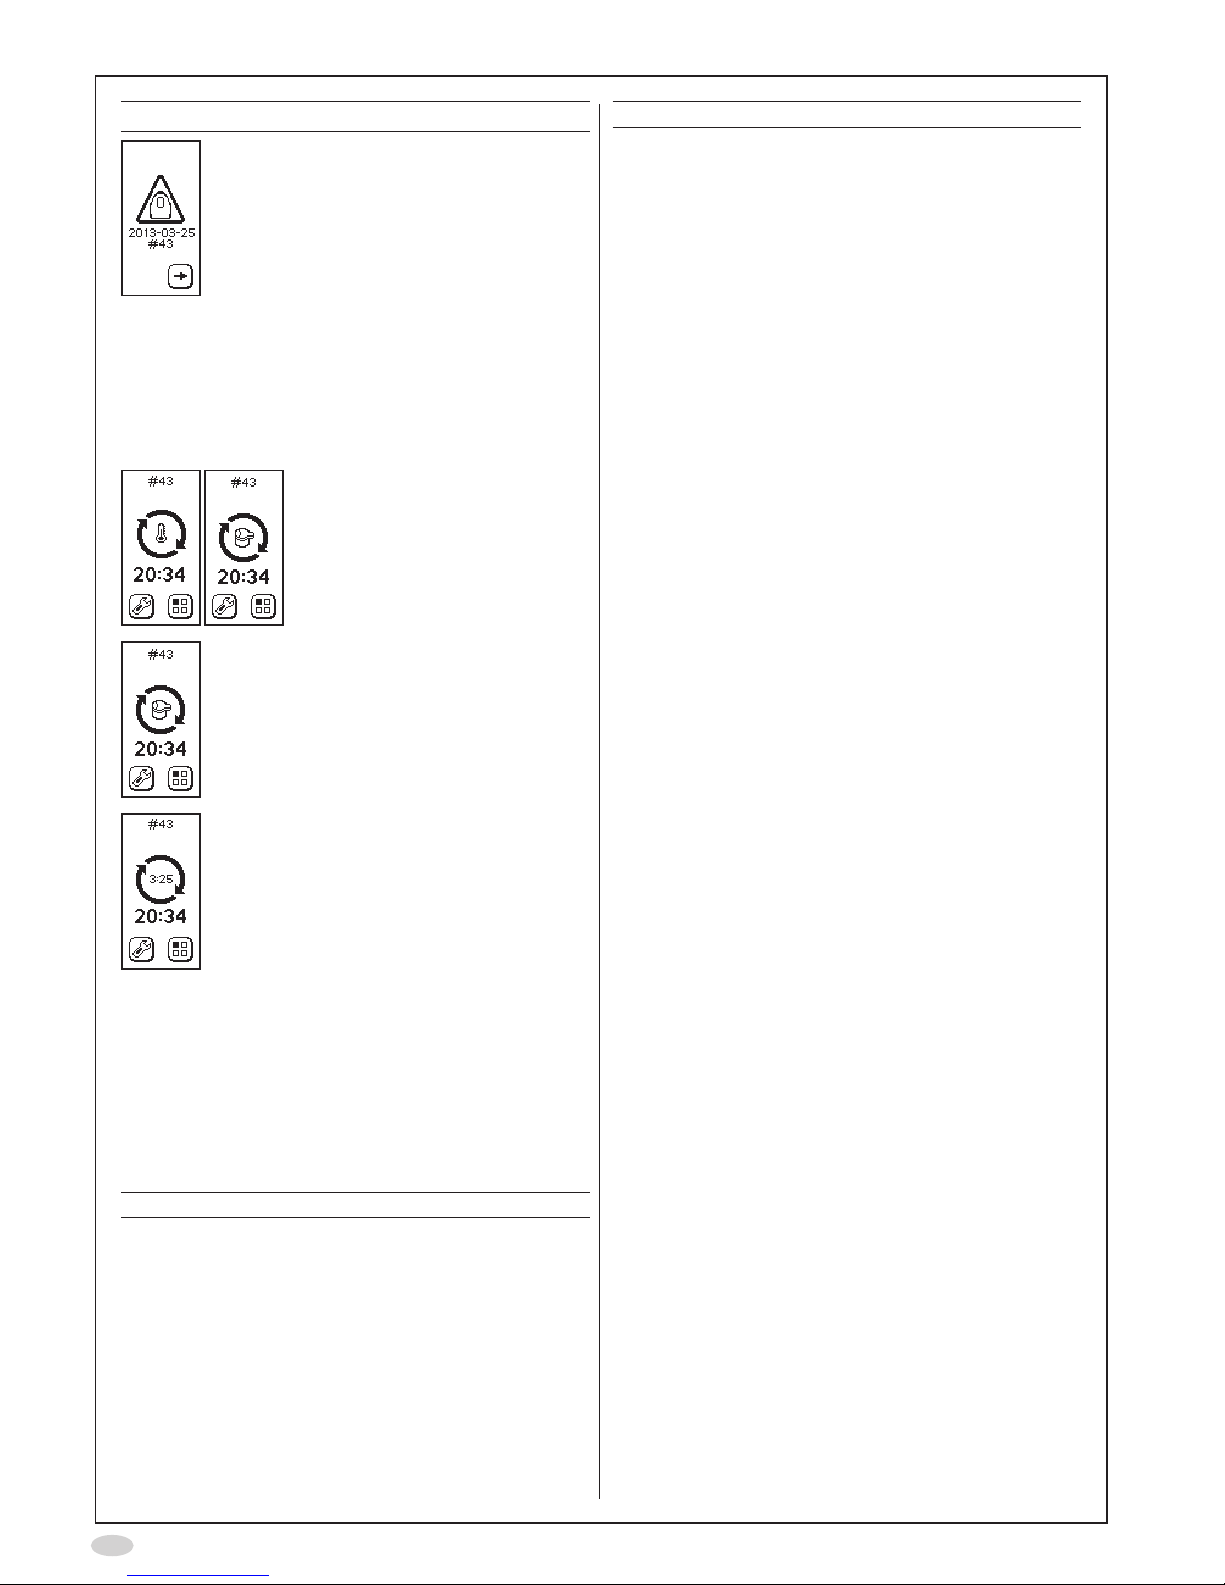
View stored results
A measurement result is automatically displayed at
theendofameasurement.Allpreviousresultsare
storedintheinstrument,andcanbeviewedatany
time.
1. SelectMode
2. SelectMeasurement
results
3. Thelateststored
measurement is
displayed,showing:
A. FeNO value
B. Measurementmode
C. PatientID
(ifentered)
D. Sequencenumber
(eachmeasurement
resultisgivena
uniqueidentication
number)
E. Timeanddateof
measurement
A
B
C
D
E
4. Usethepreviousand
next buttons to step
throughthestored
measurements
5. SelectReturntogoback
to the Mode screen
Ambient NO measurement
Note!
A completed ambient NO measurement is
countedasonemeasurementfortheSensor
and NIOX MINO®.
1. Attachanewpatientlter
2. SelectMode
3. SelectAmbient
measurement
4. Waitforresult
(approximately4minutes)
Demonstration mode
Usethismodeforanewpatientinorder
todemonstratethedifferentstepsduringa
measurementandthecorrespondingillustrations
onthedisplayaswellaslightandaudiofeed-back.
(Soundvolumehastobeactivated.)
1. SelectMode
2. SelectDemo
3. Theinhalationscreenisshownand
thetoplightisturnedoff
4. UsetheForwardbuttontoadvance
to the next screen
5. Thenormalexhalationscreenis
shown
Correctexhalationpressure:The
cloudinasteadycenteredposition,
thetoplightislit,andtheaudio
emits a constant sound
6. UsetheForwardbuttontoadvance
to the next screen
7. Theexhalationtooweekpressure
screenisshown
8. UsetheForwardbuttontoadvance
to the next screen
9. Theexhalationtoostrongpressure
screenisshown
10.UsetheForwardbuttontoadvance
to the next screen
11.Thewaitforresultscreenisshown
(staticview)
12.SelectReturntogobacktothe
Mode screen

8
Change settings
Time and date
1. SelectSettings
2. SelectClock
3. Thetimeanddatesettingsare
shown
4. Selectthetimeformaticonsto
changebetweenUSandISOtime
and date
5. Usetheplusandminusbuttonsto
set the time and date
6. Selecttheforwardbuttonto
changebetweenhour,minute,
year,monthandday
7. SelectOKtoacceptthechanges
Sound volume
1. SelectSettings
2. SelectSoundandLight
3. Thesoundvolumesettingis
shown
4. Usetheplusandminusbuttonsto
set the sound volume
5. SelectOKtoacceptthechanges
Top light intensity
1. SelectSettings
2. SelectSoundandLight
3. Selecttoplight
4. Thetoplightsettingisshown
5. Usetheplusandminusbuttonsto
setthelightintensity
6. SelectOKtoacceptthechanges
Bluetooth on/off
1. SelectSettings
2. SelectBluetooth
3. TheBluetoothsettingisshown
4. Usethebuttonstodeactivateor
activateBluetooth
5. SelectOKtoacceptthechanges
QC on/off
Note!
AnoptionalExternalQualityControl(QC)
procedure is available for NIOX MINO®.
RefertotheNIOXMINOExternalQuality
Controlusermanual.Contactyourlocal
CircassiarepresentativeorCircassia
TechnicalSupportforfurtherinformation.
9
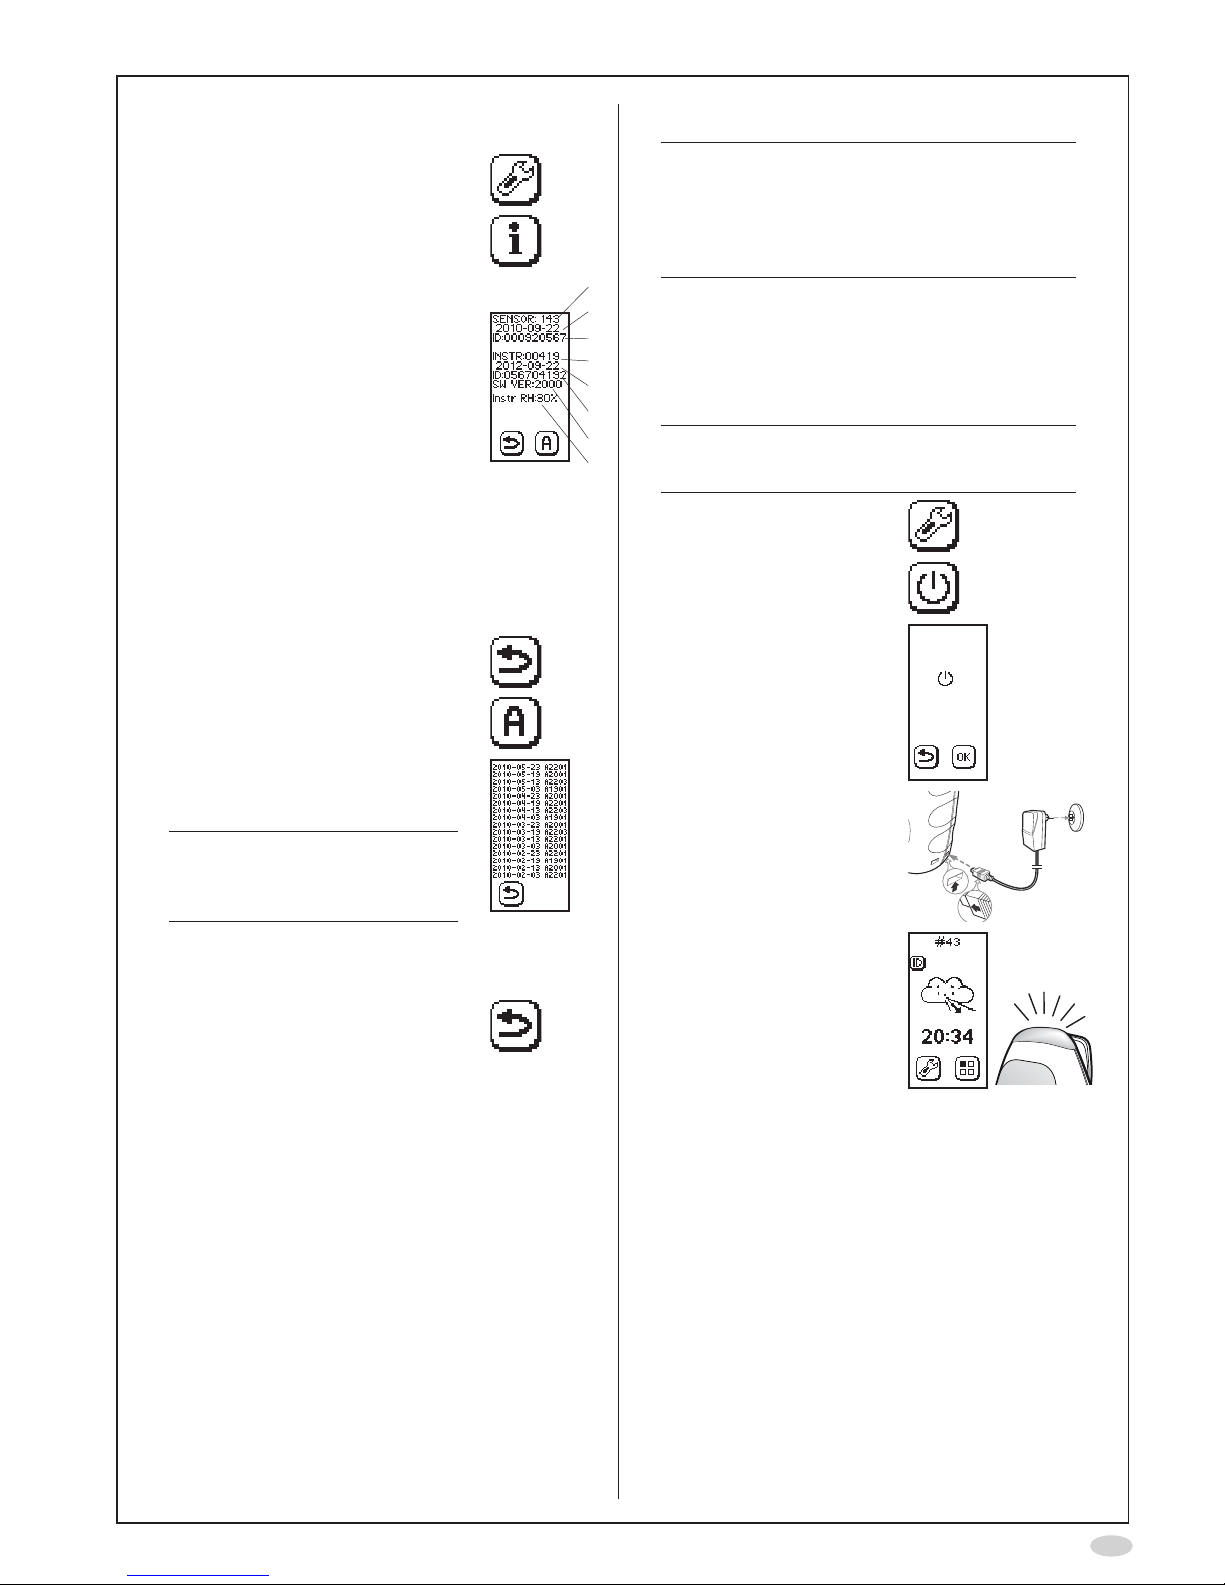
Information menu
1. SelectSettings
2. SelectInformationmenu
3. Theinformationscreenshows:
A. Numberofremainingsensor
measurements
B. Sensorexpirationdate
C. SensorserialNo.
D. Numberofremaining
instrument measurements
E. Instrumentexpirationdate
F. InstrumentserialNo.
G. Instrumentsoftwareversion
H. AmbientRH(relative
humidity),measuredinside
theinstrument(thevalue
maydifferfromRHmeasured
outsidetheinstrument)
A
B
C
D
E
F
G
H
4. SelectReturntogobacktothe
Settingsscreen
...alternativelyselectAlerttoview
the alert codes
5. Thealertcodeinformationscreen
isshown,showingthe16latest
alerts
Note!
Thealertcodesinthelistare
onlytobeusedincontactwith
Customersupport
• Date of the alert
•Alertcode(forcustomersupport
purposeonly)
6. SelectReturntogobacktothe
Information screen
Turn off NIOX MINO®
Note!
Whenwithinthespeciedoperating
conditions(seepage15)itisrecommended
tokeepNIOXMINOwithinstalledSensor
connectedtoapoweroutletwhenever
possible.
1. Pulloutthepowersupplyunitconnectorfrom
NIOX MINO
Moving NIOX MINO
Theinstrumentcanbemovedtoanotherpower
outletwithoptimizedinitiatingstartup.
Note!
Theinstrumentmustbeconnectedtothe
newpoweroutletwithinafewminutes.
1. SelectSettings
2. SelectControlledpower
off
3. SelectOKtoconrm
4. Movetheinstrumentand
connectittoapower
outlet
5. Waituntiltheinstrument
is ready to use

10
General care
•UseanewNIOX®Filter(patientlter)foreach
newpatient.
•Cleantheinstrumentwithaclothdampenedwith
70%ethanol,isopropanolorsimilardisinfectant.
Becarefulwhenusingdisinfectants,asexcessof
alcohol(ethanol)mightpermanentlydamagethe
Sensor.Donotusespraydetergents.
Note!
Never attempt to open or service the
NIOX MINO®instrumentorSensor.
Preventive inspections
Beforeeachmeasurement,visuallyinspect:
•thatNIOXMINOisnotdamaged
•thattheSensorisinplace
• that a NIOX Filter is attached
•thatthePowersupplycordisundamagedand
correctly connected to the instrument and to the
poweroutlet.
Ifanyitemismissingordamaged,contactyour
localCircassiarepresentativeorCircassiaAB.
Change Sensor
Caution!
BecarefulwhenopeningtheSensor
can.Theinsideoftheopeninghassharp
edges.
DonottouchorcleanthewhiteSensor
membrane
1. Pressandholdtheblue
button...
...whileturningtheorange
swivel
2. RemovetheSensor
3. InsertthenewSensor
4. Turnbacktheorange
swiveluntillocked
Change NOscrubber
1. Spreadthelatchesapart,
oneatatime,
(Optionally:Usethered
tooldeliveredwiththe
instrument to spread the
latchesapart)
...andcarefullypullout
the cover
2. Removetheused
NOscrubberfromthe
cover
3. Insertthenew
NOscrubberintothe
cover
Makesuretouseanew
NOscrubber,withan
unbroken hole
Unbroken Broken
4. Replacethelidandmake
sure it snaps in place
5. SelectSettings
6. SelectNOscrubber
7. AgainselectNOscrubber

11
8. Inputthepasscode0000
usingthenumberbuttons
toconrmthatanew
NOscrubberisinstalled
9. SelectOK
Disposal of used/expired products
• Used or expired NIOX MINO®Sensorsshouldbe
recycledaccordingtothelocalrecyclingprogram
forelectronicequipment.Notethatthereisa
LiMnO2batteryinsidetheSensorunit*.
•AnexpiredNIOXMINOshouldberecycled,
accordingtothelocalprogramforelectronic
equipment.NotethatthereisaLiMnO2backup
batteryinsidetheinstrument*.
•TheNOscrubbercontainspotassium
permanganateandshouldbedisposedofas
hazardouswasteinaccordancewiththelocal
wastedisposalregulations.
NIOXMINOisRoHScompliant.
*Thebatteriesarenotuser-replaceableparts.
Return shipments
ContactyourlocalCircassiarepresentativeor
CircassiaAB.
Support
PleasecontactyourlocalCircassiarepresentative
orCircassiaTechnicalSupportifyouencounter
problems,whichyoucannotsolvewiththeactions
statedinthismanual.
Forcontactdetails,seeback-page,andprovidethe
followinginformation:
•Yourname,addressandtelephonenumber.
•SerialNo.(bothinstrumentandSensor).
•Problemdescription(asthoroughaspossible).
•Alertcodesorlists.
Limited warranty
CircassiaABprovidesaLimitedWarrantyforthis
instrumentandoriginalaccessoriesdeliveredwith
thisinstrument.Conditionsaredenedwhenthe
itemsarepurchased.
DoNOTtrytorepairtheinstrument.ItisNOT
permittedtoopentheinstrument.Anyattempt
willmakethewarrantyinvalidandperformance
accordingtothespecicationscannotbe
guaranteed.
Troubleshooting
Warning Action
Theinhalationwastooweak
to initiate a measurement
or an exhalation into the
instrumentwasperformed
priortoaninhalation-Stop
the procedure immediately
whenthiswarningappears.
Wait until the main menu
screen is displayed and repeat
theinhalationwithastronger
inhalationforce.
NOscrubberreminder.
Thesymbolisshownatrst
start-upoftheinstrument
as a reminder to insert and
setthesoftwareforanew
NOscrubber.SeeInstallation
and set-upsectionpage4.
NOscrubberalmostexpired-
OrderanewNOscrubber.
Thesymbolisshownwhen
10%ofthemeasurementsare
remainingor2weeksbefore
expiration date and continue
untiltheNOscrubberhas
expired.ANOscrubbercanbe
usedfor1000measurements
or1year.RefertotheChange
NOscrubbersectionpage10.
NoSensorconnected-
ConnectaSensor.
Sensoralmostexpired–Order
anewSensor.
Thesymbolisshownwhen
10%ofthemeasurements
areleftor2weeksbefore
expiration date and continue
untiltheSensorhasexpired.
RefertotheChangeSensor
sectionpage10.
12
Warning Action
Instrumentalmostexpired–
Orderanewinstrument.
Thesymbolisshown4
months before the
instrumentexpiresorwhen
10%ofthemeasurementsare
remaining.Theinstrumentwill
notworkaftertheindicated
date,oraftertheindicated
numberofmeasurements.
Itisstillpossibletoview
measurements stored in
the instrument memory and
downloaddatatoaPC.
Make sure that the ambient
temperatureisbetween+16
and+30°C.
WaitfortheSensorto
stabilize.
Removeanysourcesof
disturbance(suchascordless
ormobiletelephones,orgas
emittingappliances).Waitfor
theSensortostabilize.
WaitfortheSensorto
stabilize.
<4minutes(countdown
started).
Alert codes
Alertmessagesandotherinformationareshown
ascodesatthetopoftheinstrumentdisplay.The
tablebelowprovidestherecommendedactionsto
betakenforanalertcode.Ifalertpersists,contact
yourlocalCircassiarepresentativeorCircassia
TechnicalSupport.
Code Action
User alerts
A10 Exhalationtoostrong.Selectreturnand
repeatthemeasurementwithlessforce.
A11 Exhalationtooweak.Selectreturnand
repeatthemeasurementwithgreater
exhalation force and exhale until the
signalforcompletedexhalationisheard.
A12 Noexhalationdetected.Selectreturnand
repeat the measurement and exhale into
theinstrumentdirectlyafterinhalation.
Code Action
A13 Selectreturnandrepeatthe
measurementanddonotbreathethrough
thepatientlterduringanalysis.
A14 WrongpasscodeforNOscrubber
exchange.
Instruments alerts
A20 Checkthattheambienttemperatureis
withinspecication.Ifnecessary,shut
theinstrumentdown,moveittoanother
locationandrestarttheinstrument.
A21 Removeanysourcesofdisturbance
(suchascordless/mobiletelephones,
orgasemittingappliances).Whenthe
instrument is ready try to repeat the
measurement.Ifthealertpersists,unplug
andreconnectthepowersupplyunitto
restarttheinstrument.
A22 Unplugandreconnectthepowersupply
unittorestarttheinstrument.
A23 Removeanysourcesofdisturbance
(suchascordless/mobiletelephones,
orgasemittingappliances).Whenthe
instrument is ready try to repeat the
measurement.Ifthealertpersists,unplug
thepowersupplyunit,removeand
reinserttheSensor,reconnectthepower
supplyunitandrestarttheinstrument.
A24 Checkthatthesupplyvoltageiswithin
specication.Ifnecessaryreplacethe
powersupplyunit.
Connection alerts
A30 ChecktheBluetoothconnectiontothe
PC
A31 ChecktheUSBconnectiontothePC
Instrument and Sensor expiration alerts
A90 Instrument expiration date has passed
or all instrument measurements have
beenused.Itisstillpossibletoview
measurements stored in the instrument
memoryanddownloaddatatoaPC.
A91 Sensorexpirationdatehaspassedorall
measurementsontheSensorhavebeen
used.ReplacetheSensor.
13
Technical data
Display buttons and symbols
Button Description
Enter patient ID
Measurement modes
Settings
QCsettings
Standard10secondexhalation
FeNO measurement
Special6secondexhalationFeNO
measurement(researchappl.)
Ambient NO measurement
Nasal measurement
(researchapplication)
Storedmeasurementresults
Nasalow2ml/s
(researchapplication)
Nasalow5ml/s
(researchapplication)
Demonstration mode
Clock
Information
Forward
OK
Return
Previous
Next
Decrease
Increase
to Number
Backspace
Button Description
Shifttokeypad0-4
Shifttokeypad5-9
Bluetoothon
Bluetoothoff
UStimeanddatesettings
ISOtimeanddatesettings
Alert info
Soundandtoplight
Sound
Toplight
NOscrubbersetting
Controlledpoweroff
14
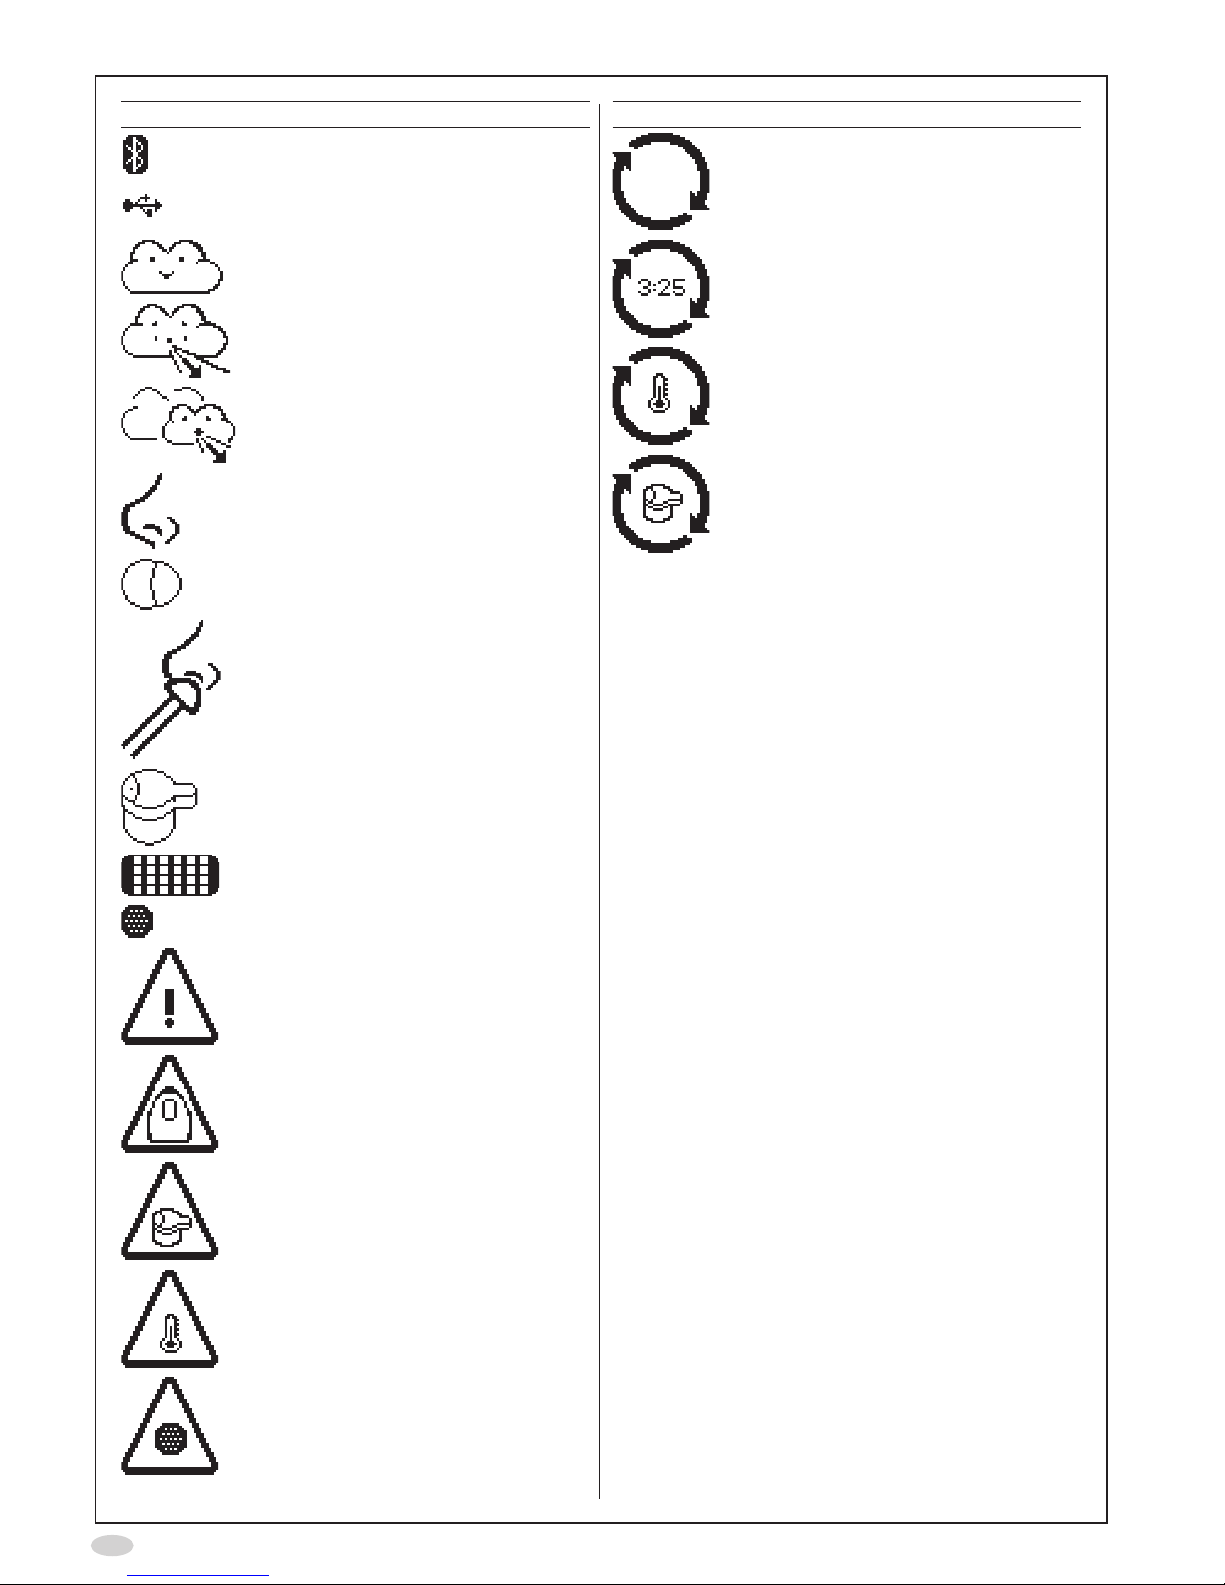
Symbol Description
Bluetoothactivated
USBcableconnected
Sleepmode
StandardFeNO measurement
Special6sFeNO measurement
(researchapplication)
Nasal measurement
(researchapplication)
Ambient NO measurement
Attach nasal olive to nostril
(researchapplication)
InsertSensor
NOscrubber
NOscrubber
Generalwarning
Instrumentexpirationwarning
Sensorwarning
Temperaturewarning
NOscrubberwarning
Symbol Description
Wait
Wait,time
Waitfortemperaturestabilization
WaitforSensorstabilization

15
Symbols explanation
Responsiblemanufacturer
Theproductmeetstherequirements
of applicable European directives
ConformstoANSI/AAMIES60601-1
andcertiedtoCAN/CSAC22.2No.
60601-1
ElectricalsafetyTypeBappliedpart
100-240V~50-60Hz
Theproductshouldberecycled
accordingtothelocalprogramfor
electronicequipment.
Consultinstructionsforuse
Refertoinstructionmanual/booklet
Expiration date
Transportandstoragetemperature
limitation
Forsingleuseonly
Invitrodiagnosticmedicaldevice
12M Durability-periodafteropening
Hazardousmaterial
ClassIIequipment
Backplate
NIOX MINO®
Article No 09-1000
Circassia AB
Hansellisgatan 13, SE-754 50, Uppsala, Sweden
www.circassia.com
Use Only Power Supply Unit Art No 09-1005
Rated Supply Voltage 6 V
Maximum Rated Power 20 VA
U.S. Patent: 5,447,165 / 5,922,610 / 6,038,913 / 6,099,480 / 6,723,056 /
6,761,185 / 7,014,692 / D496,667 / D492,035 / D457,231
1 2 3 4 5 6 7
1. Responsiblemanufacturer
2. Refertoinstructionmanual/booklet
3. Invitrodiagnosticmedicaldevice
4. TypeBappliedpart
5. Theproductshouldberecycledaccordingto
thelocalprogramforelectronicequipment
6. Theproductmeetstherequirementsof
applicable European directives
7. ETL-Listed.ConformstoANSI/AAMIES60601-
1andcertiedtoCAN/CSAC22.2No.60601-1.
Base label
2 3
1
1. Instrumentexpirationdate(year:month)
2. Instrumentarticlenumber
3. Instrumentserialnumber
Dimensions and weight
Height:230mm
Width:128mm
Depth:96mm
WeightofinstrumentincludingSensor:0.8kg
Electrical data
Electricalsafetyclassication:Theequipment
complieswiththerequirementsaccordingtoIEC
61010-1and60601-1ClassIITypeB.
NIOX MINO instrument
Secondaryvoltage(externalpoweradapter):6V
Powerconsumption:<15VA
Power supply unit
MainsVoltage:100-240V~50-60Hz
Noise level (stand by)
<35dBA,atadistanceof1m
Shelf-life
NIOX MINO®instrument:Minimum3yearsattime
ofdelivery,or3,000measurements.
NIOXMINOSensor:Maximum12monthswhen
installed in NIOX MINO or expiration date as stated
ontheSensor,whichevercomesrst.
AlwaysusetheNIOXMINOBag(closed)for
transportationandstorageofNIOXMINO
whenitisdisconnectedfromthepower
outlet.(TheNIOXMINOBagissold
separately).
Operating conditions
Ambienttemperature:+16to+30°C
Humidity:20to60%RH(non-condensing)*
Atmosphericpressurerange:700to1060hPa
AmbientNOconcentration:<300ppb
Exhaledowrateduringmeasurementsat50
ml/s±10%BTPS(BodyTemperaturePressure
Saturated,37˚C,1013hPa,100%RH)
*TheambientRHintheinstrumentcanbeviewed
intheinformationmenu,seepage10andmay
differfromRHmeasuredoutsidetheinstrument.

16
Exhaled NO - performance data
Performancedatatypicalfortemperaturerange
+16to+30˚C,Humidityrange20-60%RH,
Pressure1013hPa
Measurementrange:
FeNO:5to300ppb
LowestDetectionLimit:5ppb
Determinationbyanalyzinggasconcentrations
aroundandbelowthedetectionlimit.5ppbwas
thelowestdetectablelevel.
Measurementtime:<2min
Temperaturestabilizationtime:≤30min
AmbientNOmeasurementtime:<4min
Linearity
Squaredcorrelationcoefcientr2≥0.998,
slope0.95-1.05,intercept±3ppb.
Determinationbasedonthepooledregression
analysisfrom10instrumentsusingstandardgas
referencesamplesat7differentconcentration
levelscoveringtheoperatingmeasurementrange.
Precision
<3ppbofmeasuredvalue<30ppb,
<10%ofmeasuredvalue≥30ppb.
Expressed as one standard deviation for replicate
measurementswiththesameinstrument,using
acertiedgasconcentrationofNitricOxide
referencestandard.
Accuracy
±5ppbormax10%.
Expressedastheupper95%condencelimit,
basedonabsolutedifferencesforconcentrations≤
50ppbandrelativedifferencesforconcentrations
>50ppb,fromcertiedgasconcentrationofNitric
Oxidereferencestandard.
Method comparison
<10ppbforvalues≤50ppb,
<20%forvalues>50ppb
Expressedasthedifferencebetweena
NIOX MINO®FeNOvalueandthecorresponding
FeNOvaluemeasuredwithNIOX®instrument from
Circassia.
Inhalation parameters
InhalationtoTLC(TotalLungCapacity)beforestart
ofexhalation,tosecureproperactivation:
Minimum-3cmH2O(triggeronly)
Exhalation parameters
Exhalationtime:
Standardmode:10s(clinicaluse)
Special6s.mode:6s(researchuse)
All exhalations are to be performed at an
exhalationpressureof10-20cmH2O,tomaintain
axedowrateof50±5ml/s.
Memory capacity
3000measurements
Transport and storage
NIOX MINO instrument (transport and storage
in its unopened original package)
Relativehumidityrange:10to100%,including
condensation.
Temperaturerange:-20to+60°C
Atmosphericpressurerange:500to1060hPa
NIOX MINO Sensor (transport and storage in
original package)
Relativehumidityrange:10to100%,including
condensation.
Temperaturerange:-20to+60°C
Recommendedtemperaturerange:+2to+25°C
Atmosphericpressurerange:500to1060hPa
NIOX MINO, including sensor (transportation
in NIOX MINO Bag)
Relativehumidityrange:10to95%,non-
condensing
Temperaturerange:+2to+25°C
Atmosphericpressurerange:700to1060hPa
Whentransportingtheinstrumentfromone
locationtoanother,aprolongedstabilization
periodmightberequiredbeforemeasurements
canbeperformed.
Patient lter (mouthpiece)
Disposablelter(NIOXFilter)tobechangedfor
eachnewmeasurementsessionandforeachnew
patient.
Bacterial,virallteraccordingtoMedicalDevice
DirectiveClassIIa.
Responsible manufacturer
CircassiaAB,
Hansellisgatan13,
SE-75450Uppsala
Sweden
www.circassia.com
www.niox.com

17
NIOX MINO®parts
and accessories
Warning!
Whenselectinganaccessoryforyour
NIOX MINO product please keep in mind that
anaccessorynotrecommendedbyCircassia
ABmayresultinlossofperformance,
damagetoyourNIOXMINOproduct,re,
electricshock,injuryordamagetoother
property.Theproductwarrantydoesnot
coverproductfailureordamageresulting
fromusewithnon-approvedaccessories.
CircassiaABtakesnoresponsibilityfor
health and safety problems or other problems
caused by the use of accessories not
approvedbyCircassia.
Parts included in NIOX MINO package
(Item No. 09-1000)
NIOXMINOinstrument(09-1100)
NIOXMINOPowerSupplyUnit(incl.4supply
adapters)(09-1005)
NIOXMINOUSBcable(09-1010)
NIOXMINOQCplug(09-1015)
NIOXPanel(onUSBstick)
(12-1003)
Parts delivered separately
NIOXMINONOscrubber(09-1300)
NIOXMINOUserManual(EPM-000110)
Accessories
NIOXMINOTestKit100(03-4000)
(contains:1NIOXMINOSensor*for100
measurementsand100NIOX®Filters**)
NIOXMINOTestKit300,(03-4001)
(contains:1NIOXMINOSensor*for300
measurementsand300NIOXFilters**)
NIOXMINOTestKit500,(03-4007)
(contains:1NIOXMINOSensor*for500
measurementsand500NIOXFilters**)
NIOXMINOTestKit1000,(03-4010)
(contains:1NIOXMINOSensor*for1000
measurementsand1000NIOXFilters**)
NIOXMINOBag(09-1020)
* NIOXMINOSensor
Pre-calibrateddisposablesensorfor100,
300,500or1000measurements.Shelf-
life:Maximum12monthswheninstalledin
NIOX MINO or expiration date as stated on
theSensor,whichevercomesrst.(Useonly
NIOXMINOSensorswithCircassiaitem
number03-2005,03-2010,03-2030,03-2050
or03-2100.)
** NIOXFilter
Disposableltertobechangedforevery
patient.Bacterial,virallteraccordingto
MedicalDeviceDirectiveClassIIa.

18
Connect NIOX MINO®to a PC
using USB
Caution!
• APCconnectedtotheUSBconnector
hastobecertiedforoneofthe
standardsIEC60601-1,IEC61010-1,
IEC60950orcomparablewithsafety
extralowvoltageontheUSBports.
• TheconnectedPCshouldbeplaced
outofreachfromthepatient.Donot,
simultaneously,touchtheconnectedPC
andthepatient.
1. ConnecttheUSBcablefromtheinstrumentto
thePC
USBcablefromPC
2. TheUSBicon isshownonthe
NIOXMINOdisplaytoindicatethataUSB
connection is established
Connect NIOX MINO to a PC
using Bluetooth
1. SelectSettings
2. SelectBluetooth
3. TheBluetooth
settingisshown
4. Usethebuttonto
activateBluetooth
5. SelectOKtoaccept
thechanges
6. FollowtheinstructionsdeliveredwiththePC
orfromtheBluetoothdevicemanufacturerfor
howtosetupaBlutetoothconnection:
• CreateanewBluetoothconnection
•SelectNIOXMINO
• Enter passcode 0000
NIOX®Panel
AUSBmemorystickisdeliveredwithNIOXMINO
containingtheNIOXPanelprogram.
Forinstructionsonhowtoinstallandusethe
programrefertotheNIOXPanelUserManual.
Other manuals for MINO
1
This manual suits for next models
6
Table of contents
Other NIOX Medical Equipment manuals


Popular Medical Equipment manuals by other brands


Boston Life Labs
Boston Life Labs PC-68A user manual

Boston Scientific
Boston Scientific Vercise Neural Navigator 4.0 installation guide

Winco
Winco 8570 CUSTOMER INSTRUCTIONS

FujiFilm
FujiFilm SonoSite iViz User guide supplement

Schill
Schill Multisonic MN 80170 Instructions for use

Dermlite
Dermlite DL3N instructions