Nireeka Prime Series User manual


Nireeka Prime User’s Manual
ENGLISH
CONTENTS
IMPORTANT NOTICE 3
IMPORTANT SAFETY INFORMATION 3
HANDLING THE BATTERY 3
TO ENSURE SAFE RIDING 4
USING THE PRODUCT SAFELY 4
DISCLAIMER OF WARRANTIES; LIMITATION OF LIABILITY 5
USER COMMENT, FEEDBACK, AND OTHER SUBMISSIONS TO ANY OF OUR OFFICIAL CHANNELS 6
QUICK INSTALLATION 7
UNPACKING 8
INSTALLING THE FRONT WHEEL 9
INSTALLING THE HANDLEBAR 11
INSTALLING THE PEDALS 12
INSTALLING THE DISPLAY 13
ON/OFF BUTTON 13
BATTERY AND CHARGER 14
THE LED INDICATORS 15
REMOVING THE BATTERY 16
REINSTALLING THE BATTERY 16
CHARGING THE BATTERY 17
DISPLAY 18
BIKE PARTS 24
STEM 25
SADDLE/SEATPOST 25
THROTTLE (For models with Throttle) 26
ADJUSTING SUSPENSION FORK (Optional) 26
GROUPSETS 27
2

Nireeka Prime User’s Manual
ENGLISH
For maximum safety, be sure to read this user's manual
thoroughly before use, and follow them for correct use.
- IMPORTANT NOTICE
• Do not disassemble or alter this product.
• Use the product according to local laws and regulations.
• The Bluetooth® word, mark, and logo are registered trademarks owned by the Bluetooth SIG,
Inc., and any use of such marks by SHOJAIE MOTORS INC. is under license. Other trademarks
and trade names are those of their respective owners.
- IMPORTANT SAFETY INFORMATION
Guidelines that require replacement, contact the place of purchase, or a bike dealer.
Be sure to observe the following to avoid burns or another injury from fluid leakages, overheating,
fire or explosions.
- HANDLING THE BATTERY
• Do not deform, modify, disassemble, or apply solder directly to the battery. Doing so may cause
leakage, overheating, bursting, or ignition of the battery.
• Do not leave the battery near sources of heat such as heaters. Do not heat the battery or
throw it into a fire. Doing so may cause bursting or ignition of the battery.
• Do not subject the battery to strong shocks or throw it. If this is not observed, overheating,
bursting, or fire may occur.
• Do not place the battery into freshwater or seawater and do not allow the battery terminals to get
wet. Doing so may cause overheating, bursting, or ignition of the battery.
• Use the Nireeka specified charger and observe the specified charging conditions when
charging the specified battery. Not doing so may cause overheating, bursting, or ignition of the
battery.
3

Nireeka Prime User’s Manual
ENGLISH
- TO ENSURE SAFE RIDING
• Do not give too much of your attention to the cycle computer display while riding, otherwise,
accidents may result.
• Check wheels installed securely to the bike before commence riding. If wheels are not securely
installed, the bike may fall over and serious injury may result.
• If riding on power-assisted mode, make sure that you are fully familiar with the starting-off
characteristics of the bike before riding on roads with several vehicle lanes and pedestrian
footpaths. If the bike starts-off suddenly, accidents may result.
• Check that the bike lights illuminate before riding at night.
- USING THE PRODUCT SAFELY
• Be sure to remove the battery and charging cable before wiring or attaching parts to the bike.
Otherwise, an electric shock may result.
• When charging the battery while it is installed on the bike, do not move the bike. The power
plug for the battery charger may come loose and not be fully inserted into the electrical outlet,
resulting in a risk of fire.
• When installing this product, be sure to follow the instructions given in the user's manual.
Furthermore, it is recommended that you use only genuine Nireeka parts at these times. If bolts
and nuts are left loosened or the product is damaged, the bike may suddenly fall over and
serious injury may result.
• Do not disassemble the product. Disassembling may cause injury to persons.
• After reading the user's manual carefully, keep it in a safe place for later reference.
4

Nireeka Prime User’s Manual
ENGLISH
- DISCLAIMER OF WARRANTIES; LIMITATION OF LIABILITY
You expressly agree that your use of, or inability to use, the service is at your sole risk. The service
and all products and services delivered to you through the service are (except as expressly stated by
us) provided 'as is' and 'as available' for your use, without any representation, warranties, or conditions
of any kind, either express or implied, including all implied warranties or conditions of merchantability,
merchantable quality, fitness for a particular purpose, durability, title, and non-infringement.
In no case shall NIREEKA E-BIKES, our directors, officers, employees, affiliates, agents, contractors,
interns, suppliers, service providers, or licensors be liable for any injury, loss, claim, or any direct,
indirect, incidental, punitive, special, or consequential damages of any kind, including, without
limitation lost profits, lost revenue, lost savings, loss of data, replacement costs, or any similar
damages, whether based in contract, tort (including negligence), strict liability or otherwise, arising
from your use of any of the service or any products procured using the service, or for any other claim
related in any way to your use of the service or any product, including, but not limited to, any errors or
omissions in any content, or any loss or damage of any kind incurred as a result of the use of the
service or any content (or product) posted, transmitted, or otherwise made available via the service,
even if advised of their possibility. Because some countries or states or jurisdictions do not allow the
exclusion or the limitation of liability for consequential or incidental damages, in such areas, our liability
shall be limited to the maximum extent permitted by law.
5

Nireeka Prime User’s Manual
ENGLISH
- USER COMMENT, FEEDBACK, AND OTHER SUBMISSIONS TO ANY OF OUR
OFFICIAL CHANNELS
If at our request, you send certain specific submissions (for example contest entries) or without a
request from us you send creative ideas, suggestions, proposals, plans, or other materials, whether
online, by email, by postal mail, or otherwise (collectively, 'comments'), you agree that we may, at any
time, without restriction, edit, copy, publish, distribute, translate and otherwise use in any medium any
comments that you forward to us. We are and shall be under no obligation (1) to maintain any
comments in confidence; (2) to pay compensation for any comments; or (3) to respond to any
comments.
We may, but have no obligation to, monitor, edit or remove content that we determine in our sole
discretion are unlawful, offensive, threatening, libelous, defamatory, pornographic, obscene, or
otherwise objectionable or violates any party’s intellectual property or these Terms of Service.
You agree that your comments will not violate any rights of any third-party, including copyright,
trademark, privacy, personality, or other personal or proprietary rights. You further agree that your
comments will not contain libelous or otherwise unlawful, abusive or obscene material, or contain any
computer virus or other malware that could in any way affect the operation of the Service or any
related website. You may not use a false e-mail address, pretend to be someone other than yourself,
or otherwise mislead us or third-parties as to the origin of any comments. You are solely responsible
for any comments you make and their accuracy. We take no responsibility and assume no liability for
any comments posted by you or any third-party.
6

Nireeka Prime User’s Manual
ENGLISH
QUICK INSTALLATION
7

Nireeka Prime User’s Manual
ENGLISH
UNPACKING
Check the box carefully for any damage.
Put the box on the ground and pull the package out by grabbing the frame and rear wheel.
The package includes:
- Nireeka Prime fully-assembled bike
- Front-wheel
- Saddle
- Battery
- Charger
- Battery key (Inside the Charger box)
- User’s Manuals
- Pedals
*Your upgrades are included.
ATTENTION:
The bike is fully assembled. The only part that needs to be assembled, is the front wheel and the
handlebar.
8
Nireeka Prime User’s Manual
ENGLISH
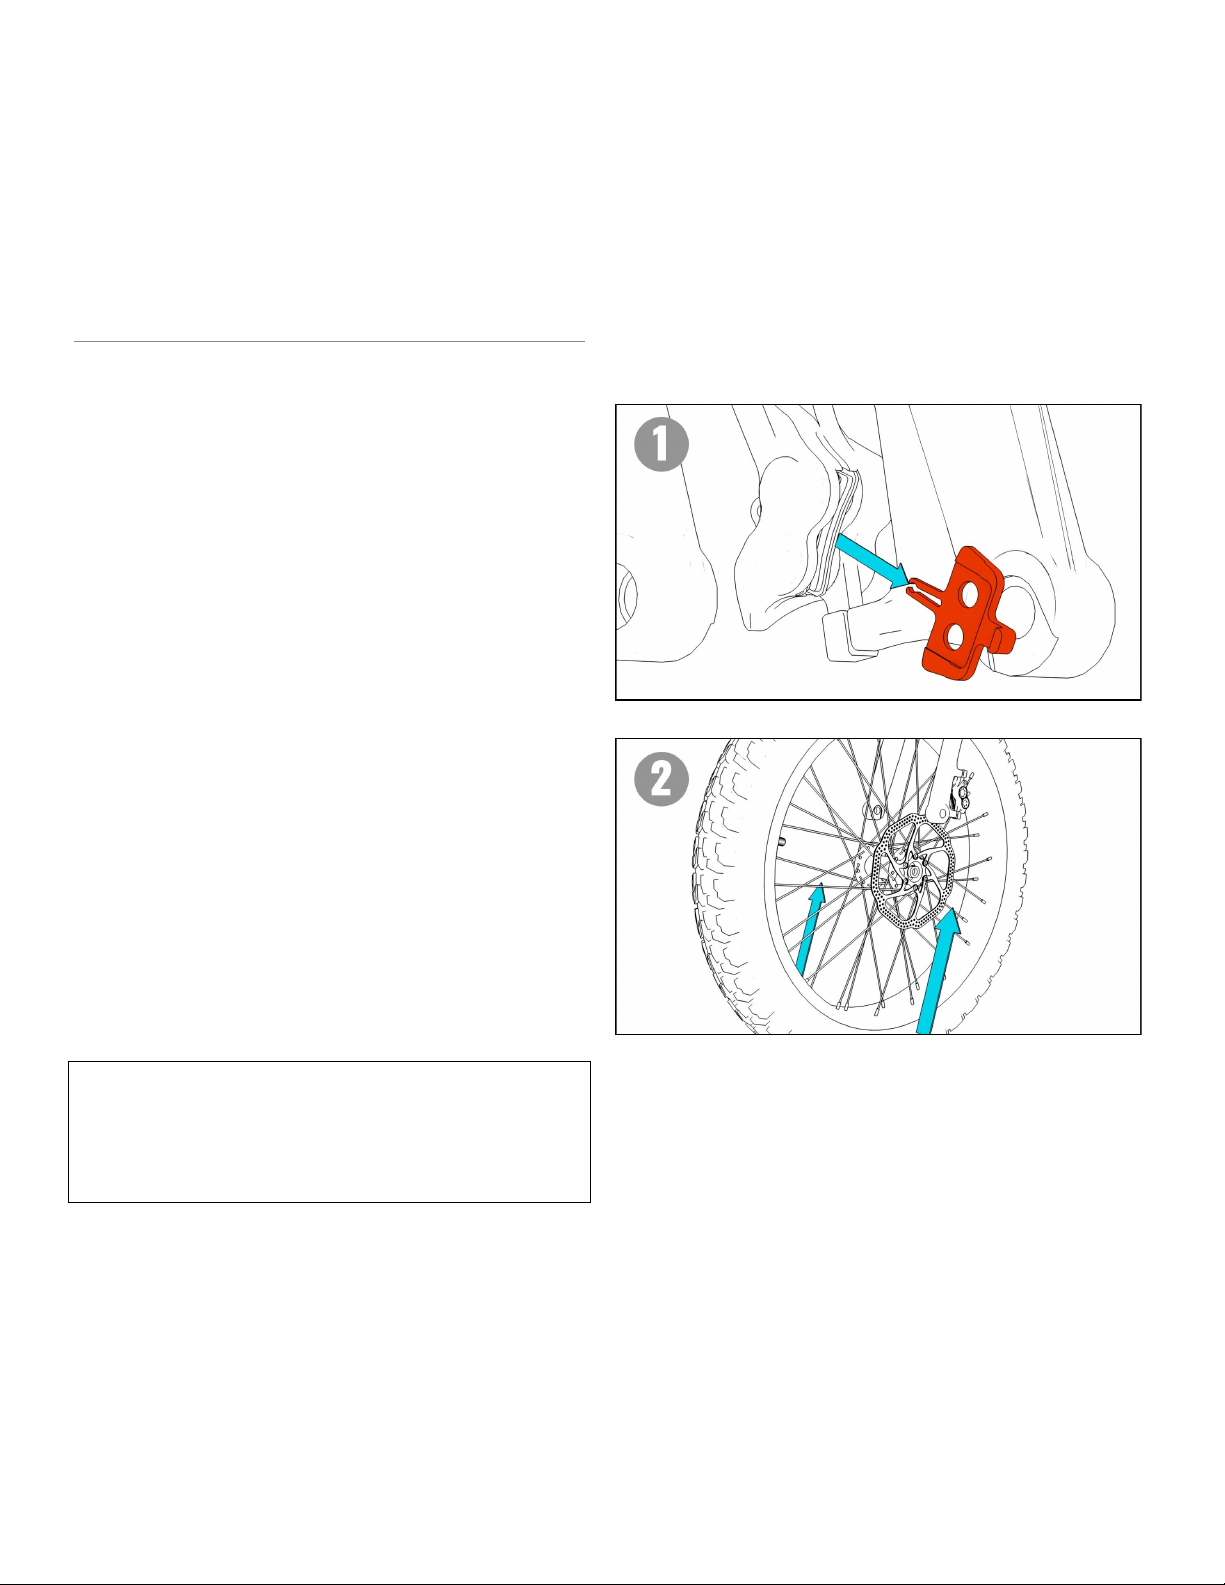
INSTALLING THE FRONT WHEEL
The front wheel hub is the thru-axle model.
1. Pull out the brake's pad protector gently.
2. Locate the rotor inside the brake’s caliper
and align the hub in the front fork dropout.
NOTE: When installing the front wheel in the
fork, make sure the brake pads aren't dislodged.
⚠ WARNING
Check the lever to be secured or it causes
serious damage or death.
9
Nireeka Prime User’s Manual
ENGLISH
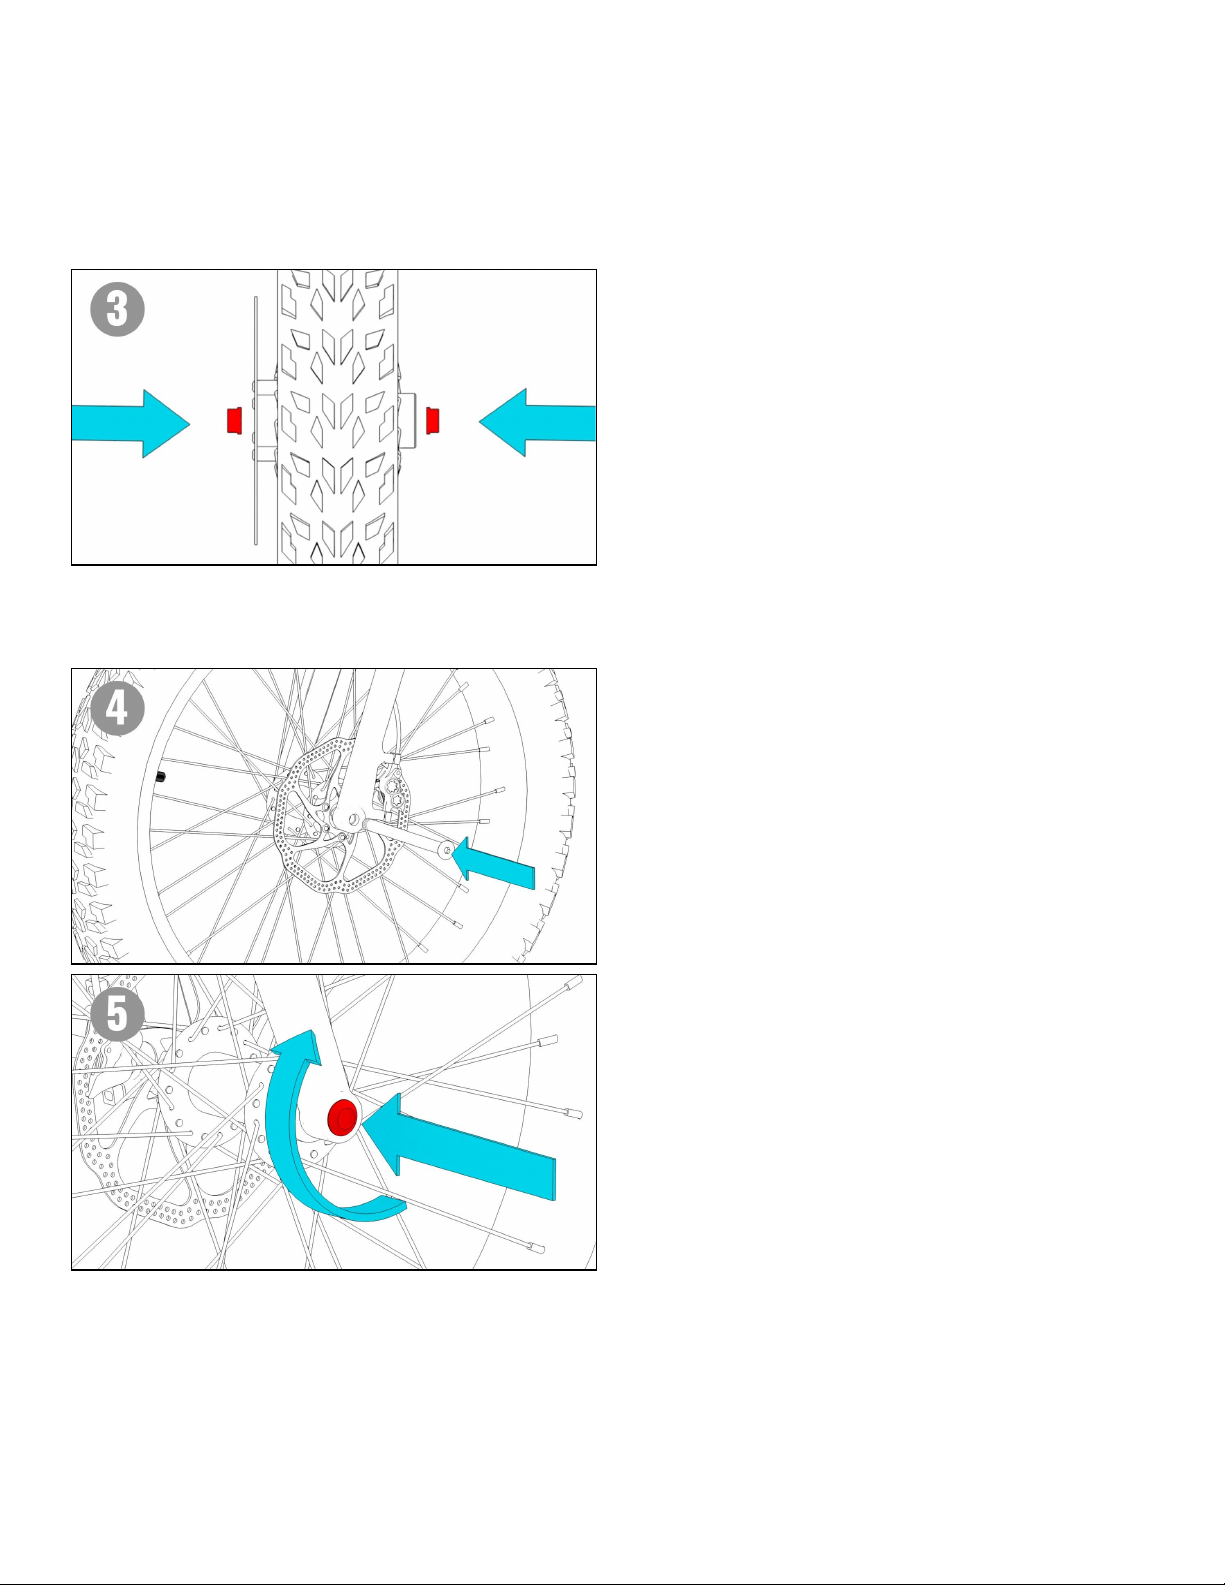
3. Insert two pieces of bushings on the right
and left sides according to the picture.
4. Insert the thru-axle shaft from the rotor
side.
5. Fasten the shaft’s nut using a 7/8" (22mm)
open-end wrench. (Torque: 9-13.5 N.m)
10

Nireeka Prime User’s Manual
ENGLISH
INSTALLING THE HANDLEBAR
1. Adjust the handlebar in the proper and
straight position.
2. Fasten the bolts on the back of the stem
respectively.
11
Nireeka Prime User’s Manual
ENGLISH
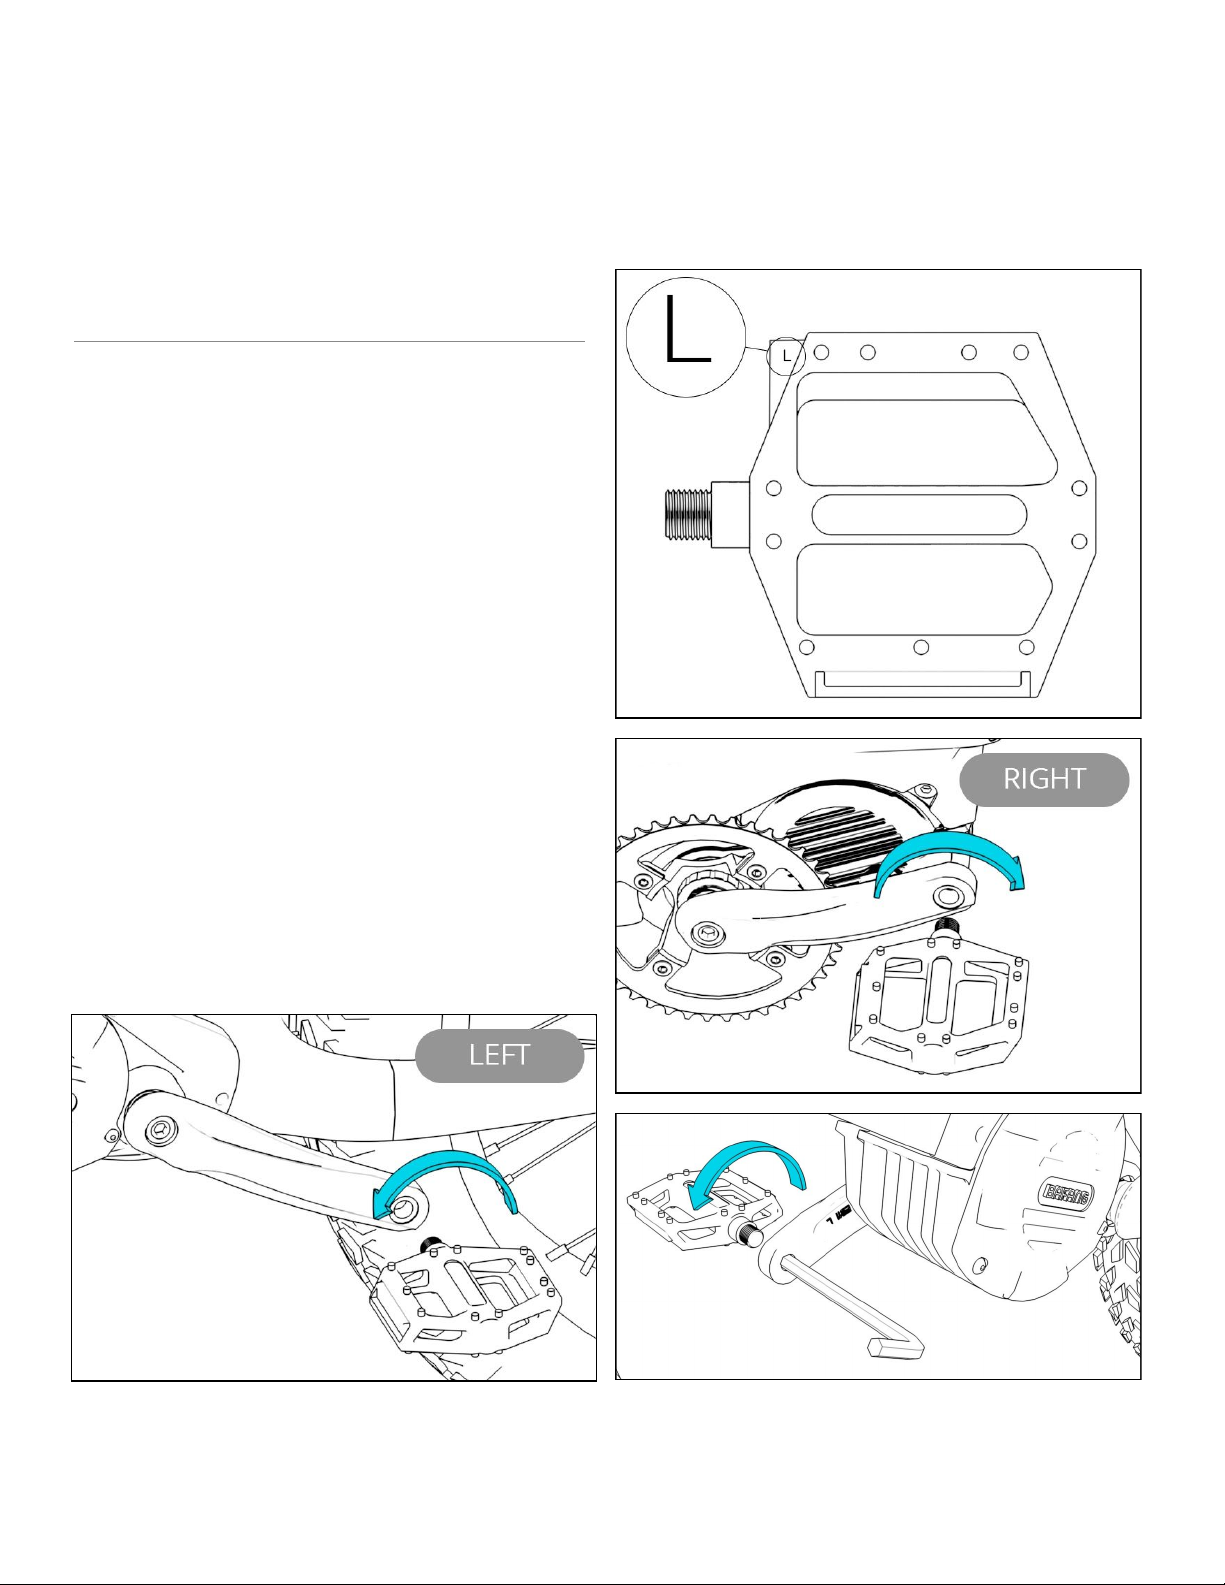
INSTALLING THE PEDALS
1. There is a small letter on each pedal
indicating that on which side it should be
installed. You need to install each pedal
on the correct side of the Crank Arm. “L”
stands for Left and “R” stands for Right.
2. If you’re standing on the right side of the
bike, the right pedal should be tightened
clockwise using a 6mm allen key, as
shown on the picture.
3. If you’re standing on the left side of the
bike, the left pedal should be tightened
anticlockwise using a 6mm allen key, as
shown on the picture.
Note: You can also use a 15mm open-end
wrench instead of Allen key.
12
Nireeka Prime User’s Manual
ENGLISH
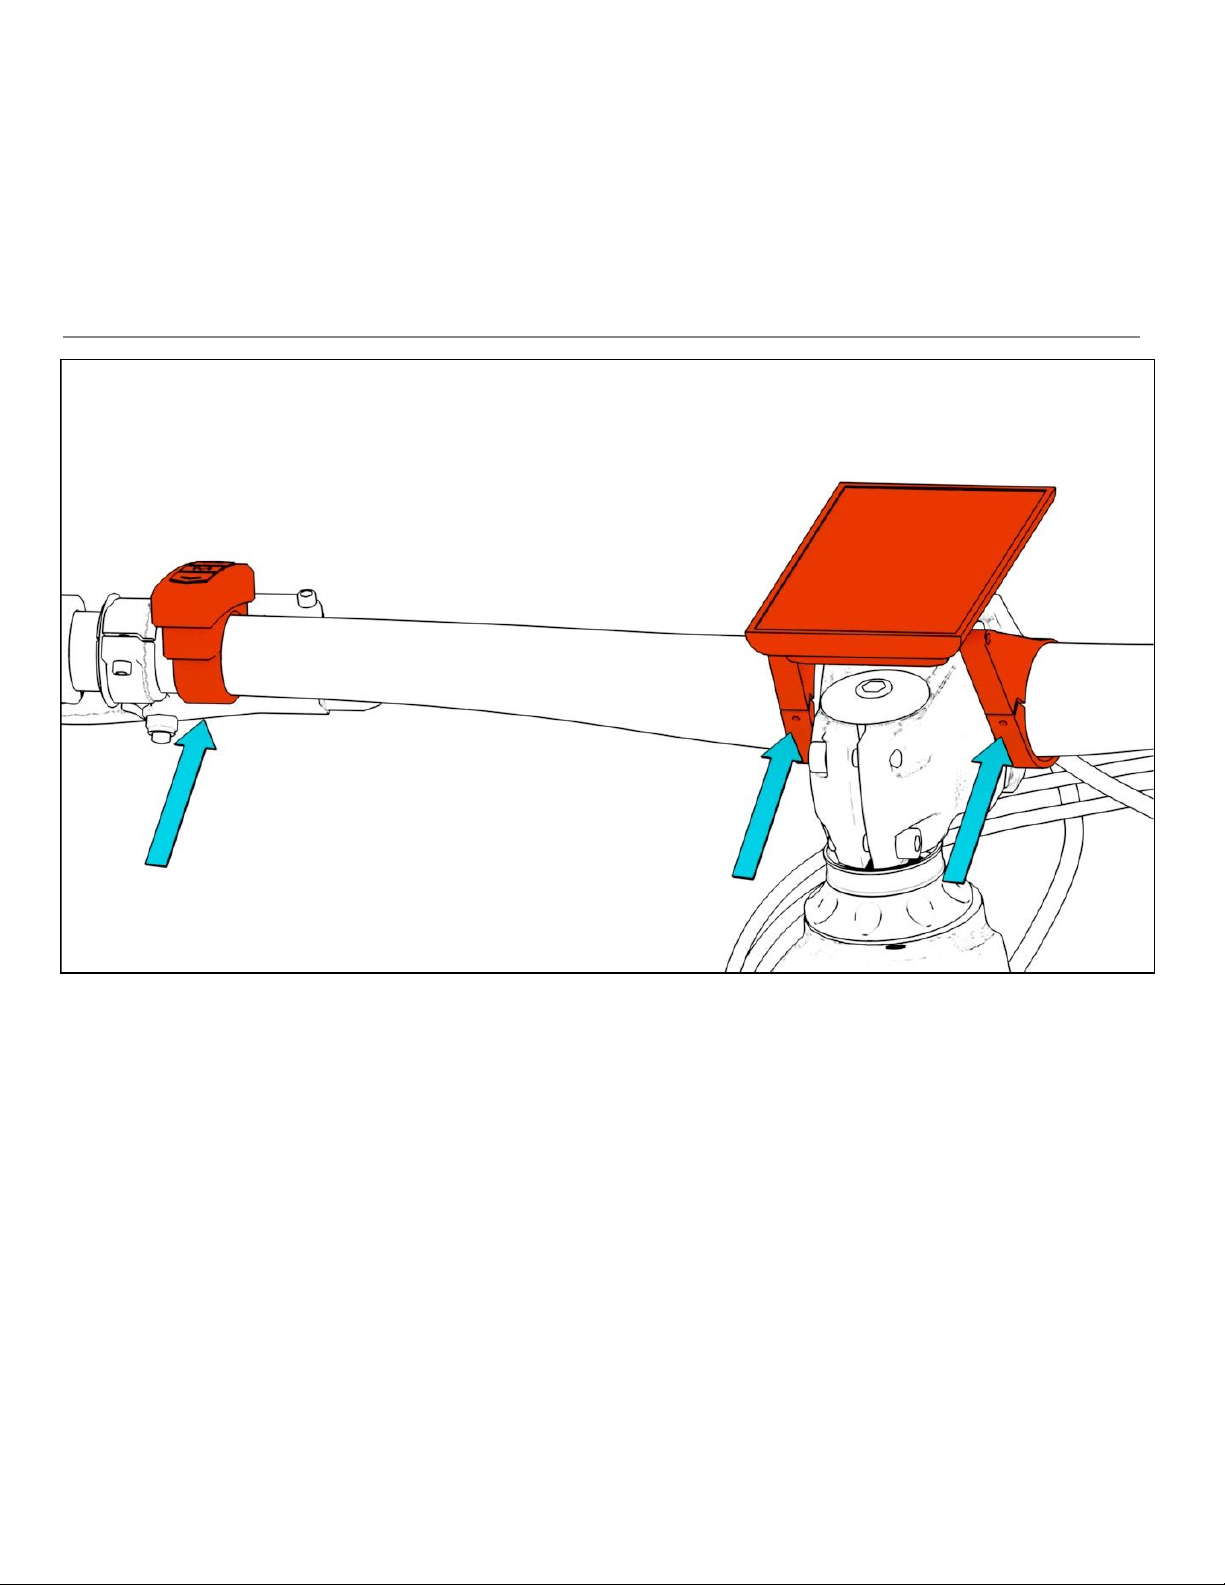
INSTALLING THE DISPLAY
1. Open the clamp band’s screw and install it on the correct place over the handlebar.
2. Adjust the angle of the display so that it is easy to be seen while riding, and then use a 3mm
allen key to tighten the clamp bolt. (Torque: 0.8 N·m)
ON/OFF BUTTON
To turn on the power, press and hold (>2 Sec.) to power on the display. The display begins to operate.
Press and hold (>2 Sec.) again to power off the display.
NOTE: After 5 minutes of inactivity, the display will be automatically turned off.
13

Nireeka Prime User’s Manual
ENGLISH
BATTERY AND CHARGER
14
Nireeka Prime User’s Manual
ENGLISH
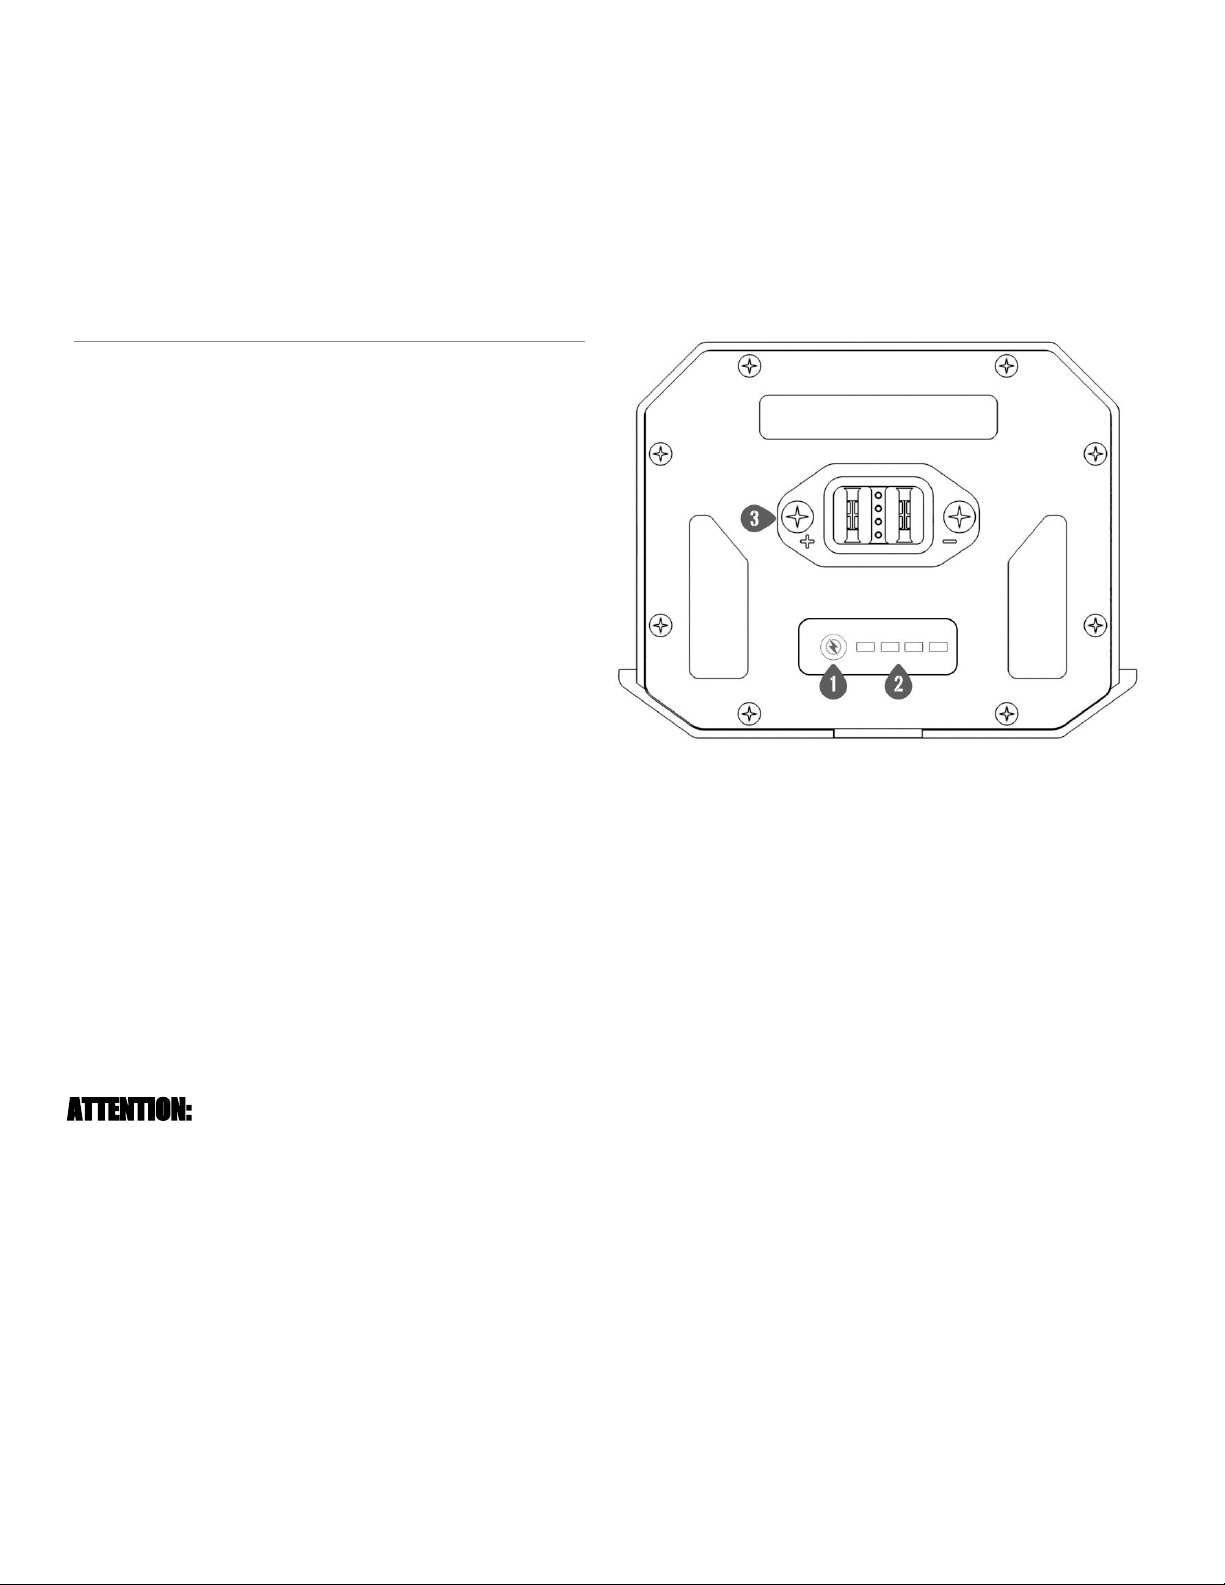
THE LED INDICATORS
1. Power Button: Press this button to turn
the battery on before installing on the
bike.
2. Battery LEDs: Press the button to see
the four LED indicators. When all 4 LEDs
are on, it means that the battery is fully
charged. As it is being discharged, the
LEDs will turn off one by one. (Figure A)
3. Discharge Connector: This connector
plugs to the male side on the battery
bracket when the battery is installed on
the bike.
Charger LEDs: When green, either the battery is
not connected or the battery is fully charged.
When red, it means the battery is charging. The
charger has a smart cut-off system. When the
battery is fully charged, it turns off automatically.
Sleep Mode: Some batteries have a sleep
feature that turns off the battery if it’s not being
used for more than 12 hours. The power button
needs to be pressed to wake the battery up.
ATTENTION:
All the batteries are identical in dimensions
regardless of the capacity.
15
Nireeka Prime User’s Manual
ENGLISH
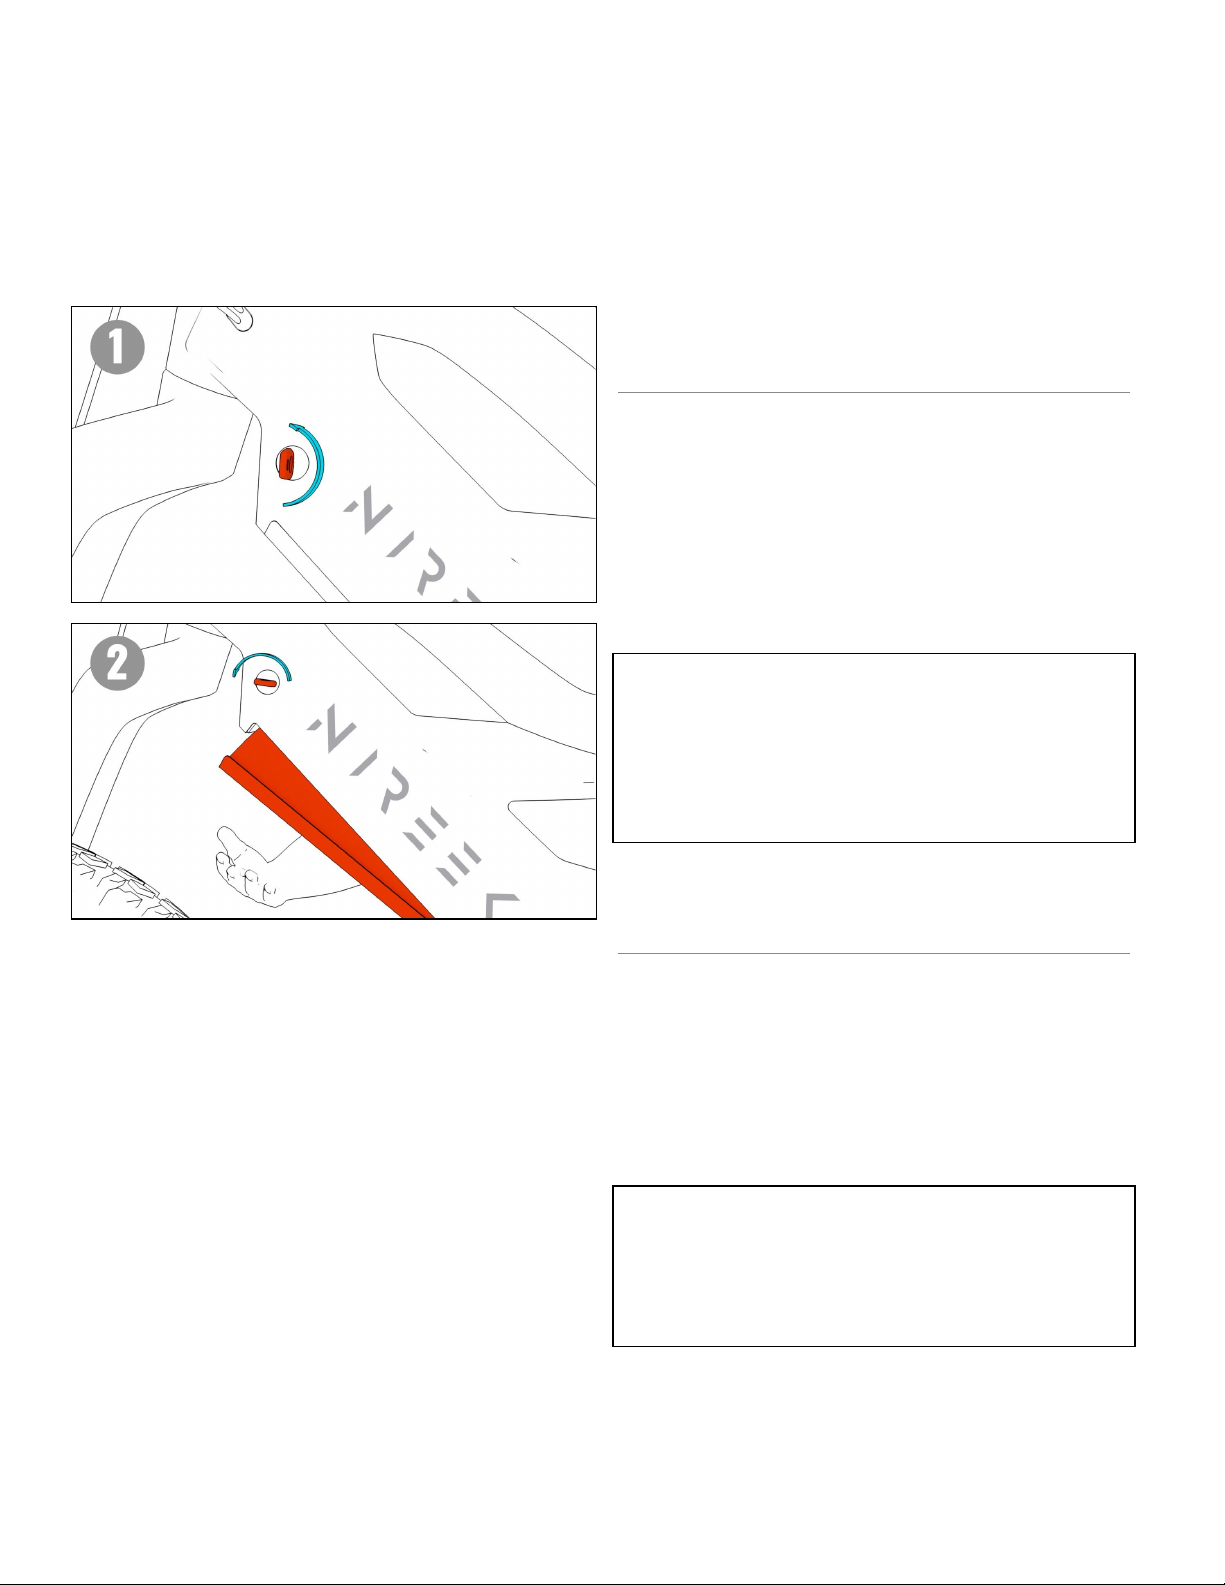
REMOVING THE BATTERY
1. The battery lock is placed on the left side
of the bike. Rotate the key anticlockwise
to unlock it with your left hand.
2. The battery drops in your right hand. Pull
it off to remove the battery.
⚠ WARNING
Make sure you keep your hand under the
battery before unlocking it or the battery may
drop resulting in injury or damage to the
battery.
REINSTALLING THE BATTERY
1. Put the bottom side of the battery into the
frame.
2. Push the battery into the frame to hear the
click sound.
⚠ WARNING
Check carefully if the battery is secured.
Dropping the battery while riding can cause
serious damage.
16
Nireeka Prime User’s Manual
ENGLISH
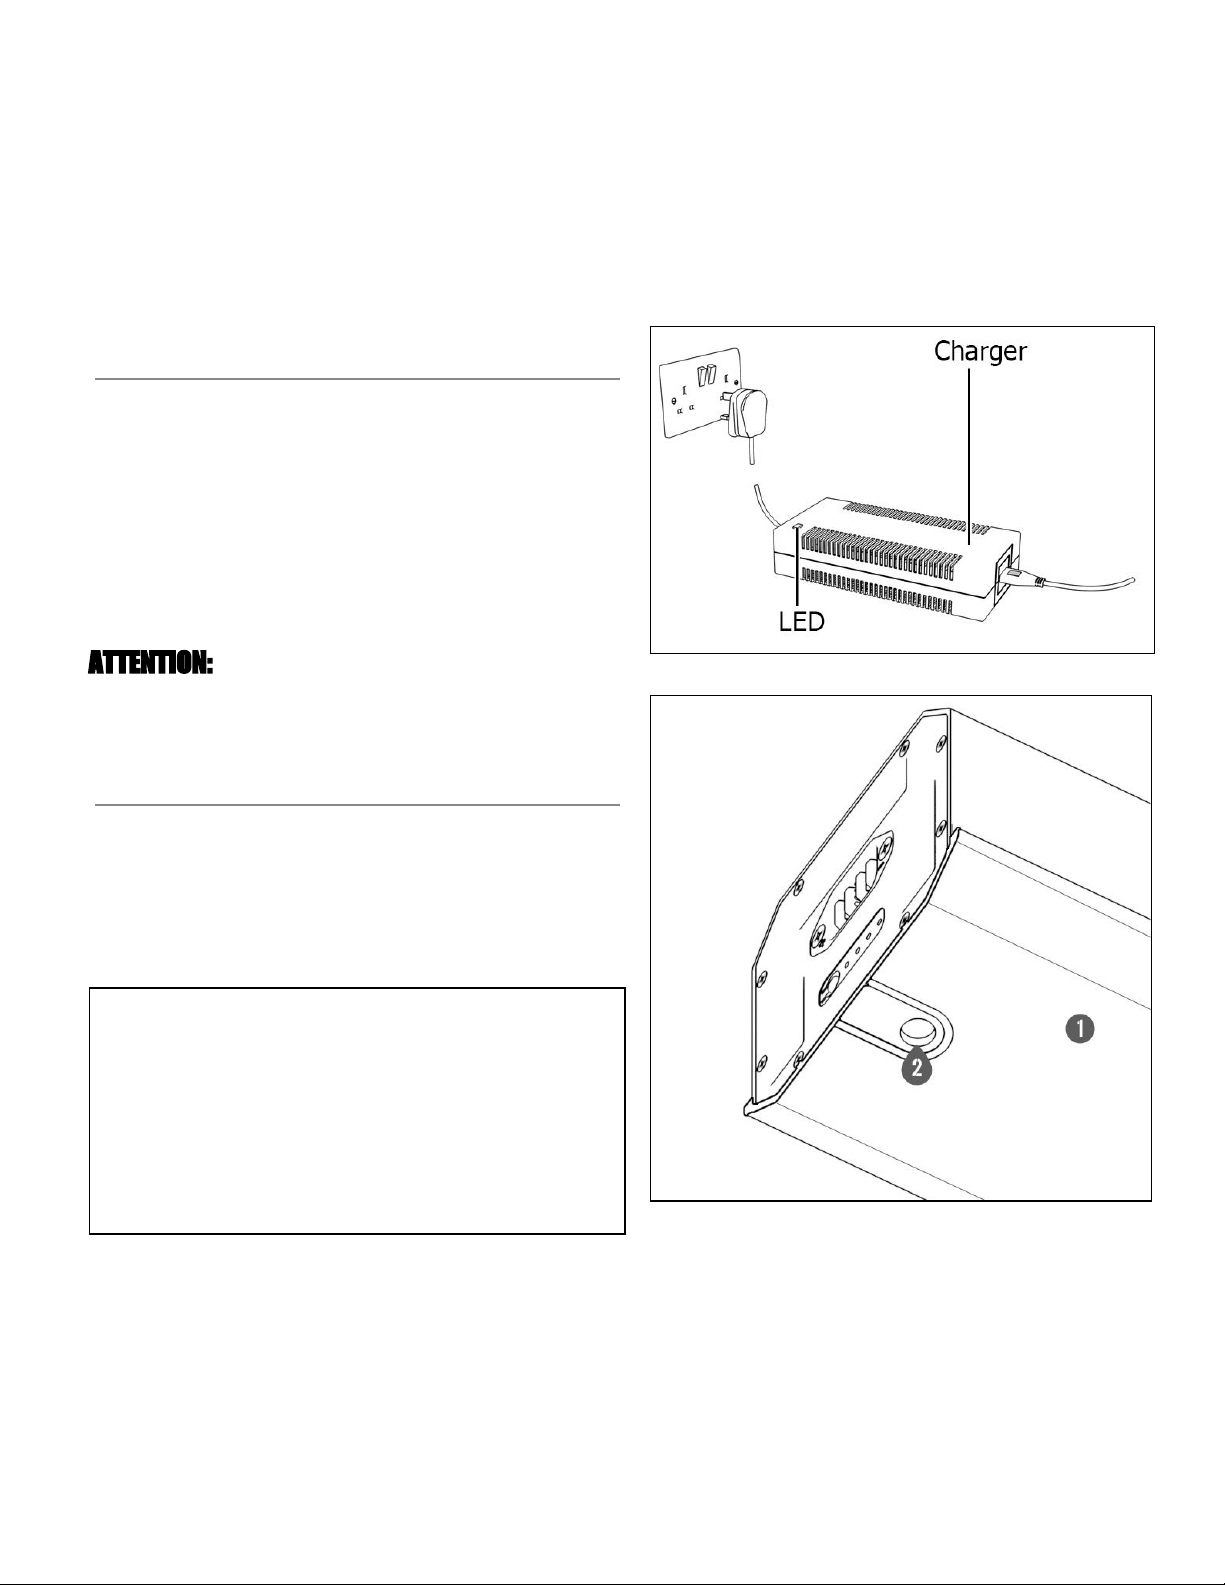
CHARGING THE BATTERY
1. Connect the charger’s power plug to the
outlet.
2. Remove the waterproof socket cover on the
battery.
3. Insert the charging plug into the battery's
charging port.
ATTENTION: Charge the battery on a flat surface
indoor, and do not leave it where you cannot see it
during charging.
1. Bottom of the battery
2. Charging port
⚠ WARNING
- Do not leave the battery while charging.
- When charging the battery while it is mounted
on the bike, be careful not to trip over the
charger cord or get anything caught on it. This
may lead to injury or cause the bike to fall over,
or damaging the components.
17

Nireeka Prime User’s Manual
ENGLISH
DISPLAY
18
Nireeka Prime User’s Manual
ENGLISH
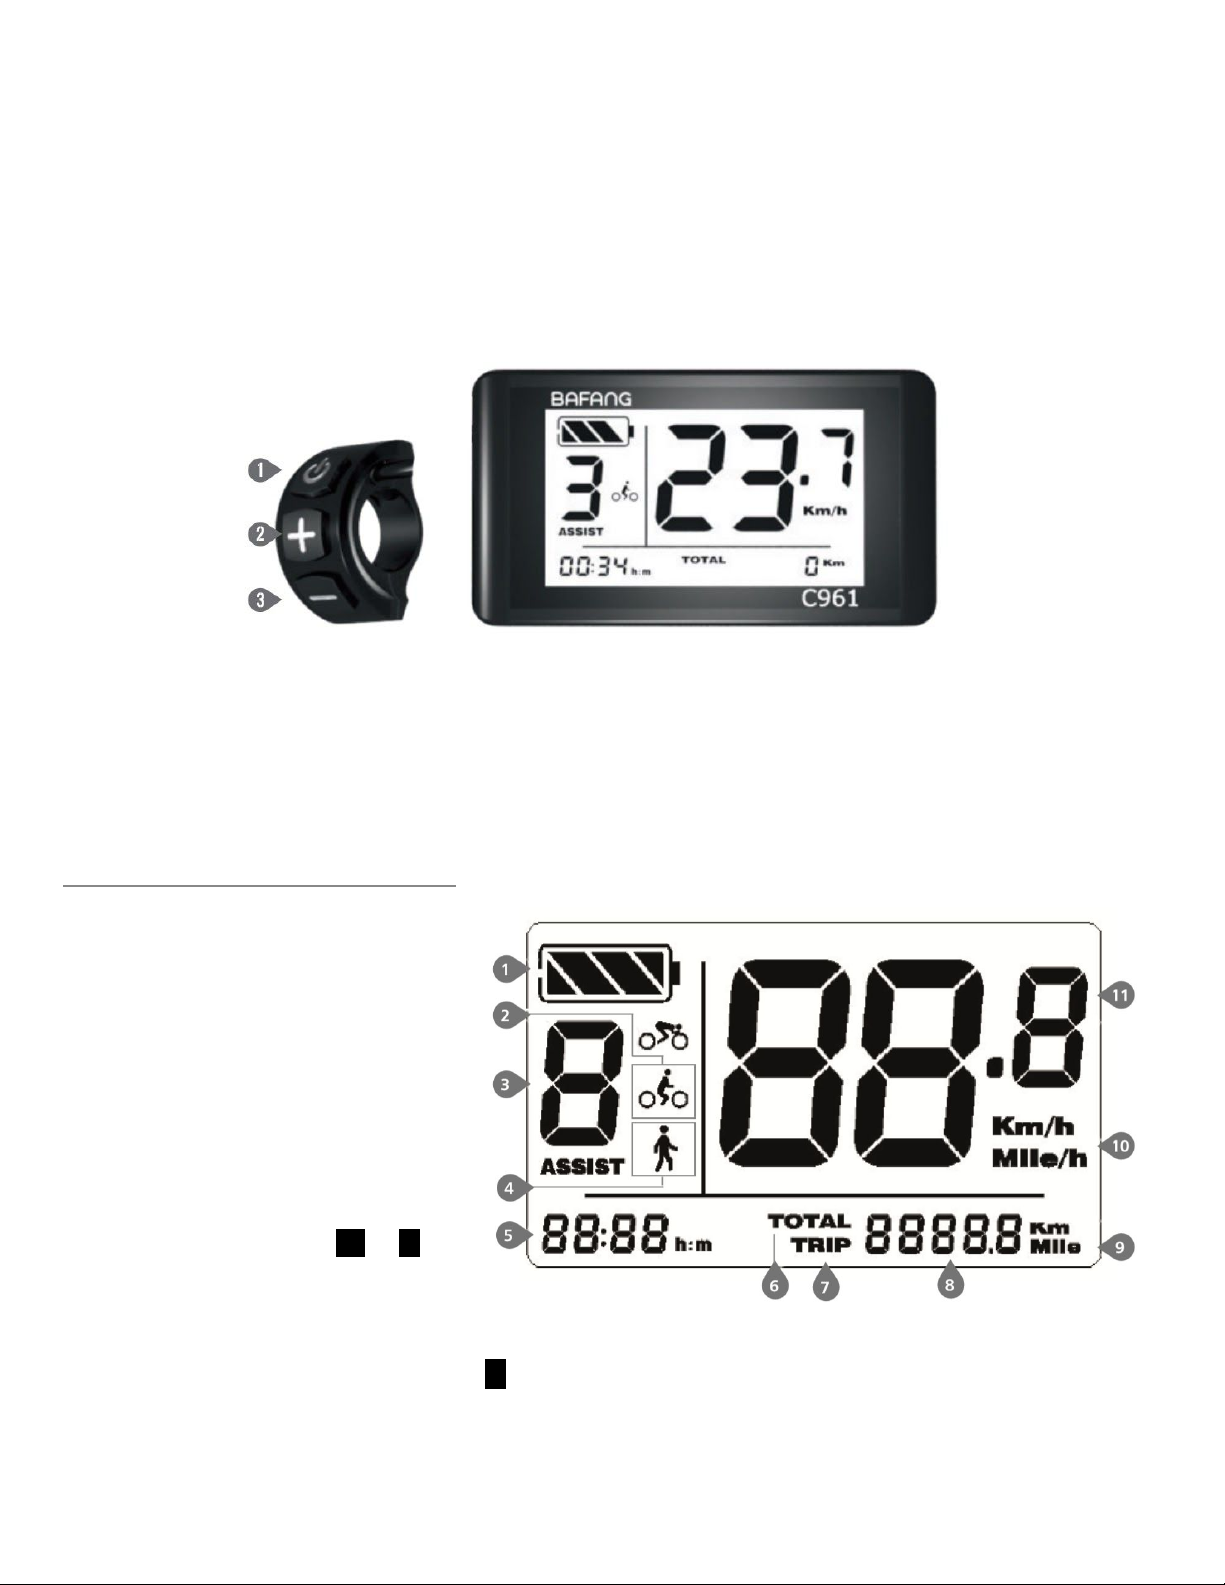
DPC-C961 B/W DISPLAY
1. Power/Mode Button
2. "+" button
3. "-" button
Press and hold the power button to turn on the display/bike.
1. Battery capacity indication:
Display current battery level
value.
2. General mode indication:
Displays current riding mode.
3. Assist levels indicator:
Displays the assist levels,
briefly press (0.5S) + or - to
switch between levels.
4. Walk assistance indicator:
In the power-on status, press the - button and hold it for three seconds to enter the walk
assistance mode. Release the button to return to the ride mode.
19

Nireeka Prime User’s Manual
ENGLISH
5. Time indicator: Displays current time.
6. ODO indicator: It will record your total distance over time.
7. Trip indicator: Displays how much distance you have covered in a single trip.
8. Trip data indicator: Displays accurate data of ODO and Trip.
9. Distance unit: Displays distance unit chosen to be shown.
10.Speed unit: Displays speed unit chosen to be shown.
11.Speed indicator: Displays accurate speed of the bike.
20
Table of contents


