NITO N1e User manual

NITO ELECTRIC
KICK SCOOTER
N1E - USER MANUAL

We believe in urban mobility.
It means transportation that’s efficient,
eco-friendly and fun.
Your new N1eelectric kick scooter will
make your life easier. The comfortable
and fast ride will help you tackle your day
with ease. It has zero emissions and folding
storage, which makes N1e the intelligent
way to move around your city.
This manual will teach you how to safely
ride and care for your N1e. We ask that you
read these instructions carefully, and store
the manual in a safe place for future use.
WELCOME
TO THE
ELECTRIC ERA
THANKS FOR CHOOSING NITO

1Handlebar
2Display
3Bell
4A Right brake lever
4B Left brake lever
5Steering column
6Quick release
7Folding hinge
8Headlight
9A Front mudguard
9B Rear mudguard
10 Brake disk
11 Brake caliper
12 Battery
13 Wooden board
14 Charging port
15 Tail light
16 Brushless motor
17 Kickstand
PRODUCT AND PARTS
1
2
3
4A
4B
5
7
6
10
11
13
12
14
9B
16
15
17
9A
8
4 5
N1e- USER MANUAL
NITO ELECTRIC KICK SCOOTER
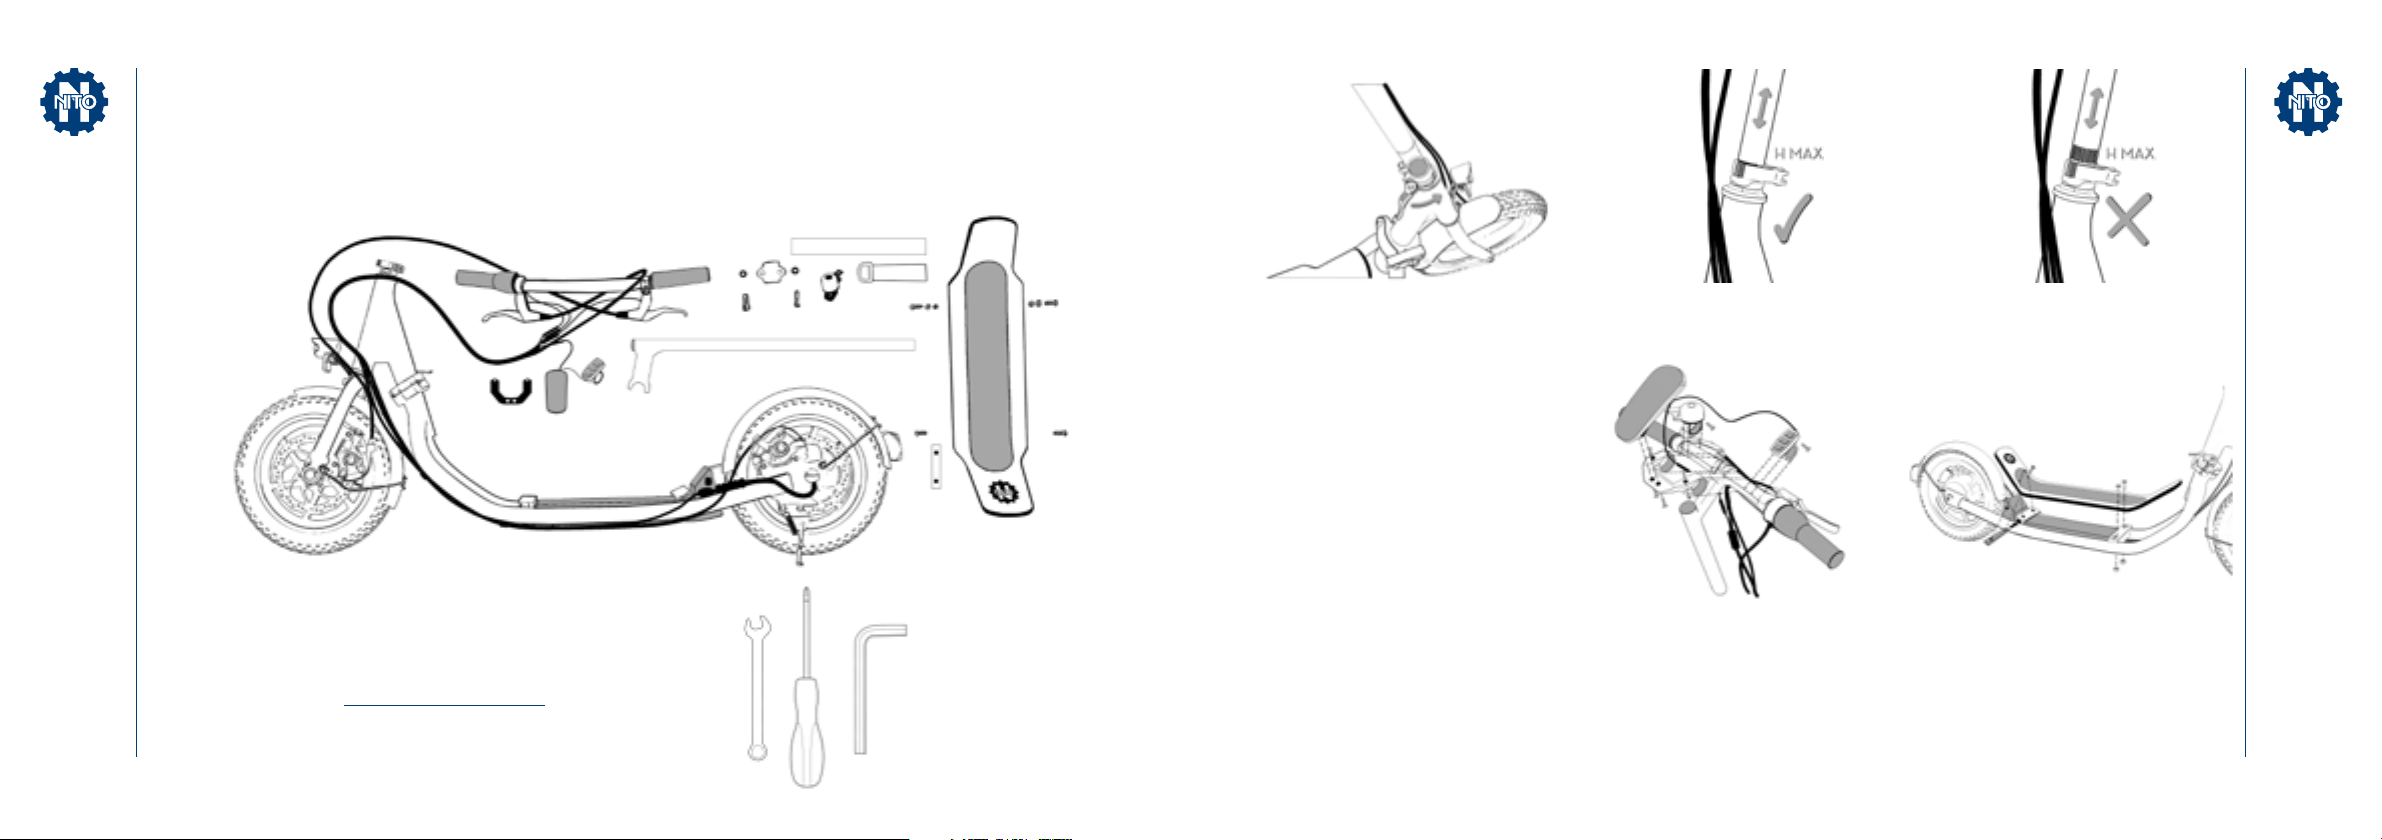
Assemble the scooter by following the instructions on the
next page. The following tools are required for assembly
and are not included in the package:
cross screwdriver, 8mm wrench and 5 mm allen key
Insert the bottom of the steering column into
the frame. Tighten the quick release to secure
the steering column.
Use the screws provided to attach the display,
buttons and bell to the handlebar. The diagram
above shows where to place each item.
Attach the handlebar to the fitting on the
steering column. Make sure the brake levers
are facing forward, like in the picture above.
Attach the wooden board to the frame.
Place the metal bracket provided under the
elevated part of the frame, and attach it with
2 screws (provided). Attach the front of the
wooden board with 2 screws and secure with
a washer and bolt (provided). Use the diagram
above for reference.
Adjust the handlebars up to the mark
that indicates the maximum height.
Do not exceed the maximum height mark.
Recommended tire pressure for an adult rider is 2.7 bar/39 psi.
If the rider weighs less than 40 kg reduce the tire pressure to 2.2 bar/32 psi
ASSEMBLY INSTRUCTIONS
6 7
N1e- USER MANUAL
NITO ELECTRIC KICK SCOOTER
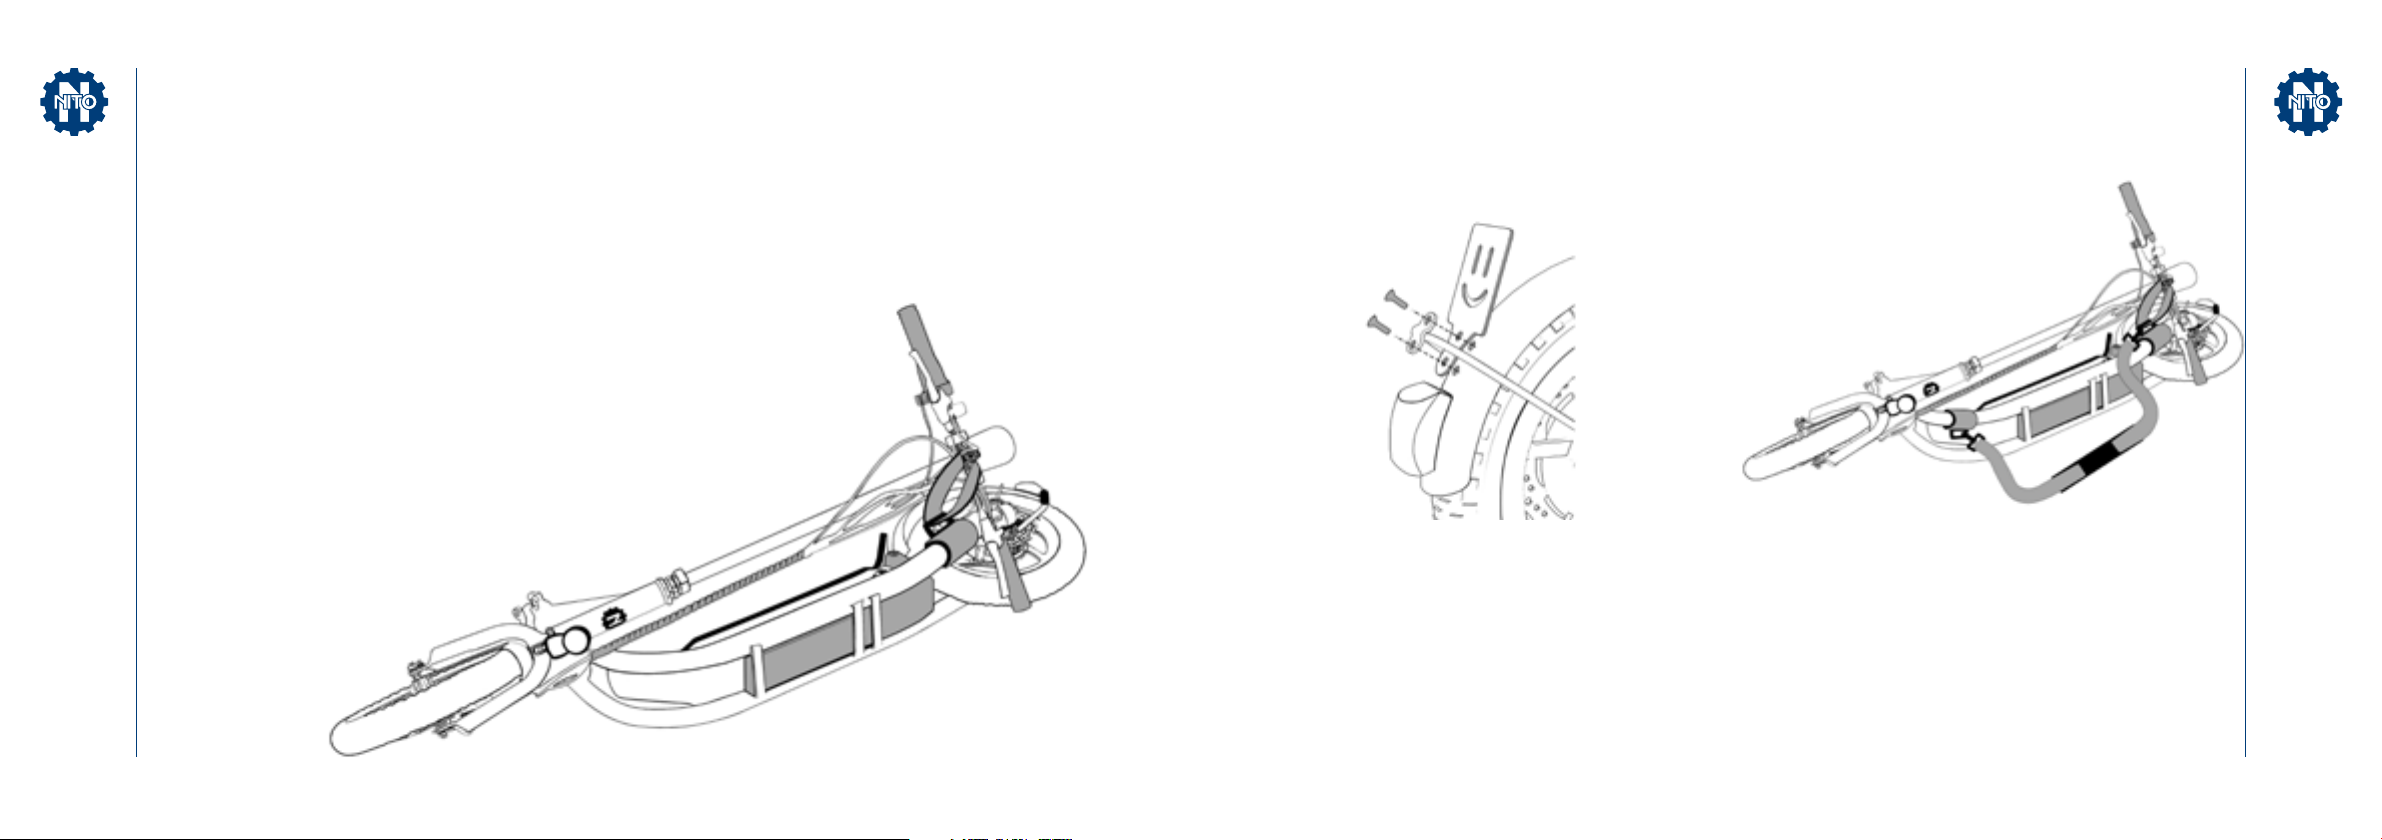
Loosen the folding hinge on the frame. This can be done by
lifting the lever on the hinge until the pin no longer holds
the hinge in place.
Slowly rotate the handlebar to the right and fold the
handlebar of the scooter towards the frame on the ground.
Secure the cuffs and shoulder strap to carry the scooter
(instructions on the next page) .
FOLDING YOUR N1eACCESSORIES
License plate holder
Remove the 2 screws from the mudguard.
Attach the license plate holder to the
bracket with the screws provided.
Shoulder strap
Attach the cuffs to the left side of the frame. The cuff with the
ring should be placed near the rear tire. The other should be
placed near the front tire (use the photo above for reference).
Place the handlebar strap on the handlebar and connect
it to the ring on the cuff near the rear tire. This will ensure
that the handlebar stays in place.
Use the hooks on the shoulder strap to connect it to the
cuffs on the frame.
8 9
N1e- USER MANUAL
NITO ELECTRIC KICK SCOOTER
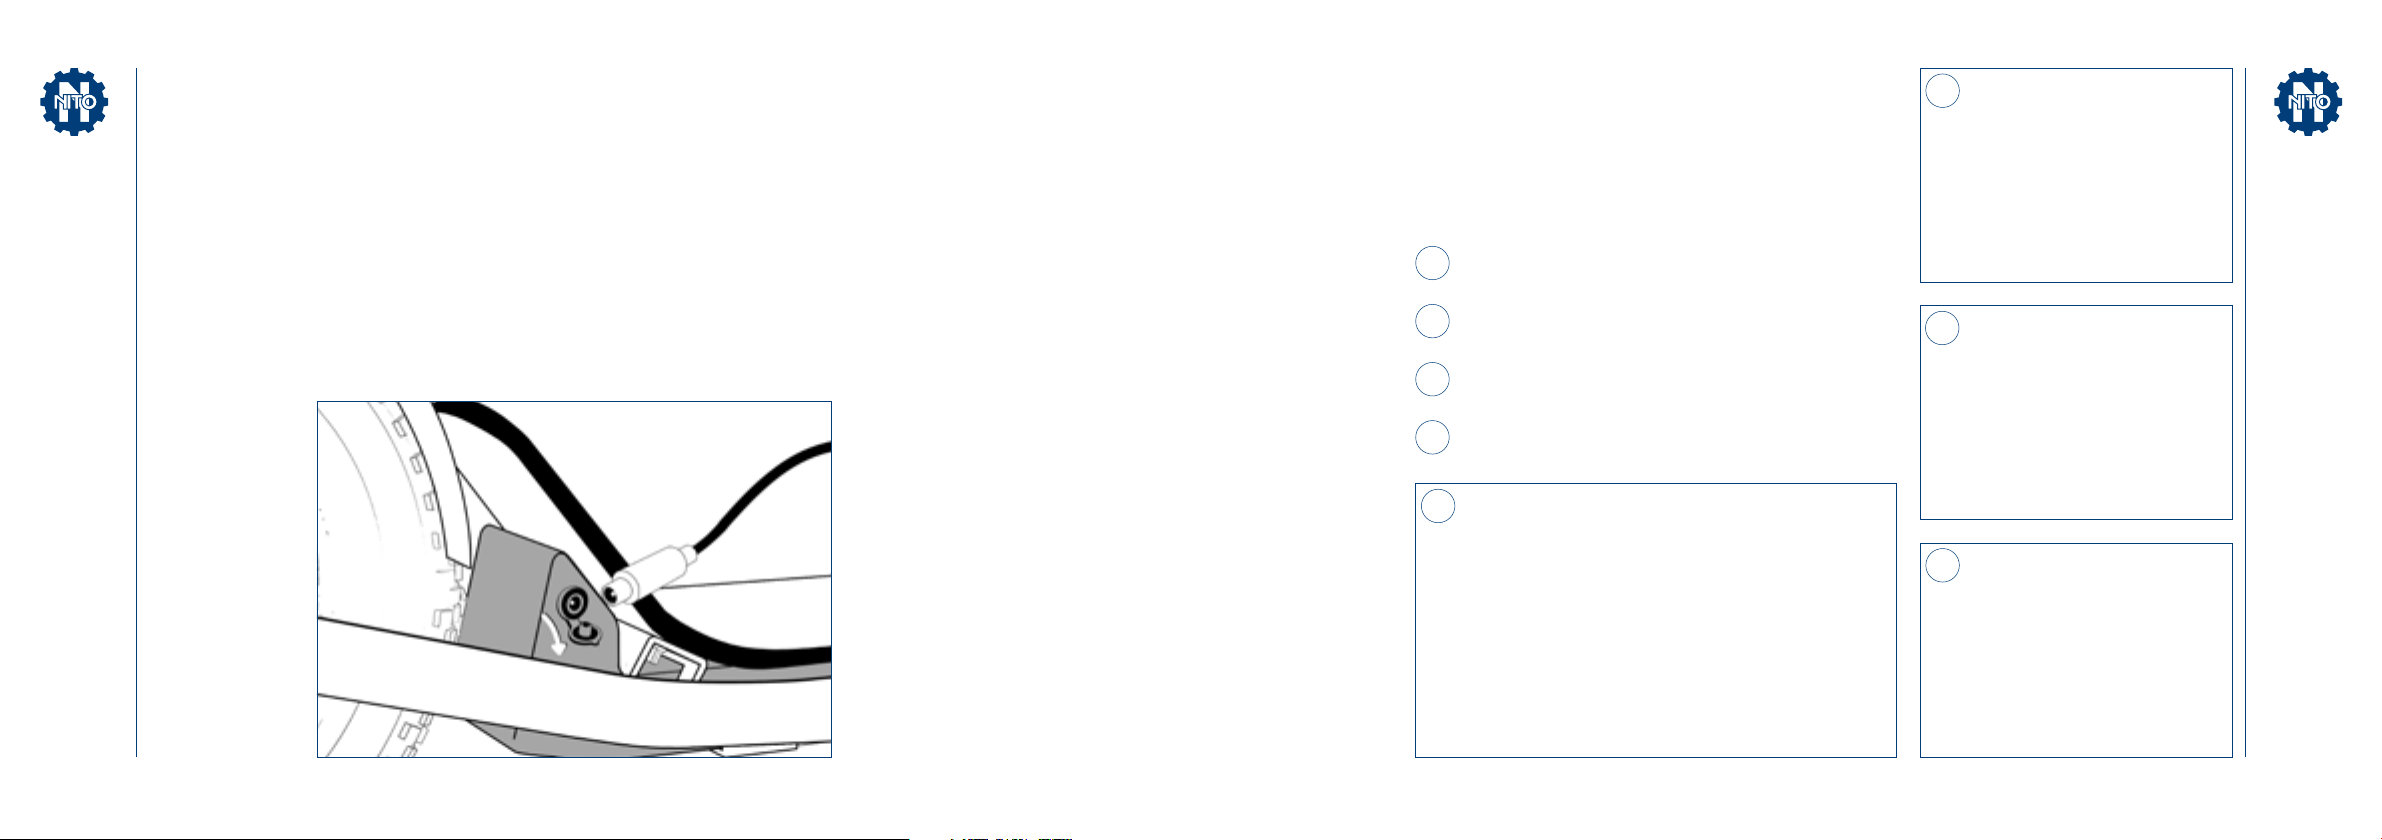
Once you’ve assembled your N1e, it’s time to charge.
Connect the charger provided to the charging port
(near the rear wheel).
Do not charge your N1e if the charging port or
charger is wet. If either is wet, wait for it to dry before
beginning charging.
1To turn on/off the scooter, first press the
power button on the battery.
2Then, hold the power button on the
handlebar (to turn on/off the display).
3Press and hold the “up” button for 3 seconds
to turn the scooter lights on/off.
4Press and hold the “down” button for 4
seconds to limit the speed to 6 km/h.
CHARGING YOUR N1eUSING YOUR N1e
ON/OFF BUTTON
ON/OFF LIGHTS BUTTON
LIMIT SPEED
1
2
4
3
10 11
N1e- USER MANUAL
NITO ELECTRIC KICK SCOOTER

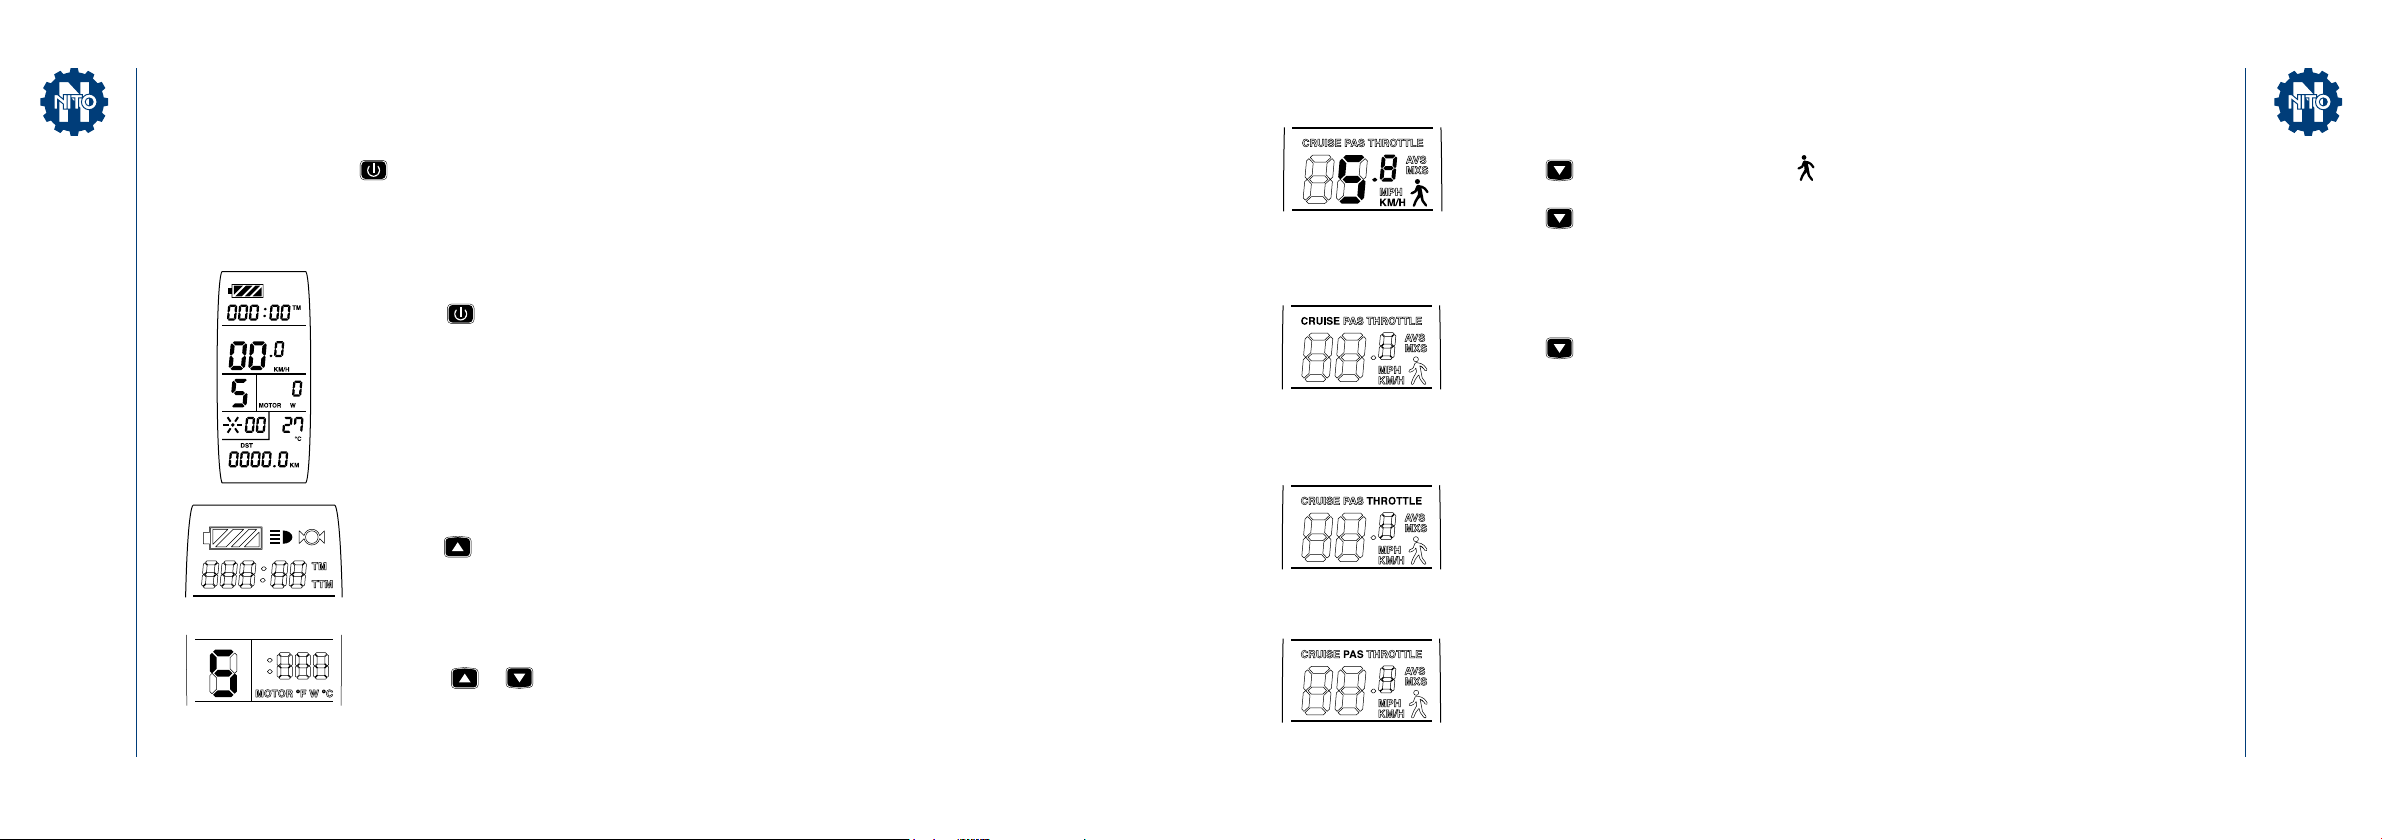
DISPLAY USER MANUAL
4 10
5 11
6 12
7 13
8 14
9 15
1
2
3
1UP button
9
MiL Distance (standard)
2POWER button DST Trip distance
3DOWN button ODO Total distance
4Battery charge indicator VOL Battery voltage
5
TM Single trip time 10 Headlight and tail light
TTM Total trip time 11 Brake display
6
KM/H Riding speed (standard)
12
CRUISE Cruise control display
MPH Riding speed (imperial) PAS PAS starting display
MXS MAX speed THROTTLE Turned on throttle
AVS Average speed 13 4 mph speed limiter
7ASSIST Power Assist Level
14
MOTO °F °C Motor temperature
8
CADENCE display (only for bikes) MOTOR W Motor power
KM Distance (metric) 15 °F °C Environment temperature
12 13
N1e- USER MANUAL
NITO ELECTRIC KICK SCOOTER
2. Display
Hold button to turn on the device and view display 1. 2.4 Cruise control (CRUISE)
Hold button to start cruise control. (The CRUISE sign will light when this function
is in use.) Cruise control can be used for any speed higher than 7 km/h.
Use the brake or hold any button to end cruise control.
2.5 Throttle display (THROTTLE)
When the throttle is being used, THROTTLE will be displayed.
2.6 Power-assist startup (PAS)
When power-assist is in use, PAS will be displayed.
2.2 Change assist gear (ASSIST)
Press or button to change gear (gears 1-5 available). Gear 1 is the
minimum power, and gear 5 is the maximum power. Upon startup, the gear
will automatically restore to the gear it was in upon shutdown.
Gear 0 means the motor is not in use.
2.3 Speed limiter 6 km/h
Hold button for 4 seconds and will begin flashing.
This means the scooter will be limited to a maximum speed of 6 km/h.
Hold button for 4 seconds again to turn off the speed limiter
function.
2.1 Turn on headlight and tail light
Hold button for 3 seconds to turn the headlight and tail light on/off.
1. Turning scooter on/off
Hold button to turn the scooter power on/off. The power will automatically turn off if the
motor is not in use for 5 minutes.
Operation
14 15
N1e- USER MANUAL
NITO ELECTRIC KICK SCOOTER
2.9 Display and delete data
Wait until the scooter has been on for 5 seconds, then hold
and buttons at the same time. This will make the
single trip riding time (TM) and single trip distance (DST)
flash. Press button to delete this data.
3. Automatically prompt interface.
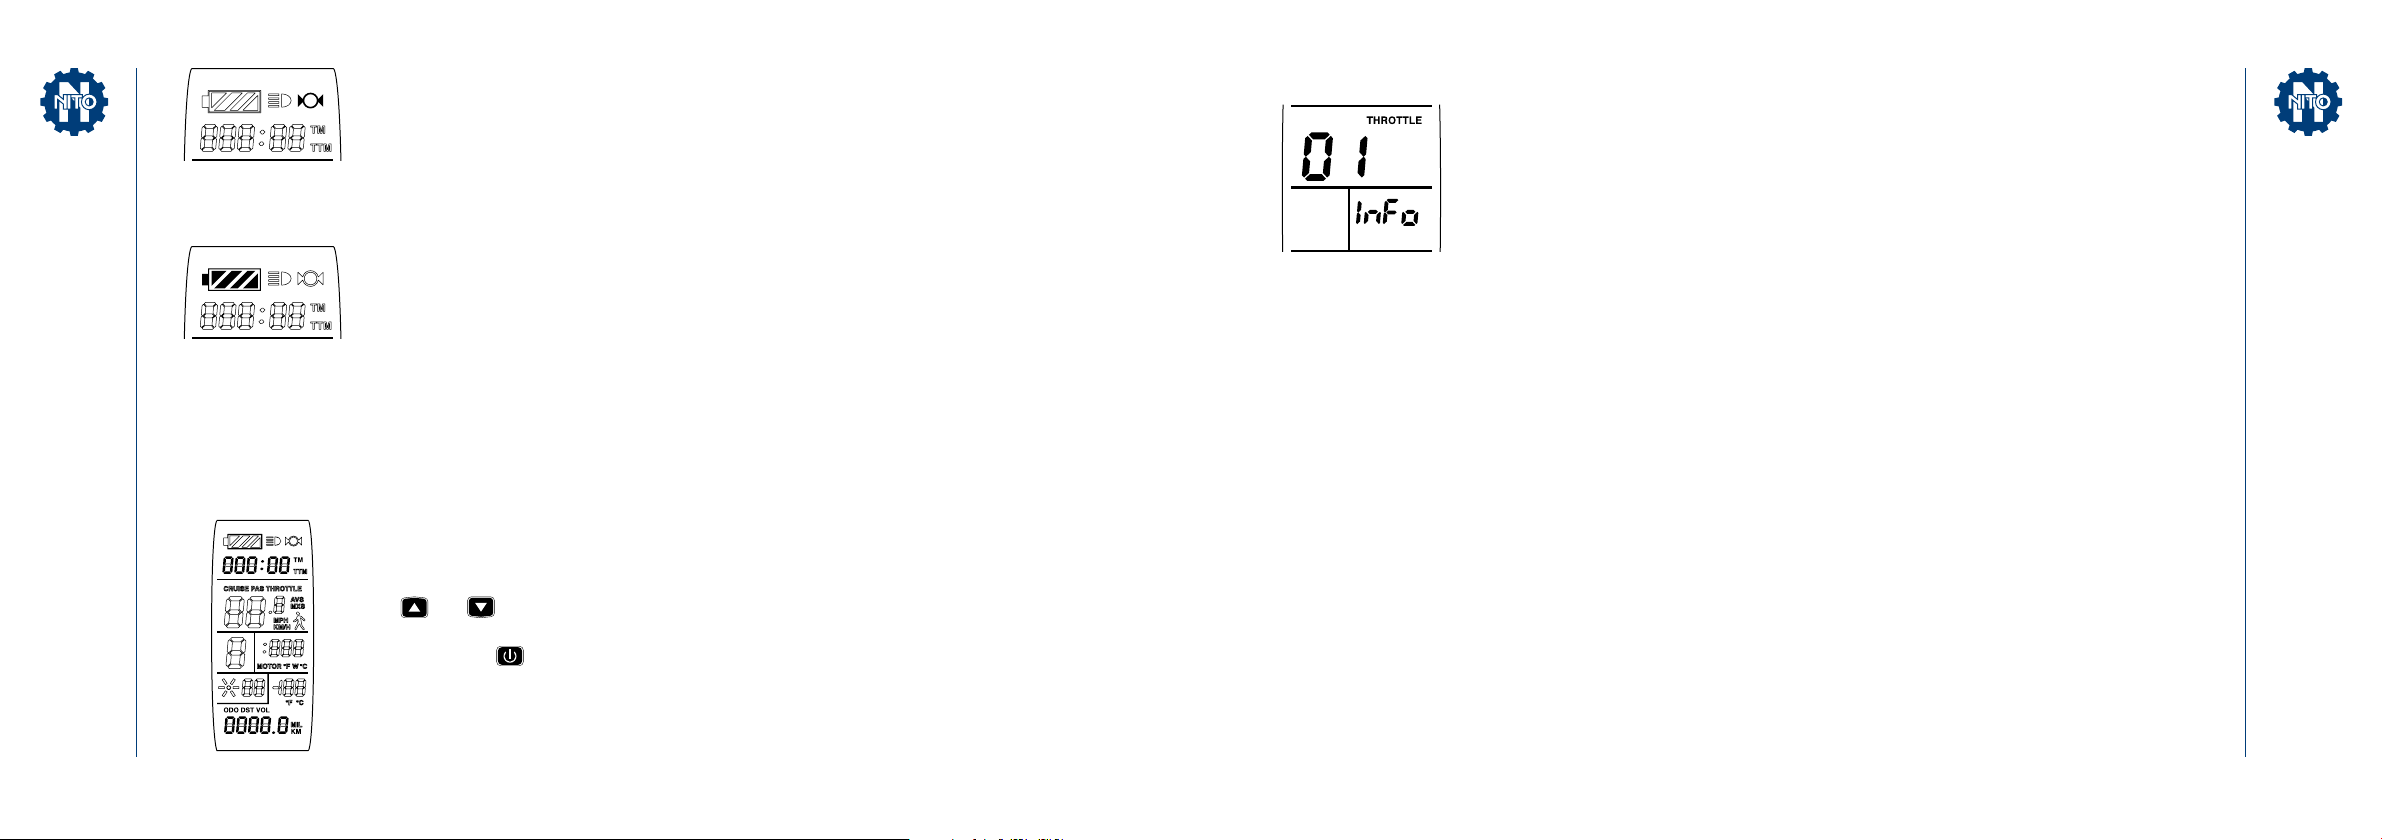
3.1 Error Code Display
error code meaning
01_info Throttle issue
03_info Motor hall signal issue
05_info Axis speed sensor issue (only applies to torque sensor)
06_info Motor or controller has short circuit issue
Electronic control system failure will display a (flashing) fault code.
Once the fault has been removed, the fault code display interface will
automatically be removed.
3.2 Motor temperature alarm
If the motor temperature reaches the warning temperature, the text
MOTOR °C (°F) will flash on the display. If this occurs, shut off the motor
as soon as possible and wait for the motor temperature to decrease.
2.8 Battery charge indicator
When charge is above 70%, four battery bars (full battery)
will appear. Bars will reduce as battery charge reduces.
When charge is below 15%, zero bars will appear. If the motor
shuts off because of a low battery (0% battery charge), the
battery indicator will flash. At this point, the scooter should
be shut down completely and charged.
Battery indicator automatically identifies 24V, 36V and 48V
batteries (when supported batteries are being used).
2.7 Brake status display
When using the brakes, the brake status will be displayed.
16 17
N1e- USER MANUAL
NITO ELECTRIC KICK SCOOTER

1. Set maximum speed
General Setting
Wait until the scooter has been on for 5 seconds, then hold and buttons
at the same time. This will make the maximum riding speed (MXS) flash.
Press or button to set the maximum riding speed. (Default is 20 km/h).
Press button to go to the next settings page.
2. Wheel diameter settings
Wheel diameter is the second settings screen (after maximum speed).
Wheel diameter specifications will flash when selected.
Press or button to select the desired wheel diameter.
Range options include: 6, 8, 10, 12, 14, 16, 18, 20, 22, 24, 26, 700c and 28
inches. Press button to go to the next settings page.
3. Set units
Display Metric Standard
Speed KM/H MPH
Mileage KM MiL
Environment temperature °C °F
Units is the third settings screen (after wheel diameter). KM/H and KM will flash.
Press or button to select the desired units of speed, mileage and temperature.
Units will stop flashing once the selection has been made.
Press button again to return to the maximum speed settings page.
Hold button to exit the settings screen. Your changes will be saved upon exiting.
4. Exit from any settings page.
You can exit from any settings page by holding button. This will save any settings that have been updated.
If any settings page has been inactive for more than 1 minute, it will automatically close and return to
display 1. In the event of automatic closure, any updated settings will not be saved.18 19
N1e- USER MANUAL
NITO ELECTRIC KICK SCOOTER

SAFETY INSTRUCTIONS
N1ekick scooters are recreational vehicles. Upon purchasing the vehicle,
you choose to ride it at your own risk. NITO S.r.l., dealers, importers, and
manufacturers are not responsible for any injuries or damage caused by a
rider's inexperience or failure to follow the instructions in this document.
You can reduce the risk to yourself and others by following all the
instructions and warnings in this manual. However, you cannot eliminate all
risks. Remember that anytime you ride, you risk injury from loss of control,
collisions, and falls.
When riding in public spaces, always comply with the local laws and regulations.
As with any vehicle, faster speeds require a longer braking distance. Sudden
braking on low traction or wet surfaces could cause loss of control or falls.
Be cautious when riding and always keep a safe distance from other people/
vehicles. Be alert and slow down when entering unfamiliar areas.
Always wear a helmet when riding. Use an approved bicycle or skateboard
helmet that fits properly (with the chin strap in place) and provides protection
for the back of your head.
Find a safe, quiet place for your first ride. Do not test your scooter in an area with
children, pedestrians, pets, vehicles, bicycles, or other potential obstacles/hazards.
Respect pedestrians and always give them the right of way. Pass on the left whenever
possible. When approaching a pedestrian from the front, stay to the right and slow
down. Avoid startling pedestrians. When approaching from behind, announce
yourself and slow down to walking speed when passing. Refer to local traffic laws and
regulations, to make sure that you are following the correct procedure.
In places without scooter laws, comply with the safety guidelines outlined in this
manual. Neither NITO S.r.l. nor the manufacturer are responsible for any property
damage, personal injury/death, accidents, or legal disputes caused by violations of the
safety instructions.
Do not let anyone else ride your scooter, unless they have carefully read this manual.
The safety of new riders is your responsibility. Make sure that each new rider wears a
helmet (and other protective gear) and is comfortable with the scooter’s operation.
Before each ride, check for loose fasteners and damaged components. If the scooter
makes abnormal sounds or signals an error message/alarm, stop riding immediately.
20 21
N1e- USER MANUAL
NITO ELECTRIC KICK SCOOTER

BE ALERT! Check the landscape in front of and far ahead of your scooter.
Your eyes are your best tool for safely avoiding obstacles and low traction surfaces
(including, but not limited to, wet ground, loose sand, loose gravel, and ice).
To reduce risk of injury, you must read and follow
all WARNING AND CAUTION notices in this document.
The manufacturer recommends riders be 14+ years old.
Riders under the age of 18 should have adult supervision.
People should not ride this scooter if they are:
• under the influence of alcohol or drugs
• aomeone who is at risk if they engage in strenuous physical activity
• aomeone who has problems with balance or motor skills (that could
interfere with their ability to maintain balance)
• over the suggested weight limit (see Warnings and Cautions p. 22)
• pregnant
Comply with local laws and regulations when riding this scooter.
DO NOT ride where prohibited by local laws.
To ride safely, you must be able to clearly see what is in front of you.
You must also be clearly visible to others.
DO NOT ride in the rain/snow or on roads that are wet, muddy, icy, or slippery for any
other reason. DO NOT ride over obstacles (sand, loose gravel, or sticks). Doing so could
result in loss of balance/traction and could cause a fall.
Use only NITO approved parts and accessories on your scooter. Do not modify your
scooter. Modifications to your scooter could interfere with its operation and result in
serious injury and/or damage. This could also void the Limited Warranty.
22 23
N1e- USER MANUAL
NITO ELECTRIC KICK SCOOTER

Apply brakes
when travelling at
high speeds.
DO NOT rotate
the handlebars
suddenly while
driving at high
speeds.
DO NOT ride the
scooter in the rain or on
wet ground.
Be sure to read this user
manual and follow safety
instructions carefully.
Maximum weight:
100 kg.
Always keep both hands on
the handlebar when riding.
The scooter shall not be
used for racing, stunt riding,
or other maneuvers, which
may cause loss of control,
or may cause uncontrolled
operator actions.
Watch your speed when
travelling downhill.
DO NOT ride over speed
bumps, thresholds, or other
bumps at high speed.
DO NOT jump over
obstacles.
DO NOT allow
more than one
rider.
DO NOT press
the throttle when
walking with the
scooter.
2 years guarantee
WARNINGS AND CAUTIONS
24 25
N1e- USER MANUAL
NITO ELECTRIC KICK SCOOTER

PERFORMANCE
TOP SPEED 20 km/h
SPEED CONTROL 6 km/h
RANGE 20 km
POWER 180 W
BASIC INFORMATION
MOTOR Brushless
DIMENSIONS 1.220 x 510 x 1.070 mm
FOLDED 1.270 x 300 x 480 mm
WEIGHT 13 kg
PERSONALIZATION 4 options
HANDLEBAR Height adjustable
LOCK Double safety hinge
DISPLAY Backlit LCD multifunction
WHEELS 12” tires
RIMS Alloy
BRAKES Front and rear disk
LIGHTS Led
WOODEN BOARD Marine plywood
MUDGUARDS Alloy
BAT T E RY
TYPE Lithium ions
VOLTAGE/AMPERAGE 24 V – 8,8 Ah
RECHARGE TIME 3-4 hours
CHARGE INPUT 110 V / 220 V
Specifications
DO NOT attempt to charge your scooter if it, the charger, or the
power outlet is wet.
As with any electronic device, use a surge protector when charging.
This will protect your scooter from damage due to power surges and
voltage spikes. Only use the charger provided to charge your scooter.
Do not use chargers from any other scooter or kind of device.
Electrical Warning
26 27
N1e- USER MANUAL
NITO ELECTRIC KICK SCOOTER

nitobikes.com
Other manuals for N1e
1
Table of contents
Other NITO Scooter manuals


