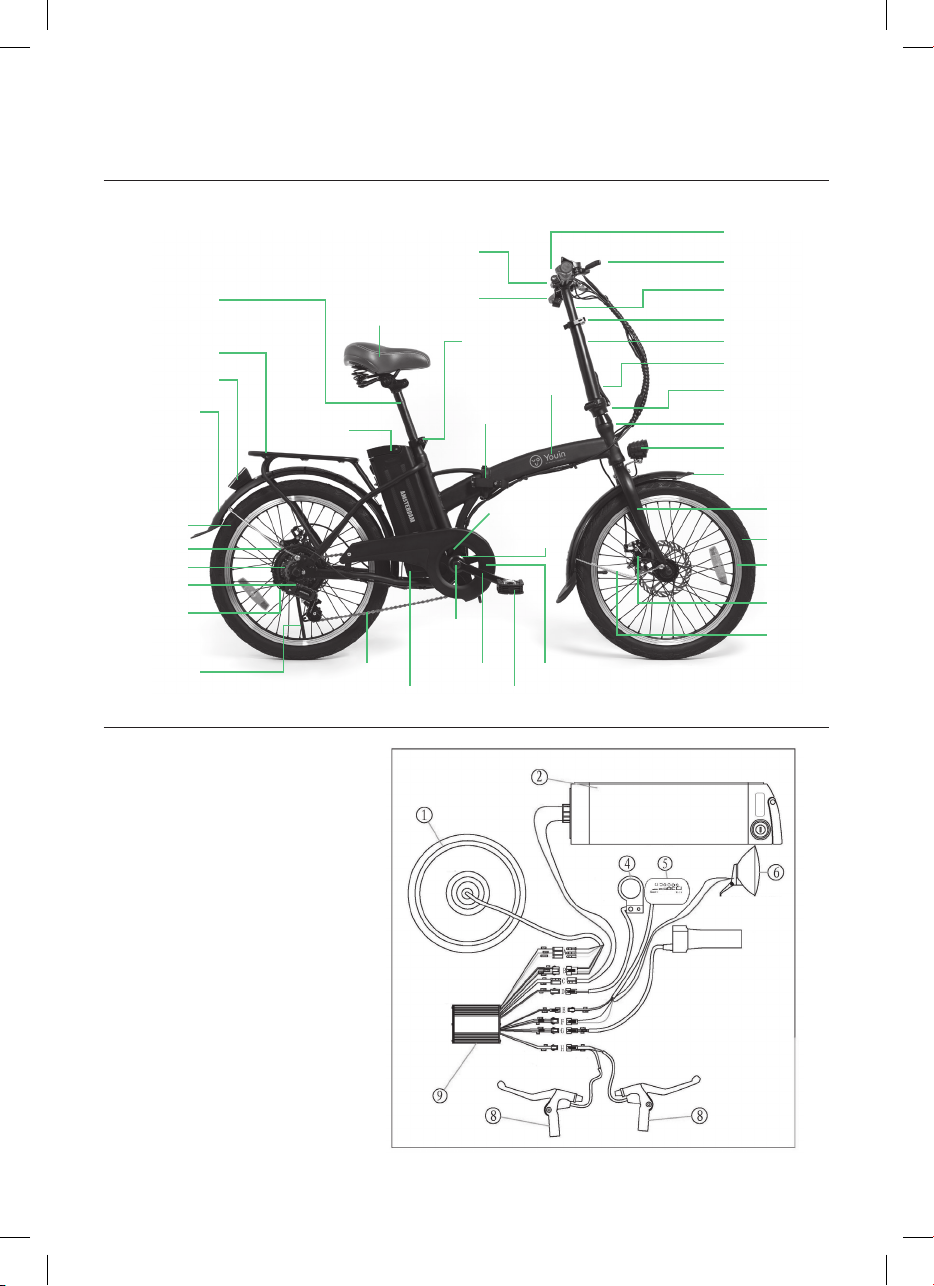
Youin BK1001 User manual

YOU-RIDE AMSTERDAM
AN ELECTRIC
INSIDE
User manual · Manual de usuario
Manuel de l’Utilisateur
Manuale d’uso · Manual do usuário
BK1001

2
YOU-RIDE AMSTERDAM
Thanks for choosing our product.
Have fun with this electric bike.
2
YOUmove
YOUup
YOUdown
YOUfold
YOUtravel
YOUrule
YOU-RIDE AMSTERDAM

3
ENGLISH
About this manual
1. Why you should read this manual . . . . . . . . . . . . . . . . . . . . . . . . . . . . . . . . . . 4
2. Important safety information . . . . . . . . . . . . . . . . . . . . . . . . . . . . . . . . . . . . . . 4
Diagram
1. Parts diagram of folding e-bicycle . . . . . . . . . . . . . . . . . . . . . . . . . . . . . . . . . . 6
2. Wiring diagram . . . . . . . . . . . . . . . . . . . . . . . . . . . . . . . . . . . . . . . . . . . . . . . . . . . 6
Operating instruction
1. Important notices . . . . . . . . . . . . . . . . . . . . . . . . . . . . . . . . . . . . . . . . . . . . . . . . 7
2. Riding method . . . . . . . . . . . . . . . . . . . . . . . . . . . . . . . . . . . . . . . . . . . . . . . . . . . 8
3. Riding safely . . . . . . . . . . . . . . . . . . . . . . . . . . . . . . . . . . . . . . . . . . . . . . . . . . . . . 8
4. Battery charging . . . . . . . . . . . . . . . . . . . . . . . . . . . . . . . . . . . . . . . . . . . . . . . . . 9
5. Checking the battery pack before first time use . . . . . . . . . . . . . . . . . . . . . 10
6. Inserting, removing, locking the battery . . . . . . . . . . . . . . . . . . . . . . . . . . . . 10
7. PAS (pedal assist system) . . . . . . . . . . . . . . . . . . . . . . . . . . . . . . . . . . . . . . . . . 11
8. Technical specifications . . . . . . . . . . . . . . . . . . . . . . . . . . . . . . . . . . . . . . . . . . 12
9. Pedal installation . . . . . . . . . . . . . . . . . . . . . . . . . . . . . . . . . . . . . . . . . . . . . . . . 12
10. How to fold the bike . . . . . . . . . . . . . . . . . . . . . . . . . . . . . . . . . . . . . . . . . . . . 13
11. Shifter (if has) . . . . . . . . . . . . . . . . . . . . . . . . . . . . . . . . . . . . . . . . . . . . . . . . . . 13
12. Derailleur system . . . . . . . . . . . . . . . . . . . . . . . . . . . . . . . . . . . . . . . . . . . . . . . 14
13. Front wheel-quick release . . . . . . . . . . . . . . . . . . . . . . . . . . . . . . . . . . . . . . . 15
14. Brake adjustment . . . . . . . . . . . . . . . . . . . . . . . . . . . . . . . . . . . . . . . . . . . . . . 16
15. Rear carrier . . . . . . . . . . . . . . . . . . . . . . . . . . . . . . . . . . . . . . . . . . . . . . . . . . . . 16
16. Light . . . . . . . . . . . . . . . . . . . . . . . . . . . . . . . . . . . . . . . . . . . . . . . . . . . . . . . . . . 16
17. Saddle position . . . . . . . . . . . . . . . . . . . . . . . . . . . . . . . . . . . . . . . . . . . . . . . . . 17
18. Display manual . . . . . . . . . . . . . . . . . . . . . . . . . . . . . . . . . . . . . . . . . . . . . . . . 18
Maintenance and cleaning . . . . . . . . . . . . . . . . . . . . . . . . . . . . . . . . . . . . . . . . 20
FAQ . . . . . . . . . . . . . . . . . . . . . . . . . . . . . . . . . . . . . . . . . . . . . . . . . . . . . . . . . . . . . . 21
Service & maintenance schedule . . . . . . . . . . . . . . . . . . . . . . . . . . . . . . . . . . 22
Problems and remedy . . . . . . . . . . . . . . . . . . . . . . . . . . . . . . . . . . . . . . . . . . . . 25
Warranty . . . . . . . . . . . . . . . . . . . . . . . . . . . . . . . . . . . . . . . . . . . . . . . . . . . . . . . . 27
Contents

4
YOU-RIDE AMSTERDAM
About this Manual
Why you should read this manual
This manual is written to help you to get the best performance, comfort, enjoyment
and safety when riding your new E-bike. The manual describes specific care and
maintenance procedures that help protect your warranty and ensure years of trouble
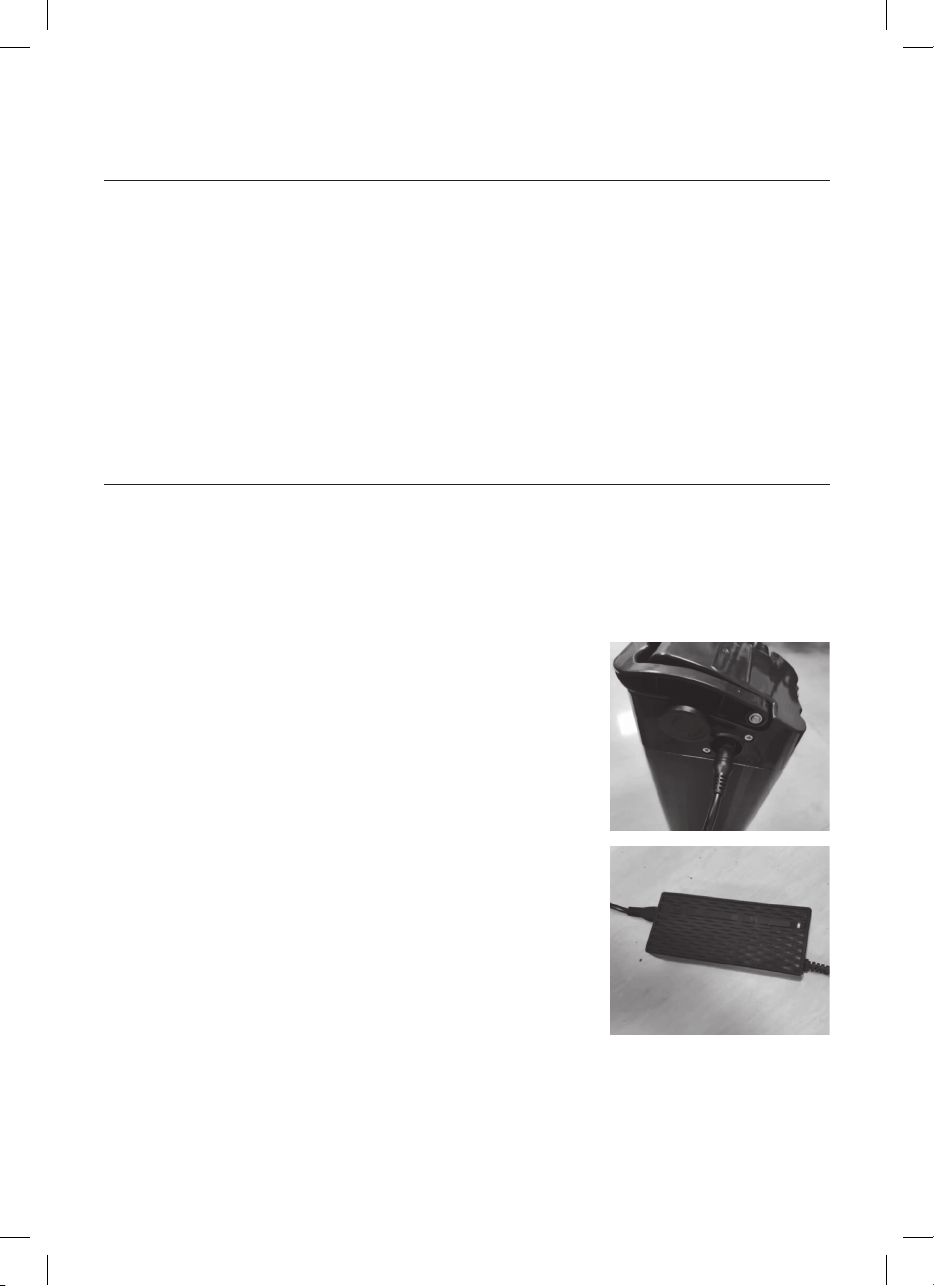
free use. Please pay particular attention to the section on battery charging and
maintenance.
It is important for you to understand the features and operation of your new E-bike
so that you can get maximum enjoyment with maximum safety. By reading this
manual before you go on your first ride, you’ll know how to get the most from your
new E-bike.
It is also important that your first ride on a new E-bike be taken under a controlled
environment, away from cars, obstacles and other cyclists.
WARNING
Cycling can be a hazardous activity even under the best circumstances, Giving Proper
maintenance to your E-bike is your responsibility as it helps to reduce the risk of injury.
This manual contains many “Warnings” and “Cautions” concerning the consequences
of failure to maintain or inspect your E-bike. Many of the Warnings and Cautions say
“you may lose control and fall” Because any fall can result in serious injury or even
death, we do not repeat the warning of possible injury or death whenever the risk of
falling is mentioned. Please note that those risks are present.
Important safety information
Your E-Bike can provide many years of service, fun and fitness if you take good care
of it.
Understand the features of your E-Bike and become aware of the challenges that you
will meet on the road. There are many things you can do to protect yourself while
riding. We will offer many recommendations and safety tips throughout this manual.
The following are those that we believe are the most important.
Always Wear A Helmet!
Helmets significantly reduce the possibility and severity of head injuries. Always wear
a helmet that complies with your state laws when riding the E-Bike.
Check with your local police department for requirements in your community.
Do not wear loose clothing that can become tangled in the moving parts of the
E-Bike. Wear sturdy shoes and eye protection. Also check your state laws concerning
other protective wear that may be required when riding the E-Bike.
Know your E-Bike!
Your new E-Bike incorporates many features and functions that have never been built
into a bicycle before. Read this manual thoroughly to understand how those features

5
ENGLISH
About this Manual
enhance your riding pleasure and safety.
Ride Defensively!
One of the most common cycling accidents is that when the driver of a parked car
opens his door into a rider’s path.
Another common occurrence is when a car or another cyclist moves suddenly into
your path. Always be aware of other vehicles around you. Do not assume that drivers
or other cyclists see you. Get prepared to take evasive action or stop suddenly.
Make Yourself Easy To See!
Make yourself more visible by wearing bright reflective clothing. Keep your reflectors
clean and properly aligned. Signal your intentions so other drivers and other cyclists
can notice your actions.
Ride Within Your Limits!
Take it slow until you are familiar with conditions that you encounter. Be especially
careful in wet conditions as traction can be greatly reduced and brakes less effective.
Never ride faster than conditions warrant or beyond your riding abilities. Remember
that alcohol, drugs, fatigue and inattention can significantly reduce your ability to
make good judgments and ride safely.
Keep Your E-Bikes In Safe Condition
Follow the inspection and maintenance guidelines. Check critical safety equipment
before each and every ride.
Know The Law
Cyclists are required to follow traffic rules. Additionally, some communities regulate
the use of motorized bicycles
regarding minimum age requirements and necessary equipment. Check with your
local police department for specific details.
Correct Frame Size
When selecting a new E-BIKE, the proper frame size is a very important safety
consideration. Most full sized bicycles come in a range of frame sizes. These sizes
usually refer to the distance between the center of the bottom bracket and the top
of the frame seat tube.
For safe and comfortable riding there should be a clearance of no less than 1-2
inches between the groin area of the intended rider and the top tube of the bicycle
frame, while the rider straddles the bicycle with both feet flat on the ground.
The ideal clearance will vary between types of bicycles and rider preference. This
makes straddling the frame when off the seat easier and safer in situations such as
sudden traffic stops. Women can use a men’s style bicycle to determine the correct
size.

6
YOU-RIDE AMSTERDAM
Diagram
Parts diagram of folding e-bicycle
Wiring Diagram
Battery
Front light
Controller
Brake lever
Motor
Display
PAS
Function switch
Brake lever
Displayer
Seat post QR
Frame
Frame QR
Seat
Seat post
Rear carrier
Rear light
Rear fender
Rear tyre
Hub motor
Freewheel
Chain adjuster
Rear brake
Side stand Chain Crankset
Centre
shaft
Chain cover
Bottom
bracket
Speed sensor
Controller box Pedal
Battery
Grip Handlebar
Folding part
Head set
Handlebar QR
Stem
Head tube
Front light
Front fork
Front brake
Front rod
Front tyre
Rim
Front fender

7
ENGLISH
Operation Instruction
Please read and understand these instructions completely before operating your
E-bike to prevent serious injury to yourself and others, and to prevent damage to
your E-bike.
IMPORTANT NOTICES
• Always recharge the battery immediately after each use. Failure to do so may
damage the battery.
• The charger can remain plugged-in for trickle-charge purposes during long periods
of storage.
• For storage periods over 1 month, the battery should be checked and fully recharged
before riding.
Helmets:
Always wear a properly fitted helmet which covers the forehead when riding an E-BIKE.
Many states require specific safety devices. It’s your responsibility to familiarize
yourself with the laws of the state where you ride and to comply with all applicable
laws, including properly equipping yourself and your bike as the law requires.
It’s strongly advised that a properly fitted E-bicycle
safety helmet be worn at all times when riding
your E-bicycle.
The correct helmet should:
- Be comfortable
- Be lightweight
- Have good ventilation
- Fit correctly
- Cover forehead
Reflectors
Reflectors are important safety devices which are designed as an integral part of your
E-bike. Federal regulations require every bicycle to be equipped with front, rear wheel
and pedal reflectors. These reflectors are designed to pick up and reflect street lights
and car lights in a way that helps you be seen and recognized as a moving bicyclist.
Checking reflectors and their mounting brackets regularly to make sure they are
clean, straight, unbroken and securely mounted. ,Replace damaged reflectors and
straighten or tighten any that are bent or loose.
Your E-bike is supplied with one front, one rear wheel reflector,and four pedals
reflectors. These are important safety and legal requirements, and should remain
securely fitted and in good, clean condition at all times. Periodically inspect all
reflectors, brackets and mounting hardware for signs of wear or damage. Replace
immediately if damange is found.
Front fork
Front brake
Front rod
Front tyre
Rim

8
YOU-RIDE AMSTERDAM
Operation Instruction
Riding method
Be familiar with all the spare parts of the E-bike and test all the electric functions
before riding. Make sure all the spare parts for the bicycle are in good condition, such
as battery power, and tire pressure. The detailed operation is as follows:
Start-up
Insert the key into power switch at the right side of battery box,
turn to “ON” position, if the power display lights on, then power supply is normal.
1. Start-up by accelerator: turn the accelerator towards you (counter-clockwise) and
the rotation angle should be from small to large to start, then you can adjust speed
by turning the accelerator slowly, The speed can increase to 20km/hour, but the
actual speed depends on weight, road surface, tire pressure and other factors.
2. Start-up by pedal assistance: After turning on the power, you can also use your
pedals to start-up the E-bike, then you can control your speed with accelerator, as
well as by pedaling the bicycle faster. But please do not pedal too hard, in case it may
damage the components of e-bike since it is mainly motor driven.
Riding safely
Riding aention on the road
1,Speed should be increased slowly after start-up, in order not to waste energy and
damage electrical components, it is much better start-up with pedal assistance.
2,Please ride with the pedal assistance when climbing hills or steep terrain, in order
to prolong the service life of battery and the motor.
1). While staying safe, try to reduce frequent braking and start-up while riding, in order
to save energy.
2). To stop the E-bike, you can release the accelerator by turning clockwise, the speed
will slow down and stop.
3). Do not use the accelerator and brake together while riding, you can release the
accelerator first, and then brake. In order to not overload motor or damage other
E-bike’s components.

9
ENGLISH
Operation Instruction
4). Optimum weight is 75kg (including the rider weight), please do not overload.
5). Moreover a rear brake system has been installed to the e-bike, it will automatically
cut off power supply to the motor and slow down when you pull the brake, then the
rear brake in the back wheel will stop the E-bike.
Parking aention
1, Shut off the power switch after you get off. In order to prevent accidents caused by
inadvertantly by turning accelerator and starting up the bicycle abruptly.
2. Do not start-up bicycle frequently while stationary, to ensure the service life of
battery, motor and electric switch.
3. Shut off the power after parking, and remove the key.
Baery charging
IMPORTANT: Before using the charger locate the voltage selector switch (Li-lon) on
the back of the charger. Select either 115 Volts or 230 Volts depending on the country
you reside in. Using the wrong Voltage seing will permanently damage the charger
and/or electrical components on the hybrid electric bicycle.
Charging methods can be divided into two kinds:
One is to take out the battery then charge, the other is
to charge the battery on e-bikes.
Connect the charger plug to the battery charging port
and the AC.
Connect to a 100-220V/50-60Hz power source
(depending on your region).
There is an LED indicator on the battery charger unit.
The LED is red when the power is connected and the
battery is charging.
When the LED turns green, the battery is fully charged.
SLA (sealed lead acid) recommended charging time:
6-8hours
Li-LON recommended charging time: 5-6 hours
*Do not charge continuously for more than 18 hours.*
After charging, unplug the input plug first (from the outlet), then unplug the output
connector (from the bike). The battery charger must have constant voltage. Fluctuating
voltage or fluctuating power supply of any kind may damage the battery storage cells.

10
YOU-RIDE AMSTERDAM
Operation Instruction
Checking the baery pack before using for the first time
WARNING
• The battery pack is provided partially charged. To ensure full battery pack capacity,
completely charge the battery pack before using for the first time.
• Distributors should charge the batteries as soon as receiving the E-bike from
supplier.
Baery Care
• Even with proper care, rechargeable batteries do not last forever. Every time the
battery is discharged and subsequently recharged, Its relative capacity decreases
by a small percentage. You can maximize the life of your battery by following the
instructions in this guide. Battery should be fully charged immediately when they are
received for the full recommended charge times
SLA (sealed lead acid) recommended charging time: 6-8hours
Li-LON recommended charging time: 5-6 hours
• For a complete,100% charging, leave the battery on the charger for one full hour
after the charger indicator light turns green.
• *Never charge batteries for longer than 24 hours*.
• Li-ion batteries do not have a ‘’memory.’’ Partial discharge/charge cycles will not
harm the batteries’ capacity or performance.
• The rated output capacity of a battery is measured at 77”F(25”C).Any variation in this
temperature will alter the performance of the battery, and shorten its expected life.
High temperatures especially reduce overall battery life &running time.
• Always be sure to turn the bike power switch to “OFF” after each use. If you leave
the power switch the “ON” position, or your E-bike has not been charged for a long
period of time, the battery may reach a stage at which it will no longer hold a charge.
Inserting, unlocking and
removing the baery
• Insert the key into the keyhole
• Turn the key switch to ON when using
the E- bike (C. picture 1)
• Turn the key switch to OFF when
stopping use of the E- bike(B. picture)
• Turn the key switch to (A. picture1),
then the battery is unlocked and
removable
Picture 1

11
ENGLISH
Operation Instruction
PAS (Pedal Assist System)
This E-bikes have an electric pedal assisted driving system. In EU countries, it is
known legally as “PAS” cylce or Pedal Assisted System.
The driving assisted system consists of a driving unit, a battery, a controller, and
various electronic components (harness wires, sensors and switches). It is important
to know that when the assistant system is turned on, the driving unit engages to
provide power only while you are pedaling. The amount of power provided by unit
depends on your pedaling force and the assistance model/level you set with handlebar
control unit at any time, if you stop pedaling, the drive assistant will disengage. In all
models/levels, the driving assisted system power reduces progressively and cuts off
as the bike reaches a speed of 25km/h,(15.5mph), or sooner if you stop pedaling. The
drive assist re-engages when speed drops below 25km/h, (15.5mph) as long as the
pedals are turning.
If the e-bike is equipped with mufti-function display (see photo), Which has 3 levels
of PAS speed, power indicator on and light on/off.
Keep pressing ‘-’ button to turn off PAS, you can pedal the bike normally. The driving
assistance system is not activated.
Hold the ‘+’ button on meter can get higher PAS speed level. Each level of assist
corresponds to a maximum motor speed; at level 3, the motor runs at full power.
Overall range decrease at higher power levels.

12
YOU-RIDE AMSTERDAM
Operation Instruction
Pedal installation
Pedals are a pair with “R” & “L” (picture 1), “R” for right, “L” for left.
Tight the pedals with the directive turnings (picture 2).
Remark: R-right; L-left
Picture 1 Picture 2
L R
Technical Specifications
Item BK1001
Frame Steel
Tyre spec 20 inches
Handlebar Steel
Front/rear
brake
disc/disc
Rim Double wall rim
Max speed 25 km/h
Range 35-45 km
Pedal Aluminum folding pedal
Seat post Folding
Fender Gloss black
Baery type Lithium battery
Baery spec 36V 10Ah
Motor type Brushless
Rated output
power
250W
Derailleur Shimano 6 speed gears
LCD display Shows speed, distance,
range, etc.
Charging
spec
42V 2A
Voltage 230V
Charging
time
4-5Hrs
Net weight 28kg

13
ENGLISH
How to fold the e-bike
1. Turn the key switch to the OFF position.
2. Unlock the handlebar quick release lever (A, Picture 1) and push down the handlebar
to the lowest position, then lock the handlebar quick release lever.
3. Unlock the handlebar quick release lever (A, Picture 2) and rollover the handle bar.
4. Rotate the pedal upward so it is perpendicular to the ground (A, Picture 3).
5. Release the lock lever from its clasp on the right side of the E-Bike (A, Picture 4).
6. Rotate the lock lever (A, Picture 4) clockwise until it points backward, pull the
locknut and rotate the locknut (A, Picture 4) out away from the e-bike until the nut
clears the lock plate (B, Picture 4).
7. Grasp the seat and the handlebar. Pivot the front half of the frame rearward around
the hinge until the front wheel is beside the rear wheel (Picture 5).
Shier ( certain models only)
Some of E-bikes go with gears, which consists of:
• A rear sprocket cluster, called a freewheel or cog set
• A rear derailleur
• One shifter
• One control cable
Operation Instruction
Picture 1
Picture 4
Picture 2
Picture 5
Picture 3

14
YOU-RIDE AMSTERDAM
Operation Instruction
• One front sprocket called a chaining
• A drive chain
There are many different types of shifter mechanisms, each preferred for specific
applications because of its ergonomic, performance and price characteristics.
A downshift is a shift to a lower or slower gear, which is easier to pedal.
An upshift is a shift to a higher or faster gear, which is harder to pedal.
For example, you can downshift to a lower gear to make pedaling easier on a hill.
On the other hand, you may upshift to a higher gear when you wish to go faster.
Whether up-shifting or downshifting, the derailleur system requires that the drive
chain is moving forward and is under at least some tension. A derailleur will shift only
if you are pedaling forward.
Caution: Never move the shifter while pedaling backward. Also do not pedal
backwards after moving the shifter. Either of these actions could jam chain and
cause serious damage to the E-Bike.
6Downshift
5
4
3
2
1Upshift
Derailleur System
The derailleur system includes the front
and rear derailleur, the shift levers, and
the derailleur control cables, all of which
must function properly for smooth gear
shifting to occur.
Derailleur
Although the front and rear derailleurs are
initially adjusted in our factory, you will
need to inspect and adjust both before
riding the E-bike.
Rear Derailleur
Begin by shifting the rear swifter to largest
number indicated, loosen the cable from
the rear derailleur cable anchor bolt, and
place the chain on the smallest Sprocket.
Freewheel
Guide Pulley
Pulley Adjustment
Screw
Adjustment
Screws
Cable Barrel
Adjuster
Tension Pulley

15
ENGLISH
Adjust the high limit screw so that the
guide pulley and the smallest sprocket
are lined up vertically. Re-tighten the
cable, pull out any slack, and re-tighten
the anchor bolt securely. Shifting through
the gears, making sure that each gear is
achieved quietly and without hesitation. If
necessary, use the barrel adjuster to fine
tune the cable tension by turning it the
direction you want the chain to go. For
example, turning clockwise will loose the
cable tension and move the chain away
from the wheel, while turning counter-
clockwise will tighten cable tension and
direct the chain to the wheel.
Operation Instruction
Front Wheel
Installation
1. Make sure the brakes are loose enough to allow the wheel to pass through the
brake pads easily.
2. Place wheel into fork dropouts.
3. Install retaining washers with r aised lip pointing towards the fork, and insert into
the small hole of the fork blade.
NOTE: Some bikes may have step retaining washers in place of the retaining washer.
If so install the step retaining washer, raised portion sliding into the fork dropouts.
4. Install axle nuts and tighten. Make sure the wheel is centered between the fork
blades.
5. Spin the wheel to make sure that it is centered and clears the brake shoes. Tighten
the brakes if necessary.
High gear
adjustment screw
Low gear
adjustment
screw
Barrel
Adjuster
Rear Derailleur
Side View
Nipple
Handlebar
Lock
nut
Ferrule
Barrel
Adjuster

16
YOU-RIDE AMSTERDAM
Operation Instruction
Brake adjustment
If there is noise from the rear brake, you can adjust this screw. This screw can be
adjusted to loosen and tighten of the rear brake.
Rear Carrier
When installing the rear carrier onto the rear wheel,
make sure the screws are firmly fixed.
Light
Insert the screw and
tighten it.
Front brake Rear brake

17
ENGLISH
Saddle position
Correct saddle adjusted position is an important factor to get the best performance
and comfort from your E-bike.
If you find the saddle position is not comfortable, there are two adjustments.
A: Up and down adjustment.
Your leg length determines the correct saddle height.
The saddle is at the correct height if you can just reach the “lower” pedal with one
heel when you are seated on the saddle and the crank arms are parallel to the seat
tube. To check for correct saddle height, perform the following:
1. Sit on the saddle, and place one heel on a pedal.
2. Rotate the crank until the pedal with your heel on it is in the down position and
the crank arm is parallel to the seat tube. Your leg should be completely straight and
just touching the center of the pedal. If this is not the case, your saddle height needs
to be adjusted.
B:Saddle tilt adjustment
Most people prefer a horizontal saddle; but some riders prefer to have the saddle
nose tilted slightly up or down. You can adjust saddle tilt by loosening the saddle
quick release, tilting the saddle to the desired position, and retightening the saddle
quick release. Tight enough so that you cannot move or jiggle the saddle. Very small
changes in saddle position can have a substantial effect upon performance and
comfort. Consequently, whenever you make a change to your saddle position, make
only one directional change at a time, and make the changes in small increments
until you have found the position at which you are most comfortable.
Operation Instruction

18
YOU-RIDE AMSTERDAM
Display Manual
Appearance: Main screen display content:
Display description:
Display Function Description
Speed Speed, display unit by KM/H or MP/H.
ODO/TRIP ODO for accumulative total mileage.
TRIP for single mileage
Switch by function key.
Battery indicator Residual electricity display.
Cruise identification Display, for cruise state.
Wheel diameter set Manufacturer used to set up the
diameter of the wheel.
Throttle fault Display, throttle abnormal.
Brake instruction Display when brake. If display when
not brake, can judge for brake fault.
Light instruction Display lighting backlight.
Motor fault Display, motor hall fault.
Controller fault Display, controller failure.
Current instruction Points 5 level display the current
current value.
PAS instruction 1-5 file display speed PAS.
Operation Instruction

19
ENGLISH
Operating instructions:
Key Operation Display Function Description
1x briefly ON Click can turn on.
After this, Illumination is
switched on/off with a
key press.
Again 1x briefly Turn on/off
the headlamp
Click and turn on/off the
light
2x briefly Trip mileage
reset
Continuous press 2 times
TRIP mileage reset
1x long OFF Pressing this button
for longer switches the
display off
1x briefly PAS increase Every click, PAS increase
a gear, total of five gear
2x briefly ODO mileage Continuous press 2 times
ODO mileage is displayed
1x long ODO mileage
reset
Long press 2 seconds
ODO mileage reset
1x briefly PAS reduce Every click, PAS re a gear,
total reduce of five gear
2x briefly Trip mileage Continuous press 2 times
,TRIP mileage is displayed
1x long 6 KM/H Long time press to enter
the 6km/h implement
mode
Set the function 3 (KMH/MPH)
1×long KMH/MPH
setting
See the following
description
KMH/MPH setting: The two keys marked by the red circle can be changed from “KMH,KM” to
“MPH,MILE” or from “MPH,MILE” to “KMH,KM” by pressing them for 5 seconds at the same time.
After setting, you can save them.
Operation Instruction

20
YOU-RIDE AMSTERDAM
Maintenance and Cleaning
NOTE:
Technological advances have made the E-Bike and the components more complex
than ever before. And the pace of innovation is increasing. This on-going evolution
makes it impossible for this manual to provide all the information required to
properly repair and/or maintain your E-Bike. In order to help minimize the chances of
an accident and possible injury, it is critical that you have any repair or maintenance
performed by your dealer which is not specifically described in this manual.
Equally important is that your individual maintenance requirements will be
determined by everything from your riding style to geographic location. Consult your
dealer for help in determining your maintenance requirements. How much of your
E-Bike service and maintenance you can do yourself depends upon your level of skill,
experience, and special tool availability.
WARNING:
Many E-Bike service and repair tasks require special knowledge and tools. Do not
begin any adjustments or service on your E-Bike if you have the slightest doubt about
your ability to properly complete them. Improper adjustment or service may result
in damage to the E-Bike or in an accident which can cause serious injury or death.
INSPECTION AND MAINTENANCE:
For your safety and enjoyment and to insure a longer life for your E-Bike, inspect and
maintain your E-Bike regularly. Use the table for guidance. It is very important that
you check certain systems and components before each and every ride. The proper
condition and function of these systems is critically important for your safety.
Component or Condition Inspect
before
Every ride
Inspect
periodically*
Clean
and/or
lubricate
Adjust /
Tighten
Repair/
Replace
If
necessary
Tire pressure (60-65 psi) X X
Tire wear / damage X X
Brake pad adjustment X X
Handlebar quick release
adjustment
X X
Controls and displays X
Seat post quick release
adjustment
X X
Brake pad wear X X
Brake cable tension/wear X X X
Spoke tension X X
Wheel true X X
Hub bearings X X X
Table of contents
Languages:
Other Youin Scooter manuals

Youin
Youin New York BK1500 User manual

Youin
Youin YOU-GO L2 User manual

Youin
Youin YOU-RIDE VIENA User manual

Youin
Youin XL2 User manual

Youin
Youin KILIMANJARO BK4000 User manual

Youin
Youin BARCELONA User manual

Youin
Youin SC2000 User manual

Youin
Youin YOU-GO L SC3000 User manual

Youin
Youin YOU-GO 2XL User manual

Youin
Youin SC7000 User manual