nl lock Rotating Premier PI20 1 Series User manual

PI20•x1 Technical Manual
CHARACTERISTICS
Rotating Premier features a special back plate to hold the lock spindle and a Dial Ring Bearing to
allow installation with StraightBolt locks models EM35-xx.
ABS or metal, black matt spray or matt chrome finish available. Cable length aprox. 30 cm.
All Premier series keypads feature built-in LED lights for use in dark room conditions.
The battery compartment is located at the bottom of the entry unit. Only use 9V-ALKALINE batteries
from brand name manufacturers like DURACELL™. A series of signals indicates that the battery is
weak and must be replaced.
DIMENSIONS
!
PI30•x1 Technical Manual rev. 160610
© 2016 Lock Technology Page !of !1 2
Rotating Premier
99.50 mm
34 mm
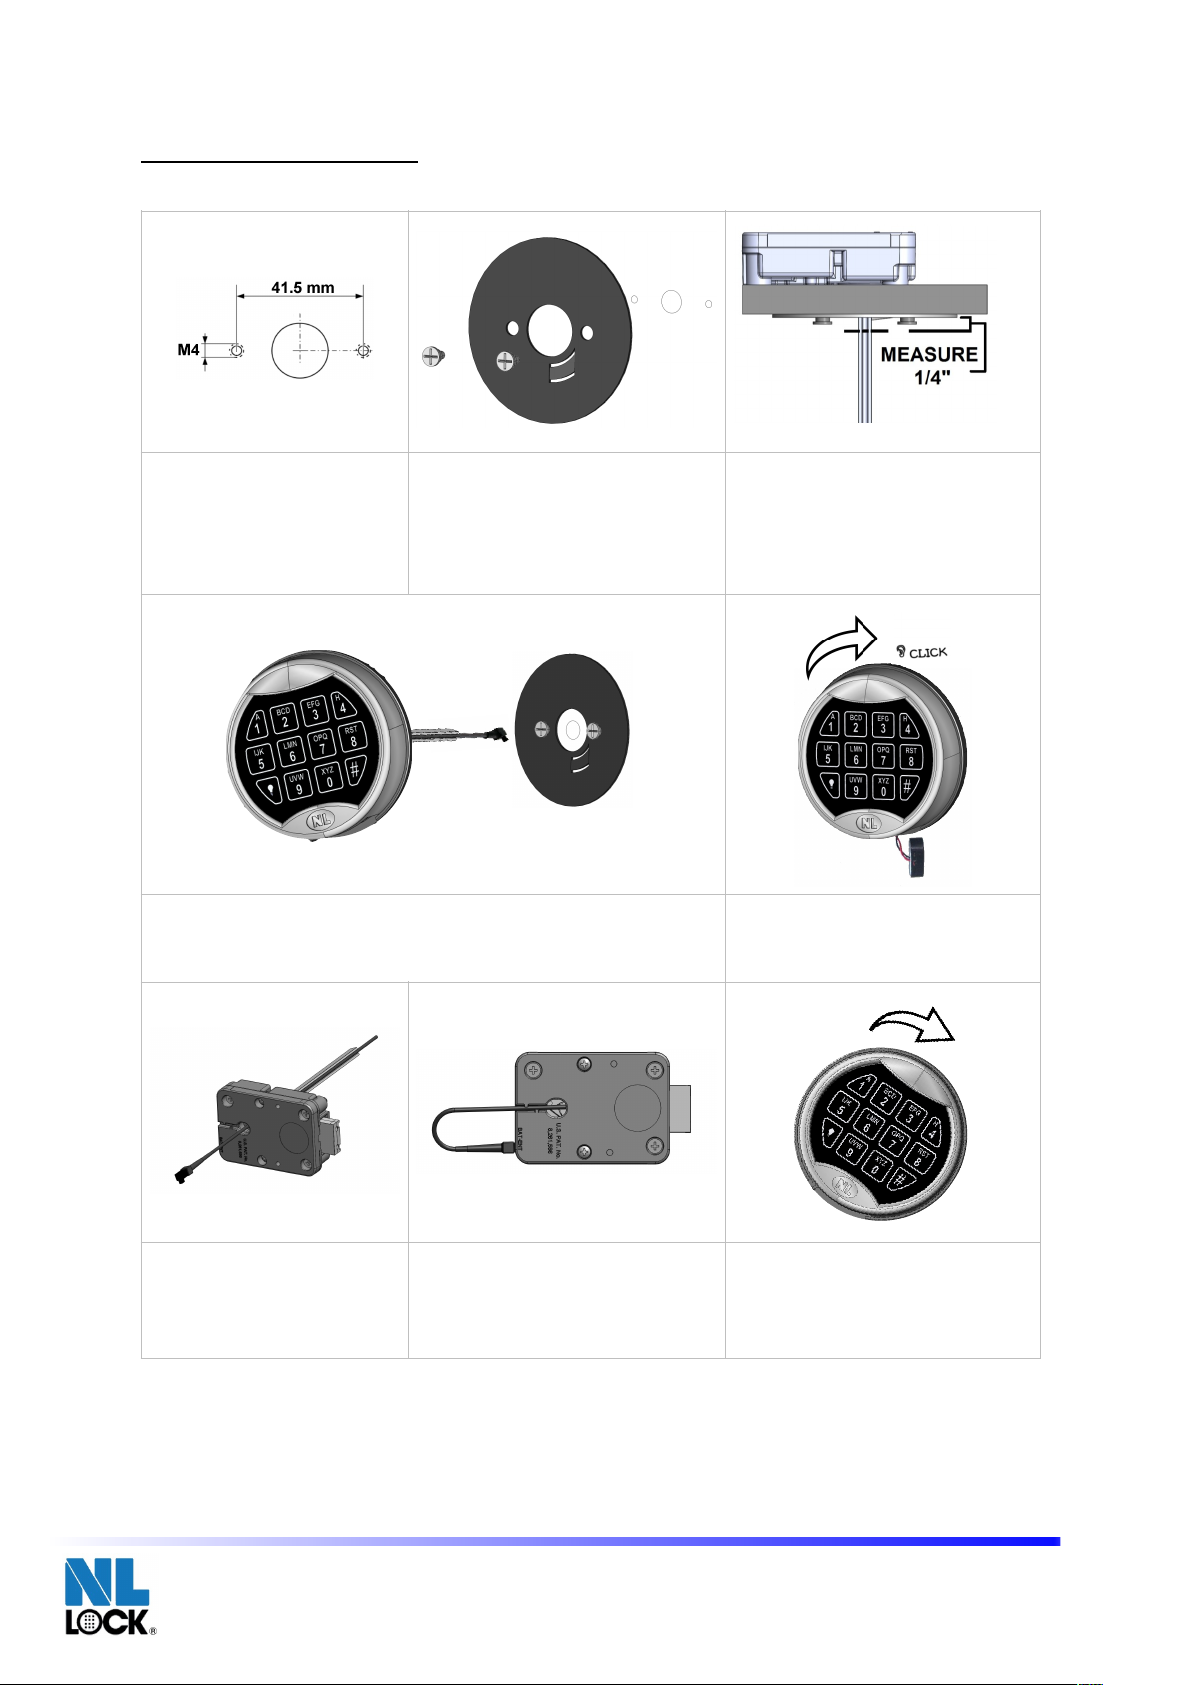
MOUNTING INSTRUCTION
The diameter of the cable/spindle
hole should be minimum 9 mm,
maximum 12 mm. The hole must
be de-burred well to avoid damage
to the cable.
Mount Rotating Premier Dial Ring Bearing
to the safe door with the mounting
adapters. Tighten with screwdriver.
Mount the lock on the inside of the safe
door with supplied mounting screws
leaving them a little bit loose. See EM35-
xx Technical Manuals for lock details.
Insert the shaft through the center hole of
the Dial Ring Bearing until it stops on lock
cam. Mark the shaft at the front surface of
the Dial Ring Bearing. Pull out the shaft
and measure an additional 1/4”(6.35mm)
longer from the shaft mark. Cut shaft and
remove sharp edges.
Put the spindle into Premier back plate and route the cable into the spindle
groove. Insert the cable and shaft into the center hole of the Dial Ring Bearing
and guide the cable through the hole in the lock body. Align input holes to the
mounting adapters so that the input is flush with the safe door.
Turn input clockwise until it snaps into
place. Place 9V alkaline battery (Duracell
TM) into the bottom compartment of the
input and close the compartment door.
Tighten lock mounting screws.
Insert the connector of the entry unit in
the outer position. Check that the
connector is completely seated. To tie the
cable, push it into the square groove in
the lock cover.
Enter the preset combination
(1-2-3-4-5-6) and turn input to the RIGHT
within 3 seconds to open the lock. (You
must turn the input back to the left to
lock.)
!
!
!
!
!
Installation Instructions 061516
Page 1 of 1
Step 1. Mount Rotating Premier Dial Ring Bearing to the safe door with the mounting adapters. Tighten with
screwdriver.
Step 2. Using the mounting screws, mount the lock in the correct position on the inside of the safe door.
Tighten the screws.
Step 3. Insert the shaft through the center hole of the Rotating Premier Dial Ring Bearing until it stops on
lock cam. Mark the shaft at the front surface of the Rotating Premier Dial Ring Bearing. Pull out the shaft and
measure an additional 1/4”(6.35mm) longer from the shaft mark. Cut shaft and remove sharp edges.
Step 4. Put the Premier Input onto the shaft. Insert the battery cable and shaft into the center hole of Rotat-
ing Premier Dial Ring Bearing. Align input holes to the mounting adapters so that the input is flush with the
safe door.
Step 6 Step 7
Step 5
Step 3
Step 2
Step 5. Turn input clockwise until it snaps into place.
Step 6. Place 9V alkaline battery (Duracell ™) into the bottom compartment of the input and close the com-
partment door.
Step 7. Enter the preset combination (1-2-3-4-5-6) and turn input to the RIGHT within 3 seconds to open the
lock. (You must turn the input back to the left to lock.)
To remove input from safe door, first remove the battery. Then, using a small screwdriver, press and hold
down the tab (marked red in the picture shown above) from the inside of the battery compartment. While
holding down the tab, turn the input counter clockwise until it stops and pull off. (Be careful not to pull too
far because the input cable is still connected.
® Lock Technology
Rotating Premier Input Installation Instructions
Step 1 Step 4
To Remove
!
!
PI30•x1 Technical Manual rev. 160610
© 2016 Lock Technology Page !of !2 2
Other nl lock Lock manuals

Popular Lock manuals by other brands


Igloohome
Igloohome Smart Keybox 3 Installer/user guide

Kaba Mas
Kaba Mas LA Gard Combogard 33E Manager Programming

Assa Abloy
Assa Abloy KESO KEK i-handle S Mounting instruction

Gianni Industries
Gianni Industries P Series Installation instruction

CDVI
CDVI V1SR manual

M-LOCKS
M-LOCKS Basic line Series user manual


