Nokia C5-03 User manual

Nokia C5–03 User Guide
Issue 2.1

Contents
Safety 4
Battery removing 4
Get started 5
Insert the SIM card and battery 5
Insert a memory card 7
Remove the memory card 8
Charge the battery 9
Keys and parts 10
Switch the device on 11
Lock the keys and touch screen 11
Home screen 11
Access the menu 13
Touch screen actions 13
Change the ringing tone 14
Nokia services 14
About Nokia Store 15
Your device 15
Contacts bar 15
Find an item with adaptive search 15
Antenna locations 16
Offline profile 16
Shortcuts 17
Sensor settings and display rotation 17
Headset 17
Attach a wrist strap 18
Make calls 18
Calls 18
Write text 19
Virtual keyboard 19
Handwriting 20
Enter text with the virtual keypad 20
Touch input settings 22
Contacts 23
Save phone numbers and mail
addresses 23
Manage names and numbers 23
Assign default numbers and
addresses 24
Ringing tones, images, and call text for
contacts 24
Copy contacts 24
SIM services 25
Messaging 26
Messaging main view 26
Write and send messages 27
Receive messages 28
Multimedia messages 28
Data, settings, and web service
messages 29
Set up e-mail 29
Mailbox 30
Mail for Exchange 32
View messages on a SIM card 33
Service commands 33
Messaging settings 33
Music player 35
Play music 35
Create a playlist 36
Camera 37
Activate the camera 37
Image capture 37
Video recording 38
Gallery 38
View and organise files 38
View images and videos 39
Share online 39
About Share online 39
Subscribe to an online sharing service 40
Manage your accounts 40
Create a post 40
2Contents

Post files from Gallery 41
Nokia Video Centre 41
View and download videos 41
Video feeds 43
My videos 43
Copy your videos between your phone
and computer 44
Video centre settings 44
Internet 44
About the web browser 44
Browse the web 45
Add a bookmark 45
Subscribe to a web feed 45
Unreadable characters while browsing
the web 46
Positioning (GPS) 46
About GPS 46
About assisted GPS (A-GPS) 47
Hold your device correctly 47
Maps 47
Maps overview 47
View your location and the map 48
Map view 49
Change the look of the map 49
Download and update maps 50
About positioning methods 51
Find a location 52
View location details 52
Save or view a place or route 53
Send a place to a friend 53
Check in 54
Get voice guidance 54
Use the compass 55
Drive to your destination 56
Navigation view 57
Get traffic and safety information 57
Walk to your destination 58
Plan a route 58
Connectivity 60
Wireless LAN 60
Other applications 62
Clock 62
Calendar 63
Find help 64
In-device help 64
Support 65
Update phone software and
applications using your phone 65
Update phone software using your PC 65
Access codes 65
Nokia original accessories 66
Practical rules about accessories 66
Battery 67
Product and safety information 67
Index 85
Contents 3

Safety
Read these simple guidelines. Not following them may be dangerous or illegal. For
further info, read the complete user guide.
SWITCH OFF IN RESTRICTED AREAS
Switch the device off when mobile phone use is not allowed or when it may
cause interference or danger, for example, in aircraft, in hospitals or near
medical equipment, fuel, chemicals, or blasting areas. Obey all instructions
in restricted areas.
ROAD SAFETY COMES FIRST
Obey all local laws. Always keep your hands free to operate the vehicle while
driving. Your first consideration while driving should be road safety.
INTERFERENCE
All wireless devices may be susceptible to interference, which could affect
performance.
QUALIFIED SERVICE
Only qualified personnel may install or repair this product.
KEEP YOUR DEVICE DRY
Your device is not water-resistant. Keep it dry.
PROTECT YOUR HEARING
To prevent possible hearing damage, do not listen at high volume levels for
long periods. Exercise caution when holding your device near your ear while
the loudspeaker is in use.
Battery removing
Switch the device off and disconnect the charger before removing the battery.
4Safety

Get started
Insert the SIM card and battery
Safe removal. Always switch the device off and disconnect the charger before removing
the battery.
Important: This device is designed to be used with a standard SIM card (see figure)
only. Use of incompatible SIM cards may damage the card or the device, and may corrupt
data stored on the card. Please consult your mobile operator for the use of a SIM card
that has a mini-UICC cutout.
A SIM card may be already inserted in the device. If not, do the following:
1 Remove the back cover.
2 Remove the battery, if inserted.
3 Slide the SIM card holder, to unlock it.
Get started 5

4 Lift the SIM card holder up.
5 Make sure the contact area of the SIM card is facing toward the device, and slide the
SIM card into the SIM card holder.
6 Lower the SIM card holder into place. Slide the SIM card holder, to lock it.
7 Line up the battery contacts, and insert the battery.
6Getstarted

8 To replace the cover, direct the top locking catches toward their slots, and press
down until the cover locks into place.
If the SIM card is not properly in place, the device can only be used in the offline profile.
Insert a memory card
Use only compatible memory cards approved by Nokia for use with this device.
Incompatible cards may damage the card and the device and corrupt data stored on the
card.
1 Remove the back cover.
Get started 7

2 Make sure the contact area of a compatible memory card is facing down, and insert
the card into the memory card slot.
3 Push the card in, until it clicks into place.
4 Replace the back cover.
Remove the memory card
Important: Do not remove the memory card when an app is using it. Doing so may
damage the memory card and the device and corrupt data stored on the card.
1 If the device is switched on, before you remove the card, press the power key, and
select Remove memory card.
2WhenRemove memory card? Some applications will be closed. is displayed,
select Yes.
8Getstarted

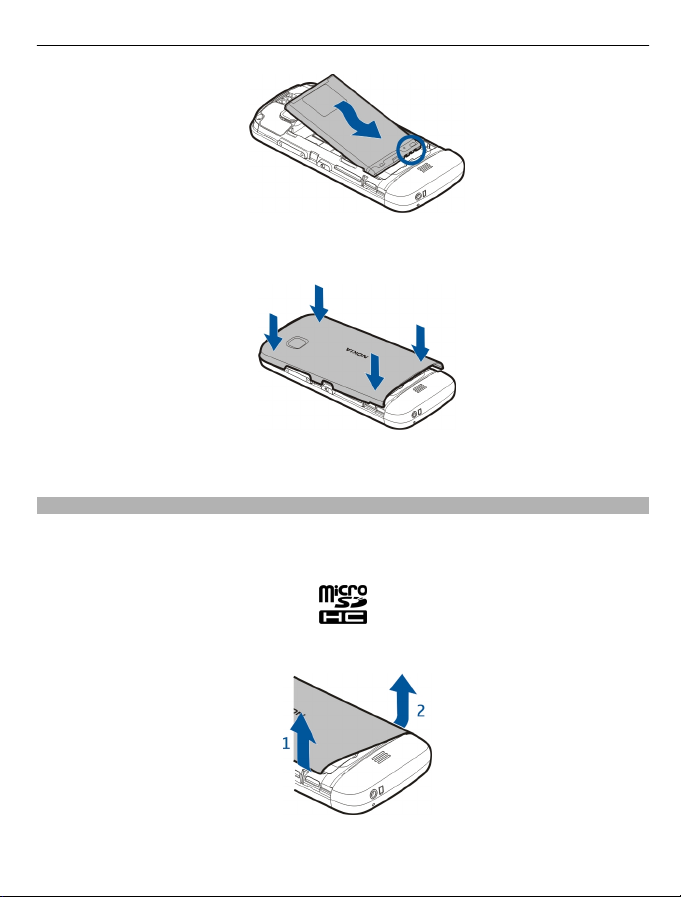
3WhenRemove memory card and press 'OK' is displayed, remove the back cover
of the device, and push the card in, until you hear a click.
4 Pull out the memory card, and replace the back cover. If the device is switched on,
select OK.
Charge the battery
Your battery has been partially charged at the factory, but you may need to recharge it
before you can switch on your device for the first time. If the device indicates a low
charge, do the following:
1 Connect the charger to a wall outlet.
2 Connect the charger to the device.
3 When the device indicates a full charge, disconnect the charger from the device,
then from the wall outlet.
You do not need to charge the battery for a specific length of time, and you can use the
device while it is charging. If the battery is completely discharged, it may take several
minutes before the charging indicator appears on the display or before any calls can be
made.
Tip: Disconnect the charger from the wall outlet when the charger is not in use. A
charger that is connected to the outlet consumes power even when it is not connected
to the device.
USB charging
You can use USB charging when a wall outlet is not available. Data can be transferred
while charging the device. The efficiency of USB charging power varies significantly, and
it may take a long time for charging to start and the device to start functioning.
1 Use a compatible USB data cable to connect your device to a compatible USB device.
Depending on the type of the device that is used for charging, it may take a while
for charging to start.
2 If the device is switched on, select the appropriate USB mode.
Get started 9

Only connect your device to products that have USB-IF logo.
Keys and parts
1Wrist strap hole
2Nokia AV connector (3.5 mm)
3Micro USB connector
4Volume/Zoom key
5Lock key
6Earpiece
7Touch screen
8Call key
9Menu key
10 End/power key
11 Camera lens
12 Loudspeaker
13 Charger connector
14 Microphone
10 Get started

Switch the device on
1 Press and hold the power key.
2 If the device asks for a PIN code or lock code, enter it, and select OK. To delete a
number, select . The factory setting for the lock code is 12345.
3 Select your location. If you accidentally select the wrong location, select Back.
4 Enter the date and time. When using the 12-hour time format, to switch between
a.m. and p.m., select any number.
Lock the keys and touch screen
To lock the touch screen and the keys, press the lock key on the side of the device.
To unlock, press the lock key on the side of the device, and select the unlock icon on the
screen.
When the touch screen and keys are locked, the touch screen is switched off and the
keys are inactive.
The screen and keys may be locked automatically after a period of inactivity.
To change the settings for automatic screen and key locking, select Menu > Settings
and Phone > Phone mgmt. > Auto. keyguard > Keypad autolock period.
Home screen
The home screen is your starting point where you can collect all your important contacts
or application shortcuts.
Get started 11

Interactive display elements
To open the clock application, tap the clock (1).
To open calendar or change profiles in the home screen, tap the date or the profile name
(2).
To view or modify connectivity settings ( ), to see the available wireless LANs if WLAN
scanning is enabled, or to view missed events, tap the top right corner (3).
To make a phone call, select
(4), or, if the contacts bar is active, select Telephone.
To open Contacts, select (5), or, if the contacts bar is active, select Contacts.
To open the main menu, press the menu key (6).
Start using the contacts bar
To add a contact to the contacts bar, in the home screen, select and a contact, and
follow the displayed instructions.
Contacts need to be saved in the phone memory.
To add a new contact to your contacts list, select > Options > New contact, and
follow the displayed instructions.
Contacts added from the contacts bar are always saved to the phone memory.
12 Get started

Change the home screen theme
To change the home screen theme or the shortcuts, select Menu > Settings and
Personal > Home screen.
Access the menu
To access the menu, press the menu key.
To open an application or folder in the menu, select the item.
Touch screen actions
Open an application or other screen element
Tap the application or element once.
To view the options available for the opened item, select Options or, if available, select
an icon from a toolbar.
Access functions quickly
Tap and hold the item. A pop-up menu with available options opens. For example, to
send an image, tap and hold the image, and from the pop-up menu, select the
appropriate option.
Tip: To see the options available for an opened item, such as an image or a video clip,
tap the screen.
Select
In this user documentation, opening applications or items by tapping them is called
"selecting". If you need to select several items in a sequence, the menu items to select
are separated by arrows.
For example, to select Options > Help, tap Options, and then tap Help.
Drag an item
Tap and hold the item, and slide your finger across the screen. The item follows your
finger.
To scroll up or down on a web page, drag the page with your finger.
Swipe
Place a finger on the screen, and steadily slide your finger in the desired direction.
Get started 13

When viewing an image, to view the next or previous image, swipe the image left or
right, respectively.
Scroll
To scroll up or down in lists that have a scroll bar, drag the slider of the scroll bar.
Place your finger on the screen, slide it quickly up or down the screen, then lift your
finger. The content of the screen scrolls with the speed and direction it had at the
moment of release. To select an item from a scrolling list and to stop the movement,
tap the item.
Tip: To view a brief description of an icon, place your finger on the icon. Descriptions
are not available for all icons.
Touch screen backlight
The touch screen backlight is turned off after a period of inactivity. To turn the screen
backlight on, tap the screen.
If the touch screen and keys are locked, tapping the screen does not turn the screen
backlight on.
Change the ringing tone
Select Menu > Settings and Personal > Profiles.
You can use profiles to set and customise the ringing tones, message alert tones, and
other tones for different events, environments, or caller groups.
To personalise a profile, go to the profile, and select Personalise.
Nokia services
With Nokia services, you can find new places and services, and stay in touch with your
friends. You can do, for example, the following:
•Download games, applications, videos, and ringtones to your phone
14 Get started

•Get music
Some items are free of charge, others you may need to pay for.
The available services may also vary by country or region, and not all languages are
supported.
To use Nokia services, you need a Nokia account. When you access a service on your
phone, you are prompted to create an account.
For more information, go to www.nokia.com/support.
About Nokia Store
You can download mobile games, applications, videos, pictures, themes, and
ringtones to your phone. Some items are free of charge; others you need to pay for with
your credit card or on your phone bill. The availability of payment methods depends on
your country of residence and your network service provider. Nokia Store offers content
that is compatible with your phone and relevant to your tastes and location.
Select Menu. To learn more about Nokia Store, go to www.nokia.com/support.
Your device
Contacts bar
To add a contact to the home screen, on the home screen, select > Options > New
contact, and follow the instructions.
To communicate with a contact, select the contact and from the following:
— Call the contact.
— Send a message to the contact.
— Refresh the contact's web feeds.
To view past communication events with a contact, select the contact. To view the
details of a communication event, select the event.
To close the view, select .
Find an item with adaptive search
Adaptive searchmakes the characters, letters,numbers, and input symbols of the entries
in your device available for searching.
Your device 15

To turn adaptive search on or off, select Menu > Settings and Phone > Touch input >
Adaptive search.
To use adaptive search when a search field is available, tap the search field, and select
the character, letter, number, or symbol of the entry you are searching for. To view more
characters, letters, numbers, or symbols, tap .
To change the input method for adaptive search under the current writing language,
select Menu > Settings and Phone > Touch input > Chinese find method.
Antenna locations
Avoid touching the antenna area while the antenna is in use. Contact with antennas
affects the communication quality and may reduce battery life due to higher power level
during operation.
Cellular antenna
GPS antenna Bluetooth and WLAN
antenna
Offline profile
The offline profile lets you use the device without connecting to the wireless cellular
network. When the offline profile is active, you can use your device without a SIM card.
Activate the offline profile
Press the power key briefly, and select Offline.
When you activate the offline profile, the connection to the cellular network is closed.
All radio frequency signals to and from the device to the cellular network are prevented.
If you try to send messages using the cellular network, they are placed in the Outbox
folder to be sent later.
Important: In the offline profile you cannot make or receive any calls, or use other
features that require cellular network coverage. You may be able to call the official
16 Your device

emergency number programmed into your device.To make calls, you must first change
to another profile.
When you have activated the offline profile, you can still use a wireless LAN (WLAN), for
example, to read your e-mail or browse on the internet. You can also use Bluetooth
connectivity while in the offline profile. Remember to comply with any applicable safety
requirements when establishing and using WLAN or Bluetooth connections.
Shortcuts
To switch between open applications, press and hold the menu key.
Leaving applications running in the background increases the demand on battery power
and reduces the battery life.
To change the profile, press the power key, and select a profile.
To call your voice mailbox (network service), in the dialler, tap and hold 1.
To open a list of last dialled numbers, in the home screen, press the call key.
To use voice commands, in the home screen, press and hold the call key.
Sensor settings and display rotation
When you activate the sensors in your device, you can control certain functions by
turning the device.
Select Menu > Settings and Phone > Sensor settings.
Select from the following:
Sensors — Activate the sensors.
Turning control — Select Silencing calls and Snoozing alarms to mute calls and
snooze alarms by turning your device so that the display faces down. Select Auto-rotate
display to rotate the display content automatically when you turn the device on its left
side or back to a vertical position. Some applications and features may not support
rotating the display content.
Headset
You can connect a compatible headset or compatible headphones to your phone.
Your device 17

Do not connect products that create an output signal, as this may damage the device.
Do not connect any voltage source to the Nokia AV connector. If you connect an external
device or headset, other than those approved by Nokia for use with this device, to the
Nokia AV connector, pay special attention to volume levels.
Attach a wrist strap
Make calls
Calls
1 In the home screen, select Telephone to open the dialler, and enter the phone
number, including the area code. To remove a number, select .
For international calls, select *twice for the + character (which replaces the
international access code), and enter the country code, area code (omit the leading
zero if necessary), and phone number.
2 To make the call, press the call key.
3 To end the call (or to cancel the call attempt), press the end key.
Pressing the end key always ends a call, even if another application is active.
1 To make a call from the contacts list, select Menu > Contacts.
2 Go to the desired name. Or, select the search field, enter the first letters or characters
of the name, and go to the name.
18 Make calls

3 To call the contact, press the call key.If you have saved several numbers for a contact,
select the desired number from the list.
Write text
The on-screen keyboards allow you to enter characters by tapping them with your
fingers.
Tap any text input field to enter letters, numbers, and special characters.
Your device can complete words based on the built-in dictionary for the selected text
input language. The device also learns new words from your input.
Virtual keyboard
You can use the virtual keyboard in landscape mode.
To activate the virtual keyboard, select > Full screen QWERTY.
When using the virtual keyboard in full screen mode, you can select keys with your
fingers.
1Close - Close the virtual keyboard.
2Input menu - Open the touch input options menu to access commands such as
Writing language.
3Virtual keyboard
4Shift and caps lock - To enter an uppercase character when writing in lowercase, or
vice versa, select the key before entering the character. To activate the caps lock,
select the key twice. A line under the key indicates that the caps lock is activated.
5Letters
6Numbers and special characters
7Character accents
8Space bar
9Move - Move the cursor.
10 Backspace
11 Enter - Move the cursor to the next row or text input field. Additional functions are
based on the current context (for example, in the web address field of the web
browser, it acts as the Go icon).
Write text 19

12 Input mode - Select the input method. When you tap an item, the current input
method view closes, and the selected one opens.
Handwriting
The input methods and languages supported by the handwriting recognition vary by
region and may not be available for all languages.
To activate handwriting mode, select > Handwriting.
Write legible, upright characters on the text input area, and leave a space between each
character.
To teach the device your handwriting style, select > Handwriting training. This
option is not available for all languages.
To enter letters and numbers (default mode), write words as you would normally. To
select number mode, select . To enter non-Latin characters, select the corresponding
icon, if available.
To enter special characters, write them as you would normally, or select and the
desired character.
To delete characters or move the cursor back, swipe backwards (see Figure 1).
To insert a space, swipe forwards (see Figure 2).
Enter text with the virtual keypad
Virtual keypad
With the virtual keypad (Alphanumeric keypad), you can enter characters like you
would with a traditional physical keypad with numbers on the keys.
20 Write text
Other manuals for C5-03
9
Table of contents
Other Nokia Cell Phone manuals

Nokia
Nokia N71 User manual

Nokia
Nokia TA-1535 User manual

Nokia
Nokia E5-00 User guide

Nokia
Nokia 5 Specification sheet

Nokia
Nokia iSkoot 6600 User manual

Nokia
Nokia 3585i User manual

Nokia
Nokia 1.4 User manual

Nokia
Nokia 225 4G User manual

Nokia
Nokia Sprint Lumia 635 User manual

Nokia
Nokia DOC-CLIENT-UG-207 Quick start guide

Nokia
Nokia WiFi Gateway 3 User manual

Nokia
Nokia X5-00 User manual

Nokia
Nokia Lumia 920 User manual

Nokia
Nokia C5-03 User manual

Nokia
Nokia N97 RM-505 Quick start guide

Nokia
Nokia 3586 User manual

Nokia
Nokia 206 User manual

Nokia
Nokia E6-00 Quick start guide

Nokia
Nokia 6126 User manual

Nokia
Nokia RM-1043 User manual