Nokia Lumia 620 User manual

Userguide Nokia Lumia 620
Table of Contents
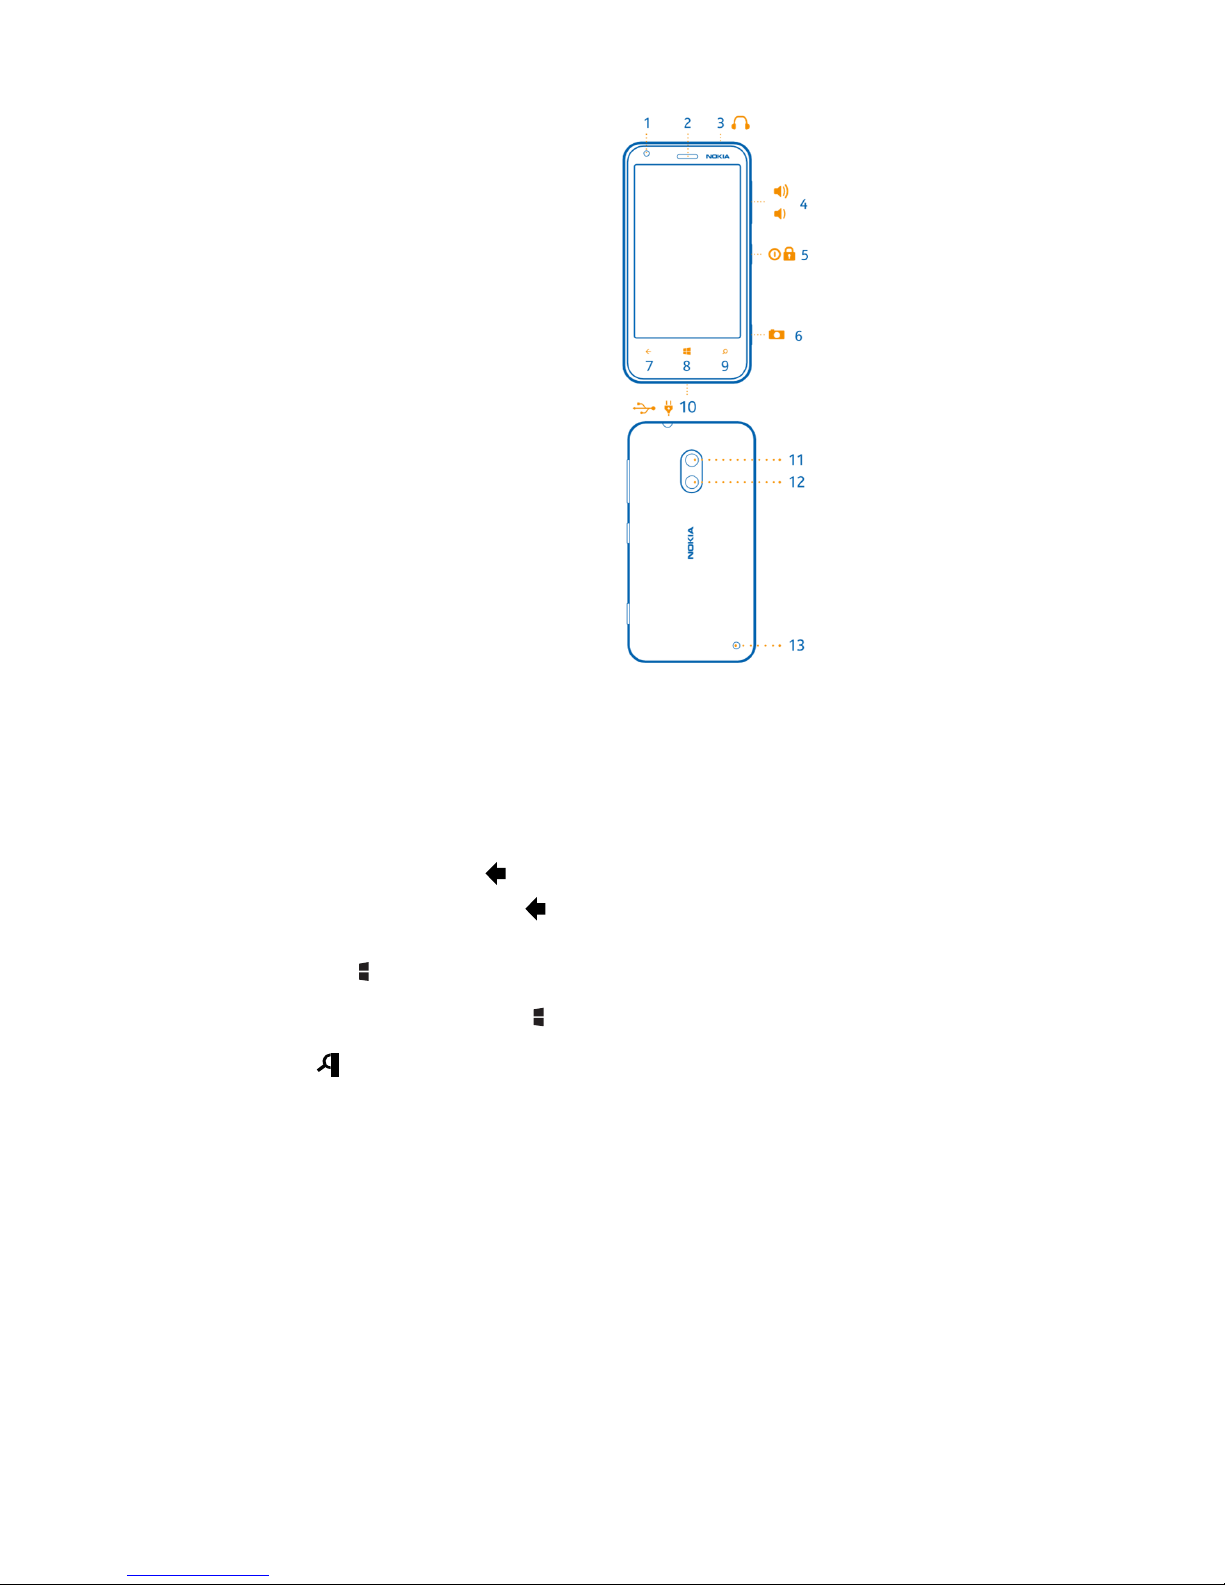
Keys and parts .................................................................................................................................................... 3
Back, start, and search key ............................................................................................................................. 3
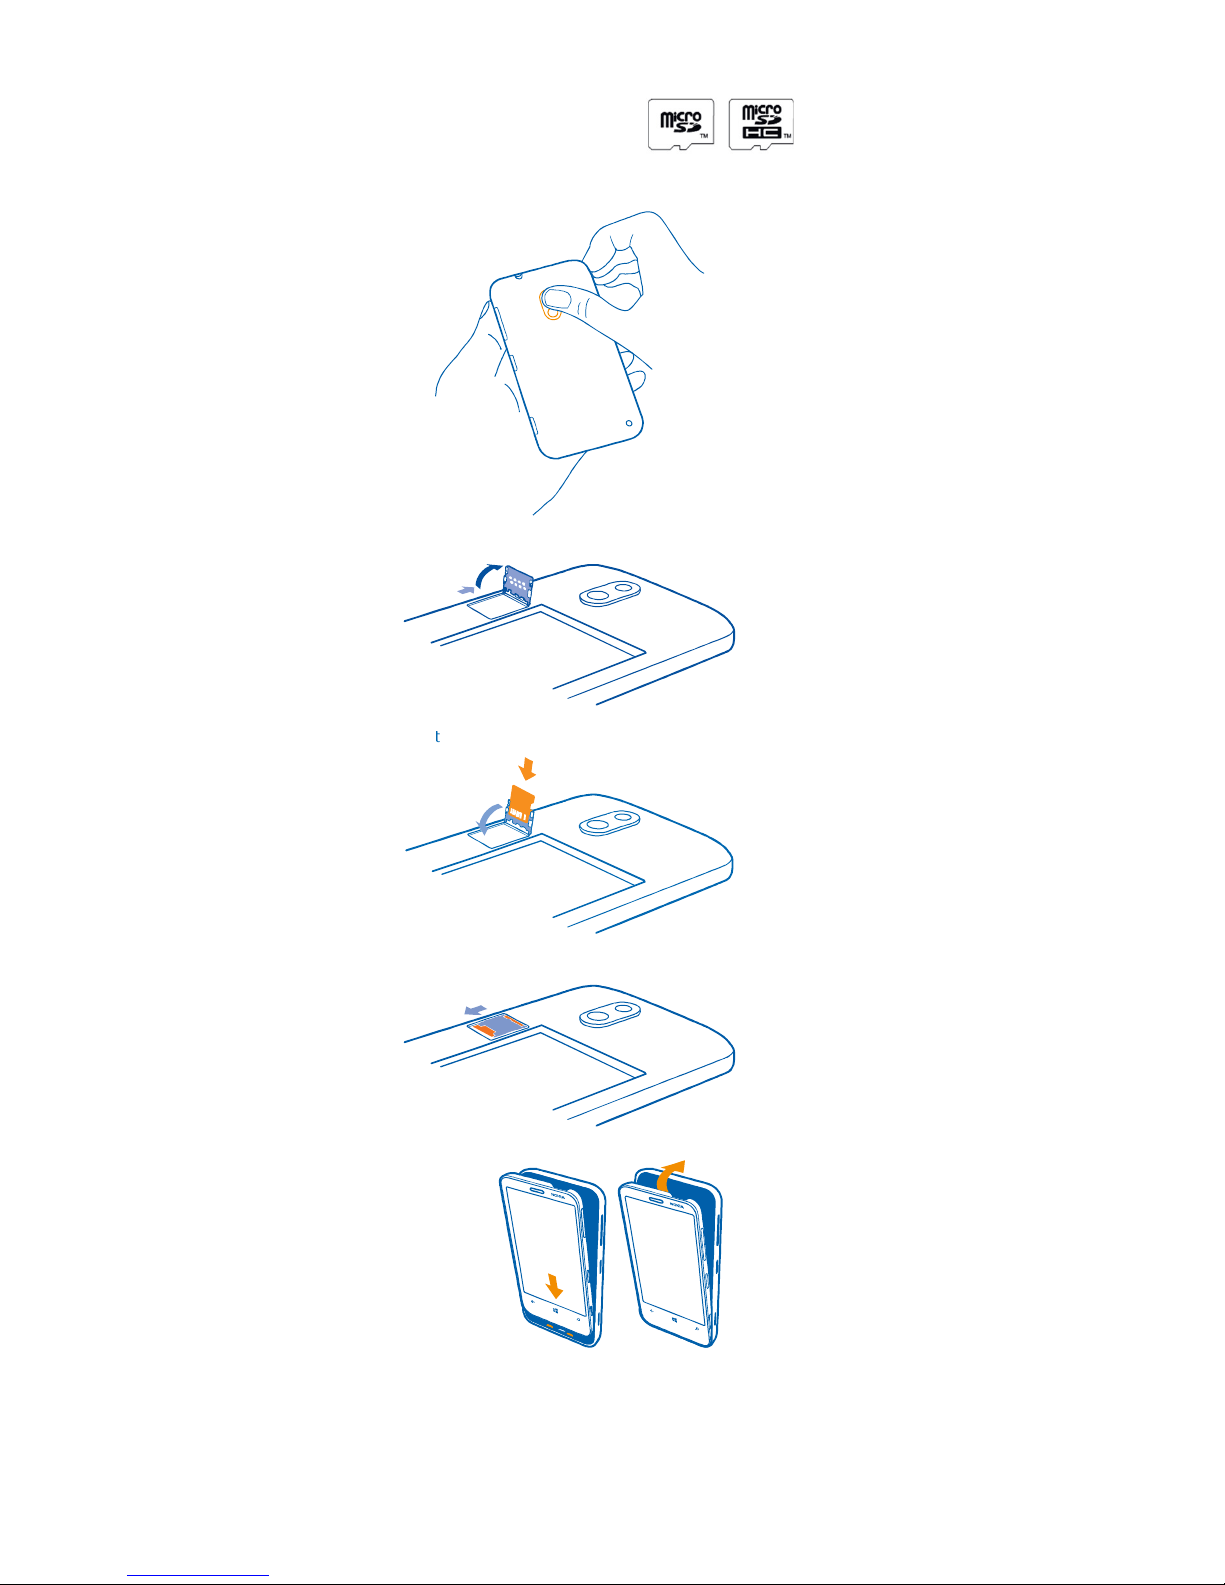
How to nsert a S M card .................................................................................................................................... 4
First start-up ....................................................................................................................................................... 6
Switching Phone ON and OFF ............................................................................................................................. 6
Switch the phone on ...................................................................................................................................... 6
Switch the phone off ...................................................................................................................................... 6
Useful Buttons .................................................................................................................................................... 6
Lock the keys and screen ................................................................................................................................ 6
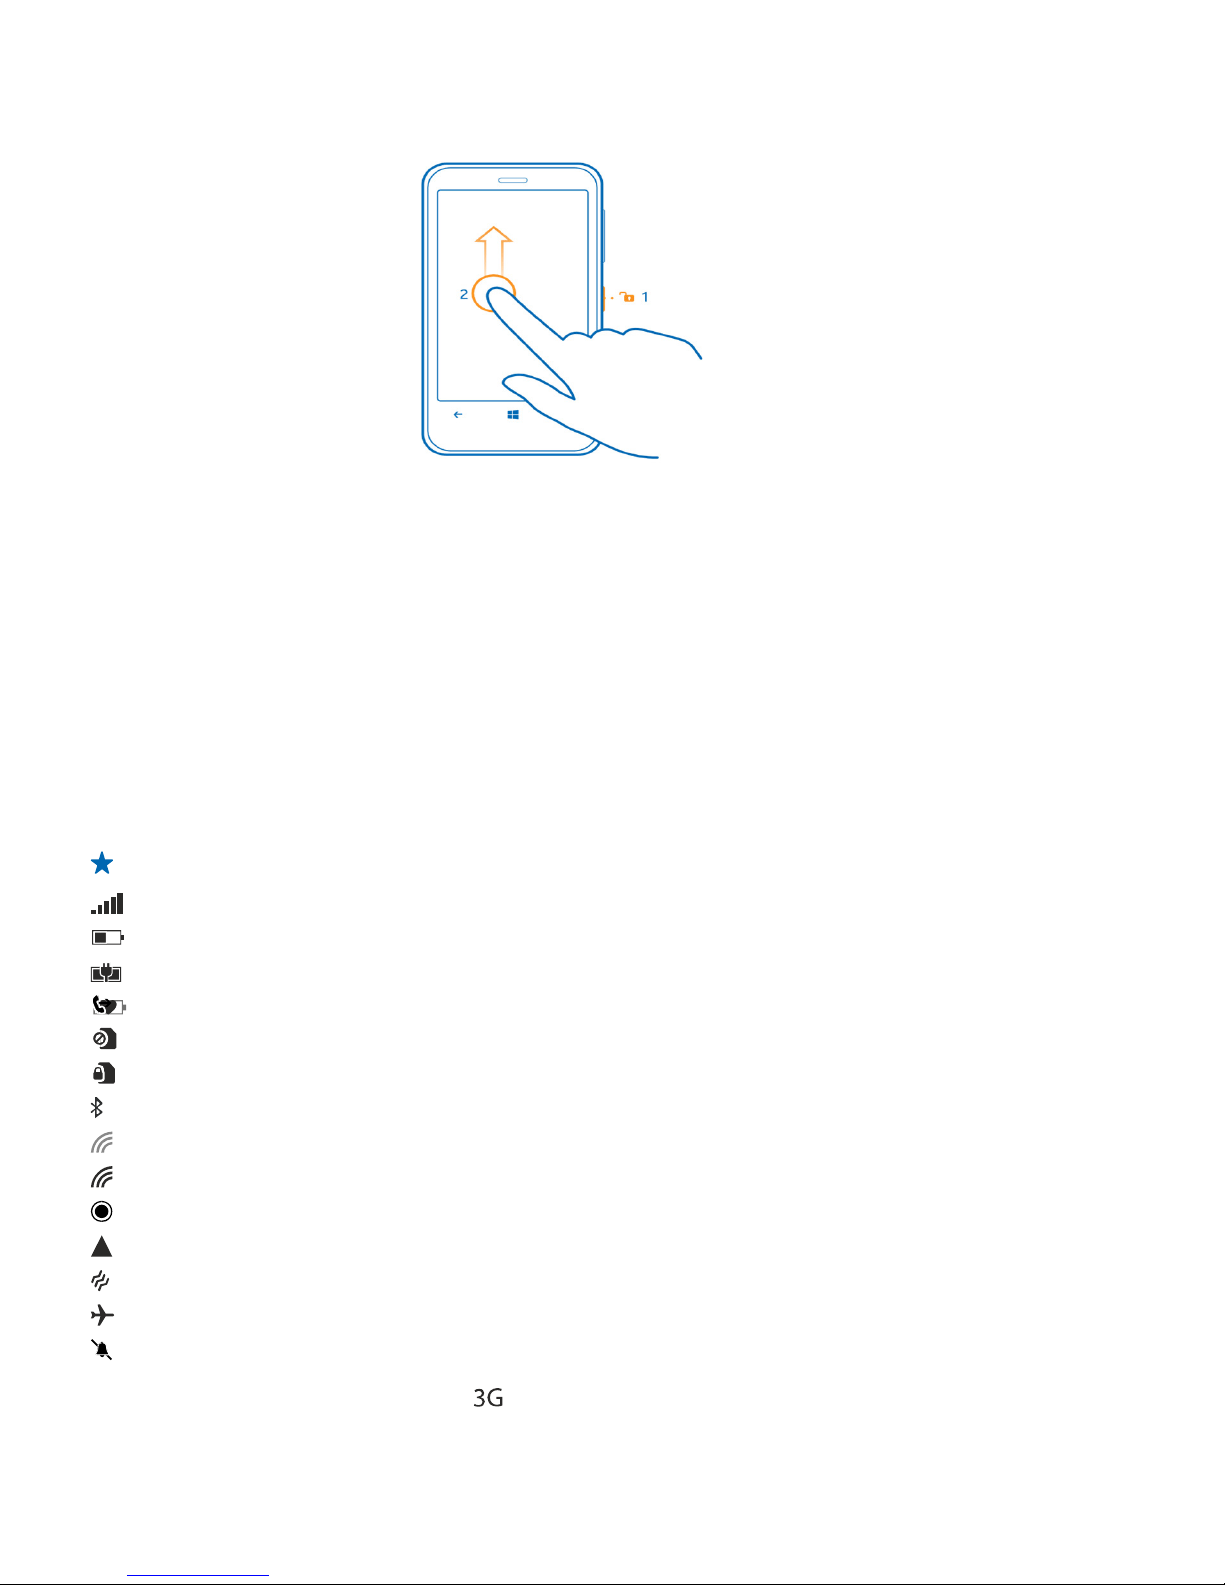
Unlock the keys and screen ............................................................................................................................ 7
Set the keys and screen to lock automatically ................................................................................................ 7
cons shown on your phone ............................................................................................................................... 7
Useful Tips for Using your Phone ....................................................................................................................... 8
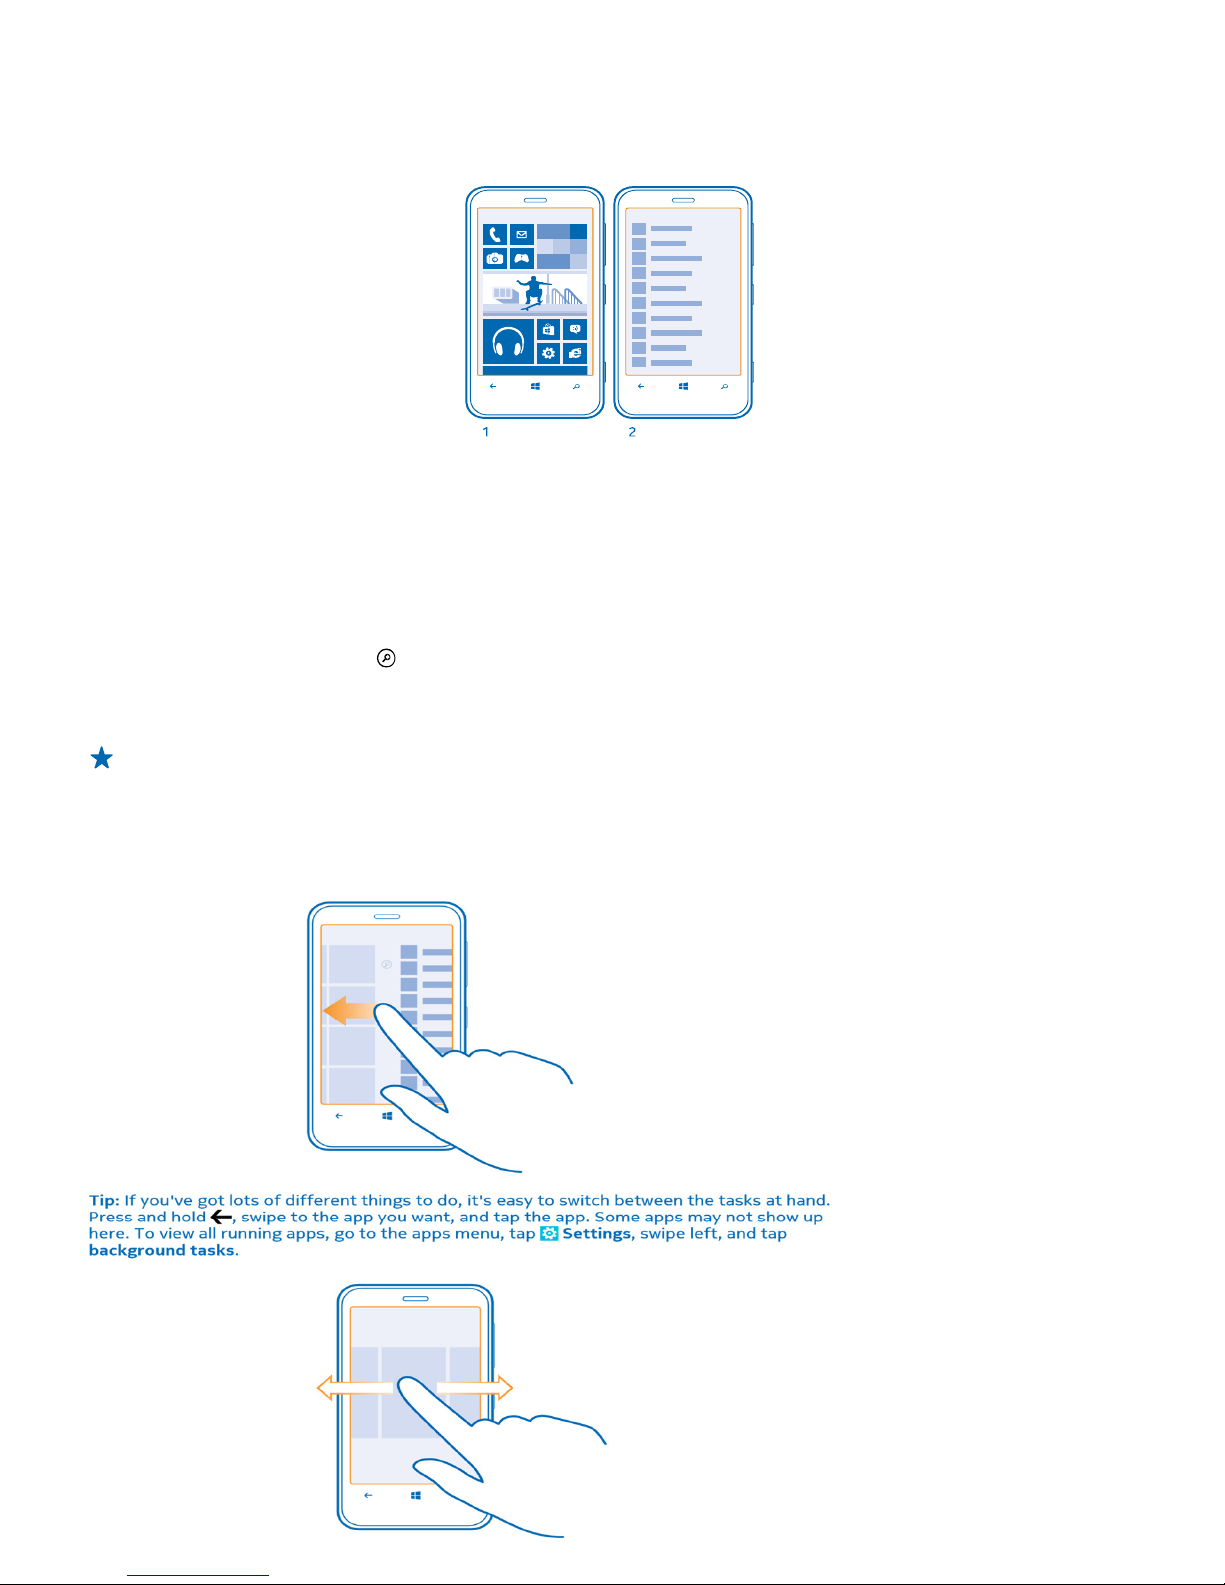
Switch between views .................................................................................................................................... 8
Use the touch screen.......................................................................................................................................... 9
Tap and hold to drag an item ......................................................................................................................... 9
Swipe .............................................................................................................................................................. 9
Zoom in or out .............................................................................................................................................. 10
Resize or unpin a tile .................................................................................................................................... 10
To unpin the tile, tap and hold the tile, and tap ........................................................................................... 11
Silence your phone ........................................................................................................................................... 11
Take a screenshot ............................................................................................................................................ 12
Make a conference call .................................................................................................................................... 12
Forward calls to another phone ....................................................................................................................... 13
Call your voice mailbox..................................................................................................................................... 13
Mail .................................................................................................................................................................. 13
Add a mailbox .................................................................................................................................................. 14
Find email+accounts" ................................................................................................................................... 14
Create new email account ................................................................................................................................ 15
Enter password ................................................................................................................................................. 16
Turn SSL encryption on ...................................................................................................................................... 16
Select setting for synchronisation ...................................................................................................................... 16
Open mail from the start screen ...................................................................................................................... 17

Read mail ......................................................................................................................................................... 17
Read mail in a conversation .......................................................................................................................... 17
Save an attachment ...................................................................................................................................... 17
Reply to mail ................................................................................................................................................ 18
Forward a mail ............................................................................................................................................. 18
Delete mail ................................................................................................................................................... 18
Delete one mail ............................................................................................................................................ 18
Wi-Fi ................................................................................................................................................................. 19
Wi-Fi connections ......................................................................................................................................... 19
Connect to a Wi-Fi ........................................................................................................................................ 19
Close the connection .................................................................................................................................... 19
Copy content between your phone and computer ........................................................................................... 19

Keys and parts
Explore the keys and parts of your new phone.
1Front camera
2Earpiece
3Connector for headphones and
loudspeakers (3.5 mm) 4 Volume keys
5Power/lock key
6Camera key
7Back key
8Start key
9Search key
10 Micro-USB connector
11 Camera flash
12 Camera lens
13 Loudspeaker
Back, start, and search key
The back, start, and search keys help you navigate your phone.
•To switch between open apps, press and hold, swipe left or right, and tap the app you want.
•To go back to the previous screen you were in, press . Your phone remembers all the apps and websites you've visited since the
last time your screen was locked.
•To go to the start screen, press . The app you were in remains open in the background.
•To control your phone with your voice, press and hold , and say a voice command.
•To search the web, press .

How to Insert a SIM card
Learn how to put a S M card in your phone, Make sure your phone is switched off before inserting the S M card.
1. Press on the camera flash, and pull the edge of the back cover until it comes off.
2. f the battery is in the phone, lift it out.
3. Pull the card holder out, put the card in, contact area face up, and push the holder back in.
4. Line up the battery contacts, and put the battery back in.
5. Press the bottom edge of the back cover against the bottom edge of the phone, and press the
back of the cover until it snaps into place.

5. Press the bottom edge of the back cover against the bottom edge of the phone, and press the back of the cover until it snaps into place.
Your phone supports memory cards with a capacity of up to 64 GB.
1
.
Press on the camera flash, and pull the edge of the back cover until it comes off.
2
.
Slide the memory card holder until it unlocks, and lift the holder.
3
.
Put the memory card in the holder, contact
t area face down, and lower the holder.
4
.
Slide the holder until it locks.

First start- p
Your phone comes with features that will be installed when you start your phone for the first time. Allow some minutes for your phone to
be ready and follow the setup guide
Switching Phone ON and OFF
.
Switch the phone on
Press and hold the power key until the phone vibrates.
Switch the phone off
Press and hold the power key, and drag the lock screen down.
Usef l B ttons
Lock the keys and screen
Press the power key.

Unlock the keys and screen
Press the power key, and drag the lock screen up.
Set the keys and screen to lock a tomatically
On the start screen, swipe left, tap Settings > lock screen > Screen times o t after, and select the length of time after which the keys and
screen are locked automatically.
Icons shown on yo r phone
The bar at the top of the screen tells you the current time, battery and signal strength, and much more.
Tip: To see hidden icons, tap the status bar.
Signal strength Battery power level
The battery is charging.
Battery saver mode is switched on.
Your calls are forwarded to another number or your voice mailbox.
There is no S M card in your phone.
Your S M card is locked.
A Bluetooth device is connected to your phone.
A Wi-Fi connection is available.
A Wi-Fi connection is active.
An app or service is using your location info.
Your phone is roaming and not on your home mobile network.
Vibrate mode is switched on.
Flight mode is switched on.
Silent mode is switched on.
The type of mobile network you're currently connected to may be shown with a single letter, a combination of letters, or a
combination of letters and numbers. For example, , depending on your network service provider.
The icons may vary depending on your region or network service provider.

Usef l Tips for Using yo r Phone
Your phone has two main views, making it easy for you to keep up with what is going on and what's where.
Start screen (1): Animated live tiles show missed calls and received messages, the latest news and weather forecasts, and more.
You can rearrange and resize the tiles, and pin contacts, apps, feeds, mailboxes, websites, and other favourites. Updates of your pinned
contacts are shown on the tile, and you can view your contacts' details directly from the start screen.
Apps menu (2): All your apps are listed here, all neatly ordered.
Got a lot of apps? To look up one, tap . f you've got loads of apps, letters of the alphabet show up in the list to help you search. Tap any
letter in the list, and tap the first letter of the app you want.
Tip: You can also search inside an app, such as Email.
Switch between views
f you don't have all the apps you need on your start screen, you can find them from the apps menu.
Simply swipe left or right between the views.

Use the to ch screen
Explore your phone with a tap, swipe or drag.
1. To use your phone, simply tap or tap and hold the touch screen.
2. To open further options, place your finger on an item until the menu opens.
Example: To open an app or other item, tap the app or item. To edit or delete a calendar appointment, tap and hold the appointment,
and select the appropriate option.
Tap and hold to drag an item
Place your finger on the item for a second or two, and slide your finger across the screen.
Swipe
Place a finger on the screen, and slide your finger in the desired direction.

.
Example: Swipe left or right between the start screen and the apps menu, or between different views in the hubs. To quickly scroll
through a long list or menu, slide your finger quickly in a flicking motion up or down the screen, and lift your finger. To stop the
scrolling, tap the screen.
Zoom in or o t
Place two fingers on an item, such as a map, photo, or web page, and slide your fingers apart or together.
Resize or npin a tile
To resize, tap and hold the tile, and tap the arrow icon.

To npin the tile, tap and hold the tile, and tap
Silence yo r phone
When you switch silent mode on, all ringtones and alert tones are muted. Use this when you are, for example, when you are in a meeting.
1. Press a volume key to see the volume status bar at the top of the screen, and tap .
Silent mode is switched on. f you have set your phone to vibrate, vibrate mode is switched on instead of silent mode.
2. f you want to set your phone to vibrate, on the start screen, swipe left, tap Settings > ringtones +so nds, and switch
Vibrate to On .

Take a screenshot
Want to send something of interest to a friend or colleague? You can capture your screen and send it to your friends.
1. Press the power key and the start key
2. Tap Photos > alb ms > Screenshots.
3. Tap and hold the screenshot you want to send, and tap share....
Make a conference call
Your phone supports conference calls between two or more people. The maximum number of participants can vary, depending on your
network service provider.
1. Make a call to the first person.
2. To make a call to another person, press , and make the call in the normal way.
3. When the new call is answered, tap .
Add another person to the call
Tap , call another person, and tap .
Have a private conversation with someone
Tap and the person's name or phone number. The conference call is put on hold on your phone. The other people continue the
conference call.
To return to the conference call, tap .

>
Forward calls to another phone
Can't always answer the phone, but don't want to miss any incoming calls? You can forward them to another phone number.
1. Tap > > settings.
2. Switch Call forwarding to On .
3. Type in the phone number in the Forward calls to box, and tap save.
Tip: To check if call forwarding is being used, shown by , tap the top of the screen.
Forward calls to yo r voicemail
Besides forwarding calls to another phone number, you can also forward these calls to your voicemail, and listen to them later.
1. Tap > settings.
2. For the first time, type in your default voicemail number in the Voicemail n mber box.
Contact your service provider to get the default voicemail number.
3. f necessary, switch Use defa lt voicemail n mber to On .
4. Switch Call forwarding to On , and type in your voicemail number in the Forward calls to box.
Edit yo r voicemail n mber
Tap > settings, switch Use defa lt voicemail n mber to Off , and edit your voicemail number.
Use the same voicemail number in the Forward calls to box.
Call yo r voice mailbox
f you've forwarded incoming calls to your voice mailbox, you can call it and listen to the messages your friends have left.
1. On the start screen, tap > .
2. f asked, type in the voicemail password.
3. You can listen or reply to voicemail messages, delete them, or record a greeting message.
>

Add a mailbox
To set up mail in your phone, you must be connected to the internet - On the start screen, tap . OR goto Settings and Email + Accounts
as per the following:
1. On the start screen, tap . Or From your ‘Desktop’ swipe right on the screen
Now Scroll down the List View until you find Settings and click this
Find email+acco nts"

Create new email acco nt
Press add an account.
Press add an account.Press add an account.
Press add an account.
Press
Press Press
Press advanced
advancedadvanced
advanced
setup.
setup.setup.
setup.
Enter email address
Enter email addressEnter email address
Enter email address
Press the field Email address and key in your email address.

Enter password
Enter passwordEnter password
Enter password
Press the field Password and key in the password
Press next.
Select Account Type
Select Account TypeSelect Account Type
Select Account Type
Press Exchange ActiveSync.
Enter Username
Enter UsernameEnter Username
Enter Username
Press the field Username and key in your username.
Enter Server Name
Enter Server NameEnter Server Name
Enter Server Name
Press the field Server and key in the server name as: o tlook.office365.com
Turn SSL encryption on
Turn SSL encryption onTurn SSL encryption on
Turn SSL encryption on
Press Server requires encrypted (SSL connection to turn SSL encryption on or off.
When the box next to the menu item is ticked (V), the function is turned on.
Enter email account name
Enter email account nameEnter email account name
Enter email account name
Press the field Account name and key in a name for the email account.
Select setting for synchronisation
Select setting for synchronisationSelect setting for synchronisation
Select setting for synchronisation
Press the field Download new content.
Press the required period.
Please note: Each time your phone connects to the server to synchronise, data charges will apply.
Select time for retrieving email messages
Select time for retrieving email messagesSelect time for retrieving email messages
Select time for retrieving email messages
Press the field Download email from.
Press the required period or any time.
Select data types
Select data typesSelect data types
Select data types
Press Email, Contacts, Calendar and Tasks to turn synchronisation of each data type on or off.
When the box next to the menu item is ticked (V), synchronisation for the required data type is turned on.
Activate Email account
Activate Email accountActivate Email account
Activate Email account
Press sign in.
Wait while the email account is activated.
Exit
ExitExit
Exit
Press the Home key to return to standby mode.

Open mail from the start screen
With live mail tiles you can open mail directly from the start screen.
From the tiles, you can see the number of unread mails and if you've received new mail.
You can pin several mailboxes to the start screen. For example, dedicate a tile for business mail and another for personal mail. f you link
several mailboxes into a unified inbox, you can open mails from all your inboxes in one tile. To read your mail, tap the tile.
Read mail
Waiting for important news? Use your phone to read your mails instead of checking them only when you're at your desk.
You can see when you have new mail on the start screen.
1. On the start screen, tap .
2. n your mailbox, tap the mail. Unread mail is marked in a different colour.
Tip: To zoom in or out, place two fingers on the screen, and slide them together or apart.
Read mail in a conversation
n your mailbox, tap the conversation that includes the mail, and tap the mail. A conversation with unread mail is marked in a different
colour.
Save an attachment
With the mail open, tap the attachment, such as a photo, and it downloads to your phone. Tap the attachment again, and tap > save
to phone. Not all file formats can be saved.

.
Reply to mail
Do you receive mail that needs a quick answer? Reply straight away using your phone.
1. On the start screen, tap .
2. Open the mail and tap
Forward a mail
Open the mail and tap > forward.
Delete mail
s your mailbox overflowing? Delete some mails to free up space in your phone.
1. n your mailbox, tap to the left of the mails you want to delete.
2. Tap the check boxes that appear next to the mails, and tap
All the mails you selected are deleted. Depending on your mail account, the mails may be deleted from your mail server, too.
Delete one mail
Open the mail and tap .

Settings
.
.
Wi-Fi
Wi-Fi connections
Your phone periodically checks for and notifies you of available connections. The notification appears briefly at the top of the screen. To
manage your Wi-Fi connections, select the notification.
On the start screen, swipe left, and tap Settings > WiFi.
Connect to a Wi-Fi
To Connect to the UH W F ,
On the start screen, swipe left, and tap
1. Tap WiFi.
2. Make sure WiFi networking is switched to On .
3. Select the connection you want to use either UH or UH Guest
4. Once connected, Open the nternet browser
5. Enter your UH Username and password
6. SETUP PROXY
7. Go back into the W F Settings
8. Long press on the W F you are connected to
9. Enter fcache.uhi.ac.uk as proxy name and port 8080
Close the connection
Tap WiFi, and switch WiFi networking to Off
Copy content between yo r phone and comp ter
Copy photos, videos, and other content created by you between your phone and computer.
f your computer is a Mac, install the Windows Phone app from the Mac App Store.
1. Connect your phone to a compatible computer with a compatible USB cable.
2. On your computer, open a file manager, such as Windows Explorer or Finder, and browse to your phone.
Tip: Your phone is shown under portable devices as Windows Phone. To see the folders of your phone, double-click the name of the
phone. There are separate folders for documents, music, photos, ringtones, and videos.
3. Drag and drop items from your phone to the computer, or from your computer to the phone.
Tip: f your computer's operating system is Windows 7 or Windows 8, you can also use the Windows Phone app. Windows 8 installs
the app automatically. With Windows 7, you can download it from www.windowsphone.com.
Tip: f you need to identify your phone, to view the unique ME number of the phone, dial *#06#.
Other manuals for Lumia 620
7
Table of contents
Other Nokia Cell Phone manuals

Nokia
Nokia E51 - Smartphone 130 MB User manual

Nokia
Nokia RM-519 User manual

Nokia
Nokia G310 5G User manual

Nokia
Nokia 6820 - Cell Phone - GSM User manual

Nokia
Nokia C7 User manual

Nokia
Nokia N95 Specification sheet

Nokia
Nokia XpressMusic 5130 User manual

Nokia
Nokia C1-00 User manual

Nokia
Nokia 6301 User manual

Nokia
Nokia 6310I - Cell Phone - GSM User manual

Nokia
Nokia RM-595 User manual

Nokia
Nokia 6235 Guide

Nokia
Nokia 6682 User manual

Nokia
Nokia 6300 - Cell Phone 7.8 MB User manual

Nokia
Nokia Lumia 1320 User manual

Nokia
Nokia Lumia 530 User manual

Nokia
Nokia 6265 Guide

Nokia
Nokia 2.1 User manual

Nokia
Nokia TA-1182 Specification sheet

Nokia
Nokia 500 User manual