Nokta Golden King User manual

USER MANUAL

Durng each power-up, the Golden Kng Deep Processor Radar
system should be held as shown n the pcture. The 'ON' key
should be pressed n ths poston.
After pressng the 'ON' key, keep your poston stll for
approxmately 20 seconds. Then lower the search col to the
normal searchng heght, press 'RESET' and release.
When the above process s fnshed you can do the ground
balancng and start your search. Durng ths process, the system
adopts tself to the surroundng condtons and makes all the
necessary reference adjustments for better searchng.
The qualty of the receved sgnal s related drectly to ts cleanness. The receved sgnal
mght be affected from many envronmental factors lke mneral ntensve sols, cold/hot
weather, magnetc (electrcal) noses etc. These factors cause the receved sgnal to be
dstorted. For ths reason, we have developed a new system called D.I.S.S that can clean the
receved sgnal no matter what the reason of dstorton s. What we get s always a clean
snusod that s easy to process.
Equipment Safety
Especally durng transportaton, do not forget that ths s an electronc devce and do not
expose t to harsh mpacts.
Waterproofness
The system box of the equpment s not completely waterproof. It should not be exposed
to ran or soaked nto water.
Proper Use
The accessores and connecton components used on the equpment should be
connected and removed carefully.
Please don't keep the system box over the search col.The depth of the
system s excessve. Therefore t can sense the system box as a target.
Keep the system box away from the search col.
Please keep your search col away from your shoes. The system
can sense the metals n your shoes as a target.
Please do not apply force to the search col nput connector wth your
hand when the system s operatng. Do not stretch the cable, do not
apply force to the connecton socket. In order to nterpret the target
sgnal accurately you must follow the warnngs.
WARNINGS
For consumers wthn the European Unon: Do not dspose of ths equpment
wth the general household waste. The crossed wheeled bn symbol on ths
equpment ndcates that ths unt should not be dsposed of wth the general
household waste but rather be recycled n complance wth the local
government regulatons and the envronmental requrements.
Accessories and Batteries
Only use such batteres, headphones, camera recorder, gas sensor, cable andconnecton
components that are approved by Nokta Engneerng. Use of any unapproved accessory
may damage your unt.
Special Regulations
Comply wth the law and the regulatons applcable to any gven place. Do not use the
devce at the protected areas and the mltary zones. You should defntely nform the
concerned authortes of any cultural fndngs you may fnd durng your search.
Battery
If you use another type of battery nstead of that prepared by Nokta Engneerng whch s
equpped wth protecton crcuts, your unt may get damaged. Use the battery accordng
to the nstructons wrtten n the user’s manual prepared by Nokta Engneerng. Do not
expose the battery to heat.
Important Note: If the lthum polymer battery used on the system s exposed to hgh heat
or drect sunlght, t may get damaged. Never leave t nsde a car n hot weather. Short
crcutng of the lthum polymer battery may also cause t to get damaged.
Installation
Your equpment s electronc and manufactured wth hgh technology. Because t s a
senstve devce, do not attempt to nstall or operate t before readng the user’s manual.
Operation of the Unit
Do not start searchng before dong ground balancng. Results obtaned wthout ground
balancng wll not be accurate.
Environmental Effects
Do not let any other detector or unt that emts magnetc waves closer than 10 meters to
your devce.
Hot and Cold
Do not expose your devce and search cols drectly to fre. Do not keep them n a very cold
envronment for a long perod of tme.
Use
Protect your devce aganst external mpacts.
Authorized Service
Only authorzed personnel may repar your devce. If the unt s opened by the user, any
thrd party or a reparman for any reason, the equpment wll no longer be covered under
warranty.
WARNINGS

Monitor
On the Golden Kng Deep Processor Radar system, a 7’TFT screen wth 800 X
480 resoluton, 262.000 colors and 16-bt color depth s used.
Construction
The Golden Kng Deep Processor Radar s constructed wth thermoset
engneerng plastc. It has very hgh durablty and s affected by extreme hot
and cold weather condtons at a mnmum level.
Ergonomics
Golden Kng Deep Processor Radar s desgned ergonomcally for easy
carrage and s approprate for the human body.
Smart Detection Heads
On the Golden Kng Deep Processor Radar, there are 3 types of search cols
sutable for every purpose. The search cols detect every move of the user and
mnmze the negatve results due to wrong usage of the devce.
Language Selection
The Golden Kng Deep Processor Radar can operate n 10 dfferent languages:
Turksh, Englsh, Greek, Persan, Bulgaran, French, Spansh, German, Russan
and Arabc.
Operating Manual
The Golden Kng Deep Processor Radar contans an operatng manual. The
user can access the warnngs about the equpment, correct usage and other
useful nformaton by selectng the operatng manual from the settngs
menu.
Volume Setting
A stereo audo system s used on the Golden Kng Deep Processor Radar.
Brightness Setting
On the Golden Kng Deep Processor Radar system, you can set the TFT screen
brghtness through the brghtness settng menu.
Sensitivity
You can use the Golden Kng Deep Processor Radar system at any depth you
desre by settng the senstvty levelthrough the senstvty menu.
Features of the Equipment

Features of the Equipment
Ferrous Setting
Durng your search wth the Golden Kng Deep Processor Radar, you can
search by swtchng the ferrous settng to OFF to avod ferrous metals (ron,
nal, beverage bottle caps, etc.).
Interface Selection
When searchng wth the Golden Kng Deep Processor Radar, you can select
ether the dgtal detecton or the gauge detecton nterface, whchever s
more sutablefor your needs.
Ground Balance
On the Golden Kng Deep Processor Radar, two alternatves of ground
balancng are provded. These are automatc and manual ground balance
menus.
Gas Sensor
Due to the gas sensor avalable on the Golden Kng Deep Processor Radar
system, you can check whether the confned areas (caves, tunnels, csterns,
shelters) contan methane gas or not that may adversely affect the human
health.
Camera Recorder
The Golden Kng Deep Processor Radar s equpped wth a specal camera
recorder as an attachable accessory whch operates at a very hgh dsplay
qualty even 30 meters under water, has nght vson, thus allowng use both
on land and under water.
Saving
Wth the Golden Kng Deep Processor Radar system, you can save the result
screens and the vdeos you have recorded and you can access them anytme
for revew purposes.
Signs
It s a menu whch you can access through the sgns menu on the Golden Kng
Deep Processor Radar where 406 sgns and symbols prepared by the experts
are descrbed, allowng you to nterpret the meanngs of sgns and symbols
you may come across durng your search.
Information
On the Golden Kng Deep Processor Radar, whchever menu or secton you
are n, when you press the nfo button, you canaccess the descrpton about
that menu or secton.

Make sure all the parts are present.
• System box
• Extenson ppe
• Battery box
• Charger
• Leather case
• Surface search col (optonal)
• General search col
• Deep search col (optonal)
• Camera Recorder (optonal)
• Gas sensor (optonal)
• Headphones
All these parts can be obtaned from the dealers of Nokta Engneerng. Please do not use
any external or any other branded tem.
Unpacking - Equipment
Clamping apparatus
to adjust the monitor
angle
Multi-functional keypad
Speakers
Search coils
socket input
Gas sensor
socket input
7” TFT monitor
Headphones socket input
Camera recorder input
Battery
compaction apparattus
Battery
Battery
compaction apparattus

Battery
Intal steps to operate the equpment
Preparing and charging the equipment
You are requred to charge the battery before ntal use.
The battery should be charged for about 3-4 hours. Under normal condtons, the battery
should allow 5-6 hours of operaton. For sols contanng hgh densty of mnerals, ths term
reduces down to 4-5 hours.
Note: The battery charger used on the system s equpped wth a specal software. Due to
ths software, the battery s charged n sequence. For the frst several chargng operatons,
the duraton of the operaton wll be shorter than the normal values. When t s charged
agan and agan, t wll reach to the values ndcated above.
The battery box s removed by openng the clampng apparatus on the system box. The
socket of the charger s plugged nto the charger nput on the battery box. The plug of the
charger s nserted nto the wall socket.
Devce On / Off Buttons: Turn on the devce by pressng the <ON> and turn off the devce
by pressng the <OFF> button.
Warning Lights: When the battery s nserted n the devce, f the ON/OFF button s
pressed, all 3 LEDs wll blnk once n order. When the battery s ON but not nserted
properly n the devce, the yellow LED wll blnk constantly.
Yellow LED: When the battery s empty, the yellow LED wll blnk fast and the devce wll
shut down. When the battery s ON but not nserted properly n the devce, the yellow LED
wll blnk constantly.
Green LED: Whle the battery s chargng, the LED wll stay sold green. When the battery s
fully charged, t wll start blnkng untl the battery s removed from the charger.
Red LED: Whle the battery s chargng, the RED LED wll start blnkng n case of
overheatng and the battery wll stop chargng. Dsconnect the battery from the chargng
adapter, wat for a whle for the temperature to drop and then reconnect t. If the
temperature s stll hgh, the RED LED wll contnue blnkng. In such a case, please wat
untl the temperature drops to normal level.
Please remove your battery from the devce or the chargng adapter and contact your
dealer f the RED LED s constantly blnkng.
System On/Off Buttons
Charger input The system
isactive
System
Warning
Battery
Full
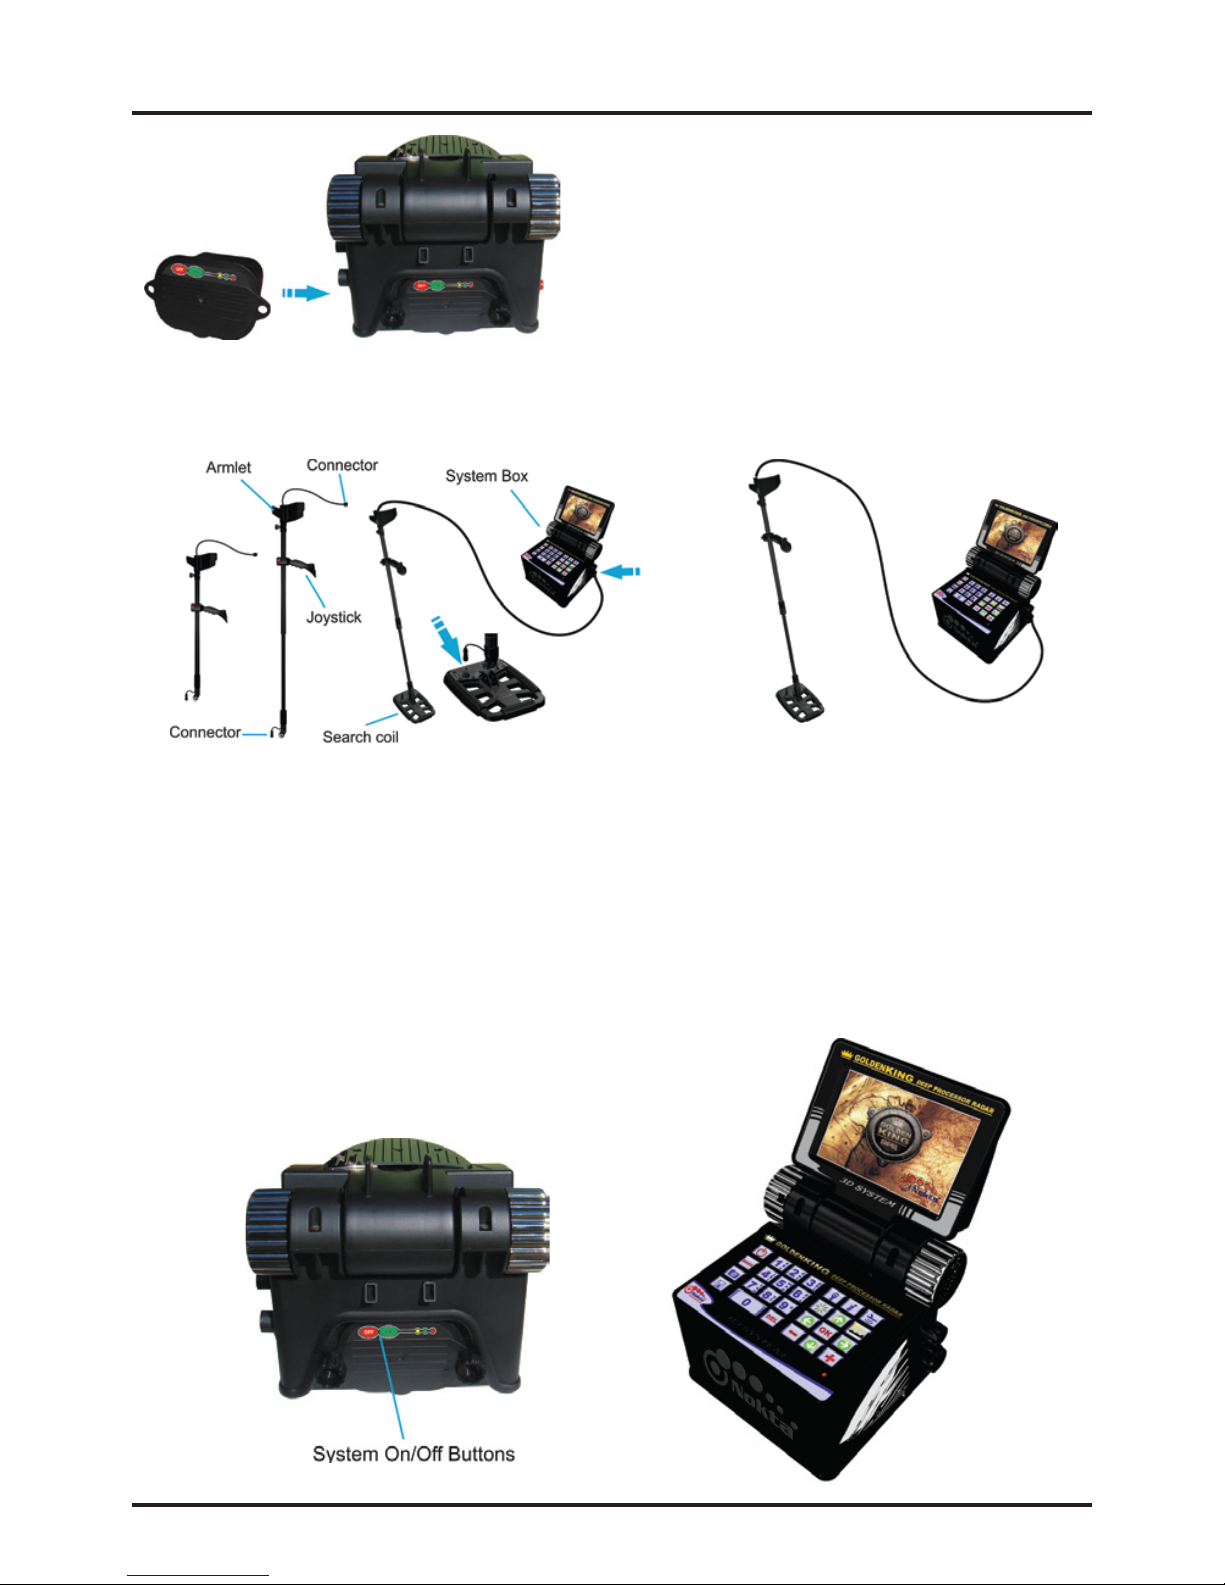
After completon of these steps, adjust the length of the detecton system to your heght
by usng the sleeves on the extenson bar. Now the system s ready for use.
On / Off Switch
After chargng the battery, turn the system off by pressng the OFF button and place the
battery box n ts place on the system box.
Then, n order to turn on the system, press the ON button on the battery box. In order to
turn off the system, frst you need to press the STANDBY button on the keypad. Then you
need to press the OFF button on the battery.
After the battery s taken out of the bag, t s
nstalled n ts place on the system box by the
connecton screws.
The extenson bar to whch the armlet and the
joystck are connected s removed from the
bag. The search col s attached to the bobbn
connecton component on the extenson bar
wth the bobbn clampng screws. The connector at the end of the extenson bar s nserted
n ts place on the search col and the connector next to the armlet s nserted n ts place
on the system box.
Assembly

Keys and Screen
Standby Key
It s the key to turn off the entre system.
Back Key
The functon of the back key s to return to the prevous menu or to ext the
current operaton.
Camera Recorder Key
After the camera recorder’s socket s nserted nto the camera recorder’s nput
jack, the camera recorder can be used by pressng ths key.
Recording Key
When ths key s pressed, recordng and archve screens appear. You can
record the result screens and the vdeos on ths screen. Furthermore, you can
use the archve secton to access the prevously recorded nformaton.
Gas Sensor Key
After the gas sensor’s socket s nserted nto the gas sensor jack on the system
box, press ths button to take advantage of the gas sensor functon.
Info Key
Whchever menu or secton you are n, when you press the nfo key, you wll
vew detaled nformaton about that secton or menu. Also n ths secton, the
user wll be nformed about the followng steps.
Ground Balance Key
Ths key s used to access the ground balance menu. You can select ether the
automatc or the manual opton from the ground balance menu when
needed.
Brightness Setting
Once the brghtness settng key s pressed, t brngs up the brghtness settng
menu. In ths menu, you can set the screen brghtness to any level you need.
Sunlight Mode Key
When the sunlght s ntensve and t affects the screen mage, you wll see the
sunlght mode of ths screen come up when ths key s pressed whch
mnmzes the effect of the sunlght. The system swtches to ths mode.
Delete Key
It s used to delete prevously made recordngs. Furthermore, t s used to
delete any wrong letter or number typed durng recordng.
Up Direction Key
It s the up drecton key to go up the optons on the menu screens.
Keys and Screen
Down Direction Key
It s the down drecton key to go down the optons on the menu screens.
Left Direction Key
It s the left drecton key to go leftward on the optons on the menu screens.
Right Direction Key
It s the rght drecton key to go rghtward on the optons on the menu
screens.
OK Key
It s the key to confrm the operatons made on the menu screens.
Minus Key
It s used to change the effect of the ground n the negatve drecton n the
manual ground balance screen.
Plus Key
It s used to change the effect of the ground n the postve drecton n the
manual ground balance screen.
Confirm Button
The confrm button on the joystck s used to confrm the operatons the
system warns the user for.
Numeric Keys
It s the mult-functonal secton of the keypad. Especally at the
tme of recordng, t lets you enter the Date / Regon / Name and the
Tme. Press the key untl the character you desre appears on the
screen. You can delete any letter or number by usng the DEL key.
After enterng a text or a number, press the OK key to save.
Screen
7”TFT
262.000 Colors
800 X 480 Resoluton
16-Bt Color Depth
Ant Glare
Brghtness 450cd/m²
Contrast Rate 400:1
Do not expose your montor to
fre drectly.
Protect your montor aganst
excessve hot, excessve cold or
ran.
Your montor s fragle, please
handle t gently.
Your montor can get
scratched, please handle t
gently.
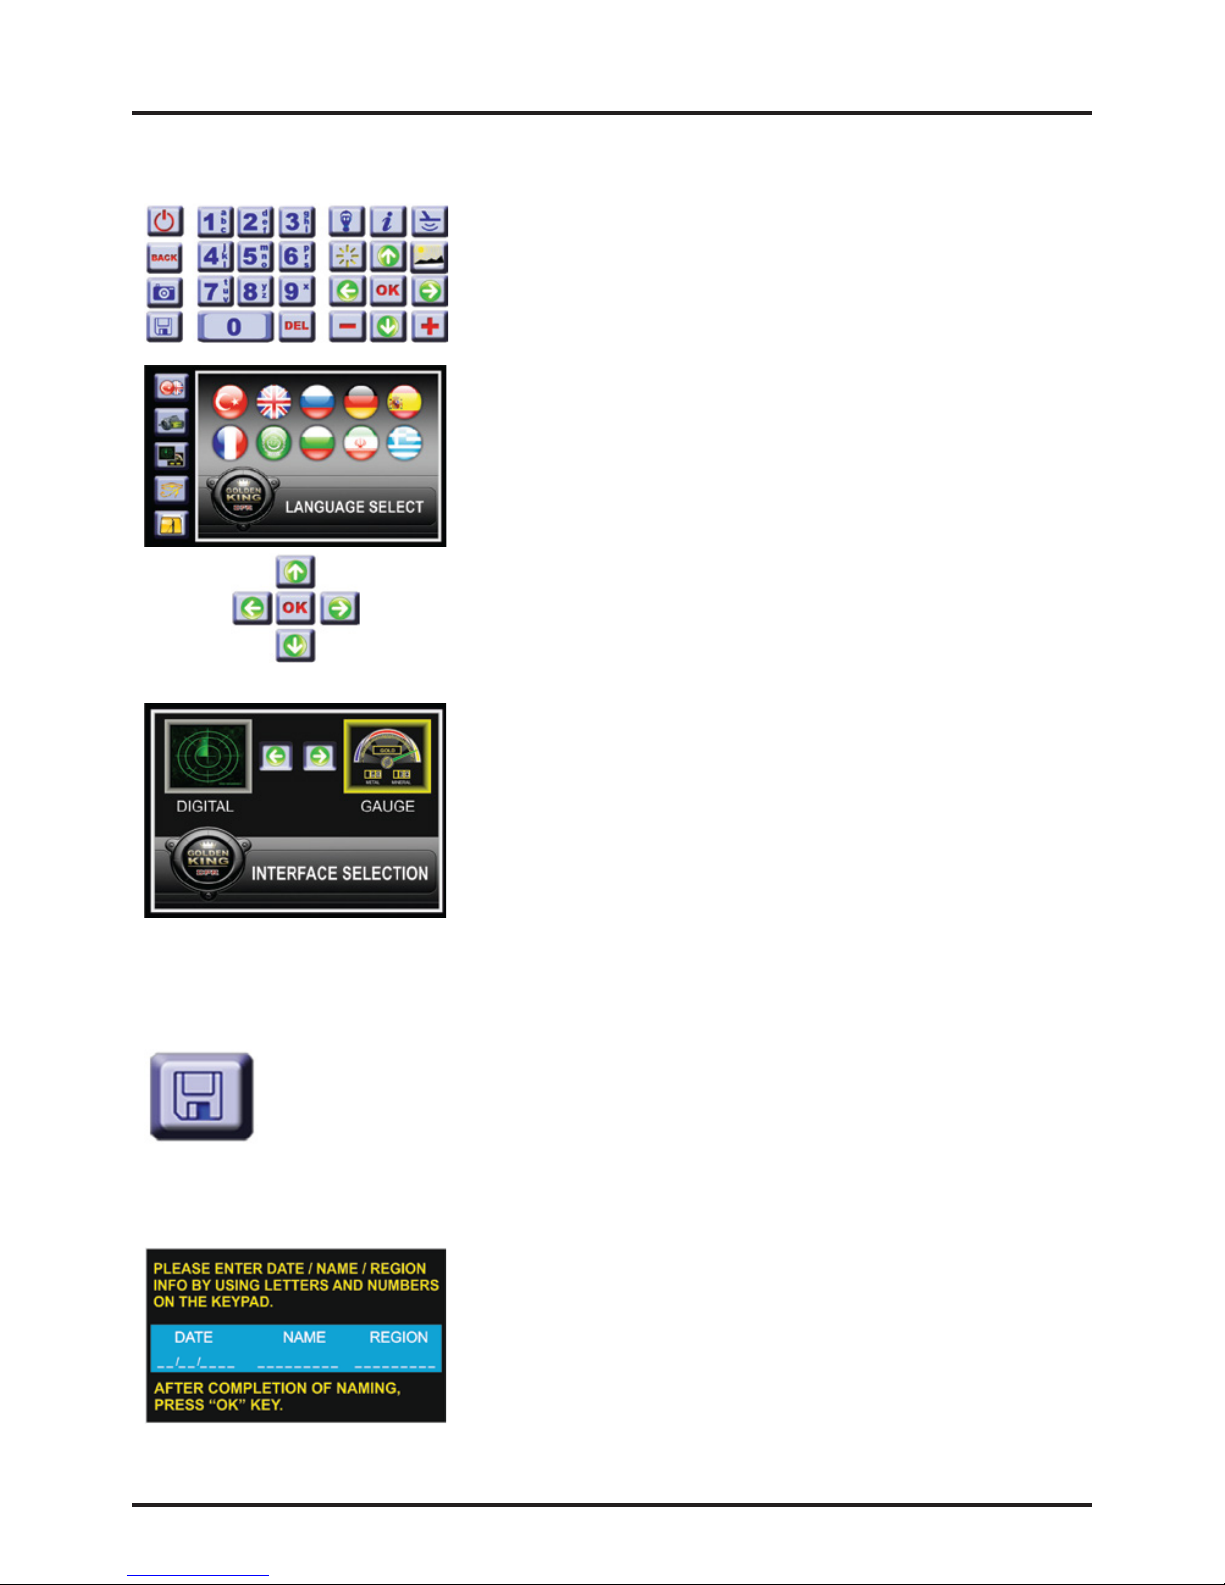
Method 1:
Is the mult-functonal keypad on the system box. You can
access the menu functons by usng the keys here.
Method 2:
Is to access the menu functons by usng the buttons on the
settngs menu, the drectonal arrows, the “OK” key and the
“BACK” key. You can navgate among the menus by usng
the up/down drecton keys n the settngs menu; enter the
menu by usng the “OK” key; navgate among the optons
by usng the rght-left drecton keys, and access the
functons of the opton you have selected by usng the“OK”
key. When you want to go back from the menus and the
optons you are n, you can return to the prevous menu by
pressng the“BACK”key.
Detection:
To search wth the Golden Kng Deep Processor Radar, you
should select one of the two nterface optons. Select one of
the optons - DIGITAL or GAUGE - and actvate the opton
you have selected by pressng the “OK” key. Ths selecton s
kept n memory at the ntal use and t s used as the default
detecton nterface unless t s changed by the user.
If you do not want to save the result screen, press the
“BACK” key and return to the ground balance selecton
screen. When you press the “SAVE” key, the followng
wndow wll appear on the screen. You should enter the
requred nformaton on the wndow.
Accessing Menu Functions
There are 2 methods to access the menu functons of the Golden Kng Deep Processor
Radar.
NOTE: You can learn how to search usng the nterfaces by followng the drectons n the
operatng manual of the Golden Kng Deep Processor Radar or by readng the techncal
manual.
Saving detections
You can save the fndngs obtaned by the Golden Kng Deep Processor Radar
as well as the result screen reports and graphs. In order to save the result
screens, you can use the save key on the keypad. After dgtal or gauge
detecton, f you wsh to save the result screens press the save key on the
keypad.
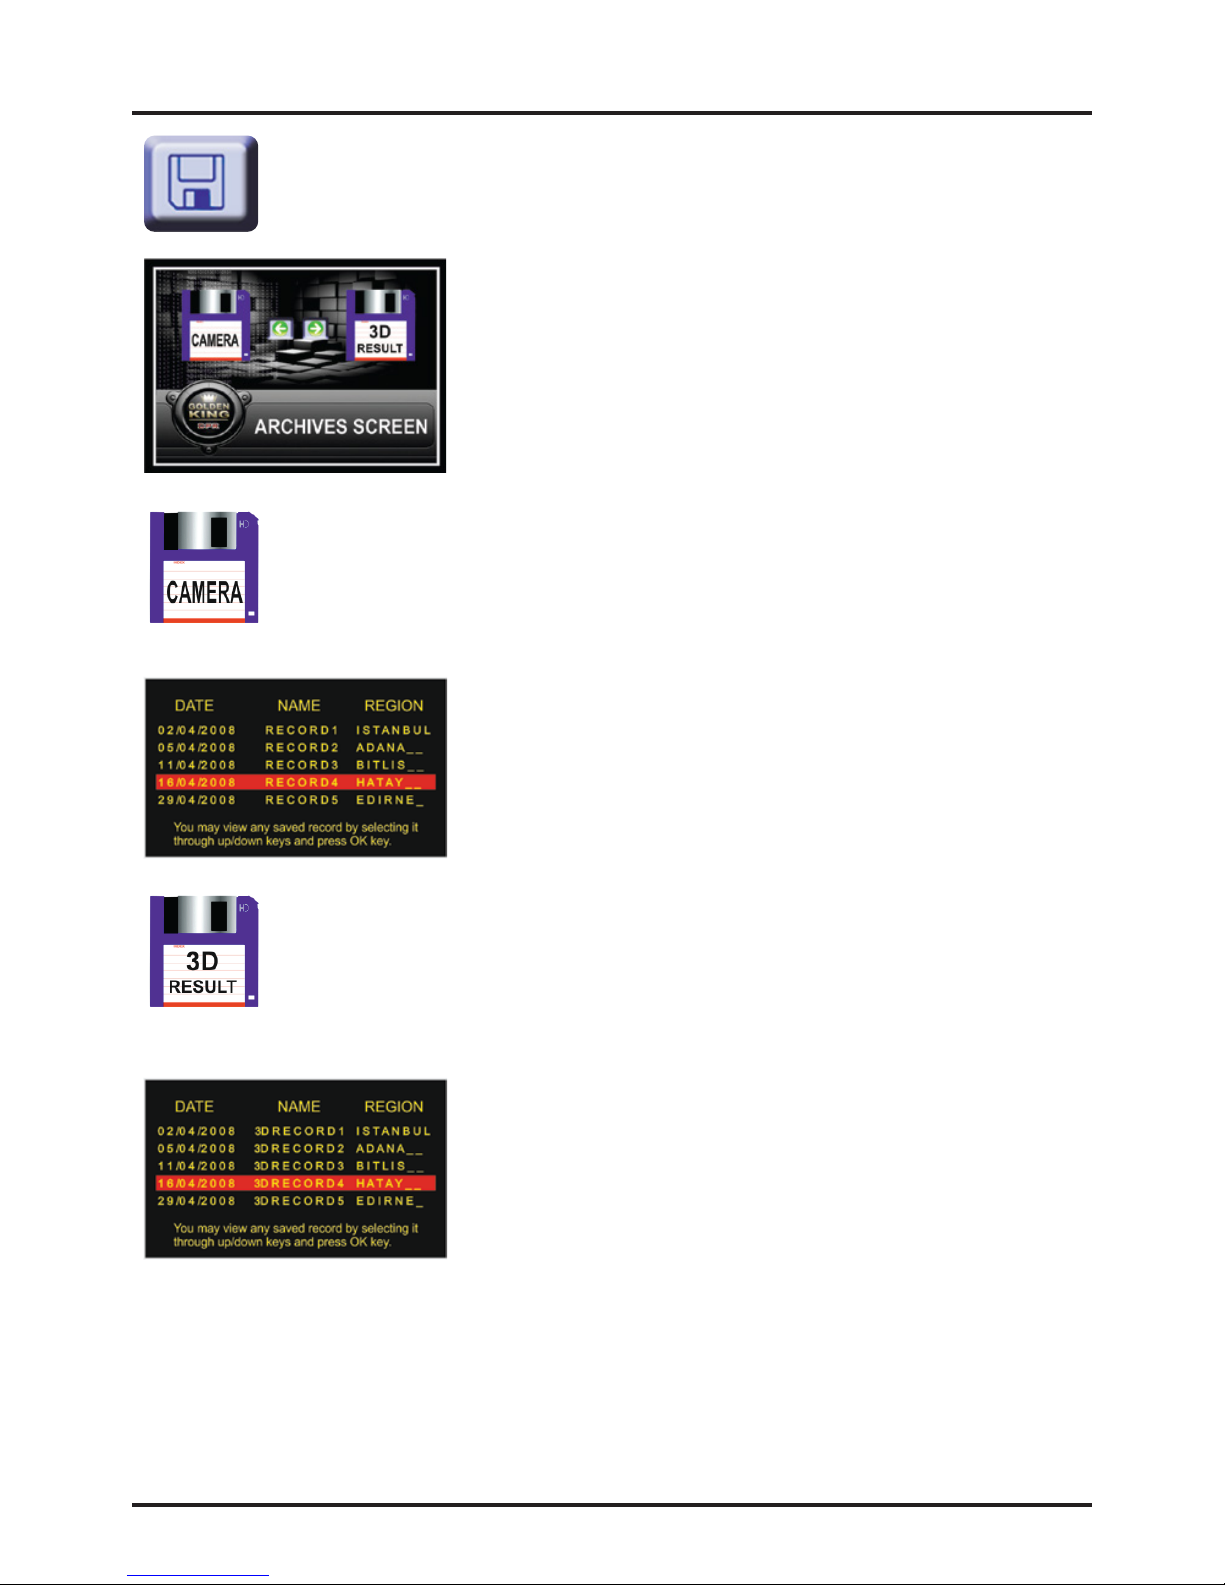
Accessing the stored data
In order to access the «3D RESULT» and the «CAMERA» recordngs press the
«SAVE» key on the keypad. The archves screen wll appear on your montor.
CAMERA MENU:
You can watch the vdeos you have prevously recorded n the Golden Kng
Deep Processor Radar system. In order to watch a vdeo, please press the
«SAVE» key on the keypad. Usng the rght/left drecton keys you can select
the «CAMERA» tab and press the «OK» key.
3D RESULT:
You can vew the 3D result screens you have prevously saved n the Golden
Kng Deep Processor Radar system. To vew the 3D result screens, please
press the «SAVE» key on the keypad. Usng the rght/left drecton keys, you
can select the «3D RESULT» tab and press the «OK» key.
There are two tabs n the archve menu. These are the “3D
RESULT” tab and the “CAMERA” tab. Usng the rght/left
drecton keys, you can select one of these tabs and you can
access the «CAMERA» or the «3D RESULT» records when you
press the «OK» key.
After selectng one of the records usng the up/down
drecton keys and by pressng the «OK» key, you can watch
the vdeo that you have recorded. Please use the «BACK»
key n order to ext ths wndow. Please use the «DEL» key n
order to delete any of the entres after selectng t wth the
up/down drecton keys.
After selectng one of the records usng the up/down
drecton keys, press the «OK» key to vew the 3D result
screen. Please use the «BACK» key n order to ext ths
wndow. Please use the «DEL» key n order to delete any of
the entres after selectng t by the up/down drecton keys.

After the camera’s socket s nserted nto the camera
recorder’s nput jack, press the camera key on the keypad.
Approxmately wthn 15-20 seconds, the nterface below
wll come up. Here the camera s n the prevew mode and t
wll show the current vew.
After enterng the date, name and the regon nformaton
and pressng the «OK» key, the recordng starts. In order to
stop the recordng, you can use the «STOP» button. You can
use the «BACK» key n order to qut wthout recordng and
to return to the prevew mode.
Pck-up Devce: 1/4" 1/3" SONY Super HAD CCD
Pcture Element: PAL: 500 (h) x 582 (v)
NTSC: 510 (H) x 492 (V)
TV Systems: PAL / NTSC
Horzontal Resoluton: 480-420 TV lnes
Mnmun Illumnaton: IR or 0 Lux
S/N Rato: More than 48dB
Gamma Characterstc: 0,45
Back Lght Compensaton: Auto
Synchronous System: Internal Synchronzaton
Lens Mount: Board lens: 3,6/6/8/12mm
Vdeo Output: 1,0Vp-p, 75W, BNC Connector
Infrared Lamps rradaton dstance: 15m
Use of Additional Features
Using the Camera Recorder :
The Golden Kng Deep Processor Radar system s equpped wth a specal camera recorder
wth nght vson that can be used 30 meters under water, s resstant up to 4 bars of
pressure and that can record at a hgh dsplay qualty. The camera recorder can also
operate on land wth the same dsplay qualty.
Durng your search n dffcult areas such as wells and caves flled wth water, lakes, sea,
brooks, water-flled csterns and tunnels, you wll get clear mages due to your hgh qualty
camera recorder. Also on land, you wll convenently vew the nsde of tunnels, caves and
csterns wthout havng to enter them.
Use:
The camera recorder wth ts 30m cable comes wth your devce,ready for use. After you
remove the camera recorder from ts bag, nsert the socket at the end of the cable nto the
camera recorder’s nput jack. Then, press the camera recorder key located on the keypad.
Wthn seconds, your system wll sense the camera recorder and transfer the mage to the
montor. After ths step, your camera recorder s ready to operate.
REC BUTTON:
When the “REC” button s pressed, the camera s swtched from the prevew
mode to the record mode. By selectng the “REC” button wth the up/down
drecton keys and by pressng the “OK” key, the record wndow below wll
appear on the screen.

If slower vewng s needed, press the “¼ X” button to watch the vdeo recorded on 30 fps
as 7 fps. The vdeo wll now play at 1/4 of the normal speed.
You can reach the vdeo recordngs of the regons you have prevously searched through
the «ARCHIVES» screen. You can also obtan the sgnal map of the regons you have
searched by the archve feature of the system. You can access all ths nformaton when
needed.
PLAY BUTTON:
In order to watch the vdeos you have recorded please select the «PLAY»
button wth the up/down drecton keys and press the «OK» button. When
you press the «PLAY»button all the vdeos you have recorded wll appear on
the screen.
Use of Additional Features
PAUSE BUTTON:
When vewng the saved vdeos, you can pause any moment of the vdeo
ndefntely by usng the “PAUSE” button. Ths way, you can vew the vdeos
you have recorded n more detal. By pressng the“PAUSE”button agan, you
can contnue watchng the vdeo.
½ X BUTTON - ¼ X BUTTON:
When vewng the vdeos you have recorded, your system s desgned to
dsplay 30 frames per second (fps). Ths frame speed s the standard vdeo
format. When you want to watch the vdeo n slow moton, the system offers
two alternatves to the user. Frst s the “½ X” button. Wth the up/down
drecton keys, select the “½ X” button and actvate t wth the “OK” key. The
vdeo wll now play at half of the normal speed.
The user can select the desred vdeo wth the
up/down drecton keys. Then, the vdeo can be
watched by pressng the «OK» key.
Gas Sensor:
The Golden Kng Deep Processor Radar system s equpped wth a
gas sensor whch measures and nforms the user of the presence
of methane gas whch s one of the flammable, explosve and toxc
gases n confned places.
The connector of the gas sensor s nserted nto the gas sensor nput on the
system box. Then,the gas sensor key on the keypad s pressed. The gas
sensor menu appears on the screen.
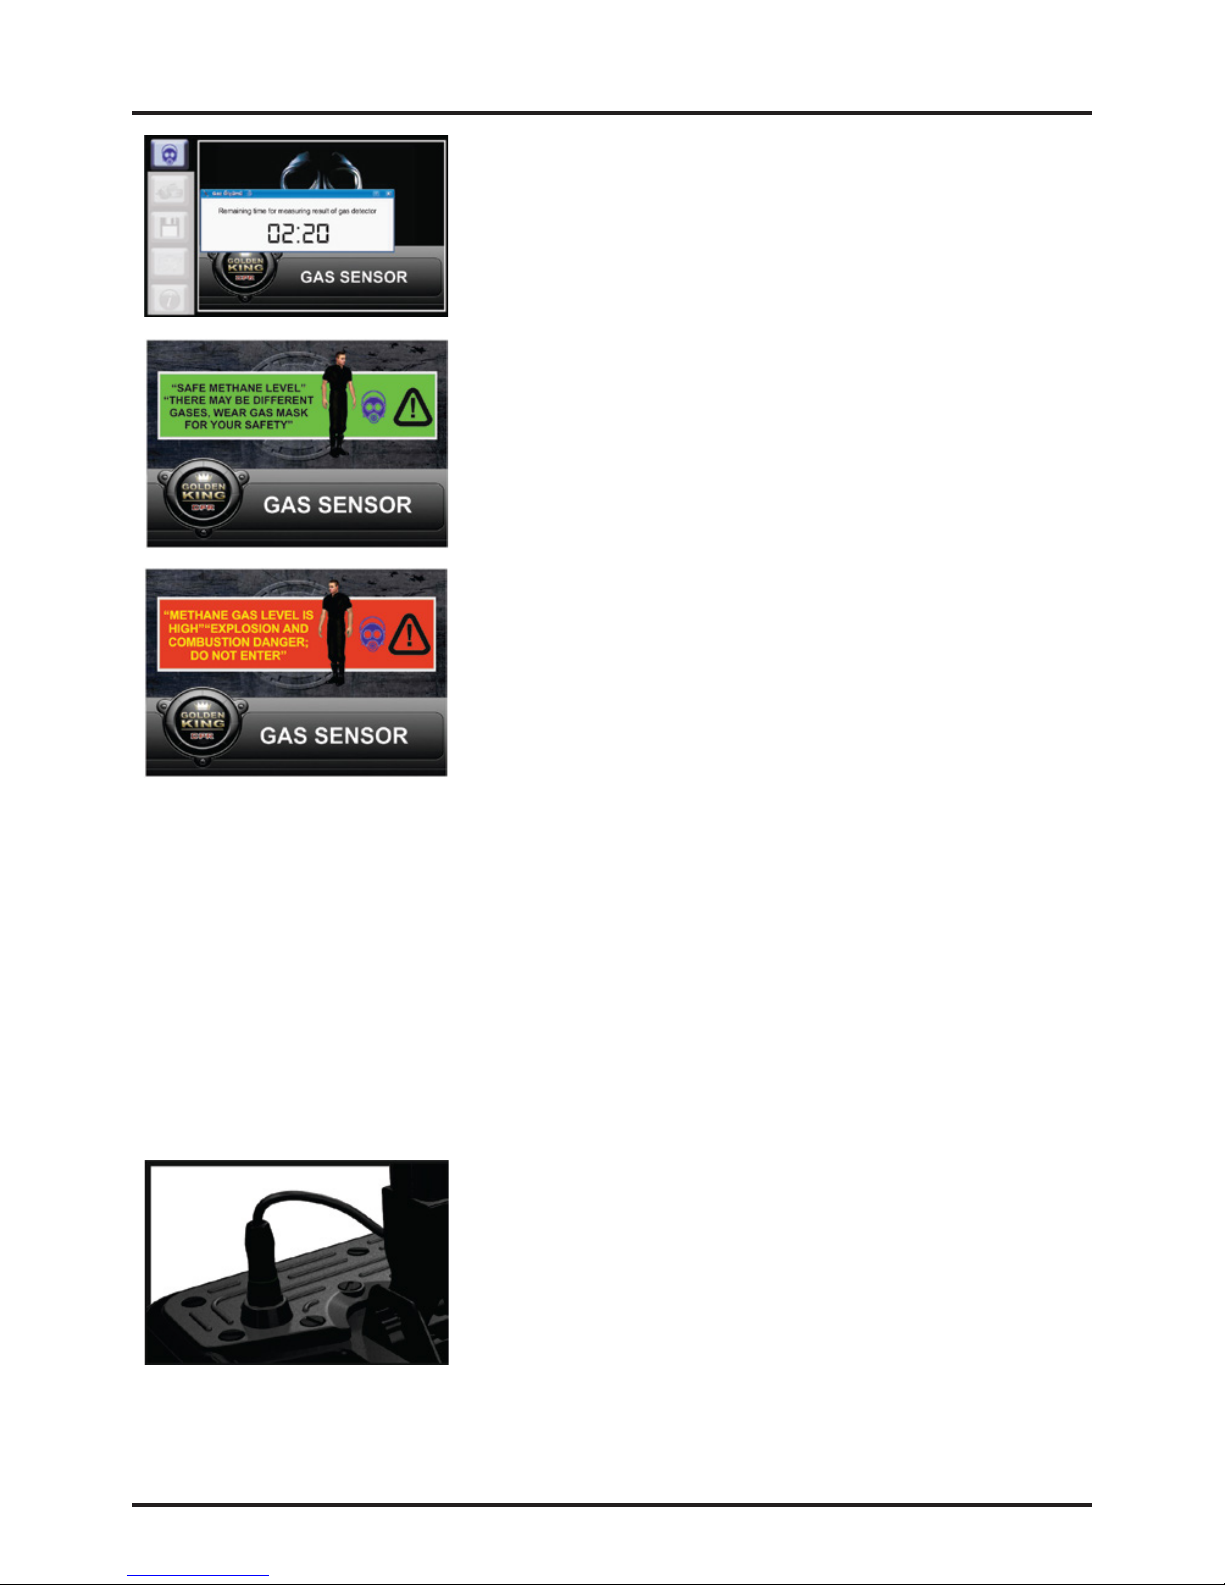
The gas sensor measures the methane gas level n the
confned space wthn an average of 5 mnutes after arrval
at the ste and nforms the user of the result. The system
starts to count down and shows the remanng tme for
measurng on the screen to the user.
Use of Additional Features
After measurng, the user s warned by one of the two
results: Frst one s:“SAFE METHANE LEVEL”“THERE MAY BE
DIFFERENT GASES, WEAR GAS MASK FOR YOUR SAFETY”
The other one s “METHANE GAS LEVEL IS HIGH”
“EXPLOSION AND COMBUSTION DANGER; DO NOT ENTER”
Press “BACK” to ext the gas sensor menu.
There s a dfferent search col for every need. The Golden
Kng Deep Processor Radar provdes you wth three types
of search cols. You wll be able to attach these search cols
wthn seconds wth the provded connectors when
needed.
SMART DETECTION s one of the features whch makes the
Golden Kng Deep Processor Radar unque worlwde.
When you turn on the SMART DETECTION system, t gets actvated rght away and t
observes all your moves untl the completon of your search. Due to the hgh dsplay
technology t uses, the user can vew hs/her moves n real tme on the montor.
Use of the Search Coil:
When desgnng the Golden Kng Deep Processor Radar, t was our frst and one of the
most mportant goals to consder all the needs of the user on the feld and to provde the
best results whle fulfllng these needs.
Therefore, we have developed the SMART SEARCH COIL system. These detecton heads wll
not only gve the most accurate nformaton to you, but they wll also check all your moves
and acts whch may adversely affect the data durng your search. The adverse effects of
such acts on the result are taken nto consderaton and the effects are mnmzed.
The SMART SEARCH COIL system manages and delvers all the nformaton - heght, depth
etc. - that the user needs.

Surface Search Coil (210x315mm):
Ths search col whch s very senstve to small objects and
to those that are close to the surface, s capable of gettng
results up to 3 meters depth. It s very deal for sngle con
searches and t s very senstve to small metals on the
surface lke no other searh col s.
You can, f you lke, swtch off the “FERROUS” mode on your system and search whll
avodng any undesred ferrous metal (beverage bottle caps, nals, wres or cans, etc.). The
surface search col has also hgh capablty of metal dscrmnaton. No matter how small
the target s, you wll not mss t.
General Search Coil (360x440mm):
Ths search col whch has been very effcent n detectng
targets up to 5 meters depth s desgned to get the most
accurate results both n deep places and at the surface.
Due to ts superor metal dscrmnaton, excellent target
detecton and ts capablty of searchng whll avodng
ferrous metals, your searches wll be very pleasant. The Smart Search Cols and the entre
Golden Kng Deep Processor Radar system have been developed after comprehensve
R&D actvtes, both electroncal and chemcal. Thermoset engneerng plastc s used on
the entre system and on the Search Cols. They are developed perfectly to resst the bad
weather condtons such as hot, cold and humd as well as water and most.
Use of Additional Features
Deep Search Coil 600x1000mm:
As you wll not be able to use the «RESET» and the
«CONFIRM» buttons on the joystck once you connect ths
search col, the buttons on the search col carryng hangers
are used for performng the reset and the confrm
functons.The green button s used for the «CONFIRM»
functon and blue button s used for the «RESET» functon.
The Deep Search Col s controlled by an exclusve
software program whch enables the devce to examne
very deep target sgnals at a very hgh resoluton. The
deep search col has also metal dscrmnaton capablty.
Ways and Speed of Detection:
Usage speed durng detecton
Fast detectons: 3.913 m/hour
Normal Detectons: 1.200 m/hour
Slow Detectons: 664 m/hour
Wth the Golden Kng Deep Processor Radar system, you
can search wth or wthout swayng the search col.
Ground Balance
Ground Balance:
On the Golden Kng Deep Processor Radar system, ground balancng s done through the
“GROUND BALANCE” menu. You can access the ground balance menu both from the
settngs secton or by pressng the “GROUND BALANCE”key on the keypad.
After pressng the «RESET» button, followng
the anmated gude on the screen, hold your
search col about 10cm above the ground
agan and press the «CONFIRM» button.
Please wat untl the clock on the screen
makes one complete turn after pressng the
«CONFIRM» button.
Method:
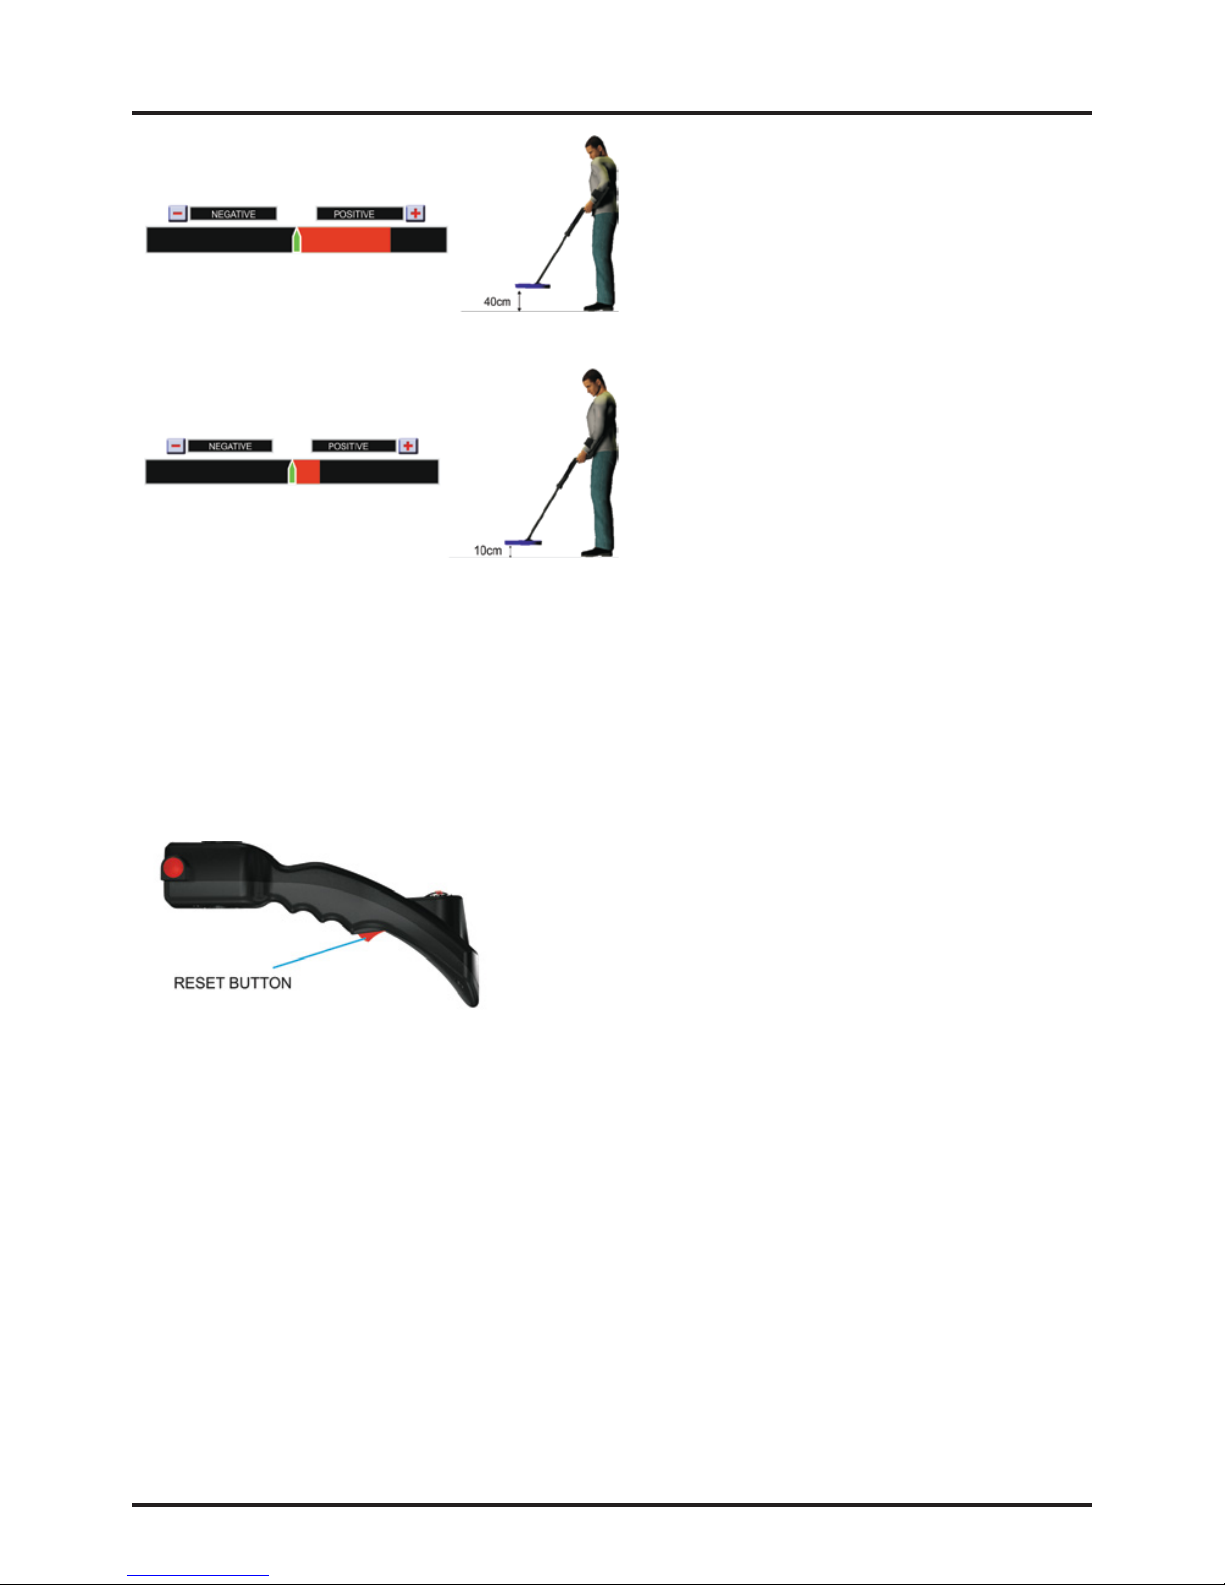
Before dong automatc ground balancng, hold the search col about 10
centmeters above the ground and press “OK”. Wth ths operaton, your
equpment wll take the ground as a reference.
What you should do next s to rase the search col about 40 centmeters
above the ground and press the «RESET» button.
When “GROUND BALANCE” s selected, you
wll see two tabs. These tabs are“AUTOMATIC”
and “MANUAL” ground balance tabs. You may
swtch from one tab to another wth the
rght/left drecton keys. You can select the
one you want by pressng the “OK” key. The
opton you select wll turn to red.
What you need to do s to elmnate the sol n
the box on the left sde of the screen and turn
t to green and save t by pressng the «OK»
button.
Ground Balance
What you should do now s to rase the search
col to 40cm above the ground agan. When
you press the «RESET» button, the anmated
gude wll lower the search col down to 10cm
above the ground agan and so should you.
Each tme you lower your search col to the
ground and press the «CONFIRM» button, the
box wth the sol on the left sde of the screen wll start turnng to green.These steps should
contnue untl the box completely turns to green as shown on the rght sde. When the box
s completely green, t means that the ground balancng has been completed succesfully.
Please contnue these steps untl the box wth the sol on the left sde completely turns to
green. The sol n the box wll decrease each tme you follow these steps dependng on the
mneral composton of the ground. The ground balance wll be completed as soon as the
box completely turns to green. You can swtch to the search screen by pressng the «OK»
button.
The system wll swtch to the general detecton mode when you press the «OK»button.The
system wll not swtch to any screen untl you press the «OK» button.
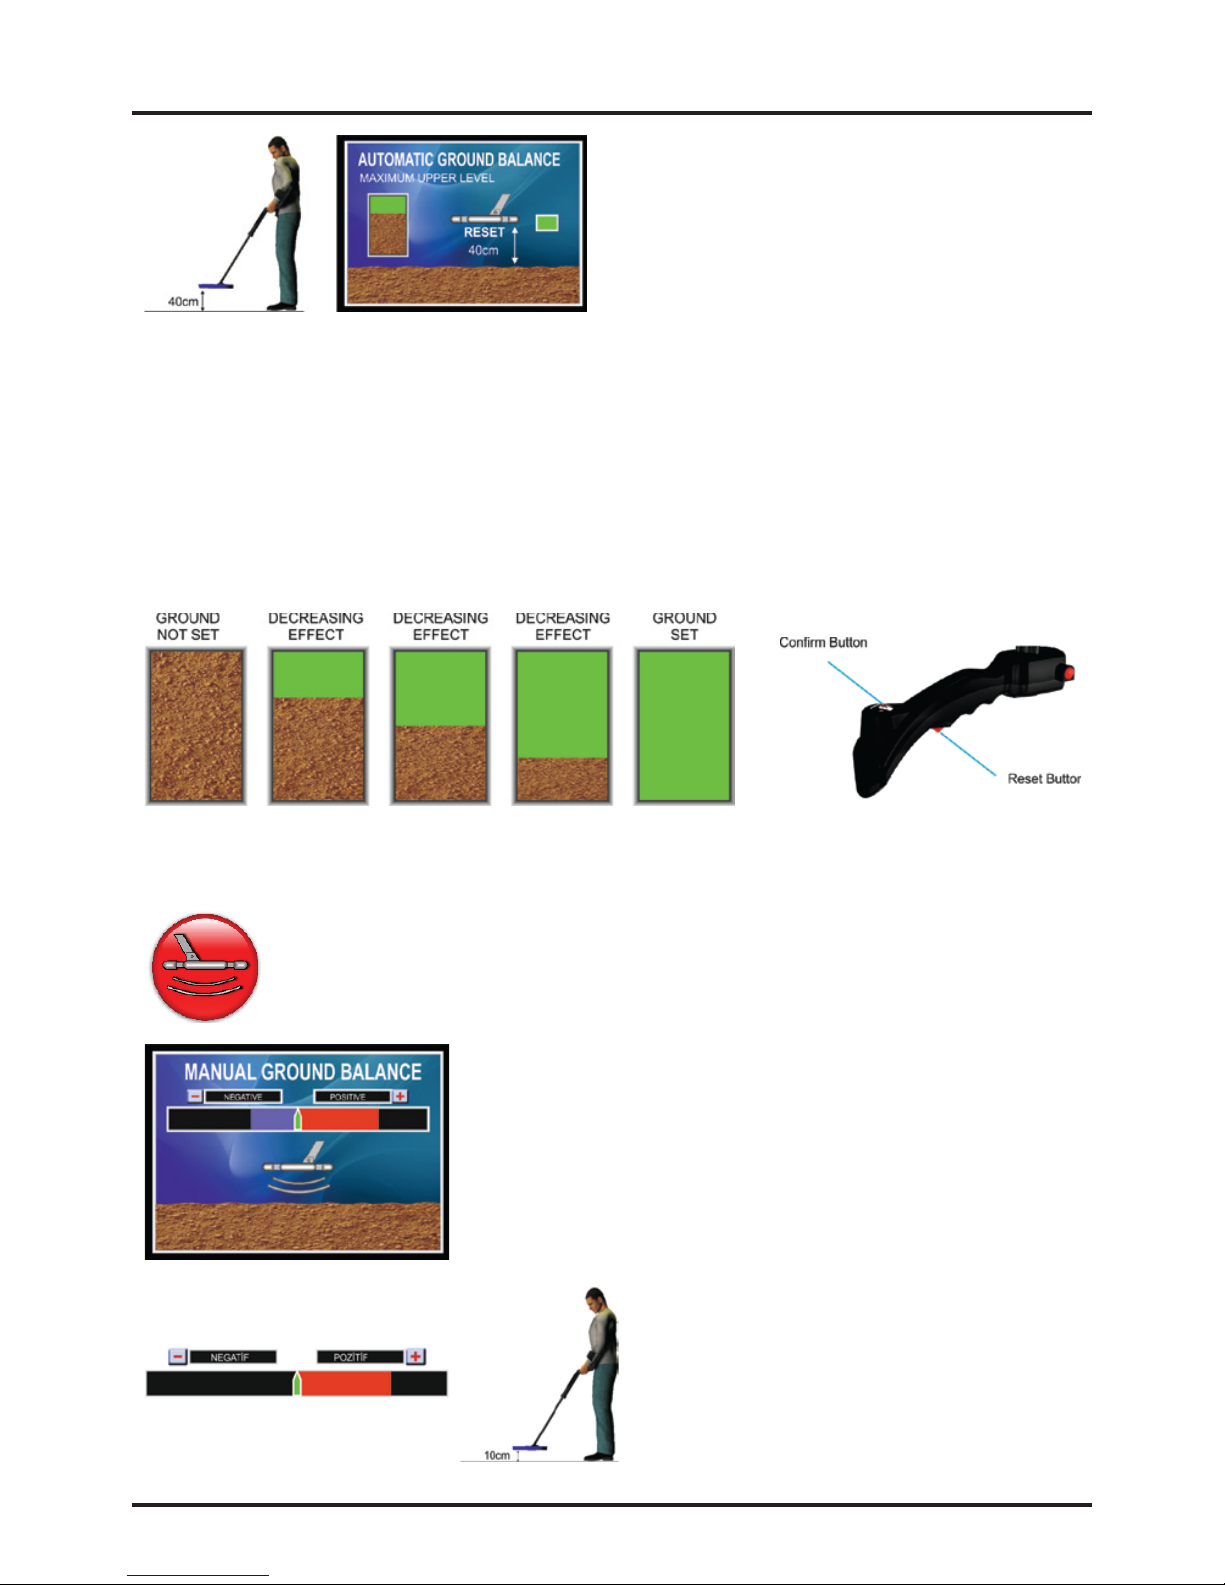
MANUAL GROUND BALANCE:
When “MANUAL GROUND BALANCE” s selected, you wll see the nterface
below.
On ths screen, there s a level ndcator that can receve
the effect of the ground n both drectons, “-” Negatve
and “+” Postve. When you hold the search col above
the ground for the frst tme, the system s affected from
the mneral level of the ground n the negatve or the
postve drecton. The purpose s to elmnate ths effect
comng from the ground.
Method:
Detecton col s held 10cm. above the
ground. Let's say that we we have
receved an effect from the ground n the
postve“+”drecton.
Ground Balance
Rase the search col 40cm above the
ground and press the “- / +” key on the
keypad for an estmated number of tmes
to elmnate the effect. Because the effect
s n the postve drecton n the example
below, you should press the “+” key. If the
ncomng effect was negatve, then you
would press the “-“ key.
Now press the «RESET» button, release
and lower the search col to 10cm above
the ground agan.
You see that the effect comng from the ground s less now. Repeat these steps untl you
receve no effect from the ground. When the effect s completely elmnated, save the
ground settng by pressng the “OK”button.
When fnshed, do not forget to save the ground balance settng by pressng the “OK”
button. When you press the“OK”key, the system wll swtch to the general detecton mode.
If you do not press the“OK” button, the system wll not swtch to another screen untl you
press the“OK”button.
RESET BUTTON:
The reset button wll brng all the detecton settngs of
your system to the settngs when you made the ground
balance. Reset should not be used when you are on the
target sgnal. Otherwse, t may cause loss of depth and
msnterpretaton of the sgnal.
The reset operaton should be performed when the col s away from the target. You are
recommended to reset after each operaton.
Note:
When ground balance cannot be performed completely due to hgh levels of mnerals,
return to the“SENSITIVITY” menu and reduce the senstvty level. Contnue ths operaton
untl you can do the ground balance completely.
Note:
Ground balance should be performed on a ground where there s no metal or cavty.
Otherwse, the equpment wll detect that you are on a metal or cavty and wll warn you
accordngly. In such a case, change your locaton and do t agan.

DIGITAL DETECTION:
The dgtal detecton nterface named
as General Detecton conssts of the
parts and sectons below and on the
rght sde. Now we wll explan these
sectons whch wll gve you the ntal
data about the target sgnal durng
your searches.
SMART DETECTION COILS:
Due to the Smart Detecton Cols used n the Golden
Kng Deep Processor Radar, you can vew your moves as
well as the detected target on the nteractve search
screen.
SCOPE SCREEN:
Wth the Golden Kng Deep Processor Radar, you wll
easly follow the ampltude of the target sgnal n
real tme on the SCOPE Screen. On ths screen, you
wll both see the hghest ampltude pont of the
sgnal center n real tme and examne the sgnal
graphs of both the cavtes and the metal targets.
You can select the nterface you want from the menu
above wth the rght/left drecton keys. You can save the
nterface you have selected by pressng the“OK”button.
Detection Functions
Interface Selection:
The Golden Kng Deep Processor Radar system offers two types of detecton nterfaces.
Frst one s “ DIGITAL” and the second one s “GAUGE” nterface. The user can search by
selectng the nterface whch he/she wll use most convenently. These nterfaces can be
changed anytme through the nterface selecton menu.
RADAR SCREEN:
Another new feature of the Golden Kng Deep Processor
Radar s the RADAR SCREEN. Due to ths screen, whle the
user s followng the operaton of the system, he/she wll also
have nformaton about the target based on the color
changes of the RADAR SCREEN when a metal / a cavty
(negatve/postve) sgnal s detected. The RADAR SCREEN
turns to red n case of a postve (metal) sgnal. In case of a
negatve (cavty) sgnal, t turns to blue. Ths way the user s gven ntal data about the
target whch enables the user to search more quckly.
Other manuals for Golden King
1
Table of contents
Other Nokta Metal Detector manuals

Nokta
Nokta 107 TB User manual

Nokta
Nokta Fors Tech User manual

Nokta
Nokta Velox one User manual

Nokta
Nokta FORS Core User manual

Nokta
Nokta Pointer User manual

Nokta
Nokta GOLDEN SENSE User manual

Nokta
Nokta FORS Gold User manual

Nokta
Nokta Velox one User manual

Nokta
Nokta Simplex LITE User manual

Nokta
Nokta FORS Gold User manual


Popular Metal Detector manuals by other brands


Bounty Hunter
Bounty Hunter PIONEER 202 owner's manual

Explore Your World
Explore Your World Discovery Channel instruction manual

Treasure Cove
Treasure Cove Fortune Finder JUNIORTC-1010 owner's manual

CST
CST Magna-Trak 102 instruction manual

PQWT
PQWT SLKD-M801 Product introduction

Bounty Hunter
Bounty Hunter DISCOVERY 2200 owner's manual


