Nokta SCORE User manual

USER
MANUAL


READ CAREFULLY BEFORE
OPERATION OF THE DEVICE
LEGAL DISCLAIMERS
Comply with applicable laws and regulations governing
use of metal detectors while using this detector. Do not
use the detector without authorization in protected or
archeological sites. Do not use this detector around
unexploded ordnance or in restricted military zones
without authorization. Notify appropriate authorities
with details of any historical or culturally significant
artifacts you find.
WARNINGS
SCORE is a state-of-the-art electronic device. Do not
assemble or operate the device before reading the user
manual.
Do not store the device and search coil under extremely
low or high temperatures for extended periods. (Storage
Temperature: - 20°C to 60°C / - 4°F to 140°F)
The device has been designed with IP68 rating as a
waterproof unit up to 5 meters / 16ft.
Pay attention to the items below after using the device
especially under salty water:
1. Wash the system box, shaft and the coil with tap
water and be sure no salt water is left in the connectors.
2. Do not use any chemicals for cleaning and/or for any
other purposes.
3. Wipe the screen and the shaft dry with a soft, non-
scratch cloth.
Protect the detector against impacts during normal
use. For shipping, carefully place detector in original
carton and secure with shock resistant packaging.
SCORE metal detector may only be disassembled and
repaired by Nokta Authorized Service Centers. Unauthorized
disassembly/intrusion into the metal detector control
housing for any reason voids the warranty.
IMPORTANT!
Do not use the device indoors. The device may constantly
give target signals indoors where there are many metals
present. Use the device outdoors, in open fields.
Do not let another detector or an electromagnetic
device come in close proximity (10m (30ft.)) to the device.
Do not carry any metal objects while using the device.
Keep the device away from your shoes while walking.
The device may detect the metals on you or inside your
shoes as targets.
CONTENTS
ASSEMBLY
INTRODUCTION TO THE DEVICE
DISPLAY
BATTERY INFORMATION
CORRECT USE
QUICK GUIDE
COMMON AND MODE-BASED SETTINGS
SEARCH MODES
SENSITIVITY
TARGET DEPTH
FREQUENCY
NOISE CANCELLATION
TARGET ID
DISCRIMINATION PATTERNS
PINPOINT
SETTINGS
Ground Balance
Recovery Speed
Iron Filter
Volume
Backlight
Bluetooth
Ground Suppressor
User Profile
Notch (Accepting and Rejecting IDs)
SUB-SETTINGS
Vibration
LED Flashlight
REVERTING BACK TO FACTORY DEFAULTS
WARNING MESSAGES
SOFTWARE UPDATE
TECHNICAL SPECIFICATIONS
: 2
: 3
: 4
: 5
: 6
: 7
: 8
: 9-10
: 11
: 11
: 12
: 13
: 14
: 15
: 16
: 17-28
: 17-20
: 20-21
: 21
: 22
: 22
: 23
: 24
: 24-25
: 26-27
: 27-28
: 27
: 28
: 28
: 29
: 29
: 30

2
ASSEMBLY
(1) After inserting the washers on the lower shaft, place
the lower shaft in its location on the search coil. Secure
by tightening the screw and nut. Do not overtighten.
(2) To join the middle rod with the upper and lower rods,
open the lever latches and engage the pieces together.
After adjusting the length of the device to your height,
press the latches to secure.
(3) Wind the search coil cable on the shaft without
stretching too much. Then, plug the connector to the
search coil input socket on the system box and secure
by tightening the nut. While tightening, you may hear
clicks indicating that the connector is secured.
(4) If you want to adjust the armrest, first remove the
screws. After sliding the armrest up or down one level,
align the holes and secure by tightening the screws.
You can attach the spare screw to the empty hole if
you do not want to lose it.
(5) Insert the armrest strap as shown in the picture and
adjust it to your arm size and tighten.
4
2
2
5
3
1

3
INTRODUCTION TO THE DEVICE
1. LCD Screen
2. Power & Settings Button
To turn the device on, press the button for 3 seconds.
To enter or exit settings, press once. To turn the device
o, press and hold.
Note: While in settings, pressing the button long will not
turn the device o.
3. Pinpoint & Discrimination Button
Long pressing this button on the main screen is used
for pinpoint. Short pressing this button allows you to
switch between dierent discrimination options.
4. Frequency & Noise Cancellation Button
Short pressing this button allows you to select the
operating frequency amongst the multi and single
frequencies. Long pressing this button allows you to
noise cancel automatically.
5. Right & Left Buttons
On the main screen, they are used to navigate between
the modes and in the settings menu, they are used to
navigate through the settings.
6. Plus (+) & Minus (-) Buttons
On the main screen, they are used to increase or
decrease the sensitivity and in the settings menu, they
are used to change the value of a setting.
7. Speaker
8. LED Flashlight
9. Search Coil Input Socket
10. Wired Headphones and Charging Input Socket
IMPORTANT! If no headphones or charging cable is
plugged in the socket, please keep it closed with the
screw cap.
IMPORTANT! The higher model DOUBLE SCORE
is used throughout this manual for illustration
purposes. Some of the features and settings shown
are NOT present in the SCORE model.
1
3 24 56
7
8
9
10

4
1. Info Bar
2. Search Modes
3. Target ID Scale and Rejected IDs
and Pinpoint Indicator
4. Sensitivity Indicator
5. Target ID
6. Operating Frequency
7. Depth Indicator
8. Sub-settings
9. Settings
DISPLAY
1
2
3
6
7
8
9
4
5

5
BATTERY INFORMATION
SCORE has an internal 3250mAh Lithium Polymer
battery.
Battery runtime varies between 5-12 hours. Factors
such as operating frequency, usage of speaker or
wired/wireless headphones, display backlight, LED
flashlight etc. will affect battery runtime.
Charging
Charge the SCORE before initial use.
Charging an empty battery will take approximately 3-4
hours.
To charge the battery, insert one of the ends of the
cable supplied with the device to the wired headphones
/ charger input socket and the other end to the
charging adapter.
You can use a regular, 5V 2A (minimum) USB power
adapter to charge the device. The charging time will
increase if you charge the device through the USB port
on a PC.
The green LED light flashes when the device is charging.
When charging is complete, the green LED lights up
steady and the battery icon shows 3 bars indicating
full charge.
Operating with a Powerbank
You can also power and charge the battery with
a powerbank. To do this, just insert one of the ends
of the cable supplied with the charger to the wired
headphones / charger input socket and the other end
to the powerbank. Please note that you will not be
able to attach wired headphones to the device when a
powerbank is attached to the device.
IMPORTANT! Do NOT use the detector underwater
while connected to a power bank.
WATERPROOF REPLACEABLE SPARE BATTERY
Optionally available separately, this waterproof and
rechargeable battery can be used when the device’s
internal Lithium Polymer battery is depleted and you
are unable to charge the battery.
Low Battery Level
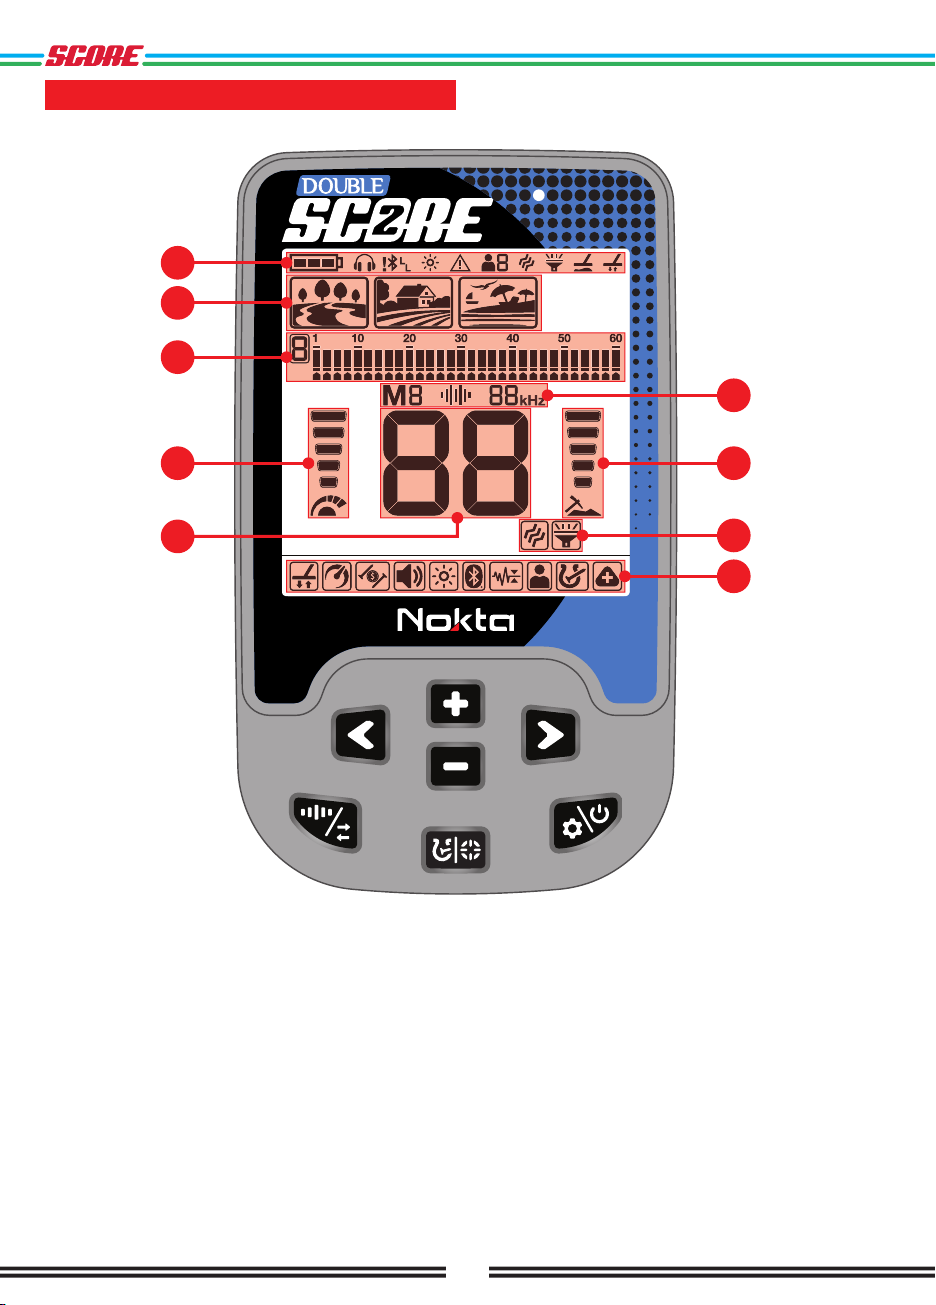
Battery icon on the display shows the battery life
status. When the charge decreases, the bars inside the
battery icon decrease, too. When battery is depleted,
‘’Lo’’ message appears on display and the device shuts
down.
BATTERY WARNINGS
Do not expose the device to extreme temperatures (for
example a car’s trunk or glove compartment)
Do not charge the battery in temperatures over 35° C
(95° F) or below 0° C ( 32° F).
SCORE battery can only be replaced by Nokta Detectors
or its authorized service centers.

6
CORRECT USE
While detecting, the device may detect the metal
objects you’re carrying or your shoes and generate
false signals.
While detecting, the device will not detect the metal
objects you’re carrying or your shoes and it will not
generate false signals.
CORRECT WAY OF SWEEPING
Wrong search coil angle
Correct search coil angle
Incorrect way of sweeping
It is important to keep the search coil parallel to the
ground in order to get accurate results.
Correct way of sweeping
The search coil must be parallel to the ground at all
times.

7
QUICK GUIDE
1. Press and hold the Power & Settings Button for 3
seconds to turn on the device. A loading bar and the
software version below it will appear on the screen.
2. When the device is turned on, it will start in the
Park mode and in Multi frequency. You can change the
mode based on ground conditions. You can find more
details on search modes and frequencies further in this
manual.
3. You can increase the sensitivity using the Plus (+) &
Minus (-) Buttons if needed. Increasing the sensitivity
will offer you greater depth. However, if the surroundings
or the ground cause excessive noise in the device, you
need to lower the sensitivity setting.
4. If the device receives noise when you increase
the sensitivity setting, you can turn on the Noise
Cancellation by long pressing the Frequency & Noise
Cancellation button before decreasing the sensitivity
setting.
5. You can start detecting!

8
COMMON AND MODE-BASED
SETTINGS
Certain settings are common to all modes; changes in
these settings will take effect in all modes.
Most of the settings are mode based and they only
affect the mode currently selected; changes made in
one mode do not affect the others.
Common settings and mode-based settings are shown
below:
Common Settings
Sensitivity
Volume
Backlight
Vibration
Mode-based Settings
Custom Discrimination Pattern
Frequency / Noise Cancellation
Ground Balance
Recovery Speed
Iron Filter
Ground Suppressor

9
SEARCH MODES
SCORE has 3 search modes designed for different
terrains and targets.
Navigating Through Search Modes
You can navigate through the modes easily by using
the Right & Left Buttons. The selected mode will be
framed.
PARK
Designed for coin and jewelry hunting in
urban areas and parks where there are
lots of modern trash (aluminum foil, pull-
tabs, bottle caps etc.) present. There are 3 tones in Park
Mode: Device produces a low tone for ferrous targets
with 01-10 IDs, a medium tone for gold and non-ferrous
metals with IDs 11-41 and a high tone for non-ferrous
metals with IDs 41-60 such as silver, brass and copper.
This mode is optimized for mid to large coins and
jewelry. The default discrimination is set to reject Target
IDs up to and including 10 to eliminate ferrous targets.
Rejected IDs
1-10
Accepted IDs
11-60
To avoid targets such as aluminum, you can utilize the
Custom Discrimination Pattern. In this pattern, the
default discrimination is set to reject Target IDs up to
and including 12.
Rejected IDs
1-12
Accepted IDs
13-60
Gold targets may fall between 11-12 IDs. When this
pattern is selected, you cannot detect targets with 11-
12 IDs.
Aluminum foil typically generates a Target ID of 11.
However, depending on the shape, its ID can go up
to 20.
Both single frequency and multi frequency can be used
in this mode. Based on target type, you can choose the
frequency you want. Multi frequency in Park mode will
allow for maximum depth and separation. Thus, a slight
noise can be experienced.
Bottle caps are unwanted targets for detectorists and
they are mostly detected as non-ferrous targets by
metal detectors. Bottle Cap Rejection setting is added
to the Park mode by default. This features enables you
to discriminate bottle caps as iron. This feature works
in Multi frequency only.
FIELD
Recommended for coin and relic hunting
in pasture and cropped/plowed fields.
These fields may contain ferrous trash and coke. To
detect coins and relics more easily amongst these
trash items, you can use the Custom Discrimination
Pattern. In this pattern, the default discrimination is set
to reject Target IDs up to and including 12. There are 2
tones in this mode and the tone break point is set to 12.
Both single frequency and multi frequency can be used
in this mode. Multi frequency in Field mode will allow for
maximum depth and separation.
The ID resolution of IDs 11-15 is different in Park versus
the Field mode. You may get a different ID in each
mode for targets that fall within this ID range.
Park and Field modes offer 3 different Multi
frequencies as Multi-1 (M1), Multi-2 (M2) and Multi-3
(M3). For details, please refer to the Frequency
section.
In Park and Field modes different algorithms are
run in M3 Multi frequency. In trashy sites, M3 Multi
frequency in Park mode should be preferred. When
a target is isolated underground, the ID will be the
same in both modes. However, if the target is next
to trash such as aluminum foil, Multi 3 in Park mode
will generate a more accurate ID for the target.

10
BEACH
This mode is optimized for use on dry or
wet beach sand as well as for underwater
use up to 5m. (16ft.).
The salt typically present in beach sand and sea
causes the sand and water to be very conductive
generating noise and false signals. Single frequency
detectors cannot work in these environments or they
underperform. Multi frequency can minimize this
noise allowing for maximum performance in these
environments.
For these reasons, single frequency cannot be used in
the Beach mode. When Beach mode is selected, the
device automatically switches to Multi frequency and
single frequency cannot be selected.
There are 2 tones in this mode and the tone break point
is set to 10.
Black Sand
Some beaches are covered with black sand which
contains natural iron. These types of beaches make
metal detection almost impossible. Beach mode senses
black sand automatically and displays a warning icon
on the top of the screen in the info section.
When this icon disappears, the device resumes its
normal operation.
IMPORTANT! After submerging the device
underwater and taking it out, the speaker cover may
be filled with water and the device’s audio may be
muffled. This is normal. In such a case, shake off the
water that’s inside the speaker cover lightly and the
audio will go back to normal.
Differences Between Search Modes
In Field and Beach modes, there are 2 tones.
Tone Zone
1
Tone Zone
2
In Park mode, there are 3 tones.
Tone Zone
1
Tone Zone
2
Tone Zone
3
In the SCORE, Iron Filter feature is set to a higher level
(8) in the Park and Beach modes, and in the Field mode
to a lower level (3) by default.

11
SENSITIVITY
Sensitivity is the depth setting of the device. It
is also used to eliminate the ambient
electromagnetic signals from the surrounding
environment and noise signals transmitted from
ground.
The sensitivity setting is 10 levels for DOUBLE
SCORE and 5 levels for SCORE.
Sensitivity setting is a personal preference. However, It
is important to set the sensitivity to the highest level
possible where no major popping sounds are heard to
avoid missing smaller and deeper targets.
Sensitivity is a common setting for all modes and
changes to this setting will affect them all.
Adjusting the Sensitivity
On the main screen, use the Plus (+) & Minus (-) Buttons
to increase or decrease the sensitivity. Single click to
change the values one by one or hold down to change
them rapidly. The sensitivity value is displayed in the
Target ID display.
The Sensitivity Indicator is located on the left side of
the Target ID. The indicator consists of 5 bars. Each bar
represents 2 levels of sensitivity for DOUBLE SCORE
and 1 level of sensitivity for SCORE.
The sensitivity values corresponding to each level on
the Sensitivity Indicator are shown below:
1-2 3-4 5-6 7-8 9-10
The device always starts with the last adjusted
sensitivity level.
IMPORTANT! To obtain maximum depth performance,
to eliminate the noise caused by electromagnetic
interference, try noise cancelling automatically first.
TARGET DEPTH
The device provides an estimated target depth
according to the signal strength during
detection.
Depth Indicator: It shows the target’s proximity
to the surface in 5 levels during detection. As
the target gets closer, the levels decrease and
vice versa.
Depth detection is adjusted presuming that the target
is a 2.5cm (1’’) coin. Actual depth varies according to
the size of the target. For instance, the detector will
indicate more depth for a target smaller than a 2.5cm
(1’’) coin and less depth for a larger target.
Shallow target Deep target
IMPORTANT! As the operating frequency of the
device has a direct impact on the device, the
estimated depth may vary for the same target
during frequency changes.

12
FREQUENCY
SCORE offers Multi frequency (M1/M2/M3),
where a wide range of frequencies work
simultaneously, as well as 1 single frequency
(15kHz).
You can switch between frequencies easily by short
pressing the Frequency & Noise Cancellation Button.
Noise cancellation can be performed by long pressing
the same button.
It is recommended to use Multi frequency in all modes.
When Multi frequency is selected the letter ‘’M’’ appears
on the screen. When a single frequency is selected, the
frequency is shown numerically on the screen.
Frequency only affects the mode currently selected;
changes made in one mode do not affect the others.
In areas where there is electromagnetic interference,
single frequencies may be less noisy compared to Multi
frequency. However, they will be less sensitive to many
targets at the same time.
Multi Frequency
Multi frequency which runs multiple frequencies
simultaneously gives the user the advantage of covering
a broader range of targets on all types of terrains.
In addition, it offers maximum depth for a large range of
metals with different sizes on wet salt beach sand and
underwater by minimizing ground noise.
Modes and Frequencies
Different than the Beach mode, Park and Field modes
offer 3 Multi frequencies as Multi-1 (M1), Multi-2 (M2) and
Multi-3 (M3). M1 is more sensitive to higher conductors
while the M2 detect lower conductors better.
M3 is ideal for humid, wet and/or conductive soils.
It reduces the effect of moisture in soils which can
cause falses. It also weakens the response of targets
generating 10-11 IDs such as coke and aluminum foil.
Ferrous Targets
Nails, Iron…
Low Conductive Targets
Foil, Small Gold Jewelry,
Nickels, Coke…
Medium Conductive Targets
Coins, Large Jewelry,
Small Silver...
High Frequencies provide
better results
Low Frequencies provide
better results
Simultaneous Multi Frequency provides better results for all targets
High Conductive Targets
Large Silver and
Copper Coins…

13
NOISE CANCELLATION
It is used to eliminate the electromagnetic interference
that the device receives from another detector which
operates in the same frequency range nearby or from
the surroundings (high voltage power lines, cellular base
stations, wireless radios and other electromagnetic
devices).
There are 13 channels available for all frequencies
including Multi frequency. The default channel is 1.
Noise Cancellation only affects the mode and frequency
currently selected; changes made in one mode does not
affect the other modes or frequencies..
If too much noise is received when the search coil
is lifted in the air, this may be caused by the local
electromagnetic signals or high sensitivity level.
To obtain maximum depth performance, to eliminate the
noise caused by electromagnetic interference, try Noise
Cancellation first before decreasing the sensitivity.
Detectors may become noisy due to electrical
interference and may exhibit erratic behavior such
as loss of depth or unstable target ID. The Noise
Cancellation setting allows you to eliminate unwanted
noise.
Noise Cancellation
1. Before doing a noise cancellation, lift the device up in
the air as shown in the picture and hold it still until the
process is completed.
2. You can start the Noise Cancelling by long pressing
the Frequency & Noise Cancellation Button.
3. When the process is done, automatically selected
channel number will be displayed and a confirmation
sound will be heard.
IMPORTANT! Noise Cancellation selects the
quietest channel based on various criteria. However,
sometimes the selected channel may still present
some noise.

14
TARGET ID
Target ID (2-Digit number in the middle of the screen) is
the number produced by the metal detector based on
the conductivity of the metals and gives an idea to the
user about what the target may be.
Target ID is shown with two digits on the display and
ranges between 01-60.
SCORE’s Target ID scale consists of 30 lines and each
line represents 2 Target IDs.
In addition to showing the Target ID in the middle of
the screen, the ID is also marked with a small cursor
under the ID scale.
Ferrous range is 1-10.
Non-ferrous range is 11-60.
In some cases, the device may produce multiple IDs for
the same target. In other words, the IDs may be jumpy.
This may result from several factors. Target orientation,
depth, purity of the metal, corrosion, mineralization level
of the soil etc. Even the direction of the search coil
swing may cause the device to generate multiple IDs.
In some cases, the device may fail to provide any ID.
The device needs to receive a strong and a clear signal
from the target in order to provide an ID. Therefore, it
may not be able to provide an ID for targets at fringe
depths or smaller targets even if the device detects
them.
Keep in mind that Target IDs are “probable”, in other
words, estimated values and it would not be possible
to know the properties of a buried object exactly until
it is dug out.
IDs of non-ferrous metals such as copper, silver,
aluminum and lead are high. Target ID range of gold
is wide and may fall within the same range of metal
wastes such as foil, screw caps, and pull tabs. Therefore,
if you are looking for gold targets, digging out some
trash metals is expected.
Coins searched throughout the world are made of
different metals and in different sizes in different
geographical locations and historical eras. Therefore, in
order to learn the Target IDs of the coins in a specific
zone, it is suggested to perform a test with the samples
of such coins, if possible.
It may take some time and experience to make best use
of the Target ID feature in your search area. Different
brands and models of detectors produce different
Target ID numbers.

15
DISCRIMINATION PATTERNS
SCORE offers advanced discrimination setting
to users for an easier operation.
By using the Pinpoint & Discrimination Button, you
can select one of the 3 different discrimination pre-set
patterns and 1 separation pattern that is completely
under the user’s control.
The default discrimination pattern for Park, Field, Beach
modes is the ‘’F’’ discrimination pattern which stands
for Ferrous Off.
In SCORE, two IDs are rejected or accepted at the same
time.
The discrimination setting only affects the mode
currently selected; changes made in one mode do not
affect the others.
All Metal Discrimination Pattern
In this pattern all ID’s are accepted on the
ID scale (1-60). In other words, all the lines
on the scale are visible and no ID is rejected.
The device will emit an audio response for all
metals as well as the ground and their IDs will
be displayed on the screen.
Ground Off Discrimination Pattern
In this pattern, the device will not receive
ground noise and will not provide any audio or
Target ID for it. Target IDs 1 and 2 are turned
off (rejected) and the rest are open (accepted).
Ferrous Off Discrimination Pattern
In this pattern, the device will not provide any
audio or Target ID for ferrous targets. Target
IDs 1 - 10 are turned off (rejected) and the rest
are open (accepted).
Custom Discrimination Pattern
This pattern allows users to create their own
discrimination pattern according to the type of
targets they would like to accept and reject.
Rejected IDs will vary based on the search
mode.
Accepting and rejecting IDs are also referred to
as ‘’notch’’ and this function is only available on the
DOUBLE SCORE model.
The default, accepted and rejected IDs in the Custom
Discrimination Pattern for each mode are shown in the
table below:
Rejected IDs
1-12
1-12
1-10
Accepted IDs
13-60
13-60
11-60
PARK
FIELD
BEACH
Default Discrimination Patterns
Search Mode
PARK
FIELD
BEACH
Discrimination Patterns
Ferrous Off (F)
Ferrous Off (F)
Ferrous Off (F)
Selecting a Discrimination Pattern
The discrimination pattern changes each time you
press the Pinpoint & Discrimination Button on the main
screen.

16
PINPOINT
Pinpoint is to find the center or the exact
location of a detected target.
SCORE is a motion detector. In other words, you are
required to move the search coil over the target or the
target over the search coil in order for the device to
detect the target. The pinpoint mode is a non-motion
mode. The device continues to give a signal when the
search coil is kept stationary over the target.
When the Pinpoint & Discrimination Button is pressed,
unused icons are cleared from the screen. PP appears
on the screen.
In the pinpoint mode, the device does not discriminate
metals or provide Target IDs.
To perform pinpoint:
1. After a target is detected, move the search coil
aside where there is no target response and push the
Pinpoint & Discrimination button.
2. Keep the button pressed down and bring the search
coil closer to the target slowly and parallel to the
ground.
3. Signal sound becomes stronger and changes in pitch
while getting closer to the target center and the bars
in the ID Scale start filling up from the outside to the
inside.
4. Mark the position which provides the loudest sound
using a tool or your foot.
5. Repeat the above procedure by changing your
direction 90°. Actions to be performed from a couple
of different directions will narrow the target area and
provide you with the most exact details of the target
location.

17
SETTINGS
To enter the settings menu, press the Power &
Settings Button once. Once the button is
pressed all the settings will be displayed at
the bottom of the screen. The selected setting will be
framed. For better visibility, it will flash and its value will
be displayed on screen.
You can navigate through the settings using the Right
& Left Buttons.
You can adjust the value of a setting using the Plus (+)
& Minus (-) Buttons.
Press the Power & Settings Button once to exit the
settings menu.
1. Ground Balance
DOUBLE SCORE is designed to work without ground
balancing on most terrains. However, for experienced
users and on highly mineralized grounds, ground
balancing will bring extra depth and stability to the
device.
Ground balance can be performed in 2 ways with
DOUBLE SCORE: Automatic and Manual.
Ground balance only affects the mode currently
selected; changes made in one mode do not affect the
others.
The device ground balances between 0-20 in the Beach
mode and within the range of 0-99 in all other modes.
Automatic Ground Balance
Automatic ground balance is performed as follows in all
search modes:
1. Find a spot where there is no metal.
2. Press the Power & Settings Button to scroll to the
ground balance setting and press and hold the Pinpoint
& Discrimination Button. The ground balance icon will
start blinking in the info section at the top and the
ground balance value will be displayed in the middle of
the screen. If no ground balancing has been performed
before, this value will always be zero (0).
3. Start pumping the search coil up and down from
about 15-20 cm (~6’’- 8’’) above the ground down to
3 cm (~1’’) off the ground with smooth movements and
keeping it parallel to the ground.
15 - 20 cm
3 cm

18
4. Continue until the audio reduces in response to
the ground. Based on ground conditions, it usually
takes about 5-6 pumps for the ground balance to be
completed.
15 - 20 cm
3 cm
5. Upon completion of the ground balance, ground
balance value is shown in the Target ID section on the
display. In order to ensure that the ground balance is
proper, ground balance at least 2-3 times and check
the ground balance values on the display. In general,
the difference between the values shall not be higher
than 1-2 numbers.
6. If you cannot ground balance, it means that either
the ground is too conductive or not mineralized or there
is a target right below the search coil. In such a case,
retry ground balancing at a different spot.
IMPORTANT: DOUBLE SCORE automatically resets
the Ground Balance value to zero (0) when Ground
Balance cannot be done in Park and Field modes.
IMPORTANT: After performing Automatic Ground
Balance in Beach mode, if the Noise Cancellation
feature is activated, please Ground Balance again
for better detection.
Manual Ground Balance
Allows you to manually modify the ground balance
value. It is not preferred mostly because it takes time.
However, it is the preferred option in cases where a
successful ground balance cannot be performed using
other methods or minor corrections are required to the
automatic balance.
1. Find a clear spot without metals.
2. Press the Power & Settings Button to scroll to the
ground balance setting. The ground balance value will
be displayed in the middle of the screen.
Table of contents
Other Nokta Metal Detector manuals

Nokta
Nokta 107 TB User manual

Nokta
Nokta FORS Core User manual

Nokta
Nokta Golden King User manual

Nokta
Nokta FORS Gold User manual

Nokta
Nokta GoldenGate User manual

Nokta
Nokta Fors Tech User manual

Nokta
Nokta MAKRO NMS20 User manual

Nokta
Nokta Simplex LITE User manual

Nokta
Nokta GOLDEN SENSE User manual

Nokta
Nokta Pointer User manual
Popular Metal Detector manuals by other brands

Bounty Hunter
Bounty Hunter Sharp Shooter II owner's manual

Bounty Hunter
Bounty Hunter Tracker IV owner's manual

Velleman
Velleman K7102 Illustrated assembly manual

Tesoro
Tesoro Deep Search VII Operator's instruction manual

Bosch
Bosch GMS 120 Professional instruction manual

Kellyco
Kellyco MP5 PRO owner's manual