Norand 6200 User manual

6200 Hand-Held Computer
USER’S GUIDE
""""""""""""""""""""""""""""
NPN: 961-028-075
Revision A
June 1995

"NOTICE This publication contains information proprietary to Norand Corporation. It is being
supplied to you with the express understanding that the information contained herein is
for the benefit of the contracting party only, and may not be copied, distributed, or
displayed to third parties without the express written consent of Norand Corporation,
and shall be returned to Norand Corporation upon written request. If a purchase,
license, or nondisclosure agreement has been executed, the terms of that agreement
shall govern this document.
This publication is furnished for information only, and the information in it is subject to
change without notice. Although every effort has been made to provide complete and
accurate information, Norand Corporation assumes no responsibility or liability for any
errors or inaccuracies that may appear in this document.
We welcome your comments concerning this publication. Although every effort has
been made to keep it free of errors, some may occur. When reporting a specific problem,
please describe it briefly and include the book title and part number, as well as the
paragraph or figure number and the page number.
Send your comments to:
Publications Department
Norand Corporation
550 Second Street SE
Cedar Rapids, IA 52401
Telephone (319) 369-3100
Faxsimile (319) 369-3453
Registered trademark; Marca Registrada by Norand Corporation, Cedar Rapids, Iowa,
U.S.A.
Trademark, Norand Corporation, Cedar Rapids, Iowa, U.S.A.
Copyright 1994 Norand Corporation. All rights reserved.
This publication printed on recycled paper.
Acknowledgments
Microsoft, MS, and MS-DOS are registered trademarks and Windows, Visual Basic
for Windows, and Windows for Pen are trademarks of Microsoft Corporation.

FCC Computer Compliance
"NOTICE This equipment meets Class B digital device limits per Part 15 of FCC Rules. These
limits protect against interference in a residential area. It emits, uses, and can radiate
radio frequency energy. If you do not install and use the equipment according to its
instructions, it may interfere with radio signals. However, these is no guarantee that
interference will not occur in a particular installation.
If this equipment does cause harmful interference to radio or television reception, which
can be determined by turning our equipment off and on, the user is encouraged to try to
correct the interference by one or more of the following measures:
SReorient or relocate the radio or television receiving antenna.
SIncrease the separation between the computer equipment and receiver.
SConnect the equipment into an outlet on a circuit different from that to which
the radio or television receiver is connected.
SConsult the dealer or an experienced radio or television technician for help.
Canadian Computer Compliance
"NOTICE This digital apparatus does not exceed the Class B limits for radio noise emissions from
digital apparatus set out in the Radio Interference Regulations of the Canadian
Department of Communications.
Le présent appareil numérique n’émet pas de bruits radioélectriques dépassant les
limites applicables aux appareils numériquesdelaclasseBprescritesdansleRèglement
sur le brouillage radioélectrique édicté par le ministère des Communications du Canada.
Telephone Installation Warning Notices
The following notices apply to equipment that may be connected to telephone lines or
systems. For your personal safety, and to protect this equipment from potential
electrical or physical damage, do NOT connect equipment to telephone lines or data
communication equipment unless the following warnings have been read, understood,
and complied with.
SNever install telephone wiring during a lightning storm.
SNever install telephone jacks in wet locations unless the jack is specifically
designed for wet locations.
SNever touch uninsulated telephone wires or terminals unless the telephone
line has been disconnected at the network interface.
SUse caution when installing or modifying telephone lines.
SAvoid using telephone (other than cordless type) during an electrical storm.
There may be a remote risk of electric shock from lightning.
SDo not use the telephone to report a gas leak in the vicinity of the leak.

Installation du téléphone : avertissements
Les avertissements qui suivent s’appliquent à tout équipement qui peut être branché aux
lignes ou systèmes téléphoniques. Pour votre sécurité personnelle et pour protéger
l’équipement de tout dommage électrique ou physique potentiel, NE PAS brancher un
ordinateur tablette électronique ou ses périphériques aux lignes téléphoniques ou
équipements avant que les avertissements suivants aient été lus, compris et observés :
SNe jamais installer de câblage téléphonique pendant un orage électrique.
SNe jamais installer de prise téléphonique dans un endroit humide à moins que
la prise ait été spécifiquement conçue pour être utilisée dans les endroits
humides.
SNe jamais toucher les fils de téléphone ou de l’équipement terminal non isolés
à moins que la ligne téléphonique n’ait été débranchée de l’interface réseau.
SUser de prudence lors de l’installation ou de la modification de lignes
téléphoniques.
SÉviter d’utiliser un téléphone (autre qu’un appareil téléphonique sans fil)
pendant un orage électrique. Il pourrait y avoir un faible risque
d’électrocution par la foudre.
SNe pas utiliser le téléphone afin de signaler une fuite de gaz à proximité de la
fuite.

CONTENTS "
6200 Hand-Held Computer i
CONTENTS
""""""""""""""""""""""""""""
SECTION 1
General Information 1-1........................................
About this User’s Guide 1-1.......................................
Summary of Sections 1-1.....................................
Section 1 1-1..........................................
Section 2 1-1..........................................
Section 3 1-1..........................................
Section 4 1-1..........................................
Section 5 1-2..........................................
Section 6 1-2..........................................
Section 7 1-2..........................................
Hand-Held Computer Description 1-2...............................
Hand-Held Computer Keyboard 1-6............................
Display 1-9................................................
Battery 1-9................................................
Memory 1-10...............................................
Main Memory 1-10......................................
Flash ROM 1-11.........................................
CMOS RAM 1-11.......................................
PCMCIA Memory Cards 1-11..............................
Diagnostic EEPROM 1-13.....................................
Reset Switch 1-13...........................................
Part Number Description for Your Hand-Held Computer 1-13.........
Hand-Held Computer Specifications 1-15.............................

CONTENTS "
ii 6200 Hand-Held Computer
SECTION 2
Hand-Held Computer Operation 2-1..............................
Introduction 2-1................................................
Using PCMCIA Cards to Load Your Programs 2-2.....................
Installing PCMCIA Cards 2-2.................................
Removing PCMCIA Cards 2-4................................
Main Battery Installation 2-5......................................
Charging Your Battery Pack 2-8...................................
Backup Battery 2-8.............................................
Installing the Backup Battery 2-9..................................
Backup Battery Life 2-11......................................
Dead Backup Battery 2-11.....................................
Downloading Programs into Your Hand-Held Computer 2-12.............
Reset Switch 2-13...............................................
SECTION 3
Routine Care and Maintenance 3-1...............................
Introduction 3-1................................................
Main Battery Care 3-1...........................................
LOW BATTERY Indication 3-1...............................
Charging the Main Battery 3-2................................
Charging the Battery in Your Hand-Held Computer 3-2.........
Dead Backup Battery 3-2.........................................
Replacing the Backup Battery 3-3..............................
Hand Strap Replacement 3-6......................................
Cleaning Your Hand-Held Computer 3-9............................
Case and Display 3-9........................................
Keyboard 3-9..............................................
Surface Connectors 3-10......................................

CONTENTS "
6200 Hand-Held Computer iii
SECTION 4
Troubleshooting 4-1............................................
Introduction 4-1................................................
Troubleshooting Chart 4-2........................................
Diagnostic EEPROM 4-3.....................................
Repair Service 4-3..............................................
SECTION 5
Connector Pin-Outs 5-1.........................................
15-Pin Female D-Sub Connector (standard) 5-1.......................
12-Pin Surface Contact Connector (standard) 5-2......................
4-Pin RJ11 Connector (optional) 5-3................................
SECTION 6
Norand Utilities Program 6-1....................................
Introduction 6-1................................................
Program Conventions 6-1........................................
Main Screens 6-3...............................................
Pop-Up Menus 6-3..........................................
Drop Down Lists 6-3........................................
Keyboard Standards 6-4..........................................
Boot Drive Utility 6-5...........................................
Screen Diagrams 6-6............................................
Main Menu Entry Point 6-6...................................
Language Selection Menu 6-6.................................
Program Load/Main Menu 6-7.....................................
Modem Parameters 6-9..........................................
Communication Status 6-10........................................
Advanced Utilities Menu 6-11......................................
Format RAM Cards 6-12..........................................

CONTENTS "
iv 6200 Hand-Held Computer
SECTION 7
Advanced Power Management System 7-1.........................
Introduction 7-1................................................
Battery Management Icons 7-3....................................
FIGURES
Figure 1-1 6200 Hand-Held Computer Front View 1-4..................
Figure 1-2 6200 Hand-Held Computer Back View 1-5..................
Figure 1-3 6200 Hand--Held Computer With 30-Key Keyboard 1-7.......
Figure 1-4 6200 Hand-Held Computer With 56-Key Keyboard 1-8........
Figure 1-5 PCMCIA Memory Card Slots 1-12.........................
Figure 1-6 Part Number Identification 1-14...........................
Figure 2-1 Installing and Ejecting PCMCIA Cards 2-3..................
Figure 2-2 Opening Main Battery Compartment 2-5....................
Figure 2-3 Main Battery Compartment 2-6...........................
Figure 2-4 Installing Rechargeable Main Battery Pack 2-7...............
Figure 2-5 Top End Hand Strap Removal 2-9.........................
Figure 2-6 Backup Battery Replacement 2-10..........................
Figure 2-7 Reset Switch 2-13.......................................
Figure 3-1 Top End Hand Strap Removal 3-4.........................
Figure 3-2 Backup Battery Replacement 3-5..........................
Figure 3-3 Removing The Hand Strap 3-7............................
Figure 3-4 Removing Hand Strap Screws 3-8.........................
Figure 3-5 Keyboard Removal 3-10.................................
Figure 7-1 Graphic Mode Icons 7-3.................................
Figure 7-2 Text Mode Icons 7-4....................................
TABLES
Table 4-1 Basic Troubleshooting 4-2...............................

6200 Hand-Held Computer 1-1
Section 1
General Information
""""""""""""""""""""""""""""
About this User’s Guide
This user’s guide is divided into seven sections. Sections 1 and 2 help you to
become familiar with your new hand-held computer, and Section 3 is for
routine maintenance. Section 4 is for troubleshooting system problems. Sec-
tion 5 provides the pin-outs for the external connectors on your hand-held
computer. Section 6 contains the Norand Utilities Program screens for set-
ting the parameters for your system. Section 7 contains the Advanced Bat-
tery Management System instructions.
Summary of Sections
Section 1
Section 1 contains general information about the components of your 6200
Hand-Held Computer. This includes telling you how the user guide is orga-
nized, a summary of the sections, and the specifications for your hand-held
computer.
Section 2
Section 2 tells you how to prepare for using your 6200 Hand-Held Comput-
er.
Section 3
Section 3 contains routine maintenance for your 6200 Hand-Held Computer.
Routine maintenance includes recharging the main battery pack, replacing
the backup battery and hand strap, and cleaning the hand-held computer.
Section 4
Section 4 steps you through some procedures to use when troubleshooting
your hand-held computer. This section does not contain all troubleshooting

SECTION 1 "General Information
1-2 6200 Hand-Held Computer
that can be done by an authorized Norand Customer Support Specialist, but
does contain information to aid you in determining the level of assistance
you may need.
Section 5
Section 5 contains the pin-outs for the external connectors of your 6200
hand-held computer. This section is not usually needed for day to day tasks
but more to provide technical assistance for interfacing to other manufactur-
er’s products.
Section 6
Section 6 contains the Norand Utilities Program screens. This is system lev-
el information and is intended to be used by your system administration
people when defining and setting parameters to support your application.
Section 7
Section 7 contains the Advanced Battery Management System information
for running under DOS.
Hand-Held Computer Description
NORANDRhand-held computers are used in the mobile systems market-
place to perform a wide variety of tasks. Technology advances allow the
design team at Norand to provide features and benefits to you in the 6200
hand-held computer that have not been available before. Some of these
benefits include:
"Faster processing of data
"Larger data and program storage
"PCMCIA (Personal Computer Memory Card International Associa-
tion) Memory cards
"Internal modem with PCMCIA card form factor
"Touch screen display
"Signature capture
Norand continues its tradition of providing compatibility with previous
models. Most applications will work with either your new 6200 hand-held

SECTION 1 "General Information
6200 Hand-Held Computer 1-3
computer or previous 4000 Series models of NORAND hand-held comput-
ers.
Additionally, your 6200 hand-held computer will work with the 4000 Series
of printers, communications controllers and communication docks.
The following descriptions will familiarize you with the name, function, and
locations of the main hand-held computer components. Figure 1-1 and
Figure 1-2 on pages 1-4 and 1-5 show you the location of these key com-
ponents.

SECTION 1 "General Information
1-4 6200 Hand-Held Computer
1
2
3
4
5
6
1. 15-Pin Females D-sub connector
2. RJ-11 jack (Optional)
3. Display (Optional touch screen)
4. Keyboard
5. Keyboard mounting screw
6. 12-Pin surface contact connector
Figure 1-1
6200 Hand-Held Computer Front View
SECTION 1 "General Information
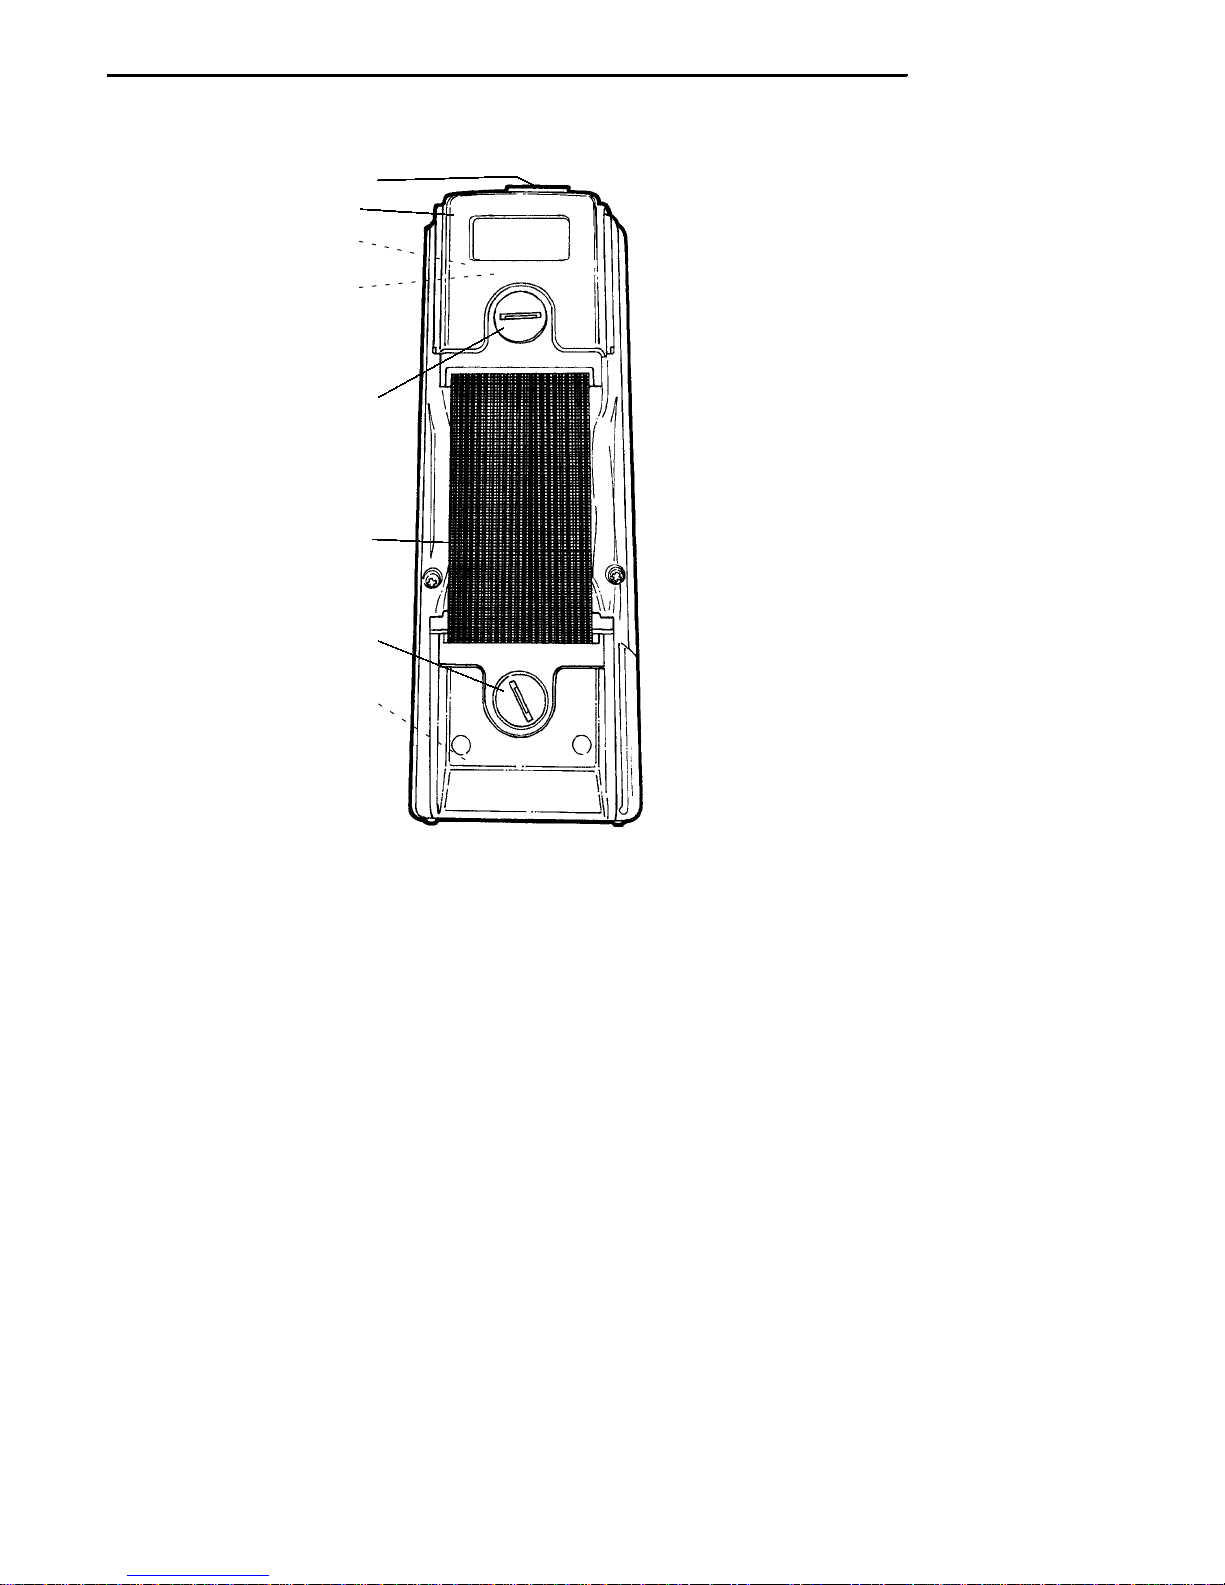
6200 Hand-Held Computer 1-5
PCMCIAmemory card door
Backup battery (inside)
Reset switch (inside)
2
1
3
4
5
6
1.
2.
3.
4.
5.
6.
7.
7
Hand strap
PCMCIA latch knob
Main battery latch knob
Main battery pack (inside)
8
8.
15-Pin female D-sub connector
Figure 1-2
6200 Hand-Held Computer Back View

SECTION 1 "General Information
1-6 6200 Hand-Held Computer
Hand-Held Computer Keyboard
The 6200 hand-held computer provides four keyboard options. Figure 1-3
on page 1-7 and Figure 1-4 on page 1-8 detail the 30 and 56 key key-
boards.
"30 key fully numeric and special alphabetic characters using the shift
key, with touch screen
"30 key full numeric and special alphabetic characters using the shift
key, without touch screen
"56 key full numeric and alphabetic, with touch screen
"56 key full numeric and alphabetic, without touch screen

SECTION 1 "General Information
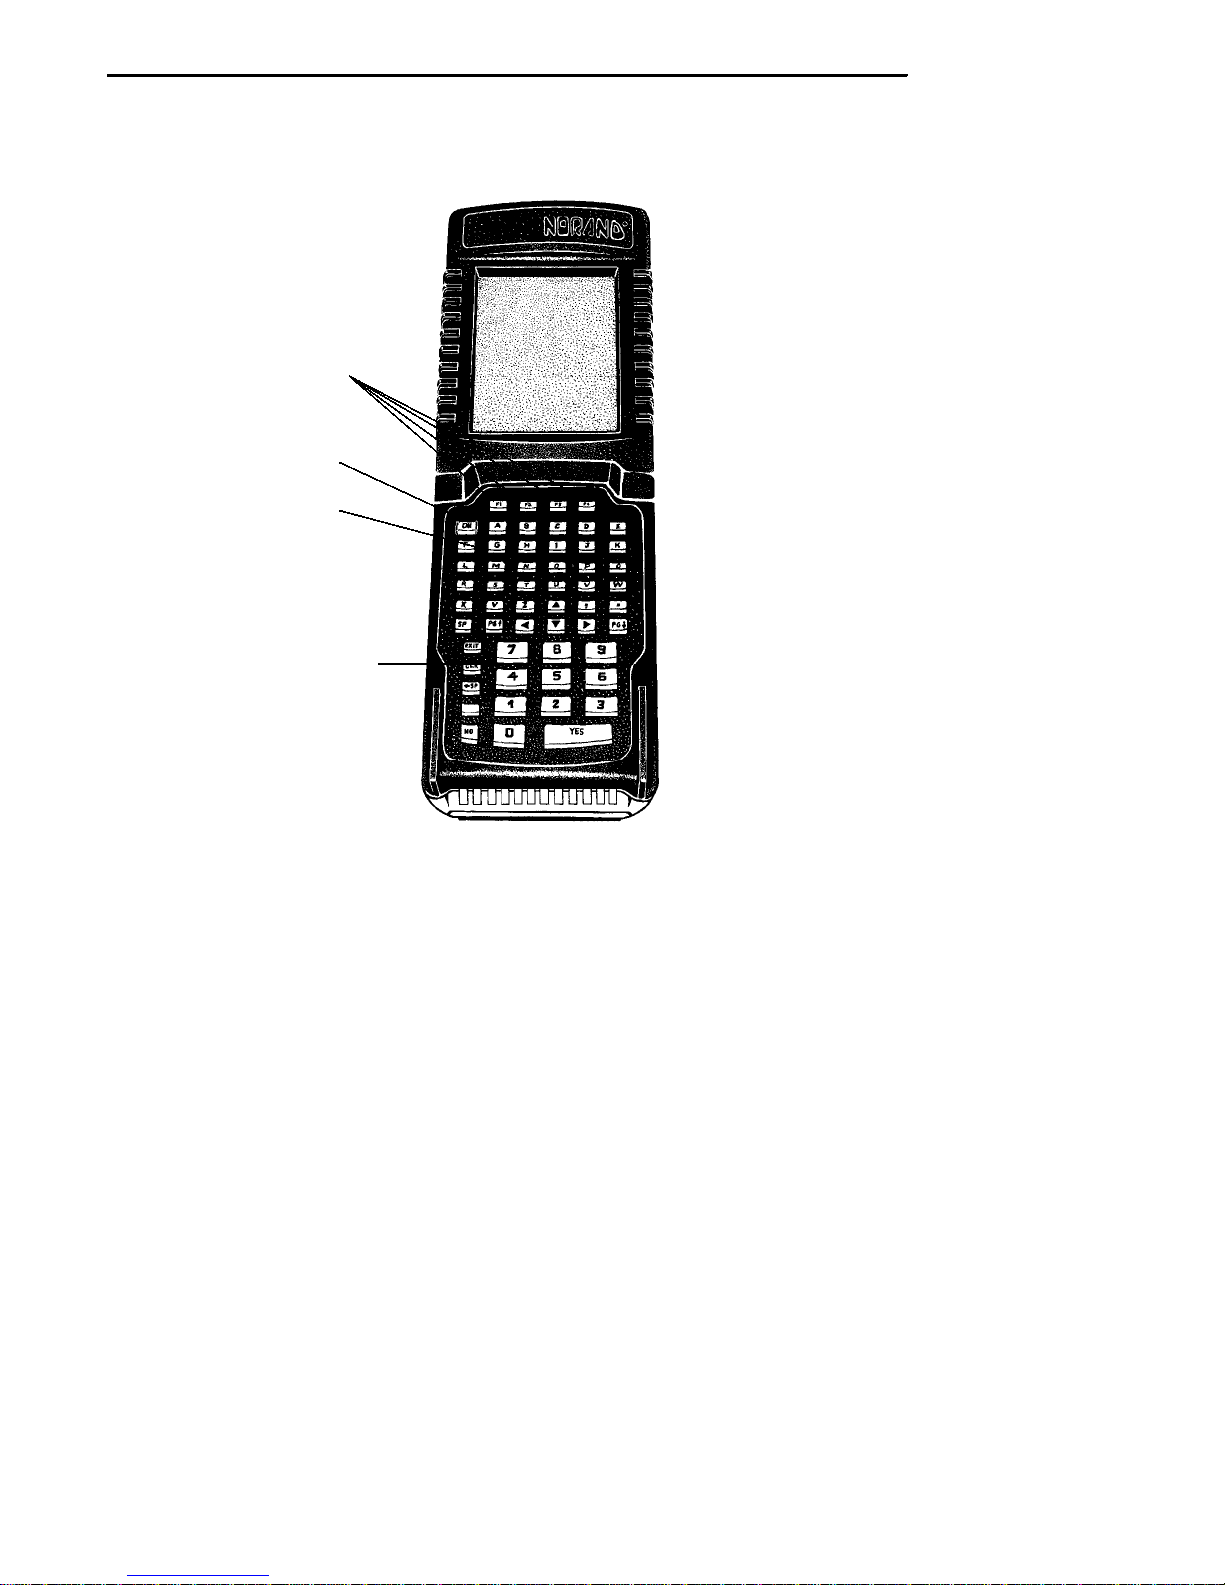
6200 Hand-Held Computer 1-7
1
2
3
1.
2.
3.
Special function keys
ON/OFF key
Numeric keys
Figure 1-3
6200 Hand-Held Computer With 30-Key Keyboard
SECTION 1 "General Information
1-8 6200 Hand-Held Computer
1
2
3
4
1.
2.
3.
4.
Special function keys
ON/OFF key
Alphabetic keys
Numeric keys
Figure 1-4
6200 Hand-Held Computer With 56-Key Keyboard

SECTION 1 "General Information
6200 Hand-Held Computer 1-9
Display
The 6200 hand-held computer has two display options.
"With Touch Screen
"Without Touch Screen
The display shows status messages, keyed-in entries, customer or product
lists, calculations, and prompts which request a response from you.
The touch screen display can be used with a stylus pencil, or by using your
finger to choose the function of the terminal, capture signature, or enter
data.
Your hand-held computer display contains a backlighting feature. Backlight-
ing the display helps when using your hand-held in dark rooms or during
early or late hours on the job. Through your application software you can
adjust the brightness and contrast of the display screen.
Backlighting provides a great benefit in dark conditions. Backlighting does,
however, reduce battery life, therefore, turn off when done using. The de-
fault setting for the backlighting feature shuts itself off after two minutes of
use. This time can be adjusted through your application settings. The No-
rand Pen*Key Programmer’s Reference Guide NPN: 977-028-014 contains
details for adjusting contrast of the display, and backlight setting.
Additional benefits of your 6200 hand-held computer are:
"Default VGA fonts or scaled font sizes
"Graphic driver
Battery
The 6200 hand-held computer can be used with three main battery pack
options:
"Alkaline
"Nickel Cadmium (NiCd)
"Nickel Metal Hydride (NiMh), available in the future
Your 6200 hand-held computer knows the kind of batteries you have
installed. If you are using alkaline, nickel cadmium (NiCd) or nickel metal
hydride (NiMh) batteries, your hand-held computer senses the amount of
charge left in your main battery pack before it goes into a low battery condi-
tion.

SECTION 1 "General Information
1-10 6200 Hand-Held Computer
When your hand-held computer goes into a shutdown mode because of low
battery condition, the data is protected by the backup battery. Your 6200
hand-held computer will not accept data or process transactions until you
deal with the low battery condition. The job of the backup battery is to pro-
tect the data you entered.
Your 6200 hand-held computer contains a replaceable alkaline backup bat-
tery. Most of the time the backup battery is in a rest mode, ready to take
over data protection instantly when the main battery cells are in low condi-
tion or out of the hand-held computer.
This User’s Guide may occasionally use the term “cycles” when presenting
rechargeable battery instructions. Cycles, are the number of times the re-
chargeable battery pack can be charged, used, and recharged during the life
of battery. The rechargeable battery design should give you approximately
500 cycles of use. There are no guarantees on this number because it de-
pends greatly on how the battery pack is used and cared for.
The Routing Care and Maintenance section beginning on page 3-1 of this
User’s Guide provides detailed instructions for maintaining the rechargeable
battery pack. Your 6200 hand-held computer will display an icon indicating
battery energy level. The complete information describing these iscontained
in Section 7 beginning on page 7-1.
Memory
The 6200 hand-held computer design uses these types of memory:
"Main Memory DRAM
"Flash ROM
"EEPROM
"CMOS RAM
"PCMCIA Memory Cards
Main Memory
Your main memory DRAM options available are 2 or 4 Megabytes. The
6200 hand-held computer main memory was ordered at the time your unit
was purchased. You are not able to upgrade to a higher memory size. A new
memory host board must be installed at your Norand Customer Support
Center. This memory is protected by the backup battery during low main
battery conditions or when the main battery pack is removed.

SECTION 1 "General Information
6200 Hand-Held Computer 1-11
Flash ROM
Your hand-held computer has 512K of flash ROM. This stores the BIOS and
DOS firmware. Applications stored in flash ROM are copied into DRAM
for execution.
CMOS RAM
The 6200 hand-held computer contains 178 bytes of CMOS RAM and con-
tains the system configuration parameters. This CMOS RAM is powered
from the backup battery.
PCMCIA Memory Cards
Different brands of PCMCIA memory cards can be used in your 6200 hand-
held computer. These memory cards are available in a variety of memory
sizes and types. Check with your Norand Sales Representative or System
Engineer for specific options.
Your 6200 hand-held computer provides two PCMCIA slots. Each slot ac-
cepts one PCMCIA Type 2 or Type 3 card. These slots are used primarily
for storage of data on a memory card, much like a floppy disk drive on a
PC. You can use Type 2 or Type 3 cards in both Drive B (upper) and A
(lower). Type 3 cards include pagers, disk drives, network adapters, ra-
dios,and other future options.
You can use a Type 2 card in Drive A and Drive B at the same time. If you
have a Type 3 card in Drive A you can not use Drive B. Figure 1-5, page
1-12 shows the locations and access to the memory card slots.
SECTION 1 "General Information
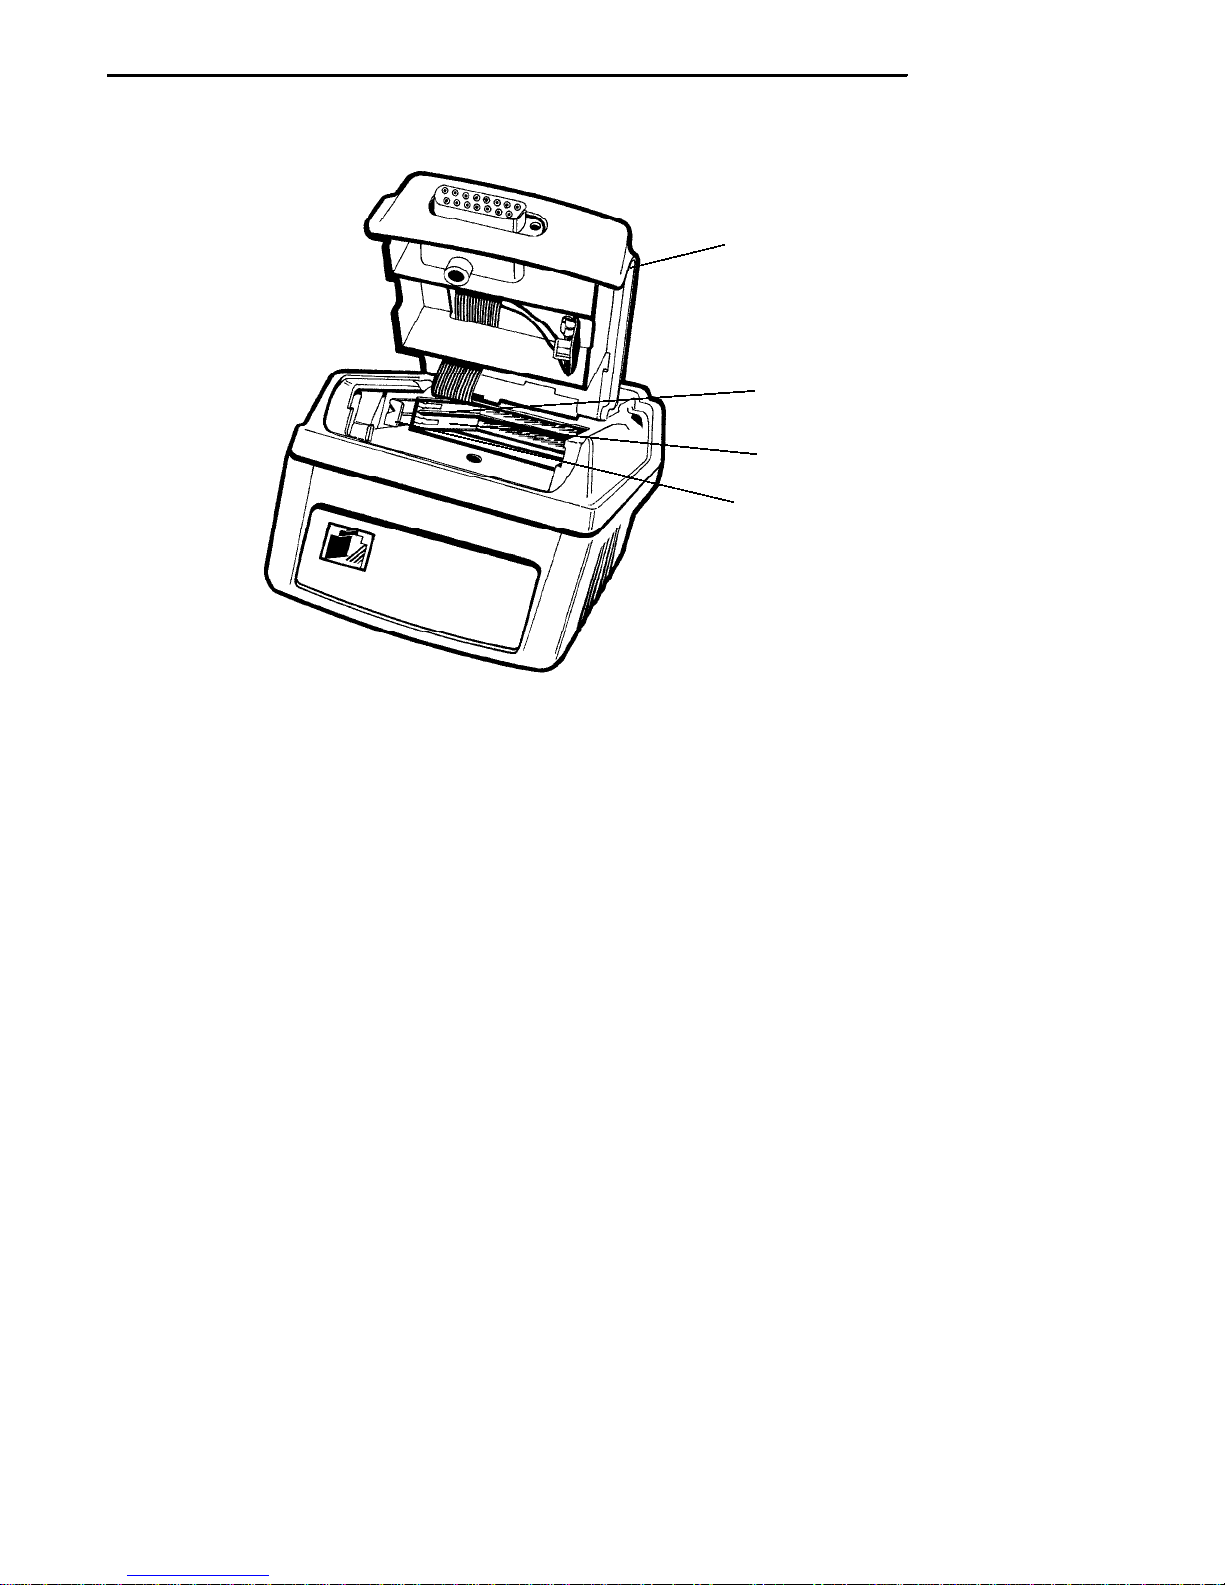
1-12 6200 Hand-Held Computer
1
2
3
4
PCMCIA door (backup battery not shown in compartment)
Upper memory card (drive B) type 2 or type 3 cards
Lower PCMCIA memory card (drive A) type 2 or type 3 cards
Memory card eject buttons (one on each side)
3.
4.
1.
2.
Figure 1-5
PCMCIA Memory Card Slots
Table of contents
Other Norand PDA manuals


