2Copyright © 2015 Nortek Security & Control LLC
Thin Door/Window Contact | Installation Instructions
IMPORTANT: Tominimizetheriskofpotentialsensordamage,
alwaysmountthesensorataminimumheightof4.7in(12
cm)fromthefloor.
4Usingthetwo(2)PhillipHeadScrews(provided),securethe
backplatethedoor(ordoorframe).
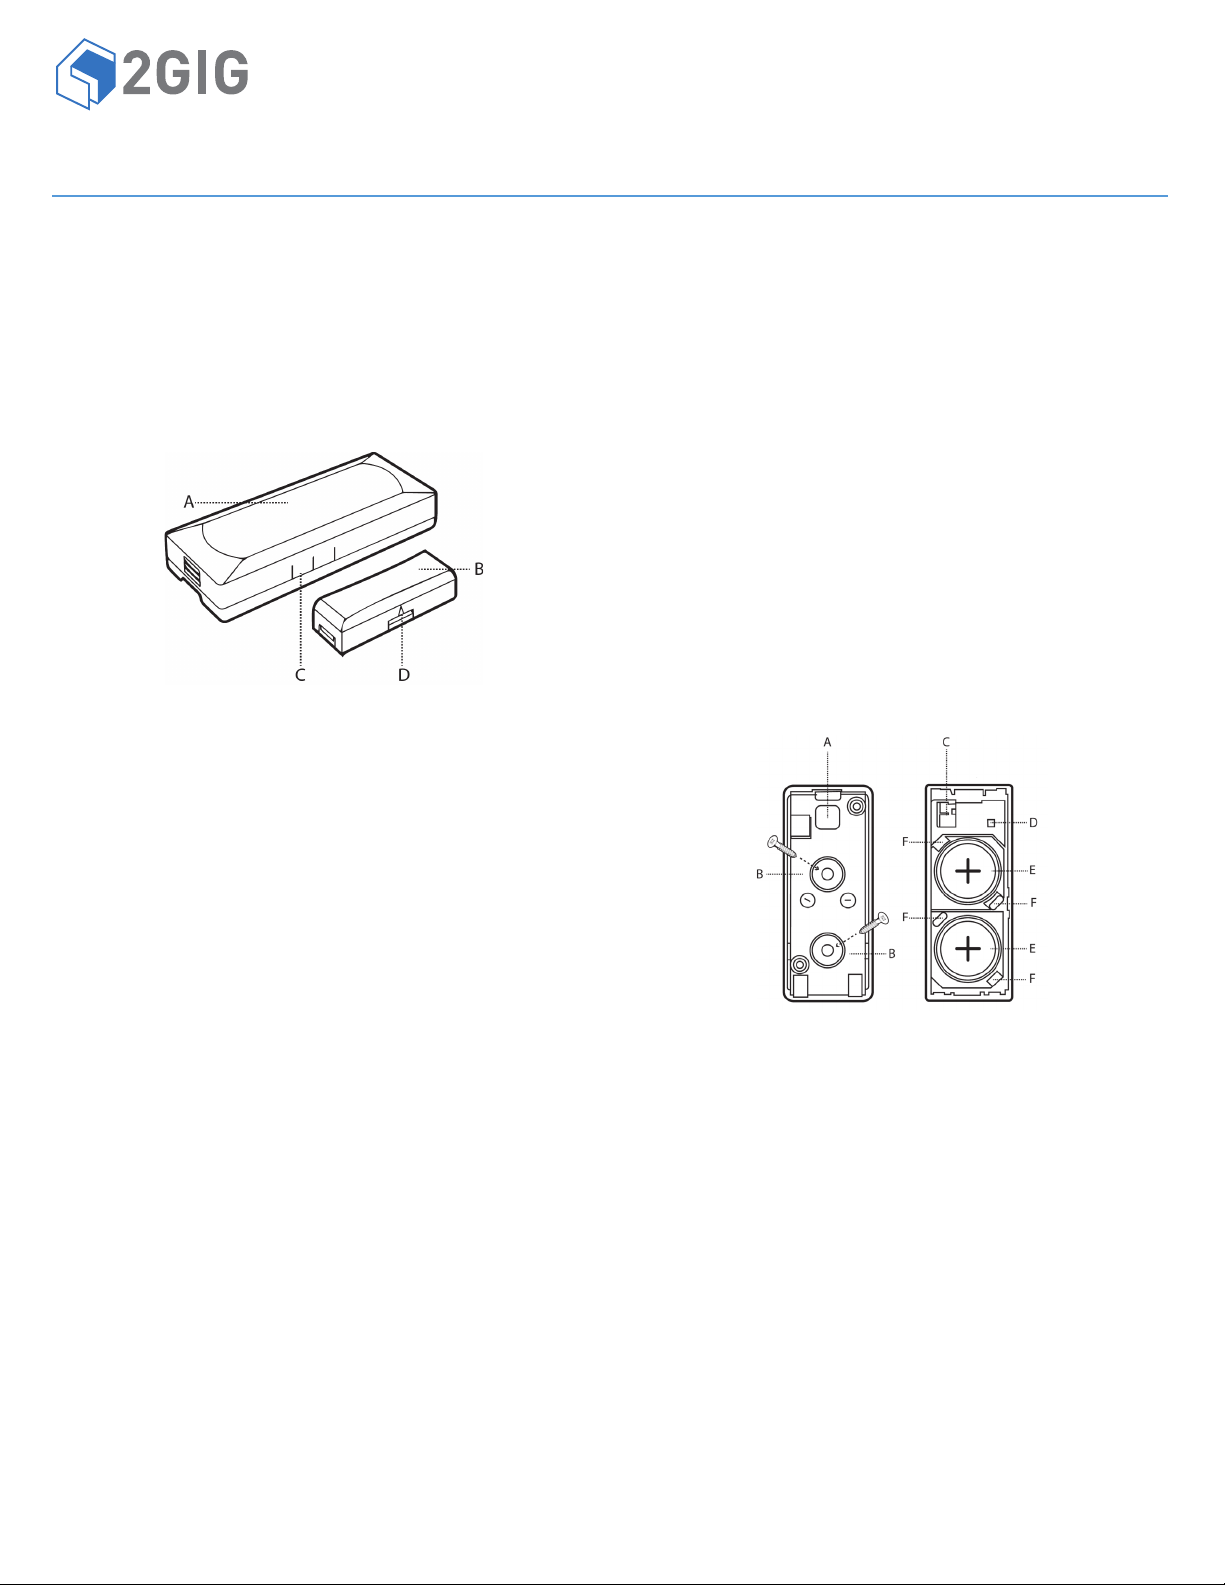
5Ensurethatthealignmentarrowonthemagnetislinedupwith
themiddlemarkonthesensor(seeFigure1ThinDoor/
WindowContact—SensorandMagnet).
6Usetheadhesive(provided)tosecurethemagnetasfollows:
•SingleDoorInstallation.Onthedoor.
•DoubleDoorInstallation.Onthemost‐useddoor.
IMPORTANT: Themagnetmustbenomorethan0.4in(1cm)
awayfromthesensor.
NOTE: Ifyouarenotusinganexternalinputwire,skipstep7
andcontinuewithstep8.
7Ifyouareusinganexternalinputwire,dothefollowing:
7a Threadtheexternalinputwirethroughthebase.
7b Insertthetwo‐pinconnectorintotheexternalinputwire
jackonthe(seePartCinFigure2ThinDoor/Window
Contact—BackplateandBatteryCompartment)cover.
8Replacethesensorbackplate.Ifapplicable,ensurethatthe
externalinputwireisconnectedtotheNCdrycontactdevice.
NOTE: TolearnhowtoprogramasensorintotheControlPanel,
seetheControlPanel’sInstallation&ProgrammingGuide.
Inserting and Replacing the Batteries
Toinsertorreplacethebatteries:
1Atthetopofthesensor,pushdownthecliptounlockthe
sensor’sbackplate.Then,gentlypulldownonthebackplateto
removeit.
2Placeasmallflatheadscrewdriverintheslotbetweenthemetal
clipandbattery(seePartFinFigure2ThinDoor/Window
Contact—BackplateandBatteryCompartment).
3Holdingdowntheraisedplasticedgeinthebattery
compartment,gentlytwistthescrewdrivertopopouteach
battery.
IMPORTANT: Alwaysdisposeand/orrecycleusedbatteriesin
accordancewiththehazardouswasterecoveryand
recyclingregulationsforyourlocation.Yourcity,state,or
countrymayalsorequireyoutocomplywithadditional
handling,recycling,anddisposalrequirements.
4Insertthereplacementbatteriesinthecompartment.Theplus
(+)signofbothbatteriesshouldbefacingupandtheminus(‐)
sidefacingdown.
WARNING: Failuretofollowthesewarningsandinstructions
canleadtoheatgeneration,rupture,leakage,explosion,
fire,orotherinjury,ordamage.Donotinsertthebattery
intothecompartmentinthewrongdirection.Always
replacethebatterywiththesameorequivalenttype(see
Specificationsonpage2).Neverrechargeordisassemble
thebattery.Neverplacethebatteryinfireorwater.Always
keepbatteriesawayfromsmallchildren.Ifbatteriesare
swallowed,promptlyseeadoctor.
SPECIFICATIONS
WirelessSignalRange 350ft(106.7m),openair,withWireless
ControlPanel
CodeOutputs Alarm;AlarmRestore;Supervisory;Low
Battery;ExternalAlarm;ExternalRestore;
Tamper;TamperRestore
TransmitterFrequency 345.00MHz(crystalcontrolled)
UniqueIDCodes Overone(1)milliondifferentcode
combinations
SupervisoryInterval 70minutes
ExternalInput AcceptsN/Cdrycontactdevices
MagnetDimensions(LxWxH) 1.3x0.435x0.312in(3.3x1.1x0.79cm)
MagnetType RareEarth
SensorDimensions(DxH) 2.59x1.03x0.49in(6.58x2.62x1.24cm)
Weight(includingbattery&magnet) 1.1oz(31.2g)
HousingMaterial ABSPlastic
Color White
OperatingTemperature 32°‐120°F(0°‐49°C)
RelativeHumidity 5‐90%Non‐Condensing
Battery(included) Two(2)CR2032orequivalentLithium
batteries
Certification Anatel,ETL,FCC,IC,andNOM
REGULATORY INFORMATION
FCC Notice
ThisdevicecomplieswithPart15oftheFCC'sRules.Operationis
subjecttothefollowingtwoconditions:
1Thisdevicemaynotcauseharmfulinterference,and
2Thisdevicemustacceptanyinterferencereceived,including
interferencethatmaycauseundesiredoperation.
Thisequipmenthasbeentestedandfoundtocomplywiththelimits
foraClassBdigitaldevice,pursuanttoPart15oftheFCCRules.
Theselimitsaredesignedtoprovidereasonableprotectionagainst
harmfulinterferenceinaresidentialinstallation.
Thisequipmentgenerates,usesandcanradiateradiofrequency
energyand,ifnotinstalledandusedinaccordancewiththe
instructions,maycauseharmfulinterferencetoradio
communications.However,thereisnoguaranteethatinterference
willnotoccurinaparticularinstallation.Ifthisequipmentdoes
causeharmfulinterferencetoradioortelevisionreception,which
canbedeterminedbyturningtheequipmentoffandon,theuseris
encouragedtotrytocorrecttheinterferencebyoneormoreofthe
followingmeasures:
•Reorientorrelocatethereceivingantenna.
•Increasetheseparationbetweentheequipmentand
receiver.
• Connecttheequipmentintoanoutletonacircuitdifferent
fromthattowhichthereceiverisconnected.
•Consultthedealeroranexperiencedradio/TVtechnicianfor
help.
ThisproductcomplieswithFCCradiationexposurelimitsforan
uncontrolledenvironment.