NorthEast Monitoring DR400 User manual
DR400 Quick Start Guide
To purchase more patch electrodes contact your distributor or go to www.nemon.com
STEP
D
ESCRIPTION
S
TEPS
/H
INTS
1
Fully charge the
DR400
•Use a power source (not the PC) to charge the DR400
•DR400 will flash orange while charging, and flash green every 4
seconds when fully charged; remove from power source
2
Install and run
PCPatch utility
•If you have not already done so, download PCPatch utility at
www.nemon.com and install on PC with analysis or remote software
3
Erase DR400 and
enter Patient ID
using PCPatch
•If you have not already done so, copy and save previous patient’s
data from DR400 before erasing
Update Settings at this time
4
Prepare patient
•Determine the best location to attach the patch and optional lead
wire onto the patient, but do not attach at this time.
•Prepare the patient’s skin. If the patient has hair in any of the patch
site, shave it with a safety razor. Use an alcohol pad and rub the sites
briskly until the skin reddens. Let the skin air dry before proceeding.
5
Prepare DR400 and
attach to patient
•Attach 1-lead electrode patch (1CH) or 1-lead electrode patch w/ lead
wire (3CH) to the DR400 recorder
•
Remove backing from leads and attach firmly to patient
6
Start Recording by
holding DR400
“EVENT” button
down until green
light goes out
•If you have the Bluetooth USB adapter, you can view the hook-up and
ECG quality via the PCPatch utility at start up
•DR400 will flash green for 30 seconds (v5.04) or 60 minutes (v5.06)
when recording starts
•At any time, press EVENT button for > 3 seconds to transmit
Bluetooth signal to view ECG via PCPatch utility
7
For Holter analysis:
Remove DR400 from
patient and upload
data via PCPatch
•Remove from patient and plug DR400 into the PC USB cable. The
DR400 will stop recording after 2 minutes.
•Start PCPatch utility to save DR400 Holter data to HE/LX Analysis (or
LX Remote patient directory)
•Open analysis software to view and analyze patient data
The PCPatch Utility
Hook-up Guide
Download PCPatch at www.nemon.com and
install on PC where analysis software
is installed.
Note: You do not need a Bluetooth USB
Adapter to use the DR400. The adapter is only required to
view ECG using the PCPatch utility. Contact your distributor
to find out more about this feature.
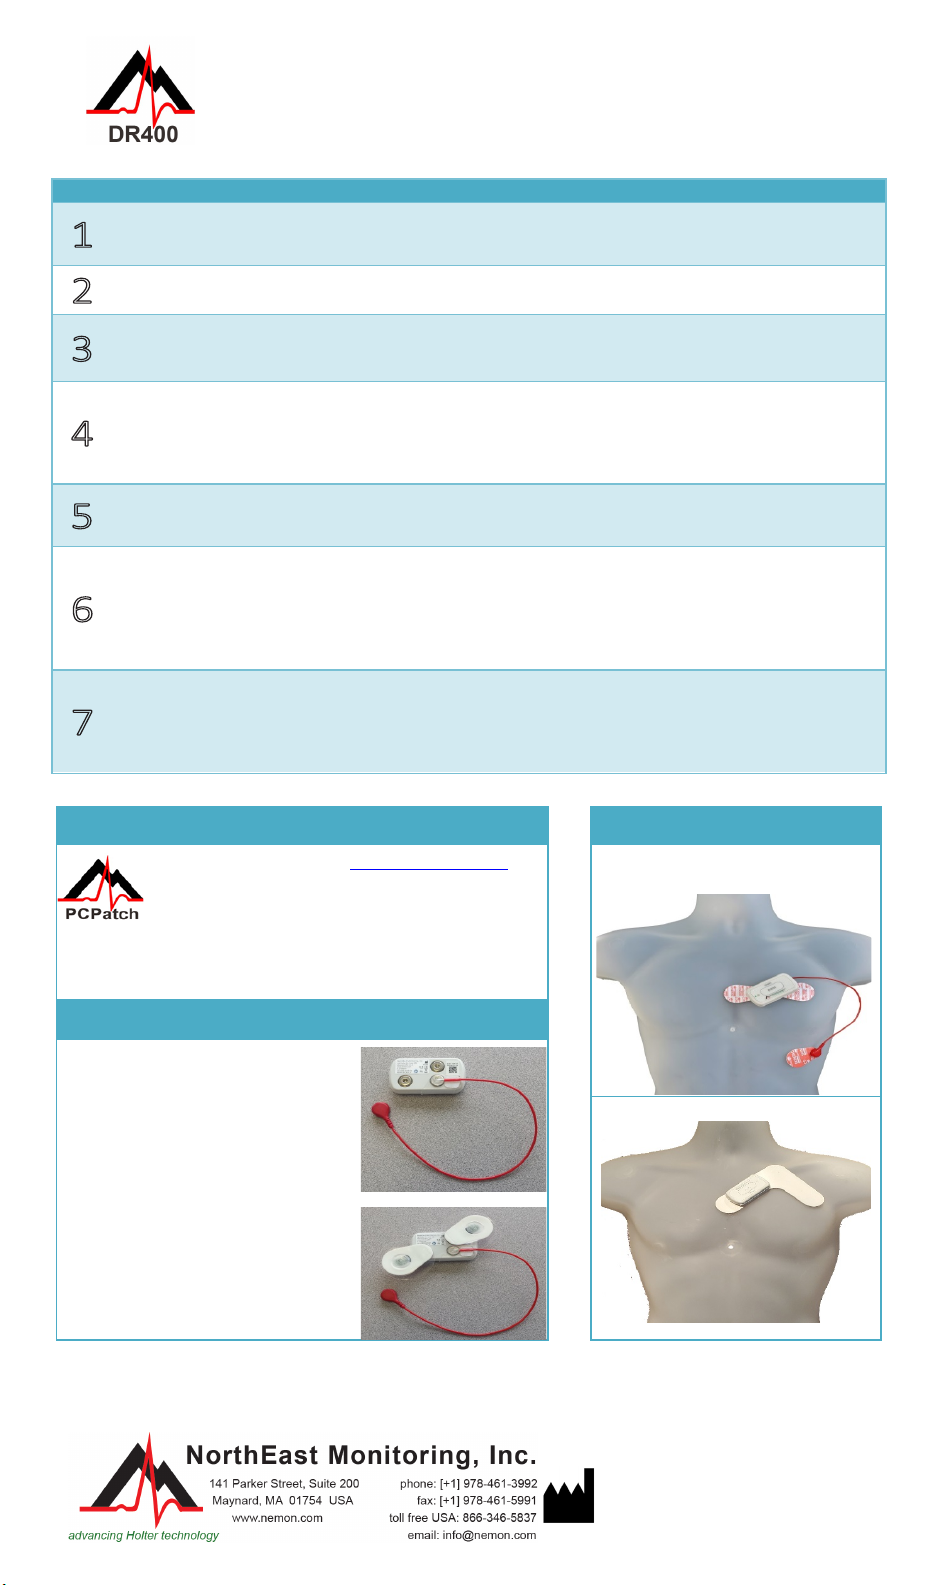
1-lead patch (1CH)
w/optional lead wire (3CH)
Snap Guide
If using the 1-lead electrode
patch with the optional ECG
lead wire:
•Attach the ECG lead wire first
•ECG lead wire attaches to
snap closest to USB port
The lead plastic should
cover the USB port
To attach the 1-lead electrode
patch for 3CH recording:
•Patch goes on diagonally
•Press down firmly so that all
snaps are locked in place
3-lead patch (3CH)
Copyright 2020
Last updated: March 20, 2020
NEMM049 - Rev-D - English
Download and install the PCPatch utility at
www.nemon.com before getting started.

DR400 FUNCTIONS:
FUNCTION
DO THIS
LIGHT
MORE INFORMATION
TO START
RECORDING
When in STANDBY
mode, hold the
EVENT button
down until green
light goes out
(about 3 seconds)
DR400 will flash
for 60 minutes
The DR400 flashes for 30 seconds (v5.04)
or 60 minutes (v5.06) to tell you that
recording has started.
DR400 shows
solid orange light.
Recording did not start as there is either
old data OR no Patient ID on the DR400.
Also, you may see if the recording has
stopped at the end of “Days”.
DR400 does not
respond
Recording did not start. Most likely, the
DR400 battery is not charged.
Charge using USB power source.
If charged or plugged into USB and no
light is visible, contact Technical Support
for further assistance.
TO RECORD
EVENT
While recording,
press EVENT
button < 3 secs.
DR400 will flash
green slowly for
about 90 seconds
An event is being saved.
TO VIEW
ECG
With PCPatch
running, hold
EVENT button
until DR400
flashes green
DR400 will flash
green rapidly
when transmitting
Bluetooth data
Takes a few seconds to open window.
The DR400 must be paired with the
NorthEast Bluetooth USB and the PCPatch
utility must be running on PC where the
Bluetooth USB is attached.
TO STOP
RECORDING
Attach DR400 to
USB cable for at
least 2 minutes
DR400 connected
to PC
DR400 will stop recording
TO SAVE
ECG &
UPDATE
SETTINGS
Attach DR400 to
PC where PCPatch
utility is running
DR400 connected
to PC
Use the PCPatch utility to Preview the file,
Copy the flash.dat file to PC, Erase the file,
update Settings, and pair the DR400 with
Bluetooth USB and/or Gateway(Event)
DR400 MODES:
DR400 USB
CONNECTION
MODE LIGHT WHICH MEANS MORE INFORMATION
POWER
SOURCE CHARGING Orange –
flashing
DR400 charging
Once removed from power source,
the DR400 will return to STANDBY
mode
POWER
SOURCE
FULLY
CHARGED
Green –
flash every
4 secs.
DR400 fully
charged
Once removed from power source,
the DR400 will return to STANDBY
mode
PC INSTALLED
ON PC
Green –
solid
DR400 visible
to PC
Once removed from PC, the DR400
will flash quickly for 5 seconds before
returning to STANDBY mode
PC
COPYING
DATA
Green -fast
flashing
DR400 transferring
data to PC
Flash.dat file being copied to Patient
directory
PC ERASING
DATA
Alternating
flashing
Data on DR400
being erased
Erasing the DR400 can only be done
using the PCPatch utility
NONE RECORDING
Flashes
green to
start and
then no
light
DR400 storing data
If you are not sure if the DR400 is
recording, press the EVENT button
down for about 1 second:
•If the DR400 flashes green for
about 30 seconds, it is recording
•See FUNCTION-> TO START
RECORDING above for more
information about recorder
status
NONE STANDBY No light
DR400 not in use
and not plugged in
DR400 Functions and Modes
Other manuals for DR400
5
Other NorthEast Monitoring Medical Equipment manuals


Popular Medical Equipment manuals by other brands


Getinge
Getinge Arjohuntleigh Nimbus 3 Professional Instructions for use

Mettler Electronics
Mettler Electronics Sonicator 730 Maintenance manual

Pressalit Care
Pressalit Care R1100 Mounting instruction

Denas MS
Denas MS DENAS-T operating manual

bort medical
bort medical ActiveColor quick guide

AccuVein
AccuVein AV400 user manual


