Nortik fold User manual

nortik fold
Freizeitkajak
Recreational kayak 06.2017
AUFBAUANLEITUNG
ASSEMBLY INSTRUCTION
QR Code zum Aufbauvideo | QR Code assembly video:

2
Aufbauanleitung nortik fold
Sehr geehrte Kundin, sehr geehrter Kunde,
Sie haben ein nortik fold erworben, ein innovatives Freizeit-Origami-Faltkajak, welches
in dieser Art einzigartig ist.
Wir haben die Aufbauanleitung sehr ausführlich gehalten und jeder Schritt ist
bebildert. Sie werden aber sehen, dass Sie nach 2-3 Aufbauten gar keine Anleitung
mehr benötigen.
Die ersten Aufbauten sind erfahrungsgemäß etwas schwerer als dann im späteren
Einsatz, wenn man das System einmal kennen gelernt hat. Die Aufbausystematik des
nortik fold ist ausgesprochen einfach und Sie werden nach ein paar wenigen Aufbauten
kaum mehr als 5 Minuten benötigen.
Bitte nehmen Sie sich aber für den Erstaufbau viel Zeit und gehen Sie anhand der
Anleitung vor. Auch wenn das etwas Disziplin erfordert, aber es dient dem richtigen
Lernen des Aufbausystems. Bitte lesen Sie die Anleitung zunächst einmal aufmerksam
durch und beginnen dann erst wieder anhand der Anleitung Schritt für Schritt mit dem
Aufbau. Sie finden immer auf der rechten Seite die Erklärung zu den Bildern auf der
linken Seite.
Jedes Boot wird einmal aufgebaut und kontrolliert bevor es das Werk verlässt. Sollten
Sie dennoch der Ansicht sein, dass mit Ihrem Boot etwas nicht stimmt, melden Sie
sich bitte bei uns.
Bei Rückfragen zum Produkt, Aufbau oder Zubehör steht Ihnen Ihr Händler sicherlich
mit Rat und Tat zur Seite. Anderenfalls können Sie sich auch gerne direkt an uns - als
Schauen Sie sich bitte auch im Internet die Auf- und Abbauvideos an. Diese
finden Sie auf www.faltboot.de oder auf www.youtube.de unter dem Stichwort
„nortik fold 4.2 Aufbau“
Assembly instruction - nortik fold
Dear Customer,
at first: please do not be alarmed by the extent of these instructions!
The assembling instructions are very detailed and almost every step is illustrated. You will
notice that it will help you at one point or another. After a few times and with a little practice
you won’t need the manual anymore.
You have purchased a nortik fold, an innovative and unique origami boat for recreational
use.
Please take your time for the first assembling to learn about the special features. It is strongly
recommended reading the manual first, then following the single steps in the instructions
carefully!
After some practice you will build it up without much hassle in about 5-10 minutes.
Always keep in mind that the individual assembling has to be learned for each folding boat.

3
Every boat is assembled and controlled, before it leaves the factory. If you have any doubts
concerning your boat anyway, don't hesitate to contact us.
If you have any questions, your dealer will be happy to assist you. Otherwise you can also
Please also consider the instructions of “Care and Accessories” at the end of this manual.
Especially if you are planning extensive tours in salt water, which requires special care!
We hope you enjoy your new kayak!
You can find many assembly videos to our boats on our YouTube channel or on our
website www.faltboot.de

4
Wichtige Hinweise vorab:
Jedes nortik fold wird in Handarbeit hergestellt. Das nortik fold ist ein Faltboot für den
Freizeitbereich und wir bitten Sie, entsprechend behutsam damit umzugehen. Steigen
Sie stets erst ins Boot ein, wenn es auf dem Wasser ist und steigen Sie aus, bevor Sie
mit dem Boot den Grund berühren. Vermeiden Sie Grundberührungen auch während
des Paddelns.
Achten Sie insbesondere darauf, dass Sie die Kappen an Bug und Heck behutsam
behandeln! Auf Kies auffahren, ans Ufer ziehen und ähnliches schadet den Kappen,
und sie können kaputt gehen/reißen. Vermeiden Sie also Grundberührungen
insbesondere auch mit den Kappen.
Bitte beachten Sie insbesondere, dass das Schließen des Firstprofils von Mal zu Mal
etwas einfacher geht, wenn sich das System etwas aufeinander ‘‘eingeschliffen’’ hat.
Die nötigen Handgriffe müssen geübt werden, gehen Ihnen dann aber jedes Mal
einfacher von der Hand.
Important information about the nortik fold:
The nortik fold is a handmade folding kayak for recreational use. Please be very careful with
it. Enter the boat not before it is in the water. Exit the kayak before you get contact with the
ground. Avoid ground contact also when you are paddling!
Take special care for the end caps on bow and stern! To land onto gravel shore or
dragging the boat on shore can damage the caps! So please avoid ground contact especially
with the end caps!
Please note, that especially closing the ridge seal is getting easier with each time doing it.
The steps have to be practiced, but you and the material of the boat will get used to it.
!
!

5
Lieferumfang / Overview parts
A) 1x Platte / Plate
B) 1x Sitz + Lehne / Seat + Back rest
C) 2x Spanten (Höher=Bug) + 2x
Stange / 2x Cross ribs + 2x Rods
D) 1x Cockpitplatte / Cockpit plate
E) 2x Fußstütze / Foot peg
F) 2x Neoprenabdeckung
2x Neoprene cover
G) 2x Endkappe (Bug- und Heck)
2x End cap (bow and stern)
Lösen Sie die seitlichen Riemen der
Platte
Release the side straps
KlappenSie die Platte behutsam auf
Gently unfold the plate
A)
B)
C)
D)
E)
F)
G)
6
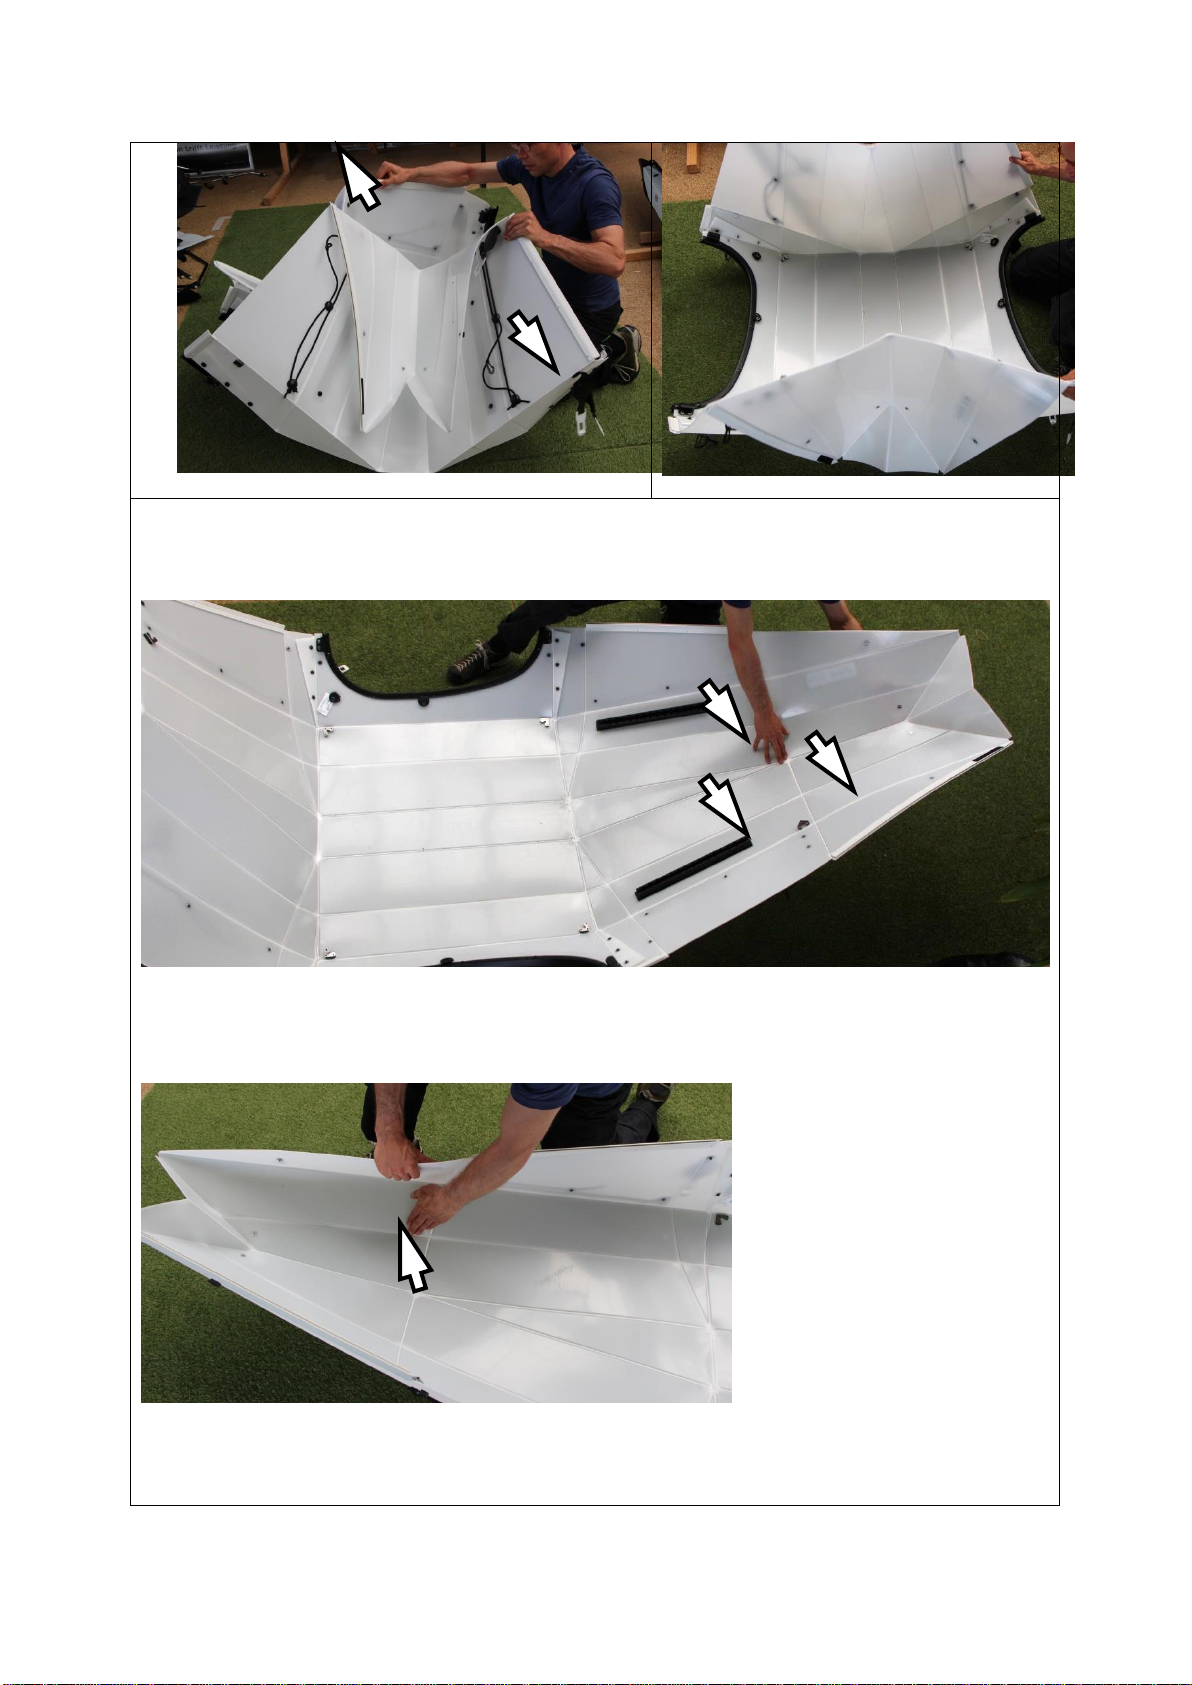
Drücken Sie alle nach innen gerichtete Wölbungen nach außen!
Press all inward bulges outwards!
!

7
Nehmen Sie bitte die beiden
Neoprenabdeckungen zur Hand…
Take the two Neoprene cover...
…und befestigen Sie diese jeweils innen
an Bug und Heck am dafür vorgesehen
Klettstreifen.
...and attach it to the Velcros on bow and
stern.
Ziehen Sie nun die beiden Seiten
zueinander und verbinden Sie jeweils
die Decksbeleinung nur mit den Clipsen,
welche jeweils näher am Cockpit sind.
Now pull the two sides together and
connect them with the deck lining.
Only close the clips nearest to the
cockpit!

8
Nehmen Sie dann die beiden kurzen
Stangen zur Hand. Diese werden im Bug
und Heck eingesetzt. Die Stangen sind
identisch.
Now the two short rods (identical) are
installed in bow and stern.
Greifen Sie in den Bug (das Heck) und
setzen die beiden Stangen ein.
Reach inside the bow (the stern) and install
the rods.
Innenansicht from inside
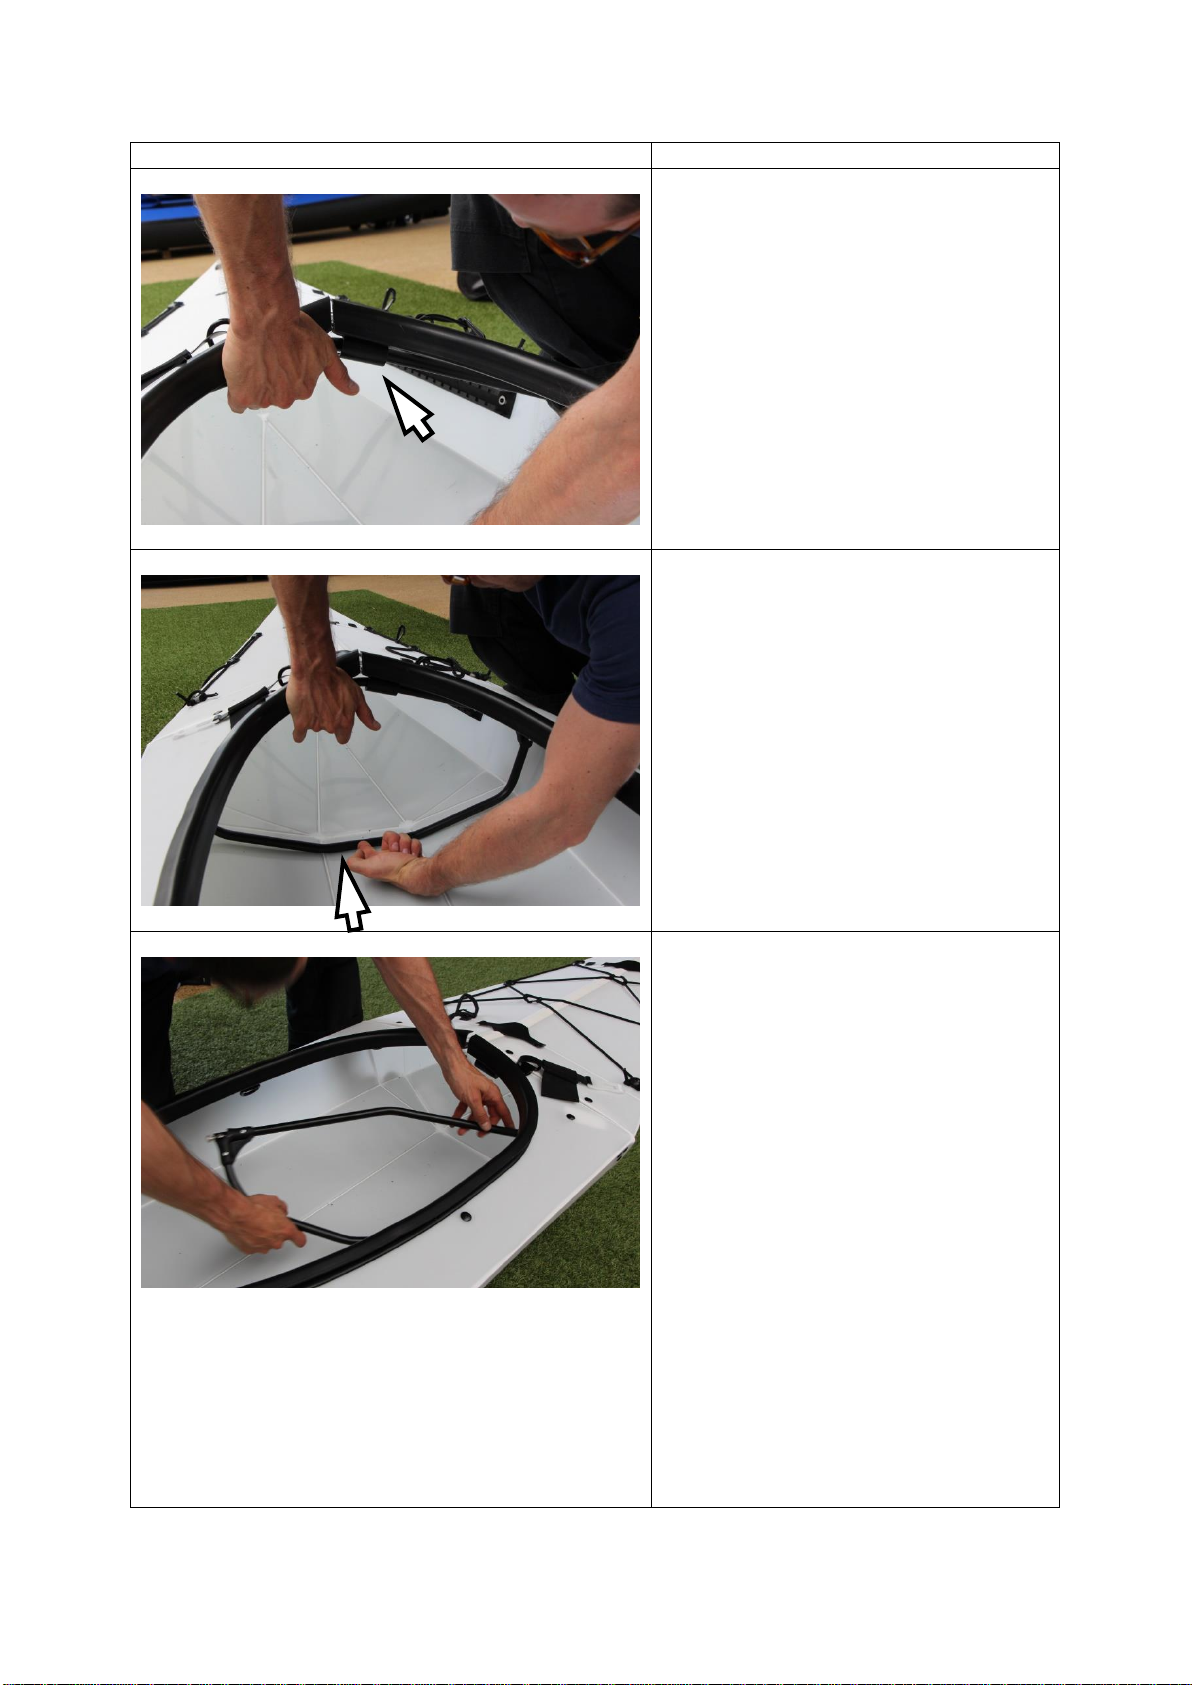
Nachdem die beiden Bug- und
Heckstangen eingesetzt sind, folgt nun
das Schließen des Firstprofils.
Links sehen Sie, wie das Profil
prinzipiell ineinander geschoben wird.
After installing the rods in bow and stern,
the ridge seal is getting closed.
On the left you see schematically, how it is
closed.

9
Dabei schieben Sie immer beide Seiten
zueinander und zwar so, dass jeweils
die eine Seite in das Profil der anderen
Seite greift. Dieser Vorgang bedarf
anfangs etwas Übung und wird Ihnen
nach den ersten Aufbauten sehr viel
schneller und leichter von der Hand
gehen.
Push the two sides together, so that one
side of the profile interlocks with the other.
This step has to be practiced and will get
easier each time.
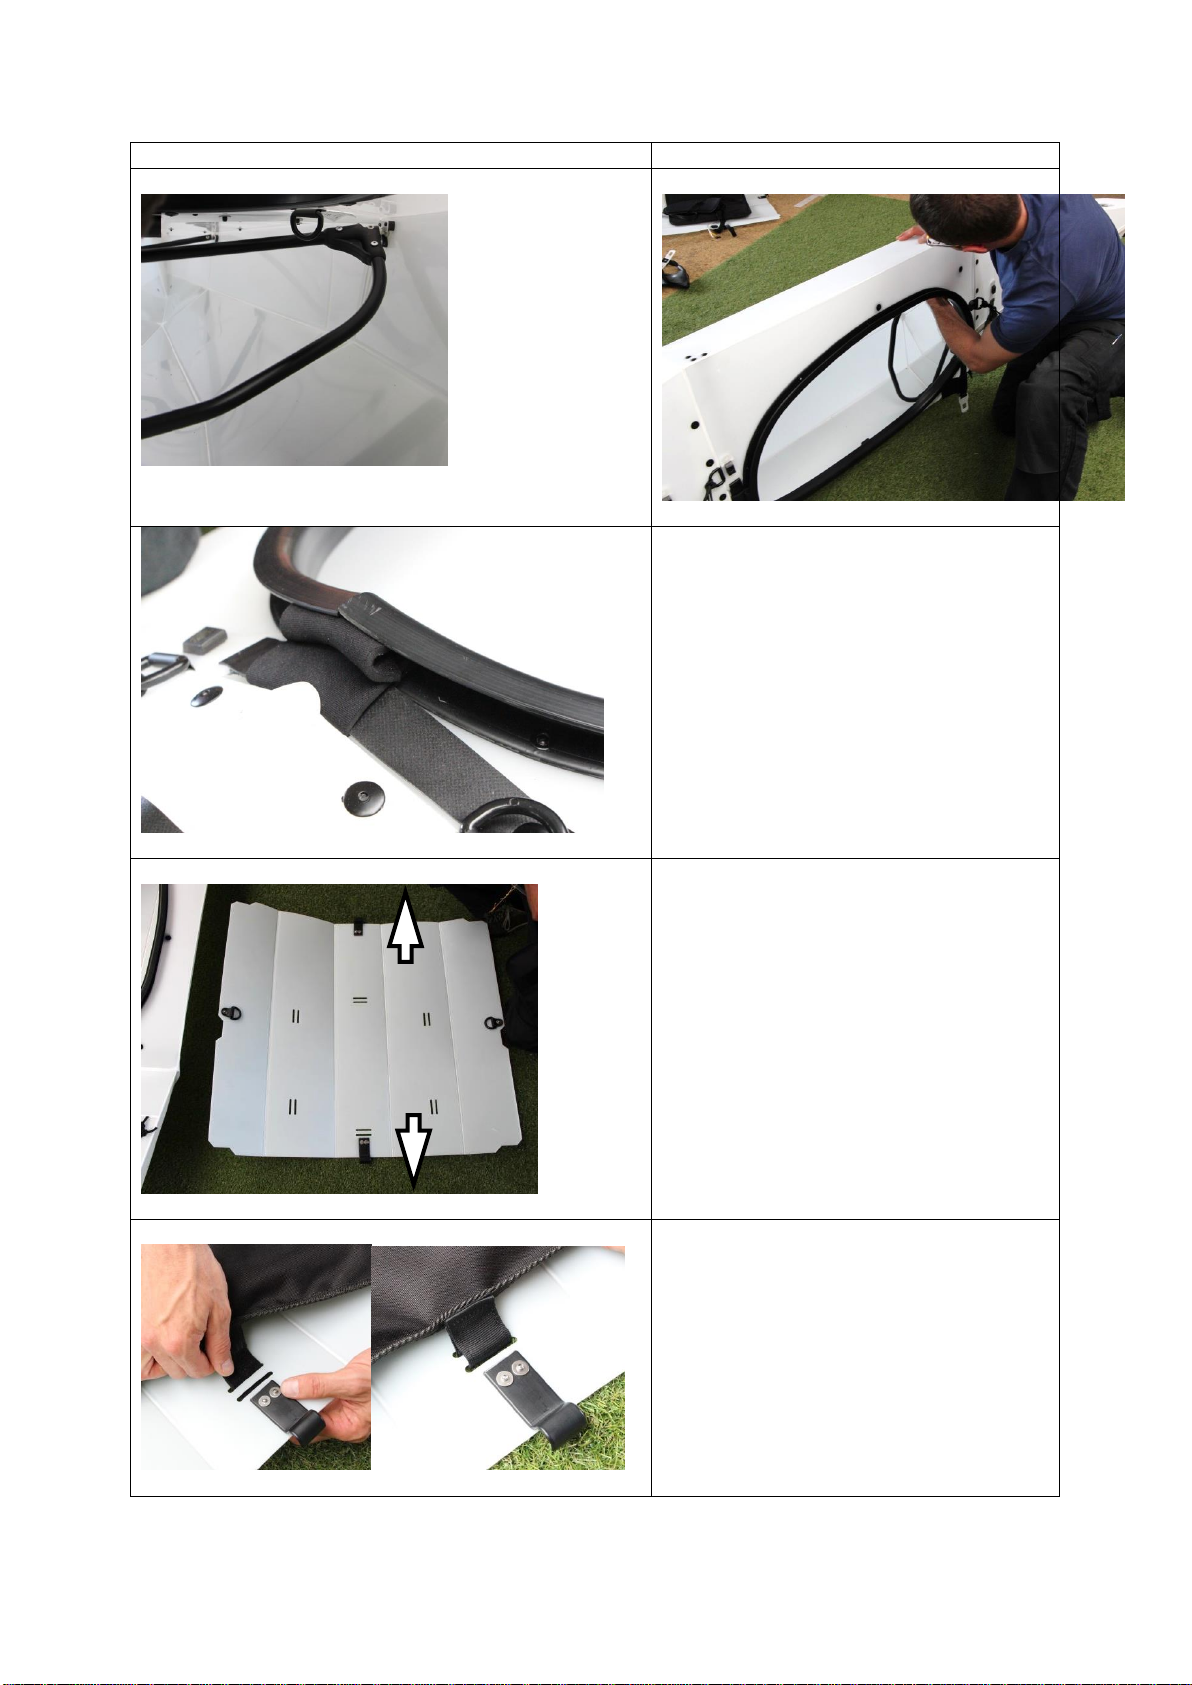
In aller Regel ist es am einfachsten,
wenn Sie vom Cockpit her in Richtung
Bug und Heck arbeiten.
Sprich, erst das kurze Stück hinter (vor)
dem Cockpit zusammen mit dem dann
folgendem Stück ineinanderschieben.
Usually it is easiest, when you work your
way from the cockpit towards the
bow/stern.
Meaning, first connecting the first part in
front of (behind) the cockpit together with
the following part.
Haben Sie das Profil ineinander
eingefädelt, so sichern Sie es gleich mit
dem Verschluss, beginnend mit dem
jeweils zweiten (!) vom Cockpit aus
gesehen.
After connecting the profile, secure it with
the closure. Begin with the second (!)
closure from the cockpit.

10
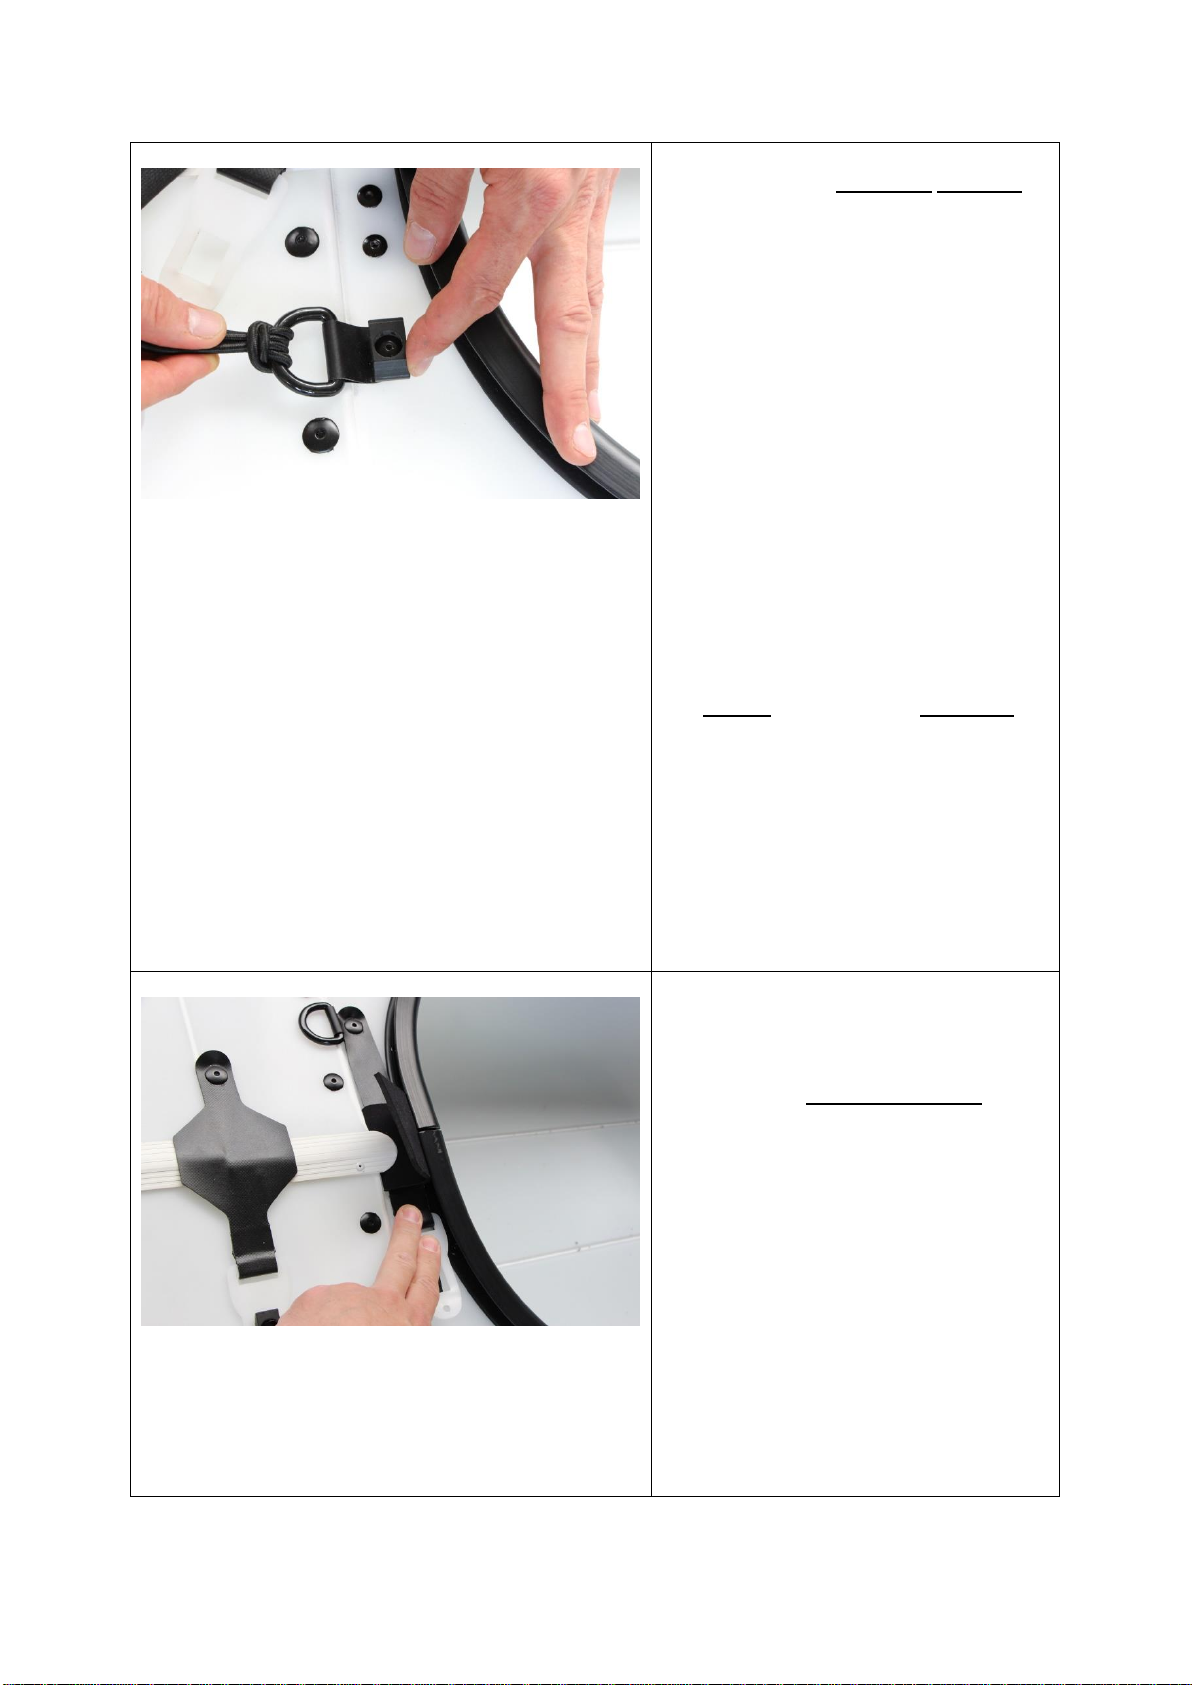
Beachten Sie bitte unbedingt folgende
prinzipielle Vorgehensweise beim
Schließen der Clipse :
ZUERST schieben Sie den weißen Clip
so weit wie möglich von hinten unter die
schwarze Befestigung, die auf Deck
befestigt ist.
It is necessary to follow the next steps as
described:
FIRST slide the white clip as far as
possible from behind under the black base
attached to the deck.
ERST DANN können Sie den weißen
Clip vorne nach unten drücken bis er
einrastet.
ONLY THEN you can push down the black
base's clip, until it snaps.
Fädeln Sie dann den weiteren Verlauf
des Verschlussprofils ineinander und
verbinden Sie danach auch gleich die
Deckbeleinung vollständig.
Continue to connect the ridge seal and the
deck lining.
Schließen Sie dann den nächsten Clip.
Then close the next clip.
2. Schritt: Den Clip vor
der schwarzen
Befestigung nach unten
drücken bis er einrastet
Step 2: Pushing down the
black base's clip, until it
snaps.
1. Schritt: Den Verschluss
von hinten unter den
schwarzen Clip
hineinschieben
Step 1: sliding the closure from
behind under the black clip
!
11
Dann wird jeweils als letztes der erste
Clip vom Cockpit aus geschlossen.
Dafür drehen Sie bitte den D-Ring vom
Cockpit weg, so dass entsprechend
Platz für den Clip entsteht. Dieser Clip
ist am schwersten zu schließen, da hier
am meisten Spannung herrscht. Mit
etwas Übung wird Ihnen auch das leicht
fallen. Falls Sie den Verschluss an
dieser Stelle gar nicht hinbekommen,
können Sie auch erst einmal die beiden
Cockpitspanten installieren (siehe
folgende Schritte) und es dann
nochmals versuchen. Die bessere
Vorgehensweise ist die hier
Beschriebene –manchen fällt es
andersherum aber leichter. Probieren
Sie es aus !
The first clip of the cockpit is closed last.
Turn away the D-ring from the cockpit, to
have enough space for the clip. This clip is
the most difficult to close because of the
high tension.
If you can't get it closed at all, continue with
the next step of installing the cross ribs first
and get back to this step afterwards.
Try out which order suits you best.
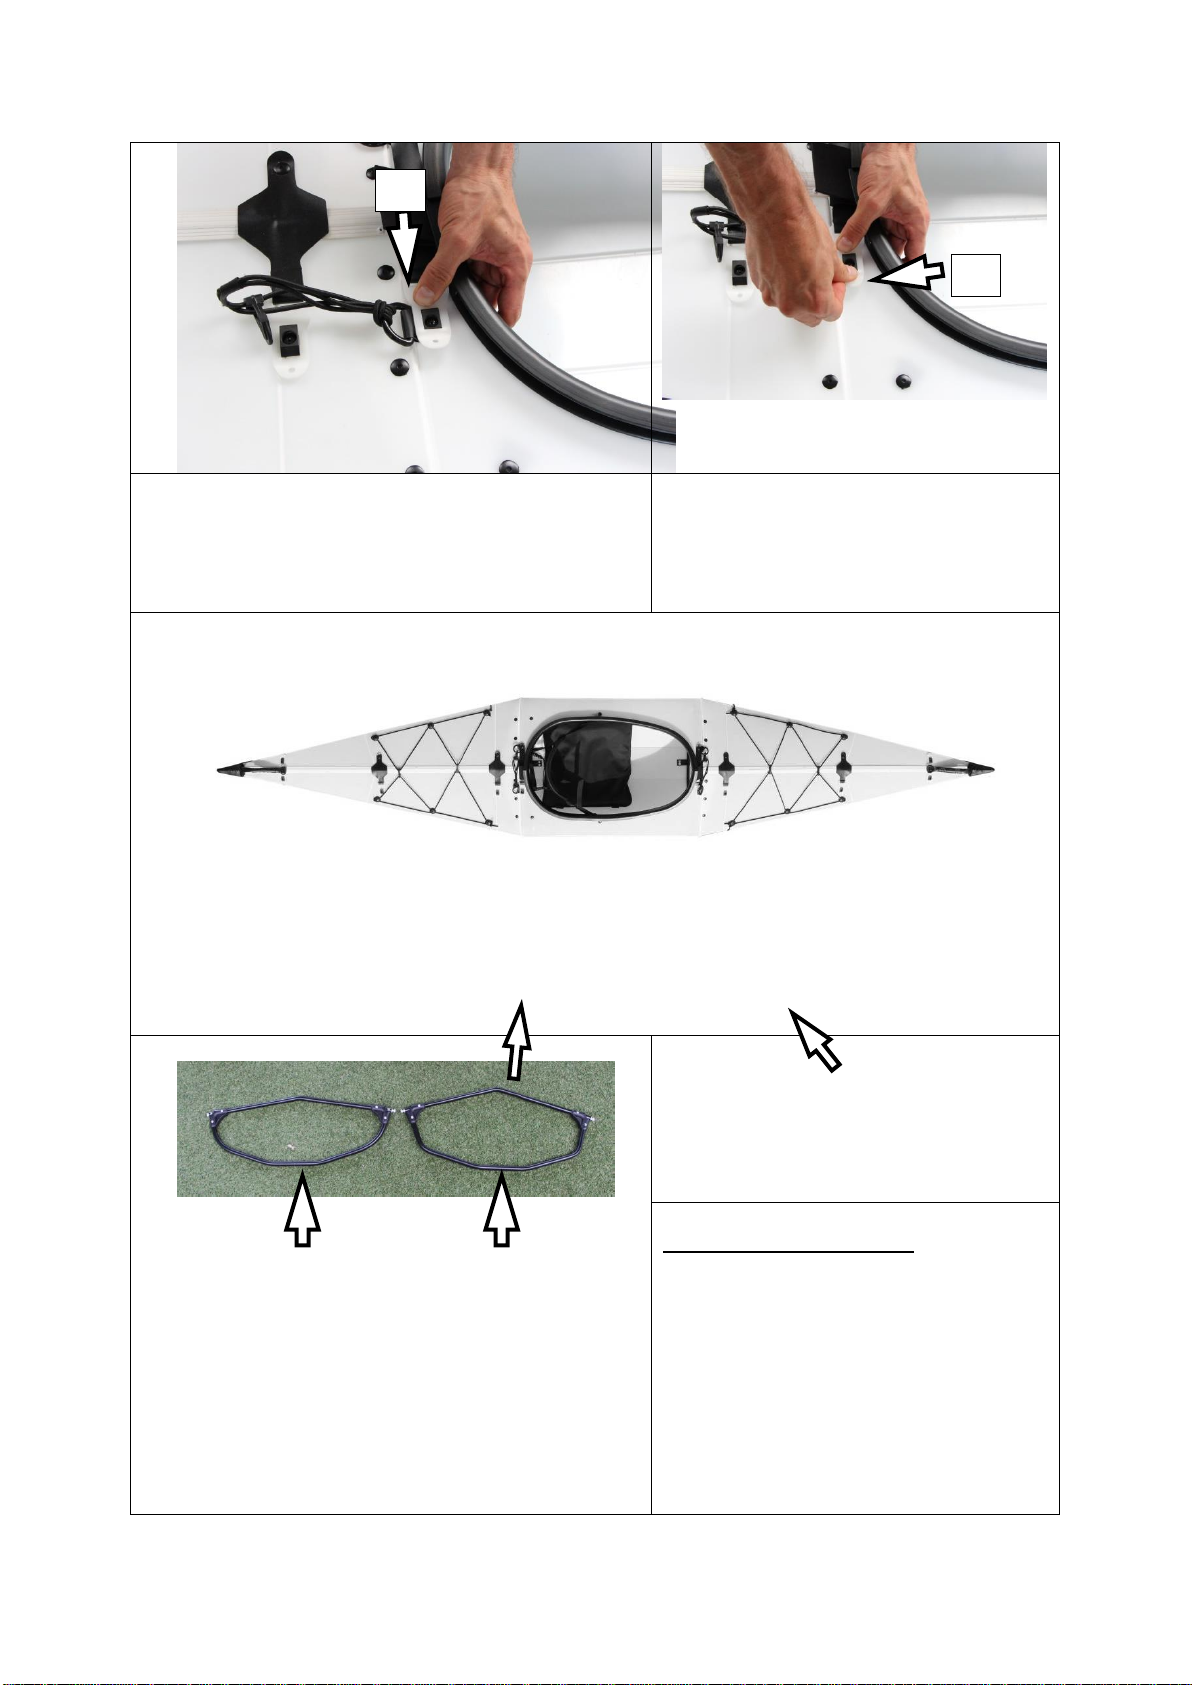
Legen Sie zunächst das Band des
Verschlussclips unter das Profil.
Hier ist es nun besonders wichtig, dass
Sie den Clip so weit wie möglich von
hinten untern die schwarze Befestigung
schieben und dann erst vorne den Clip
nach unten drücken!
(siehe folgende zwei Bilder)
First put the strap of the closing clip under
the profile.
Especially here it is very important to slide
the clip as far as possible from behind
under the black base and then push down
the black base's clip, until it snaps!
(see following pictures)
!
12
Es sind nun die Verschlussprofile eingefädelt
und alle Clipse auf Deck (je drei in Richtung
Heck und Bug) geschlossen und die
Deckbeleinung ist miteinander verbunden.
The ridge seal, all clips on deck (3 towards
bow, 3 towards stern) and the deck lining
are now closed.
Orientierung Bug-Heck / Orientation bow-stern
Es werden nun die beiden
Cockpitspanten eingesetzt.
You now install the two cockpit cross ribs.
Spezifikation der Spanten:
Der höhere Spant wird vom Cockpit aus
gesehen in Richtung Bug eingesetzt,
der flachere in Richtung Heck.
Specification of the cross ribs:
The higher cross rib is installed towards the
bow, the lower one towards the stern.
BUG (Cockpit ist schmaler und Fußstützen
sind im Bugbereich installiert)
BOW (cockpit is narrower and foot pegs are
installed)
HECK (Cockpit ist breiter)
STERN (cockpit is wider)
1
2
!
Heckspant (flacher)
stern cross rib (lower)
Bugspant (höher)
bow cross rib (higher)
13
Nehmen Sie zunächst den Bugspant
(höher) zur Hand. Die Aufnehmer an den
Seiten kennen Sie bereits vom
Einsetzen der Stangen in Bug und Heck.
Der obere Teil des Spants wird in das
Boot hinein geschoben und greift dann
später von innen in die Halterungen, die
Sie oben am Cockpitende sehen:
First take the bow cross rib. You already
know the pickup elements from the two
rods, you installed earlier.
Push in the upper part, it will connect later
with the
pickup
elements you
see at end of
the cockpit.
Setzen Sie den Spant also schräg an …
Join the cross rib diagonally...
… clipsen Sie ihn in die Halterungen auf
beiden Seiten…
...clip it into the pickup elements on both
sides...
14
…drehen Sie die obere Seite von innen
in Richtung Cockpit, so dass der Spant
vom Bootsinneren aus in die
Halterungen oben greift…
...turn the upper side from the inside
towards the cockpit, so the cross rib will
connect with the pickup elements from the
inside of the boat…
…und schieben Sie gleichzeitig den
Spant unten in Richtung Bug.
...and simultaneously push the cross rib at
the bottom towards the bow.
Der Heckspant (= der flachere Spant)
wird in gleicher Weise eingesetzt. Auf
beiden Seiten in die Halterungen
einsetzen und das obere Ende des
Spants greift dann von innen in die
Halterungen.
Die Spanten erzeugen beim Einsetzen
gleichzeitig auch etwas Zugkraft.
Gerade beim Heckspant kann es sein,
dass Sie sich etwas leichter tun, wenn
Sie die Seiten des Bootes vorsichtig
zueinander drücken, um den Spant gut
in die seitlichen Halterungen zu bringen.
The stern cross rib (the lower one) is
installed in the likewise. Join with the
pickup elements on both sides, the upper
part then will connect with them from the
inside.
The cross ribs will create some tension.
Especially with the stern cross rib it could
be easier to gently push the two sides of
the boats to another, in order to connect
the cross rib.
15
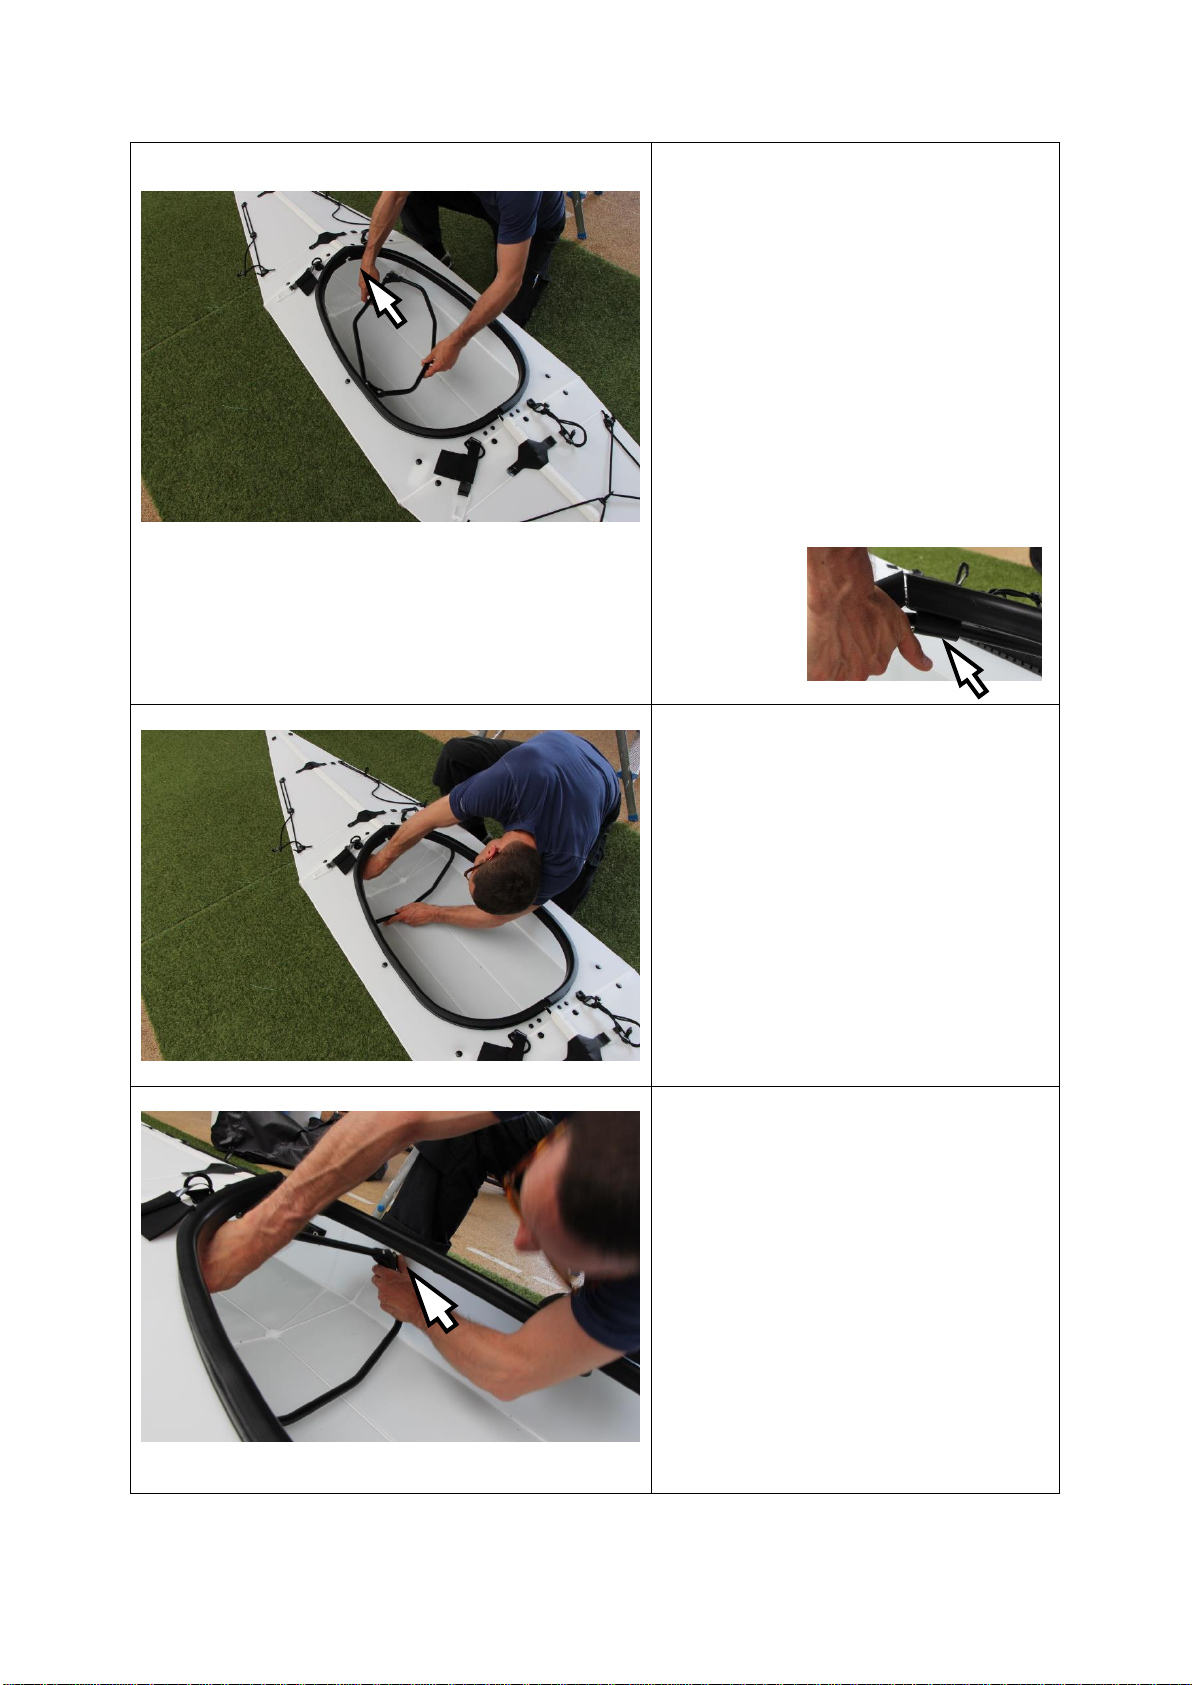
Wickeln Sie dann jeweils das Neopren,
welches an den Verschlussclipsen vor
und hinter dem Cockpit angebracht ist,
unter den Cockpitrand (Süllrand).
Wrap the Neoprene, that is attached to the
closing clips behind and in front of the
cockpit underneath the coaming.
Als nächstes werden die Cockpitplatte,
der Sitz und die Lehne installiert.
Orientieren Sie sich bitte am Bild links,
wie die Platte platziert wird.
Now the cockpit plate, the seat and the
back rest are installed.
Please place the plate as shown in the
picture.
Fädeln Sie den Sitz zunächst durch die
Einfädelschlitze auf der Cockpitplatte
und kletten diesen fest. Die D-Ringe
sind später links und rechts im Kajak
und an diesen wird die Lehne
abgespannt.
First lead the Velcro strap of the seat
through the slit on the plate and attach it.
The back rest will be attached lateron to
the D-rings on the left and on the right side.
HECK /STERN
BUG / BOW
16
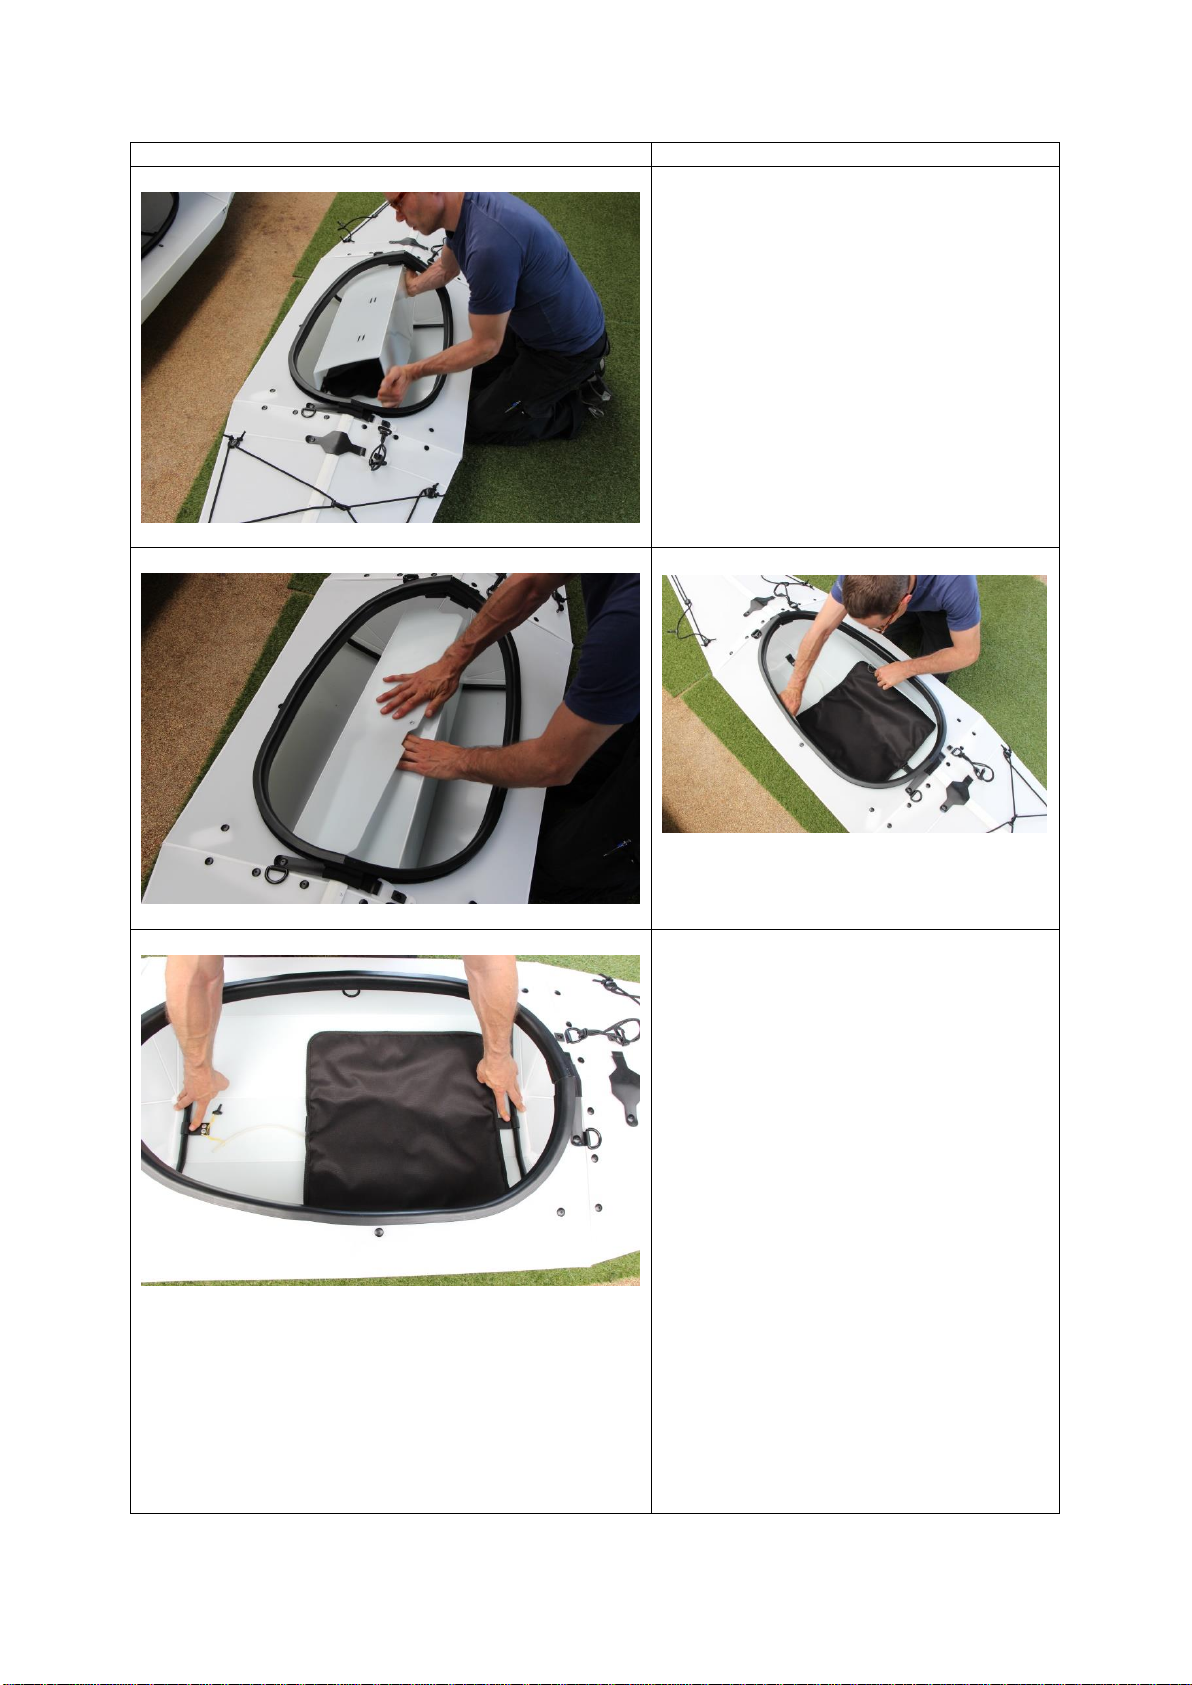
Nehmen Sie dann die Platte, „rollen“ Sie
diese an den Knickstellen etwas
zusammen und setzen Sie sie in das
Cockpit.
Drücken Sie die Seiten in das Boot, so
dass die Platte genau im Cockpitbereich
platziert ist.
Take the plate, "roll" a bit along the kinks
and put it into the cockpit.
Push the sides into the boat, until the plate
sits exactly in the cockpit.
Achten Sie darauf, dass die beiden
Beschläge der Platte jeweils um die
Cockpit-Spanten greifen.
Make sure, the two metal fittings close
around the cross ribs.
17
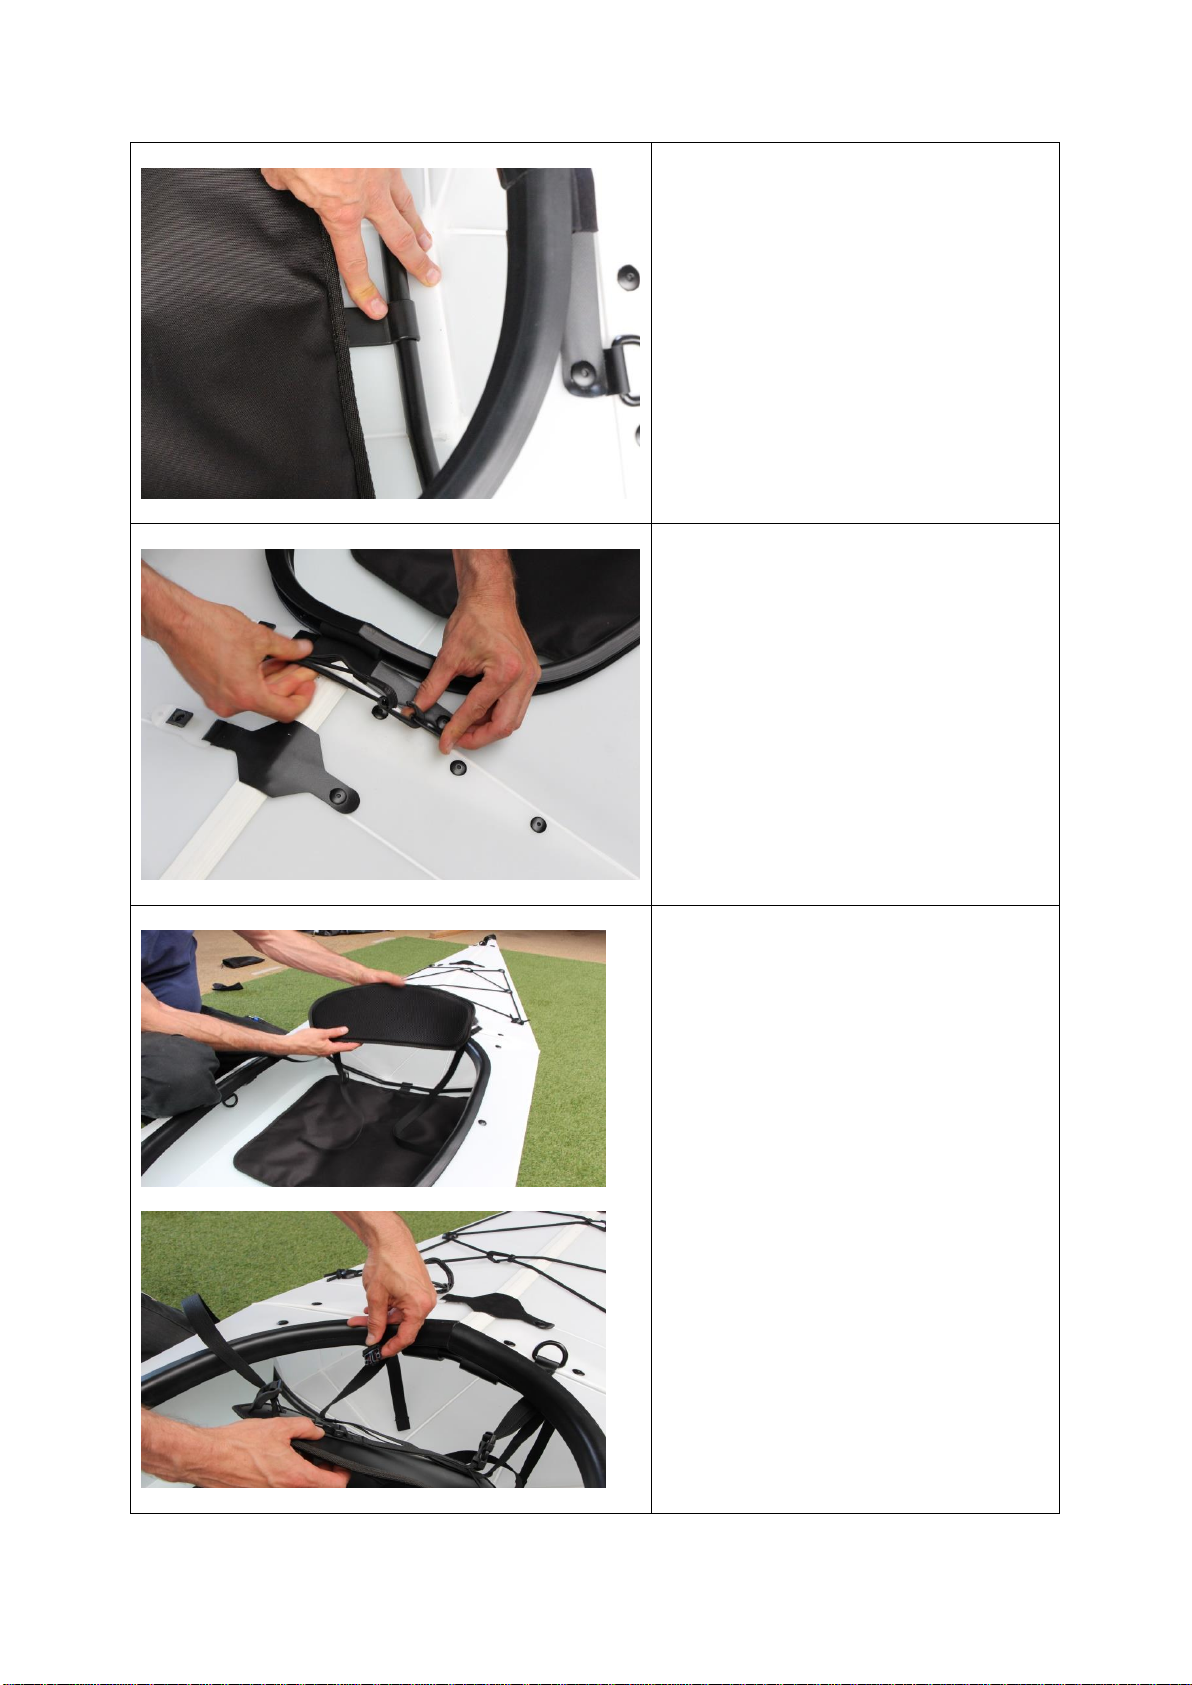
Hier nochmal in der Detailaufnahme
In the close-up.
Hängen Sie dann die Clipse vor und
hinter dem Cockpit in die D-Ringe ein
(die Clipse mit dem Rundgummi, welche
das Kajak auch im gefalteten Zustand
zusammenhalten).
Then attach the clips behind and in front of
the cockpit to the D-rings. (those with the
rubber string, that holds together the kayak,
when folded.)
Installieren Sie dann die Lehne, indem
Sie die mittleren Spanngurte um den
Cockpitspant legen und die Clipse
schließen.
Install the back rest by closing the middle
straps around the cross rib.
18
Führen Sie dann die seitlichen Riemen
durch den D-Ring an der Seite...
Then lead the side straps through the D-
rings on the side...
...und spannen/positionieren Sie die
Lehne nach Ihren Wünschen.
…and adjust the back rest, as you like it.
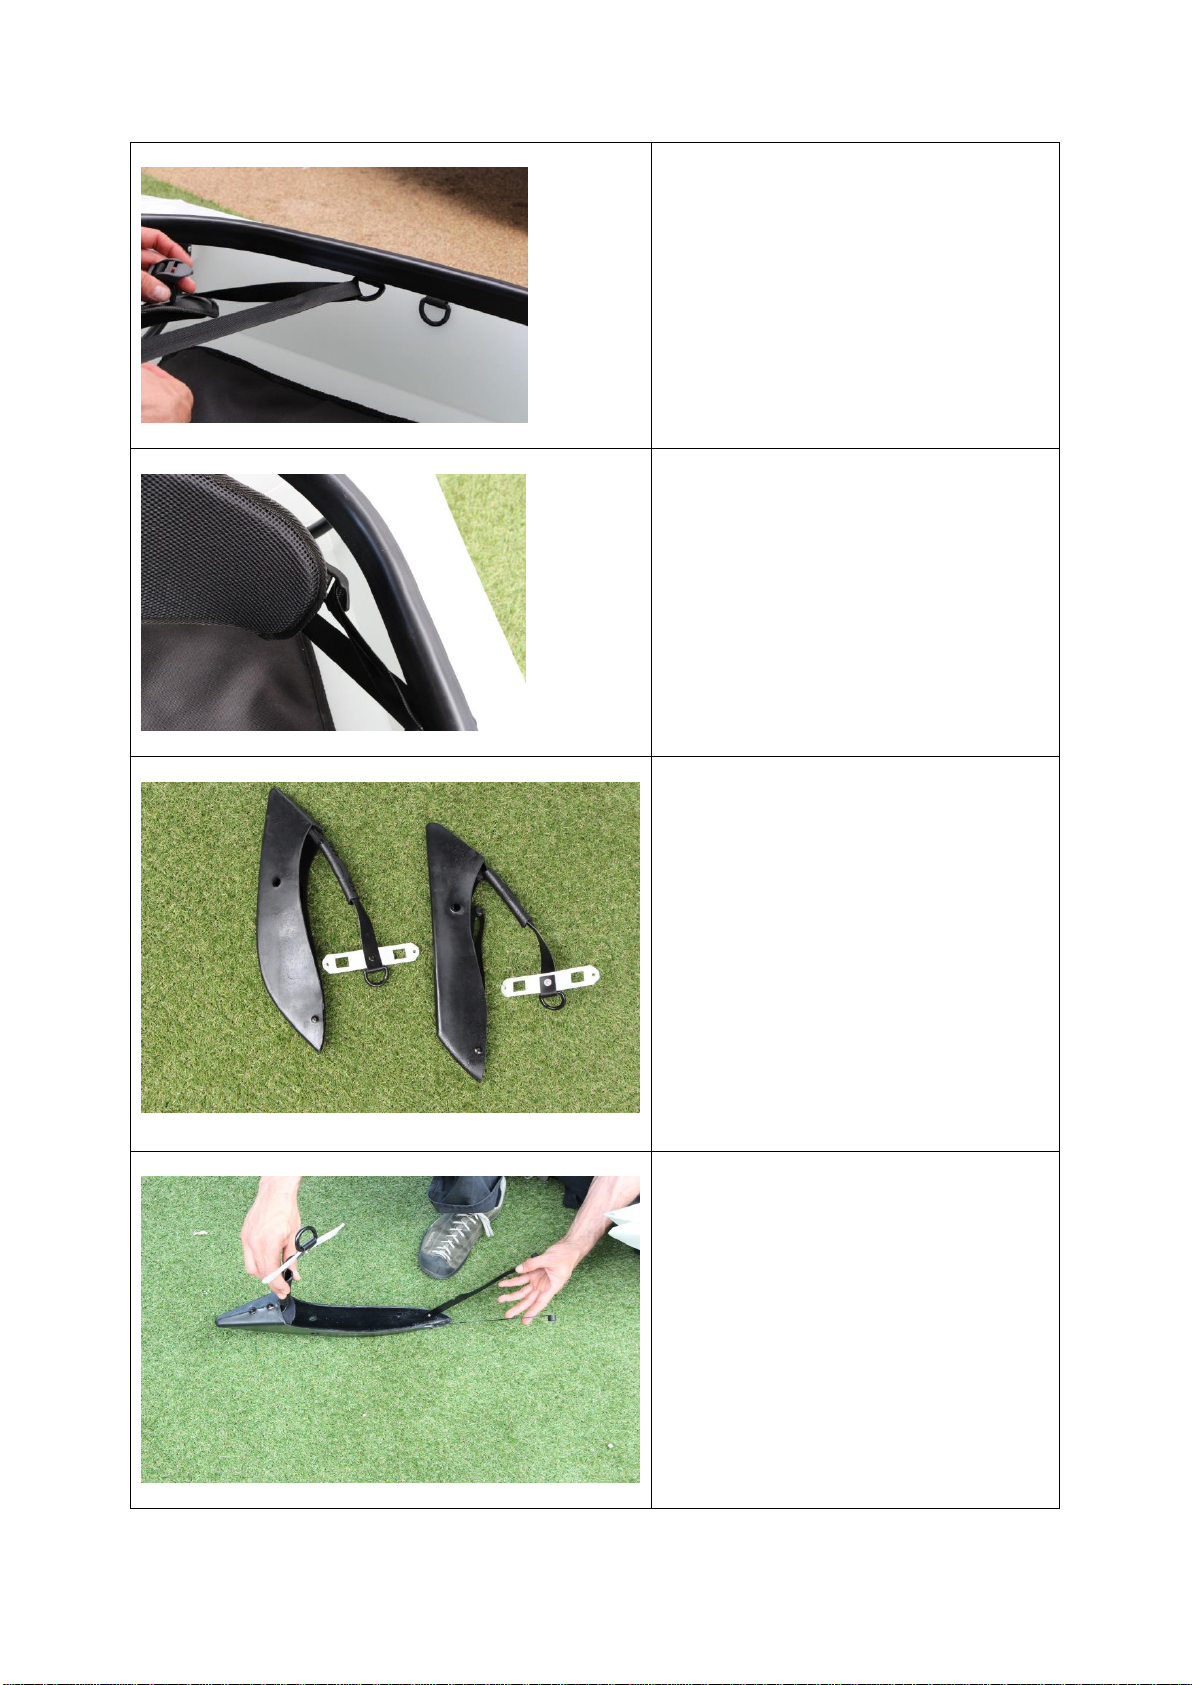
Nehmen Sie dann die Bug- und
Heckkappe zur Hand.
Die Bugkappe ist etwas bauchiger, die
Heckkappe schlanker. Achten Sie
darauf, dass Sie die Kappen nicht
vertauschen!
Take the bow- and stern end cap.
The bow cap is a bit bulbous, the stern cap
slightly slimmer.
Make sure not to mix them up!
Wir zeigen die Installation anhand der
Heckkappe. Am Bug gehen Sie bitte
identisch vor.
Die Kappe hat zwei metallene
Verspannhebel und einen
Befestigungsclip (mit D-Ring) für das
Oberwasserschiff. Klappen Sie die
Verspannhebel auf.
We show the procedure with the stern cap.
please proceed likewise at the bow.
The cap has two metal tensioning hand
gears and one Clip with D-ring for the
upper hull. Open the hand gears.
HECK
STERN
BUG
BOW
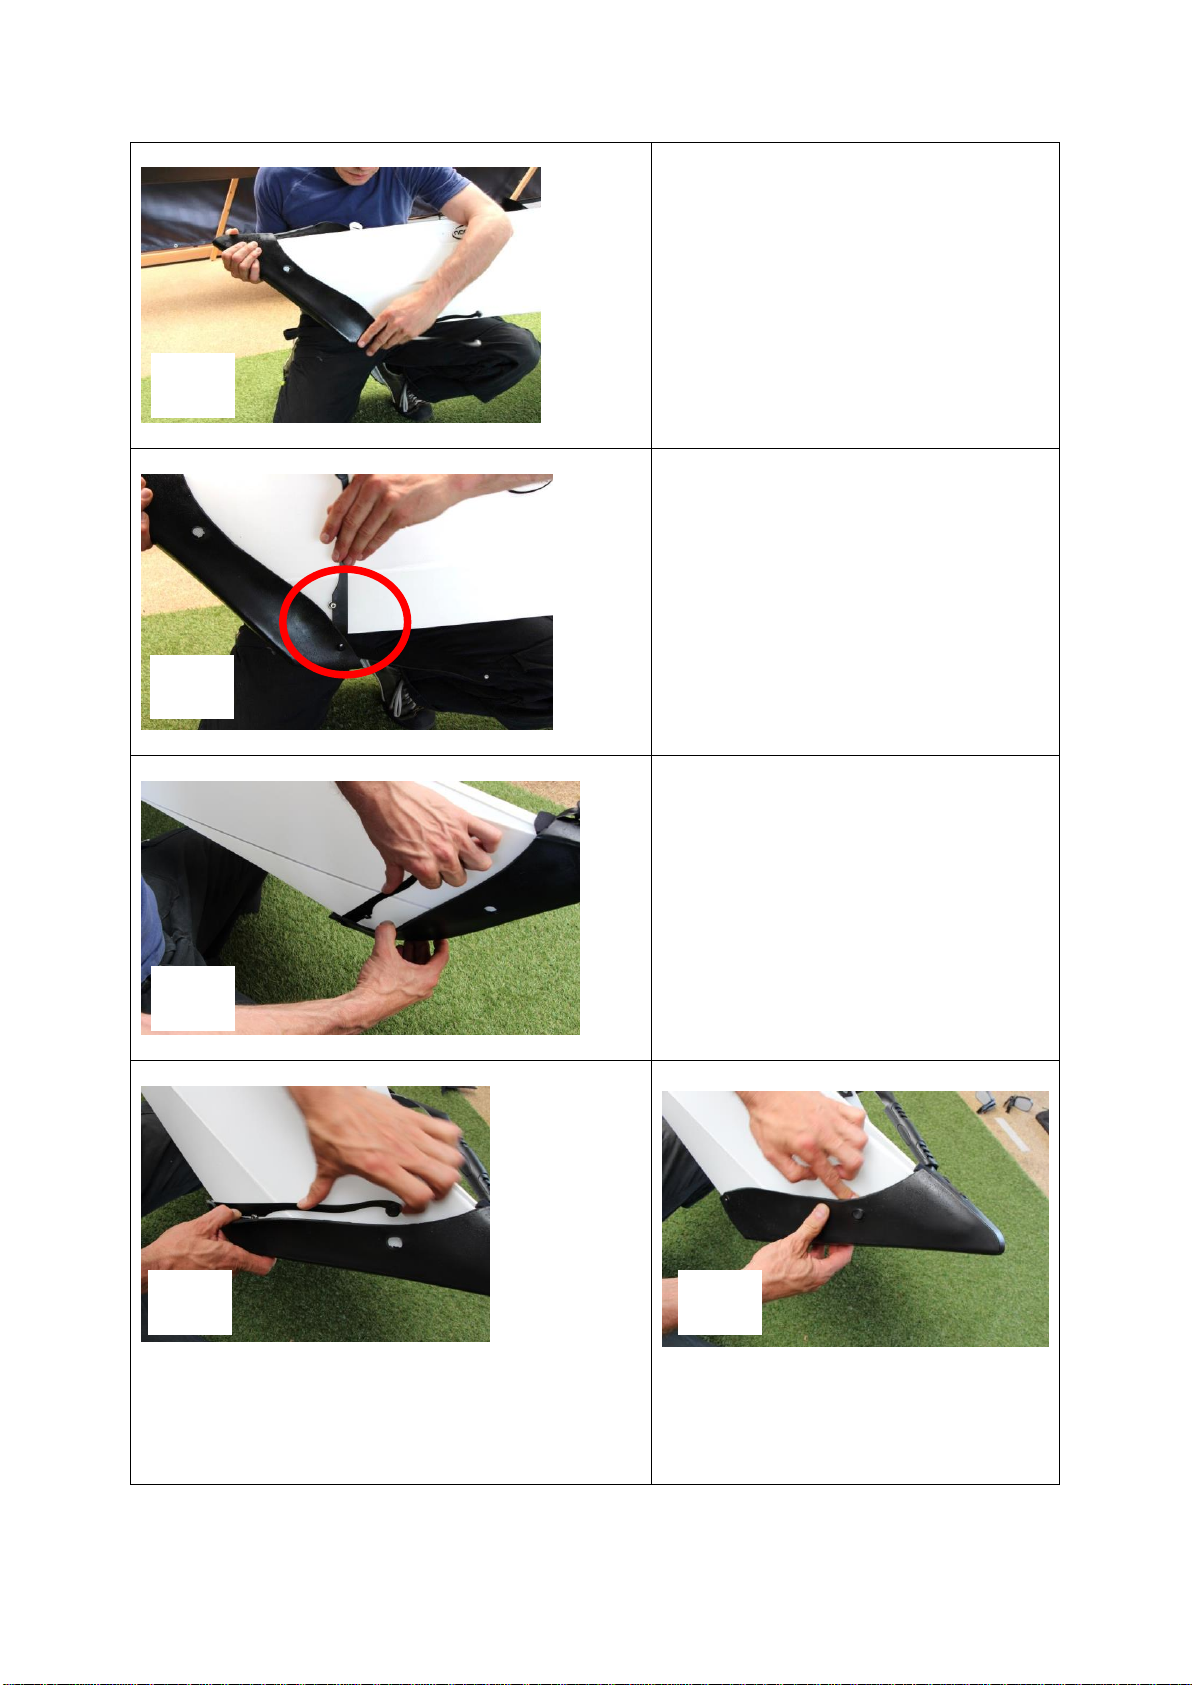
19
Setzen Sie die Kappe dann zunächst auf
das Heck, schieben Sie die Kappe so
weit wie möglich auf das Boot.
Put the cap onto the stern and push it as
far as possible onto the boat.
Nehmen Sie dann einen der
Verspannhebel und setzen Sie die
Auskerbung genau auf das Gegenstück
am Kajak.
Take the tensioning hand gear and place
the notch exactly onto the counterpart on
the boat.
Drücken Sie dann den Hebel nach
vorne. Dadurch entsteht etwas
Spannung.
Then push the gear slightly to the front to
tension it.
Schieben Sie den Verspannungshebel unter die
Abdeckkappe, so dass der Knopf am Hebel in das
dafür vorgesehen Loch an der Kappe geschoben
wird.
Push the hand gear under the cap, so that
the button on the gear fits into the whole in
the cap.
1.
2.
3.
4.
5.

20
Verfahren Sie so auf beiden Seiten!
Proceed likewise on both sides!
Einsetzen der Fußstützen / Installing the foot pegs
Ziehen Sie zunächst den
Arretierungsstift zu sich.
Pull the latch towards you.
Schieben Sie die Fußstütze auf die im
Boot fest installierte Schiene.
Slide the foot pegs onto the pre-installed
rail.
Other Nortik Boat manuals

Nortik
Nortik Scubi 2 User manual

Nortik
Nortik scubi 1 XL User manual

Nortik
Nortik Scubi 1 User manual

Nortik
Nortik Navigator User manual

Nortik
Nortik Fold 4.2 User manual

Nortik
Nortik scubi 2 XL User manual

Nortik
Nortik ARGO User manual

Nortik
Nortik Packraft TrekRaft User manual

Nortik
Nortik Scubi 3 User manual
Popular Boat manuals by other brands

Outcast Sporting Gear
Outcast Sporting Gear PAC 1200 owner's manual

Aquaglide
Aquaglide BACKWOODS EXPEDITION 85 owner's manual

SEATTLE Sailing Club
SEATTLE Sailing Club Wildflower J/35c quick guide

Moomba
Moomba Kamberra owner's manual

On Point Products
On Point Products Inflatable Sport Boats Yacht Dock owner's manual

Boston Whaler
Boston Whaler 255 Conquest owner's manual


