Nortik Scubi 2 User manual

Assembly instructions nortik scubi 2
Recreational kayak
QR-Code assembly video:

2
Assembly instructions nortik scubi 2
Dear Customer,
You have purchased a nortik scubi 2, an innovative hybrid kayak for recreational
use. With great performance, little packing size and weight for a boat of this size, it is
extremely versatile in use.
The assembling instructions are very detailed and almost every step is illustrated.
You will notice that it will help you at one point or another. After a few times and with
a little practice you won’t need the manual anymore.
The experience shows that the first assembly needs more time than you will need
later and we ask you to assemble the boat step by step according to this instruction.
After some practice, you will assemble the nortik scubi 2 easily within 10 minutes!
Please note that there is an assembly video on youtube:
https://www.youtube.com/faltboot_de
For further information please contact your dealer.
Otherwise, you may also like to contact us - as the manufacturer:

3
1) Parts overview
#1
1x Hull
#2 2x Stem element (bow
and stern = identical)
#3 4x Keel rod
#4 2x Cross ribs for front
seat 1x open (lower
than for rear seat) 1 x
closed (wider than for
rear seat)
#5 2x Cross ribs for back
seat 1x open, 1 x
closed
#6 Packing bag (no pic)
#7 Repair kit (no pic)
#8 Double action pump
(no pic)
2) Marking
All keel rods have little marks
with arrows. Sort the rods in
a way that all arrows point in
the same direction.
The arrow always points in
direction of the bow.
The two keel rods in the
middle positions have
installed „counter clips“ for
the installation of the cross
ribs
#
1
#
2
#
3
#
4
#
5

4
3) Assembly
General proceeding: First you assemble the keel rods and the stem and insert them into the
hull. Then mount the cross ribs and at last inflate the sponsons.
First unfold the hull and take
one of the stem elements
(they are identical).
Take the keel rod shown on
the picture (with the arrow
marking positioned in the
front).
Make sure the arrow points
towards the bow.
Slide the keel rod under the
front seat and push it through
the sleeve on the hull before
clipping it to the stem
element.
Push both as far as possible
into the stern.
Bow-Section
sleeve
keel rod

5
Make sure everything sits
centrally.
Fold the support rod upwards
and clip it into the cross tube.
Then take the stern element
and the keel rod shown on
the picture (with the arrow
marking positioned in the
rear).
Make sure the arrow points
towards the bow.
s
upport rod
c
ross tube

6
Proceed in the same way as
with the bow.
Slide the keel rod under the
back seat and push it through
the sleeve on the hull before
clipping it to the stem
element.
Push the stem element as far
as possible into the stern
Then fold the flexible rod
upwards and clip it from
below into the cross-tube
installed in the hull again
Take the last two keel rods.
Make sure that the arrows on
the rods point towards the
bow.
Stern-Section
sleeve
keel rod

7
Place the keel rods under the seats and
slide them through the sleeves on the
hull before clipping them to the rods you
have already installed to the bow-/
stern-section.
sleeve
sleeve

8
First make sure, that bow- and stern
element still are in a central position.
Then take out the split pin.
Pull up the two middle keel rods.
IMPORTANT:
Do not grab the rods too close to the
ends, but at least a length of the riveted
half-tube away from it! (see picture on
the left)
Pull them both up, until you can fit the
lower (with hemispherical end) in the
upper (with the riveted half-tube) rod.
Make sure that bow and stern do not
twist sidewise, but stand as much as
possible upright.
Slowly push both rods downwards into
the hull. This is how the longitudinal
tension is provided by pressing the
frame into the hull.
Make also sure not to twist the rods
while pushing them down.
If the rods are twisted, it can be difficult
to re-enter the split pin in the next step.

9
Push the split pin through the two
rods…
…and put the rubber band around to
secure it.
Now install the cross ribs.
First take the closed cross rib for the
front seat (#4 in the part overview).
Push the boat skin a bit aside and place
the cross rib behind the front seat
diagonally onto the clip on the keel rod.
(see picture on the left)
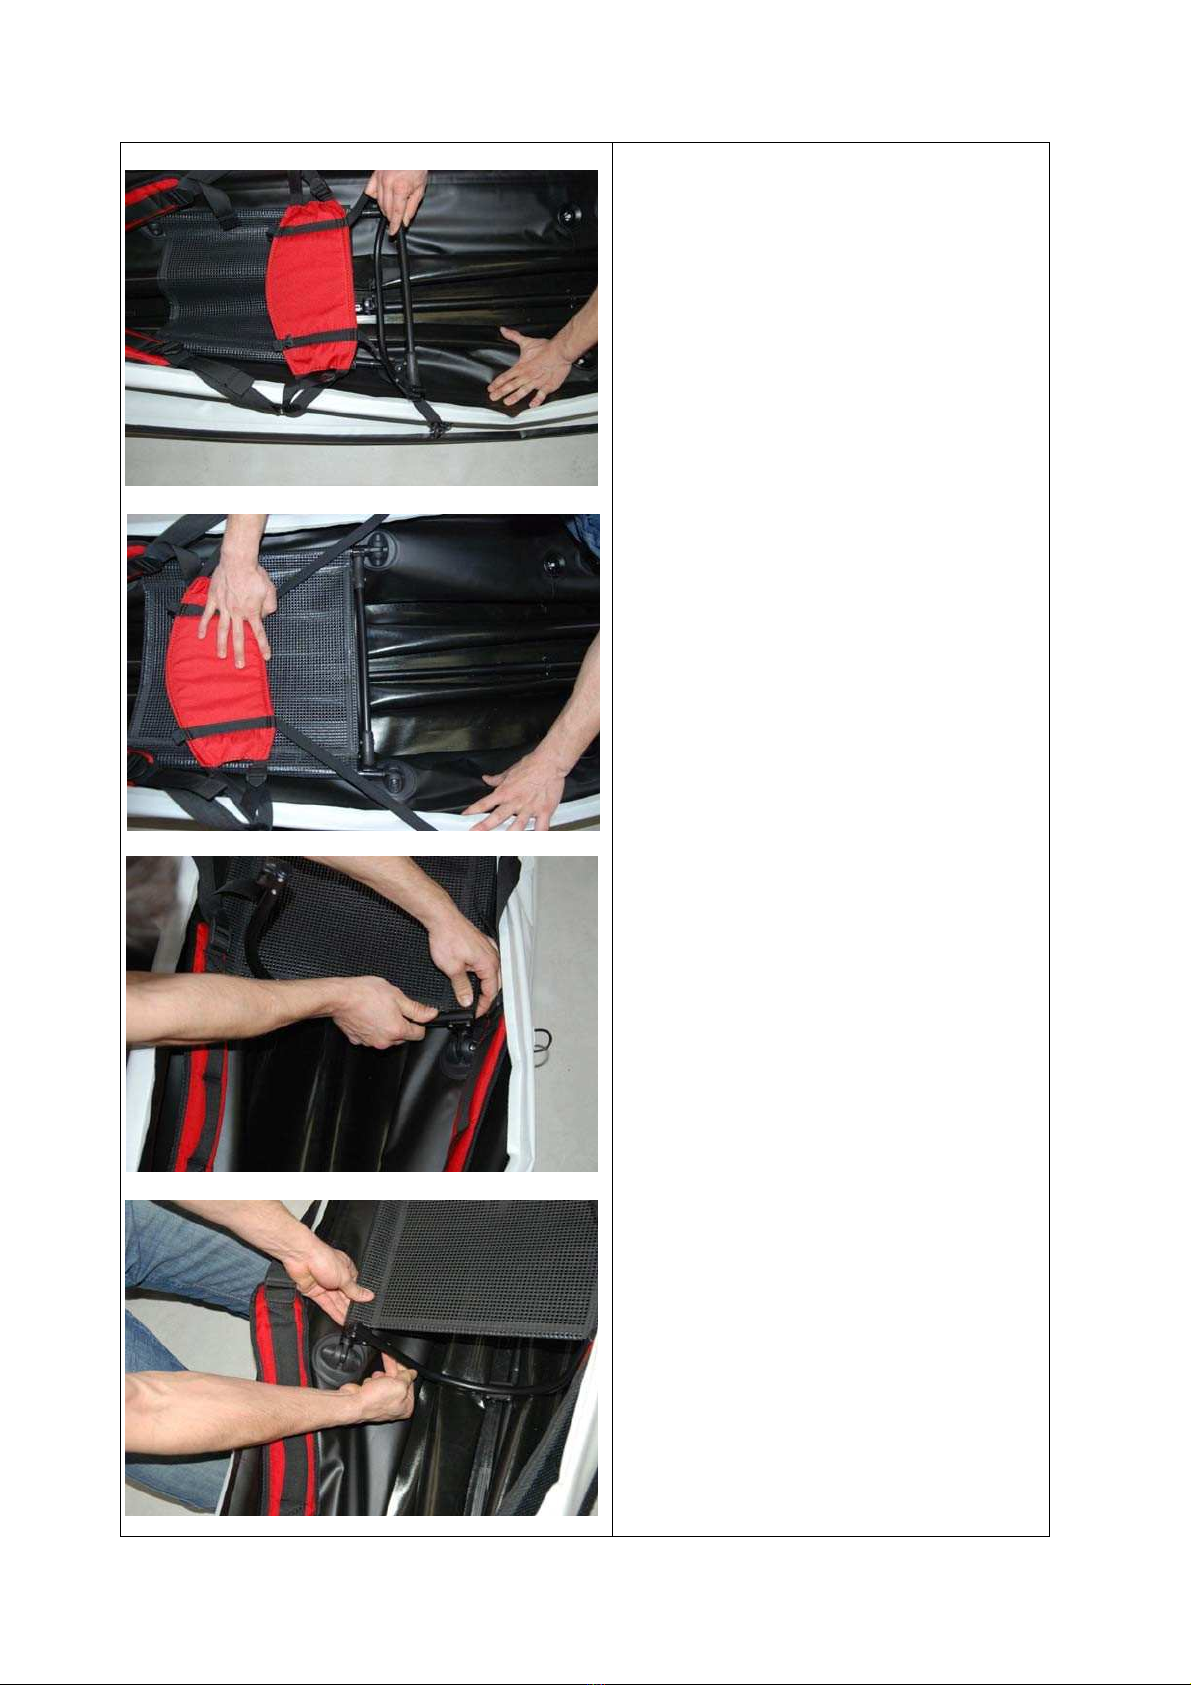
10
Then right it slowly up, while the clips
interlock.
When the cross rib sits upright, clip in the
seat bars on the back side of it. (see
picture below)
Note: If this is hard to do, slide the seat
cloth as far as possible towards the bow
Then take the open cross rib for the front
seat (#4 in the part overview).
Clip it on both sides to the seat bars.

11
Then press the C-Clip onto the keel rod
Follow the same procedure with the
remaining cross ribs (#5 in the part
overview) for the back seat.

12
Now inflate the high pressure sponsons.
IMPORTANT:
There is an adapter for the filling valves in
the repair kit. Put it onto the double action
pump.
Then insert the adapter into the valve and
with a half turn screw it to it.
The inflating valves have to positions that
you can adjust by pushing and turning the
white pin in the middle.
In one position you can inflate and
disconnect the pump without letting the air
out again.
If you want to deflate, push in the pin and
do a half turn. The valve stays open.
Best is first to inflate the lower sponson on
one side to around 50%, then on the other
side equally. Then change again and fully
inflate them in turns.
Proceed likewise with the upper sponsons.
The ideal pressure is 0.2-0.25 bar (2.9-
3.63psi)
Do not exceed it!
Your boat is now fully assembled and ready for use.

13
4) Solo use
If you want to paddle your nortik scubi 2
alone, you can do that from the front seat.
You will have to use the stern as bow (the
front seat is around 35 cm more in the
middle of the boat.)
For that you just have to change the
backrest of the front seat to the other
direction.
A solo deck is also available.

14
5) Installation of the Deck
Mount the deck from the stern. Place it in
such wise, the deck just covers the
Velcro on the boat.
It will overlap a little in the back.
(see picture on the left)
Then mount it completely and make sure
to tauten it.
Then shove the overlap underneath the
black cover at the stern.
The two little tubes are the openings for
the tripping lines of the rudder system, in
case you want to use it.
The deck is fully installed. Now you can
attach the sprayskirts.

15
5) Installation of the rudder system
The rudder system can be used on both sides of your nortik scubi 2.
Both, bow and stern
have a pickup for the rudder blade. This allows you to use the rudder system either in solo
use, or when paddling in pairs.
At the first assembling take the small
security ring (1.) off the rudder blade.
Then open the wing nut (2), put the
distance piece through the hole (3) and
reclose the wing nut.
Now place the rudder onto the cavity at
the stern and secure it with pin, by
pushing it through from above. Secure
the pin at the bottom again with the little
ring.
Steering rope extension
2x Steering rope
Steering bar
2x
Shackle for
steering bar
Carabiner for
pull-up rope
Pull
-
up rope
Rudder blade

16
Take the pull-up clip (with Velcro
underneath) and lead the pull-up line
through it.
Then lead the two steering ropes through
the holes of the cross beam…
...and turn them around. They will lock
themselves by being tensioned.
Now lead the extensions of the steering
lines (with chains) from behind under the
cross rib of the middle seat.

17
Then lead the whole extension through
the loop.
Now you have attached the extension to
the cross rib.
Lead the two steering lines from behind
through the two D-rings, on which the
back rest is attached.
Now knot the steering line to the last
chain link of the extension. You can
adjust the length of the line to your
requirements.
Then position the steering bar as you
favour and secure it with the shackles.

18
By pushing the bar with your feet you can
now change the direction of the rudder
blade.
Lead the end of the pull-up rope back
through pin and attach it to the rudder
with the carabiner.
8) Instructions for disassembling
The disassembling corresponds the assembling in reverse order.
Before folding the hull, lay it out flatly.
Fully drain the air from the sponsons.
You can also do this with the supplied
pump, since it has a suction function.
Then fold the sides in the middle
(lengthwise) as shown.
Fold it like shown on the next pictures…
Bow-section

19
So you can get the hull back into the bag
easily.
Bow-section

20
9) Care, Safety, Storage and further Information:
Salt water: If you want to use your boat in the brackish water / salt water, the treatment of the rod with
"CorroFilm" is absolutely recommended. Ask your local Dealer for it!
CorroFilm can be sprayed onto (and if necessary also in) the rods and generates a transparent, dry
protective film which protects the aluminum perfectly against the "attack" of salt water. Ask your dealer
about CorroFilm. Clean the rods and boat skin after exposing it to salt water (e.g. after the tour) with
sufficient fresh water.
IMPORTANT: If the boat is to be stored for a longer time, take the air out of the sponsons! A folding
boat should be built up and removed several times a year.
Ensure that the boat skin and rods are dry when packed and stored.
The boat skin is resistant to salt water. Nevertheless, it should also be cleaned with fresh water after
the return from a tour in brackish or salt water. Especially when sand or small stones can cause high
abrasion.
Please make sure to carry the boat not only by the handles, but also support it from the bottom, in
order to relieve the handles from tension.
Always wear a life jacket when you are using your boat on the
Waters! Beware of rapid weather changes!
IMPORTANT: If you are on tour for longer, be sure to check the air pressure in the sponsons. Air
expands when heated. The operating pressure must not be exceeded. In the case of doubt, be careful
to carefully let out some air.
Your boat is equipped with overpressure valves (the two red valves in the stern).
These will let out air in case the pressure exceeds too much. It is a security mechanism for the extreme
case. Do not test it willingly, but follow the guidelines.
You can store your nortik scubi 2 built up or disassembled in the bag.
Please make sure that your boat is not exposed to unnecessarily long heat. If it is built up, take the
pressure from the sponsons by deflating them a bit.
Repairing and reinforcements:
The PVC / PU skin can easily be repaired in case of abrasion, a small crack or hole with the included
repair kit.
- Cut a strip of PVC / PU material from the supplied repair kit.
Make sure that it extends generously over the damaged area.
- Round the corners of the strip with scissors or similar.
- Clean the strip and the area to be patched. Both must be free of grease.
- It is best to roughen the spot with a fine sandpaper,(but in a pinch it will also work without it)
- Apply a thin layer of glue on both surfaces
- Wait for the glue to dry slightly, then press the patch firmly onto the area to be repaired.
If you can make the repairing at home: Let the glue dry for an hour, place the patch on the spot, and
gently warm both with a hot air dryer. Then push the patch firmly onto the hull.
On tour: The nortik scubi 2 can be reused shortly after repair. However, the adhesive and protective
effect still improves within 12 hours when the adhesive is completely dried. The sponson can be
repaired in the same procedure as described above. Please pay attention to a clean, grease-free
surface.
Your nortik scubi 2 is equipped with a keel strip. However, you can apply additional reinforcements at
much stressed points. Depending on the type of use, other keel strips or partial reinforcements of the
skin are recommended. If necessary, ask for it in specialized dealers.
Other Nortik Boat manuals

Nortik
Nortik Packraft TrekRaft User manual

Nortik
Nortik Fold 4.2 User manual

Nortik
Nortik scubi 2 XL User manual

Nortik
Nortik fold User manual

Nortik
Nortik scubi 1 XL User manual

Nortik
Nortik ARGO User manual

Nortik
Nortik Navigator User manual

Nortik
Nortik Scubi 1 User manual

Nortik
Nortik Scubi 3 User manual


