Nortik Packraft TrekRaft User manual

Assembling Instruction –nortik Packraft Line
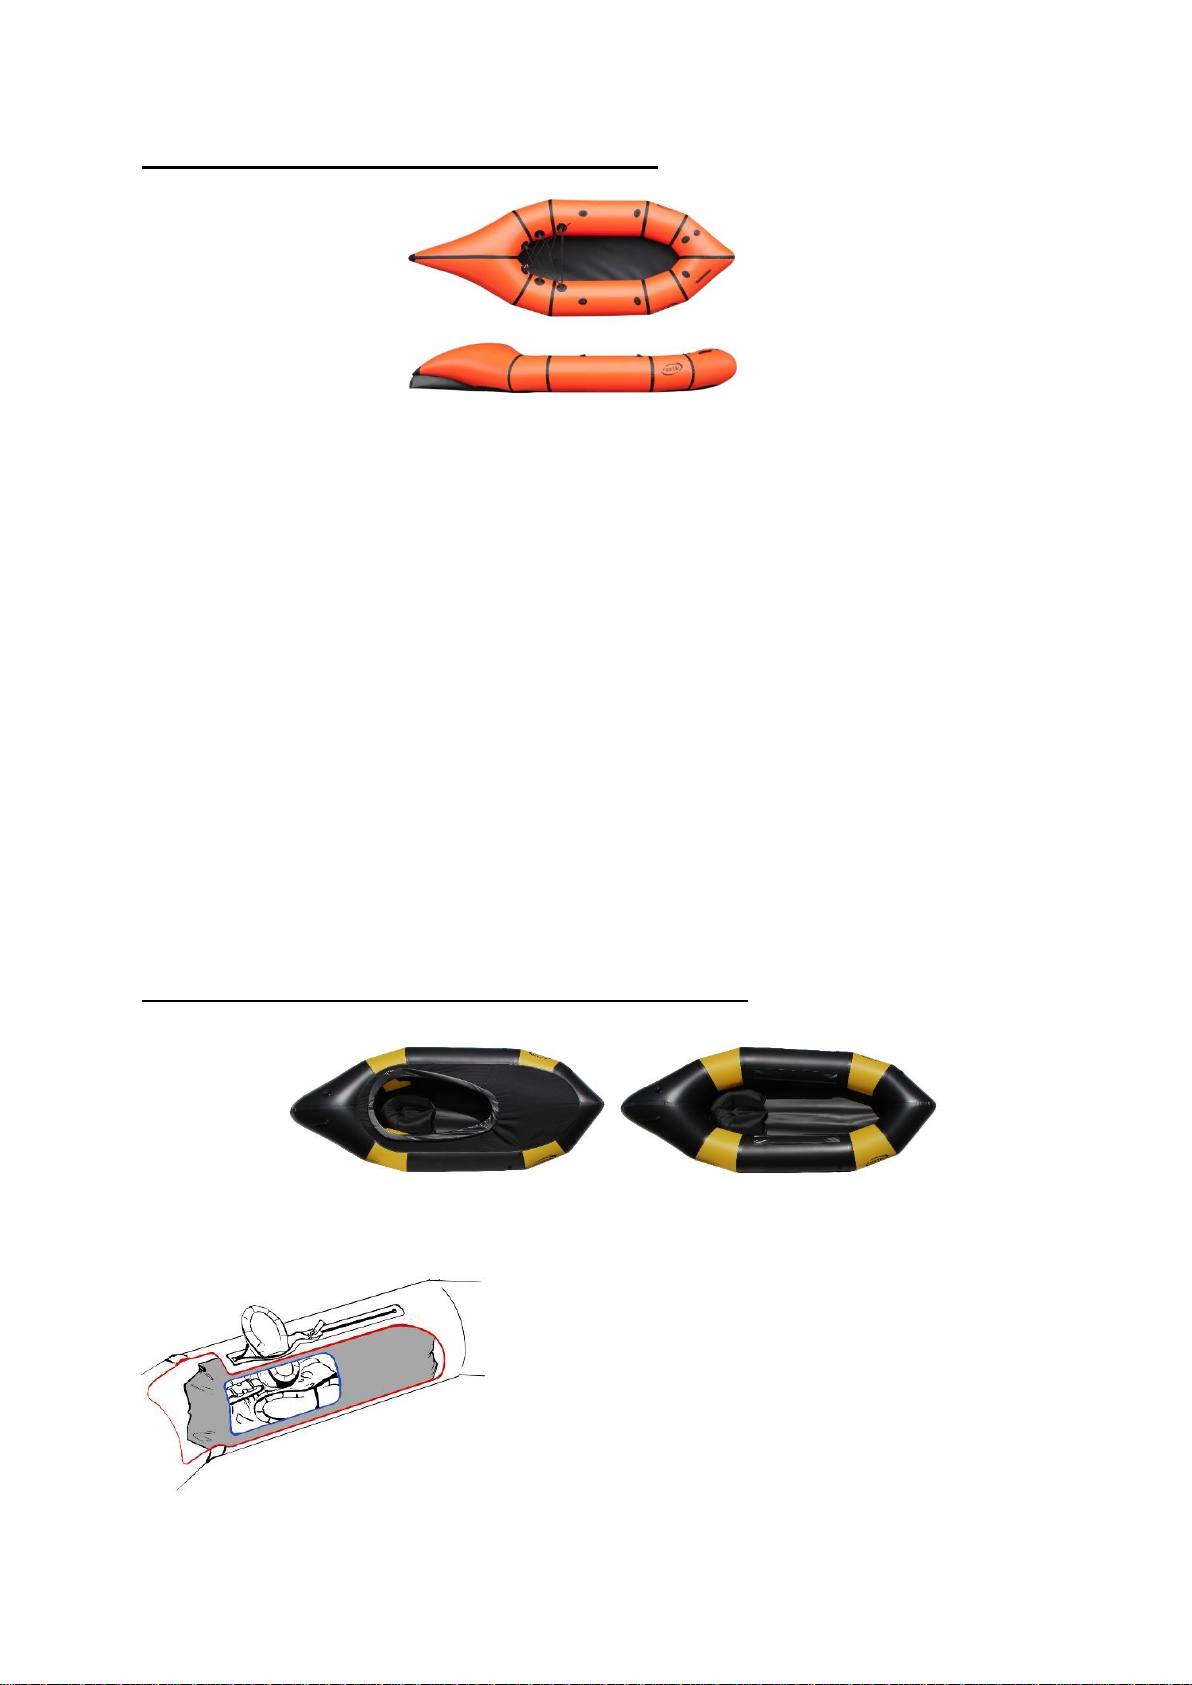
TrekRaft | LightRaft | FamilyRaft
QR-code assembly instruction (TrekRaft):

1
Please read the manual carefully, before you start. Then follow it step by step.
1) Scope of delivery:
1) 1x Transport bag
2) 1x Filling bag
3) 1x inflatable seat
4) 1x TrekRaft/LightRaft/FamilyRaft
5) Repair-kit (not on the image)
2) Assembly:
Please unfold the boat skin and
unscrew the black valve. Then stick
the plug of the filling bag in it, like it
is shown on the image on the left.
1)
2)
3)
4)

2
Air will be pumped in the boat with
the filling bag. It needs some time
getting used to in the beginning, but
works very well.
After 7-8 pushes the TrekRaft is so
far filled, that the rest pressure can
be produced with the second valve
and your mouth.
TrekRaft with deck:
If you have a TrekRaft with deck, please read the advice for installing the coaming before
fully inflating! You find them after the next page!
The general method of inflating the boat is shown in the following:
Pull the filling bag up and wrap it
together. That way air is “trapped”
inside…
…then proceed to fold it downwards.
That way air is going to be pushed
in the TrekRaft.

3
After 7-8 pushes the TrekRaft is so
far filled. Now you unplug the filling
bag and close the valve.
Important: Close the valve tightly.
Otherwise you will have there
coming less air out continuously
and your TrekRaft will not stay
inflated as it should.
If some air evades that isn’t big of
a deal! The actual pressure is
generated in the next step.
Generating pressure:
Please open the long valve and
blow a few times into it till enough
air is in the boat.
Blow up the boat till there is
enough pressure it. If you do that
by your own (without a pump)
there is no danger that too much
pressure will be generated.
TrekRaft with deck –Installation and handling of the coaming
The coaming is going to be installed when there’s just a little air in the TrekRaft . The
procedure of assembling and disassembling of the coaming must be followed, because the
connection takes damage very easily! Please read the procedure carefully.
Take the four parts of the coaming
and lay them down, so that the
short parts and the long parts lay
beside each other, like shown on
the left.
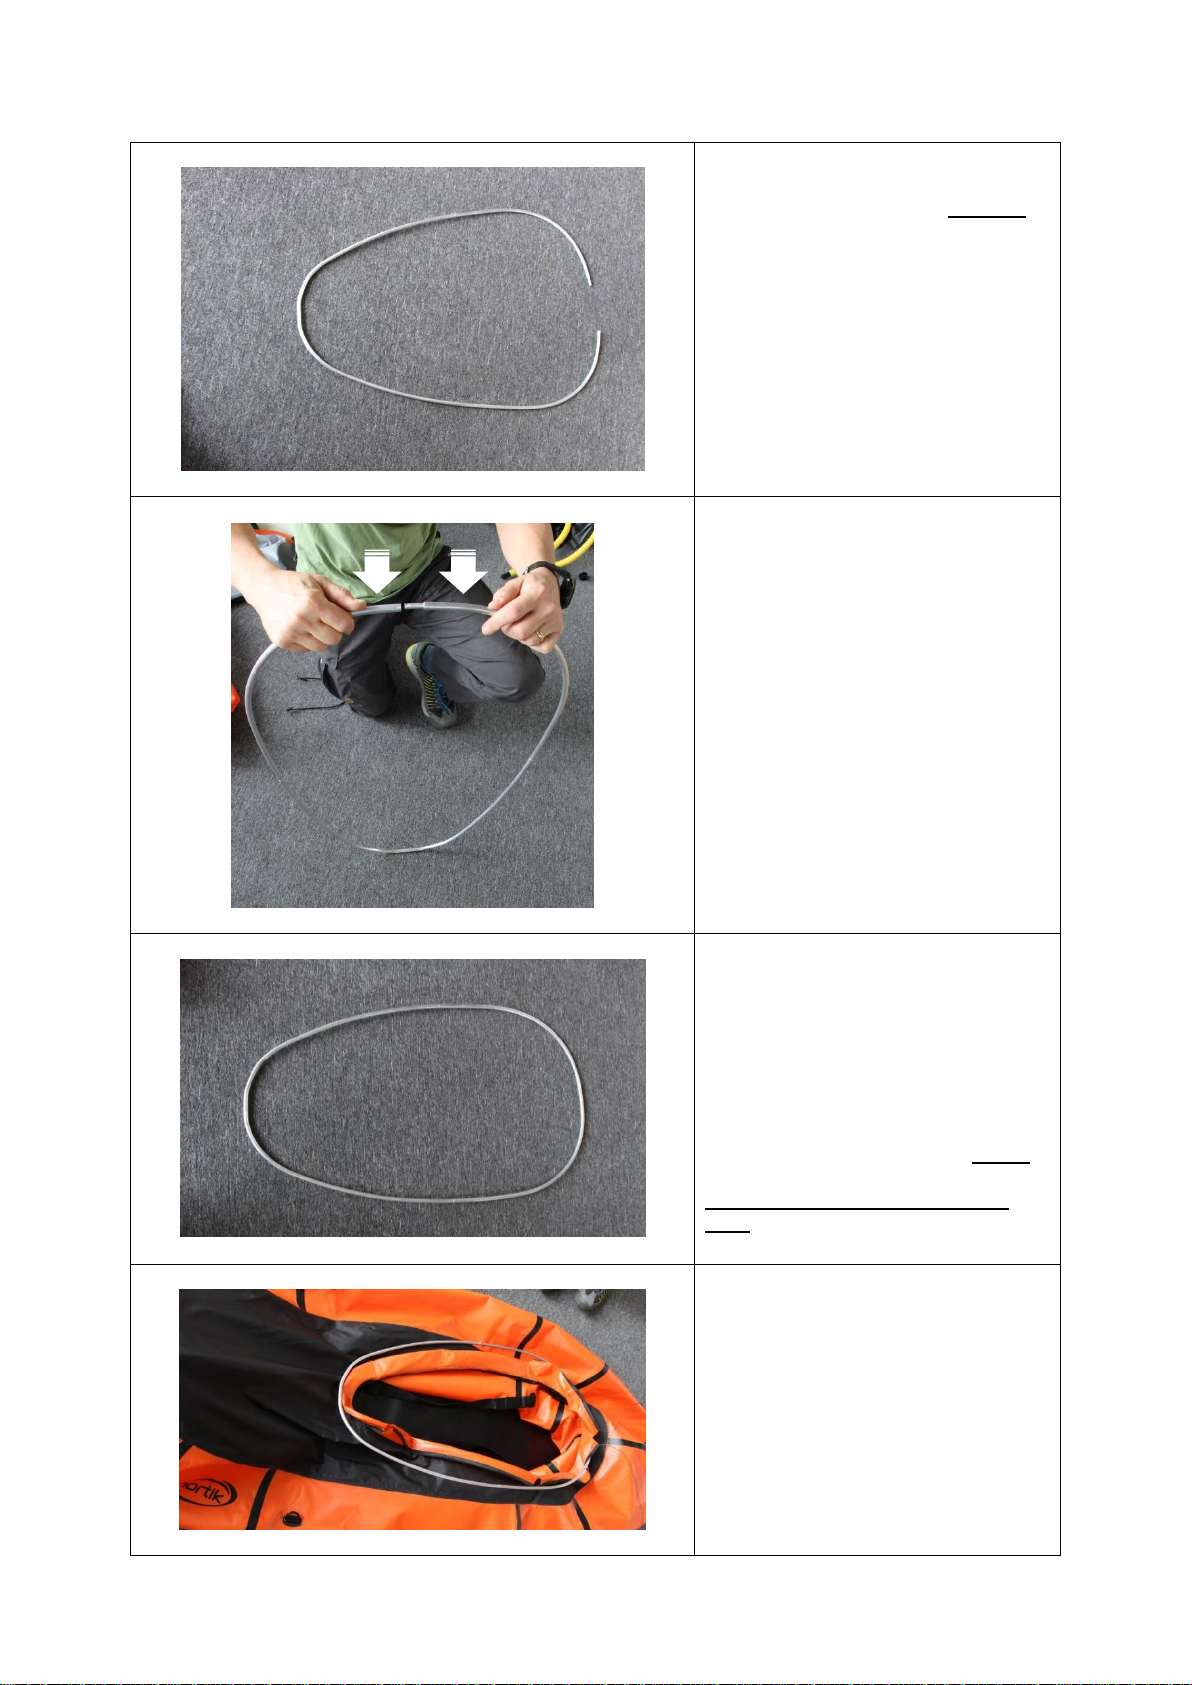
4
Now assemble the parts without
closing the top lock (right side in
the image).
Place the coaming on the ground
with the top lock reaching
upwards. Then press the upper
part a bit down and close the
connection (as shown on the left).
Please follow these steps otherwise
there could occur some canting which
damages the parts.
Disassembling:
Follow the steps in an exact
backwards order. Meaning: placing
the coaming upwards on the ground
and open the connection with a little
pressure from above.
And always open the upper part
first!
Assembly of the connected
coaming
Place the coaming on the cockpit

5
The cockpit is then placed around
the coaming. This can be a little bit
difficult on the first time but gets
easier with practice.
When the coaming is in position
the fortification cord is placed
around it. The disassembling
works by following the steps in
backward order.
Seat
Inflate the seat. Then the seat is
fixed in the mounting inside the
boat.
Your TrekRaft is now ready for
action!
6
Special information about the nortik CityRaft
Seat:
The seat is already installed in the boat and is knotted, this knotting can be varied individually
stronger or weaker.
Finn:
The CityRaft is equipped with a permanent fin, the further you sit in the back of the raft (on
the seat), the better the fin dips into the water and provides more directional stability. The
further you move the weight forward, the more the fin comes out of the water and the more
manoeuvrability you achieve.
Disassembly:
Open the large filling valve to let the air out. The CityRaft is rolled up from behind over the
fin. Always roll it in the direction of the valve so that the air is pressed out. It is best to place
the filling bag around the rolled CityRaft and then push it into the packing bag.
Please make sure that the filling valve and the fin are not kinked!
Special information about the nortik Expedition Rafts
Integrated bags: On both sides of the raft there are integrated bags with
a volume of 70l each inside the air tubes. These can be
used to stow luggage, improve the centre of gravity and
reduce the wind's impact surface. They also serve as
additional floats.
Please make sure to fill these bags BEFORE inflating
the raft and close the zippers tightly. The bags are also
unloaded when the raft is empty, as the counterpressure
of the air tubes would otherwise cause the bags to turn outwards.

7
Advice:
You may notice that the TrekRaft is losing air after some time. It’s not unusual, that you have
to refill some air after 24h (through the recoil valve).
Inflatable floor mat:
If you have the optional inflatable floor mat, please inflate it a bit and then lay it in the boat
before installing the seat. Then inflate it completely. Try if it’s easier for you to install the
ground matt before inflating the TrekRaft completely.
Disassembling:
Unscrew the big filling valve, so the air can evade. The TrekRaft either is foldable (lay it flat
on the ground, then fold it along of the edges inwards and then again on each other –then
fold it from one side in size of the transport bag) or you could roll it up. Always fold or roll in
direction of the valve so that the air is going to be pressed out. Also when rolling it up, first of
all fold it along of the edges inwards. At best you lay the filling bag around the folded/rolled
TrekRaft before you put it in the transport bag. Please pay attention that the filling valve
won’t be kinked!
Please also take care that your boat isn’t wet when stored. If you have to pack it in a wet
status please make sure that you soon dry it.
Please also follow the following hints concerning safety, maintenance and repairing:
Tips generally to be followed:
If the boat is exposed to sunlight, check the pressure in the air tubes from time to time. Air
expands when it heats up. Therefore prevent that through solar radiation a to high pressure
is build up and drain some air if necessary.
Please only sit in the boat if it’s completely in the water and hasn’t any contact to the ground
anymore.
Safety
Please always wear a life jacket, if you are in the water with your boat. Be beware of quick
weather changes. Don’t underestimate the danger of water sports.
Storage
You can store the boat inflated or dissembled in the transport bag. Take care that it isn’t
exposed to great heat unnecessary.
Saltwater
If you use the boat in saltwater please clean it afterwards with enough freshwater.
Tips to repair and strengthening the TrekRaft
The TPU-skin can be easily repaired with glue and the corresponding PU-patch in case of a
small tear or a hole. For that cut a piece out of the PU-material (normally part of the included
repair-kit). Be aware that it covers the damaged part to a great extend. Round the edges of
the piece with scissors or something similar.
Important: Clean the piece and the damaged part to a large scale with the included special
cleanser! Otherwise the patch won’t hold. Use for that the included paper towel. Wipe the
unnecessary cleanser with water away. Then put a small among of the included glue
(stormsure) on both surfaces. Let it dry for 20 minutes and then press both materials against
each other. Then let it dry again for some hours. Stormsure dries after 4-6 hours, total
corroboration is reached after 12 hours.

8
Further information about your and other product as well as sources of supply and
downloads, you can find at any time on:
Speeding up the process: You can accelerate the desiccation of your boat through adding
1% water to the glue. That is like 1-2 drops per tube. Mix it good and use it as usual. The
time of desiccation is reduced to 2-4 hours now.
The glue is sensitive to moisture. Protect from light and heat. Always store already opened
tubes of Stormsure in the ice compartment. Before using Stormsure always make sure that it
has room temperature. Safety: Stormsure contains Isocyanate, read the according warning
information. Watch videos of mending on YouTube: http://www.youtube.com/user/Glueshop
Additional information concerning the glue under: http://www.stormsure.com
We appreciate every form of critique, praise or everything else you want to say about your
TrekRaft: kontakt@nortik.com
This manual suits for next models
2
Other Nortik Boat manuals


Popular Boat manuals by other brands


Ranger
Ranger Fisherman Series owner's manual

Pelican
Pelican Monaco owner's manual

Robalo
Robalo 2008 Walk Around Owner's and operator's manual

Oru Kayak
Oru Kayak COAST XT Assembly guide

SEVEN BASS DESIGN
SEVEN BASS DESIGN SB-HFHE-2 Assembly instructions and user's manual

Sea Ray
Sea Ray 240 Sundancer Specific information