Nortik scubi 2 XL User manual
Assembly instructions nortik scubi 2 XL
Recreational kayak

2
Assembly instructions nortik scubi 2 XL
Dear Customer,
You have purchased a nortik scubi 2 XL, an innovative hybrid kayak for recreational
use. With great performance, little packing size and weight for a boat of this size, it is
extremely versatile in use.
The assembling instructions are very detailed and almost every step is illustrated.
You will notice that it will help you at one point or another. After a few times and with
a little practice you will not need the manual anymore.
The experience shows that the first assembly needs more time than you will need
later and we ask you to assemble the boat step by step according to these
instructions. After some practice, you will assemble the nortik scubi 2XL easily
within 15 minutes!
Please take your time at the first assembly to learn about the special features. It is
strongly advised that you read all the instructions carefully before proceding! You will
find following topics:
1. Overview of the parts
2. Marking
3. Assembly scubi 2XL
4. Installation of the rudder system (optional)
5. Installation of the 3rd seat (optional)
6. Installation of the Drop Stitch inset (optional)
7. Installation of the extra high backrest (optional)
8. Installation of the nortik kayak sail (optional)
9. Instructions for disassembly
Then you may procede step by step.
If you have any questions, your dealer will be happy to assist you. Otherwise, you
can also contact us directly - as an importer (call: +49/731/4007675,
mail:kontakt@nortik.de)
You can watch how to assemble many of our boats on our YouTube
channel: https://www.youtube.com/c/faltbootde

3
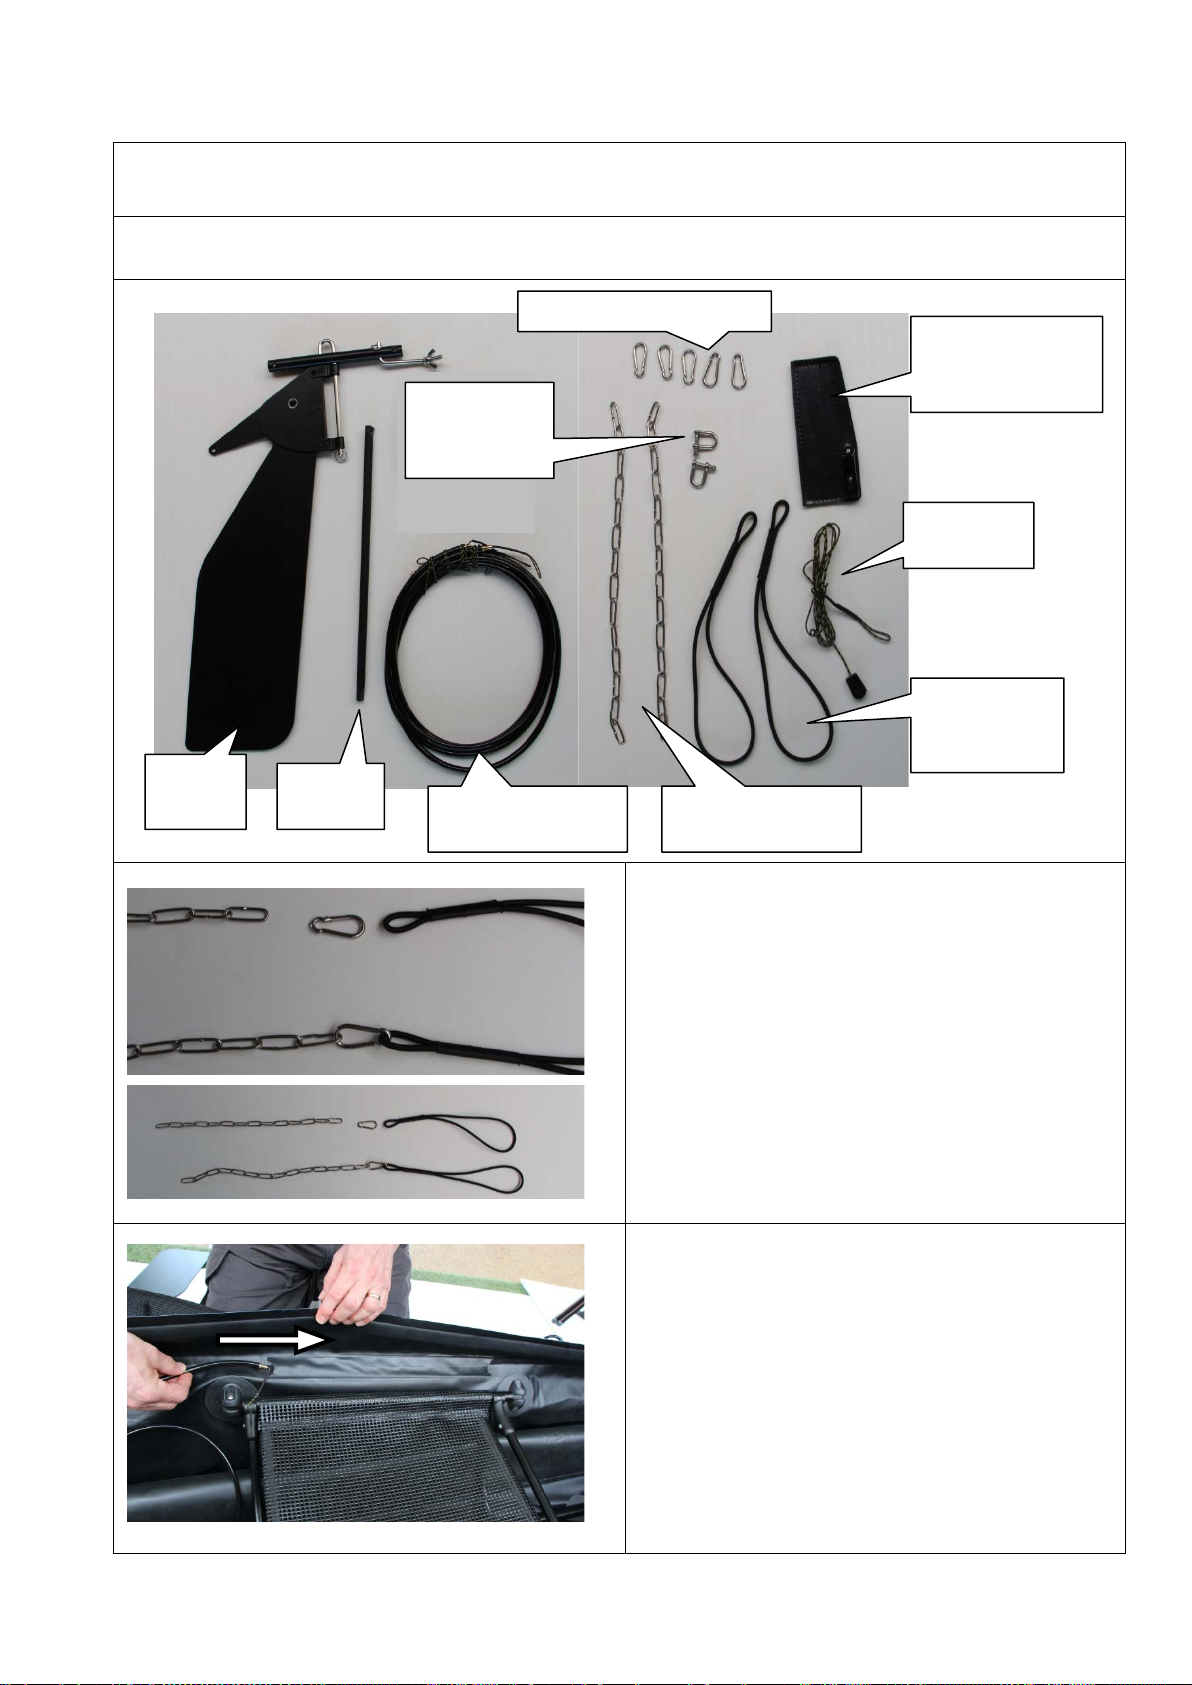
1) Overview of the parts
These parts are included in the standard
scope of delivery:
1) 1x hull
2) bow element (more curved, higher)
3) stern element (more open, lower)
4) 4x keel rods
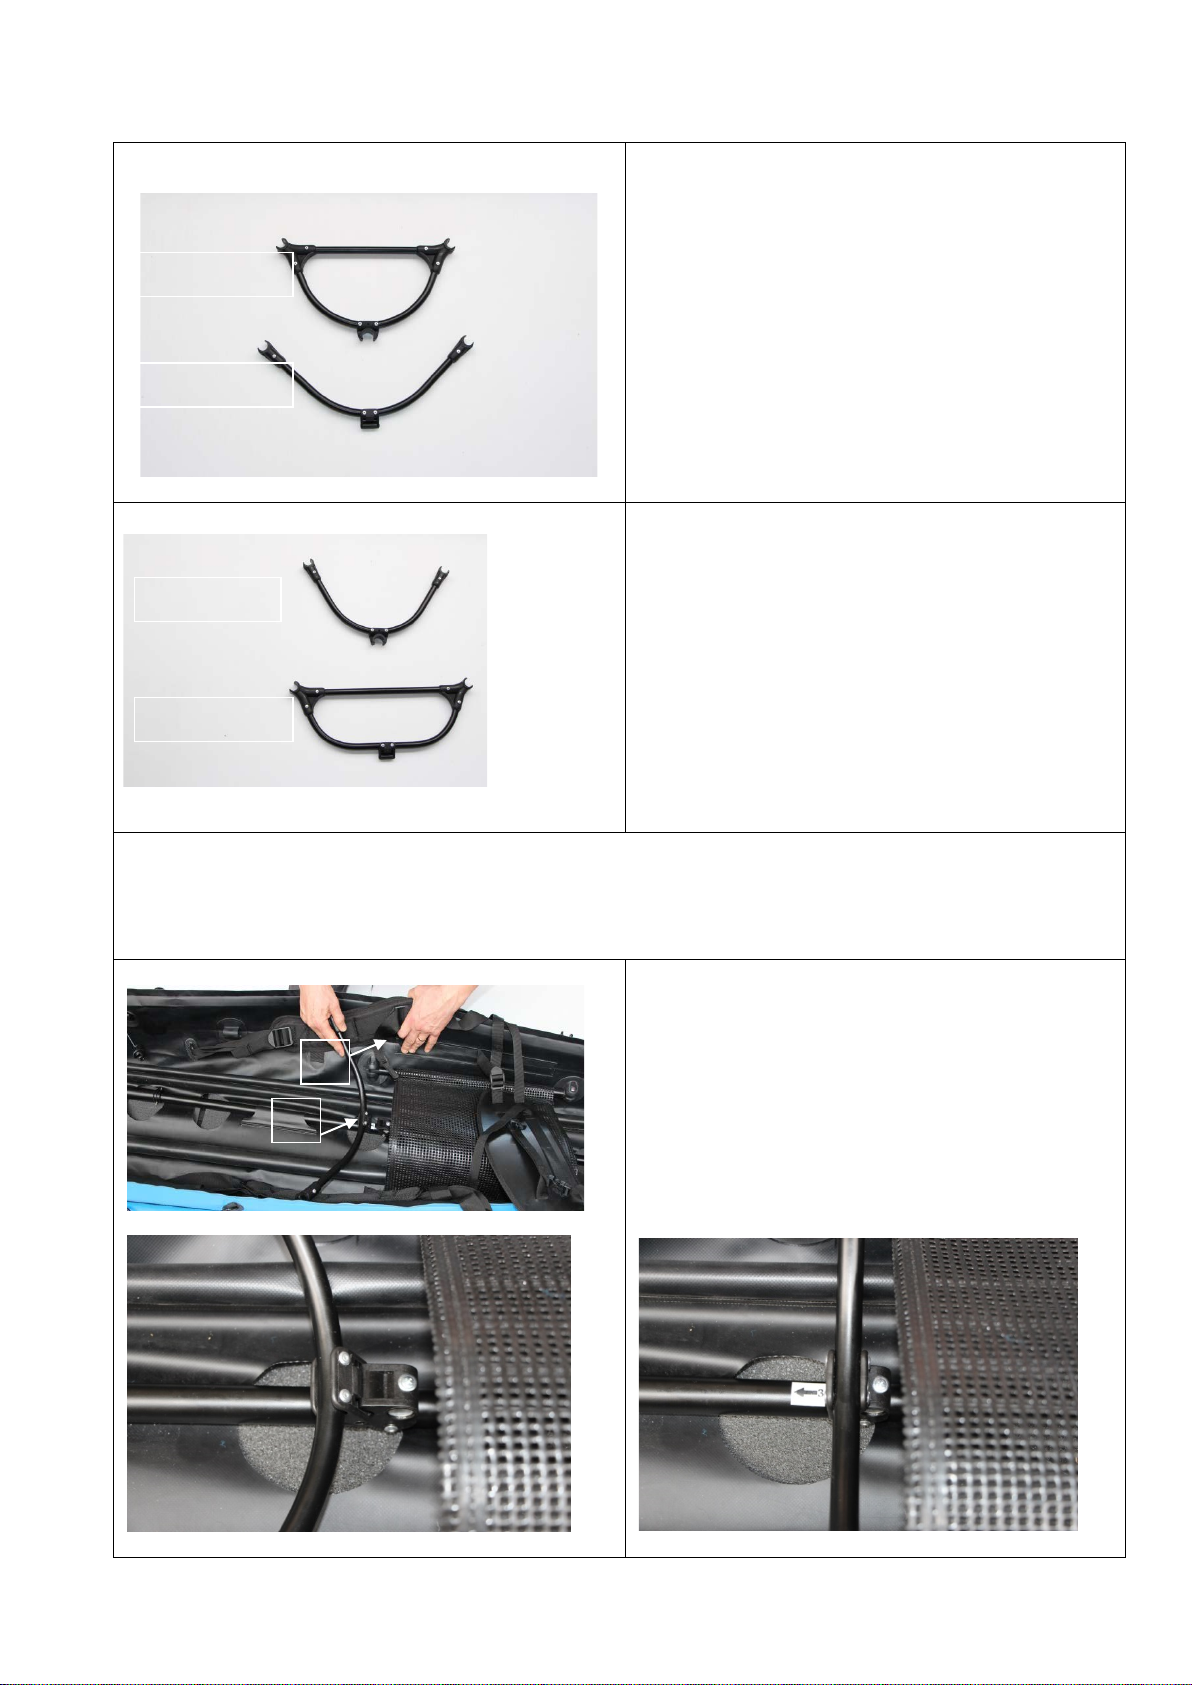
5) For front seat: 1x open cross rib
(narrower) and
1x closed cross rib (wider)
6) For back seat: 1x open cross rib
and 1x closed cross rib
7) stern and bow cross ribs
8) Packing bag
9) Repair set
10) Double action pump with gauge
(no pic)
2) Marking
The 4 keel rods are marked with arrows
to help ordering them.
Make sure the arrows point to the
bow. Rod #1 goes first (at the bow):
the arrow ist placed ahead. Rod #2
goes right after it: the arrow ist placed
slightly backwards. Rod #3 has its
arrow even more backwards. Rod #4
goes last: its arrow is placed at the
back end.
Note: Rods #1 and #4 are identical (only the placing of the arrow differs), which means they are
interchangeable.
5)
6)
8)
9)
1)
2)
3)
4)
#1
#2
#3
#4
7)
4
2)
3) Assembly
Brief summary of the steps:
1. Insert bow and stern elements into the hull and clip 2 keel rods onto each of them.
2. Tense the keel while connecting the rods in the middle .
3. Install all cross ribs (for each seat: there is always an open cross rib in the front and a closed
one at the back)
4. Inflate the sponsons.
Every step is detailed in the following instructions.
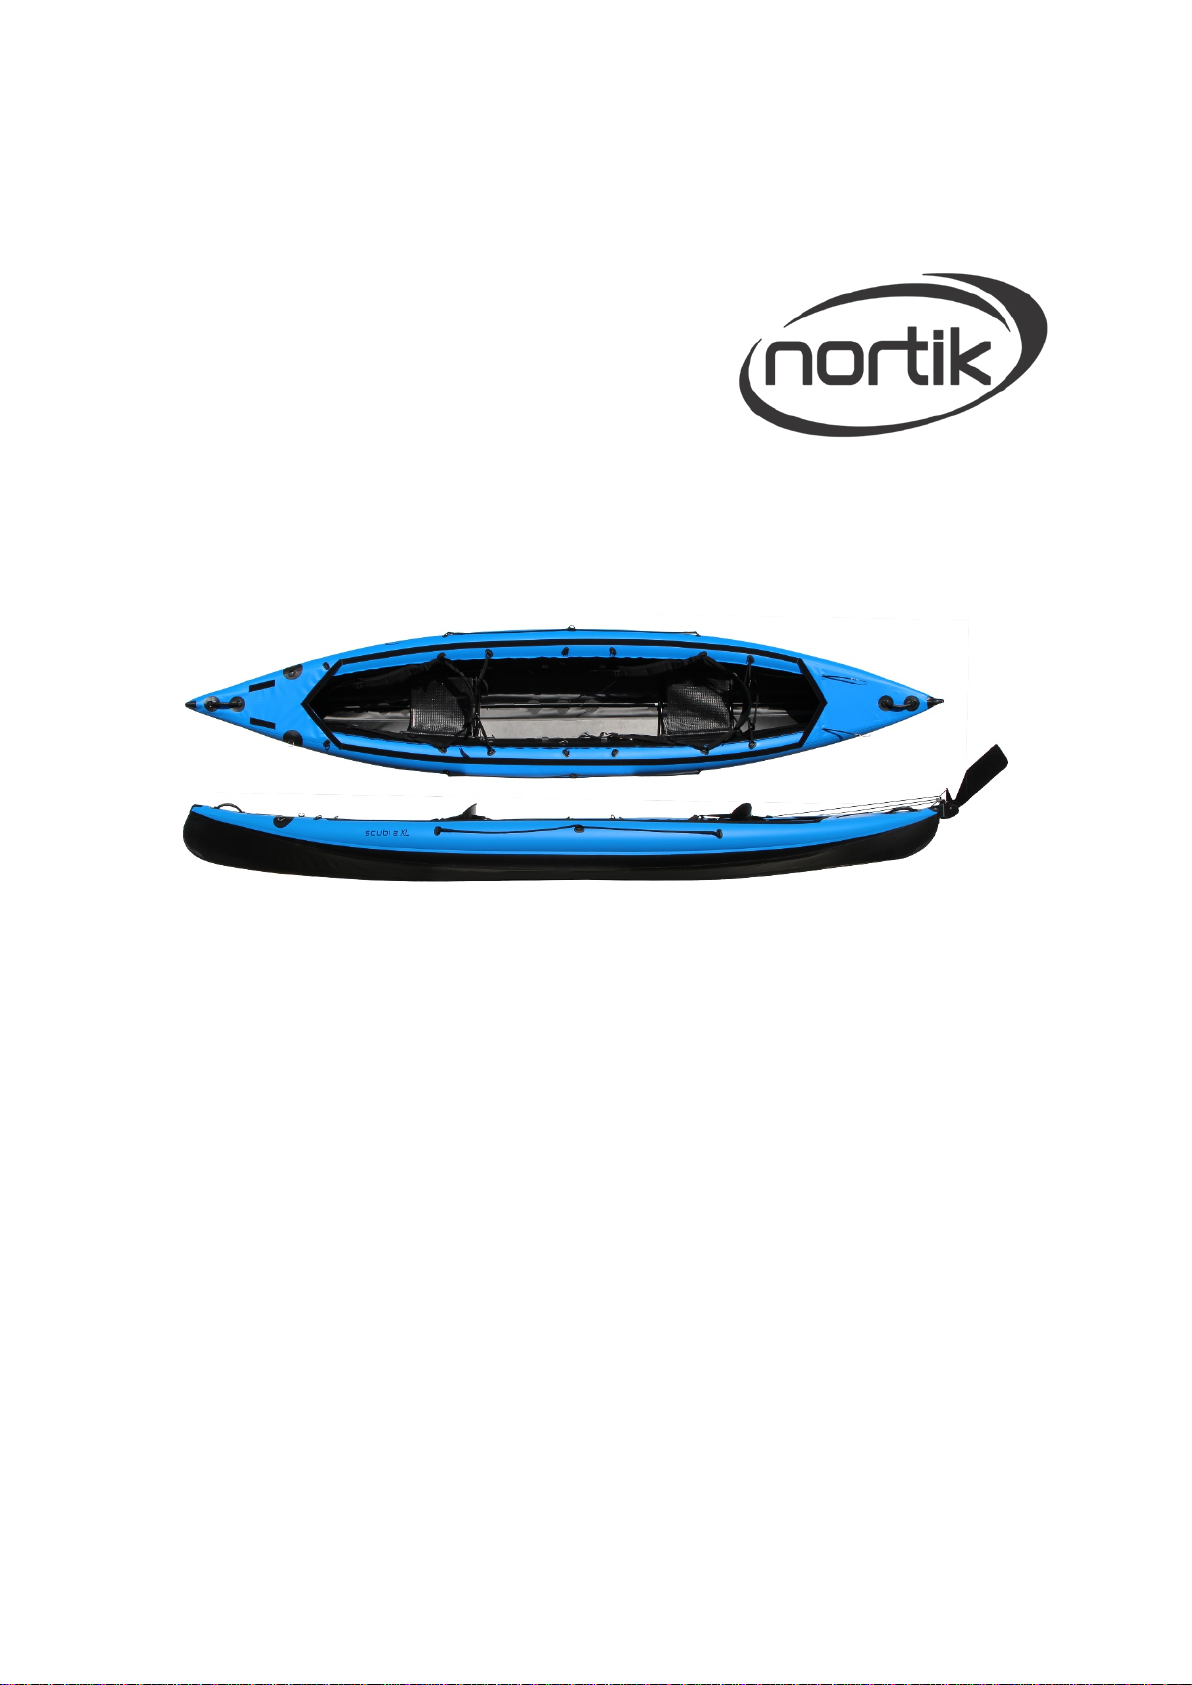
Prior information:
Scubi 2 XL is supplied with “foam pads“. They are placed along the keel into a channel in the hull. It is
an extra protection for the hull, in addition to reinforcement strips already present on the outside of the
hull.
These foam pads are usually already in place on a new boat.They can remain in place while
assembling/disassembling the boat.
You may want to take them out in order to rinse
the channel for instance. The insertion and the
removal of the foam pads is easy thanks to the
wide round holes along the channel.
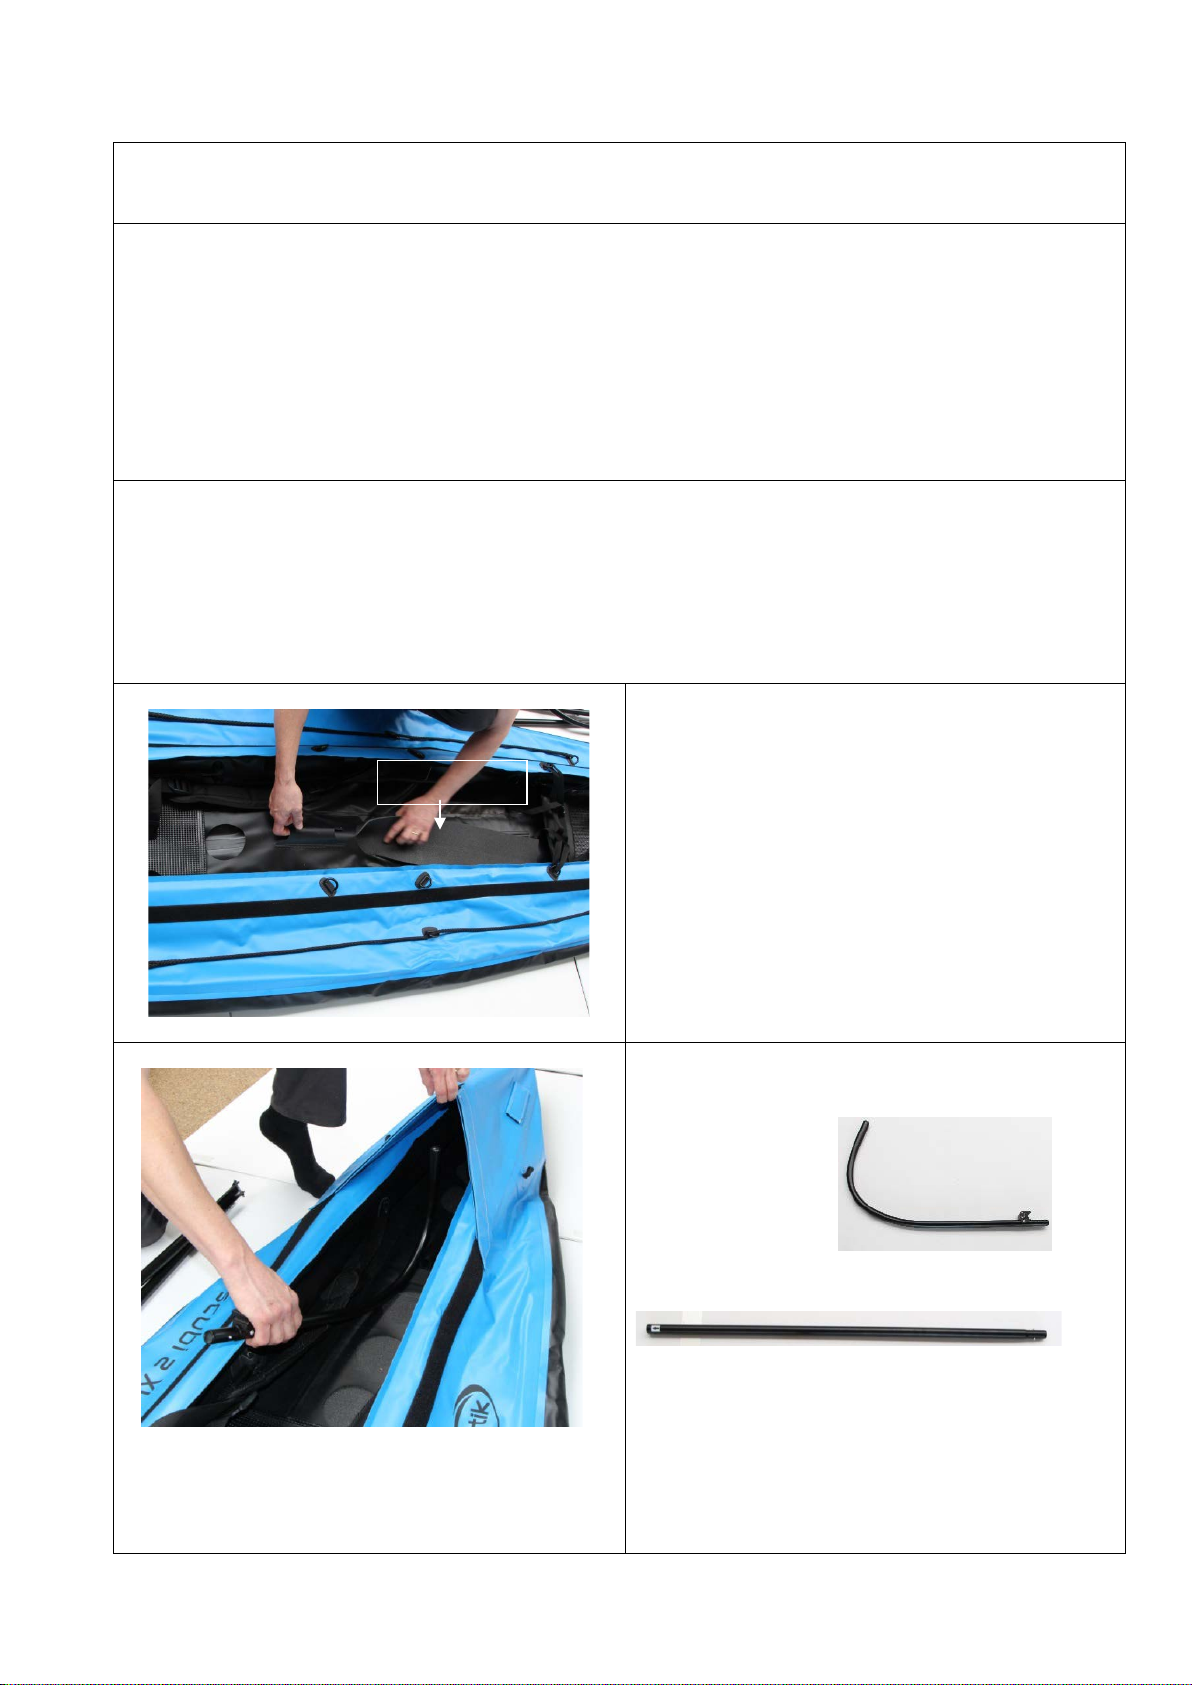
First unfold the hull.
Take the bow
segment
And the keel rod #1
(arrow ahead pointing towards bow).
Foam Pad

5
Insert the bow element as far as possible into the
bow.
First take the keel rod #1 under the front seat
(a) and then slide it forward through the sleeve
(b) ... (the arrow must point to the bow)
The picture on the left shows the sleeve welded
on the hull, into which the keel rod should slide.
Then clip the keel rod and the bow element
together (spring button system)
Take the keel rod #2, the one with the half
round end piece.
Remove the security pin.
sleeve
sleeve
a)
b)
6
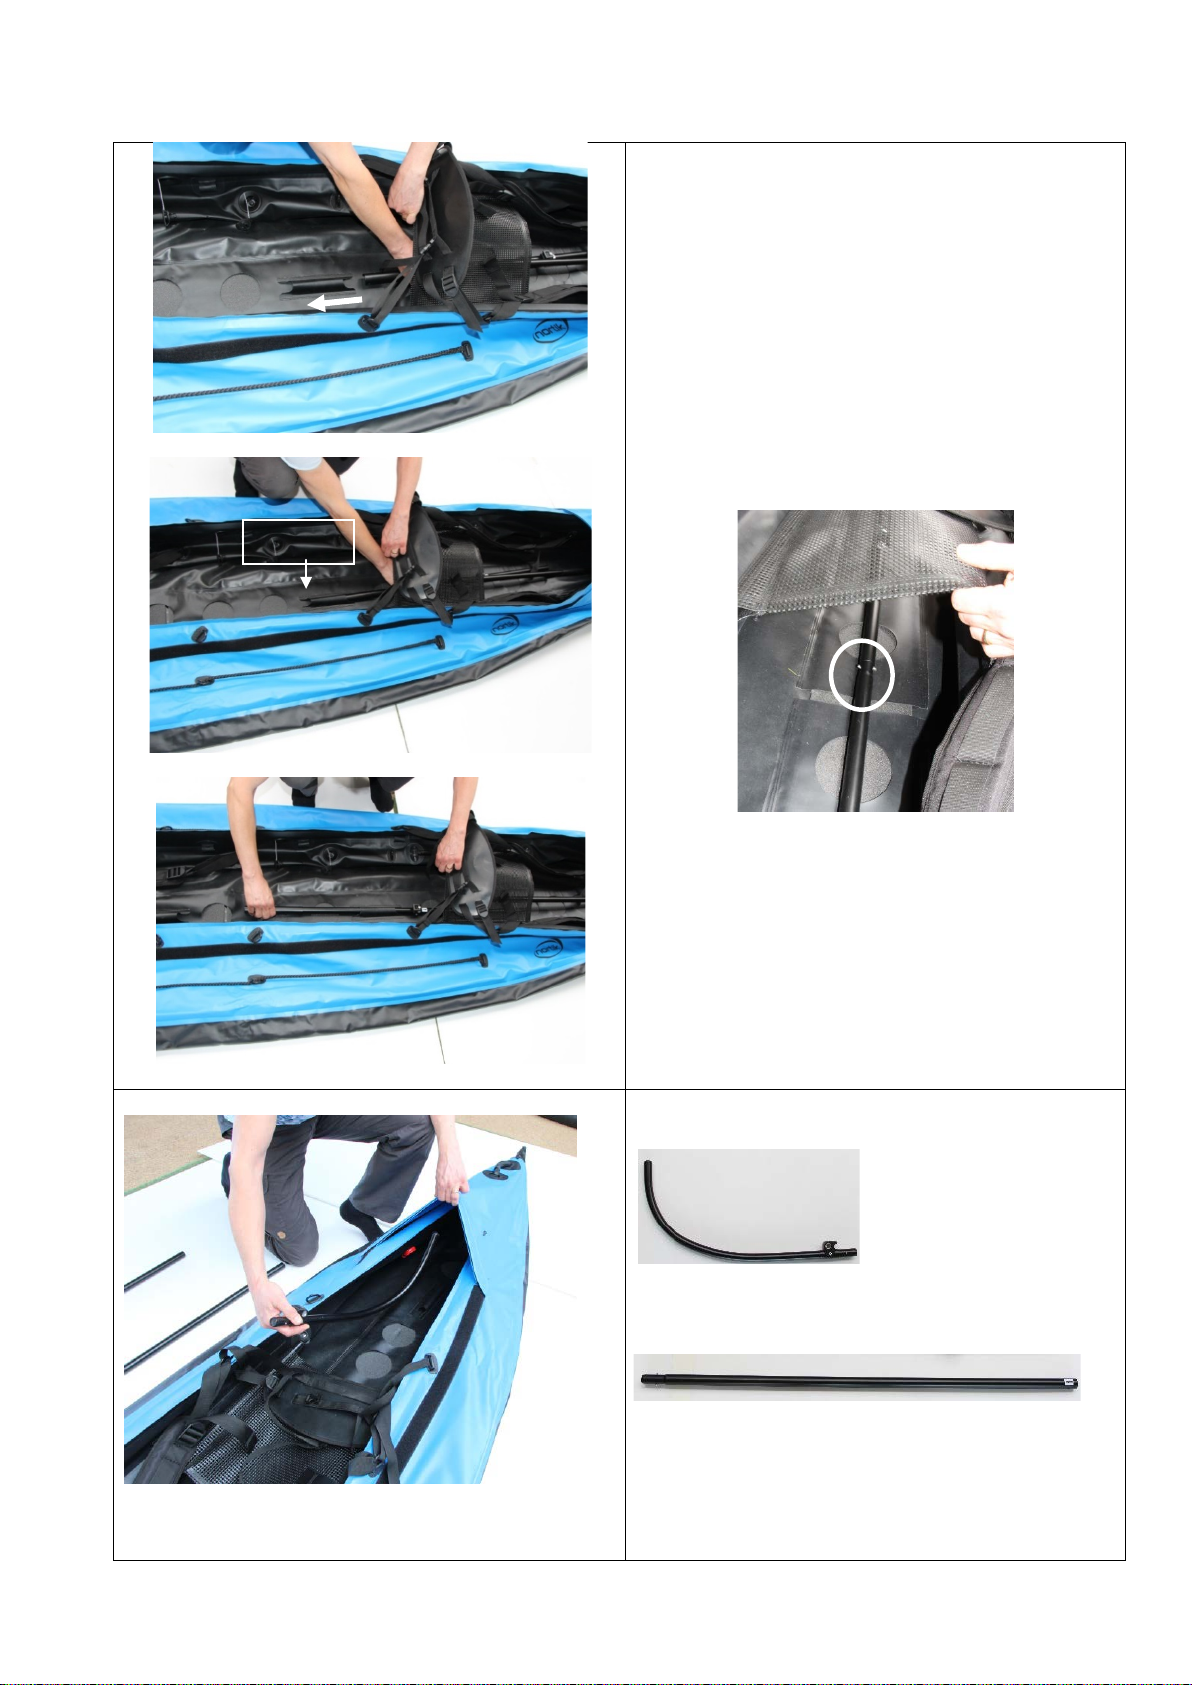
3)
Take the keel rod #2 under the front seat (the
arrow pointing towards bow)
And slide it (half-tube first) into the sleeve
located a little behing the seat.
Clip keel rods #1 and #2 together.
Take now the stern element
And the keel rod #4 (with the arrow at the back
end of the rod pointing towards the bow ).
sleeve
7
Insert the stern element as far as possible into
the stern.
First take the keel rod #4 under the back seat
and then slide it into the sleeve towards the stern
(the arrow is pointing to the front).
Clip the keel rod and the stern element together.
Then take the keel rod #3, the one with a
rounded tip:
Take the keel rod #3 under the back seat (the
arrow pointing to the front).
Then slide it with the rounded tip first into the
sleeve located a little ahead of the seat.
1.)
2.)
rounded tip
sleeve
sleeve
half round end piece
sleeve

8
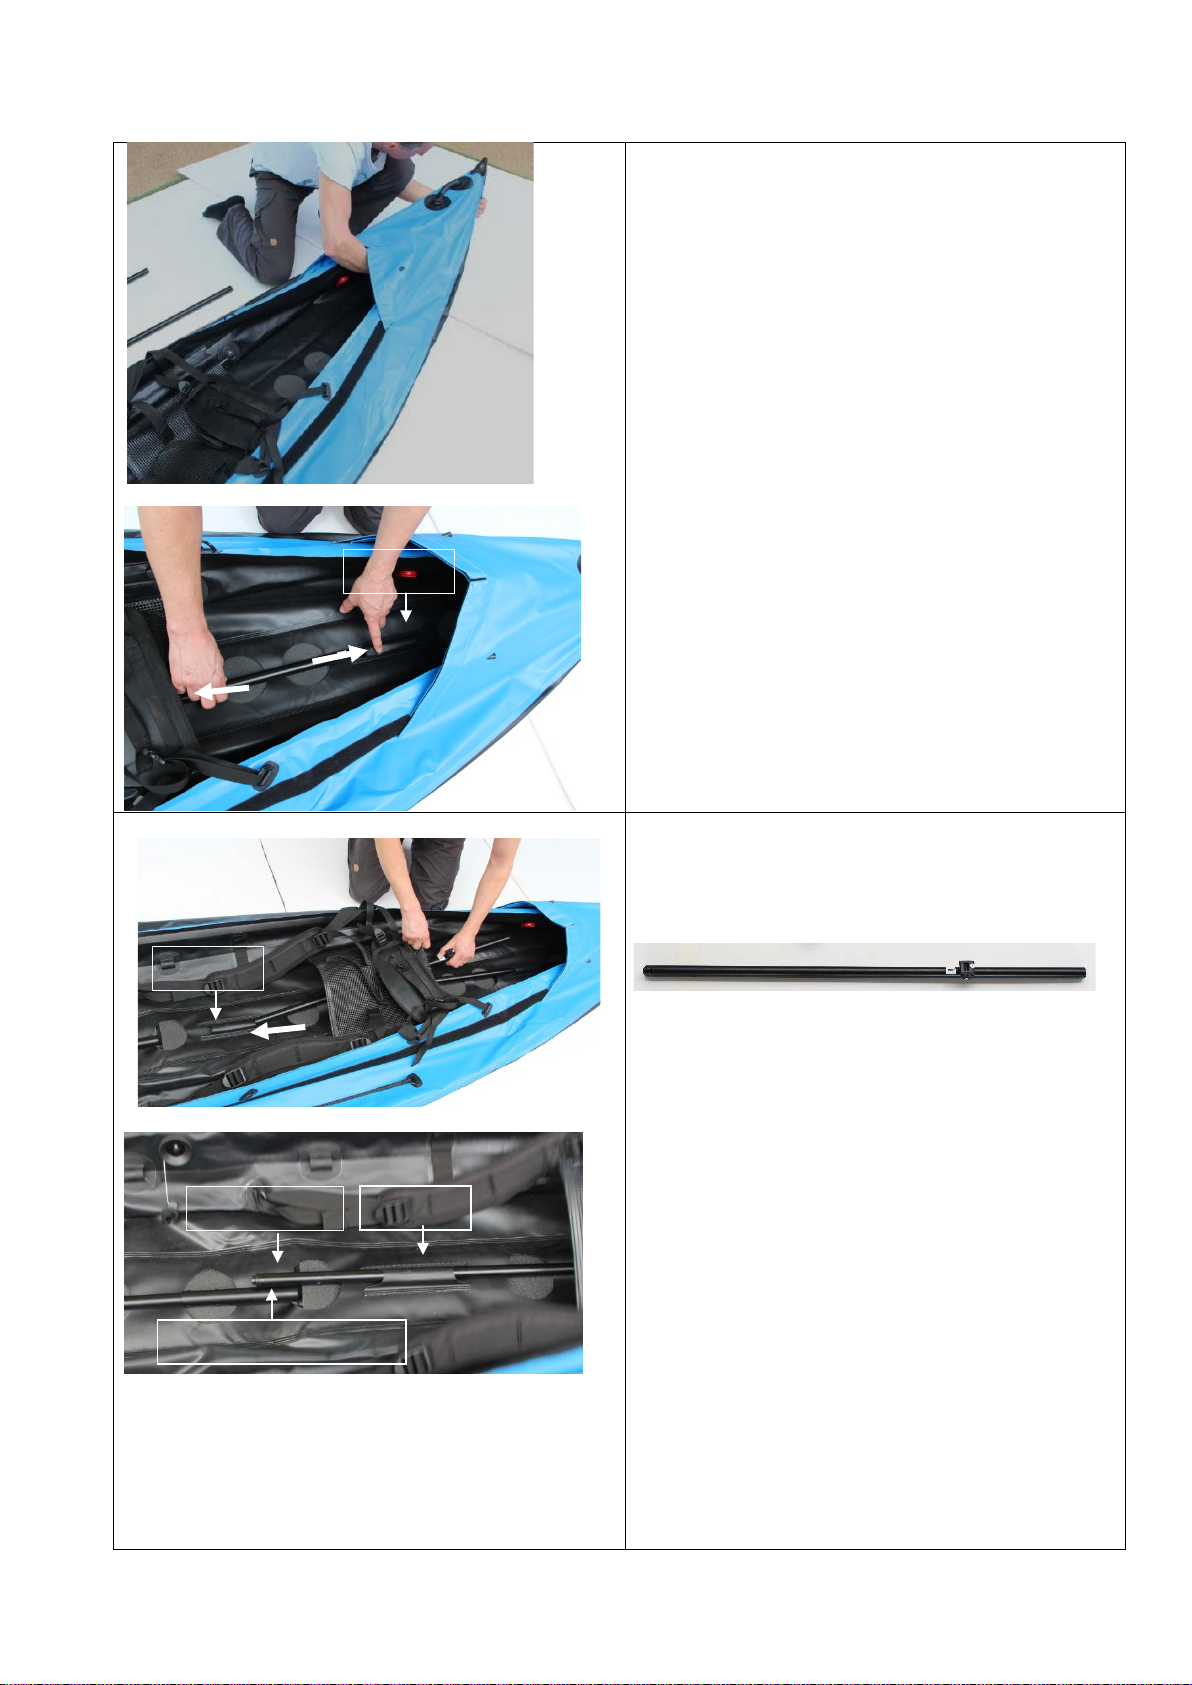
Clip keel rods #3 and #4 together. The
connection takes place under the back seat.
How to tense the keel:
Control the correct position of both bow and
stern elements. They should be centered and
pushed as far as possible into the hull.
Grab both middle keel rods and pull them
carefully up.
Caution: the half round end piece should be
placed above the rounded tip. Pull both up until
you can fit the first one upper the second one.
Make sure while pulling up that bow and stern
parts remain upright instead of twisting.
9
Slowly push both rods down into the hull.
Make sure that the rounded tip remains under
the half round end piece and push straight off.
If the rods are twisted, it can be difficult to get the
pin back in place in the next step.
When the rods reach the bottom of the boat, you
have obtained the required longitudinal tension.
The frame stretches now the hull as it should.
Insert the pin through the two rods and put the
rubber band around to lock it.
If you are unable to insert the pin, try to rotate
the rods to help align the holes.This will get
easier with a little pratice.
10
Now install the cross ribs
under the seats.
Each seat always comes with 2 cross ribs.
How to distinguish the cross ribs for the back
seat:
#4 is closed and narrow
#3 is open an wide.
How to distinguish the cross ribs for the front
seat:
#1 is open and narrow
#2 is closed an wide
Tip: To remember the order of the cross ribs, just of the hull shape, narrow at the front, wide in the
middle, narrow at the rear.
The open cross rib is always at the front of the seat! (comfort for the thighs)
Take the cross rib #3.
(1) Place it tilted onto the clip on the keel rob (in
front of the back seat)
(2) Then right it slowly up, while the clips
interlock.
cross rib #4
cross rib #3
cross rib #1
cross rib #2
Cross ribs back seat
Cross ribs front seat
2
1

11
When the cross rib sits upright, clip both C
ends in the seat bars.
Take the cross rib #4.
Clip it first onto the keel rod (at the back of the
back seat)and clip both C ends in the seat bars.
Install the same way the cross ribs of the front
seat, beginning with #2…(at the back of the
seat)

12
… and then the cross rib #1.
Now install both small cross ribs: one at the bow
(narrower) and the other one at the stern (wider)
At the bow as at the stern, place the cross rib
tilted onto the clip on the keel rod, then right it up
and push the ends into the intented holders on
each side of the hull.
Push from the outside of the hull to help the ends
of the cross rib fit into the holders.
bow cross rib = narrow
stern cross rib = wide

13
The red valves at stern are here juste in case of
overpressure. If the pressure inside the sponsons is to
high (while the kayak is exposed to the sun for
instance) these valves release automatically some air
and you can hear a hissing sound.
Now inflate the high pressure sponsons. There
are 2 sponsons on each side, which means 4 in
total.
You can find the adapter for the valves in the
repair set. Put it onto the pump.
The inflating valves have to positions that you
can adjust by pushing and turning the white pin
in the middle. In one position you can inflate
and disconnect the pump without letting the
air out again.
If you want to deflate, push in the pin and do a
half turn. The valve stays open.
Best is first to inflate the lower sponson on
one side to around 50%, then on the other side
equally. Then change again and fully inflate them
in turns.
Proceed likewise with the upper sponsons.
The ideal pressure is 0.2-0.25 bar (2.9-3.63psi)
Do not exceed it!
Your scubi 2 XL is now fully assembled and ready for use.
The following instructions cover the installation of all accessories:
•rudder system
•deck
•3rd seat
•Drop Stitch inset
•extra high backrest
•nortik kayak sail
Please find at the end of this manual important information regarding disassembly, transport, salt
water use and security matter.
14
4) Rudder system
Several actions only need to be made one time during the first assembly.
Bind first each steering rope extension to a
rubber band using a carabiner (this is a one-time
process)
Take both steering ropes (Bowden cables) and
push them into the sleeves on each side of the
back seat in any direction. This action is easier
while the sponsons are deflated.
rudder
blade
steering
bar
steering ropes
(Bowden cable)
clamp fixation for
the pull-up rope
(with velcro)
link carabiners
pull-up
rope
rubber bands
for steering
rope
steering rope
extensions
shackles for
steering bar

15
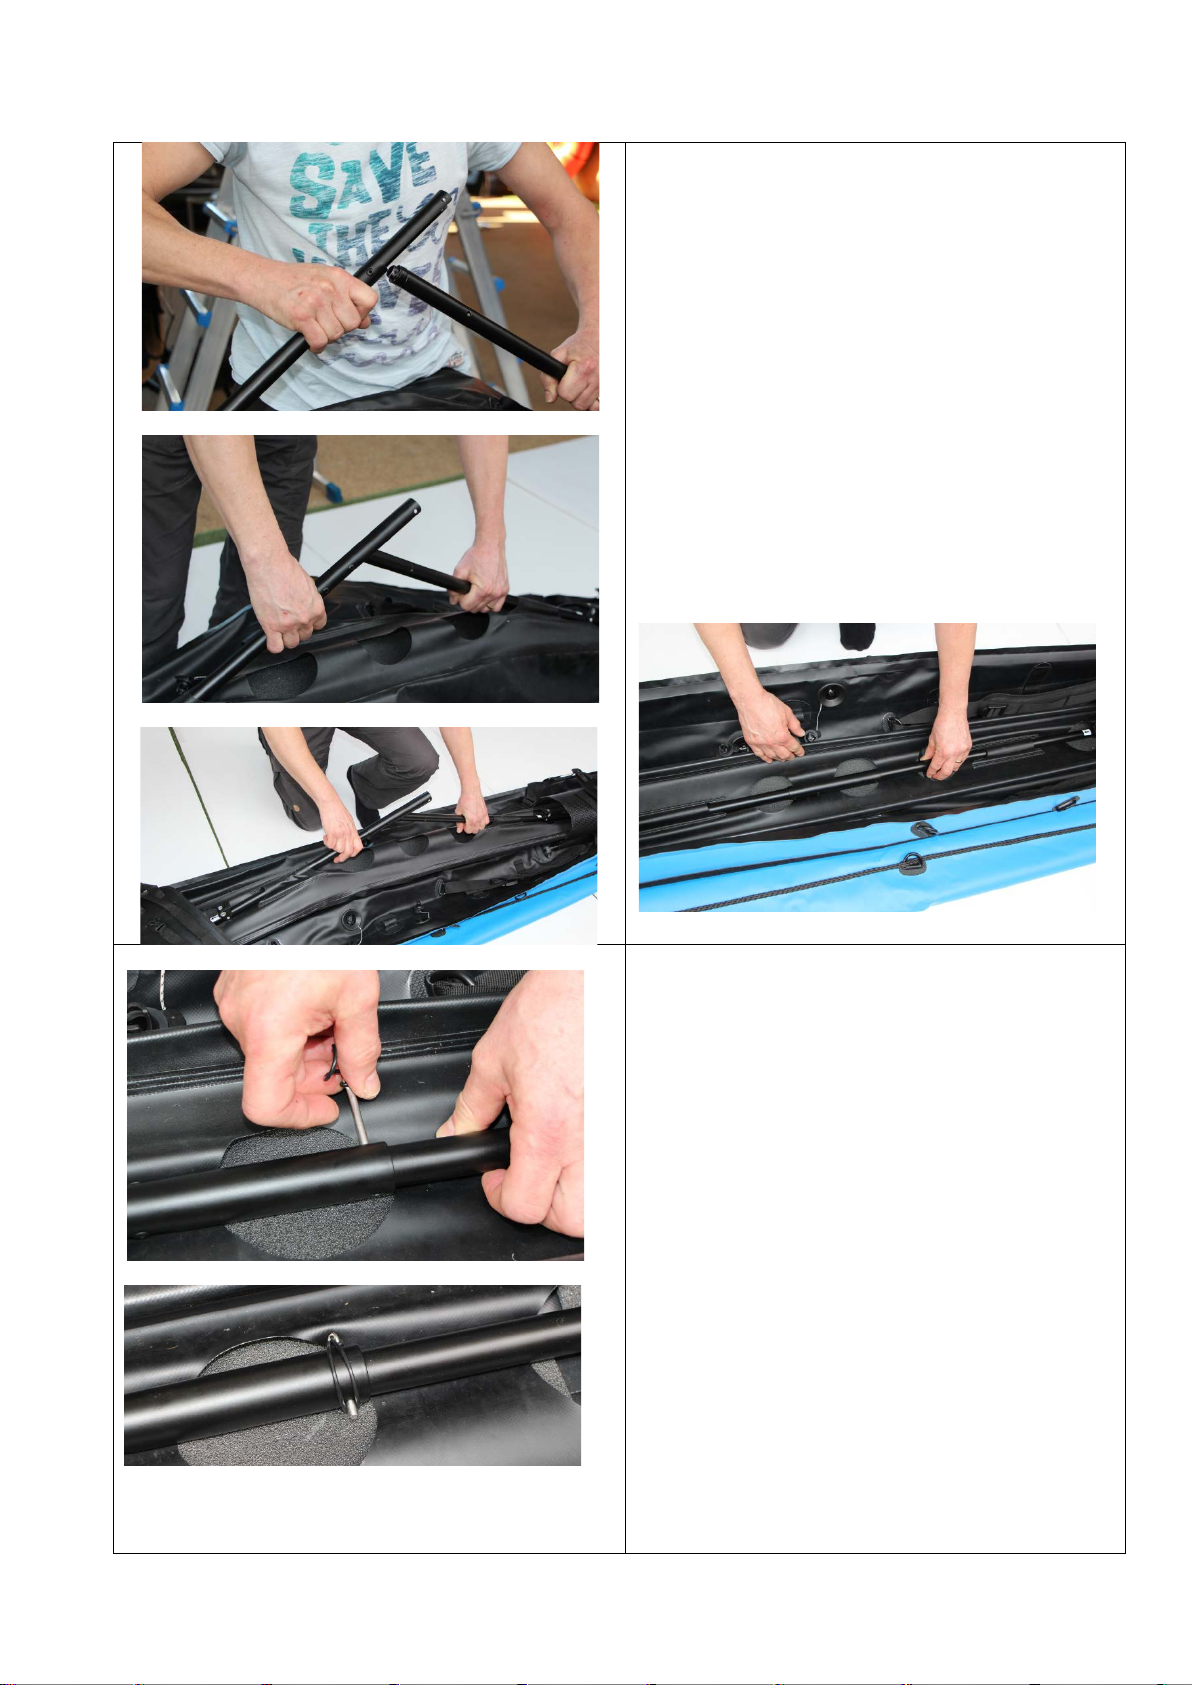
Pull the cables backwards and slip them into the
narrow intended tubes. It will be easier if you
push it out vertically into the tube while stirring it
to get it through.
Take the other end of the cable and slide it
through the strap in front of the seat. This will
maintain the cable on the side.
At the first assembly, take the small security ring
off the rudder blade and remove the pin (1).
Then unscrew the wing nut and take off the ring
of the spacer (2) Leave them aside for now.
front rear
2
1

16
Now place the rudder blade onto the cavity at the
stern and secure it with the pin by pushing it
through from above.
Secure the
pin by
placing back
the little ring.
Insert the straight end of the spacer into the hole
at the top of the blade, and the curved end into
the hole located on the cross beam.
Tighten the swing nut again on one end …
… and place the security ring back on the other
end.
(this was a one-time process)
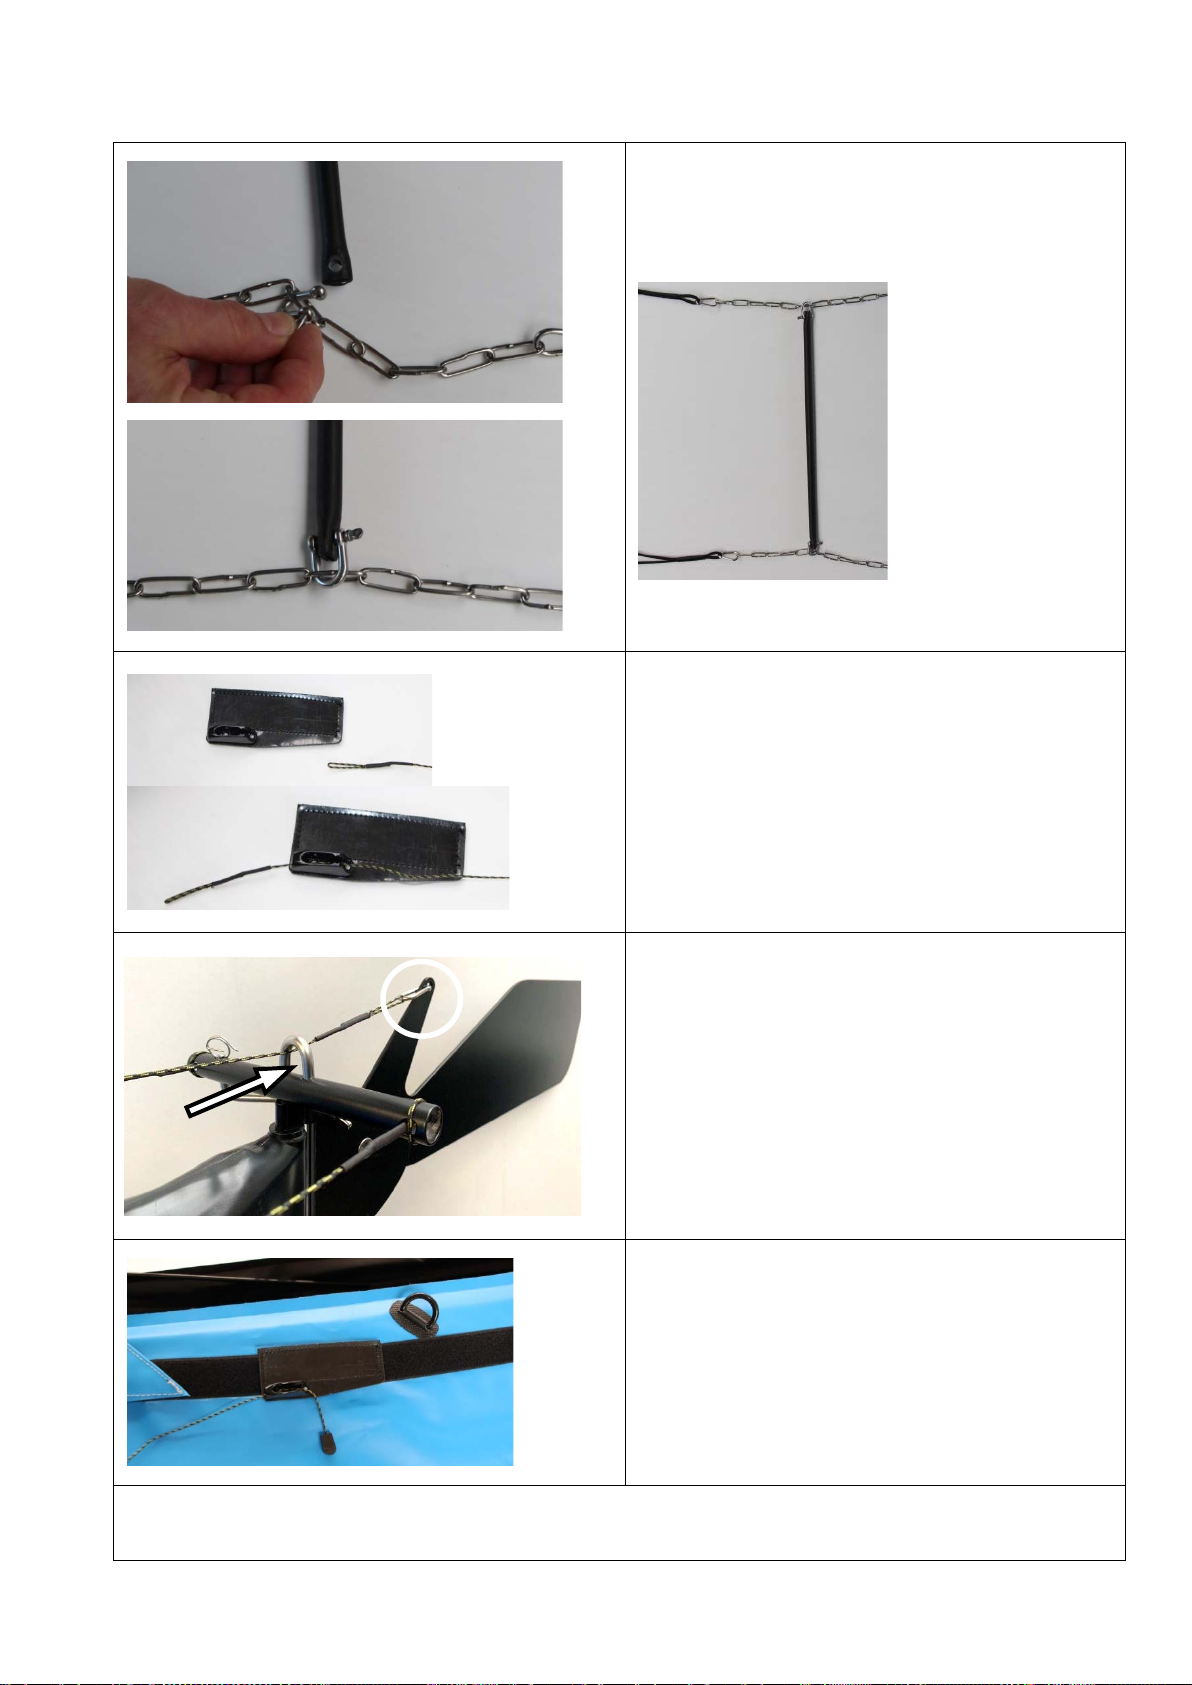
Then lead the two steering ropes through the
holes of the cross beam...

17
...and turn them around. They will lock
themselves by being tensioned.
Now fix the extension of the steering rope to
the D ring located before the front seat.
How to fix it: take the rubber loop into the D ring,
pull the whole chain into the loop and tighten.
Do it on both side.
Bind the chain to the end of the steering rope
by using a carabiner.
18
Position the steering bar as you like. You can fix
the bar at any point of the chain by using the
shackles.
You will operate the
rudder while pushing
with your feet on the
steering bar.
Take the pull-up rope and the fixation clamp
with velcro.
Lead the pull-up rope through the clamp .
Slide the pull-up rope through the loop of the pin
and attach it to the rudder using the last
carabiner.
You can put the fixation clamp wherever you
want on the velcro band near the back seat.
To remove the rudder system, just remove a few carabiners, the pin and the rudder, the rest can
remain in place.

19
5) Deck
The large velcro bands serve are used to install
the deck.
Attach first the deck at the stern and at the
bow.
scubi 2 XL has flaps at the bow and at the
stern. The deck goes under these flaps, so that
the water cannot penetrate in case of big
waves.
Open the flaps…
... attach the deck properly.
… close the flaps.
Then attach the deck along both sides.
The deck is fully installed. Now you can attach the optional sprayskirts or seasocks. Other
accessories to close your kayak are available such as the solo deck and hatch covers.

20
6) Third seat
The 3rd seat can be positioned in 3 different ways:
- young child seats rear facing
- older child/small person seats in the direction of travel
- solo paddling
The 3rd seat can only be installed on the intented short sleeves (see white circles).
Position 1 (young child):
Position 2 (older child):
Position 3 (solo):
Other Nortik Boat manuals


