Nortik Navigator User manual
Assembly Instruction nortik navigator
High performance touring kayak
QR code assembly video: QR code pdf downlaod:

2
Assembly Instruction nortik navigator
Dear Customer,
At first: please do not be alarmed by the extent of these instructions!
The assembly instructions are very detailed and almost every step is illustrated. You will
notice that it will help you at one point or another. After a few times and with a little practice
you won’t need the manual anymore.
You have purchased a nortik - navigator - an innovative single kayak with extremely high
performance, small packing size and little weight.
The first few setups are power intensive, since frame and skin have to adapt to another (the
hull expands a bit while/after assembling the first couple of times). The assembling gets then
easier each time.
Please take your time for the first assembling to learn about the special features. It is
strongly recommended following the single steps in the instructions carefully!
Otherwise, it will be unnecessarily difficult.
After some practice you will build it up without much hassle in about 15-20 minutes.
Always keep in mind that no one is born a master, and the individual assembling has to be
learned for each folding boat.
If you have any questions, your dealer will be happy to assist you. Otherwise you can also
contact us directly - as an importer (call: 0049/731/4007675, mail: kontakt@nortik.de).
Please also consider the instructions of “Care and Accessories” at the end of this manual.
Especially if you are planning extensive tours in salt water, which requires special care!
We hope you enjoy your new kayak!
Please note that there is an assembly video on YouTube:
https://www.youtube.com/faltboot_de

3
1) Overview parts
1) 1x Hull
2) 1x Bow element
3) 1x Stern element
4) 2x Thigh brace
5) 4x Side element
6) 2x Keel rod (18mm x 24mm)
7) 7x Cross rib
8) 2x Ridge bar (18mm x 18mm)
9) 1x Seat & Backrest
10) 2x Seat-Tubes
11) 2x Hatch-Covers
12) 1x Repair-Kit
2) Marking
All side elements have an arrow. These
arrows have to point towards the bow.
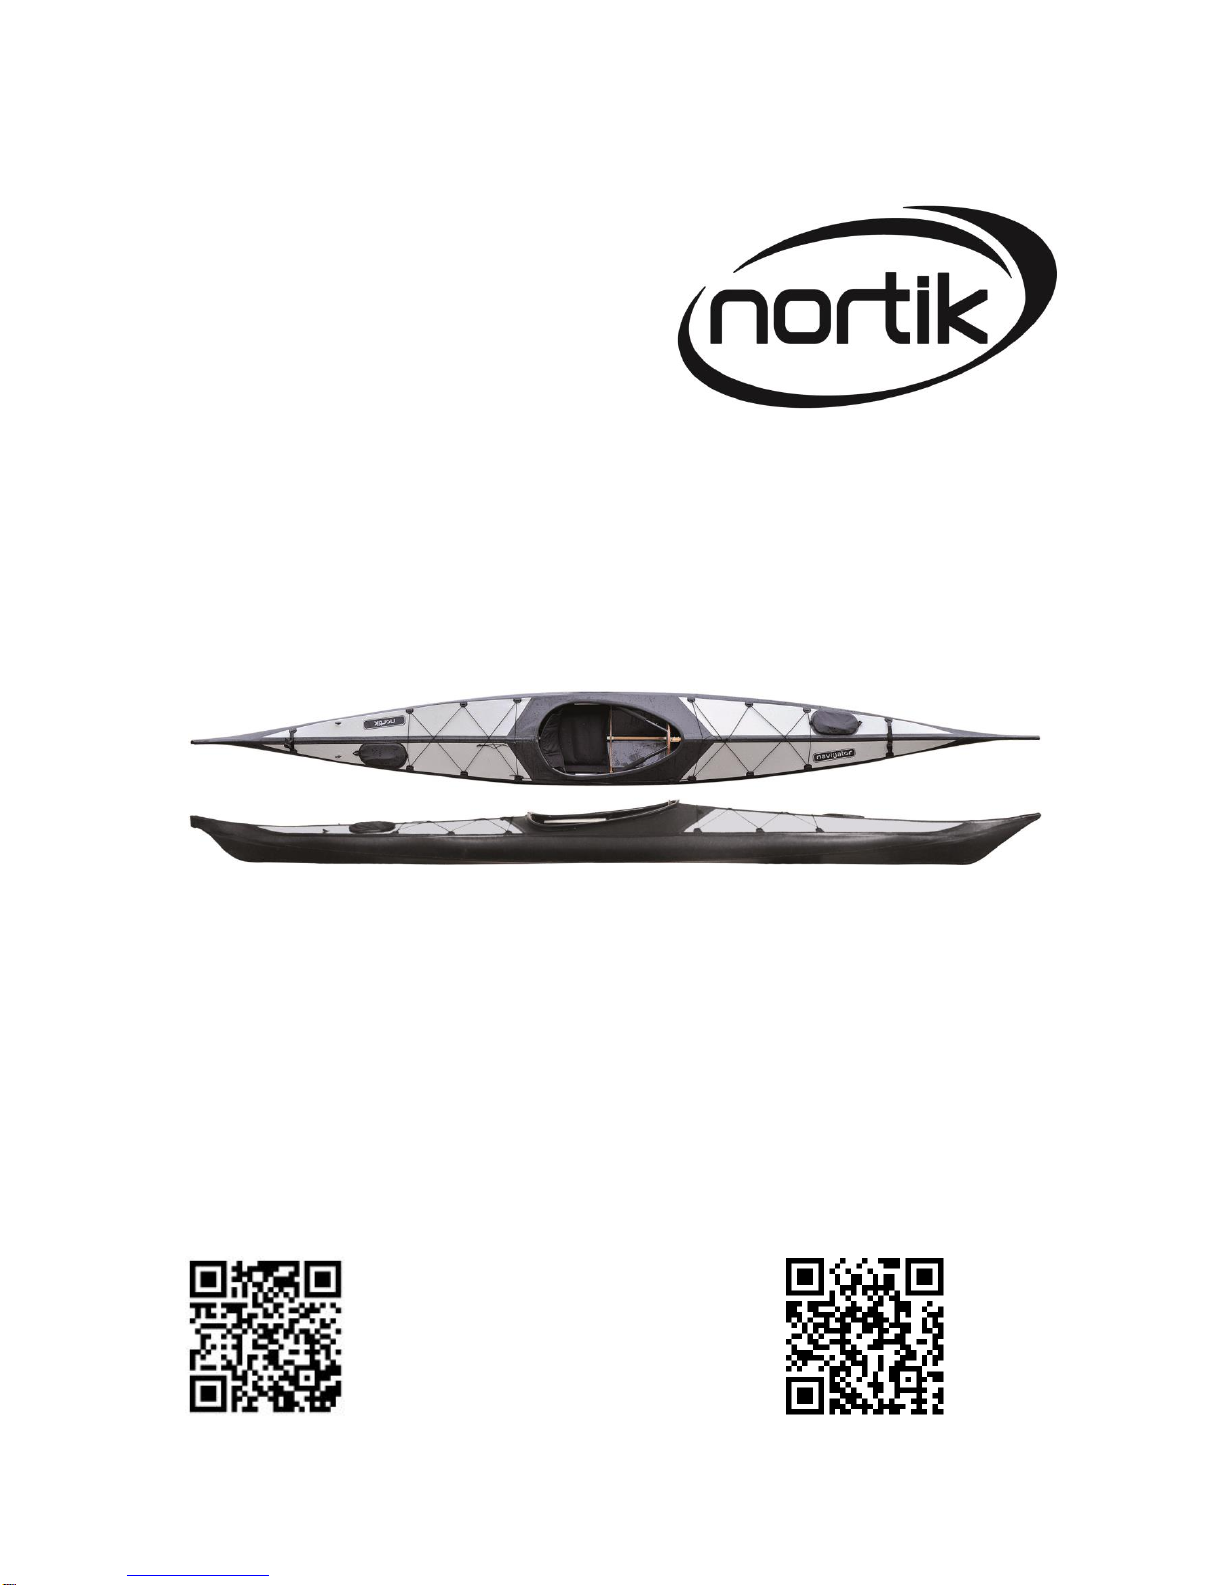
3) Assembly of the stern
You need:
1) Stern element
2) cross ribs #7 und #6
3) Keel with the steel-fitting (see picture)
4) Ridge bar (the shorter one)
5) 2x Side elements with the steel-fittings
(marked on the picture)
Note: You will see that the arrows on all
parts will point towards the bow after the
installation. This will help you to figure out
which parts and pieces are needed during
your further assemblies.
1)
4)
3)
2)
5)
7)
6)
9)
8)
12)
)
11)
10)

4
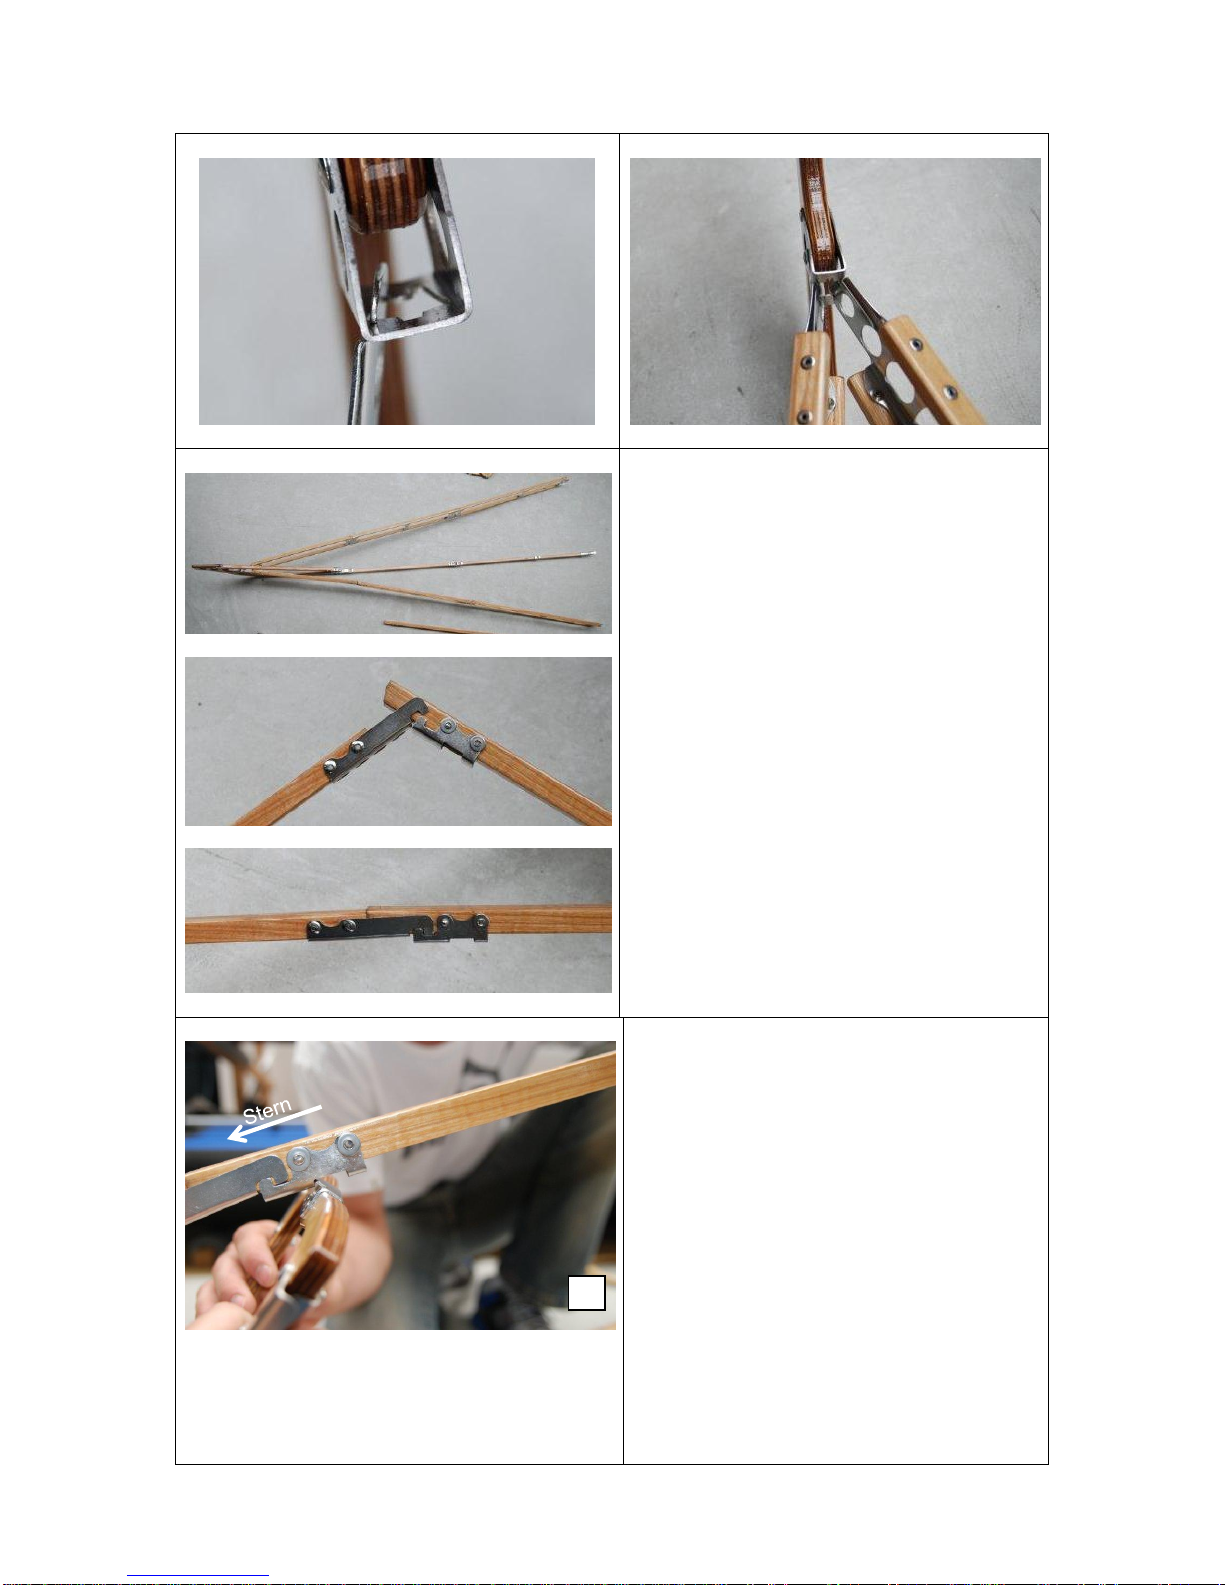
Connect the stern to the keel.
Take the side elements and unfold them.
Connect the side elements to the stern as
shown on the pictures.
5
Please install the ridge bar.
Now you can start the installation of the
cross ribs. Start with Cross rib #7 (the
smallest).
There are little “hooks / noses” on the top
and the bottom of the cross ribs. They have
to “look” to the stern of the Kayak. Install it
first to the ridge bar (like shown on the
pictures 1 and 2)
1

6
After installation of the cross rib to the ridge
bar you can connect it to the keel.
This can be a little tricky. If so, just bend the
hook/nose a little more downwards with
pliers.
Take one side element and hook the cross
rib into it. Please make sure that the side
element is still correct connected to the
stern:
Then hook the cross rib into the side
element on the other side.
Control again the connection of the side
element to the stern:
2
7
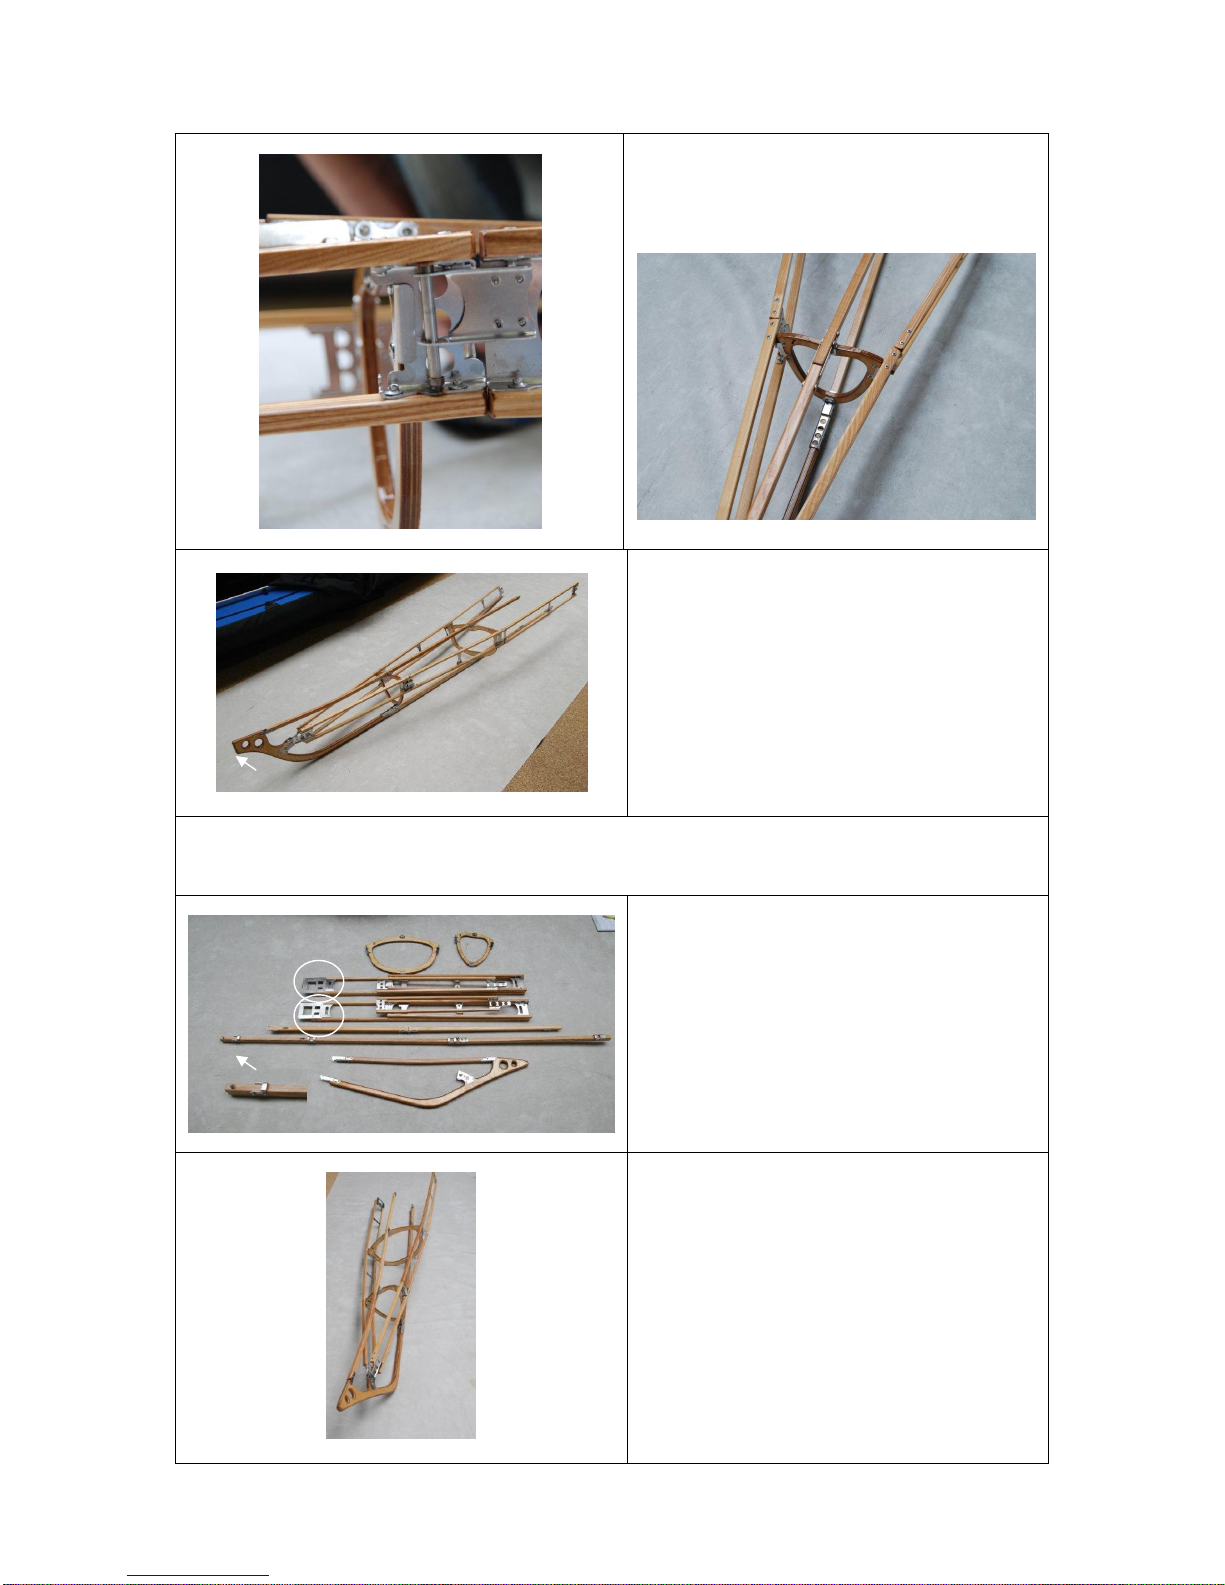
Proceed equally with cross rib #6.
The stern element is now fully assembled
and should result in the image on the left.
4) Assembly of the Bow
You need:
1) Bow element
2) Cross rib #1 and #2
3) The remaining keel-rod
4) Ridge bar (the longer one)
5) 2x Side elements
Please proceed analogously to the
assembly of the stern.
(The only difference is, that the
hooks/noses on top and bottom of the
cross ribs have to point towards the stern)
8
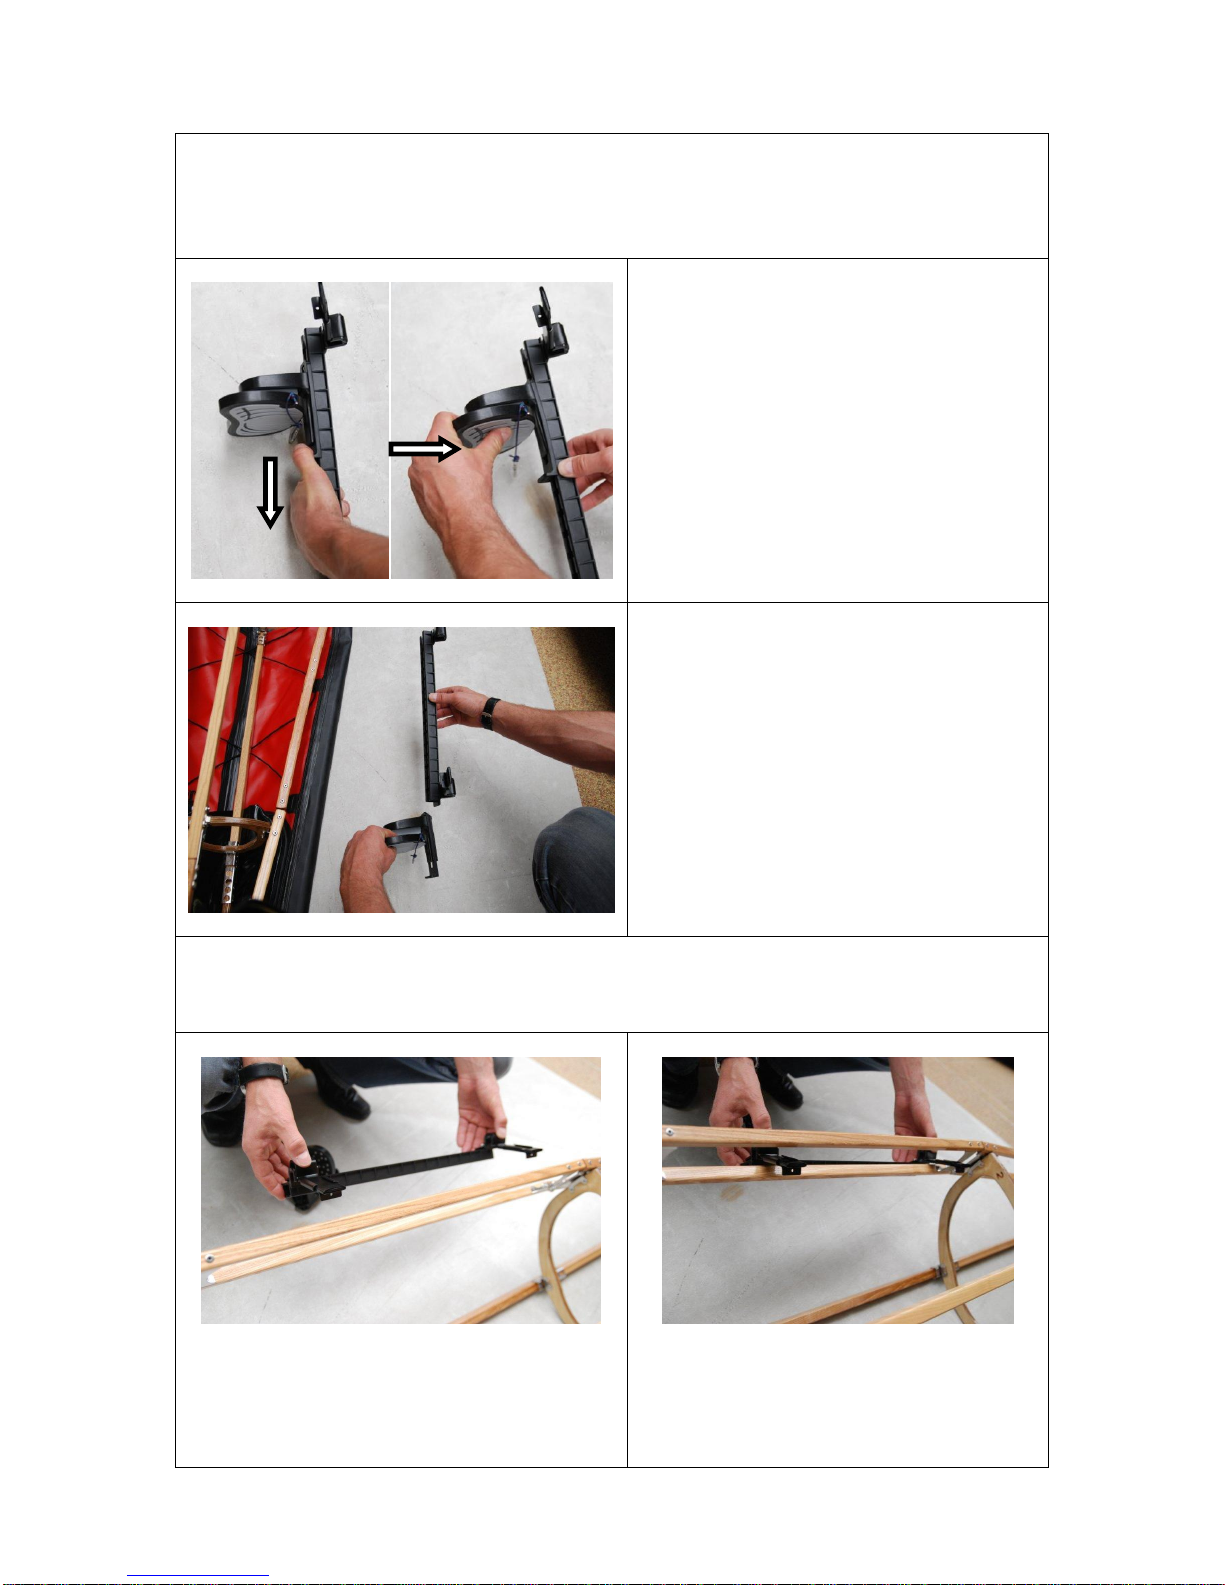
5) Installation rudder rails / rails for the foot pegs
Note: If you are not installing any rudder system / foot rest, you can skip this step
Take the steering/rudder rail.
You can adjust the pedals on the rail or
take it out completely by releasing the
locking (pull towards you) and pushing the
pedal towards the rail.
(see next picture)
Now take the rail and install it at the bow frame.
In the following you can see the procedure:

9
The result should look like the image on the
left.
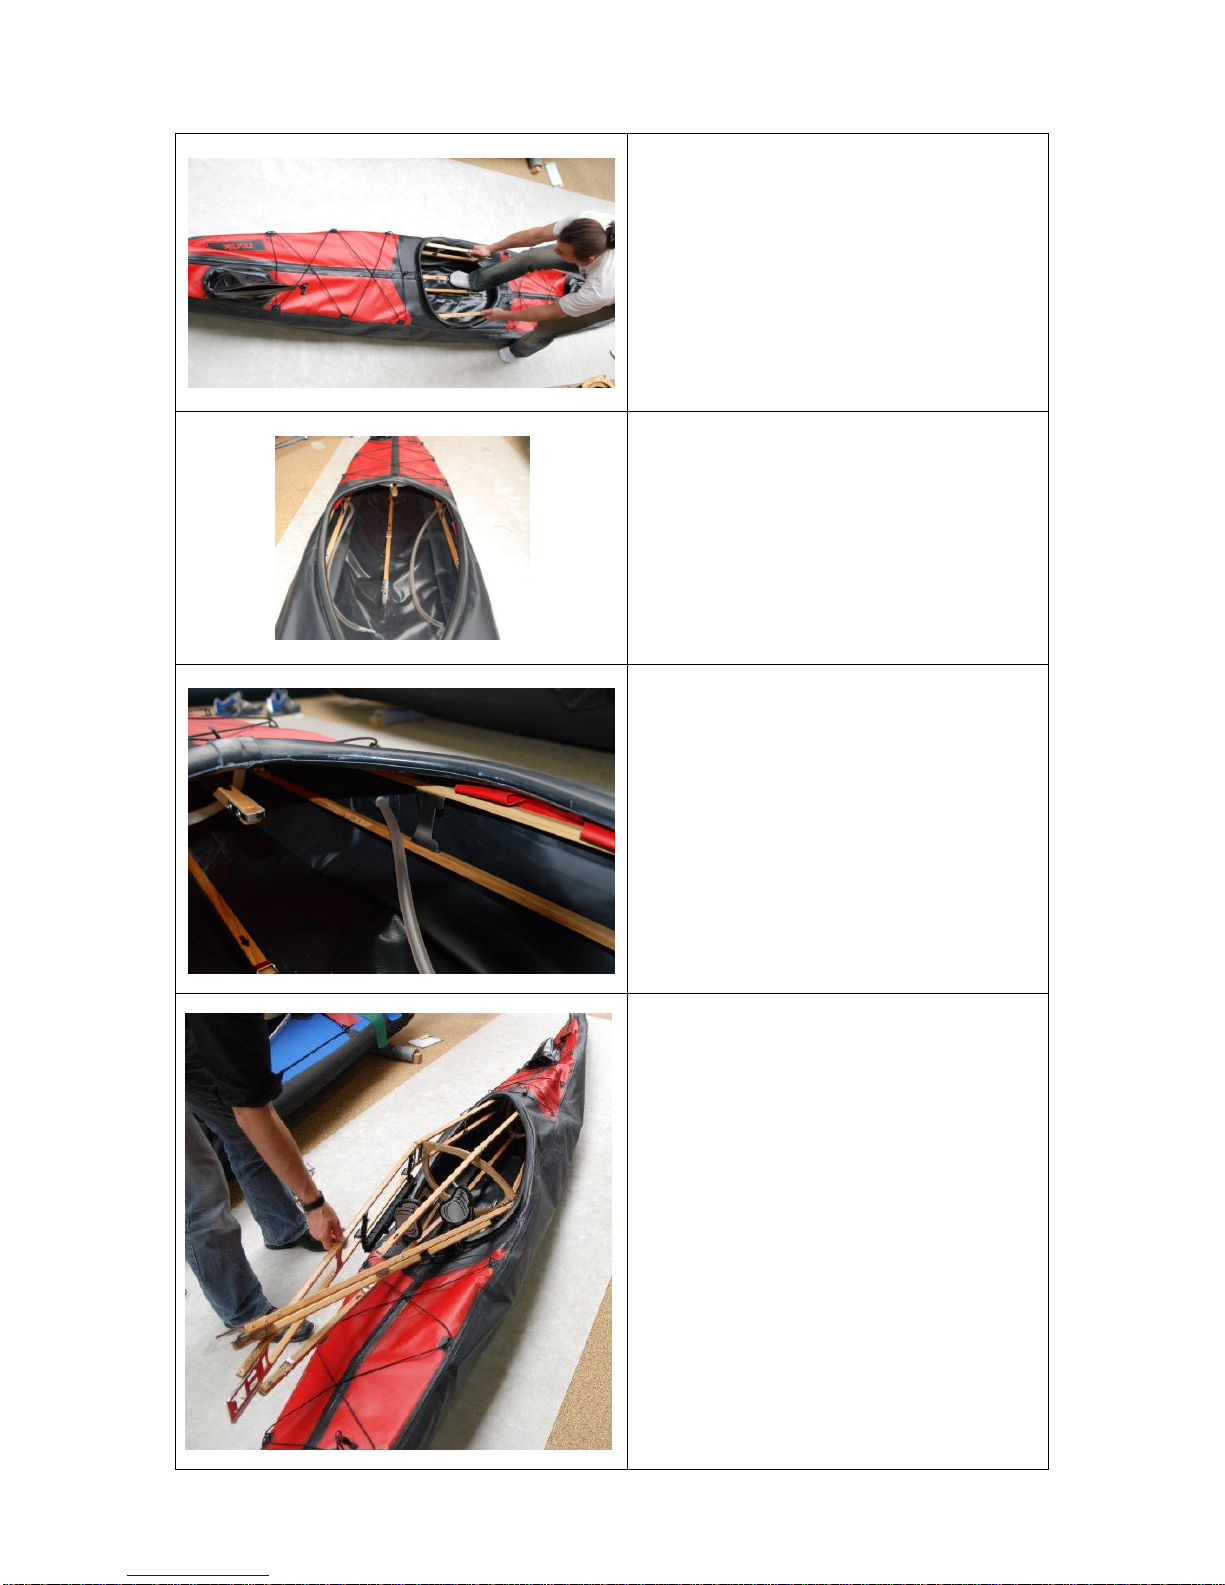
6) Inserting the frame into the hull
Roll out the hull.
First insert the stern element into the hull.
If needed, twist the frame by doing so, but
make sure to place the frame (ridge bar
and keel) centered!
10
Push the frame into the hull. Try to
orientate at the ridge bar and the
reinforcement strip on the deck to insert the
frame centrally.
The result should look like the picture on
the left.
Make sure to take the filling tubes for the
sponsons between the stringer of the side
elements.
Proceed likewise with the bow element.
NOTE:
At the beginning the bow sits very tight
inside the hull and it can get difficult to get it
out again (see notes for disassembling). By
lubricating or by putting a thin plastic bag
around the frame you reduce the friction.
11
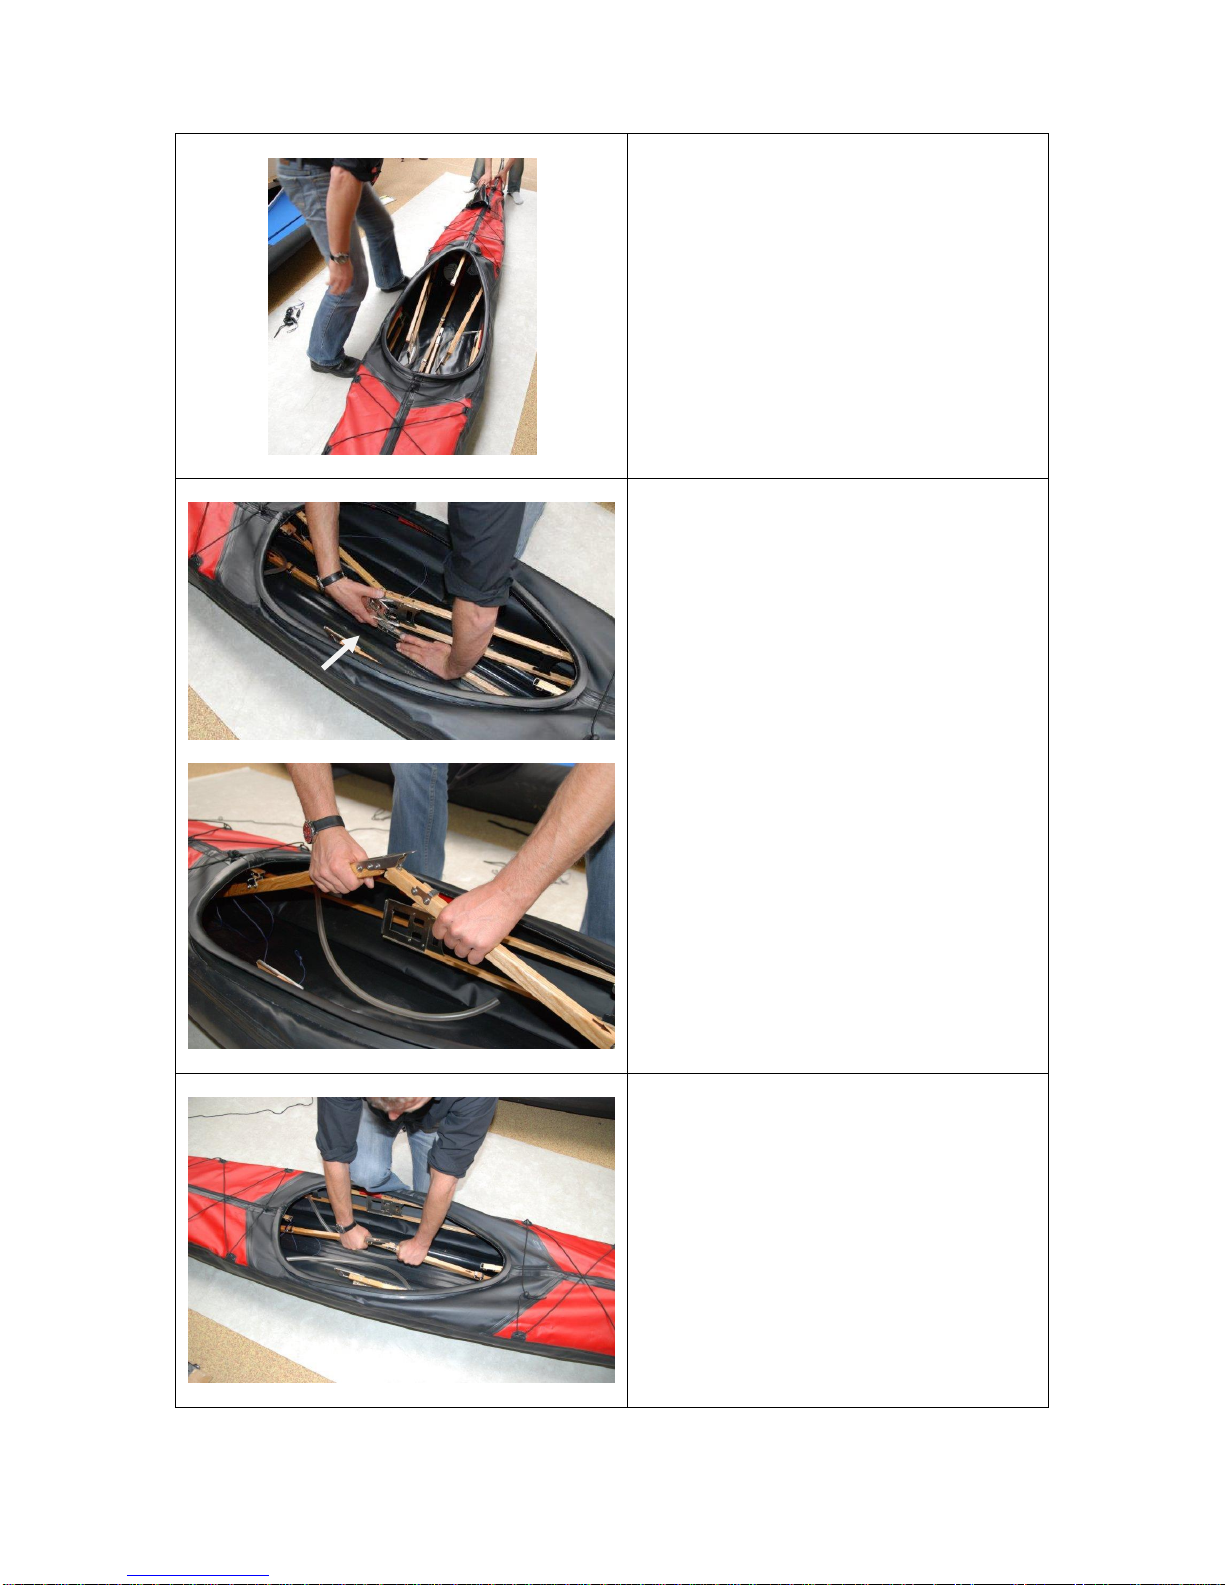
Again: Make sure, that the frame lays flat
and centered inside the hull.
Then take the side walls and insert the
narrow fitting into the larger fitting and
press the side elements outwards.
Take the two keel rods upwards and place
the one with the overlapping fitting over the
other one.
Gently push the two rods downwards.

12
Now take cross rib #5 and install it.
Important: Install the frames #5 and also
#3 so that the ridge bar can snap into the
fitting on the top of the cross rib. The fitting
points away from the cockpit.
Make sure that the side fittings of the cross
rib are properly positioned into the side
elements. In order to do this, you may
have to push it into the right position
towards cross rib.
Insert ridge bar into the cross rib.
Now take the seat with the inflating tubes
facing to the front of the cockpit.
Insert the two seat rods into the seat.
Note: Your seat has inflatable "hip-fit-
pads" on the sides, which will provide more
contact with your boat.
(not shown on the pictures)

13
Push the two seat rods into the cross rib
#5.
Then take half cross rib #4 and push it
onto the two seat rods,…
…and by keeping them in place, install the
half cross rib first to the side elements…
…before pushing it onto the pickup on the
keel rod.
The “nose” has to point towards the bow.
14
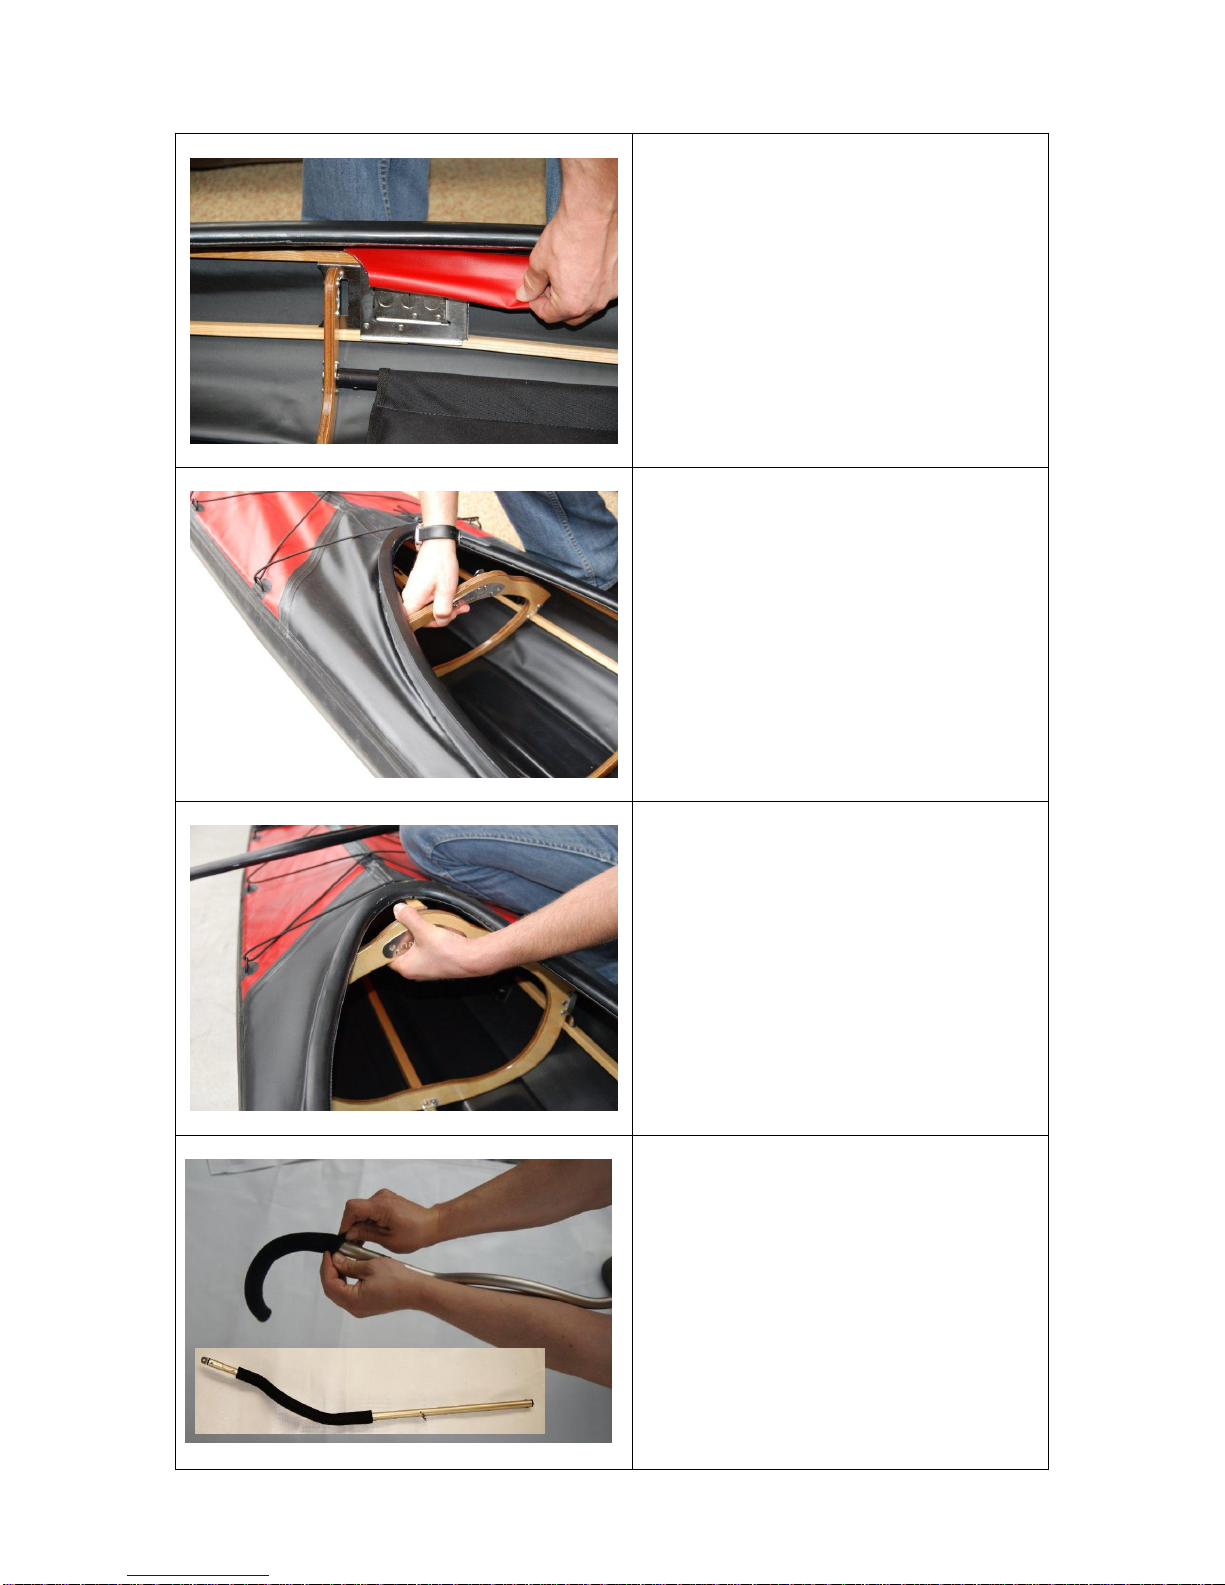
Make sure, that the flaps for the thigh
braces are not jammed behind the side
elements.
Install cross rib #3 just as #5.
Insert ridge bar into the cross rib.
Take the thigh braces and slide on the
neoprene sleeves.
Note: This is a one-time installation for
your new boat.
TIP: Put some dish liquid into the
neoprene sleeve to put it on easier.
(shown on the thigh braces of the nortik
argo)

15
Push the thigh brace through the flaps and
the loops from the "hip-fit-pads" of the seat
into the hole in cross rib #5 towards the
stern.
The front end of the thigh brace is pushed
into cross rib #3.
Therefore push the sliding sleeve towards
the cross rib until the snap button locks
into the hole.
Install the back rest.
The straight side faces downwards, the
curved upwards.
16
Lead the strap through the D-ring on the
thigh brace, then lead it back though the
counterpart on the back of the back rest.
Attention:
Unlike shown on the pictures is your boat
already equipped with a reinforced
backrest and quick fastener.
Lead the two straps on the back around
cross rib #5 and close them with the quick
fastener.
If you are not installing a rudder system,
you can now inflate the sponsons by
using the filling tubes.
It is best to inflate the sponsons with the
mouth. When you notice, that it gets harder
to inflate, it is usually the right pressure.
First inflate one side only a little, then the
other side. Then inflate the one side
completely, and finally the other.
17
Make sure, that the stringer don't get
pushed into the cockpit. That means too
much pressure on the sponsons.
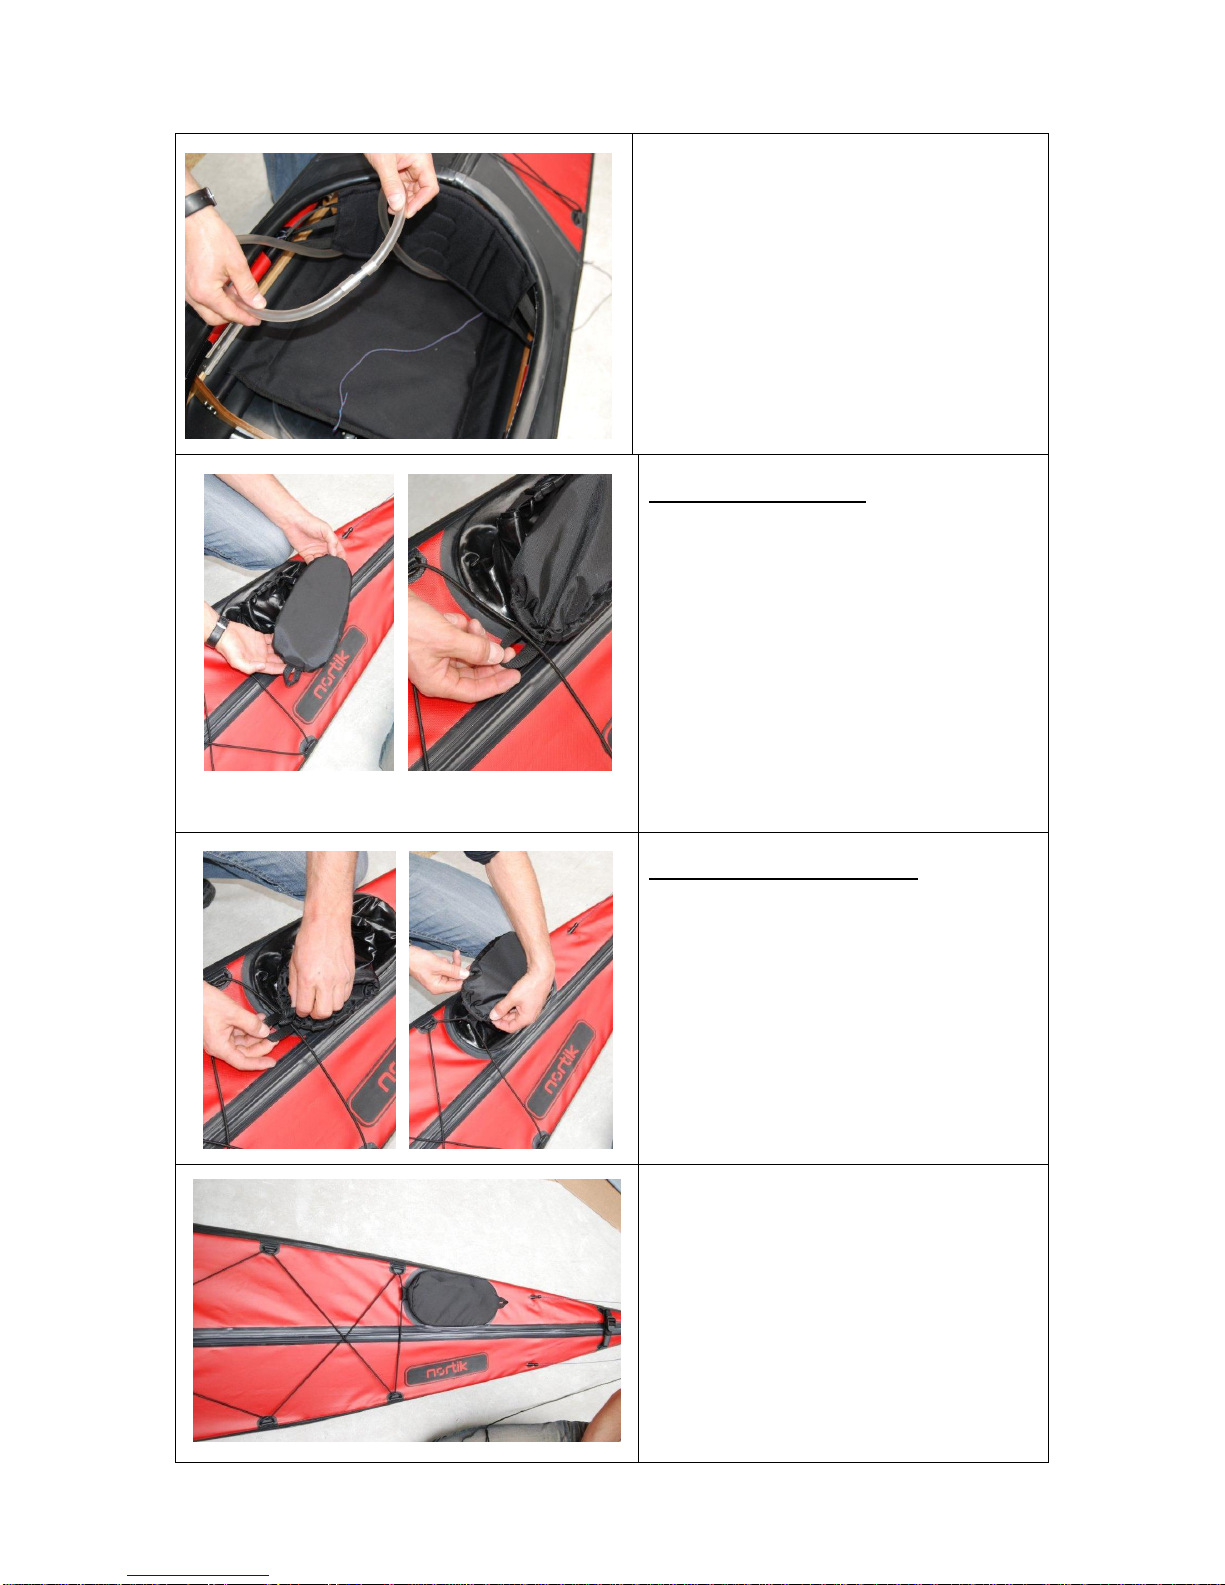
The filling tubes are then connected with
the connecting pipe. By connecting the
tubes you will provide a pressure
equalization, which guarantees an ever
symmetrical underwater hull.
Install the deck lining:
If the deck lining isn't already preinstalled,
you will have to do it once on your new
boat.
The deck lining can be installed in
different ways.
One suggestion is, to form a loop, lead it
through the middle D-ring and lead the
two ends back through the loop.
But you are free to attach the lining as
you want.
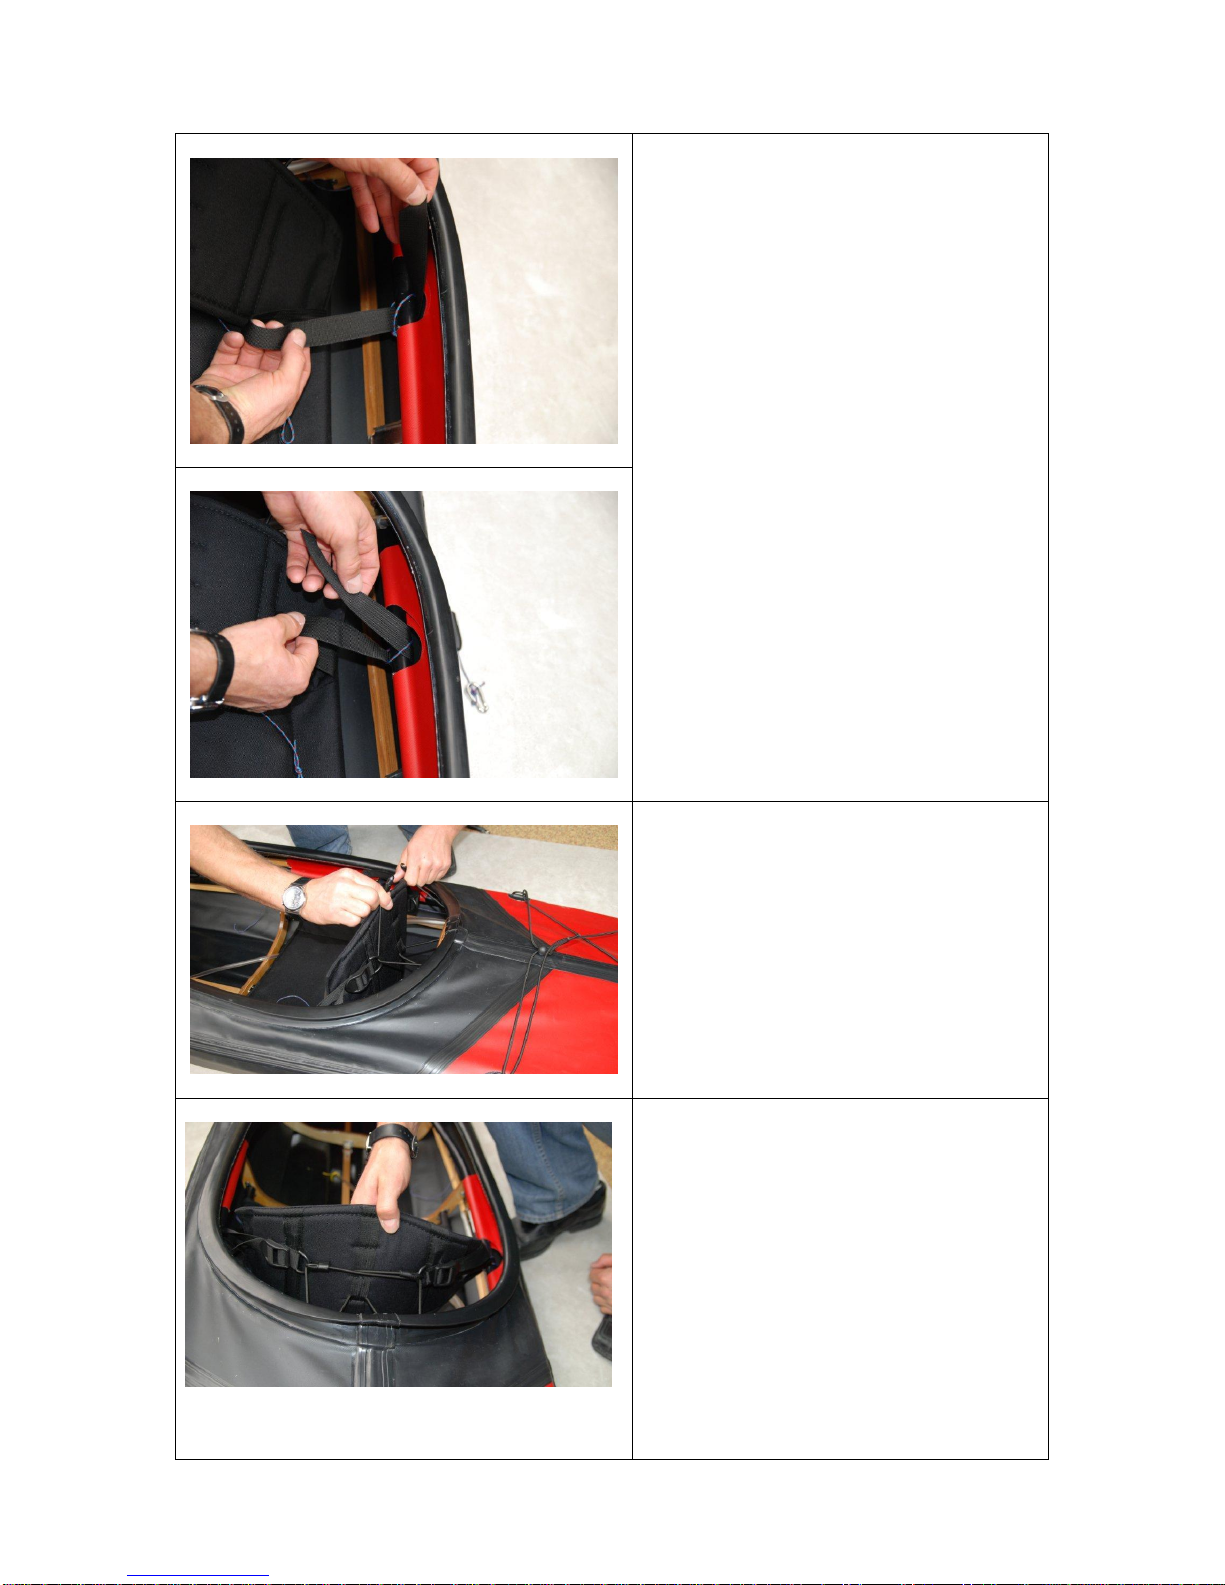
Cover for the loading hatch:
Please secure the hatch cover at the first
assembling to the deck lining on the fore
ship. It can stay there, and you won't lose
it.
Lay it "on the back", run one hanger under
the lining and then the whole cover
through it.
Now the hatch cover is securely
connected to the lining and stays on
board.
18
If you haven't installed a rudder system, the assembling is done. Please see the notes for
disassembling.
The next step is the installation of the rudder system. A few things have to be done here only
once. It is not necessary to redo them at further assembling.
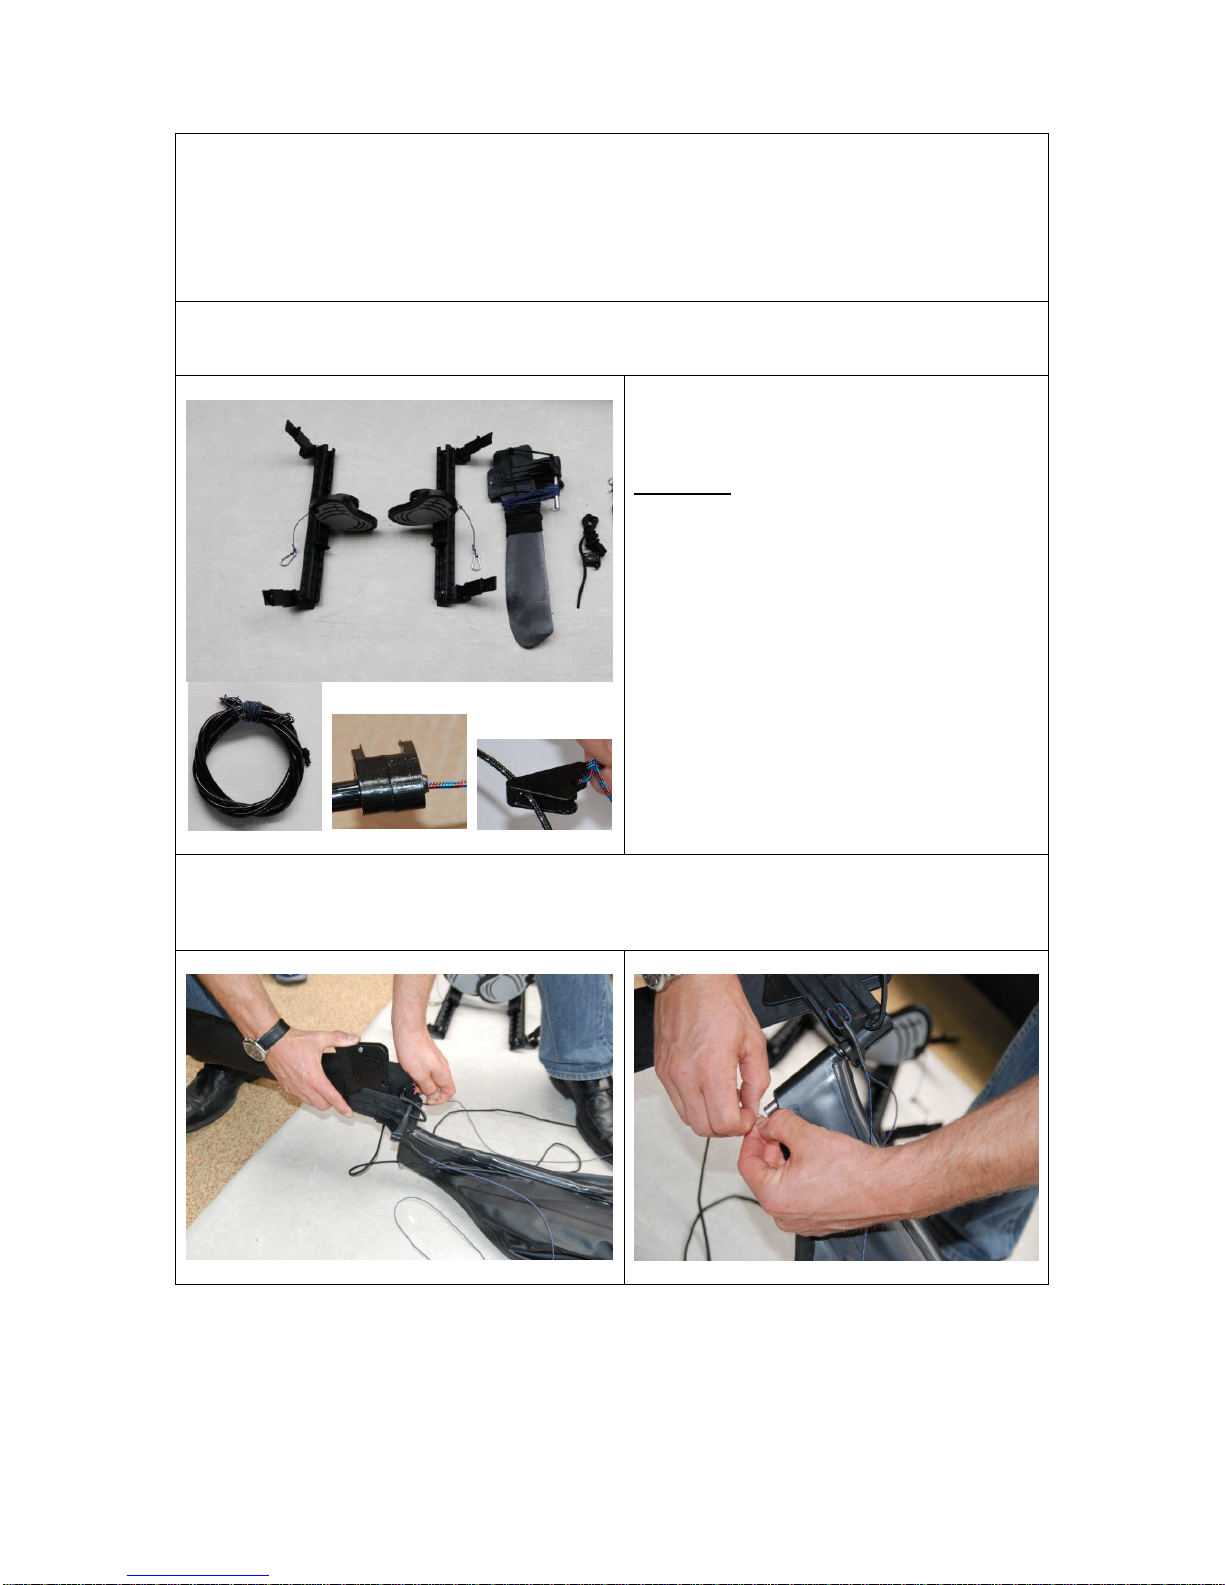
7) Installation of the rudder system
You have already installed the two rails
(see installation steps above)
It remains:
2x pedals
2x rolled up bowden wire (1)
1x rudder blade (2)
1x pull-up cord (3)
2x holding clip for cockpit (4)
2x cable clamp (5)
2x loose ropes (no pic)
Take the rudder blade and insert it on the pickup on the stern. Therefore take off the secure
ring, slide the rudder into the pickup and re-secure it with the ring:
1)
2)
3)
4)
5)

19
Unroll the two bowden wires. They both
have a little rope and a carabiner at the
end.
Detach the short rope and the carabiner
from the bowden wire.
Lead the short rope from behind through
the bigger hole in the side of the rudder
head.
NOTE: The rope will just squeeze through
the hole. If necessary help along with a
small screw driver or similar.
This has to be done only once!
Now re-attach the carabiner.
Proceed identically on the other side.
The rope and the carabiner always stays on
the rudder.

20
Now lead the bowden wire from the inside
of the boat (through the loading hatch)
through the small tube at the stern's deck.
Proceed as follows:
First lead the rope through the tube…
...then push the bowden wire through the
opening.
It is best to do some circling movements
while pushing firmly, until the bowden wire
comes through the opening.
Now lead the bowden wire from the back to
the front inside the cockpit. Lead it out- and
side wards above the cross ribs to the front.
At that position it won't bother you, not even
while loading the boat.
Now lead the bowden wire from the back to
the front inside the cockpit. Lead it out- and
side wards above the cross ribs to the front.
At that position it won't bother you, not even
while loading the boat.
Also lead it outward cross rib #5 and behind
the "hip-fit-pads".
NOTE: If you use the rudder system
regularly, you can leave the bowden wires
in the boat.
The bowden wire ends in the cockpit.
Other Nortik Boat manuals


