Nortrac 3-Pt. Landscape Rake User manual

SAVE THESE INSTRUCTIONS
3-Pt. Landscape Rake
Owner’s Manual
WARNING: Read carefully and understand all ASSEMBLY AND OPERATION
INSTRUCTIONS before operating. Failure to follow the safety rules and other basic safety
precautions may result in serious personal injury.
Item # 51454, #51455, #51456

Page 2 of 14
Thank you very much for choosing a Nortrac™product!
For future reference, please complete the owner’s record below:
Serial Number/Lot Date Code: ________________________________
Purchase Date: ____________________________________________
Save the receipt, warranty, and this manual. It is important that you read
the entire manual to become familiar with this product before you begin
using it.
This 3-Pt. Landscape Rake is designed for certain applications only.
Northern Tool & Equipment is not responsible for issues arising from
modification or improper use of this product such as an application for
which it was not designed. We strongly recommend that this product not
be modified and/or used for any application other than that for which it
was designed.
For technical questions, please call 1-800-222-5381.

Page 3 of 14
Table of Contents
Intended Use..........................................................................................................................................4
Technical Specifications......................................................................................................................4
Important Safety Information...............................................................................................................4
Specific Operation Warnings...............................................................................................................5
Assembly Instructions..........................................................................................................................6
Before Each Use....................................................................................................................................8
Operating Instructions..........................................................................................................................9
Maintenance ........................................................................................................................................10
Parts Diagram......................................................................................................................................11
Parts List..............................................................................................................................................11
Replacement Parts..............................................................................................................................12
Limited Warranty.................................................................................................................................13

Page 4 of 14
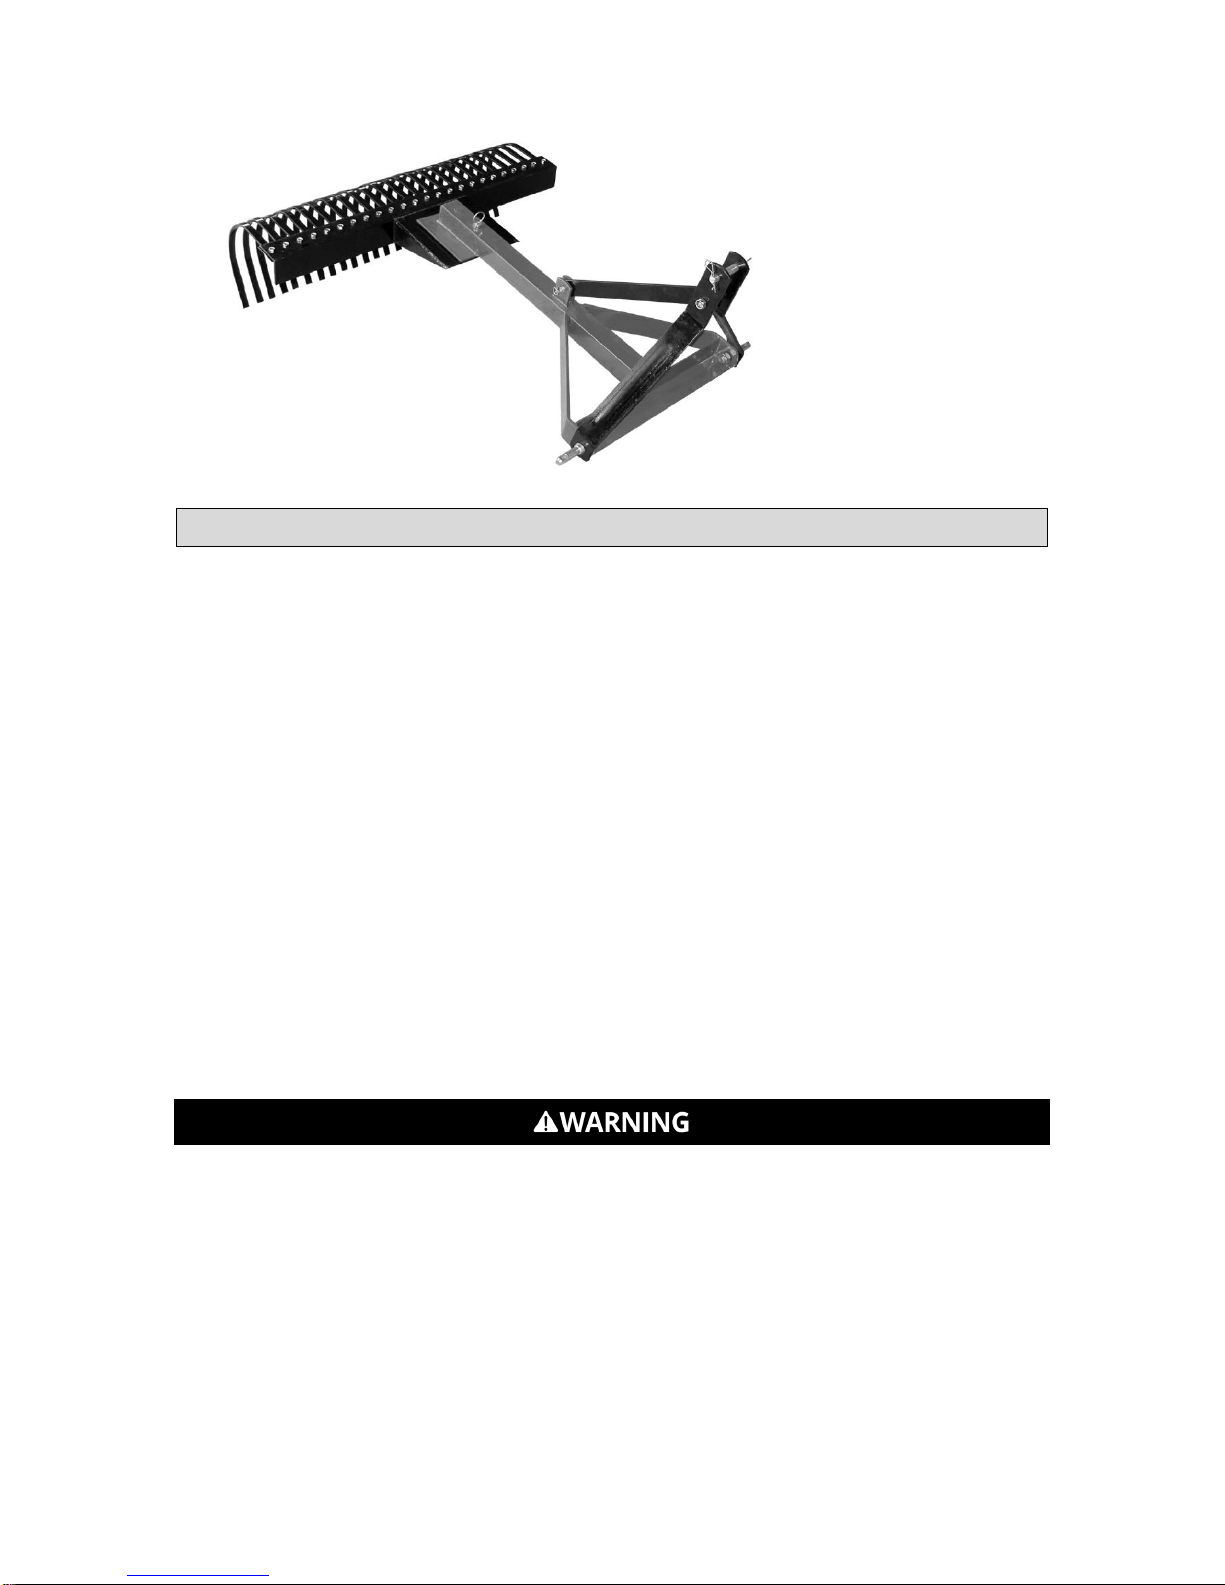
Intended Use
The NorTrac 3-Pt. Landscape Rake is ideal for grading, leveling, spreading, and removing stones
from lawns. It’s designed with a 3-point hitch which fits category 1 pins.
Technical Specifications
Property
#51454
#51455
#51456
Ship Weight
207. lbs.
235.0 lbs.
255.0 lbs.
Working Width (inches)
48
60
72
Max. HP
45
45
45
Tines (qty.)
24
30
36
Tines per Foot (qty.)
6
6
6
Important Safety Information
Read and understand all instructions. Failure to follow all instructions may result in serious injury
or property damage.
The warnings, cautions, and instructions in this manual cannot cover all possible conditions or
situations that could occur. Exercise common sense and caution when using this Landscape
Rake. Always be aware of the environment and ensure that the tool is used in a safe and
responsible manner.
Do not allow persons to operate or assemble the rake until they have read this manual and have
developed a thorough understanding of how it works.
Do not modify this rake in any way. Unauthorized modification may impair the function and/or
safety and could affect the life of the rake. There are specific applications for which the rake was
designed.
Use the right tool for the job. DO NOT attempt to force small equipment to do the work of larger
industrial equipment. There are certain applications for which this rake was designed. It will be
safer and do a better job at the capacity for which it was intended. DO NOT use this equipment
for a purpose for which it was not intended.
Industrial or commercial applications must follow OSHA requirements.
WORK AREA SAFETY
Inspect the work area before each use. Keep work area clean, dry, free of clutter, and well lit.
Cluttered, wet, or dark work areas can result in injury. Using the rake in confined work areas may
put you dangerously close to other cutting tools and rotating parts.
Do not allow the rake to come into contact with an electrical source. The rake is not insulated and
contact will cause electrical shock.
Keep children and bystanders away from the work area while operating the tool. Do not allow
children to handle the rake.

Page 5 of 14
Be aware of all power lines, electrical circuits, water pipes, and other mechanical hazards in your
work area. Some of these hazards may be hidden from your view and may cause personal injury
and/or property damage if contacted.
PERSONAL SAFETY
Stay alert, watch what you are doing, and use common sense when operating the rake. Do not
use the rake while you are tired or under the influence of drugs, alcohol, or medication. A moment
of inattention while operating the tool may result in serious personal injury.
Dress properly. Do not wear loose clothing, dangling objects, or jewelry. Keep your hair, clothing,
and gloves away from moving parts. Loose clothes, jewelry, or long hair can be caught in moving
parts. Air vents on the tool often cover moving parts and should be avoided.
Wear the proper personal protective equipment when necessary. Use ANSI Z87.1 compliant
safety goggles (not safety glasses) with side shields, or when needed, a face shield. Use a dust
mask in dusty work conditions. Also use non-skid safety shoes, hardhat, gloves, dust collection
systems, and hearing protection when appropriate. This applies to all persons in the work area.
Do not overreach. Keep proper footing and balance at all times.
Remove keys or wrenches before connecting the tool to an air supply, power supply, or turning on
the tool. A wrench or key that is left attached to a rotating part of the tool may cause personal
injury.
Secure the work with clamps or a vise instead of your hand when practical. This safety precaution
allows for proper tool operation using both hands.
PRODUCT USE AND CARE
Do not force the rake. Products are safer and do a better job when used in the manner for which
they are designed. Plan your work, and use the correct product for the job.
Check for damaged parts before each use. Carefully check that the rake will operate properly and
perform its intended function. Replace damaged or worn parts immediately. Never operate the
product with a damaged part.
Store the rake when it is not in use. Store it in a dry, secure place out of the reach of children.
Inspect the tool for good working condition prior to storage and before re-use.
Use only accessories that are recommended by the manufacturer for use with your rake.
Accessories that may be suitable for one product may create a risk of injury when used with
another tool. Never use an accessory that has a lower operating speed or operating pressure
than the tool itself.
Keep guards in place and in working order. Never operate the product without the guards in
place.
Specific Operation Warnings
To prevent serious injury or death:

Page 6 of 14
Read and understand the Owner’s Manual before operating, servicing, or repairing the
equipment.
Stop the engine, remove the key, and set the brake before dismounting the tractor.
Operate from the tractor seat only.
DO NOT operate without guards in place and in good condition.
Never allow riders on equipment.
Keep bystanders at least 50 feet away while operating.
DO NOT operate or transport on steep inclines.
DO NOT exceed this implement’s maximum speed of 5 MPH. Exceeding this speed may result in
loss of control during transport or braking.
When using the rear blade in the reverse direction, do not ram large dirt and snow piles.
DO NOT use if the implement is damaged. Repair before continuing use.
Park and store on a hard, level surface.
Store out of reach of children. Not for use by or around children.
FALLING OFF CAN RESULT IN IMPALEMENT OR BEING RUN OVER.
The tractor must be equipped with a Roll Over Protection Structure (or ROPS CAB) and a seat
belt. Keep the foldable ROPS system in the “locked up” position at all times.
Keep the seat belt securely fastened.
Never allow riders on equipment.
RAISED EQUIPMENT CAN DROP AND CRUSH.
Before servicing, follow all instructions and safety rules in this Owner’s Manual and securely block
all corners of the equipment with jack stands.
Securely blocking prevents equipment dropping from mechanical component failures.
FALLING OFF OR FAILING TO BLOCK SECURELY CAN RESULT IN SERIOUS INJURY OR
DEATH.
Assembly Instructions
THE FOLLOWING SAFETY PRECAUTIONS SHOULD BE THOROUGHLY UNDERSTOOD
BEFORE ATTEMPTING TO BEGIN ASSEMBLING THIS MACHINE
Select an area for assembly that clean and free of any debris which might cause persons working
on the assembly to trip.
Do not lift heavy parts or assemblies. Use crane jack, tackle, fork trucks or other mechanical
device.
Never put hands, or any part of body, under blocked up assemblies if at all possible
After completing assembly, thoroughly inspect the machine to be sure that all nuts, bolts,
hydraulic, fittings or any other fastened assemblies have been thoroughly tightened.
Before operating equipment--If you have any questions regarding the proper assembly or
operations, contact your dealer or the manufacturer
Page 7 of 14
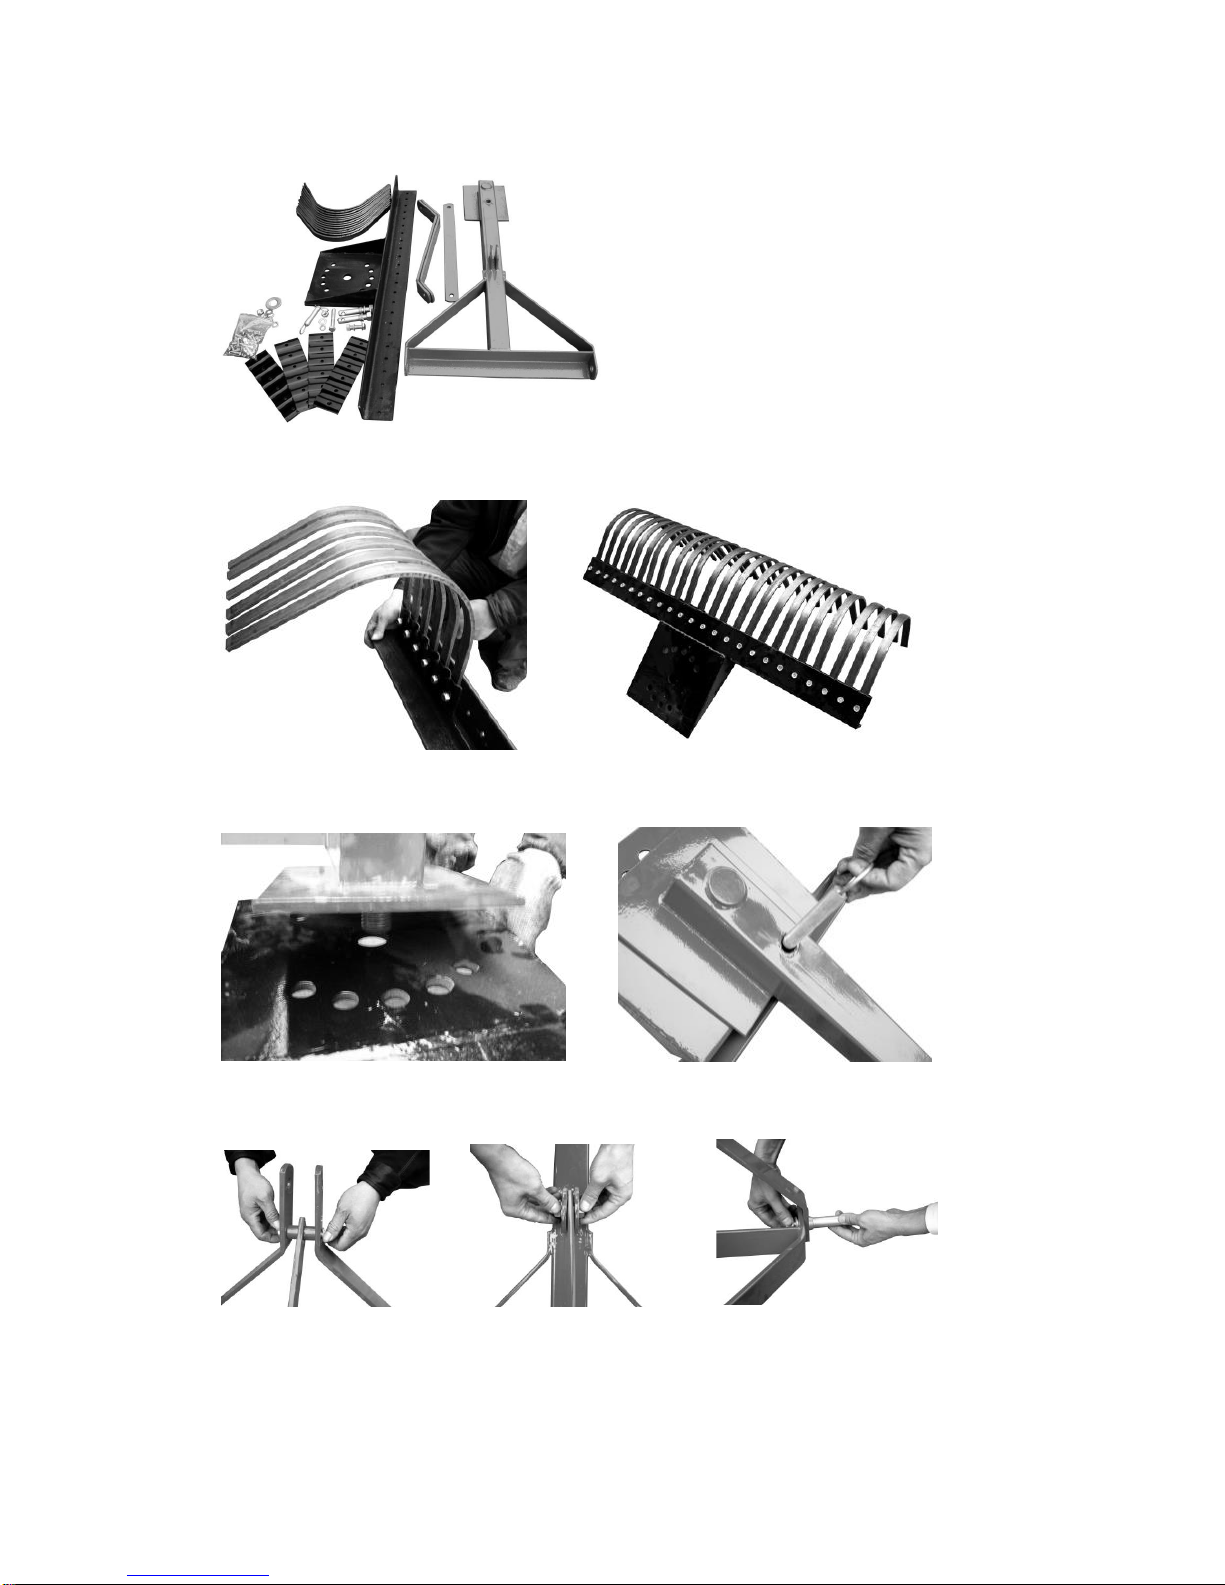
1. Take all the components out from the packing crate.
2. Install the tooth support (part No.15) and tines (part No.16) onto the mounting
frame, and then tighten them with M10 x 30 bolt and M10 nut.
3. Assemble the main frame weldment (part No.1) with the mounting frame using a
slotted nut and draw pin.
4. Assemble the side bars (lift arms) (part No.7) and braces (part No.3) with the main
frame weldment.
Page 8 of 14
Before Each Use
Tractor Requirements and Preparation
The Landscape Rake fits category 1 hitches.
Check the tractor’s 3-point hydraulic lift system. It should operate up and down smoothly and have
enough power to lift the rake. Refer to your tractor’s Owner’s Manual or dealer for any adjustments
necessary to put the 3-point hydraulic lift system in good working order.
Check the tires and rims to make sure they are in good condition. Inflate the tires to the proper
recommended air pressure. Smaller tractors may need front counter weights to counter-balance the
weight of the implement. Mounted rakes normally require added weight to the tractor to maintain the
proper stability and traction during operation and transport.
Mounting Instructions
Make sure the lower draw pins (pull pins) are installed correctly for your tractor.
Insert the draw pins into the ball sockets in the lower lift arms of the tractor’s 3-point hitch. Lock into
place with linch pins. Attach the mast of the 3-point main frame by installing the tractor’s top link with
the top link pin.
Adjust the top link assembly to obtain the correct angle of the implement. Check the tractor 3-point lift
arms and adjust to level the implement from side to side.
Never allow anyone to ride or sit on the rake or tractor while in operation. Keep bystanders at a safe
distance.
Preparation Procedure
Thoroughly read and understand this Owner's Manual.
UNDERGROUND UTILITIES —Contact appropriate agencies to determine if hazardous items
are buried under the work area BEFORE OPERATING! Be certain underground utilities have
been called to locate underground electric, gas, telephone and other lines. Be sure the operator
is properly informed. WHEN IN DOUBT, DO NOT RAKE!

Page 9 of 14
Check for ditches, stumps, holes, or other obstacles that could cause the tractor to roll.
Be sure tractor tires and rims are in good condition. Inflate tires to proper air pressure.
All persons should be at least twenty-five feet (25') away during operation. Clear the area of
helpers, bystanders, and especially children.
Do NOT allow anyone to stand between the hitch and implement.
It is recommended that only tractors with wide front axles use the rake. Tricycle front wheel
arrangements are inherently unstable and can cause rollover accidents.
Make sure all safety stickers are installed and in good condition. Replace if damaged.
Check that all equipment is properly installed and securely attached to the tractor.
Operating Instructions
To prevent property damage, watch for and avoid catching the blade on stumps, large rocks, large dirt
piles, and other immovable objects.
If you have any questions regarding the proper operation of this rake, contact your dealer or the
manufacturer.
1. Set the rake on the ground. Rake about twenty feet, or until you can see what adjustment
the rake needs.
2. Adjust the tractor’s top link and the rear landslide heel to set the rake frame level end-to-end.
3. The frame should also be level when it’s in the ground for in-furrow operation, depending on
the furrow depth.
Front End Ballast
The front end ballast may be required for stability and steering control when the weight is transferred
to the back tires as the rake is raised. As a general guide: ballast the tractor (less the rake) so that
approximately 1/3 of the tractor weight is on the front tires.
When a mounted rake is raised, the resulting load on the front wheels should be less than 20% of the
tractor’s weight. Add additional ballast as required for stability during operation and transportation.
A heavy load can cause instability when driving a tractor. Make sure the front of the tractor is properly
counterbalanced with weights. The tractor front end ballast may not always maintain the tractor
stability if the tractor is operated on rough terrain at high speeds. In such cases, reduce speed and
exercise caution especially around turns. An unstable tractor could steer badly and possibly tip over,
causing injury or death.
It is essential that everyone involved in the operation, transportation, maintenance, and storage of this
equipment be aware, concerned, prudent, and properly trained in safety.
Select an area for assembly that is clean and free of any debris which might cause anyone
working in the area to trip and fall.

Page 10 of 14
Do not lift heavy parts or assemblies. Use a crane jack, block and tackle, forklift, or other
mechanical lifting device.
Never put hands or any other body part under blocked-up assemblies, if at all possible.
After completing assembly, thoroughly inspect the machine to be sure that all nuts, bolts,
hydraulics, fittings, or any other fastened assemblies have been thoroughly tightened.
Stay alert, watch what you are doing, and use common sense when operating this machine. Do
not operate while you are tired or under the influence of drugs, alcohol, or medication. A moment
of inattention while operating may result in serious personal injury.
Use safety apparel and equipment. Use safety goggles or safety glasses with side shields which
comply with current national standards, or when needed, a face shield. Use as a dust mask in
dusty work conditions. Also use non-skid safety shoes, hardhat, gloves, dust collection systems,
and hearing protection when appropriate.
Keep alert and watch the front as well as the rear when working with the implement.
Do not operate close to ditches or creeks. Slow down when operating over rough ground.
Always be sure the implement is in the fully raised position when in transport.
When removing, changing the angle, or reversing the rake, be sure that your feet are never under
the rake.
Use extreme caution when backfilling deep holes and trenches.
Be careful to avoid catching the rake on stumps or other immovable objects.
Use care when working on slopes.
Avoid excessive speed during operation.
Make adjustments only when the rake is attached to the tractor.
When using the rake in a reverse position, use extra care. Do not ram the rake into piles of dirt.
Both the tractor lift arms and the rake are not built to take high-impact loads in this position.
Ramming backwards can also dislodge operator from seat and/or tractor controls, resulting in
possible serious injury or death.
The spring steel rake tines in operation may suddenly fling rocks and clods of earth. Keep all
bystanders 25 feet or more away from an operating rake.
Before operating equipment —If you have any questions regarding the proper assembly or
operations, contact your dealer or the manufacturer.
Maintenance
Clean, inspect, service, and make necessary repairs to the rake when parking it for long periods and
when parking it at the end of a working season. This will help ensure that the rake is ready for field
use the next time you hook up to it. Clean off any dirt or grease that may have accumulated on the
rake. Scrape off compacted dirt and then wash the surface thoroughly with a garden hose.
1. Inspect the rake for loose, damaged, or worn parts. Adjust and tighten loose parts or replace if
necessary.
2. Clean dirt, oil, and grease from areas where the paint has been worn, chipped, or scratched.
Prime any bare metal surfaces after cleaning and repaint to prevent rust.
3. A light coat of oil or grease may be applied to the cutting blade to minimize oxidation.
4. Follow the unhooking instructions when disconnecting the rake from the tractor.
Page 11 of 14
5. Store the rake in a clean, dry place. Inside storage will reduce the maintenance and make for a
longer rake life.
6. Lay the unit on the ground or ensure that the main frame is stable by using auxiliary supports,
such as planted posts, to prevent the possibility of the unit tipping over.
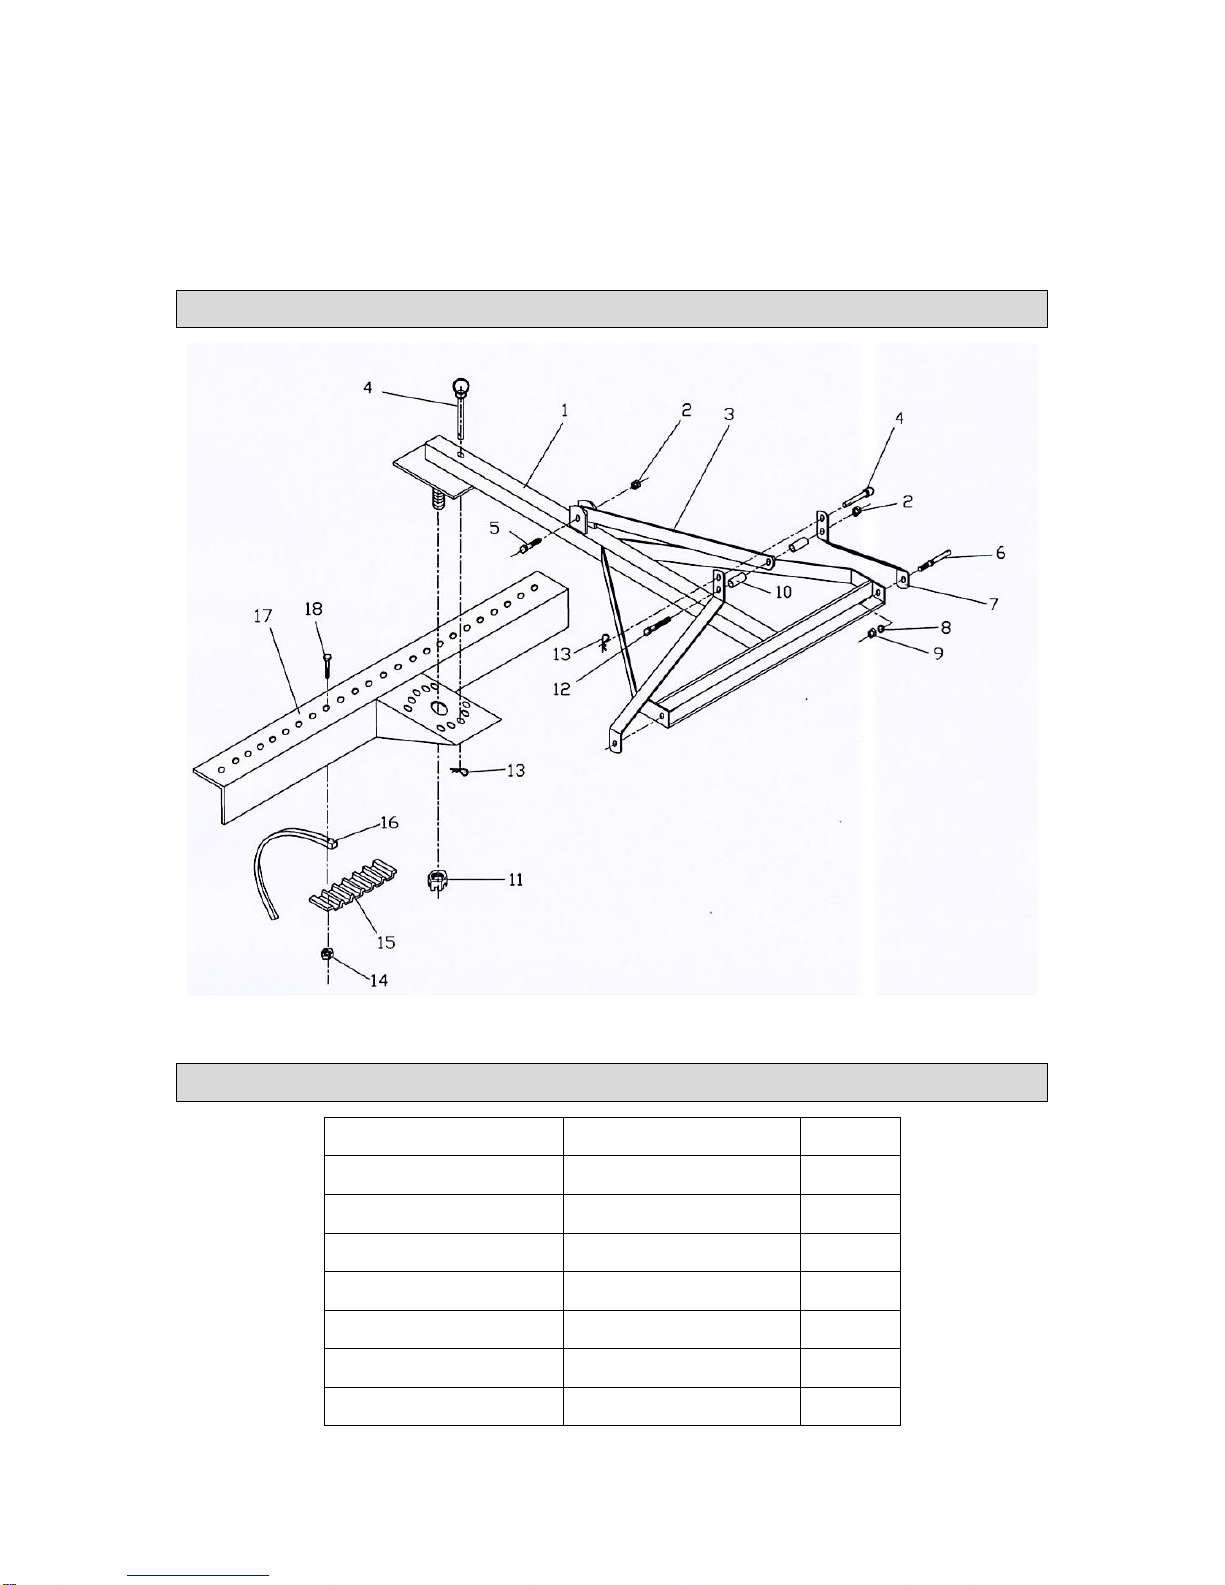
Parts Diagram
Parts List
Reference Number
Description
Quantity
1
Main Frame Weldment
1
2
Lock Nut M16
2
3
Brace
1
4
Pin
2
5
Bolt M16x50
1
6
Draw Pin
2
7
Side Bar
2

Page 12 of 14
Reference Number
Description
Quantity
8
Lock Washer 22
2
9
Nut M22x1.5
2
10
Steel Collar
2
11
Slotted Nut M30
1
12
Bolt M16x100
1
13
Hair Pin
2
14
Nut M10
4’: 24,
5’:30,
6’: 36
15
Tooth Support
4’: 4,
5’:5,
6’:6
16
Tooth
4’: 24,
5’:30,
6’: 36
17
Tine bar Weldment
1
18
Bolt M10x30
4’: 24,
5’:30,
6’: 36
Replacement Parts
For replacement parts and technical questions, please call Customer Service at 1-800-222-5381.
Not all product components are available for replacement. The illustrations provided are a
convenient reference to the location and position of parts in the assembly sequence.
When ordering parts, the following information will be required: item description, item model
number, item serial number/item lot date code, and the replacement part reference number.
The distributor reserves the rights to make design changes and or improvements to product lines
and manuals without notice.

Page 13 of 14
Limited Warranty
Northern Tool and Equipment Company, Inc. ("We'' or '"Us'') warrants to the original purchaser only
("You'' or “Your”) that the Nortrac product purchased will be free from material defects in both
materials and workmanship, normal wear and tear excepted, for a period of one year from date of
purchase. The foregoing warranty is valid only if the installation and use of the product is strictly in
accordance with product instructions. There are no other warranties, express or implied, including the
warranty of merchantability or fitness for a particular purpose. If the product does not comply with this
limited warranty, Your sole and exclusive remedy is that We will, at our sole option and within a
commercially reasonable time, either replace the product or product component without charge to You
or refund the purchase price (less shipping). This limited warranty is not transferable.
Limitations on the Warranty
This limited warranty does not cover: (a) normal wear and tear; (b) damage through abuse, neglect,
misuse, or as a result of any accident or in any other manner; (c) damage from misapplication,
overloading, or improper installation; (d) improper maintenance and repair; and (e) product alteration
in any manner by anyone other than Us, with the sole exception of alterations made pursuant to
product instructions and in a workmanlike manner.
Obligations of Purchaser
You must retain Your product purchase receipt to verify date of purchase and that You are the original
purchaser. To make a warranty claim, contact Us at 1-800-222-5381, identify the product by make
and model number, and follow the claim instructions that will be provided. The product and the
purchase receipt must be provided to Us in order to process Your warranty claim. Any returned
product that is replaced or refunded by Us becomes our property. You will be responsible for return
shipping costs or costs related to Your return visit to a retail store.
Remedy Limits
Product replacement or a refund of the purchase price is Your sole remedy under this limited warranty
or any other warranty related to the product. We shall not be liable for: service or labor charges or
damage to Your property incurred in removing or replacing the product; any damages, including,
without limitation, damages to tangible personal property or personal injury, related to Your improper
use, installation, or maintenance of the product or product component; or any indirect, incidental or
consequential damages of any kind for any reason.
Assumption of Risk
You acknowledge and agree that any use of the product for any purpose other than the specified
use(s) stated in the product instructions is at Your own risk.
Governing Law
This limited warranty gives You specific legal rights, and You also may have other rights which vary
from state to state. Some states do not allow limitations or exclusions on implied warranties or
incidental or consequential damages, so the above limitations may not apply to You. This limited
warranty is governed by the laws of the State of Minnesota, without regard to rules pertaining to
conflicts of law. The state courts located in Dakota County, Minnesota shall have exclusive jurisdiction
for any disputes relating to this warranty.

Page 14 of 14
Distributed by:
Northern Tool & Equipment Company, Inc.
Burnsville, Minnesota 55306
www.northerntool.com
Made in China
Table of contents
Other Nortrac Farm Equipment manuals


Popular Farm Equipment manuals by other brands

Schaffert
Schaffert Rebounder Mounting instructions

Stocks AG
Stocks AG Fan Jet Pro Plus 65 Original Operating Manual and parts list

Cumberland
Cumberland Integra Feed-Link Installation and operation manual

BROWN
BROWN BDHP-1250 Owner's/operator's manual

Molon
Molon BCS operating instructions

Vaderstad
Vaderstad Rapid Series instructions


