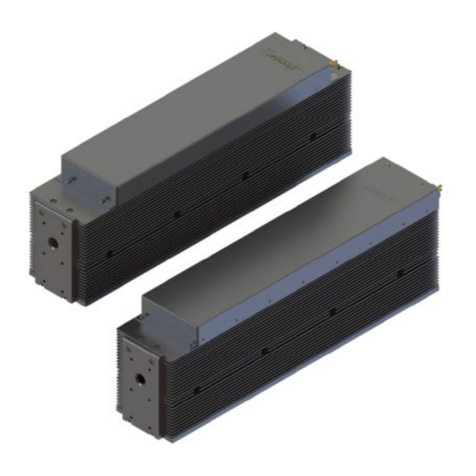
Novanta i401 User manual

ENGINEERED BY SYNRAD
i401 Laser
User Manual

IMPORTANT INFORMATION PAGE |2
Table of Contents
Important Information ......................................................................................................................................................................6
Introduction.......................................................................................................................................................................................9
Trademark, Warranty & Copywrite ...................................................................................................................................................9
Warranty Information .......................................................................................................................................................................9
Worldwide Headquarters ................................................................................................................................................................10
Technical Support ............................................................................................................................................................................11
Reference Materials ........................................................................................................................................................................11
EU Headquarters .............................................................................................................................................................................11
Getting Started ................................................................................................................................................................................12
Introduction.....................................................................................................................................................................................12
Unpacking ........................................................................................................................................................................................13
Inventory .........................................................................................................................................................................................17
Mounting .........................................................................................................................................................................................19
Connecting.......................................................................................................................................................................................23
Laser Safety......................................................................................................................................................................................37
Hazard Information .........................................................................................................................................................................38
General Hazards ..............................................................................................................................................................................39
Other Hazards..................................................................................................................................................................................40
Disposal............................................................................................................................................................................................41
Additional Laser Safety Information................................................................................................................................................42
i401 label locations..........................................................................................................................................................................43
Agency Compliance .........................................................................................................................................................................44
Center for Devices and Radiological Health (CDRH) requirements .................................................................................................44
Federal Communications Commission (FCC) Requirements ...........................................................................................................45
European Union (EU) requirements ................................................................................................................................................46
Declaration of conformity ...............................................................................................................................................................49
Operation.........................................................................................................................................................................................50
Controls and indicators....................................................................................................................................................................50
Initial start-up ..................................................................................................................................................................................52

IMPORTANT INFORMATION PAGE |3
Technical reference .........................................................................................................................................................................58
Technical overview ..........................................................................................................................................................................58
Laser Design.....................................................................................................................................................................................59
RF power supply ..............................................................................................................................................................................61
Optical setup....................................................................................................................................................................................62
Controlling laser power ...................................................................................................................................................................63
Control signals .................................................................................................................................................................................63
Operating modes .............................................................................................................................................................................65
User I/O connections .......................................................................................................................................................................67
User I/O connection summary.........................................................................................................................................................68
Input/output signals ........................................................................................................................................................................70
Sample I/O circuits...........................................................................................................................................................................77
DC power/DC sense cables ..............................................................................................................................................................81
DC power cables ..............................................................................................................................................................................81
DC voltage sense cable ....................................................................................................................................................................81
I401 i401 web interface ...................................................................................................................................................................82
Accessing the i401 web page...........................................................................................................................................................82
Home page layout............................................................................................................................................................................83
Event log page layout ......................................................................................................................................................................86
Changing the i401’s IP address ........................................................................................................................................................87
Alternate Ethernet connection ........................................................................................................................................................87
i401 firmware upgrade ....................................................................................................................................................................87
Firmware upgrade procedure..........................................................................................................................................................88
Integrating i401 safety features ......................................................................................................................................................92
Key switch functions........................................................................................................................................................................93
Shutter functions .............................................................................................................................................................................93
Remote interlock functions .............................................................................................................................................................93
i401 general specifications ..............................................................................................................................................................94
i401 outline & mounting drawings ..................................................................................................................................................96
i401 packaging instructions .............................................................................................................................................................98
Maintenance/Troubleshooting........................................................................................................................................................99
Maintenance....................................................................................................................................................................................99

IMPORTANT INFORMATION PAGE |4
Disabling the i401 laser....................................................................................................................................................................99
Daily inspections..............................................................................................................................................................................99
Storage/shipping ...........................................................................................................................................................................100
Cleaning optical components ........................................................................................................................................................100
Troubleshooting ............................................................................................................................................................................103
Operational flowchart ...................................................................................................................................................................105
Index ..............................................................................................................................................................................................122
Table of Figures
Figure 1-1 Unpacking the laser. .......................................................................................................................................................15
Figure 1-2 Removing the i401 lifting handles. .................................................................................................................................16
Figure 1-3 i401 shipping box contents.............................................................................................................................................17
Table 1-1 i401 ship kit contents.......................................................................................................................................................17
Figure 1-4 Mounting locations for four-point mount with feet.......................................................................................................20
Figure 1-5 Mounting locations for four-point mount without feet.................................................................................................21
Figure 1-6 Mounting locations for three-point mount without feet...............................................................................................22
Table 1-2 Dew point temperature ...................................................................................................................................................25
Figure 1-7 i401 cooling connections................................................................................................................................................26
Figure 1-8 PS-401 voltage selection access panel ...........................................................................................................................28
Table 1-3 AC three-phase electrical recommendations ..................................................................................................................28
Figure 1-9 PS-401 input section.......................................................................................................................................................29
Figure 1-10 DC power connection locations – rear view ................................................................................................................30
Figure 1-11 DC power connection locations – side view .................................................................................................................30
Figure 1-12 Gas purge kit assembly.................................................................................................................................................34
Figure 1-13 I401 home page ............................................................................................................................................................37
Figure 2-1 Hazard label locations. ...................................................................................................................................................43
Table 2-1 Class 4 safety features. ....................................................................................................................................................47
Table 2-2 European Union Directives. .............................................................................................................................................48
Figure 2-2 i401 Declaration of conformity.......................................................................................................................................49
Figure 3-1 i401 front panel controls and indicators ........................................................................................................................50

IMPORTANT INFORMATION PAGE |5
Figure 3-2 i401 rear panel controls and indicators..........................................................................................................................51
Figure 4-1 Hybrid waveguide/unstable resonator design ...............................................................................................................59
Figure 4-2 i401 beam ellipticity .......................................................................................................................................................60
Figure 4-3 Converting 45° linear polarization to circular polarization............................................................................................61
Table 4-1 Assist gas purity specifications ........................................................................................................................................63
Figure 4-4 PWM Command signal waveform ..................................................................................................................................65
Table 4-2 PWM Command signal specifications..............................................................................................................................65
Figure 4-5 User I/O connector pinouts............................................................................................................................................68
Table 4-3 User I/O pin descriptions .................................................................................................................................................68
Figure 4-6 Auxiliary DC power diagram ...........................................................................................................................................71
Figure 4-7 Quick Start Plug wiring diagram .....................................................................................................................................73
Figure 4-8 Input equivalent schematic ............................................................................................................................................74
Table 4-4 Input circuit specifications...............................................................................................................................................74
Figure 4-9 Output equivalent schematic .........................................................................................................................................76
Table 4-5 Output circuit specifications ............................................................................................................................................76
Figure 4-10 Customer supplied interlock.........................................................................................................................................77
Figure 4-11 Customer-supplied interlock, negative voltage............................................................................................................77
Figure 4-12 PLC driven interlock signal............................................................................................................................................78
Figure 4-13 Multiple PLC driven inputs ...........................................................................................................................................78
Figure 4-14 I401 output driving warning lamp ................................................................................................................................79
Figure 4-15 I401 output driving relay ..............................................................................................................................................79
Figure 4-16 I401 output driving PLC input module..........................................................................................................................80
Figure 4-17 I401 home page ............................................................................................................................................................83
Figure 4-18 I401 event log page ......................................................................................................................................................86
Figure 4-19 I401 Change IP Address page .......................................................................................................................................87
Figure 4-20 Windows Control Panel ................................................................................................................................................88
Figure 4-21 Programs and Features dialog......................................................................................................................................89
Figure 4-22 Windows Features dialog .............................................................................................................................................89
Figure 4-23 Local Area Connection Properties dialog......................................................................................................................90
Figure 4-24 Internet Protocol (TCP/IP) Properties dialog ................................................................................................................90
Figure 4-25 Configure IP Address link on I401 home page..............................................................................................................91
Figure 4-26 i401 Change IP Address page .......................................................................................................................................91
Figure 4-27 I401 web browser display.............................................................................................................................................92
Table 4-6 i401 general specifications ..............................................................................................................................................94
Table 4-7 Cooling specifications ......................................................................................................................................................95

IMPORTANT INFORMATION PAGE |6
Figure 4-28 i401 outline & mounting dimensions ...........................................................................................................................96
Figure 4-29 I401 outline & mounting dimensions (mounting feet removed...................................................................................97
Figure 4-30 i401 packaging instructions ..........................................................................................................................................98
Table 5-1 Required cleaning materials ..........................................................................................................................................102
Figure 5-1 I401 operational flowchart ...........................................................................................................................................105
Figure 5-2 I401 functional block diagram ......................................................................................................................................106
Table 5-2 Status signals .................................................................................................................................................................107
Table 5-3 Effect of Remote Interlock input on operating parameters ..........................................................................................108
Table 5-4 Normal operating condition ..........................................................................................................................................108
Table 5-5 ........................................................................................................................................................................................109
Table 5-6 Interlock Open condition ...............................................................................................................................................109
Table 5-7 Over Temperature fault.................................................................................................................................................109
Table 5-8 Shutter Closed condition ...............................................................................................................................................110
Table 5-9 No-Strike condition ........................................................................................................................................................110
Table 5-10 Laser fault codes ..........................................................................................................................................................111
Figure 5-3 Enable Java script in browser .......................................................................................................................................118
Figure 5-4 Add IP address to list of authorized/trusted websites .................................................................................................119
Important Information
For your protection, carefully read these instructions before installing and operating the scan
head.
Retain these instructions for future reference.
Novanta reserves the right to update this user manual at any time without prior notification.
If product ownership changes, this manual should accompany the product.
Safety Symbols
DANGER:Indicates a hazardous situation which, if not avoided, will result in serious injury or death.
Its use should be limited to the most extreme situations.
WARNING: Indicates a hazardous situation which, if not avoided, could result in serious injury or
death.
CAUTION: Indicates a hazardous situation which, if not avoided, could result in minor or
moderate injury.
Important: Indicates information considered important but not directly hazard related (e.g.,
security, hygiene, or equipment or property damage).

IMPORTANT INFORMATION PAGE |7
Safety Labels
DANGER:Laser radiation can cause severe retinal and corneal burns, burns on the skin, and may
pose a fire risk. To avoid injury and reduce risk of fire, please follow the control measures and
safety guidelines provided by the laser’s manufacturer, and those established by your Laser
Safety Officer (LSO), Radiation Safety Officer (RSO), or safety department of your business or
institution.
ESD Warning
MOVIA scan heads are electrostatic discharge-sensitive devices (ESD). The equipment should
remain sealed until the user is located at a proper static control station; improper handling could
cause damage to these electronics.
A proper static control station should include:
A soft grounded conductive tabletop or grounded conductive mat on the tabletop.
A grounded wrist strap with the appropriate (1 MΩ) series resistor connected to the tabletop mat
and ground.
An adequate earth ground connection, such as a water pipe or AC ground.
Conductive bags, trays, totes, racks, or other storage.
Properly grounded power tools.
Personnel handling ESD items should wear ESD protective garments and ground straps.
Important: Equipment returned to the factory must be shipped in anti-static packaging.
Important: Customers assume all responsibility for maintaining a laser-safe working environment.
Original equipment manufacturer (OEM) customers assume all responsibility for CDRH (Center
for Devices and Radiological Health) certification.
Customer Support
Before contacting Novanta for assistance, review appropriate sections in the manual that may
answer your questions.
After consulting this manual, please contact one of our worldwide offices between 9 AM and 5 PM
local time.
Americas, Asia Pacific
Novanta Headquarters, Bedford, USA
Phone: +1-781-266-5700
Email: photonics@novanta.com

IMPORTANT INFORMATION PAGE |8
Europe, Middle East, Africa
Novanta Europe GmbH, Wackersdorf, Germany
Phone: +49 9431 7984-0
Email: photonics@novanta.com
Milan, Italy
Phone: +39-039-793-710
Email: photonics@novanta.com
China
Novanta Sales & Service Office, Shenzhen, China
Phone: +86-755-8280-5395
Email: photonics.china@novanta.com
Novanta Sales & Service Office, Suzhou, China
Phone: +86-512-6283-7080
Email: photonics.china@novanta.com
Japan
Novanta Service & Sales Office, Tokyo, Japan
Phone: +81-3-5753-2460
Email: photonics.japa[email protected]

INTRODUCTION PAGE |9
Introduction
This section outlines the following information:
•Trademark, Copywrite & Warranty information
•Guidelines and contents description
•i401 Nomenclature
Important Note: This Operation Manual explains operation activities related to i401 lasers. If you
cannot operate the unit using the information described in this manual, contact Novanta®
(+1.425.349.3500) or an authorized Novanta Distributor.
Do not lift or support the laser by its cooling fittings.
Failure to properly package the laser using Novanta shipping box and foam/cardboard inserts as shown
in Packaging Instructions may void the warranty. Customers may incur additional repair charges due to
shipping damage caused by improper packaging.
Before beginning any maintenance or inspections of your i401 laser, be sure to completely disable the
laser by disconnecting the DC Power cable (or cables) from the rear of the laser.
Trademark, Warranty & Copywrite
Novanta and I401 are registered trademarks of Novanta, Inc.
All other trademarks or registered trademarks are the property of their respective owners.
© 2013 by Novanta, Inc. All rights reserved.
Warranty Information
This is to certify that ® i401 lasers are guaranteed by Novanta, Inc. to be free of all defects in materials
and workmanship for a period of one year from the date of purchase. This warranty does not apply to
any defect caused by negligence, misuse (including environmental factors), accident, alteration, or
Caution: Possible Equipment Damage
Novanta does not recommend vertical or head down configurations.
Please contact the factory for limitations as a vertical orientation increases the risk of damage to the
laser’s optics.
A risk of exposure to toxic elements may result when certain optical or beam delivery components
are damaged. In the event of damage to laser, marking head, or beam delivery optics, contact
Novanta®, or the optics manufacturer for handling instructions.
If you operate your laser dirty or dusty environments, contact Novanta about the risks of doing so
and precautions you can take to increase the longevity of your laser, marking head, and associated

WORLDWIDE HEADQUARTERS PAGE |10
improper maintenance. This includes, but is not limited to, damage due to corrosion, condensation, or
failing to supply properly conditioned purge gas.
We request that you examine each shipment within 10 days of receipt and inform Novanta, Inc. of any
shortage or damage. If no discrepancies are reported, Novanta shall assume the shipment was delivered
complete and defect-free.
If, within one year from the date of purchase, any part of the I401 laser should fail to operate, contact the
Novanta Customer Service department at 1. 800.NOVANTA1 (outside the U.S. call 1.425.349.3500) and
report the problem. When calling for support, please be prepared to provide the date of purchase, model
number and serial number of the unit, and a brief description of the problem. When returning a unit for
service, a Return Authorization (RA) number is required; this number must be clearly marked on the
outside of the shipping container for the unit to be properly processed. If replacement parts are sent to
you, then you are required to send the failed parts back to Novanta for evaluation unless otherwise
instructed.
If your I401 laser fails within the first 45 days after purchase, Novanta, Inc. will pay all shipping charges to
and from Novanta when shipped as specified by Novanta Customer Service. After the first 45 days,
Novanta will continue to pay for the costs of shipping the repaired unit or replacement parts back to the
customer from Novanta. The customer, however, will be responsible for shipping charges incurred when
sending the failed unit or parts back to Novanta or a Novanta Authorized Distributor. In order to
maintain your product warranty and to ensure the safe and efficient operation of your i401 laser, only
authorized Novanta replacement parts can be used. This warranty is void if any parts other than those
provided by Novanta, Inc. are used.
Novanta, Inc. and Novanta Authorized Distributors have the sole authority to make warranty statements
regarding Novanta products. Novanta, Inc. and its Authorized Distributors neither assumes nor
authorizes any representative or other person to assume for us any other warranties in connection with
the sale, service, or shipment of our products. Novanta, Inc. reserves the right to make changes and
improvements in the design of our products at any time without incurring any obligation to make
equivalent changes in products previously manufactured or shipped. Buyer agrees to hold Novanta
harmless from all damages, costs, and expenses relating to any claim arising from the design,
manufacture, or use of the product, or arising from a claim that such product furnished Buyer by
Novanta, or the use thereof, infringes upon any Patent, foreign or domestic
Worldwide Headquarters
Novanta’s worldwide headquarters are located north of Seattle in Mukilteo, Washington, U.S.A. Our
mailing address is:
Novanta,inc,
4600 Campus Place
Mukilteo, WA98275
Phone us at: 1.800.SYNRAD1 (1.800.796.7231)
Outside the U.S.: +1.425.349.3500
Fax: +1.425.349.3667
E-mail: Novanta@Novanta.com

SALES & APPLICATION PAGE |11
Sales & Application
Novanta Regional Sales Managers work with customers to identify and develop the best CO2 laser
solution for a given application. Because they are familiar with you and your laser application, use them
as a first point of contact when questions arise. Regional Sales Managers also serve as the liaison
between you and our Applications Lab in processing material samples per your specifications. To speak
to the Regional Sales Manager in your area, call Novanta at 1.800. NOVANTA1.
Customer Service
For assistance with order or delivery status, service status, or to obtain a Return Authorization (RA)
number, contact Novanta at 1. 800.NOVANTA1 and ask to speak to a Customer Service representative,
or you can email us by sending a message to customercare@Novanta.com.
Technical Support
Novanta Regional Sales Managers can answer many technical questions regarding the installation, use,
troubleshooting, and maintenance of our products. In some cases, they may transfer your call to a Laser,
Marking Head, or Software Support Specialist. You may also e-mail questions to the Technical Support
Group by sending your message to Novanta tech support@ Novanta.com.
Reference Materials
Your Regional Sales Manager can provide reference materials including Outline & Mounting drawings,
Operator’s Manuals, Technical Bulletins, and Application Newsletters. Most of these materials are also
available directly from the Novanta web site at http://www.Novanta.com.
EU Headquarters
For assistance in Europe, contact Novanta® European subsidiary, Novanta Europe, at:
©Novanta Distribution (USD) GmbH
Parkring 57-59
85748 Garching bei München,
Germany
Phone: +49 89 31707-0
web: www.Novanta.com
E-mail: EMEA-service@Novanta.com
For assistance in China, contact Novanta® at:
Novanta China Sales and Service Center
2401-J, Bak Building, Hi-tech Park, Nanshan District Guangdong, PRC 518057
Phone: +86 (755) 8280 5395
Fax: +86 (755) 8672 1125

GETTING STARTED PAGE |12
E-mail: sales-china@Novanta.com
web: www.Novanta.com
Getting Started
Use information in this section to prepare your i401 laser for operation. The or-der of information
presented in this section is the same as the order of tasks that you will need to perform. The best way to
get your laser ready for operation is to start at unpacking and work your way through connecting.
This section contains the following information:
Introduction – introduces the i401 laser, lists important features, and describes i401 nomenclature.
Unpacking – provides important information about unpacking your i401 laser.
Inventory – displays and describes all components shipped with your i401 laser.
Mounting – describes how to attach your i401 laser to a mounting surface.
Connecting – explains how to connect cooling tubing, power, and control cabling.
Introduction
The Introduction section includes subsections:
•I401 nomenclature
•Model numbers
The i401 laser is a new addition to Novanta i401 series of high-power lasers. This single tube 400 W laser
features an integrated RF power supply with no external RF cables. The compact, single- tube design
mounts easily to flatbed cutters, robotic arms, or gantry systems making integration into your
production line simple and fast.
i401 features include:
•Built-in electromechanical shutter
•Built-in gas purge port
•TCP/IP web-based Internet interface
•Color-coded LEDs mirror user output status
•Field-replaceable integrated RF modules
•“Industrial-strength” ±5 V to 24 VDC I/O
•Built-in internal humidity sensor
•Beam output pre-aligned to within ±1.0 mm
•Duty cycles from 1% to 100% (CW)
•Low 6 kW heat load

UNPACKING PAGE |13
i401 nomenclature
i401 lasers are divided into two distinct functional categories: Key switch and OEM models. OEM lasers,
like the i401, do not incorporate key switch or shutter functions required by CDRH and EN 60825- 1
regulations because they are designed as components for integration into larger processing systems by
the Original Equipment Manufacturer (OEM) or System Integrator who bears full responsibility for
meeting the appropriate laser safety requirements for systems incorporating Class 4 lasers.
Although i401 lasers are available only as OEM lasers, they do include a built-in electromechanical shutter
assembly.
Model numbers
The last three characters in the i401 model number serve to designate the functional category, cooling
method, and model version. The functional category is indicated by either a “K” for Key switch or “S”
(Switch-less) for OEM models. The next letter indicates the cooling method: “W” for water-cooled units,
“F” for fan-cooled units, and “A” for air-cooled lasers (the cooling method, the “W,” is omitted on all i401
lasers since they are all water-cooled lasers). The last letter in the model number indicates the current
model version beginning with “B.”
Unpacking
The Unpacking section includes subsections:
•Incoming inspection
•Packaging guidelines
•Unpacking the i401
•Removing the lifting handles
Incoming inspection
Upon arrival, inspect all shipping containers for signs of damage. If you discover shipping damage,
document the damage (photographically if possible), then immediately notify the shipping carrier and
Novanta, Inc.
The shipping carrier is responsible for any damage occurring during transportation from Novanta, Inc. to
your receiving dock.

UNPACKING PAGE |14
Packaging guidelines
•To prevent equipment damage or loss of small components, use care when removing packaging
materials.
•After unpacking, review the Inventory section and verify that all components are on hand.
•Do not lift or support the laser using the cooling fittings; lift the laser by the lifting handles or
base plate only.
•Save all shipping containers and packaging materials, including covers and plugs. Use these
specialized packing materials when shipping the laser to another location.
•When packing a laser for shipment, be sure to remove all accessory items not originally attached
to the laser including beam delivery components, cooling tubing, etc.
•Refer to packaging instructions drawings in the Technical Reference section for details on
packaging i401 lasers using Novanta supplied shipping materials.
•When storing or shipping water-cooled lasers, remember to drain all cooling water from the laser
and then cap the open fittings to prevent debris from entering the coolant path.
•i401 lasers are heavy and awkward to move. Use appropriate lifting techniques, additional
personnel, and/or hoisting equipment to prevent a risk of injury when rigging this equipment.
Warning: Serious Personal Injury
Lifting or moving the i401 laser poses a potential for injury. Use appropriate lifting techniques
and/or equipment to prevent a risk of injury. In some cases, you may require assistance from
additional personnel to safely unpack and move this equipment.

UNPACKING PAGE |15
Unpacking the i401 laser
To unpack the i401 laser, refer to Figure 1-1 and perform the following steps. The numbered items in Fig-
ure 1-1 correspond to the step numbers in the following procedure.
Figure 1-1 Unpacking the laser.
1Carefully cut the shipping straps wrapped around the shipping container.
2Remove the upper lid and set it aside.
3Carefully lift or hoist the sling containing the i401 laser out of the container and place it on a solid
surface. To prevent injury to personnel or damage to the laser, always use at least two people to
lift and move the sling.
4Lift or hoist the i401 laser out of the container using the three lifting handles. To prevent injury to
personnel or damage to the laser, always use at least two people to handle the i401 laser.
5After removing the laser, pull out all accessory items and paperwork packaged behind the laser in
the shipping container’s accessory compartment.
6Save the shipping container and sling. Use these specialized packaging materials when shipping
the laser to another location.
Important Note: Do not lift or support the i401 laser using the cooling fittings. Lift the laser
by the lifting handles or base plate only

UNPACKING PAGE |16
Removing the lifting handles
Once you have placed the i401 laser in its final mounting location, perform the following steps to remove
the lifting attachments.
1Remove the 1/4–20 × 5/8" cap screws from two locations on each of the three handles as shown
in the figure below.
2Save the lifting handles and cap screws so the handles can be reinstalled if the i401 is moved to
another location.
Figure 1-2 Removing the i401 lifting handles.

INVENTORY PAGE |17
Inventory
Figure 1-3 i401 shipping box contents.
Table 1-1 i401 ship kit contents.
Shipping Box Contents
Qty
Shipping Box Contents
Qty
i401 400 W Laser 1 Quick Start Plug
1
Customer Communication Flier 1 1/2" Tubing Fitting Kit
1
Ethernet Crossover Cable 1 Mounting Hardware Kit
4
BNC Control Cable 1 Gas Purge Kit
1
12 mm Cooling Tubing 1 Spare Fuses (not shown)
4
DC Power Cables 1 Final Test Report (not shown)
1

INVENTORY PAGE |18
i401 contents description
Each item below is also listed in tables that follow:
i401 400 W Laser –i401 laser is a compact, single tube 400 W laser producing near-perfect beam
quality with < 100 µs rise/fall times and a PWM duty cycle range from 1% up to 100% (full CW operation).
Customer Communication Flier –contains a i401 website location information that provides setup,
operation, and maintenance information for your i401 laser.
Ethernet Crossover Cable –provides the communications link between a host and the laser for
accessing operating parameters via a TCP/IP web-based interface.
BNC Control Cable –Coaxial cable carries the PWM Command signal from the UC-2000 Controller to
the laser’s Quick Start Plug.
12 mm Cooling Tubing –carries cooling water from the chiller to the laser and back. This clear
polyethylene tubing is 12 mm O.D. by 30 feet and must be cut to length.
DC Power Cables –carry DC power from the 48 V power supply to your i401 laser. Standard cable
length is 2.0 meters (6.5 feet) while optional 5.0 m (16 ft) power cables are available.
Quick Start Plug –connects to 401’s User I/O connector. Jumpers are built into the plug to enable Fire-
star’s interlock circuits for initial start-up and testing.
1/2" Tubing Fitting Kit –provides a means to replace the i401’s 12 mm fittings with fittings that accept
1/2" coolant tubing. See the Connecting section for installation details.
Mounting Hardware Kit –fasten i401 to your mounting surface. Four each M10 ×1.5 ×35 mm cap
screws and M10 washers are provided for mounting the i401 laser.
Gas Purge Kit –provides a filtering and connection point to the laser from your facility’s purge gas
system.
Spare Fuses (not shown) –40 ampere fast-blow fuses protect i401’s internal RF circuitry.
Final Test Report (not shown) – Contains data collected during the laser’s final pre-shipment test.

MOUNTING PAGE |19
Mounting
The Mounting section includes subsections:
•Four-point mount with feet
•Four-point mount without feet
•Three-point mount without feet
The i401 base plate is designed so that the laser is easily mounted in various configurations as described
in the subsections below. Refer to the i401 package outline drawing in the Technical Reference section
for mounting locations and dimensions.
Four-point mount with feet
Use this scheme to mount the laser to a horizontal or vertical surface (or to a surface that will move
dynamically in multiple axes) using the factory-installed mounting feet. To use a four-point mount, the
variation in mounting surface flatness must not exceed 1.02 mm (0.040").
To install a i401 (with feet) using the four-point mounting method, perform the following steps:
1Determine whether you will use metric (ISO) or inch (SAE) fasteners to mount the laser. Four M10
(metric) cap screws and M10 flat/split washers are included in the ship kit.
2Refer to the i401 outline and mounting drawing (Sheet 1 of 2) for Option ‘A’ mounting dimensions,
then drill and tap four M10 × 1.5 or four 3/8" (UNC or UNF) holes into your mounting surface.
These holes should correspond with the holes labeled “A” shown in following figure.
3Carefully place the i401 laser on the mounting surface so the holes in the mounting feet line up
over the threaded holes in the mounting surface.
4Place a split washer and flat washer on each cap screw and insert the fasteners through the feet
into the mounting surface. Turn the screws by hand until the threads fully engage.
5Evenly tighten all four fasteners to a torque of 40 N m (29 ft lb.).
Important Note: Each mounting foot also contains a 9.65 mm (0.380") dowel pin guide (labeled
“B” in the following) for applications that require precision positioning for alignment purposes.
Caution: Possible Equipment Damage
Novanta does not recommend mounting lasers in a vertical “head-down” or “tail-down” orientation.
If you must mount your laser in this manner, please contact the factory for limitations as a vertical
orientation increases the risk of damage to the laser’s output optic.

MOUNTING PAGE |20
Figure 1-4 Mounting locations for four-point mount with feet.
Important Note: After the laser is fastened into position, remove the lifting handles if necessary
Four-point mount without feet
Use this scheme to mount the laser to a horizontal or vertical surface (or to a surface that will move dy-
namically in multiple axes) by fastening directly into the laser’s base plate. To use a four-point mount, the
variation in mounting surface flatness must not exceed 1.02 mm (0.040").
To install a i401 (without feet) using the four-point mounting method, perform the following steps:
1Raise the i401 laser and place support blocks under the base plate.
2Unscrew the four M10 cap screws fastening the feet to the bottom of the i401 laser and remove
the factory-installed mounting feet.
3Refer to the i401 outline and mounting drawing (Sheet 2 of 2) for Option ‘B’ mounting
dimensions, then drill four 10.6 mm (close fit) or 11.2 mm (normal fit) thru holes in your mounting
Caution: Possible Equipment Damage
When removing the mounting feet, raise the laser by placing support blocks under the base plate.
Do not lay or place the i401 laser on its side or top, even temporarily, because the sheet metal
covers are not designed to support the weight of the laser. Always support and mount the laser
using the mounting feet or base plate to avoid damaging the laser.
Other manuals for i401
1
Table of contents
Other Novanta Measuring Instrument manuals

Novanta
Novanta SYNRAD Pulstar p100 User manual

Novanta
Novanta p400 OEM Series User manual

Novanta
Novanta v30 User manual

Novanta
Novanta SYNRAD Pulstar p100 User manual

Novanta
Novanta gem with smd24 User manual
Novanta
Novanta v40 User manual

Novanta
Novanta f201 User manual
Novanta
Novanta ventus with mpc6000 User manual

Novanta
Novanta 32-1 Laser User manual

Novanta
Novanta ATI Axia80 User manual
