NovaSail NS350 User manual
Operating Manual
v2.0

NS350
Operating Manual2
Introduction. . . . . . . . . . . . . . . . . . . . . . . . . . . . . . . . . . . . . . . . . . . . . . . . . . . . 3
Installation . . . . . . . . . . . . . . . . . . . . . . . . . . . . . . . . . . . . . . . . . . . . . . . . . . . . 4
Controls and display description . . . . . . . . . . . . . . . . . . . . . . . . . . . . . . . . . . 5
• Modes and sub-modes.................................................................5
Operations. . . . . . . . . . . . . . . . . . . . . . . . . . . . . . . . . . . . . . . . . . . . . . . . . . . . . 6
• Switching power on and off..........................................................6
• Switching backlight on and off......................................................7
• Switching modes and sub-modes ................................................7
• Magnetic heading compass mode................................................8
• Wind shift indicator mode.............................................................8
• Tack incator mode......................................................................10
• ROLL angle indicator mode........................................................12
• TIMER mode..............................................................................13
Advanced Operations . . . . . . . . . . . . . . . . . . . . . . . . . . . . . . . . . . . . . . . . . . 14
• SET mode ..................................................................................14
• Exit timer mode .........................................................................15
• Tack mode timer threshold ........................................................16
• Enable or disable the race functions .........................................16
• Reset to factory compass calibration values..............................17
User calibration of the magnetic compass . . . . . . . . . . . . . . . . . . . . . . . . . 17
Document History. . . . . . . . . . . . . . . . . . . . . . . . . . . . . . . . . . . . . . . . . . . . . . 24
Limited Warranty . . . . . . . . . . . . . . . . . . . . . . . . . . . . . . . . . . . . . . . . . . . . . . 26
Disclaimer . . . . . . . . . . . . . . . . . . . . . . . . . . . . . . . . . . . . . . . . . . . . . . . . . . . . 27
Contents

NS350
Operating Manual 3
With the
NS350
, you can find a magnetic compass along with the all-
essential race functions : wind shift indicator, direction, tactical compass and race
timer.
Compact (125mm x 80mm x 26mm) and intuitive, the
NS350
is lighter (190
grams) than any existing system, wired or wireless. It is also waterproof and
robust, being made of bombproof polycarbonate and anodized aluminium.
Powered with only one AA battery, the
NS350
gives sailors accurate information
for over 150 hours and can be installed in minutes.
We hope you enjoy sailing with the
NS350
, and encourage you to read this
manual thoroughly to learn about the many features of your exciting new Novasail
product.
Introduction

NS350
Operating Manual4
The mounting location should be as far as possible from any magnetic objects to
avoid any interference with the compass sensor.
The
NS350
should be mounted as close as possible to the vertical and
horizontal planes.
Installation
NS350
Operating Manual 5
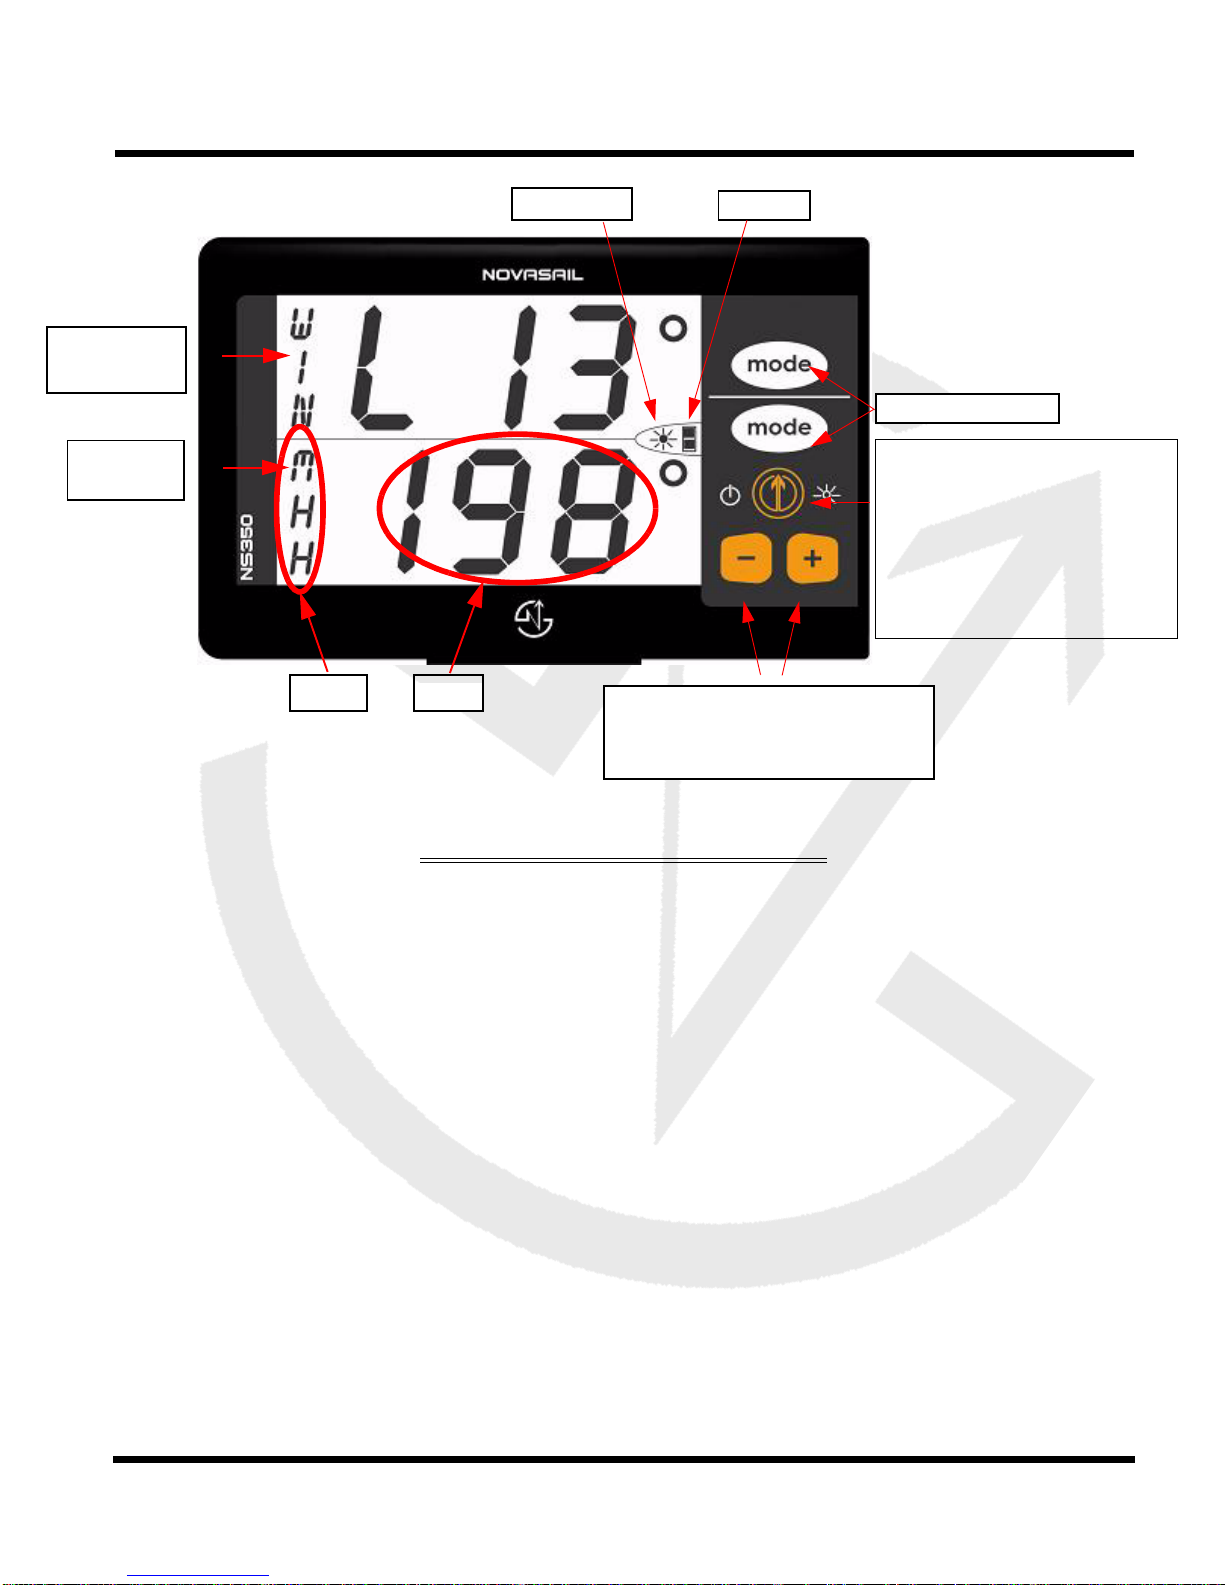
Modes and sub-modes
Magnetic Heading : MH
•MHH : High sensitivity
•MHM : Medium sensitivity
•MHL : Low sensitivity
Wind Shift Indicator : WIN
Tack Indicator : TAK
Roll angle indicator : ROL
TIMER : TIM
Battery
Backlight
Data
Mode
Controls and display description
Start/stop the
NS350
Start/stop the backlight
Memorize the wind
direction
Memorize the tack
lines
Switchmodes
Primary
display
Secondary
display
To switch the sub-modes
Select the tack lines
Adjust the timer value
Table of contents
Other NovaSail Marine GPS System manuals


Popular Marine GPS System manuals by other brands

Airmar Technology Corporation
Airmar Technology Corporation GH2183 Owner's guide and installation instructions

JRC
JRC JHS-183 installation manual

Thuraya
Thuraya IP Voyager user guide

Furuno
Furuno GP-1610CF Operator's manual

Raytheon
Raytheon NautoPilot NP 5100 Operator's manual

Furuno
Furuno GP-1650WDF Operator's manual


Raymarine
Raymarine G-Series system Installation & commissioning instructions

Radio Zeeland DMP
Radio Zeeland DMP Sigma 120 manual

Addvalue Innovation
Addvalue Innovation wideye SABRE RANGER 5000 quick start guide

Garmin
Garmin GPSMAP 190-01120-00 owner's manual

Humminbird
Humminbird 532162-1_B installation guide

Garmin
Garmin GWS 10 Marine Wind Sensor Declaration of conformity