Novibo TY GSM CALL/SMS/MMS User manual

TY GSM CALL/SMS/MMS Auto-dial Alarm System
TY GSM CALL/SMS/MMS
Alarm System
Installation and User Manual
The excellent GSM + Camera alarm system bases on the GSM network. Integrated with
advanced communication technology, it can automatically ca ture a hoto with the
intruder or burglar, then save it to SD card and send it to user's cell hone. So the user
can see who breaks into the ro erty. This is an unique design out of all the security
roducts!
Product Features:
1. AUTO CALL/ SMS/ MMS MESSAGE ALARM ALERT FU CTIO .
2. Include digital camera with VGA resolution and IR LEDs for night vision.
3. Camera can capture photo automatically when motion is detected.
4. The system supports 900/ 1800/ 1900 MHz GSM SIM cards (with MMS function).
5. Wireless device operation frequency 433MHz.
6. Remote command access to the system via phone call or SMS message (arm/disarm/listen-in/take photo/etc).
7. Support up to 2G SD Card which can store about 28,800 photos.
8. Pictures to be transmitted can be adjusted to QCIF (160x128), CIF (320x240), or VGA (640x480).
9. Can capture thief's photo and send to owner's cell phone or email box, which provides evidence for case.
10. Metal case - more protection.
11. 16 wireless and 2 wired distinguishable guard zones - wireless/ wired sensors can be used with the system.
12. Auto-dial and text function: can preset 5 telephone numbers in the unit. Will auto-dial/ send text message/
send MMS to the numbers when the alarm set off.
www.novibo.com 1 V2.0_JUL_2012

TY GSM CALL/SMS/MMS Auto-dial Alarm System
13. Can program 4 groups of text message in the unit.
14. One siren port with Silent Alarm Function - alarm can be triggered without sound and make calls to the
preset numbers in order to arrest the thief silently.
15. Power cut protection: in case the power supply is cut, the system can automatically switch to build-in-
batteries and keep operating for up to 24 hours.
16. Password: 6-digit password gives a good operational security.
17. Internal relay which user may connect with lamp switch. It will auto turn on for 2 mins when alarm set off.
18. Internal relay which user may control switch of light, air-conditioner, heater, or cooker by call or SMS.
19. Remote distance monitoring the background sound around the main host.
20. Easy installation and operation.
Identifying The Rear Ports of Main Host
1. DC input, the power must be 12V 2A
2. MIC input for listen-in function
3. 10-pin ports (from left): A T, VD, G D, Siren, Relay 1a, Relay 1b, Relay 2a, Relay 2b, Input 1, Input 2
A T – Antenna for wireless sensors
VD – VDD output for wired sensors
G D – Ground line
Siren – Siren audio output, another port of siren should be connected to G D
Relay 1a, Relay 1b – Internal relay outputs ,these two ports can be closed or opened by user control
Relay 2a, Relay 2b – Internal relay outputs, these two ports will close automatically for 2 mins when
alarm set off
Input 1, Input 2 – inputs for wired sensors
4. Camera input port (VD, Tx, Rx, G D)
5. Reset Key: The alarm system will come back to the original factory settings when keep pressing the RESET
key and connecting the power supply at the same time. The original password is 123456. At this moment,
all coded information has been deleted.
6. SD Card Slot: Use SD card to save pictures if you need (max. 2GB)
7. LED: LED is used for showing the signal status of the base
8. SIM Card Slot: Press the yellow button next to the SIM port and the card tray will come out
9. A T: Antenna for GSM
10. Power Switch: Power On or Off
www.novibo.com 2 V2.0_JUL_2012

TY GSM CALL/SMS/MMS Auto-dial Alarm System
Installation Guide
1. Insert a SIM card to the main host
Press the yellow button next to the card slot gently with a small screwdriver. The SIM card tray will come
out. Put the SIM card in correct direction (metal contacts face down) and insert into the system carefully.
Attention! Metal contacts of the SIM card must face down. Make sure it is inserted correctly into the unit.
**Before inserting SIM card into the main host, use a regular mobile phone to do the following steps:
- Set the SIM card PI code (Password) request to off.
- Delete all stored numbers or any message history
2. Connect the GSM antenna
Attention! Be careful, do not over-tighten the antenna! Connect the antenna before power up the system.
3. Connect the siren to main host
Connect solid black wire to G D port and red (or black-white) wire to SIRE port. If the siren has two
white wires instead, connect smooth surface wire to G D and patterned wire to SIRE port.
4. Connect wired sensors
Two inputs are available to connect wired sensors. When the alarm set off via the wired sensors and send
out a SMS, it will show Port 1 Alarm or Port 2 Alarm. Sensors should be O (normally open) type. You
can connect more than one sensor at one in ut by connecting the sensors in arallel.
5. Connect switched out ut devices (Home-a liance control)
The system has two internal relays. Relay 1 can be controlled by phone call or SMS commands. Relay 2
will auto close for 2 mins when alarm set off. It can be used for turning on a lamp to scare the thief away.
www.novibo.com 3 V2.0_JUL_2012

TY GSM CALL/SMS/MMS Auto-dial Alarm System
6. How to distinguish the LED on the main host?
LED during power on:
When the system is supplied with power, the LED first turns to static red color for about 5 seconds and the
system turns on the GSM module. After this period, the LED starts flashing and system starts to search for
GSM network. It will then enter into the last system status. If system is in disarm status, LED turns to green.
If system is in arm status, LED turns to flashing green.
LED light
Green light O : Disarm status
Green light flashing: Arm status
Red light flashing slowly: Searching GSM network/ Alarm triggered
Red light is O : Power on/ Matching sensors period
Red light flashing quickly: Receiving call/ SMS in remote-distance/ Receiving signals from remotes
Attention! Backup batteries are built in the main host. Power is present in the main host even
when power supply is not plugged in AC socket or during power cut-off. The user will receive
a SMS message when the AC power is off.
O erating the System
1. How to start?
1. Delete all telephone numbers and messages in the SIM card memory and disable password protection.
Insert SIM card into the main host.
2. Connect camera and antenna to the main host.
3. If you have SD card, insert it to the main host (Before using the SD card, make sure you re-format the
SD card with a computer to FAT32 format, the system doesn't support SDHC or SDXC card).
4. Plug the power supply to the main host and turn the power switch to O . The LED first turns to static
red color for about 5 seconds and the system turns on the GSM module. After this period, the LED starts
flashing and system starts to search for GSM network. It will then enter into the last system status. If
system is in disarm status, LED turns to green. If system is in arm status, LED turns to flashing green.
2. Using remote control
1. Arming button – press it to arm system. Wired siren will give a short ring.
2. Disarm button – press it to disarm system. Wired siren will give two short rings.
3. Panic button – press it and wired or wireless siren will start to ring continuously, alarming the others.
3. Using hone call or SMS text message to control alarm system
Calling the alarm system: after one ring unit will answer and a beep will be heard. You have to input the
password followed by “ # ” key (Default password is 123456). For every key you pressed on the phone, the
system will respond with a short beep. After pressing the “ # ” key, if the password is correct, the system
will respond with a long beep and now you can send several commands and change some settings.
** ote: During phone operation, one long beep means command succeed, two short beeps means command
failed and user should try again. Some of the settings can only be set by SMS messages (Command 2, 30,
40 - 50, 60 - 90).
Sending SMS text message: text message should start with assword# followed by system command
(Password#Command#Parameter#). If setup is completed, user will receive a confirmation SMS message.
www.novibo.com 4 V2.0_JUL_2012

TY GSM CALL/SMS/MMS Auto-dial Alarm System
System Commands (* re resents default setting):
Command Function Description Command Function Description
1#1# System Arm 1#0# System Disarm*
2#--# Take and send photos (1 - 20), ex. 2#1# → Take one photo and send (to phone and email)
3#1# Start siren immediately 3#0# Stop siren
4#1# Start to listen-in (phone only) 4#0# Stop to listen-in (phone only)
11#1# eed siren sound when alarming* 11#0# o siren sound when alarming
12#1# Send SMS when alarming* 12#0# Do not send SMS when alarming
13#1# Send MMS when alarming* 13#0# Do not send MMS when alarming
15#1# Dial phone number when alarming* 15#0# o dialing when alarming
21#--# Set picture size (0 - 2), 0 for 160 x 128; 1* for 320 x 240; 2 for 640x480
22#--# umber of photos taken when alarming (1 - 20), ex. 22#1# → send one pictures when alarming*
24#1# Set picture motion detection alarm on* 24#0# Set picture motion detection alarm off
27#--# Set the sensitivity of camera (1 - 99), 1 is the highest sensitivity, 99 is the lowest sensitivity, 15*
30## Show arm/disarm status of the zones
31#--# Change password. Enter a new password (1 - 6 bit), 123456*
32#1# Set E GLISH version 32#0# Set CHI ESE version*
38#--# Undo bypass zone (Wireless zone: 1 - 16; Wired zone: 21 - 23)
39#--# Bypass zone (Wireless zone: 1 - 16; Wired zone: 21 - 23)
40## Show MMS setup details of main host (41# to 46#)
41#--# Set Access Point ode (AP )
42#--# Set MMS User name (User)
43#--# Set MMS User Password (Pass)
44#--# Set IP Address (IP)
45#--# Set Port (Port)
46#--# Set MMS Homepage (MMS Home)
50## Show preset phone numbers in main host
51#--# First group phone number (0 - 15bit) 52#--# Second group phone number (0 - 15bit)
53#--# Third group phone number (0 - 15bit) 54#--# Fourth group phone number (0 - 15bit)
55#--# Fifth group phone number (0 - 15bit)
60## Show email address in main host
61#--# First email address (0 - 31bit) 62#--# Second email address (0 - 31bit)
70## Show call center phone number.
71#--# Set PST monitoring call center number. 71#center number# room o. #
72#--#--#--# Set Time interval Reporting 72# (Center number 0 - 15bit)#(Time interval 1 - 99hr)#(Type 0 - 2)#
Type: 0→send SMS; 1→send MMS; 2→send SMS & MMS
80## Show preset SMS in the main host
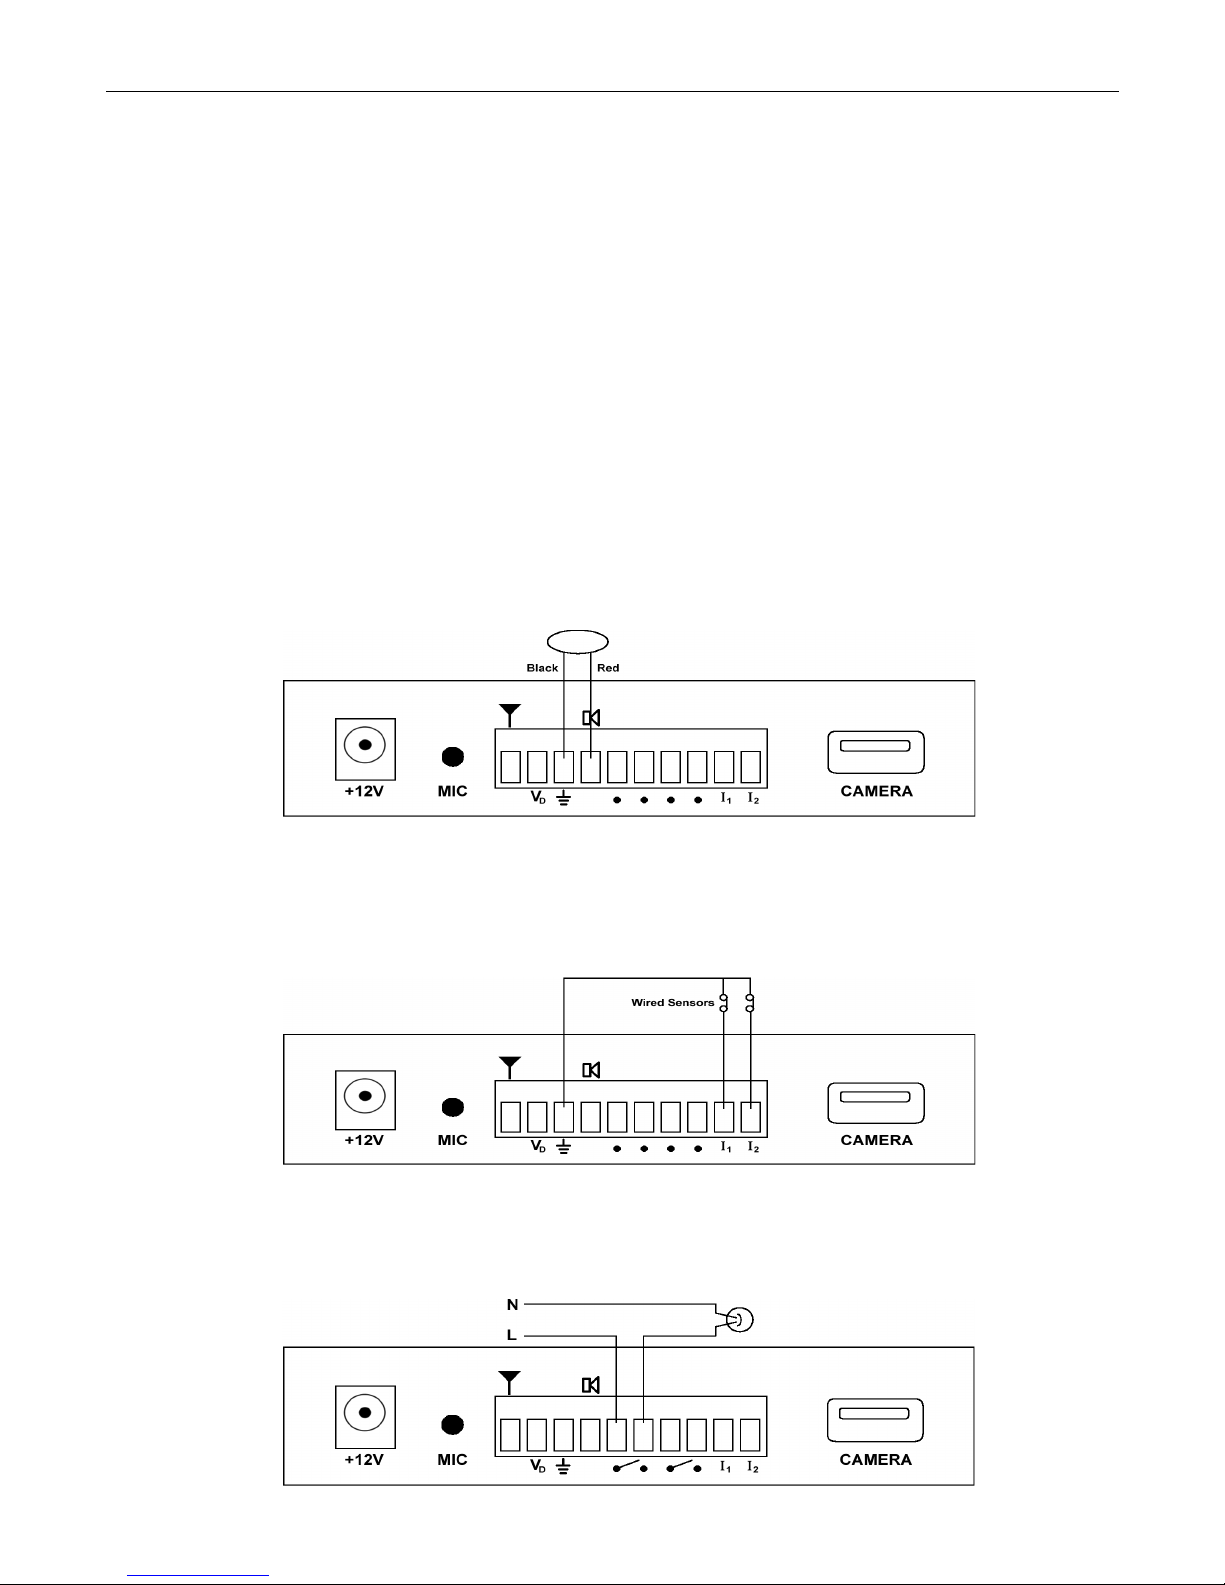
81#--# Message 1 (0 - 24bit) for wired I1 alarm 82#--# Message 2 (0 - 24bit) for wired I2 alarm
84#--# Message 4 (0 - 24bit) for camera alarm 85#--# Message 5 (0 - 20bit) for wireless alarm
90## Show output in the main host
92#1# Set Relay 1 to high (Relay close) 92#0# Set Relay 2 to low (Relay open)
94#1# Set Relay 2 to high (Relay close) 94#0# Set Relay 2 to low (Relay open)
4. How to setu the alarm hone numbers and the content of SMS alerts?
i. User can send a SMS to set the alarm phone number, and the SMS command should be sent as:
Send SMS: 123456#51#12345670# → save 12345670 as 1st alarm phone number in main host
Send SMS: 123456#52#12345672# → save 12345672 as 2nd alarm phone number in main host
Send SMS: 123456#53#12345674# → save 12345674 as 3rd alarm phone number in main host
Send SMS: 123456#54#12345676# → save 12345676 as 4th alarm phone number in main host
Send SMS: 123456#55#12345678# → save 12345678 as 5th alarm phone number in main host
www.novibo.com 5 V2.0_JUL_2012

TY GSM CALL/SMS/MMS Auto-dial Alarm System
Send SMS to delete a stored phone number: 123456#51## → delete the 1st alarm phone number.
Other phone numbers can be deleted using similar method but changing to 52##, 53##, 54##, and 55##.
Send a SMS to acquire the phone numbers stored: 123456#50##.
ii. The system has 6 kinds of SMS alerts. The first two alerts are for wired port I1 and I2. The third alert is
for wired port I3, but it is not applicable for this system model. The fourth alert is for picture-motion
detection alarm. The fifth alert is for wireless sensors (door sensors, PIR Sensors, etc) activated alarm. The
sixth alert is for emergency help. The default messages are shown below:
Wired I1 alarm alert message: Port 1 Alarm
Wired I2 alarm alert message: Port 2 Alarm
Wired I3 alarm alert message: Port 3 Alarm ( ot applicable)
Picture motion detection alarm alert message: Image Alarm
Wireless sensors alarm alert message: Wireless Alarm (Zone 1 - 16)
Emergency help alarm alert message: Emergency Alarm
User can send SMS to edit 4 kinds of alerts:
Send SMS: 123456#81#Front Door O en# → save content to 1st alert message
Send SMS: 123456#82#Back Door O en# → save content to 2nd alert message
Send SMS: 123456#84#Camera Working# → save content to 4th alert message
Send SMS: 123456#85#Window O en# → save content to 5th alert message
Send a SMS to acquire the content of SMS: 123456#80##
Note: Every SMS alert cannot be longer than 10 Chinese characters or 20 English characters. Excess
characters will be deleted automatically.
5. How to Setu S ecial Functions of the System by SMS?
i. Set email address:
Send SMS: 123456#61#[email protected]# → set first email address to be alarm@gmail.com
Send SMS: 123456#62#[email protected]# → set first email address to be [email protected]
ii. Set PST monitoring call center:
You can save: phone number#room o.# and it will dial the room number as well when alarming (for users
whose alarm system is working with monitoring call center).
Send SMS: 123456#71#88886666#0001# → set call center number to 88886666 and room o. 0001
iii. Set time interval reporting:
72#(Center number 0 - 15bit)#(Time interval 1 - 99hr)#(Type 0-2)#
Send SMS: 123456#72#88887777#12#2# → send SMS & MMS to mobile number 88887777 every 12 hrs
iv. Set MMS parameter:
For example, to have the following MMS settings with China Mobile:
Access Point ame (AP ): CMWAP (China Mobile)
Gateway IP (proxy) address (IP): 10.0.0.172
User name:
Password:
Port umber: 9201
MMS Message (Relay) Server URL: http://mmsc.monternet.com
Send SMS:
123456#41#CMWAP# → set GPRS access point to CMWAP (China Mobile)
123456#42## → Set MMS user name (empty)
www.novibo.com 6 V2.0_JUL_2012

TY GSM CALL/SMS/MMS Auto-dial Alarm System
123456#43## → Set MMS user password (empty)
123456#44#10.0.0.172# → Set IP address
123456#45#9201# → Set Port
123456#46#htt ://mmsc.monternet.com# → Set MMS Server
v. Check the present state of alarm host settings:
User can only send assword# to check out the present state of alarm host settings. The replied message is
shown in this format: Disarm, Siren-O , SMS-O , MMS-O , Phone-O , Pic-Middle, Pic-1, Infared-OFF,
Pic-Moniter-O , Cam-sensitivity-15
Advanced Instructions
1. How to add new sensors to the alarm system (Registering wireless sensors with main host)?
Sensors and remote controls delivered in it are already added (registered) to the system.
You can add new sensors or detectors, such as wireless door sensors, PIR sensors, gas or smoke detectors.
When LED is in green color, press the reset button until the LED changes from green to red. Then trigger the
sensor you want to match to the system in order to emit a signal, the red LED will flash to indicate program
success. For remote control, press the emergency button to transmit signal. After finished adding all sensors,
user can press the reset button again or wait for 20 seconds to exit program sensor mode and the system
automatically enters into working state (with green LED). Maximum number of wireless zones that can be
coded by the system is 16. But you can register multiple wireless sensors by grouping them to the same zone
(with same address code, 8-digit jumper setting in sensors).
2. How to cancel the lost remote controls/detectors in the alarm system?
If a remote or sensor is lost, user needs to cancel the lost remote/detector information in the alarm system.
Perform a hardware reset following the instructions in the next section. After hardware reset, all sensors or
remotes are deleted, and all settings are reset to factory settings. The default password is 123456. Repeat the
add sensor instructions above to match back other sensors and remotes.
3. Resetting the system (Only erformed under technical guidance)
OTICE! Resetting the system will cause all coded information and messages to be lost.
System will be loaded with basic factory settings. The passwords will be back to the default value 123456.
You must code/register all wireless sensors again after reset.
Reset procedures:
- System must be disarmed and then power off.
- Press and hold the reset button, meanwhile connect a 12Vdc supply to the main host.
- Release the reset button.
- Wait until the LED changes to green color.
ow system is reset and back to factory settings (the password is 123456). After system initialization, user
can try to press any button on remote control to see if the system respond or not. If the system does not
respond, it means system is reset successfully. If the system responds to the remote control, repeat the reset
procedures.
4. How to test the alarm system function
1. When the power is on and turns into the disarm status, users can arm it through remote controller (arm key)
or by sending a SMS (password#1#1#).
www.novibo.com 7 V2.0_JUL_2012

TY GSM CALL/SMS/MMS Auto-dial Alarm System
2. When the alarm system is in arm status, the red light flashes slowly if the wired/wireless sensors trigger the
alarm or user pass by the camera. The alarm system will send alarm information by SMS, MMS and dial
to stored phone numbers.
3. System will send SMS and Pictures (MMS) before dial to alarm phone numbers. If the SMS and MMS
option have been closed or limited, it can only dial out the preset telephone numbers. User can disarm with
remote controller.
4. After the alarm set off and the system dials phone call, user does not need to in ut the assword again to
control the system.
5. After user answers the alarming call, user can listen-in the background sound. Press 3#1# to make the main
host to hoot the siren and press 3#0# to stop it. You can press 1#1# to return to arm state and not dial next
phone numbers.
6. The main host will save the picture inside the SD card if the camera is available.
ote: when you dial in, please first enter password# (default password is 123456).
Standard Com onents and O tional Com onents
Optional sensors/detectors are packed separately. It includes remote controllers, wireless PIR, wireless gap
sensor, wireless gas detector, wireless smoke detector, panic button, baluster, wireless sirens, etc.. according
your specific needs. Please contact us for full details on all the supported wired / wireless sensors.
www.novibo.com 8 V2.0_JUL_2012

TY GSM CALL/SMS/MMS Auto-dial Alarm System
Technical Parameters
GSM Alarm Module
Operating Voltage: DC12V
Power: 110-240VAC to 12VDC Power Adapter, 2A
Wireless Receiving Distance: 80m open space
Support PHASE 2/2 agreement (including data business)
GSM Frequency: 900 / 1800 / 1900 MHz
Sending Power: Class10 (2 w)/ EGSM900 and CLASS 1(1W)/GSM1800
Receiving code: ASK
Operating Frequency: 433.92 MHz
Alarm Siren
Volume: 110 dB
Working Condition: Temperature 0 °C to 40 °C
Working Humidity: 10% - 90% rh
Wireless Ga Detector (Door / Window Contact)
Power Supply: DC12V (inner 12V battery)
Static Current: ≤ 20 mA
Transmission Current: ≤ 15mA
Transmission Frequency: 433 MHz ± 0.5 MHz
Transmission Distance: 80m open space
Internal Distance: 15mm
Working Condition: Temperature 0 °C to 45 °C
Working Humidity: 10% - 90% rh
Wireless PIR Detector
Power Supply: DC9V (inner 9V battery)
Static Current: ≤ 100 mA
Transmission Current: ≤ 20mA
Transmission Frequency: 433 MHz ± 0.5 MHz
Transmission Distance: 80m open space
Detective Speed: 0.3 - 3m/s
Detective Range: 5 – 12m, Horizontal 110°, Vertical 60°
Working Condition: Temperature 0 °C to 45 °C
Working Humidity: 10% - 90% rh
Remote Control
Power Supply: DC12V (inner DC12V battery)
Transmission Current: ≤ 15mA
Transmission Frequency: 433 MHz ± 0.5 MHz
Transmission Distance: 80m open space
Troubleshoot Section
GSM Problem - The light keeps flashing red meaning the GSM network has not been established.
1. The SIM card circuit side should face downwards, slide the SIM card holder into the slot of the main host
carefully to make sure the card has the contact with the main host circuit board.
2. The SIM card should use 900/ 1800/ 1900 MHz GSM Band.
3. Make sure the SIM card has O password, O phone number, or any message history in it.
www.novibo.com 9 V2.0_JUL_2012

TY GSM CALL/SMS/MMS Auto-dial Alarm System
4. Apply the power with the 12V 2A power adapter we supplied and connect it to the main supply.
5. Use the antenna, this is for the GSM reception.
6. If possible try with another unlock SIM card (different company), or try the alarm at another location to
check GSM reception.
If the alarm has established a GSM network, then the signal LED should change to green color.
Sensors / Remotes - The sensor does not trigger the alarm system
1. Check the sensor battery.
2. Re-match the sensor to the system according to adding a new sensor section.
Please let us know if you have any question ([email protected]), we are very happy to assist you.
For MMS Parameters, you can download at:
htt ://ad.novibo.com/download/MMS_Parameters. df
For Reset and Zone Arrangement, you can download instructions at:
htt ://ad.novibo.com/download/TY_Reset&Zone_Arrangement. df
www.novibo.com 10 V2.0_JUL_2012
Table of contents
Other Novibo Security System manuals
Popular Security System manuals by other brands

Tigersecu
Tigersecu HN-7108-1TB user manual

Argus
Argus TAURUS TW-CP-R-01/916 quick start guide

Honeywell
Honeywell ADEMCO LYNXR Series Installation and setup guide

Nice
Nice HSSO installation instructions

Secure Care
Secure Care Advantage 500DE installation manual

FingerTec
FingerTec TA200 Plus installation guide