NTI SM-16X16-HD4K Manual
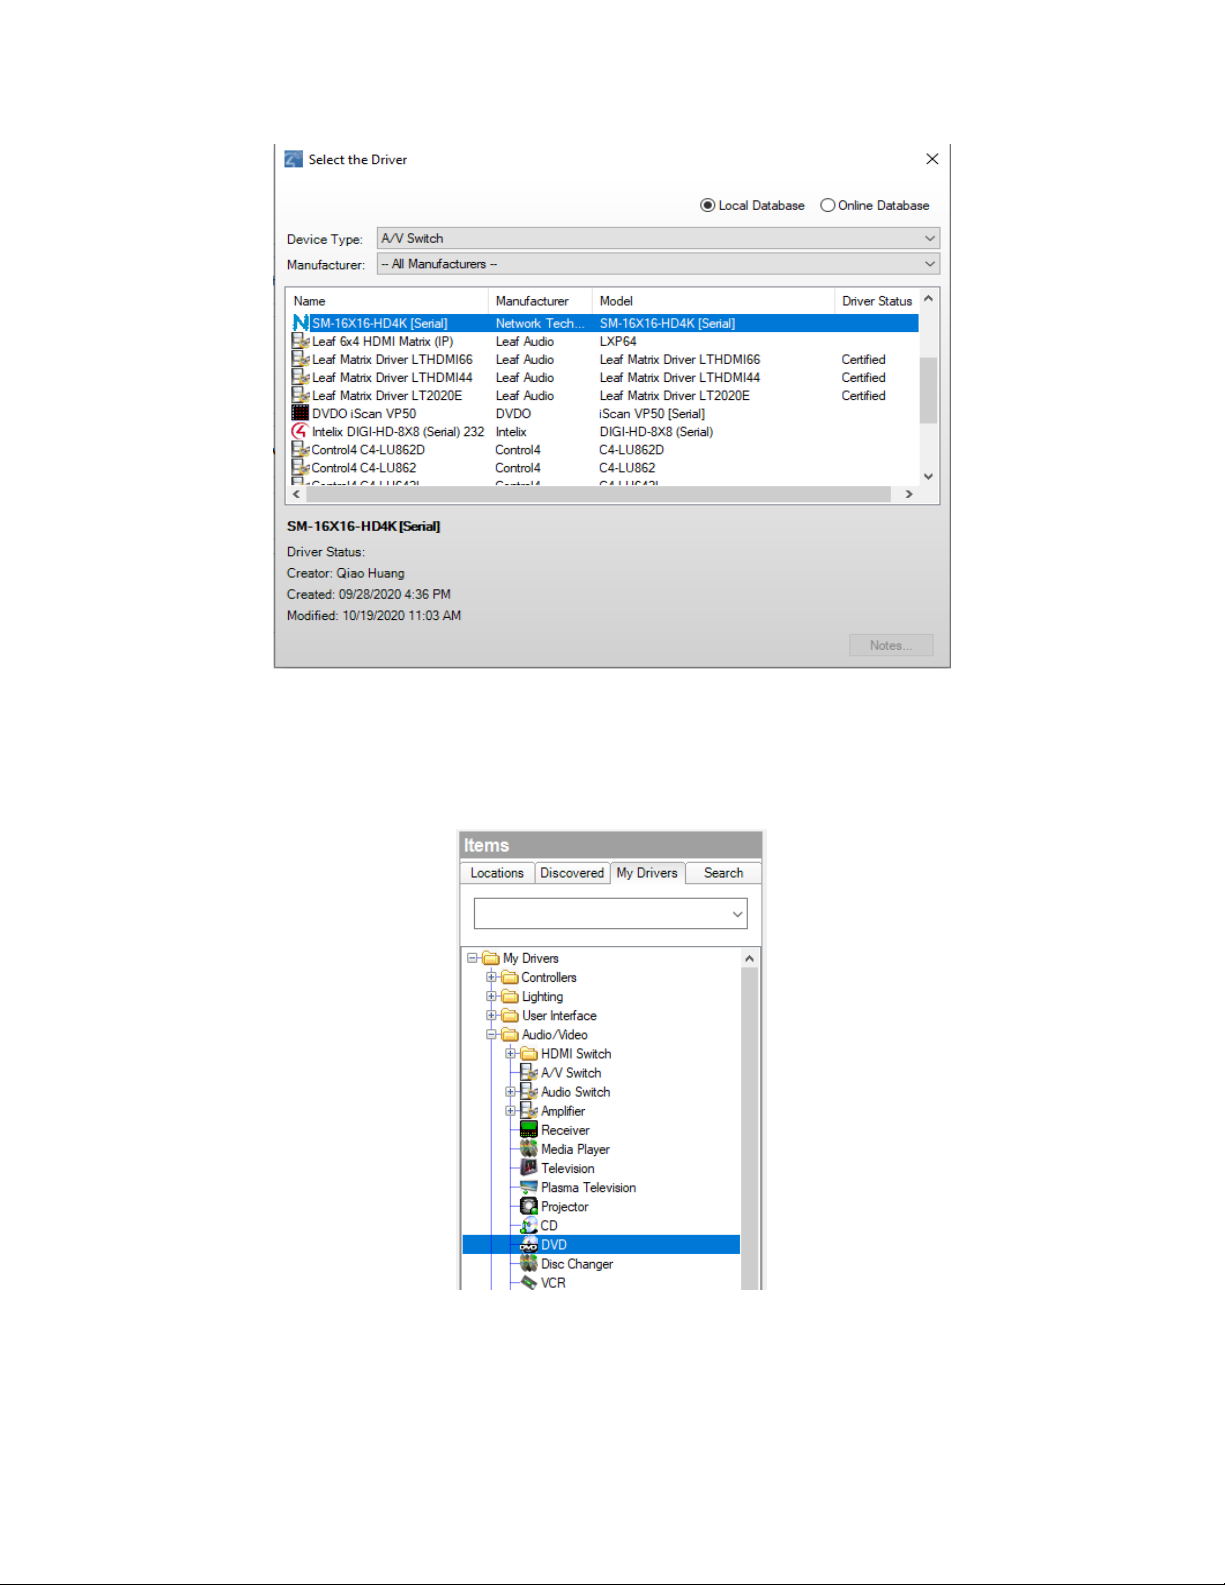
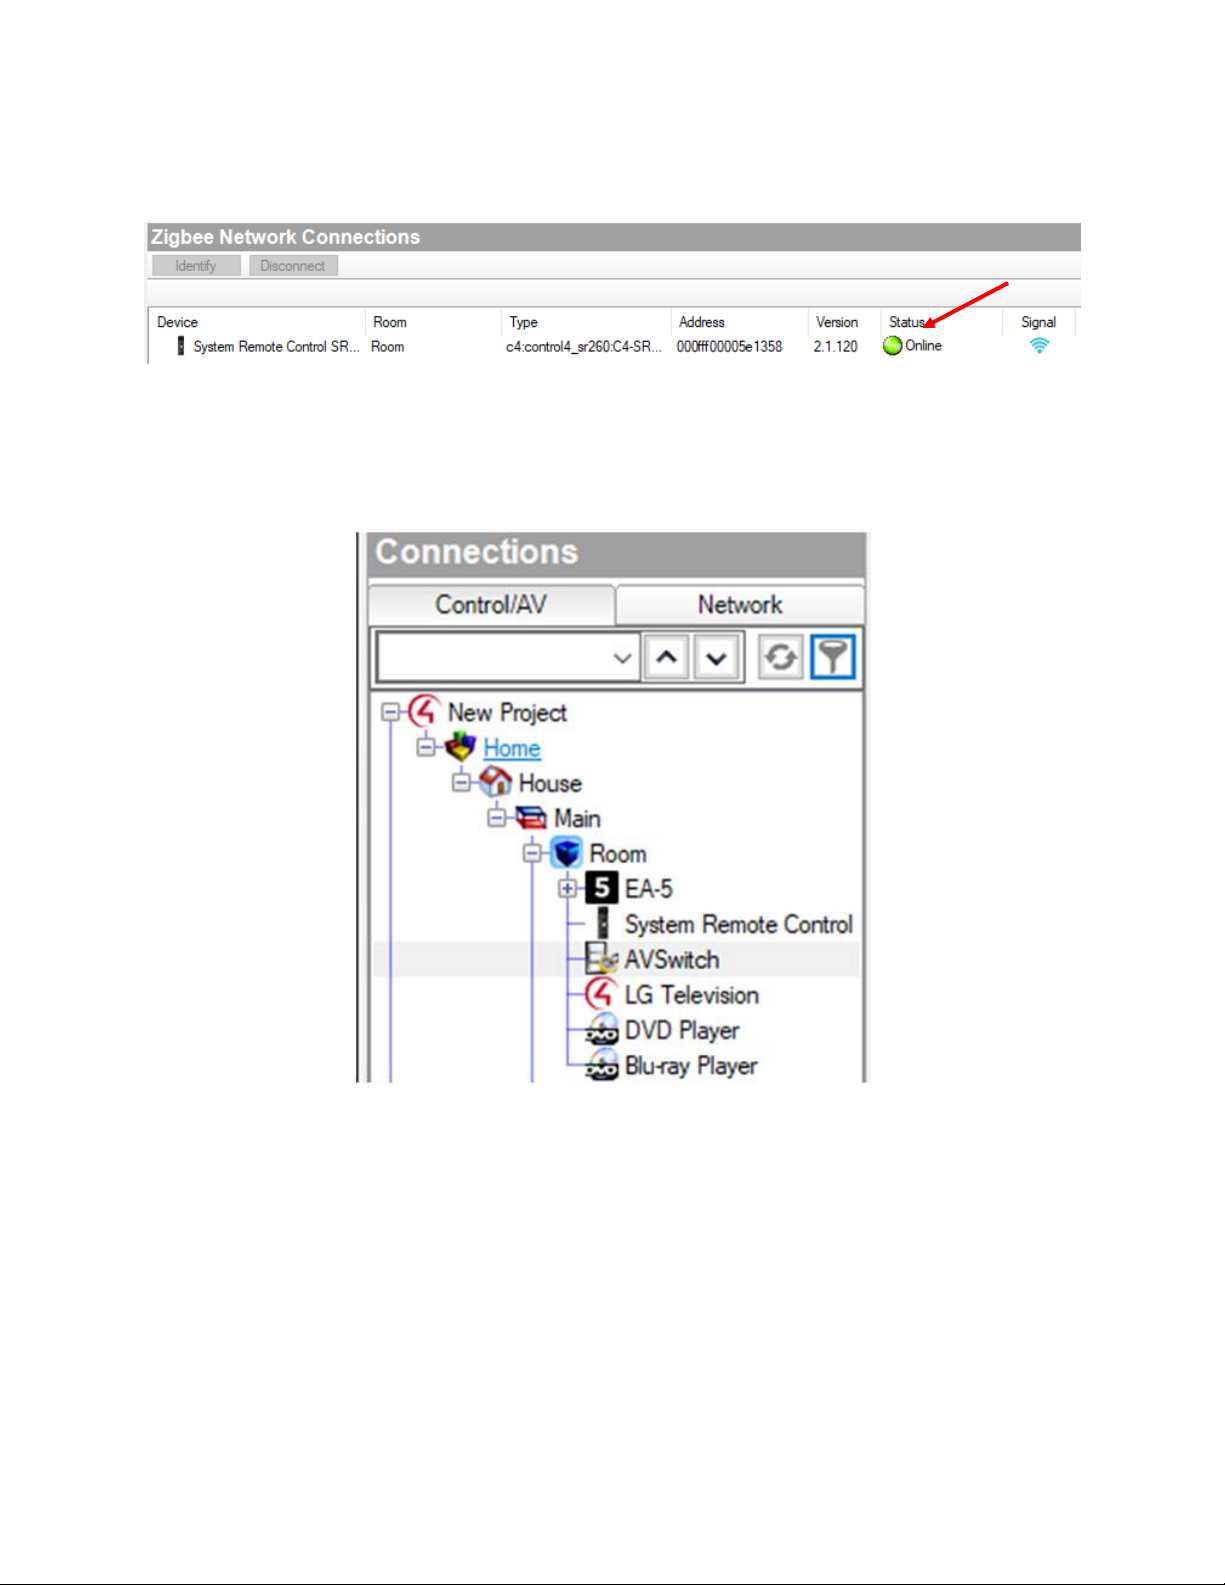
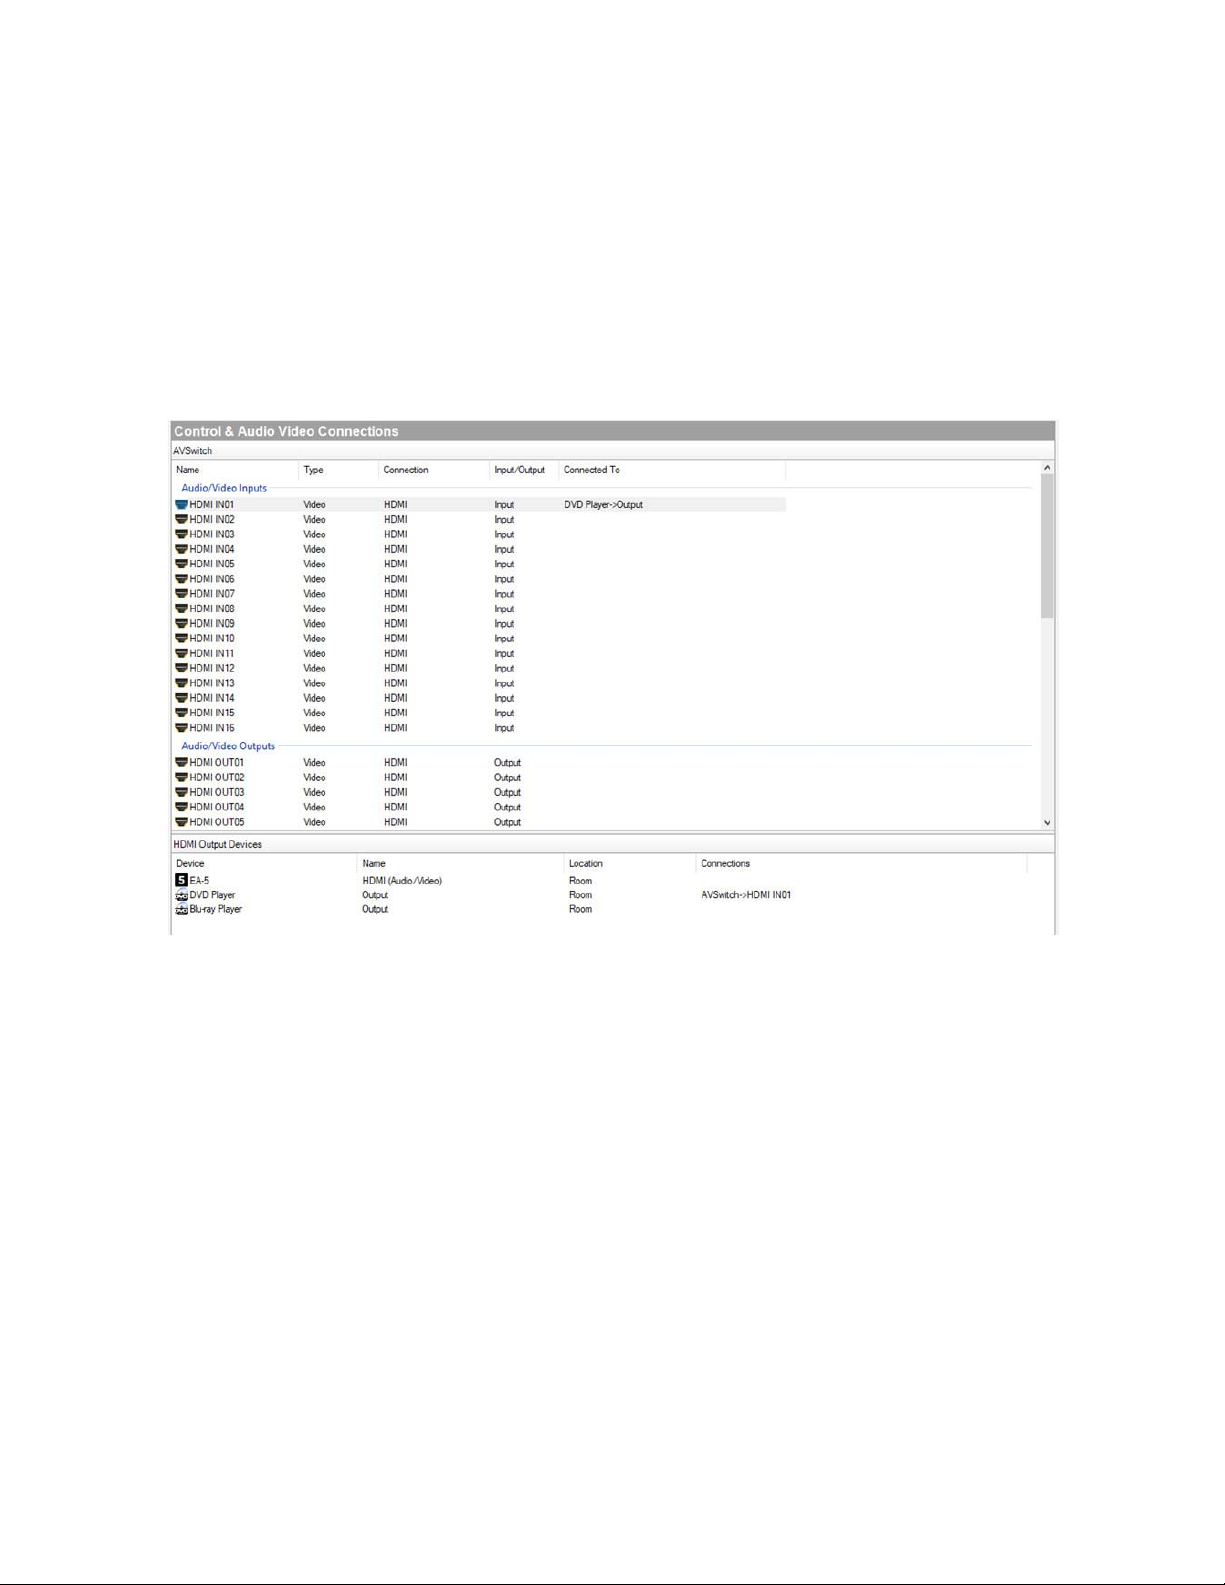
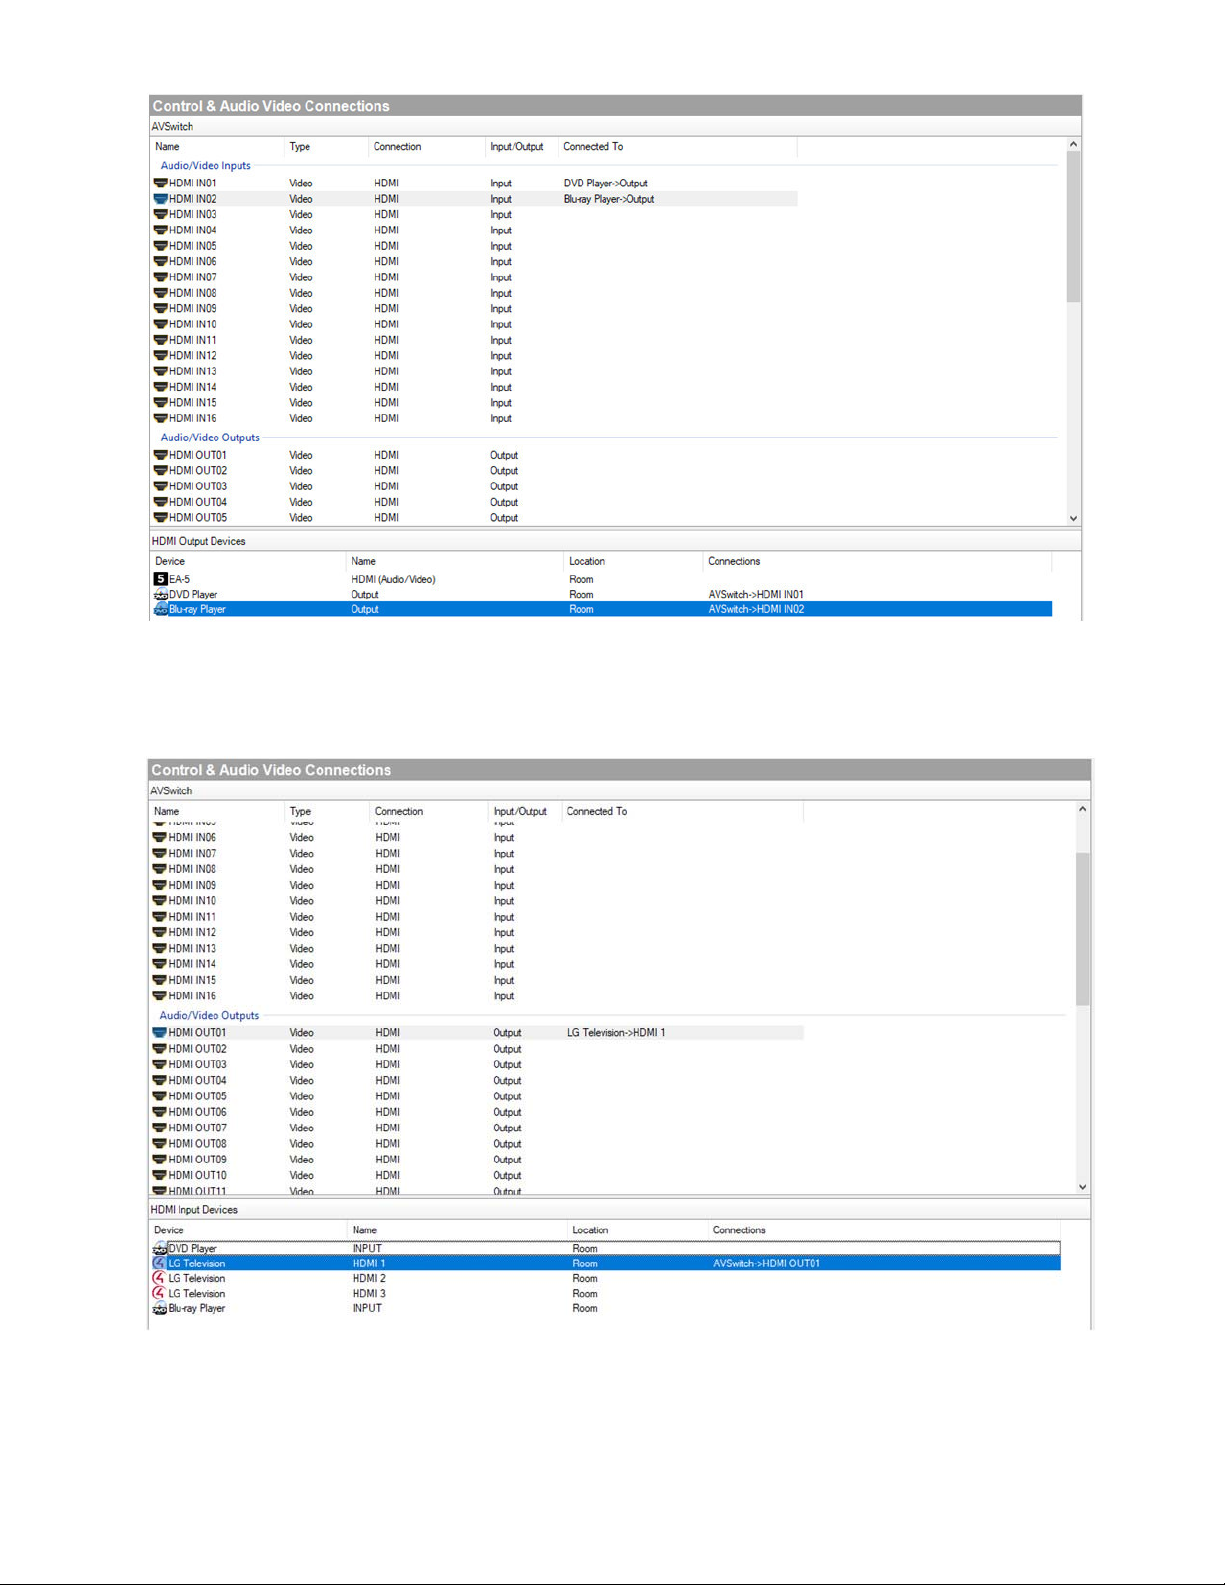
SM-16X16-HD4K Installation Setup
Demo with Control4

TRADEMARK
VEEMUX and the NTI logo are registered trademarks of Network Technologies Inc in the U.S. and other countries. All
other brand names and trademarks or registered trademarks are the property of their respective owners.
COPYRIGHT
Copyright © 2021 by Network Technologies Inc. All rights reserved. No part of this publication may be reproduced,
stored in a retrieval system, or transmitted, in any form or by any means, electronic, mechanical, photocopying,
recording, or otherwise, without the prior written consent of Network Technologies Inc, 1275 Danner Drive, Aurora,
Ohio 44202.
CHANGES
The material in this guide is for information only and is subject to change without notice. Network Technologies Inc
reserves the right to make changes in the product design without reservation and without notification to its users.

TABLEOFCONTENTS
1. Introduction ................................................................................................................................................................1
2. Hardware Installation .................................................................................................................................................1
3. Connect to the Controller...........................................................................................................................................2
4. Project Setup..............................................................................................................................................................3
5. Add EA-5 Driver and Set up Zigbee Network.............................................................................................................4
6. Add Drivers ................................................................................................................................................................6
6.1 SR-260 Remote...................................................................................................................................................6
6.2 AV Switch ............................................................................................................................................................7
6.3 HDMI Source 1 and 2 ..........................................................................................................................................8
6.4 HDMI Display 1 and 2........................................................................................................................................10
7. Make Zigbee Connection .........................................................................................................................................11
8. Map The Connections..............................................................................................................................................13
9. Action Test...............................................................................................................................................................17
10. Customer’s View: Navigator...................................................................................................................................18
11. Multiple Video Outputs...........................................................................................................................................19
12. Programming Test..................................................................................................................................................21
12.1 Special Note for switching video sources.........................................................................................................24
12.2 Device Specific Commands.............................................................................................................................24
13. Custom Button Agent.............................................................................................................................................26
14. (DEBUG USE ONLY) Check Matrix Connection Map............................................................................................33

1
1. Introduction
This manual provides a demo on how to properly set up a test project to use NTI Control4
drivers, using the VEEMUX® SM-16x16-HD4K 4K Video Matrix Switch. This document is for
Control4 installers and a basic understanding of Control4 controller and the associated
Composer Pro software is required. To program a Control4 controller properly, please download,
install and register the Composer Pro software.
Requirements; For this project, you will need the following components to perform setup:
Control4 Controller (EA-5 is used in this manual.)
Control4 SR260 Remote Controller
VEEMUX® SM-16x16-HD4K 4K Video Matrix Switch
DB9F-RJ45F Serial adapter
10-foot CAT5e/6 Ethernet Cable
Two 1080p HDMI sources
Two 1080p HDMI displays
HDMI and Ethernet cables
Ethernet switch
WiFi-enabled router
Android or iOS device with the Control4 App installed and configured correctly.
2. Hardware Installation
Install the Zigbee Antenna to the Control4 controller EA-5 (if available).
Connect the SM-16x16-HD4K’s RS232 port to Control4 EA-5 Controller’s Serial 1 port
using the DB9F-RJ45F Serial adapter and the 10-foot CAT5e/6 cable.
Turn ON the matrix switch and EA-5.
For SM-16x16-HD4K, connect two video sources to HDMI IN 1 and HDMI IN 2,
respectively.
Connect an HDMI display (#1) to HDMI OUT 1.
Connect another HDMI display (#2) to EA-5’s HDMI port.
Connect the Ethernet switch to the router.
Connect the Controller to an Ethernet switch.
Connect a PC with Composer Pro installed to the same subnet as the Controller.
Connect the Router’s WAN port to the Ethernet switch
Note: If you are familiar with Composer Pro, you can skip to page 6: Add Drivers. And if you are
new to the Control4 system, please continue.

2
3. Connect to the Controller
Open Composer Pro. Choose “Local System” in the popup window.
Composer Pro should automatically discover all Control4 Controller Units in the same subnet.
Choose the controller to be used and then click “Connect”.

3
4. Project Setup
After you connect to the controller, you will see the Project Properties window in the middle of
the screen. Choose a Project Name that you prefer and click “Set”.
Click the “Lookup…” button (above) for Location. A window will pop up. Enter your city or zip
code and click “Search”.
Note: Make sure that you choose your city from the listed search results.

4
5. Add EA-5 Driver and Set up Zigbee Network
Look at the right side of the screen, you should find “Items”. In the Items page, click
“Discovered”. You should see the Controller listed. Double-click it.
The “Control4” Controller should be added to your “System Design” Tree shown on the left side
of the screen. Then, click “New Project” in “System Design”.
You should see your middle window go back to the first “Properties” page where we set up our
project. We will setup Zigbee to work with the SR260 remote controller. In “Properties”, click the
“Zigbee Configuration” tab. Find the blue underlined “Edit Zigbee Configuration” link and click it.
Click “Yes” to create a new Zigbee Network.

5
Click “OK” and then “OK” again.
You should see a new Zigbee Network created in the “Zigbee Configuration” The Properties
page should be as shown in the image on the next page.

6
6. Add Drivers
Add Control4 Drivers for the Devices we use in this Project.
Control4 EA-5 Controller. We have already added it in the previous section.
Control4 SR-260 Zigbee Remote Controller. We will use “SR-260”.
AV Switch. We will use “NTI SM-16X16-HD4K”.
HDMI Source 1. We will use “generic DVD Player” driver in this manual. (You don’t have
to use a real DVD player for this video source.)
HDMI Source 2.We will use “generic DVD Player” driver again.
HDMI Display 1 connected to HDMI OUT 1. We will use the HDMI1 port of a “LG
Television” driver in this manual. (You don’t have to use a real LG television for video
output.)
HDMI Display 2 connected to EA-5. We will use the HDMI2 port of the created “LG
Television” driver in this manual (Only for simplification. In a real project, you should add
another TV driver for this.)
6.1 SR-260 Remote
Go to “Items” -> “My Drivers” -> “User Interface” -> Double-click “System Remote Control
SR260”.

7
6.2 AV Switch
Go to “Items” -> “My Drivers” -> Double-click “A/V Switch”.
In the pop-up window, double-click “SM-16X16-HD4K [Serial]” in the list.
If the NTI driver is not listed here, we may need to manually download the driver from the NTI
website and provide to Composer Pro. In this case download the AV switch driver with .c4z
extension and add it to the Control4 Driver Folder
C:\Users\<username>\Documents\Control4\Drivers .

8
6.3 HDMI Source 1 and 2
Go to “Items” -> “My Drivers” -> Double-click “DVD”.
In the pop-up window, double-click “DVD-Generic IO” in the list.

9
Repeat this step for adding another Video source Driver.
Go to the System Design Page. Right-click the HDMI Source drivers and rename them for
easier recognition. In this example project, we will name them as “DVD Player” and “Blu-ray
Player”, respectively, even though you don’t have to use DVD and Blu-ray players as video
sources.

10
6.4 HDMI Display 1 and 2
Go to “Items” -> “My Drivers” -> Double-click “Television”.
Double-click “LG 43UH6109”. If it’s not shown in the list, choose “Online Database” on the top
right corner and search for LG Drivers.
You don’t need to repeat this step as we want to keep this project as simple as possible. We will
use this LG Television’s HDMI 1 port to simulate our Monitor 1 and HDMI 2 port to simulate our
Monitor 2.

11
7. Make Zigbee Connection
The next step is to let the EA-5 Controller know what the physical and Zigbee connections are.
Check the bottom-left of the Composer Pro’s main window. You should see “Connections”
below “System Design” for which we have been editing. Click it.
On the left hand side, below the “Connections” Tab, choose the “Network” Tab and then the
“Zigbee Network”. You should see the SR260 Remote is listed here but not connected. Double-
click this “System Remote Control SR260”.
You should see the identification window pops up. Follow the instruction and press the red “4”
button four times and wait until an address shows up in the text box.

12
If you receive an error message at this step, go back to the Add EA-5 Driver and Set up
Zigbee Network section of this manual (page 4), remove the created Zigbee network, and then
recreate it. (This might take up to 3 minutes.) After the Zigbee network is recreated, wait at
least 1 minute before you come back to this “Connections” page and try again to identify the
remote.
Once you see an address in the Address block,
click “Close”.

13
If you see the “status” is “Online”, then the remote has been successfully identified and
connected to the EA-5 controller.
8. Map The Connections
The next step is to map the connections as needed. Go to “Connections” -> “Control/AV” Tab.
Choose “AVSwitch”.

14
Find the “HDMI IN01” at the top of the list, select it using a mouse and drag it to the “DVD
Player” in the “HDMI Output Devices” list at the bottom.
Repeat this step dragging “HDMI IN02” to “Blu-ray Player”.

15
Find the “HDMI OUT01” from the list on the top, drag it to “LG Television -> HDMI1” in the list on
the bottom.

16
Connect (drag) the “RS-232 Control” to EA-5’s “SERIAL 1 (DB-9)”.
Next, choose “LG Television” in the “Connections” -> “Control/AV” Tab. Connect (drag) “HDMI
2” TO EA-5’s “HDMI” port.
Now all of our connections have been finished.

17
9. Action Test
Go to “Properties” -> “Actions”. You should see a few actions available.
Click “Initialize the Matrix Switch” button. This will enable the autostatus function and update the
matrix connection map. After you click this button, you should see the LUA log has been
updated and the connections have been read by the connection map GUI.
Table of contents
Other NTI Switch manuals

NTI
NTI SM-4X4-4K18GB-LC User manual

NTI
NTI KEEMUX-USBV-2U Operation manual

NTI
NTI RACKMUX-D17-N-16DVIHD User manual

NTI
NTI UNIMUX-USBV-2R User manual

NTI
NTI ST-nXm-U-HD User manual

NTI
NTI SE-DVI-2A User manual

NTI
NTI KEEMUX-Sx-O User manual

NTI
NTI UNIMUX Series User manual

NTI
NTI SPLITMUX Series User manual

NTI
NTI SM-nXm-AV-LCD User manual

NTI
NTI RACKMUX-V15-4UNV User manual

NTI
NTI KEEMUX-P2-LC Operation manual

NTI
NTI PRIMUX-RDSW User manual

NTI
NTI ST-nXm-USBV-U Operation manual

NTI
NTI ENVIROMUX Series User manual

NTI
NTI UNIMUX Series User manual

NTI
NTI ST-xU User manual

NTI
NTI RACKMUX-V15-N-PRIMUX User manual

NTI
NTI 1394-HUB-5-x FW106 Operation manual

NTI
NTI UNIMUX-DVI-2 User manual