NuAire CARBON-FILTERKIT-S User manual

1
Nuaire | Western Industrial Estate | Caerphilly | CF83 1NA | nuaire.co.uk 29. 09. 23. Document Number 672105
CARBON-FILTERKIT-S
CARBON-FILTERKIT-D
Carbon Filter Replacement and
Foam Kit Installation Manual
1.0 SAFETY INFORMATION
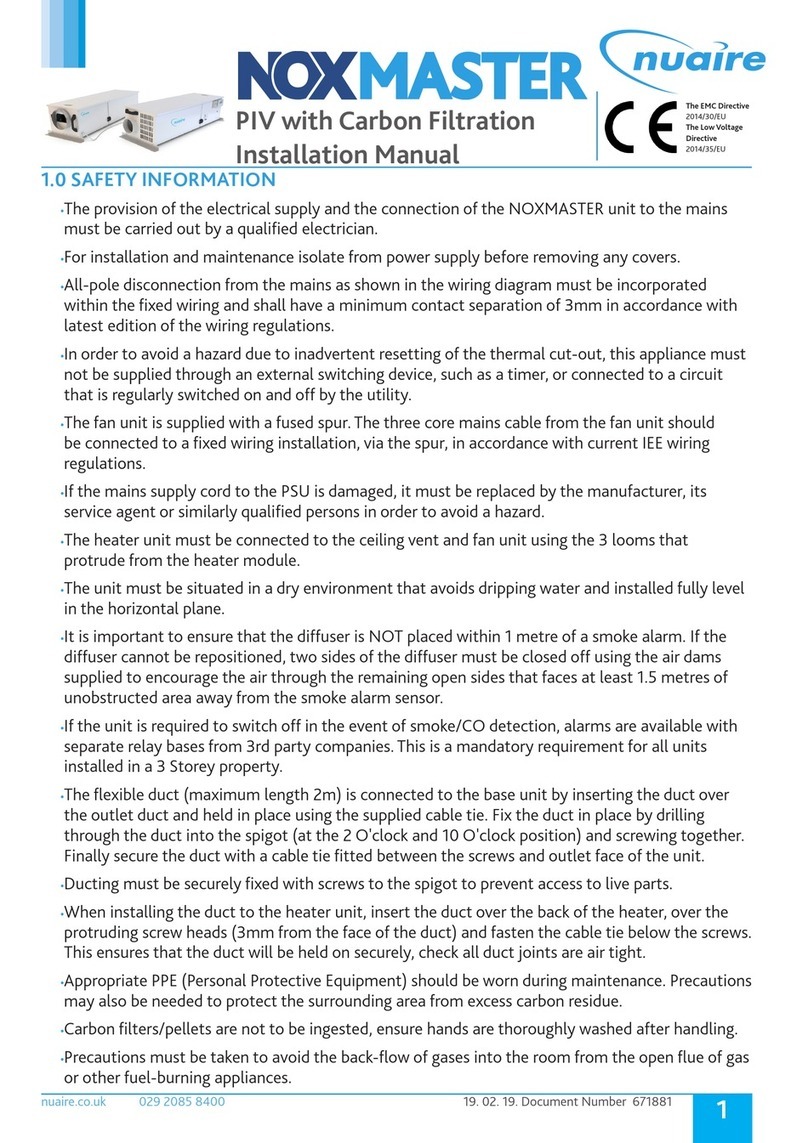
• The carbon filter block is supported by a retaining clamp, loosening the clamp will result
in the filter being freed. Be prepared to support the whole weight of the carbon filter
block.
• Carbon filters / pellets are not to be ingested
1.1 Hazard Symbols
REFER TO INSTRUCTION MANUAL
Read and understand the installation and maintenance manual before
installing, operating or maintaining this product.
2.0 Introduction
2.1 Code Description
1 - 2
CARBON-FILTERKIT - D
1. Filter Type Replacement Carbon Filter
2. Unit Width S= Single
D= Double
3.0 INSTALLATION
Upon removal of your carbon filter from the unit, please check if the cartridge being replaced is fitted with a foam kit along the front
edge and down its side. See below for an example:
Foam kit fitted on the
carbon filter cartridge
1 Check for existing foam kit
My old filter is already fitted with a foam kit: My old filter was not fitted with a foam kit:
üYou will need to install the foam kit provided with
the kit following the instructions in Section 3.1 ûYou can fit the carbon filter cartridge as provided,
following the instructions below in Section 3.2.
Check with your local authority if the foam kit
can be recycled.
2.2 Filter Cartridge Details
Unit Code Carbon Filter
Lifespan
Cartridge
Weight
CARBON-FILTERKIT-S 2 years 6kg
CARBON-FILTERKIT-D 4 years 12kg

2
Nuaire | Western Industrial Estate | Caerphilly | CF83 1NA | nuaire.co.uk 29. 09. 23. Document Number 672105
CARBON-FILTERKIT(-S/-D)Installation Manual
3.1 Fitting the Foam Kit
NOTE: Fitting the foam kit is only required if the filter being
replaced already has a foam kit fitted (see Section 3.0)
1. Remove the backing paper from the underside of the foam
2. Align the notched edge of the foam with the adhesive side
facing down to the inner edge of the filter (Figure 2). Press
down along its edge to secure.
3. Neatly wrap the foam around the front and back edges. Firmly
pressing the foam down against the filter (Figure 2).
4. Once attached repeat procedure on the opposite side of the
cartridge.
2 Locating the Foam Kit on the Filter Cartridge
Ensure foam covers
the front edge
3.2 Installing the Filter Cartridges
The carbon filter block is supported by a retaining
clamp, loosening the clamp will result in the filter being
freed. Be prepared to support the whole weight of the
carbon filter.
IMPORTANT
Appropriate PPE (Personal Protective Equipment)
should be worn during maintenance.
Precautions may also be needed to protect the
surrounding area from excess carbon residue.
IMPORTANT
3.2.1 Replacing Single Carbon Filter - IAQBOX-S
1. Unscrew the fixings securing the lid in place and remove lid
from unit (Figure 3).
2. Whilst supporting the back of the carbon filter block, loosen
the retaining clamp bolt and rotate the clamp in order to
release the block (Figure 4).
3. Pulling firmly on the rear edge of the carbon filter block will
lever the filter to approximately a 45° angle (A). At this position
it can be removed from the unit (B) (Figure 5).
4. Replace the carbon filter in the reverse operation to
the above process. Ensure the filter is fitted in the same
orientation as before. Firmly push the filter back into position
to compress the rubber seal. Rotate the clamps back and
tighten clamp bolt prior to removing support from the
replacement carbon filter block.
5. If the foam strips behind the carbon filter (Figure 4) sustain
any damage during the removal or installation. Remove and
replace foam strips with new foam supplied with replacement
filter.
6. Refit the unit lid.
7. Wash hands thoroughly after handling.
Carbon Filter
3 Single carbon filter access panel removal
Carbon Filter
Foam Strip
(on either side
6 kg
4 Single carbon filter cartridge retaining clip
5 Single carbon filter cartridge removal
Carbon Filter
6 kg
A
B
A
B
Carbon Filter

3
Nuaire | Western Industrial Estate | Caerphilly | CF83 1NA | nuaire.co.uk 29. 09. 23. Document Number 672105
CARBON-FILTERKIT(-S/-D)Installation Manual
3.2.2 Replacing Double Carbon Filter - IAQBOX-D
1. Unscrew the fixings securing the lid in place and remove lid
from unit (Figure 6).
2. Whilst supporting the back of the carbon filter block, loosen
the retaining clamp bolt and rotate the clamp in order to
release the block (Figure 7).
3. Pulling firmly on the rear edge of the carbon filter block will
lever the filter to approximately a 45° angle (A). At this position
it can be removed from the unit (B) (Figure 8).
4. Replace the carbon filter in the reverse operation to
the above process. Ensure the filter is fitted in the same
orientation as before. Firmly push the filter back into position
to compress the rubber seal. Rotate the clamps back and
tighten clamp bolt prior to removing support from the
replacement carbon filter block.
5. If the foam strips behind the carbon filter (Figure 7) sustain
any damage during the removal or installation. Remove and
replace foam strips with new foam supplied with replacement
filter.
6. Refit the unit lid.
7. Wash hands thoroughly after handling.
Carbon Filter
6 Double carbon filter access panel removal
1
2 kg
Carbon Filter
Foam Strip
(on either side of unit)
7 Double carbon filter catridge retaining clip
8 Double carbon filter cartridge removal
Carbon Filter
1
2
kg
A
B
A
B
Carbon Filter
Carbon filters / pellets are not to be ingested
IMPORTANT
4.0 WARRANTY
The 5 year warranty starts from the day of delivery and includes parts
and labour for the first year. The remaining period covers parts only,
filter replacement is not covered by the unit warranty.
This warranty is void if the equipment is modified without
authorisation, is incorrectly applied, misused, disassembled, or
not installed, commissioned and maintained in accordance with
the details contained in this manual and general good practice.
For technical assistance or further product information, including
spare parts and replacement components, please contact the
After Sales Department.
5.0 END-OF-LIFE AND RECYCLING
Ensure that Nuaire product is made safe from any electrical /
water / refrigerant supplies before dismantling commences.
This work should only be undertaken by a qualified person in
accordance with local authority regulations and guidelines,
taking into account all site based risks.
Where possible Nuaire use components which can be largely
recycled when the product reaches its end-of-life:
•Fans, motors, controls, actuators, cabling and other electrical
components can be segregated into WEEE recycling
streams.
•Sheet metal parts and other metallic items can be
segregated and fully recycled.
•Cardboard packaging, wood, used filters and other paper
components can be largely recycled or fully processed in
energy from waste centres.
•Remaining items can be further segregated for energy from
waste centres or, as a last resort, sent to landfill. Please
call After Sales Support for further information on items not
listed above. Ensure that Nuaire product is made safe from
any electrical supplies before dismantling commences. This
work should only be undertaken by a qualified person in
accordance with local authority regulations and guidelines,
taking into account all site based risks.

4
Nuaire | Western Industrial Estate | Caerphilly | CF83 1NA | nuaire.co.uk 29. 09. 23. Document Number 672105
CARBON-FILTERKIT(-S/-D)Installation Manual
6.0 AFTER SALES AND REPLACEMENT
PARTS
For technical assistance or further product information, including
spare parts and replacement components, please contact the
After Sales Department.
If ordering spares please quote the serial number of the unit
together with the part number, if the part number is not known
please give a full description of the part required. The serial
number will be found on the identification plate attached to the
unit casing.
Repair and replacement of the defined critical components shall
only be carried out by a Nuaire authorized representative. These
fans are certified by a notified body, the substitution of a critical
component with an alternative version of this component, must
be approved by the notified body.
Telephone 02920 858 400
aftersales@nuaire.co.uk
Technical or commercial considerations may, from time to
time, make it necessary to alter the design, performance and
dimensions of equipment and the right is reserved to make such
changes without prior notice.
This manual suits for next models
1
Other NuAire Water Filtration System manuals
Popular Water Filtration System manuals by other brands

GE
GE GX1S50F Owner's manual and installation instructions

Drinking Fountain Doctor
Drinking Fountain Doctor FGDF7105 1H Installation use and care manual

Aqua
Aqua ARO DUPLEX Use and maintenance manual

IMI
IMI NORGREN F64G Installation & maintenance instructions

Mountain Fresh
Mountain Fresh UBM1 user guide

The Table Stable
The Table Stable TCF-1 instruction manual