NUTRICHEF PKAIRFR52 User manual

PKAIRFR52
User Manual

Introduction
The new PKAIRFR52 provides an easy and healthy way of preparing your
favorite food. You can make more dishes with this new technology that
combines hot rapid air circulation in a grill. The best part is that the
PKAIRFR52 heats food at all directions and you don’t need to use cooking
oil.
General description Fig.1
1. Pan
2. Basket
3. Basket handle
4. Basket release button
5. Power-on knob/cancel button
6. LED with Touch screen
7. Timer control (0-30min.)
8. Temperature control (176-392 °F)
9. Air inlet
10. Air outlet openings
11. Main cord
Important
Please read this manual carefully before any using of the appliance to
prevent accidents due to inappropriate use. Keep the user manual for future
reference.
Danger
• NEVER IMMERSE the housing, which contains electrical components and
heating elements, in water. Do not rinse under the tap.
• TO AVOID ELECTRICAL SHOCK, do not put liquid of any kind into the
main Unit housing containing the electrical components.
• TO PREVENT FOOD CONTACT with the heating elements, do not overfill
the Basket.
• DO NOT cover the air inlet and outlet openings while the PKAIRFR52 is
operating.
• Do not fill the pan with oil to avoid fire hazard.
• Do not touch the inside of the appliance while it is operating.
1

Warning
• Check if the voltage indicated on the appliance match the local main
voltage.
• Do not use the appliance if there is any damage on plug, main cord or
other parts.
• Do not go to any unauthorized person to replace or fix damaged
main cord.
• KEEP THE APPLIANCE and its power cord out of the reach of children
when it is in operation or in the “cooling down” process.
• KEEP THE POWER CORD away from hot surfaces.
• Do not plug in the power cord or operate the Unit controls with wet hands.
• Plug in the appliance to an earthed wall socket. Always make sure
that the plug is inserted into the wall socket properly.
• Do not connect appliance to an external timer switch.
• Do not place the appliance on or near combustible materials such as a
tablecloth or curtain.
• Do not place the appliance against a wall or against other appliance.
Leave at least 10cm free space on the back and sides and 10cm free
space above the appliance.
• Do not place anything on top of the appliance.
• Do not use the appliance for any other purpose than described
in this manual.
• Do not let the appliance operate unattended.
• During hot air frying, hot steam is released through the air outlet openings.
Keep your hands and face at a safe distance from air outlet openings.
Also be careful of hot steam and air when you remove the pan from
the appliance.
Any accessible surfaces may become hot during use. (fig.2)
• Immediately unplug the appliance if you see dark smoke coming out
of the appliance.
• Wait for the smoke emission to stop before you remove the pan from the
appliance.
Caution
• Always operate the appliance on a horizontal surface that is level, stable
and noncombustible.
• This appliance is designed for household use only. It may not suitable to
be safely used in environments such as staff kitchens, farms, motels, and
other non-residential environments.
• The guarantee is invalid if the appliance is used for professional or
semi-professional purposes or it is not used according to instructions.
• Always unplug the appliance after use
• Let the appliance cool down for approximately 30 minutes before handling,
cleaning or storing.
2

Automatic switch-off
The appliance has a built-in timer and will automatically shut down when
the countdown reaches zero. You can manually switch the appliance
off by pressing the timer buttons until it shows zero or by pressing the
cancel button one time. In either case, the appliance will automatically shut
down within 20 seconds.
Electromagnetic fields (EMF)
This appliance complies with all standards regarding electromagnetic fields
(EMF). If handled properly and according to the instructions in this user
manual, the appliance is safe to use based on scientific evidence available
today
Before first use
1. Remove all packaging materials and stickers or labels.
2. Clean the basket and pan with hot water, wash using liquid soap and a
non-abrasive sponge. These parts are safe to be cleaned in dishwasher.
3. Wipe inside and outside of the appliance with a cloth. And there is no
need to fill the pan with oil or lard as the appliance works on hot air.
Using the appliance
1. Place the appliance on a stable, horizontal and even surface.
Do not place the appliance on non-heat-resistant surface.
2. Put the basket in the pan. (fig.3)
Do not fill the pan with oil or any other liquid.
3. Preheat the appliance for 3 minutes when it is cold. Press the WARM-UP
“+” first, and then press the power on button to start the appliance to warm
up gradually. After the warming-up, carefully pull the pan out of the air fryer.
Caution:The appliance will stop heating after the pan is pulled out,the air
blower will stop in 5 seconds.(fig.4)
4. Place the ingredients in the basket, and then pull the basket into the
appliance.(fig.5)
5. Select proper function and temperature for the ingredients. See section
'settings' in this chapter to determine the right temperature.(Fig. 7)
Notes: There are two knobs (TIME '+' & '-') in the control panel which can
adjust time setting - Increase/Decrease 1 minute per a press or increase/-
decrease rapidly in the unit of 1 minute by long pressing. There are two
knobs(TEMP '+' &'—') in the control panel which can adjust temperature
setting - Increase/Decrease 5 degrees per a press or increase/decrease
rapidly in the unit of 5 degrees by long pressing.
Tip: Before you switch on the appliance, you can press power on/off icon to
cancel the selected setting, the setting will recover to default setting (320 °F
and 15 minutes).
3

6. To switch on the appliance, just press the power on/off icon, it will beep
for 1 time and then start work according to selected temperature and time.
If you didn’t select the temperature and time, it will work according to the
default temperature and time (320 °F and 15 minutes), the LCD display will
show set temperature (not the real-time temperature) and time, the timer
start to counting down.
7. The heating-up icon and blower icon will be blinking during the running
of the applicant. (Fig. 6)
Caution:During the hot air frying process, the heating-up icon blinks and
keep lighted from time to time. This indicates that the heating element is
switched on (temperature is below the setting) and off (temperature reaches
the setting) to maintain the set temperature.
8. Oil from the ingredients will gather in the bottom of the pan.
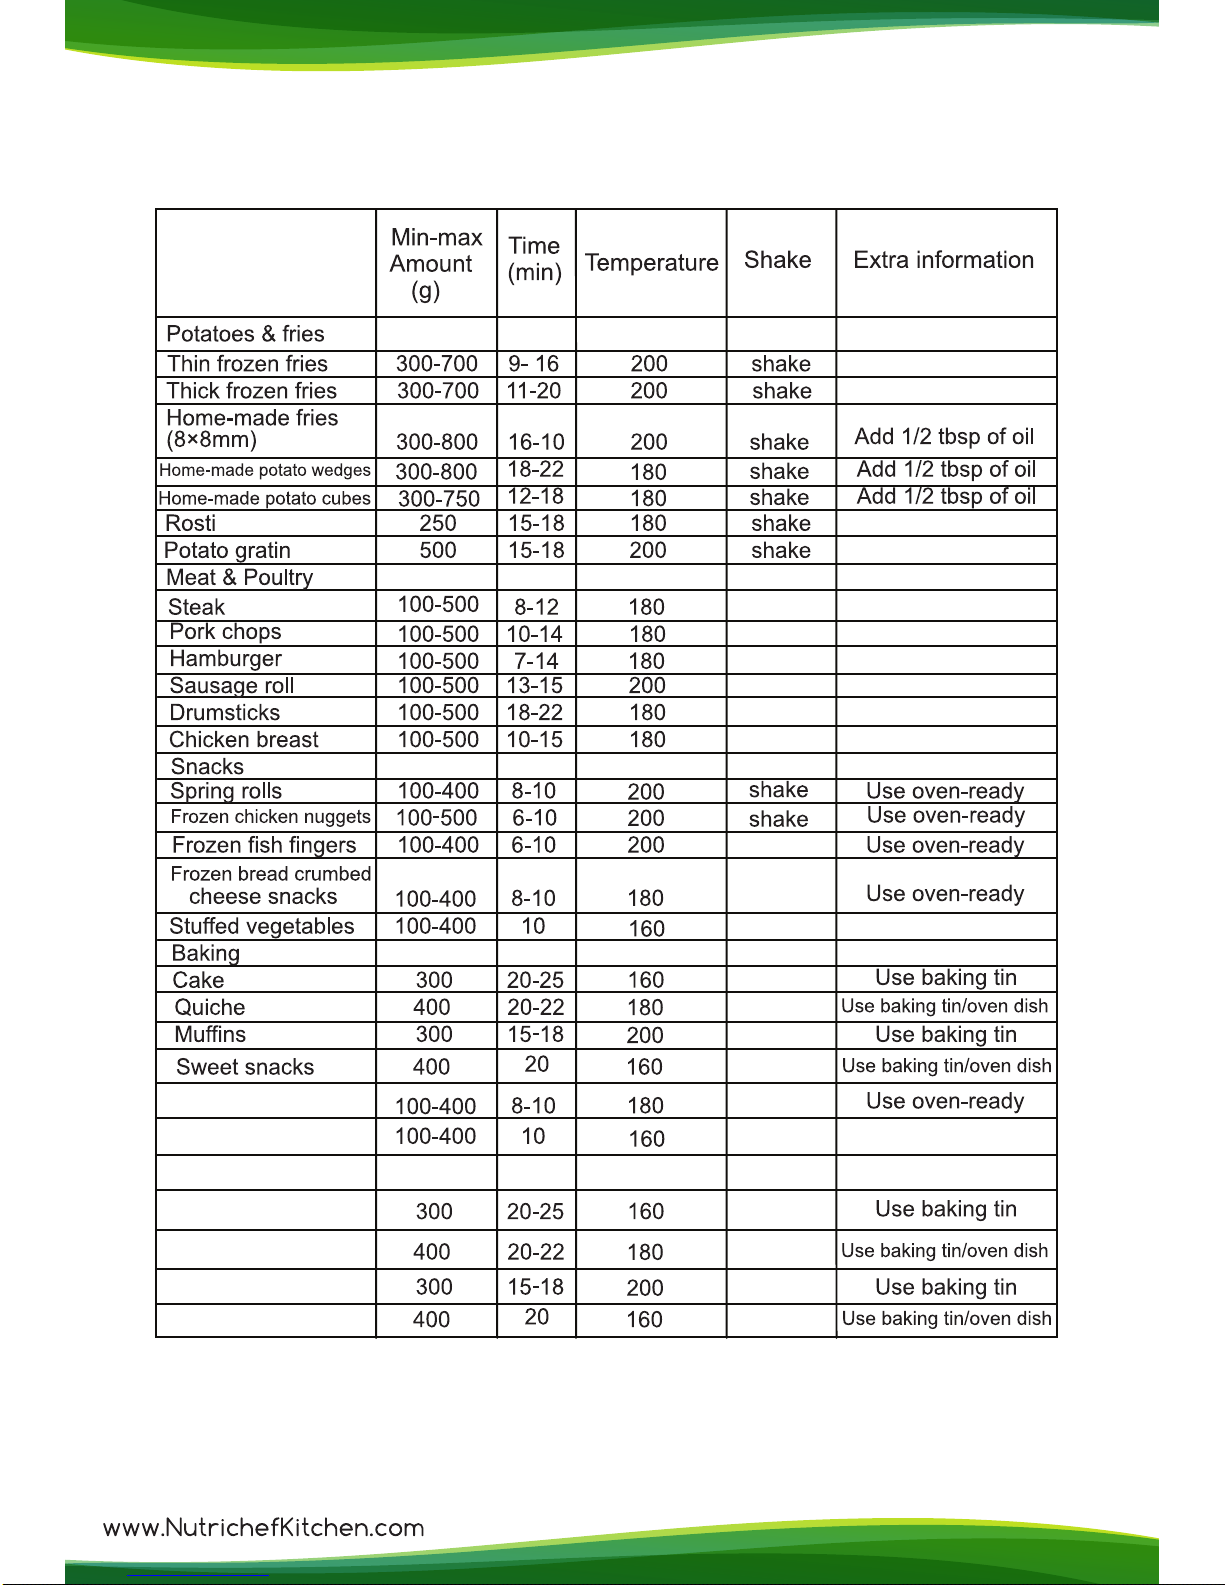
9. Some ingredients require to shake halfway during the preparation time
( see section 'settings' in this chapter ). By this way, pull the pan out of the
appliance by the handle and shake it. Then slide the pan back into the air
fryer.( Fig.8 )
Tip:1. when you pull the pan out during working, the appliance will power
off automatically.
2. when you slide the pan back into appliance, it will continue to work
for rest time at selected temperature
3. If you press power on/off icon after you pull the pan out, when you
slide the pan back, it will not continue to work, you should restart the
appliance, and setting will recover to default setting.
4. You can remove the basket from the pan and shake the basket only
to reduce the weight. Do like this, pull the pan out of the appliance,
place it on the heat-resistant holder and press the button of the handle.
(Fig.10)
Caution:Do not press the button of the handle during shaking(fig.9)
10. When you hear the “beep” for 5 times, the set preparation time has
elapsed. Pull the pan out of the appliance and place it on the heat-resistant
holder.
Note:After it beeps for 5 times, the air blower will stop in 20 seconds.
11. Check if the ingredients are ready.
Note:If the ingredients are not ready yet, simply slide the pan back into the
appliance and adjust the settings of TIME&TEMP.
If the ingredients are not ready yet, simply slide the pan back into the
appliance. Press the temperature control knob to adjust Temperature
setting, and press the Timer control knob to adjust time setting. And then
press the Start knob to run the appliance.
4

12. To remove ingredients, press the basket release button and lift the
basket out of the pan(fig.11)
Note:Do not turn the pan over,the oil collected on the bottom of the pan
will leak onto the ingredients.
13. Empty the basket into a bowl or onto a plate.(fig.12)
Tip: To remove large or fragile ingredients, lift the ingredients out of the
basket by a pair of tongs.
14. When a batch of ingredients is ready, the magic fryer is instantly ready
for preparing another batch.
15. You can power off the appliance manually when it’s working, just press
the power on/off icon, it will beep for 3 time, then appliance will power
off after the pan blow for 20 seconds.
Settings
This table below will help you to select the basic settings for the ingredients.
Note: Keep in mind that these settings are indications. As ingredients differ
in origin, size, shape and brand, we cannot guarantee the best setting for
your ingredients.
Because the Rapid Air technology reheats the air inside the appliance
instantly, pull the pan briefly out of the appliance during hot air frying barely
disturbs the process.。
Tips:
• Small ingredients usually require a slightly shorter preparation time than
larger ingredients.
• A larger amount of ingredients only requires a slightly longer preparation
time, a smaller amount of ingredients only requires a slightly shorter prepa-
ration time.
• Shaking smaller ingredients halfway during the preparation time optimizes
the end result and can help prevent unevenly fried ingredients.
• Add some oil to fresh potatoes and fry your ingredients for another few
minutes then for a crispy result.
• Do not prepare extremely greasy ingredients such as sausages in the air
fryer.
• Snacks can be prepared in an oven can also be prepared in the air fryer.
• The optimal amount for prepare crispy fries is 500 grams.
• Use pre-made dough to get snacks quickly and easily. Pre-made dough
also requires a shorter preparation time than home-made dough.
• Please a baking tin or oven dish in the fryer basket if you want to bake a
cake or quiche or if you want to fry fragile ingredients or filled ingredients.
• You can also use the air fryer to heat ingredients. To heat ingredients, set
the temperature to 302 °F for up to 10 minutes.
5

6

Making home-made fries
To make home-made fries, follow the steps below.
1. Peel and slice potatoes.
2. Wash the potato sticks thoroughly and dry them with kitchen paper.
3. Pour 1/2 tablespoon of olive oil in a bowl, put the sticks on top and mix
until the sticks are coated with oil.
4. Remove the sticks from the bowl with your fingers or a kitchen utensil so
that excess oil stays behind in the bowl. Put the sticks in the basket.
5. Fry the potato sticks according to the instructions in this chapter
Cleaning
Clean the appliance after every use.
Do not clean the pan, basket and the inside of the appliance by metal
kitchen utensils or abrasive cleaning materials; this may damage the
non-stick coating.
1. Remove the main plug from the wall socket and make the appliance cool
down.
Note: Remove the pan to let the fryer cool down more quickly.
2. Wipe the outside of the appliance with a moist cloth.
3. Clean the pan and basket with hot water, some washing-up liquid and a
non-abrasive sponge.
You can remove any remaining dirt by dishwashing liquid.
Note: The pan and basket are dishwasher-proof.
Tip: If dirt is stuck to the basket or the bottom of the pan, fill the pan with
hot water with some dishwashing liquid. Put the basket in the pan and let
the pan and the basket soak for about 10 minutes.
4. Clean the inside of the appliance with hot water and non-abrasive
sponge.
5. Clean the heating element with a cleaning brush to remove any food
residues.
Storage
1. Unplug the appliance
2. Make sure all parts are clean and dry.
Environment
Do not throw away the appliance with the normal household waste when it
is exhausted, but hand it in at official collection point for recycling. By doing
this, you do contribution to environmental protection (fig.13).
Guarantee and service
If you need service or information or if you have any problems, please visit
our website or contact your distributor.
7

Problem Possible cause Solution
Cut the potato sticks smaller for a crispier result
Add slightly more oil for a crisper result.
Troubleshooting
8

9
Table of contents
Other NUTRICHEF Fryer manuals

NUTRICHEF
NUTRICHEF PKAIRFR96 User manual

NUTRICHEF
NUTRICHEF PKAIRFR25 User manual

NUTRICHEF
NUTRICHEF PKAIRFR24 User manual

NUTRICHEF
NUTRICHEF PKAIRFR75 User manual

NUTRICHEF
NUTRICHEF PKAIRFR18 User manual

NUTRICHEF
NUTRICHEF PKAIRFR28 User manual

NUTRICHEF
NUTRICHEF PKAIRFR48 User manual

NUTRICHEF
NUTRICHEF PKAIRFR22 User manual

NUTRICHEF
NUTRICHEF PKAIRFR54 User manual

NUTRICHEF
NUTRICHEF PKAIRFR46 User manual