NutriMill Harvest User manual

Owner's
Manual


on the purchase of your NutriMill Harvest™. We paid special attention to
optimizing its technical functionality and design. Before using the NutriMill
Harvest™, please read this owner’s manual carefully and keep these instructions.
Please contact us if you require any further information.
Welcome to the NutriMill®Family.
Your Harvest™ mill is the perfect solution to provide you with fresh natural ours
so you can aordably create delicious, healthy meals. Eortlessly grind non-oily
whole grains, beans and legumes any time. These powerful “Super Food” ours
help you get the benets of whole grain goodness in your daily diet.
The natural bamboo housing and high quality, ultra-strong, Corundum
Grainmaster™ Millstones were manufactured with superior craftsmanship to ensure
many years of ecient milling.
NutriMill® – Giving you Superior Equipment for Healthy Meals™.
Fresh is always better!
HOUSEHOLD USE ONLY
Technical Information
Millstones: Ceramic-Bound Corundum
Millstone Ø: 3 inches
Motor: 4 Amps; 450 W
Weight: 16lbs
Housing: Bamboo
Measurements: 7" W x 7" D x 13" H
Capacity of Hopper: 3.5 cups
Flour Fineness: Adjustable - Cracked to Pastry Fine

Please read all of these instructions thoroughly.
– Keep small children away from mill at all times.
– Avoid contact with moving parts on the mill.
– To prevent hazardous operation or electric shock, DO NOT put motor base or
power cord in water or other liquids.
– Keep mill and power cord away from stove or other heat sources.
– The use of attachments not sold by or recommended by the manufacturer
may cause re, electrical shock or other injury.
– Turn o mill before unplugging from or plugging into an electrical outlet.
– Be sure to turn switch to o position after every use. Make sure motor stops
completely before disassembling.
– Mill should be unplugged from electrical outlet before cleaning, before
assembling or disassembling and when not in use.
DO NOT
– unplug from electrical outlet by pulling on the cord. To unplug, grasp the plug
and pull.
– put your ngers or other foreign objects into any of the mill’s openings while it is
in operation.
– leave mill unattended while in use.
– let cord hang over the edge of a table or counter or touch hot surfaces.
– place on or near a hot gas or electric burner or in a heated oven.
– clean mill by inserting pointed objects into milling chamber, or using running
water.
– operate any appliance with a damaged cord or plug, or after appliance malfuntions
or is dropped or damaged in any manner. Return appliance to nearest authorized
service facility for a thorough examination, and any needed repairs, or electrical or
mechanical adjustments.
– use outdoors
IMPORTANT SAFEGUARDS
• chia seeds
• sesame seeds
• ax seeds
• sunower seeds
• nuts
• sugar
• dates/raisins
• poppy seeds
• popcorn
• tapioca
• coee beans
• hemp nuts
• herbs & spices
• chilies
• goji berries
• sprouted grains/beans
(if not throughly dried)
DO NOT MILL ANY OF THE FOLLOWING
1
SAVE THESE INSTRUCTIONS

Turning the adjustment knob will control our texture.
Turn right (clockwise), for ner our. (Fig. A)
Turn left (counterclockwise), for coarser our. (Fig. B)
1. Place mill on a hard, at surface. Make sure ventilation slots are unobstructed.
2. Avoid areas with signicant variations in temperature and humidity.
3. Verify existing voltage is 110v-120v. Plug in power cord.
4. Place bowl or container under our outlet.
5. Turn on mill.
6. Select grind texture setting.
7. Pour grain into hopper.
8. When nished milling, turn switch o and unplug power cord.
ADJUSTING FLOUR TEXTURE
OPERATING INSTRUCTIONS
1. Grind about ¼ - ⅓ cup rice or wheat on a coarse setting.
2. Hold a vacuum cleaner tube against the our outlet for a few seconds. Or use a
dry brush to brush clean the millstones. NEVER USE WATER TO CLEAN STONES
3. Millstones may be removed for occassional cleaning or replacing, if necessary.
4. Additional millstones can be purchased from the retailer where you purchased
your mill. Those stones can be used as a replacement, or can be used as a set
when milling for those with gluten intolerance, celiacs, or with other allergies or
sensitivities.
CLEANING YOUR MILL
2
The adjustment knob can be turned in either direction at
any time while milling. The markings on the adjustment
knob will help you identify the proper texture. (Fig. C)
When adjusting to the nest texture you may hear the
sound of the millstones coming in contact with each
other. Making a slight adjustment to a coarser setting
will eliminate that noise.
Under normal conditions, the mill can be turned o while grinding and restarted
with grains in the hopper. If the motor does not spin, quickly turn the mill o. Adjust
knob slightly (counterclockwise). Turn mill on and try again. If necessary, empty
hopper and remove hopper and upper stone. For detailed instructions on removing
millstones, see page 3.

Disassembly:
1. Turn o mill. Unplug from electrical outlet.
2. Turn hopper counter clockwise and lift o.
3. Remove upper stone.
4. While holding lower stone, turn screw in the middle of the stone
counter-clockwise using a 4 mm hex key, (wrench).
5. Lift rubber insert to remove lower stone from housing.
Reassembly:
1. Replace rubber insert by pushing outlet tube as far as possible into our outlet
in housing.
2. Next push down bottom of insert from front to back until insert is seated rmly
in mill. You will need to align the three holes with the protruding tabs.
3. Put lower millstone onto motor shaft. Align at sides on middle of millstone with
at sides of motor shaft.
4. Place washer over hole in lower millstone and insert screw. Turn screw clockwise
(using hex key) until tight.
5. Set upper millstone in place, aligning tabs with slots in stone. Set hopper on mill
and click into place (clockwise). Texture setting does not change during
disassembly. Setting will remain the same as before removal of stones.
REMOVING MILLSTONES (FOR CLEANING OR REPLACING)
The Harvest™ mill is suited for milling all types of non-oily grains, beans and le-
gumes. Avoid milling seeds or any grains, beans and legumes that have a high oil or
moisture content.
If there is a question about grain being dry enough to mill, check using a “knife test”.
Take a single piece of grain. With the at side of a knife, press grain against a hard
surface (like a countertop). Grain that bursts with a distinct cracking sound is dry
enough to mill. Grain that is too wet will be soft and not crack or burst.
Know the source of your grain. Purchase and mill only carefully cleaned grain from a
reliable source. Unclean grain may contain small stones, which can damage mill-
stones.
Do not mill damp or wet grain. Damp grain may stick to millstones, block the our
outlet and aect your mill’s performance.
Note: Store grain in a dry, cool, well-ventilated location. Grain tends to absorb mois-
ture from the air.
PURCHASE QUALITY GRAIN
3

L’Chef, LLC warrants the NutriMill®Harvest™ mill to be free of manufacturing defects
in materials and workmanship for a period of 5 years. Defective product will be re-
paired or replaced with a comparable model at our sole discretion upon receiving the
defective product. L’Chef will not refund purchase price or provide any other remedy.
This warranty applies to the original noncommercial purchaser.
Warranty does not cover damage resulting from accident, misuse, shipping, normal
wear, commercial use, neglect, incidental or consequential damages, or from damage
caused by any foreign objects getting into the mill.
YOU MUST keep a dated sales receipt for warranty service.
To ensure full warranty, return the mill, securely packed, to:
Include a copy of dated sales receipt, name, address information, phone number,
email address and a statement giving specic reason for return.
For your convenience, there is a Request for Warranty Service Form located at
www.boschkitchencenters.com. Click on the warranty button. For more information
call customer service at 1.877.267.2434 or email service@lchef.com.
L’CHEF
Attn: Service Dept.
825 N. Industrial Road
St. George, UT 84770
Motor will not start.
Motor stalls during operation.
This may be caused from
overheating or improper use.
The Harvest mill has a built-in
thermal cut-o switch that
stops the motor to prevent
serious damage.
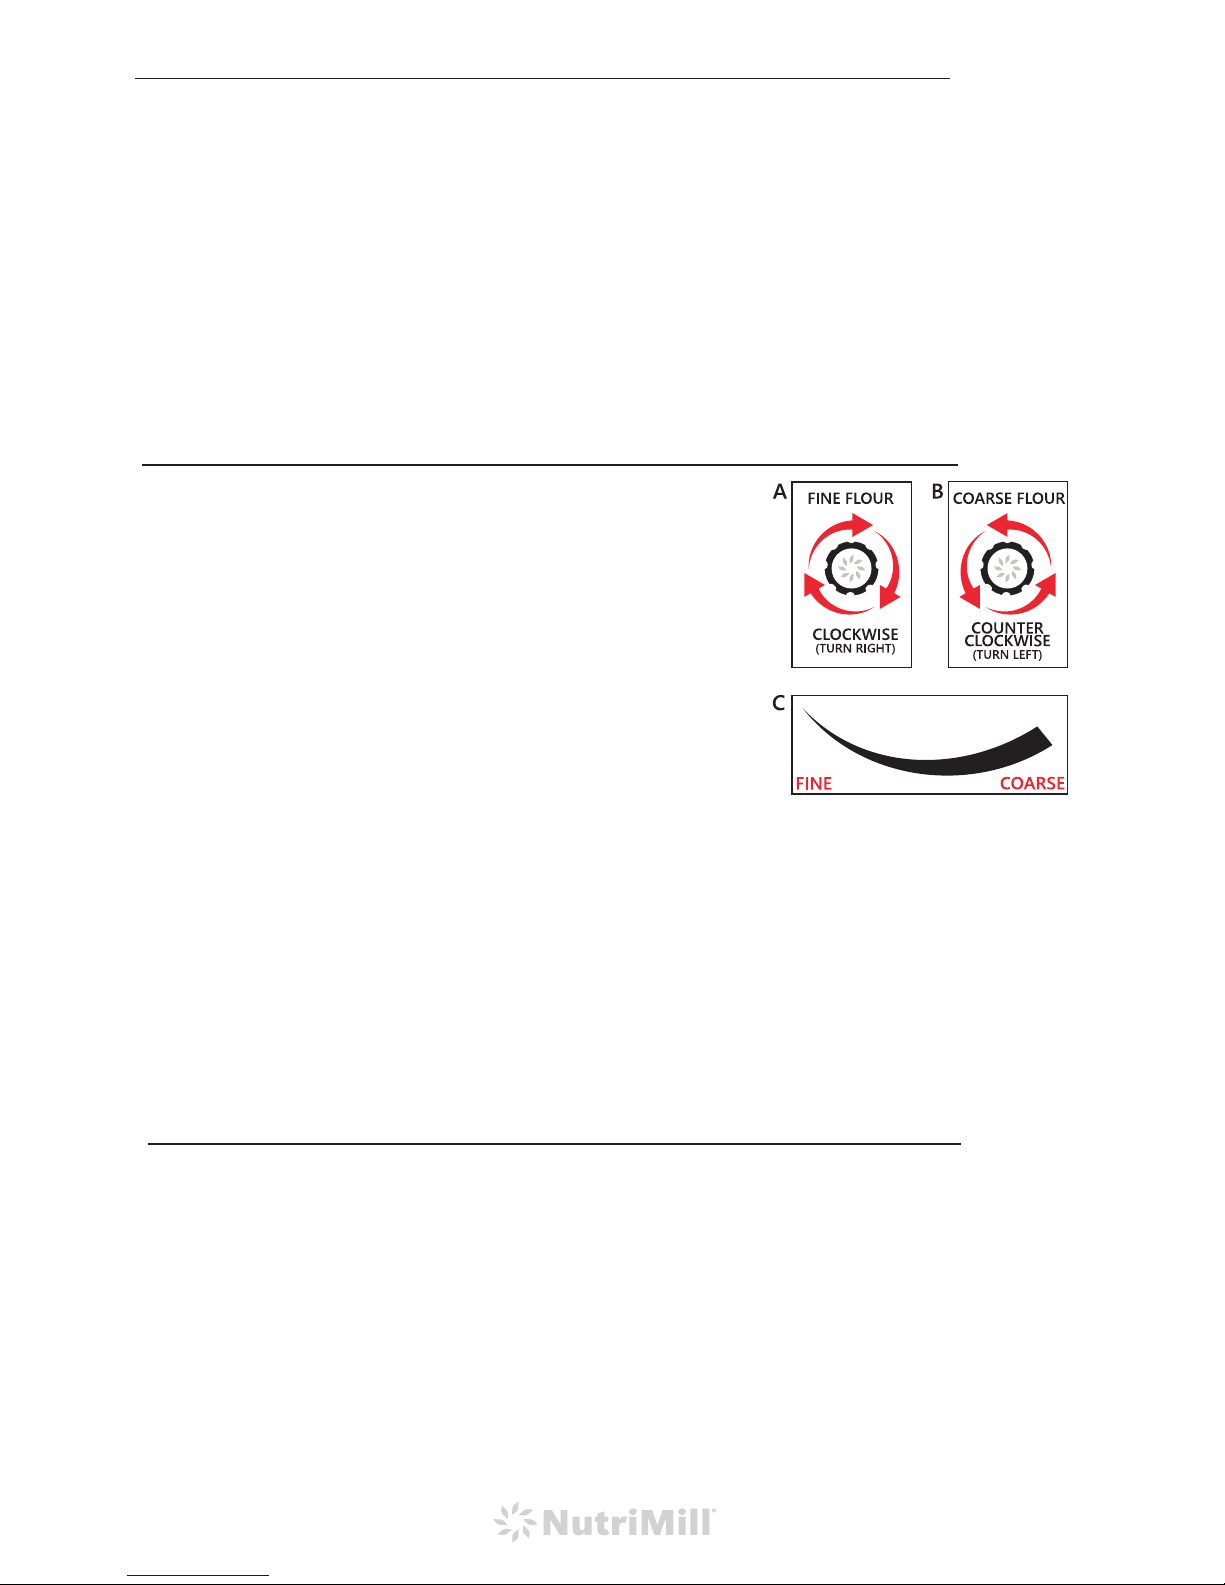
Unusual smell or noise Milling heads rubbing during operation. Rotate the
adjustment knob to a coarser setting.
Rotate adjusting knob to coarse setting (counter-
clockwise) until motor starts. Then adjust texture
knob to desired setting.
Unplug and allow mill to cool down. Remove
hopper, empty any left over grains or legumes,
and remove upper millstone. Make sure stones
and milling chamber are clean and dry. Try re-
starting motor with upper stone and hopper o. If
the motor starts, turn o the mill. Reassemble and
begin milling.
If problem persists, troubleshoot the source:
• Is grain too moist?
• Are millstones or mill chamber clogged?
• Is a foreign object caught between the millstones?
• Was the mill turned on when hopper was lled and millstones were at nest
grind setting?
WARRANTY INFORMATION
TROUBLESHOOTING
4

For more information and recipes
visit us online at boschkitchencenters.com
v1.2
Other manuals for Harvest
2
Table of contents
Other NutriMill Kitchen Appliance manuals

NutriMill
NutriMill Artiste User manual

NutriMill
NutriMill Classic Grain Mill Guide

NutriMill
NutriMill Harvest User manual

NutriMill
NutriMill Smart Seal User manual

NutriMill
NutriMill Classic User manual

NutriMill
NutriMill plus User manual

NutriMill
NutriMill Harvest User manual

NutriMill
NutriMill SMART BLEND User manual

NutriMill
NutriMill Classic User manual