nuVita 1165 User manual

Scaldabiberon
Calienta Biberónes
Bottle Warmer
Chaue-Biberon
Flaschenwärmer
Aquecedor de Biberões
θερμοφόρα μπιμπερό
IT
ES
EN
FR
DE
PT
GR
Manuale di Istruzioni
Manual de Instrucciones
Instruction Manual
Manuel d’Instructions
Bedienungsanleitung
Manual de instruções
Εγχειρίδιο οδηγιών
IT
ES
EN
FR
DE
PT
GR
1165

fig.4fig.1
fig.8fig.7
fig.5fig.6
fig.10
a
c
b
fig.3
df
e
fig.2

19
Keep the instruction sheet for future reference:
Only use the appliance indoors/inside the car. NEVER use it outdoors.
Ensure the voltage is compatible with the electricity supply.
Always add water rst before switching the unit on.
Use the appliance away from children. Store the appliance in a safe place away
from children.
Once nishing using the bottle warmer, unplug, empty the water from the device
and store it in a dry place. Keep it away from children’s reach. Note the surface of
the heating element is subject to residual heat after each use.
DO not immerse any xed or removable parts in water to avoid injury.
Follow the heating guidelines suggested for child’s safety during feeding.
Do not use the appliance with a damaged part. If the damage is from a new unit,
please return the unit immediately to the store.
The supplied accessories of the bottle warmer should only be use.
•
•
•
•
•
•
•
•
•
important safety notes
Bottle warmer main body
Ring
Lift out basket
12V car adapter
Plug
Measuring cup
A.
B.
C.
D.
E.
F.
box contents (FIG 1, 2, 3, a, b, c, D, e, f)
If you are experiencing problems with the Nuvita 1165 bottle warmer immediately
contact the establishment where the item was purchased.
customer service
The table indicates standard and suggestive heating times, that may vary according
to the size of the bottle, the temperature of the water inside in the bottle warmer
and the initial temperature of the food.
CAUTION: Always check temperature of liquid before feeding to the baby.
setting guiDe
ENGLISH
1165

20
time chart for home use
gentle Defrost
warming
content
heat
time
(min)
heat
time
(min)
heat
time
(mins)
-5°C 20°C 5°C
reCom-
mended
water
(ml)
reCom-
mended
water
(ml)
reCom-
mended
water
(ml)
60ml
200
1840 140
12 140
180ml 2855 23
120ml 2350
190
18
190
250ml 3565 28
300ml 4080 34
90ml 2045 16
210ml 3255 25
150ml 2550 20
280ml 3765 30
330ml 4585 38
fast warming
heat
time
(
min:seC)
heat
time
(
min:seC)
20°C 5°C
reCom-
mended
water
(ml)
reCom-
mended
water
(ml)
3:45
40
2:50
50
6:053:50
5:25
50
3:35
70
6:404:05
7:004:30
4:203:30
6:254:00
5:503:45
6:504:10
7:204:45
80g 25
150 150
160g 39
120g 28
fooD jar warming
heat
time
(min)
heat
time
(min)
reCom-
mended
water
(ml)
reCom-
mended
water
(ml)
32
45
35
20°C5°C
content
start
temperature
start
temperature
(*) At the end of the GENTLE DEFROST cycle, the nal temperature reached
will be about 20°C.
(**) At the end of the WARMING AND FAST WARMING cycle, the nal
temperature reached will be about 37°C, the ideal temperature for
administering food to the baby, as it is similar to the temperature of breast
milk.
To reach higher temperatures, use the Fast Warming mode by increasing
the times shown in the Table.

21
80g 48
150 150
160g 82
120g 68
fooD jar warming
heat
time
(min)
heat
time
(min)
reCom-
mended
water
(ml)
reCom-
mended
water
(ml)
57
90
69
20°C5°C
content
start
temperature
start
temperature
time chart for car use
gentle Defrost
warming
content
heat
time
(min)
heat
time
(min)
heat
time
(min)
-5°C 20°C 5°C
reCom-
mended
water
(ml)
reCom-
mended
water
(ml)
reCom-
mended
water
(ml)
60ml
200
2140 130
13 130
180ml 4055 28
120ml 3350
170
22
170
250ml 4565 35
300ml 6080 42
90ml 2445 17
210ml 4355 30
150ml 3850 25
280ml 5565 38
330ml 6585 47
fast warming
heat
time
(
min:seC)
heat
time
(
min:seC)
20°C 5°C
reCom-
mended
water
(ml)
reCom-
mended
water
(ml)
11:00
20
7:30
30
17:0011:30
14:00
30
10:30
40
19:0014:00
21:0015:30
12:3010:00
18:3012:30
15:3011:00
19:3014:30
21:3016:00
(*) At the end of the GENTLE DEFROST cycle, the nal temperature reached
will be about 20°C.
(**) At the end of the WARMING AND FAST WARMING cycle, the nal
temperature reached will be about 37°C, the ideal temperature for
administering food to the baby, as it is similar to the temperature of breast
milk.
To reach higher temperatures, use the Fast Warming mode by increasing
the times shown in the Table.

22
FOR USE AT HOME
Before using the bottle warmer, ensure the mains outlet is of correct voltage.
The bottle warmer must be use out of reach of children. Placed the bottle warmer
on a stable surface.
Make sure that the knob is positioned on the OFF symbol and plug the cable to a
power outlet.
Choose one of the heating options and set times and volumes according to the
table in the manual.
1.
2.
3.
4.
Device setup
FOR USE IN CAR
Before using the bottle warmer, ensure the mains outlet is of correct voltage.
The bottle warmer must be use out of reach of children. Placed the bottle warmer
on a stable surface.
Connect the car adapter to the cigarette lighter socket of the automobile (12V
DC) See. FIG.3.
Choose one of the heating options and set times and volumes according to the
table in the manual.
1.
2.
3.
4.
CAUTION
- During operation, the device indicator light will continuously switch o and on every
time the temperature drops with respect to the selected setting, until the device is
manually switched o.
-
Always ensure to avoid any water overow once a lled baby bottle is inside.
- Do not use the bottle warmer while the car is moving.
- Always use the bottle warmer with water inside it.
- Re-heating solid food is not recommended.
- The "automatic temperature maintenance" mode of the DEFROST, BABY BOTTLE
WARMING functions will work continuously unless it is manually disconnected by
unplugging the power socket or until the water runs out.
- Before heating, remove the protective cap and the teat from the bottles and remove
the lid from the jars.
Please refer to the SETTING GUIDE section for table of volume and warming times
1.
operation
GENTLE DEFROSTING
Insert the basket and if necessary the adapter ring. See FIG.1. (A-B-C)
NOTE: If the adapter ring does not t loosely around the bottle, do not use.

23
2.
3.
4.
5.
Fill the tank with water as indicated in the GENTLE DEFROSTING table. Do not overow.
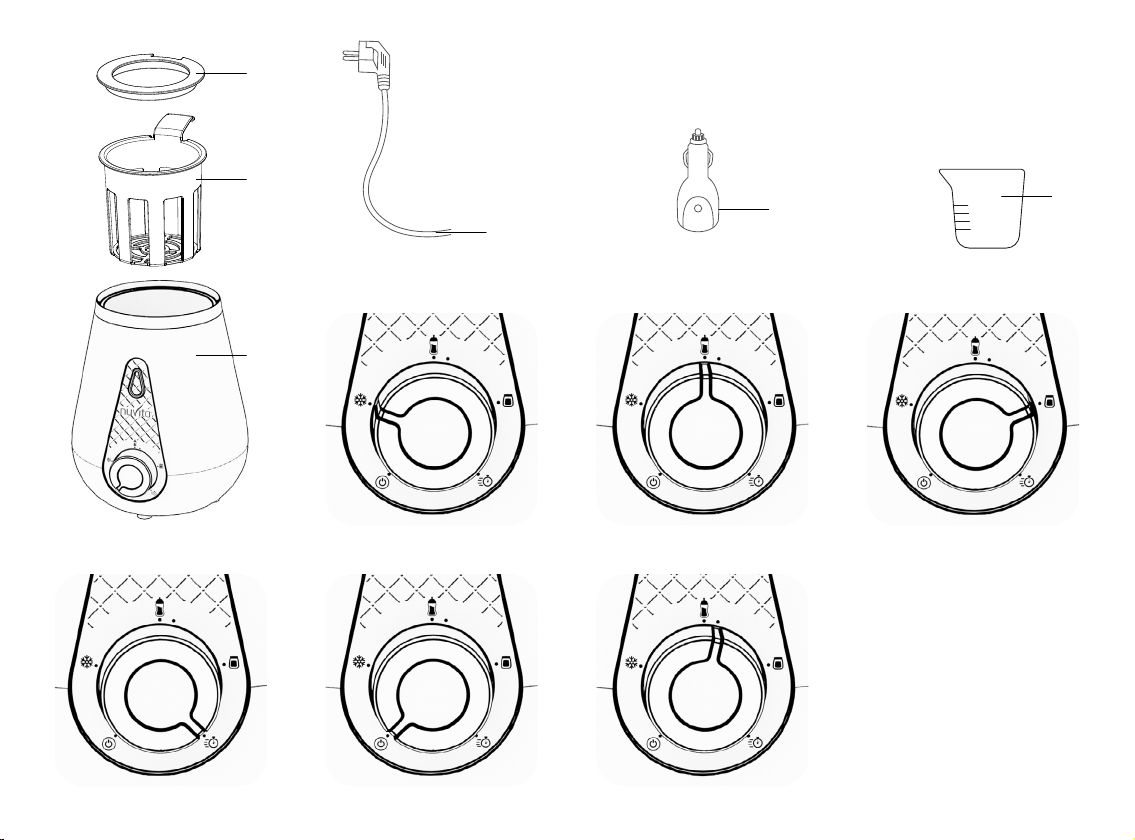
Place the bottle or the jar inside the bottle warmer.
Turn the knob to the defrost position. See FIG.4.
When the indicative time specied in the table ends, turn o the device by
turning the knob back to the OFF position. See FIG.8., disconnect the cable from
the power outlet and empty any remaining water.
Please note that this function doesn’t substitute the Warming function because at
the end of the gentle warming cycle the nal temperature will reach max 20°C. To
feed the food later, use one of the reheat functions.
1.
2.
3.
4.
5.
6.
7.
8.
1.
2.
3.
WARMING OF BABY BOTTLES (HOME USE)
Insert the basket and if necessary the adapter ring. See FIG.1.
NOTE: If the adapter ring does not t loosely around the bottle, do not use.
Fill the tank with water as indicated in the WARMING Table. Do not overow.
Place the bottle without the teat and protective cap inside the bottle warmer.
Rotate the knob to the bottle position. See FIG.5. The light turns on to indicate
that the warming cycle is still on or a cycle is running.
When the light switches o, it does not indicate that the heating cycle has ended,
but simply that the device has reached the set temperature. Remove the bottle
from the device when the indicative time shown in the Table has expired.
Shake the bottle slowly to distribute the heat evenly. Pour a few drops on the
back of your hand to make sure that the temperature of the milk is not too high
before feeding the baby.
When the indicative time shown in the WARMING table ends, turn the knob to
the OFF position. See FIG.8., disconnect the cable from the power outlet and
empty any remaining water.
KEEP THE BABY BOTTLE WARM: To maintain the temperature, leave the bottle
inside the basket and with the knob positioned on the bottle position. The
indicator light of the device will turn o and turn on continuously each time
the temperature drops with respect to the selected setting, until the device is
manually turned o or when the water inside it runs out.
Insert the basket and if necessary the adapter ring. See FIG.1.
NOTE: If the adapter ring does not t loosely around the bottle, do not use.
Fill the tank with water as indicated in the car WARMING table. Do not overow.
Place the bottle without the teat and protective cap inside the bottle warmer.
WARMING OF BABY BOTTLES (CAR USE)

24
1.
2.
3.
4.
5.
6.
WARMING OF BABY FOOD JARS (ONLY FOR HOME USE)
Insert the basket.
Remove the food jar cover. Place the jar inside the basket and ll the tank, as
indicated in the Table, with enough water to reach the same level of the jar. Do
not allow the water to enter the jar.
Rotate the knob to the jar position. See FIG.6. The light turns on to indicate that
the warming cycle is still on or a cycle is running.
If necessary, remove the basket slightly and mix the contents of the jar, so as to
equalize the temperature.
Remove the jar from the basket only when the indicative time shown in the Food
Jar Warming Table has ended.
Once the jar has been removed, turn the knob back to OFF position. See FIG.8.,
disconnect the cable from the power outlet and empty any remaining water.
4.
5.
6.
7.
8.
Rotate the knob to the bottle position. See FIG.10. The light turns on to indicate
that the warming cycle is still on or a cycle is running.
Remove the jar from the basket only when the indicative time shown in the
Warming Table has ended.
Shake the bottle slowly to distribute the heat evenly. Pour a few drops on the
back of your hand to make sure that the temperature of the milk is not too high
before feeding the baby.
When the baby bottle has been removed, turn the knob to the OFF position. See
FIG.8., disconnect the cable from the power outlet and empty any remaining
water.
KEEP THE BABY BOTTLE WARM: To maintain the temperature, leave the bottle
inside the basket and with the knob positioned on the bottle position. The
indicator light of the device will turn o and turn on continuously each time
the temperature drops with respect to the selected setting, until the device is
manually turned o or when the water inside it runs out.
FAST WARMING
This bottle warmer has a fast warming function that will warm the bottles and jars in
a shorter time.
1.
2.
3.
4.
Insert the basket and if necessary the adapter ring. See FIG.1.
NOTE: If the adapter ring does not t loosely around the bottle, do not use.
Fill the tank with water as indicated in the FAST WARMING Table. Do not overow.
Place the bottle without the teat and protective cap inside the bottle warmer.
Rotate the knob to the bottle position. See FIG.7. The light turns on to indicate
that the fast warming cycle is on or a cycle is running.

25
Disconnect the bottle warmer from the main power supply. Only clean once
the warmer has cooled down. Clean the container and the outside part with a
damp cloth. Do not use strong cleaning liquids. To reduce sediment deposits will
recommend using bottled, ltered or previously boiled water.
cleaning
NOTE
To remove limescale sediments it is recommended to mix 50ml of white alcohol
vinegar with 50ml of plain water or dissolve a dose of citric acid in 200ml of cold
water. Pour the solution into the device. Leave the solution to act until the limescale
is completely dissolved. Do not use the device during this period. Repeat the cleaning
operation in the presence of limescale or whenever the performance of the product
appears less ecient.
CONSECUTIVE CYCLES
This device has been designed to allow consecutive cycles without having to wait
for the heating plate to cool. Change the water between one use and the next.
NUTRITIONAL VALUES OF BREAST MILK
This device has been designed to gently heat milk and prevent overheating in order
to retain breast milk nutrients. By following the Table of Volumes and Times shown
in the manual, a suggestive temperature of 37° is ideal for administering food to the
child.
5.
6.
7.
When the indicative time specied in the table ends, remove the baby bottle
from the device. Taking care not to burn yourself.
Shake the bottle slowly to distribute the heat evenly. Pour a few drops on the
back of your hand to make sure that the temperature of the milk is not too high
before feeding the baby.
Once the baby bottle has been removed, turn knob back to OFF position. See
FIG.8., disconnect the cable from the power outlet and empty any remaining
water.
This product benets of a warranty of 24 months on material and manufacturing defects,
starting from the date of purchase (see sales slip). The warranty of 24 months does not
include damages caused by the usual use of parties identied as "consumable" (e.g.,
batteries, brush heads or parts subject to usury). The legal guarantee of 24 months is void
if: 1. The product has undergone aesthetic damage due to improper use not in accordance
with instructions in the manual. 2. This product has been modied and/or tampered with.
3. The cause of the failure was due to poor maintenance of the individual components
warranty - terms anD conDitions

26
and/or accessories and/or supplies (e.g. oxidation and/or scaling due to the retention of
water or other liquids, sediment blocking the sensor, leak of corrosive liquid from batteries).
The following is excluded from the legal guarantee of 24 months: 1. Costs related to
replacements and/or repair of parts subject to wear or costs for ordinary maintenance
of the product. 2. The costs and risks involved in transporting the product to and from
the store where you purchased or otherwise authorized collection centre to receive the
products under warranty. 3. Damage caused by or resulting from improper installation
or improper use not in accordance with the directions in the instruction manual. 4.
Damage due to natural disasters, accidental events or adverse conditions not compatible
with the product. 5. Defects that have a negligible eect on product performance. The
manufacturer, distributor and all the parties involved in the sale do not assume any liability
for losses and economic damage from any malfunction of the product. In accordance with
current regulations the manufacturer, distributor and all the parties involved in the sale are
not responding in any case for damages, including direct, indirect ones, loss of net income,
loss of savings and additional damage and other details consequences going beyond the
damage caused by the breach of warranty, contract, strict liability, wrongdoing or due
to other causes, resulting from the use or inability to use the product and/or paper and
electronic documents, including the lack of service. For further information on the help
service visit the website www.nuvitababy.com

Il prodotto Nuvita 1165 Scaldabiberon e un marcho registrato da
El producto y el diseño del calentador digital de biberones Nuvita 1165 son marcas registradas de
The Nuvita 1165 Digital Bottle Warmer product and design are trademark by
Le produit et le design du chaue-biberon numérique Nuvita 1165 sont une marque déposée de
Das Produkt und das Design des Nuvita 1165 Digital Bottle Warmer sind Warenzeichen von
O produto e design do aquecedor digital de garrafas Nuvita 1165 são marcas registradas da
Το προϊόν και ο σχεδιασμός Nuvita 1165 Digital Bottle Warmer είναι εμπορικά σήματα
κατατεθέντα
Anteprima Brands International,
1, St. Luke’s Street, Gwardamangia, PTA1020 Pieta, Malta, Europe.
www.nuvitababy.com
Fabbricato in Cina. Fabricado en China. Made in China. Fabriqué en Chine.
In China hergestellt. Fabricado na China. Κατασκευάζεται στην Κίνα.
Home use: 220V-240V / 320 Watts
Car use: 12V/100 Watts

IT - PROTEGGI IL TUO PRODOTTO DAI DANNI PROVOCATI
DAL CALCARE
Il calcare, quando si cristallizza, può danneggiare in modo
irreparabile il tuo prodotto. Avendo un elevato potere isolante,
quando si accumula potrebbe non riscaldare l’acqua in modo
adeguato oppure il prodotto potrebbe spegnersi improvvisamente
senza aver terminato l’impostazione selezionata, rendendo meno
ecienti le sue prestazioni. Inoltre, sapevi che i depositi di calcare sono
un terreno ideale per la formazione di batteri e altri microrganismi
indesiderati? Esatto! Proprio così!
I depositi di calcare hanno una supercie ruvida e irregolare,
pertanto le piccole cavità che si formano tra i cristalli, sono il luogo
perfetto per l’attecchimento dei batteri. Proteggi il tuo bambino da
sostanze potenzialmente pericolose che rimarrebbero intrappolate
nel calcare, se non rimosso con regolarità.
SUGGERIMENTI PER LA PULIZIA DEL CALCARE:
• Scollegare l’apparecchio prima di pulirlo.
• Per una semplice pulizia del tuo dispositivo, ti consigliamo di
decalcicare con aceto bianco di alcol oppure acido citrico.
• Mescolare 50 ml di aceto bianco di alcol con 50 ml di acqua
naturale oppure sciogliere una dose di acido citrico in 200 ml di
acqua fredda. Versare la soluzione nell’apparecchio. Lasciare agire
la soluzione no a quando il calcare non verrà completamente
disciolto; non utilizzare il dispositivo durante questo periodo. Alla
ne della pulizia, rimuovere il liquido, risciacquare accuratamente il
dispositivo ed asciugare con un panno morbido.
• Ripetere l’operazione di pulizia in presenza di calcare oppure ogni
qual volta le prestazioni del prodotto appaiono meno ecienti.
ES - PROTEJA SU PRODUCTO DEL DAÑO CAUSADO POR LA
CALIZA
La cal, cuando se cristaliza, puede dañar irreparablemente su
producto. Al tener un alto poder aislante, cuando se acumula puede
no calentar el agua adecuadamente o el producto puede apagarse
repentinamente sin haber terminado la conguración seleccionada,
lo que hace que su rendimiento sea menos eciente. Además, ¿sabía
que los depósitos de la cal son un medio ideal para la formación de
bacterias y otros microorganismos no deseados? ¡Exacto! ¡Así es!
Los depósitos de la cal tienen una supercie rugosa e irregular, por
lo tanto, las pequeñas cavidades que se forman entre los cristales
son el lugar perfecto para que las bacterias echen raíces. Proteja a
su hijo de sustancias potencialmente peligrosas que podrían quedar
atrapadas en la cal si no se eliminan regularmente.
CONSEJOS DE LIMPIEZA DE CAL:
• Desenchufe el aparato antes de limpiarlo.
• Para una limpieza simple de su dispositivo, le recomendamos que
lo descalcique con vinagre de alcohol blanco o ácido cítrico.
• Mezcle 50 ml de vinagre de alcohol blanco con 50 ml de agua
corriente o disuelva una dosis de ácido cítrico en 200 ml de agua
fría. Vierta la solución en el aparato. Deje que la solución actúe hasta
que la cal se disuelva por completo; no use el dispositivo durante
este período. Al nal de la limpieza, retire el líquido, enjuague bien el
dispositivo y seque con un paño suave.
• Repita la operación de limpieza en presencia de la cal o cuando el
rendimiento del producto parezca menos eciente.
EN - PROTECT YOUR PRODUCT FROM DAMAGE CAUSED BY
LIMESTONE
Limestone, when it crystallizes, can irreparably damage your
product. Having a high insulating power, when it accumulates it
may not heat the water adequately or the product may suddenly
switch o without having nished the selected setting, making its
performance less ecient. Also, did you know that limestone deposits
are an ideal medium for the formation of bacteria and other unwanted
microorganisms? Exact! That’s right!
Limestone deposits have a rough and uneven surface, therefore the
small cavities that form between the crystals are the perfect place for
bacteria to take root. Protect your child from potentially dangerous
substances that would become trapped in limestone if not removed
regularly.
LIMESTONE CLEANING TIPS:
• Unplug the appliance before cleaning it.
• For easy cleaning of your device, we recommend that you descale
it with white alcohol vinegar or citric acid.
• Mix 50 ml of white alcohol vinegar with 50 ml of plain water
or dissolve a dose of citric acid in 200 ml of cold water. Pour the
solution into the appliance. Leave the solution to act until the
limestone is completely dissolved; do not use the device during
this period. At the end of the cleaning, remove the liquid, rinse the
device thoroughly and dry with a soft cloth.
• Repeat the cleaning operation in the presence of limestone or
whenever the product performance appears less ecient.
FR - PROTÉGEZ VOTRE PRODUIT DES DOMMAGES CAUSÉS
PAR LE CALCAIRE
Le calcaire, lorsqu’il cristallise, peut endommager irrémédiablement
votre produit. Ayant un pouvoir isolant élevé, lorsqu’il s’accumule, il
peut ne pas chauer l’eau de manière adéquate ou le produit peut
s’éteindre soudainement sans avoir terminé le réglage sélectionné,
rendant ses performances moins ecaces. Aussi, saviez-vous que les
dépôts de calcaire sont un milieu idéal pour la formation de bactéries et
autres micro-organismes indésirables? Exact! C’est vrai!
Les dépôts de calcaire ont une surface rugueuse et inégale, donc les
petites cavités qui se forment entre les cristaux sont l’endroit idéal
pour que les bactéries prennent racine. Protégez votre enfant des
substances potentiellement dangereuses qui seraient emprisonnées
dans le calcaire si elles ne sont pas éliminées régulièrement.
CONSEILS DE NETTOYAGE DE LA LIME:
• Débranchez l’appareil avant de le nettoyer.
• Pour un nettoyage simple de votre appareil, nous vous
recommandons de le détartrer avec du vinaigre d’alcool blanc ou
de l’acide citrique.
• Mélangez 50 ml de vinaigre d’alcool blanc avec 50 ml d’eau
ordinaire ou dissolvez une dose d’acide citrique dans 200 ml d’eau
froide.Versez la solution dans l’appareil. Laisser agir la solution jusqu’à
ce que le calcaire soit complètement dissous; n’utilisez pas l’appareil
pendant cette période. À la n du nettoyage, retirez le liquide, rincez
soigneusement l’appareil et séchez-le avec un chion doux.
• Répéter l’opération de nettoyage en présence de calcaire ou
chaque fois que les performances du produit semblent moins
ecaces.

DE - SCHÜTZEN SIE IHR PRODUKT VOR SCHÄDEN DURCH
KALKSTEIN
Wenn Kalkstein kristallisiert, kann er Ihr Produkt irreparabel
beschädigen. Bei einer hohen Isolationsleistung erwärmt sich das
Wasser möglicherweise nicht ausreichend, wenn es sich ansammelt,
oder das Produkt schaltet sich plötzlich ab, ohne die ausgewählte
Einstellung abgeschlossen zu haben, wodurch die Leistung weniger
ezient wird. Wussten Sie auch, dass Kalksteinablagerungen ein ideales
Medium für die Bildung von Bakterien und anderen unerwünschten
Mikroorganismen sind? Genau! Das stimmt!
Kalksteinablagerungen haben eine raue und unebene Oberäche,
daher sind die kleinen Hohlräume, die sich zwischen den Kristallen
bilden, der perfekte Ort für Bakterien, um Wurzeln zu schlagen.
Schützen Sie Ihr Kind vor potenziell gefährlichen Substanzen, die
sich in Kalkstein verfangen würden, wenn sie nicht regelmäßig
entfernt würden.
TIPPS ZUR KALKREINIGUNG:
• Ziehen Sie den Stecker aus der Steckdose, bevor Sie das Gerät
reinigen.
• Zur einfachen Reinigung Ihres Geräts empfehlen wir, es mit weißem
Alkoholessig oder Zitronensäure zu entkalken.
• Mischen Sie 50 ml weißen Alkoholessig mit 50 ml klarem Wasser
oder lösen Sie eine Dosis Zitronensäure in 200 ml kaltem Wasser.
Gießen Sie die Lösung in das Gerät. Lassen Sie die Lösung einwirken,
bis sich der Kalkstein vollständig aufgelöst hat. Verwenden Sie
das Gerät während dieser Zeit nicht. Entfernen Sie am Ende der
Reinigung die Flüssigkeit, spülen Sie das Gerät gründlich aus und
trocknen Sie es mit einem weichen Tuch.
• Wiederholen Sie den Reinigungsvorgang in Gegenwart von
Kalkstein oder wenn die Produktleistung weniger ezient erscheint.
PT - PROTEJA SEU PRODUTO DE DANOS CAUSADOS POR
LIMESTONE
O calcário, quando cristaliza, pode danicar irreparavelmente o seu
produto. Com um alto poder isolante, quando acumulado, pode
não aquecer a água adequadamente ou o produto pode desligar
repentinamente sem ter nalizado a conguração selecionada,
tornando seu desempenho menos eciente. Além disso, você sabia
que os depósitos de calcário são um meio ideal para a formação de
bactérias e outros microorganismos indesejados? Exato! Está certo!
Os depósitos de calcário têm uma superfície áspera e irregular,
portanto, as pequenas cavidades que se formam entre os cristais
são o local perfeito para as bactérias se enraizarem. Proteja seu lho
de substâncias potencialmente perigosas que cariam presas em
calcário se não fossem removidas regularmente.
DICAS DE LIMPEZA DE LIMÃO:
• Desconecte o aparelho antes de limpá-lo.
• Para uma limpeza simples do seu dispositivo, recomendamos
descalcicá-lo com vinagre de álcool branco ou ácido cítrico.
• Misture 50 ml de vinagre de álcool branco com 50 ml de água
pura ou dissolva uma dose de ácido cítrico em 200 ml de água
fria. Despeje a solução no aparelho. Deixe a solução agir até que
o calcário esteja completamente dissolvido; não use o dispositivo
durante esse período. No nal da limpeza, remova o líquido, lave o
dispositivo cuidadosamente e seque com um pano macio.
• Repita a operação de limpeza na presença de calcário ou sempre
que o desempenho do produto parecer menos eciente.
GR - ΠΡΟΣΤΑΤΕΥΣΤΕ ΤΟ ΠΡΟΪΟΝ ΣΑΣ ΑΠΟ ΖΗΜΙΑ ΠΟΥ
ΠΡΟΚΑΛΕΙ Η ΛΙΜΕΣΤΟΝ
Ο ασβεστόλιθος, όταν κρυσταλλώνεται, μπορεί να καταστρέψει
ανεπανόρθωτα το προϊόν σας. Έχοντας υψηλή μονωτική ισχύ,
όταν συσσωρεύεται μπορεί να μην θερμαίνει σωστά το νερό ή το
προϊόν μπορεί ξαφνικά να απενεργοποιηθεί χωρίς να έχει τελειώσει
την επιλεγμένη ρύθμιση, καθιστώντας την απόδοσή του λιγότερο
αποτελεσματική. Επίσης, ξέρατε ότι οι εναποθέσεις ασβεστόλιθων είναι
το ιδανικό μέσο για το σχηματισμό βακτηρίων και άλλων ανεπιθύμητων
μικροοργανισμών; Ακριβής! Σωστά!
Οι εναποθέσεις ασβεστόλιθου έχουν μια τραχιά και ανώμαλη
επιφάνεια, επομένως οι μικρές κοιλότητες που σχηματίζονται μεταξύ
των κρυστάλλων είναι το ιδανικό μέρος για να ριζωθούν τα βακτήρια.
Προστατέψτε το παιδί σας από δυνητικά επικίνδυνες ουσίες που θα
παγιδευτούν σε ασβεστόλιθο εάν δεν αφαιρούνται τακτικά.
ΣΥΜΒΟΥΛΕΣ ΚΑΘΑΡΙΣΜΟΥ LIME:
• Αποσυνδέστε τη συσκευή πριν την καθαρίσετε.
• Για εύκολο καθάρισμα της συσκευής σας, σας συνιστούμε να την
αφαλάσετε με ξύδι λευκού αλκοόλ ή κιτρικό οξύ.
• Ανακατέψτε 50 ml λευκού ξιδιού αλκοόλης με 50 ml απλού νερού
ή διαλύστε μια δόση κιτρικού οξέος σε 200 ml κρύου νερού. Ρίξτε
το διάλυμα στη συσκευή. Αφήστε το διάλυμα να δράσει μέχρι να
διαλυθεί εντελώς ο ασβεστόλιθος. Μην χρησιμοποιείτε τη συσκευή
κατά τη διάρκεια αυτής της περιόδου. Στο τέλος του καθαρισμού,
αφαιρέστε το υγρό, ξεπλύνετε καλά τη συσκευή και στεγνώστε με
ένα μαλακό πανί.
• Επαναλάβετε τη διαδικασία καθαρισμού παρουσία ασβεστόλιθου ή
όποτε η απόδοση του προϊόντος φαίνεται λιγότερο αποτελεσματική.
Il prodotto Nuvita 1165 Scaldabiberon e un marcho registrato da
El producto y el diseño del calentador digital de biberones Nuvita 1165 son
marcas registradas de
The Nuvita 1165 Digital Bottle Warmer product and design are trademark by
Le produit et le design du chaue-biberon numérique Nuvita 1165 sont une
marque déposée de
Das Produkt und das Design des Nuvita 1165 Digital Bottle Warmer sind
Warenzeichen von
O produto e design do aquecedor digital de garrafas Nuvita 1165 são
marcas registradas da
Το προϊόν και ο σχεδιασμός Nuvita 1165 Digital Bottle Warmer είναι
εμπορικά σήματα κατατεθέντα
Anteprima Brands International,
1, St. Luke’s Street, Gwardamangia, PTA1020 Pieta, Malta, Europe.
www.nuvitababy.com
Fabbricato in Cina. Fabricado en China. Made in China. Fabriqué en Chine.
In China hergestellt. Fabricado na China. Κατασκευάζεται στην Κίνα.
Home use: 220V-240V / 320 Watts
Car use: 12V/100 Watts
Other manuals for 1165
1
Table of contents
Other nuVita Bottle Warmer manuals