NuWave Nutri-Pot 33501 Quick guide

1
Owner’s Manual & Complete Recipe Book
NuWave Nutri-Pot™
Electric Pressure Cooker
13
Quart

2
TABLE OF CONTENTS
OWNER’S MANUAL
Important Safeguards ................3
Additional Safeguards .............4-5
Care & Maintenance ..................6
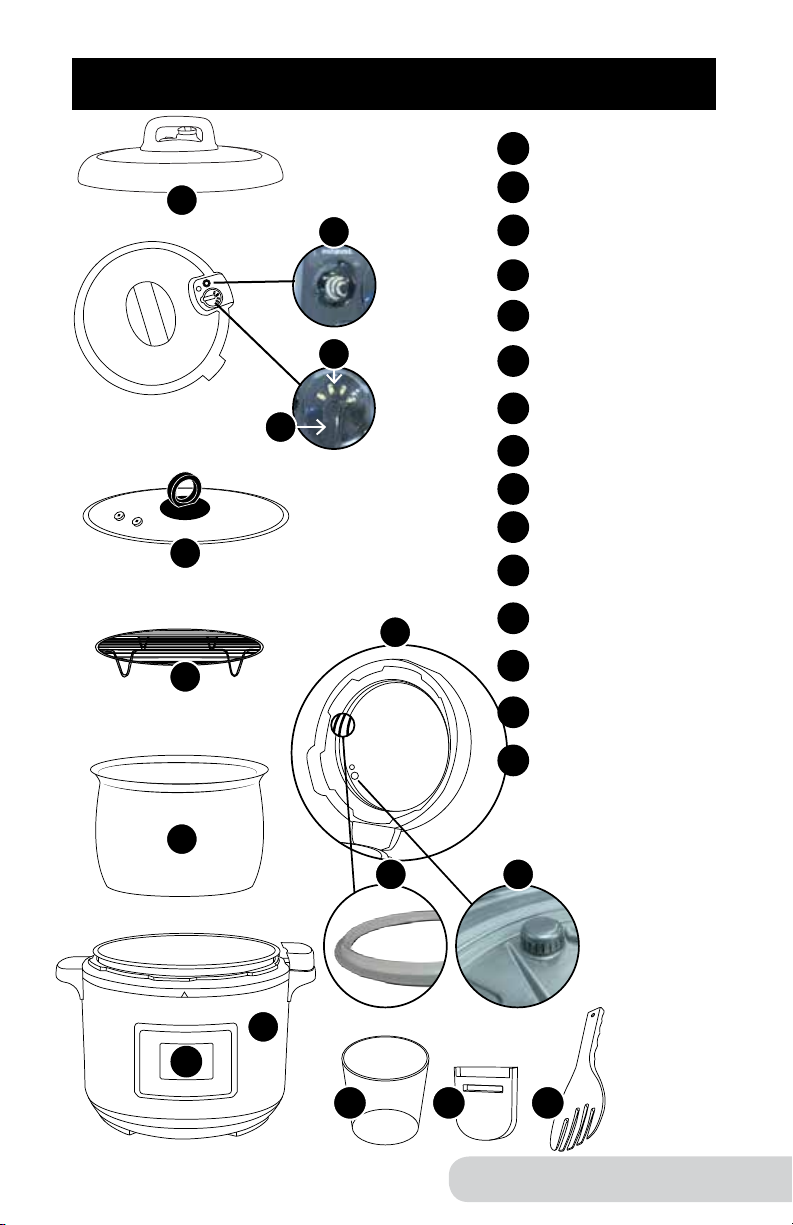
Parts Descriptions ......................7
Product Features ....................8-9
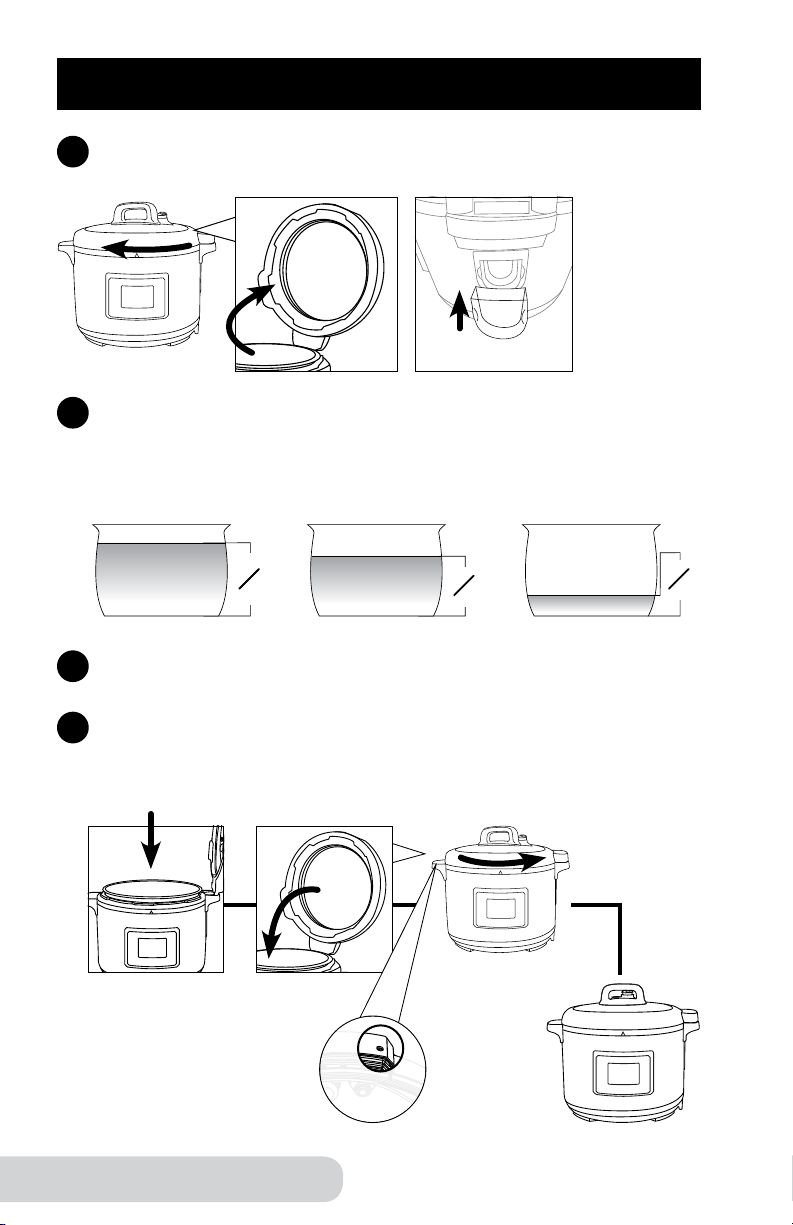
Operating Instructions .........10-11
Silicone Gasket Installation ......11
Control Panel ........................12-14
Presets........................................15
Functions ..............................16-18
Time .........................................16
Texture .....................................16
Delay ........................................17
Warm .......................................17
Sear .........................................18
Slow Cook ................................18
Pressure Canning .................19-21
Troubleshooting Guide .............22
Warranty .....................................23
Pressure Cooking Notes ...........24
Soups
Andouille Sausage & Cabbage
Soup.........................................26
Barley Beef Soup .....................27
Chicken and Rice Soup ...........28
Poultry
Cassoulet Chicken ...................30
Chicken a la King .....................31
Salsa Chicken and Rice ...........32
Beef
Beef Mac & Cheese .................34
Beef Short Ribs ........................35
Spicy Beef and Cabbage .........36
BBQ & Meats
Baby Back Ribs........................38
BBQ Pulled Pork ......................39
Honey BBQ Meatloaf ...............40
Pork Shoulder with Sauerkraut .....41
Pot Roast .................................42
Swiss Steak .............................43
Braised Lamb Shanks ..............44
Sailor’s Mussels .......................45
Veggies, Pastas & Sauces
Blistered Cherry Tomato Stuffed
Peppers....................................47
Stuffed Squash ........................48
Classic Chill .............................49
Risotto with Italian Sausage &
Parmesan.................................50
Jambalaya................................51
Garlic Cheddar Mashed
Potatoes ...................................52
Mariana Sauce .........................53
Rice & Beans ...........................54
Tortellini ....................................55
Baking
Box Cake Mix ...........................57
Orange Cheesecake ................58
Brownies ..................................59

3
IMPORTANT SAFEGUARDS
When using electrical units, basic safety precautions should
always be followed including the following:
1. Do not touch hot surfaces. Use handle.
2. To protect against electrical shock, do not immerse cord, plugs, or the unit in
water or other liquid.
3. Close supervision is necessary when any unit is used by or near children.
4. Unplug from outlet when not in use and before cleaning. Allow unit to cool before
adding on or removing off parts.
5. Do not operate any unit with a damaged cord or plug, after the unit
malfunctions or it has been damaged in any manner. In case the unit is
malfunctioning, please contact Customer Service at 1-877-689-2838
Monday - Friday 7:00 AM - 7:00 PM (CST).
6. The use of other accessories that are not intended to be use with this unit is
not recommended. Doing so may damage the unit and can cause accidents.
7. NOT INTENDED FOR OUTDOOR USE.
8. Do not let cord hang over edge of table or counter, or touch hot surfaces.
9. Do not place on or near a hot gas or electric burner and or in a heated oven.
10. Extreme caution must be used when moving a unit containing hot oil or other
hot liquids.
11. Always attach the plug to the unit rst, then plug the cord into the wall outlet.
To disconnect, turn any control “OFF”, then remove plug from the wall outlet.
12. Always check the pressure release devices for clogging before use.
13. DO NOT place any object above the pressure release valve as this is steam
being released from the NuWave Nutri-Pot™ Electric Pressure Cooker.
14. DO NOT USE THE UNIT FOR OTHER THAN INTENDED USE.
CAUTION
For safety reasons please use the top handle when lifting the pressure
cooker as the stainless steel part can become hot. Avoid any contact
with hot metal surface.
• A short power-supply cord should be provided to reduce risks resulting
from becoming entangled in or tripping over a longer cord.
• Longer detachable power-supply cord are available and may be used
if care is exercised in their use.
• If a long detachable power-supply cord is used:
1) The marked electrical rating of the detachable power-supply cord
should be at least as great as the electrical rating of the unit.
2) If the unit is of the grounded type, the extension cord should be
a grounding type 2-wire cord; and
3) The longer cord should be arranged so that it will not drape over
the counter top or table top where it can be pulled on by children
or tripped over unintentionally.
READ ALL INSTRUCTIONS
Important Safeguards

4
ADDITIONAL SAFEGUARDS
1. If you cook meat with skin, such as sausage, swelling can occur when
cooked under pressure. Piercing skin after cooking can lead to bursts of
hot liquid.
2. Do not lean over the NuWave Nutri-Pot™ Electric Pressure Cooker at any
time while it is cooking.
3. The NuWave Nutri-Pot™ Electric Pressure Cooker should not be used for
any medical purposes. It is not designed to reach the required temperature
for sterilization.
4. The Silicone Gasket creates a pressure seal between lid and pot. Keep the
gasket completely clean and free from any cracks or deterioration.
5. It is extremely important to add liquid to the NuWave Nutri-Pot™ Electric
Pressure Cooker with liquid prior to operation. Never cook without liquid as
doing so can cause it to overheat and damage the safety mechanisms. In
case of overheating, never remove the NuWave Nutri-Pot™ Electric Pressure
Cooker from the heat source. Instead, shut it off immediately and let it cool.
6. Make sure all parts of the pressure regulator and ventilated pipe are clean
and properly assembled.
7. Do not alter the safety mechanisms or attempt to repair the NuWave Nutri-Pot™
Electric Pressure Cooker as this will void the warranty. Please adhere to the
Maintenance Instructions specied for use.
8. Use only the appropriate replacement parts from NuWave to maintain proper
functionality and safety. Visit www.NuWaveNow.com for replacement parts
and pieces.
9. Do not place the unit close to ammable materials and heating units
or wet environments.
10. Height of ingredients that is to be put into inner pot should comply with
“Operation Instructions”.
11. Do not break the Silicone Gasket. Do not replace it with other rubber
gaskets, nor use a tension belt to make it seal.
12. Check and wash anti-clog lter and pressure release valve regularly to
avoid being blocked.
13. Do not open the lid when the Pressure Release Valve is down.
14. Do not put anything on or use other object to replace the Pressure
Release Valve.
15. Never use a towel to clog the gap between the lid and edge of the Housing.
16. The bottom of the inner pot and heating plate should be kept clean. Do not
put the inner pot on other heat sources. Do not replace the inner pot with
other containers.
Additional Safeguards
The Water Collection Box needs to be installed before use. See page 10.

5
ADDITIONAL SAFEGUARDS (Continued)
17. Only use wood or plastic ladle spoons so not to ware the non-stick coating
in the inner pot.
18. Do not attempt to move the unit while it is cooking. Only after the unit cools
down completely can the it be moved. Move the unit using the top handle,
do not try to hold in from the base.
19. Do not disassemble on your own or try to replace parts.
20. Make sure the air/pressure discharges completely before opening the lid.
21. Do not place the unit close to ammable materials heating units or wet
environments.
22. The cooking pot and heating plate should always be kept clean.
23. Do not put any other cooking pots on the heating plate. Do not replace any
parts with other containers.
24. Keep hands and face away from the venting outlet or where pressure is
being released.
25. Depending on the function, when cooking is complete, the NuWave Nutri-Pot™
Electric Pressure Cooker will automatically go to Warm Mode. Additional time
may cause a change in avor, appearance and may cause food to spoil.
26. If a lot of smoke is escaping from the lid during operation, unplug the unit
immediately and contact customer service.
27. If any troubles arise during operation, any necessary service must be done
by NuWave, LLC or authorized by the manufacturer for repairs.
28. Do not disassemble the unit on your own or replace any parts.
29. You may experience some smoke coming out the unit during the rst few
uses, this is normal.
30. Keep the unit out of reach of children when the unit is operating or cooling down.
31. • If the main power cord is damaged, do not use.
• In the case the unit emits a continuous amount of smoke while in use.
Contact Customer Service Department at 1-877-689-2838
Monday - Friday 7:00 AM - 7:00 PM (CST) for assistance.
Additional Safeguards
Care & Maintenance

6Care & Maintenance
CARE & MAINTENANCE
• Unplug the NuWave Nutri-Pot™ Electric Pressure Cooker prior
to cleaning.
• Wipe the base and inside of the base, if necessary, with a clean cloth.
Do not immerse the base in water or spray any water in it.
• Remove and clean the water collection box. Wipe with a wet towel
and insert it back to the body of the NuWave Nutri-Pot™ Electric
Pressure Cooker.
• The lid can be detached from the base. See image on page 9 step 1
for proper operating instructions. All parts inside the lid can be hand
washed separately with water and should always be checked to make
sure they are not damaged or cracked.
• Use a sponge or non-metallic soft brush to clean the inner pot,
then wipe the surface with a clean cloth.

7
LID
PARTS DESCRIPTION
Parts Description
Pressure Cooker Lid
Floater Valve
Pressure Release Valve
Part #: 34507
Pressure Release Switch
Tempered, Vented Glass Lid
Part #: 34506
Rack
Part #: 34505
Inner Pot
Part #: 34509
Control Panel
Housing
Inner Lid
Silicone Gasket
Part #: 34510
Anti-Clog Filter
Part #: 34508
Measuring Cup
Part #: 34503
Water Collection Box
Part #: 34504
Spoon
Part #: 34502
1
1
2
3a
3b
4
5
6
7
8
9
10
11
12
13
14
1
2
3a
4
5
6
7
8
10
11
12 13 14
9
3b

8Product Features
PRODUCT FEATURES
Benets
The NuWave Nutri-Pot
™
Electric Pressure Cooker consists of a cooking
pot and a special lid that locks into place on the top of the pot. When it
is heated, steam is sealed inside, which creates pressure. With this high
pressure, the internal temperature of the NuWave Nutri-Pot
™
Electric
Pressure Cooker is raised above the normal boiling point of water.
The cooking process is thus expedited leading to healthier meals made faster.
Multiple Cooking Functions
Now you can sear, stew, steam, simmer, bake, can, slow cook and keep
your foods warm all by the push of a button.
Digital
The Presets are programmed to cook you foods fast and easy.
During operation, the NuWave Nutri-Pot
™
Electric Pressure Cooker will
indicate which cooking function it is performing. Depending on the function,
once nished, it will automatically switch to the Warm setting until you’re
ready to eat.
Preset Time Function
The NuWave Nutri-Pot
™
Electric Pressure Cooker includes a Delay feature
so you can start cooking exactly when you want.
Saved Memory
If the NuWave Nutri-Pot
™
Electric Pressure Cooker is disconnected from its
power supply and reconnected within 20 minutes, all programmed settings
will be retained.
High Efciency
Cooking in the NuWave Nutri-Pot
™
Electric Pressure Cooker saves you time
and energy.
Perfect Seal
The Silicone Gasket locks in the taste and nutrients of your favorite foods.
Easy to Clean
The inner pot is non-stick so it’s easy to clean. The stainless steel lid
is durable and detachable for easy cleaning.
Innovative Design
The NuWave Nutri-Pot
™
Electric Pressure Cooker features a user friendly
design that releases any excess steam away from the unit, ensuring safer
pressure release.
No more ddling with heat settings like you would with a conventional
pressure cooker. The NuWave Nutri-Pot™ Electric Pressure Cooker does it
automatically. It’s a Slow Cooker, Rice Cooker and Yogurt Maker all in one!
The NuWave Nutri-Pot™ Electric Pressure Cooker is easy to use, saving
you time and energy. It is an ideal unit for any modern home.

9
Faster Cooking
On average, Pressure Cookers prepare food faster than traditional cooking methods
and the NuWave Nutri-Pot™ Electric Pressure Cooker is no exception.
Tastier Meals
Pressure cooking allows food to retain its full avor by cooking quickly and
efciently. With the natural avor intact, less seasoning is required, enabling you
to craft your meals precisely to your taste.
Healthier Results
More vitamins and minerals are retained in food prepared with the NuWave
Nutri-Pot™ Electric Pressure Cooker compared to conventional stove top
cooking. In addition, pressure cooking utilizes water in lieu of additional
unhealthy oils or fat, virtually eliminating the need to add extra, unnecessary
calories to your diet.
Multi-functional
The NuWave Nutri-Pot™ Electric Pressure Cooker can be used for steaming,
simmering and stewing fresh or even frozen foods. You can even use it for
canning and baking. Prepare everything from delicate soups and desserts to
hearty meat dishes.
MULTIPLE SAFETY DEVICES
Lid Safety Device: If the lid does not fasten to the housing, the pressure will not
build. If there is pressure already built inside the pot, the lid will not be able to open.
Pressure Control: During operation, if pressure exceeds the default pressure,
the NuWave Nutri-Pot™ Electric Pressure Cooker will automatically shut off to
prevent any pressure from leaking.
Maintaining Pressure: If the thermostat and pressure controller are broken and
the pressure exceeds the maximum level, excess pressure
will automatically discharge from the pressure relief valve.
Anti-Block Device: Ensures the pressure vents smoothly.
Pressure Release Safety Device: If the NuWave Nutri-Pot™ Electric Pressure
Cooker fails to maintain the proper pressure and the pressure exceeds the
maximum level, the excess pressure will automatically discharge from oater
valve to avoid explosion.
Temperature Controller: If the inner pot heats up while empty or if the inner pot
exceeds the setting temperature, the NuWave Nutri-Pot™ Electric Pressure Cooker
will automatically shut off.
Temperature Sensor: Once the inner pot exceeds the maximum temperature
limit, the NuWave Nutri-Pot™ Electric Pressure Cooker will automatically shut off.
PRODUCT FEATURES (Continued)
Product Features

10 Operating Instructions
Silicone Gasket Installation
OPERATING INSTRUCTIONS
Open lid: Hold the lid handle. Turn the lid counter clockwise to open position
then raise it. Make sure to install the Water Collector Box.(See below)
1
2Place ingredients and water in the inner pot. Ingredients and water
should not exceed 4/5 height of the inner pot. If the ingredients expand
easily in water, then the total amount should not exceed 3/5 height
of the inner pot. The minimum amount of ingredients and water is
normally 1/5 height of the inner pot. (See below).
3Place the inner pot in the Housing. Clean the bottom of inner pot and
surface of heating plate before inserting the inner pot. (See below).
4Close lid:
• Check that the Silicone Gasket is secured in the lid before closing.
• Hold the lid handle. Lower the lid, then turn the lid clockwise to close.
A sound will conrm that the lid has been closed properly. (See below).
4
5
3
5
1
5
The push rod on the side
of the lid needs to align
properly to the base in order
for the lid to lock into place.
Right side
Note: Install the
Water Collector
Box on the right
side just below
the handle.
At a 45˚ angle
press in.

11
OPERATING INSTRUCTIONS (Continued)
5Once the lid is locked in place the Pressure Release
Valve should be level.
To manually release pressure, slowly turn the
Pressure Release Switch counterclockwise.
Steam can be extremely hot, take precautions
to prevent any injury.
6Plug the NuWave Nutri-Pot™ Electric Pressure
Cooker into an electric power supply. The LCD
display will show “--:--” and the unit will go into
standby mode.
Pressure
Release Valve
Operating Instructions
Silicone Gasket Installation
SILICONE GASKET INSTALLATION
Removal
Installation
MAKE SURE THE SILICONE GASKET HAS NO CRACKS OR IS IN
ANYWAY DAMAGED.
Remove Inner Lid from the Pressure Cooker.
• Rotate counter clockwise, this will detach the Inner Lid.
• With one hand holding the Inner Lid down, gently pull the Silicone Gasket up.
Installing the Silicone Gasket
• Line up the Silicone Gasket on top of the metal ring.
• Gently push the Silicone Gasket making sure you see the metal ring is inside
the Silicone Gasket’s groove. Continue pushing the Silicone Gasket all around.
Pressure
Release Switch

12 Control Panel
CONTROL PANEL
Main Display Interface
When unit is not cooking, or when no function has been selected,
the LED screen will display “--:--” indicating that the unit is not in operation.
beans
poultry
meat/
stew
soup
multi
grain
rice
canning
start/stop
bake
potatoes
steam/
veggies
sh
Pressure Cooker UI
time texture
delay
warm sear slow
cook
delay manual
less normal more
minutes
hours
The “delay” bar will light up once the delay button has been pressed.
This function will allow you to delay the start time of each preset function.
beans
poultry
meat/
stew
soup
multi
grain
rice
canning
start/stop
bake
potatoes
steam/
veggies
sh
Pressure Cooker UI
time texture delay warm sear slow
cook
delay manual
less normal more
minutes
hours
beans
poultry
meat/
stew
soup
multi
grain
rice
canning
start/stop
bake
potatoes
steam/
veggies
sh
Pressure Cooker UI
time
texture delay warm sear slow
cook
delay manual
less normal more
minutes
hours
The “manual” bar will light up only when the time button has been pressed
or when the cooking time has been changed manually. This will allow you to
manually set your time for each function.
beans
poultry
meat/
stew
soup
multi
grain
rice
canning
start/stop
bake
potatoes
steam/
veggies
sh
Pressure Cooker UI
time texture delay warm sear slow
cook
delay manual
less normal more
minutes
hours
beans
poultry
meat/
stew
soup
multi
grain
rice
canning
start/stop
bake
potatoes
steam/
veggies
sh
Pressure Cooker UI
time
texture
delay warm sear slow
cook
delay manual
less normal more
minutes
hours
The “less”, “normal” and “more” bars light individually, indicating your current
setting. The “texture” function applies to these displays with “normal” being
the default setting. “texture” is a function that has 3 times pre-programmed
for select presets. This also affects the consistency of your food.
All functions default to “normal”.
beans
poultry
meat/
stew
soup
multi
grain
rice
canning
start/stop
bake
potatoes
steam/
veggies
sh
Pressure Cooker UI
time texture delay warm sear slow
cook
delay manual
less normal more
minutes
hours
beans
poultry
meat/
stew
soup
multi
grain
rice
canning
start/stop
bake
potatoes
steam/
veggies
sh
Pressure Cooker UI
time texture delay warm sear slow
cook
delay manual
less normal more
minutes
hours
Presets
Presets
Functions
Press once
to start or
stop.
Press twice
to clear.

13
beans
poultry
meat/
stew
soup
multi
grain
rice
canning
start/stop
bake
potatoes
steam/
veggies
sh
Pressure Cooker UI
time texture delay warm sear slow
cook
delay manual
less normal more
minutes
hours
hours/minutes
This button will let you manually adjust the time. When the “hours/minutes” button is
pressed, the 2 digits will ash to indicate these are selected. Pressing the “+” and “-”
buttons will increase and decrease the time.
Example:
Preheating: While the unit reaches the appropriate temperature for the function selected,
the display will show “PH” indicating that it is preheating. Once the unit reaches the
appropriate pressure, it will shift from preheating to the selected preset cooking time. Once
pressure has built inside the Pressure Cooker, the PH display will change to P, followed by
the amount of time it will remain under pressure.
Pressure: The function selected will determine the amount of pressure time. In this example,
the display will show “P0:10” (pressure time). The colon or “:” will ash to indicate that the
Pressure Cooker is under pressure and the timer is counting down.
Refer to the Preset Times Chart on page 15 for default times for each function.
Figure 2
Preheat time
can take up to
15 minutes
Control Panel
minutes hours
Press “rice”, it will default to “normal” (00:10). Press “texture” to change to “more”
(00:13). Press the “texture” button again to change to “less” (00:07). The bar will light up
indicating what mode you are in. Press “start/stop” to begin.
beans
poultry
meat/
stew
soup
multi
grain
rice
canning
start/stop
bake
potatoes
steam/
veggies
sh
Pressure Cooker UI
time texture delay warm sear slow
cook
delay manual
less normal more
minutes
hours
beans
poultry
meat/
stew
soup
multi
grain
rice
canning
start/stop
bake
potatoes
steam/
veggies
sh
Pressure Cooker UI
time
texture
delay warm sear slow
cook
delay manual
less normal more
minutes
hours
beans
poultry
meat/
stew
soup
multi
grain
rice
canning
start/stop
bake
potatoes
steam/
veggies
sh
Pressure Cooker UI
time texture delay warm sear slow
cook
delay manual
less normal more
minutes
hours
beans
poultry
meat/
stew
soup
multi
grain
rice
canning
start/stop
bake
potatoes
steam/
veggies
sh
Pressure Cooker UI
time texture delay warm sear slow
cook
delay manual
less normal more
minutes
hours
beans
poultry
meat/
stew
soup
multi
grain
rice
canning
start/stop
bake
potatoes
steam/
veggies
sh
Pressure Cooker UI
time texture delay warm sear slow
cook
delay manual
less normal more
minutes
hours
beans
poultry
meat/
stew
soup
multi
grain
rice
canning
start/stop
bake
potatoes
steam/
veggies
sh
Pressure Cooker UI
time
texture
delay warm sear slow
cook
delay manual
less normal more
minutes
hours
Figure 1 When making rice using our “rice” function, you can make sticky rice by setting
the “texture” to “more” and if you want ufer rice, set the “texture” to “less”.
Note (Applies to all):
• Pressing the “-” or “+” buttons will switch to “manual” mode.
• Press “start/stop” twice to clear.
• The Pressure Cooker will clear out in 30 seconds if the “start/stop” button is not pressed.
CONTROL PANEL (continued)
Texture

14 Control Panel
CONTROL PANEL (continued)
Auto Warm Feature
Presets Indenitely Auto Shutoff Time
Hours: Minutes
Rice
Multi Grain
Soup 04:00
Meat/Stew 02:00
Poultry 01:00
Beans 04:00
Fish 00:30
Steam/Veggies 00:30
Potatoes 01:00
Bake
Canning
Warm (Function) 04:00
Note:
Food can be prepared at an earlier time and kept warm inside the Pressure Cooker using
the “warm” function. Food can be kept warm for up to 4-hours. Additional time may
cause a change in avor, appearance and may cause food to spoil.
Auto Warm Feature: When pressure cooking is complete, the NuWave Nutri-Pot™ Electric
Pressure Cooker will automatically switch to the warm function. This allows the pressure to
naturally release while your food remains warm. The times for the presets are listed below.
Example: When the “rice” preset is complete, the NuWave Nutri-Pot™ Electric Pressure
Cooker will keep your “rice” warm indenitely, until you press the “start/stop” button.

15
beans
poultry
meat/
stew
soup
multi
grain
rice
canning
start/stop
bake
potatoes
steam/
veggies
sh
Pressure Cooker UI
time texture delay warm sear slow
cook
delay manual
less normal more
minutes
hours
beans
poultry
meat/
stew
soup
multi
grain
rice
canning
start/stop
bake
potatoes
steam/
veggies
sh
Pressure Cooker UI
time texture delay warm sear slow
cook
delay manual
less normal more
minutes
hours
beans
poultry
meat/
stew
soup
multi
grain
rice
canning
start/stop
bake
potatoes
steam/
veggies
sh
Pressure Cooker UI
time texture delay warm sear slow
cook
delay manual
less normal more
minutes
hours
beans
poultry
meat/
stew
soup
multi
grain
rice
canning
start/stop
bake
potatoes
steam/
veggies
sh
Pressure Cooker UI
time texture delay warm sear slow
cook
delay manual
less normal more
minutes
hours
beans
poultry
meat/
stew
soup
multi
grain
rice
canning
start/stop
bake
potatoes
steam/
veggies
sh
Pressure Cooker UI
time texture delay warm sear slow
cook
delay manual
less normal more
minutes
hours
beans
poultry
meat/
stew
soup
multi
grain
rice
canning
start/stop
bake
potatoes
steam/
veggies
sh
Pressure Cooker UI
time texture delay warm sear slow
cook
delay manual
less normal more
minutes
hours
Press a preset button (Ex: “rice”). The main display will show the default time for this
preset (Ex: 00:10). The digits to the right of the colon (“:”) display the minutes and
the digits left of the colon display the hours. On the main panel, an LED bar will light
up to indicate that the preset is on “normal” mode, which is the default.
To begin cooking, close the lid, then press the “start/stop” button.
See “hours/minutes” and “texture” sections for instructions on adjusting the time.
1
2
3
beans
poultry
meat/
stew
soup
multi
grain
rice
canning
start/stop
bake
potatoes
steam/
veggies
sh
Pressure Cooker UI
time texture delay warm sear slow
cook
delay manual
less normal more
minutes
hours
beans
poultry
meat/
stew
soup
multi
grain
rice
canning
start/stop
bake
potatoes
steam/
veggies
sh
Pressure Cooker UI
time texture delay warm sear slow
cook
delay manual
less normal more
minutes
hours
beans
poultry
meat/
stew
soup
multi
grain
rice
canning
start/stop
bake
potatoes
steam/
veggies
sh
Pressure Cooker UI
time texture delay warm sear slow
cook
delay manual
less normal more
minutes
hours
Follow these simple steps for each preset. On this example P0:10 is the default pressure
time. The pressure time will vary depending on the preset you choose.
Example:
Presets
PRESETS
Default Time Texture
(minutes)
Time
(minutes & hours)
Presets & Functions Hrs:Min Less Normal More Min.* Max
Rice 00:10 00:07 00:10 00:13 00:01 02:00
Multi Grain 0030 00:27 00:30 00:32 00:01 02:00
Soup 00:20 00:15 00:20 00:25 00:01 02:00
Meat/Stew 02:00 01:30 02:00 02:30 00:01 03:00
Poultry 00:40 00:35 00:40 00:45 00:01 02:00
Beans 00:20 00:15 00:20 00:25 00:01 02:00
Fish 00:10 00:08 00:10 00:12 00:01 02:00
Steam/Veggies 00:10 00:08 00:10 00:12 00:01 02:00
Potatoes 00:10 00:08 00:10 00:12 00:01 02:00
Bake 00:40 00:30 00:40 00:50 00:01 02:00
Canning 00:20 00:01 02:00
Delay 00:05 24:00
Warm 04:00 01:00 24:00
Sear 0010 00:01 00:30
Slow Cook 04:00 02:00 09:00
*Minimum Time
The NuWave Nutri-Pot™ Electric Pressure Cooker is programmed to a set pressure of 70kPa.
kPa as a unit of pressure measurement, is widely used throughout the world instead
of the “Pounds per Square Inch, (PSI)” method. kPa to PSI ratio is approximately
7kPa to 1PSI.
For example: 2PSI is equal to 14kPa.

16 Functions
Time: This function lets you manually adjust the cooking time, overriding the presets
and functions.
Directions:
Press the “time” button. “manual” bar will light up and “00:01” will be ashing.
This indicates that you can change the minutes.
Press the “+” or “-” button to increase or decrease the minutes.
To change hours press the “hours/minutes” button again. The “00” will be ashing.
This indicates that you can change the hours.
Press the “+” or “-” button to increase or decrease the hours.
beans
poultry
meat/
stew
soup
multi
grain
rice
canning
start/stop
bake
potatoes
steam/
veggies
sh
Pressure Cooker UI
time texture delay warm sear slow
cook
delay manual
less normal more
minutes
hours
1
2
3
4
beans
poultry
meat/
stew
soup
multi
grain
rice
canning
start/stop
bake
potatoes
steam/
veggies
sh
Pressure Cooker UI
time
texture delay warm sear slow
cook
delay manual
less normal more
minutes
hours
beans
poultry
meat/
stew
soup
multi
grain
rice
canning
start/stop
bake
potatoes
steam/
veggies
sh
Pressure Cooker UI
time texture delay warm sear slow
cook
delay manual
less normal more
minutes
hours
beans
poultry
meat/
stew
soup
multi
grain
rice
canning
start/stop
bake
potatoes
steam/
veggies
sh
Pressure Cooker UI
time texture delay warm sear slow
cook
delay manual
less normal more
minutes
hours
Example:
Pressing the “hours/minutes”
button will switch from right to left.
FUNCTIONS
Texture: This is a function used to help change the consistency of your foods.
“less”, “normal” and “more” are selected guides that increase or decrease
the cooking time while under pressure.
Directions:
Press a desired preset button. The display will default to “normal” time.
(Ex: Press “rice” and the display will show 00:10).
To change the consistency of the food (less, normal, more), simply press “texture”.
The appropriate light will display, indicating that the time has been changed. The time
in the display will automatically adjust accordingly. (Ex: For the “rice” function, less is
7 minutes, normal is 10 minutes and more is 13 minutes).
Close the lid and press the “start/stop” button.
See page 15 for times for each function.
beans
poultry
meat/
stew
soup
multi
grain
rice
canning
start/stop
bake
potatoes
steam/
veggies
sh
Pressure Cooker UI
time texture delay warm sear slow
cook
delay manual
less normal more
minutes
hours
1
2
3
4
Example:
beans
poultry
meat/
stew
soup
multi
grain
rice
canning
start/stop
bake
potatoes
steam/
veggies
sh
Pressure Cooker UI
time
texture
delay warm sear slow
cook
delay manual
less normal more
minutes
hours
beans
poultry
meat/
stew
soup
multi
grain
rice
canning
start/stop
bake
potatoes
steam/
veggies
sh
Pressure Cooker UI
time texture delay warm sear slow
cook
delay manual
less normal more
minutes
hours
beans
poultry
meat/
stew
soup
multi
grain
rice
canning
start/stop
bake
potatoes
steam/
veggies
sh
Pressure Cooker UI
time texture delay warm sear slow
cook
delay manual
less normal more
minutes
hours

17
FUNCTIONS (Continued)
Warm: This function will let you manually adjust the time you would like to keep
your food warm.
Directions:
Press the “warm” button, display will show “04:00”.
Press the “+” or “-” button to increase or decrease the time. See “hours/minutes”
section for instructions on adjusting the time.
Press the “start/stop” button to start.
Note:
• The default time for the warm function is 4 hours, the minimum time is 1 hour and
the maximum time is 24 hours.
• You can adjust the time in 5-minute and 1-hour increments.
The Pressure Cooker will automatically go to this warm function when a desired preset has
completed. Refer to the Auto Warm Feature chart on page 14 for default warm times.
beans
poultry
meat/
stew
soup
multi
grain
rice
canning
start/stop
bake
potatoes
steam/
veggies
sh
Pressure Cooker UI
time texture delay warm sear slow
cook
delay manual
less normal more
minutes
hours
1
2
3
Example:
beans
poultry
meat/
stew
soup
multi
grain
rice
canning
start/stop
bake
potatoes
steam/
veggies
sh
Pressure Cooker UI
time texture delay
warm
sear slow
cook
delay manual
less normal more
minutes
hours
beans
poultry
meat/
stew
soup
multi
grain
rice
canning
start/stop
bake
potatoes
steam/
veggies
sh
Pressure Cooker UI
time texture delay warm sear slow
cook
delay manual
less normal more
minutes
hours
beans
poultry
meat/
stew
soup
multi
grain
rice
canning
start/stop
bake
potatoes
steam/
veggies
sh
Pressure Cooker UI
time texture delay warm sear slow
cook
delay manual
less normal more
minutes
hours
Functions
Delay: This function allows you to set a specic time you would like to start cooking.
Directions:
Press the “delay” button. The delay bar will light up and the rst set of “00”s
will be ashing.
Press the “+” or “-” button to increase or decrease the hours.
To change minutes press the “hours/minutes” button. The second set of “00”s will be
ashing. This indicates that you can change the minutes.
Press the “+” or “-” button to increase or decrease the minutes.
Press the desired function button to continue your program based on your recipe.
Close the lid and press the “start/stop” button.
Note:
• When utilizing the delay function, it will always be the rst function performed.
• You can adjust the delay time in 5-minute and 1-hour increments.
• The maximum amount of time to delay your Pressure Cooker is 24 hours.
• The delay function will not work while the Pressure Cooker is in operation.
beans
poultry
meat/
stew
soup
multi
grain
rice
canning
start/stop
bake
potatoes
steam/
veggies
sh
Pressure Cooker UI
time texture delay warm sear slow
cook
delay manual
less normal more
minutes
hours
1
2
3
4
5
6
Example:
beans
poultry
meat/
stew
soup
multi
grain
rice
canning
start/stop
bake
potatoes
steam/
veggies
sh
Pressure Cooker UI
time texture
delay
warm sear slow
cook
delay manual
less normal more
minutes
hours
beans
poultry
meat/
stew
soup
multi
grain
rice
canning
start/stop
bake
potatoes
steam/
veggies
sh
Pressure Cooker UI
time texture delay warm sear slow
cook
delay manual
less normal more
minutes
hours
beans
poultry
meat/
stew
soup
multi
grain
rice
canning
start/stop
bake
potatoes
steam/
veggies
sh
Pressure Cooker UI
time texture delay warm sear slow
cook
delay manual
less normal more
minutes
hours
Step
5

18 Functions
Sear: This function lets you “sear” your food before cooking under pressure or before
using the Slow Cook function.
Directions:
Press “sear” button. Display will show 00:10.
Press “start/stop” button to begin.
See the “hours/minutes” section for instructions on manually adjusting the time.
Note:
• Do not use sealed lid when using “sear” function.
• The minimum time is 1 minute (00:01).
• The maximum time is 30 minutes (00:30).
• When complete, the display will show “End”.
beans
poultry
meat/
stew
soup
multi
grain
rice
canning
start/stop
bake
potatoes
steam/
veggies
sh
Pressure Cooker UI
time texture delay warm sear slow
cook
delay manual
less normal more
minutes
hours
1
2
3
Example:
beans
poultry
meat/
stew
soup
multi
grain
rice
canning
start/stop
bake
potatoes
steam/
veggies
sh
Pressure Cooker UI
time texture delay warm
sear
slow
cook
delay manual
less normal more
minutes
hours
beans
poultry
meat/
stew
soup
multi
grain
rice
canning
start/stop
bake
potatoes
steam/
veggies
sh
Pressure Cooker UI
time texture delay warm sear slow
cook
delay manual
less normal more
minutes
hours
FUNCTIONS (Continued)
Slow Cook: This function lets you cook various recipes slowly at low temperatures.
Directions:
Press “slow” button. Display will show 04:00.
Press “start/stop” button to begin.
See “hours/minutes” section for instructions on adjusting the time.
Note:
• Do not use sealed lid when using slow cook function.
• Use the optional glass lid when using the slow cook function.
• The minimum time is 2 hours (02:00).
• The maximum time is 9 hours (09:00).
• When complete, the display will show “End”.
beans
poultry
meat/
stew
soup
multi
grain
rice
canning
start/stop
bake
potatoes
steam/
veggies
sh
Pressure Cooker UI
time texture delay warm sear slow
cook
delay manual
less normal more
minutes
hours
1
2
3
beans
poultry
meat/
stew
soup
multi
grain
rice
canning
start/stop
bake
potatoes
steam/
veggies
sh
Pressure Cooker UI
time texture delay warm sear
slow
cook
delay manual
less normal more
minutes
hours
beans
poultry
meat/
stew
soup
multi
grain
rice
canning
start/stop
bake
potatoes
steam/
veggies
sh
Pressure Cooker UI
time texture delay warm sear slow
cook
delay manual
less normal more
minutes
hours
Example:

19
PRESSURE CANNING
Canning
Foods with lower acid content have a greater potential for spoilage and contamination
than high acidity foods. Proper pressure canning minimizes the chances of spoilage
and contamination.
High Acid Foods Low Acid Foods
Apples Oranges Asparagus Mushrooms
Applesauce Peaches Beans Okra
Apricots Pears Beets Peas
Berries Pickled Beets Carrots Potatoes
Cherries Pineapples Corn Seafood
Cranberries Plums Hominy Spinach
Fruit Juices Rhubarb Meat Winter Squash
Never alter cooking times, temperatures or ingredients when pressure canning. Doing
so can be extremely dangerous as there is no room for experimentation. Following the
exact cooking times, temperatures and ingredients listed in the recipe will ensure that
your food is protected from harmful enzymes, bacteria and mold. Altering the cooking
time may destroy the food’s nutrients and avor.
Enzymes found in food may promote growth of yeast and mold, which in turn causes
food to spoil. These enzymes can be killed at temperatures 212°F and higher. Other
contaminants, such as salmonella, staphylococcus aureus, and clostridium botulinum,
can only be killed at temperatures 240°F. These higher temperatures can only be
achieved by pressure canning.
Before pressure canning in the NuWave Nutri-Pot™ Electric Pressure Cooker, consult
an instructional book written specically for pressure canning. The NuWave Nutri-Pot™
Electric Pressure Cooker can be used for basic pressure canning, along with the water
bath method. Both low and high acid fruits and vegetables are recommended. Meat and
seafood are not recommended to be pressure canned.
Pressure Canning
PRESSURE CANNING

20 Pressure Canning
1
4
Liquid Level
PRESSURE CANNING (Continued)
Safe Canning Tips:
1. Do not use overripe fruit. Bad quality degrades with storage.
2. Do not add more low-acid ingredients (onions, celery, peppers, garlic, etc.) than
specied in the written recipe. This may lead to an unsafe end result.
3. Don’t use too many spices. Many spices tend to contain high levels of bacteria,
which may result in unsafe canned goods.
4. Do not add butter or fat to the recipe. Fats do not store well and may cause
premature spoilage. Never use thickeners such as our, starch, pasta, rice or barley.
5. Use only USDA recommended tools and accessories.
6. Do add acid (lemon juice, vinegar or citric acid) especially to tomato products when
directed in the recipe. If necessary, you can balance the tart taste by adding sugar.
The NuWave Nutri-Pot™Electric Pressure Canning Process
Though your exact experience may vary depending on the specic recipe you are
following, most recipes can be prepared by following this guide.
1. Only follow recipes that have been tested for pressure canning. Prepare the
necessary ingredients as instructed in the recipe.
2. Fill clean 16-ounce mason jars to the level.
Do not allow ingredients to exceed the level.
Always leave no less than 1 inch of head space.
3. Gently remove any lingering air bubbles
by pressing a exible, nonporous spatula
between the ingredients and the jar itself.
4. Place a clean lid onto each jar, then add a screw
band. Turn the lid clockwise and tighten in place.
NOTE: Never re-tighten lids after pressurizing
the jars. As the jars cool, the contents will
contract, pulling the lid rmly against the jar
to form a high vacuum and create a seal.
If the screw bands are too loose, liquid may
escape from the jars during this process, causing
the seals to fail. If the screw bands are too tight,
air cannot vent during this process, causing
food to discolor while in storage. Tightening
the lids too much may also cause the lids to
buckle and the jars to break. Screw bands are not needed on stored jars.
Remove after jars have cooled. When removed, washed, dried and stored,
screw bands may be used many times. If left on stored jars, they become
difcult to remove, often rust, and may not work properly again.
5. Place the Inner Pot in the base unit. Then put the Wire Rack in the bottom of the Inner
Pot. Place Filled, sealed Jars on Rack. Unit will hold up to 9-16 oz. jars (maximum).
6. Pour hot water over the jars and into
the Inner Pot until the water level reaches
1/4 of the way up the sides of the jars.
For 9-16 oz cans. This would be about 6
cups of water. When processing fewer jars,
more water would be needed.
1
4
Liquid Level
1
4
Liquid Level
1 inch
head space
Table of contents
Other NuWave Electric Pressure Cooker manuals