NYNE RUMBLE
2
1
1
2
EN EN
Consejo: Coloque el interruptor de encendido
en posición “O” cuando no esté usando el altavoz
para ahorrar batería.
Make sure the power switch is in “I”position,
then hold to switch on.
To switch to standby mode, hold again.
To power off completely, turn the power
switch to the “O”position.
El botón de encendido debe estar en “I”,
mantenga presionado para encender.
Para pasar a modo standby, pulse
mantenido de nuevo. Para apagar, coloque
el interruptor de encendido en posición “O”..
Rumble
Quick User Guide
PA Speaker
nyne.com
EN
EN
Guía Rápida del Usuario
Altavoz PA
ES
ES
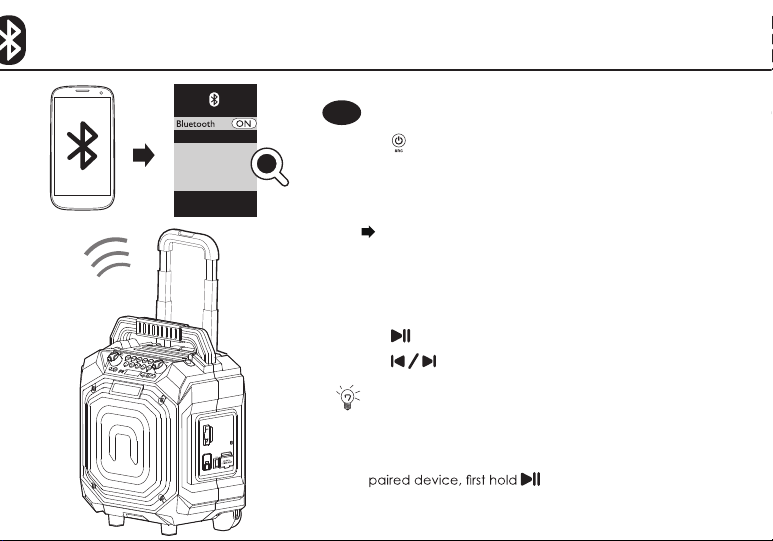
1 Press to select the Bluetooth sound source.
2 Enable Bluetooth on your device to be paired with the speaker.
3 Select ‘NYNE RUMBLE’ from the available devices to start
pairing and connection with the speaker.
After successful pairing and connection, the speaker beeps.
4 Play music on your device paired and connected with the
speaker.
During music play:
•Turn the volume knob to adjust volume.
•Press to pause or resume music play.
•Press to skip to the previous/next song.
Tips: This speaker supports automatic connection with
a previously paired device after power-off and power-on
again.
To pair with a new Bluetooth device or connect a previously
to disconnect the current
Bluetooth device, and then repeat the above steps 2 to 3.
1 Pulse para seleccionar la fuente de sonido Bluetooth.
2 Habilite Bluetooth en su dispositivo para vincularlo al
altavoz.
3 Seleccione ‘NYNE RUMBLE’ entre los dispositivos para
iniciar la vinculación y conexión con el altavoz.
Tras vincularse y conectarse, el altavoz emitirá un sonido.
4 Reproduzca música en el dispositivo vinculado y conectado
al altavoz.
Durante la reproducción de música
•Gire la rueda de volumen para ajustar el nivel.
•Pulse para pausar o reanudar la reproducción.
•Pulse para saltar a la pista anterior/siguiente.
Consejo: El altavoz permite la conexión automática
a dispositivos antes vinculados tras apagar y encender.
Para vincularlo a un nuevo dispositivo o conectar a uno
antes vinculado, presione mantenido para desconectar
el dispositivo BT actual y repita los pasos 2 a 3.
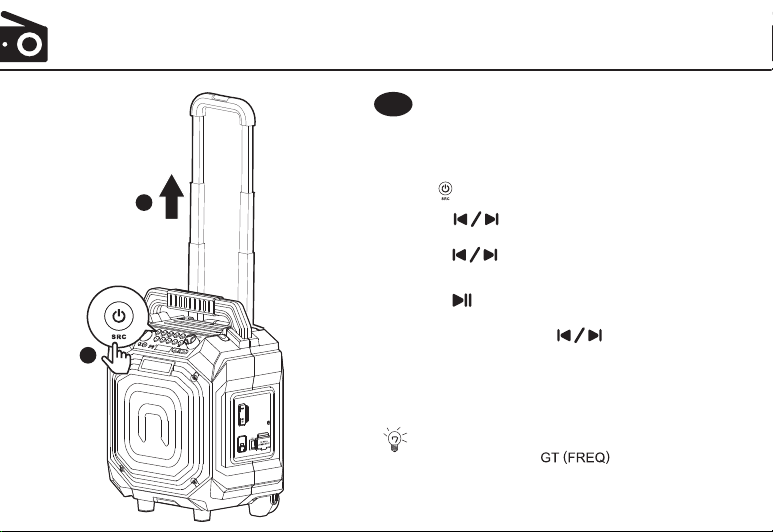
1 To get better reception, fully pull out the draw bar to
work as the FM antenna.
2 Press to select the FM radio sound source.
3 a. Press repeatedly to tune to a station step
by step.
b. Hold to tune to a station automatically.
To program FM radio stations:
1 a. Hold to start search and program available
stations automatically.
b. Tune to a station with , then hold a numeric
key (1 to 5) to assign a program number to it. Repeat
the steps to add more stations into your program list.
2 Press a numeric key (1 to 5) to select the
corresponding station in your program list.
Tip: You can hold to switch between
US and European radio frequencies.
1 Para tener mejor recepción, extienda por completo la
barra que actúa como antena FM.
2 Pulse y seleccione la fuente de sonido radio FM.
3 a. Pulse varias veces para sintonizar paso a paso.
b. Pulse mantenido para sintonizar estacíon
automáticamente.
Programar estaciones de radio FM:
1 a. Pulse mantenido buscar y programar estaciones
disponibles automáticamente.
b. Sintonice estación con , mantenga tecla
numérica (1 a 5) para asignarle un número de programa.
Repita los pasos para añadir más estaciones.
2 Pulse una tecla numérica (1 a 5) para seleccionar la
estación correspondiente en la lista de programas.
Consejo: pulse can hold para cambiar
entre frecuencias radio de US y Europa.
1 Connect a USB stick containing playable
USB socket.
then plays them automatically.
During music play:
•Turn the volume knob to adjust volume.
•Press to pause or resume music play.
•Press to skip to the previous/next song.
•You can also use the numeric key (1
number with more than one digit, press the
corresponding numeric keys consecutively.
•Hold to fast forward or reverse.
•Hold and then release 5/ repeatedly
1 onecte un USB stick con archivos de sonido
reproducible en la toma USB.
El altavoz leerá los archivos de sonido
y los reproducirá automáticamente.
Durante la reproducción de música:
•Gire la rueda de volumen para ajustar el nivel.
•Pulse para pausar o reanudar
la reproducción.
•Pulse para saltar a
canción anterior/siguiente.
•Puede usar el teclado numérico
(1a 5) para seleccionar un archivo
directamente. Para introducir un número
de varios dígitos, presione las teclas
correspondientes de forma consecutiva.
•Mantenga pulsado para
avance/retroceso rápido.
•Mantenga y suelte 5/ varias
veces para seleccionar modo de
reproducción repetida/aleatoria.
All registered and unregistered trademarks are
property of their respective owners.
Nyne Multimedia Inc.
All rights reserved.
1 Press to select the AUX input sound source.
2 Connect an auxiliary MP3 device to the speaker
through a 3.5mm audio cable.
3 Play and control music on the MP3 device, and
use the volume knob on the speaker to adjust
volume if necessary.
Tip: In AUX mode, you can press to mute
or resume music play.
1 Pulse para seleccionar la fuente de entrada
AUX.
2 Conecte un dispositivo MP3 auxiliar al altavoz
con un cable de audio 3.5 mm
3 Reproduzca y controle música desde el
dispositivo MP3. Para ajustar el volumen use la
rueda del altavoz.
Consejo: En modo AUX, pulse para
silencia o reanudar la música.
EN
EN ES
EN
EN
ES
ES
ES
ES ES
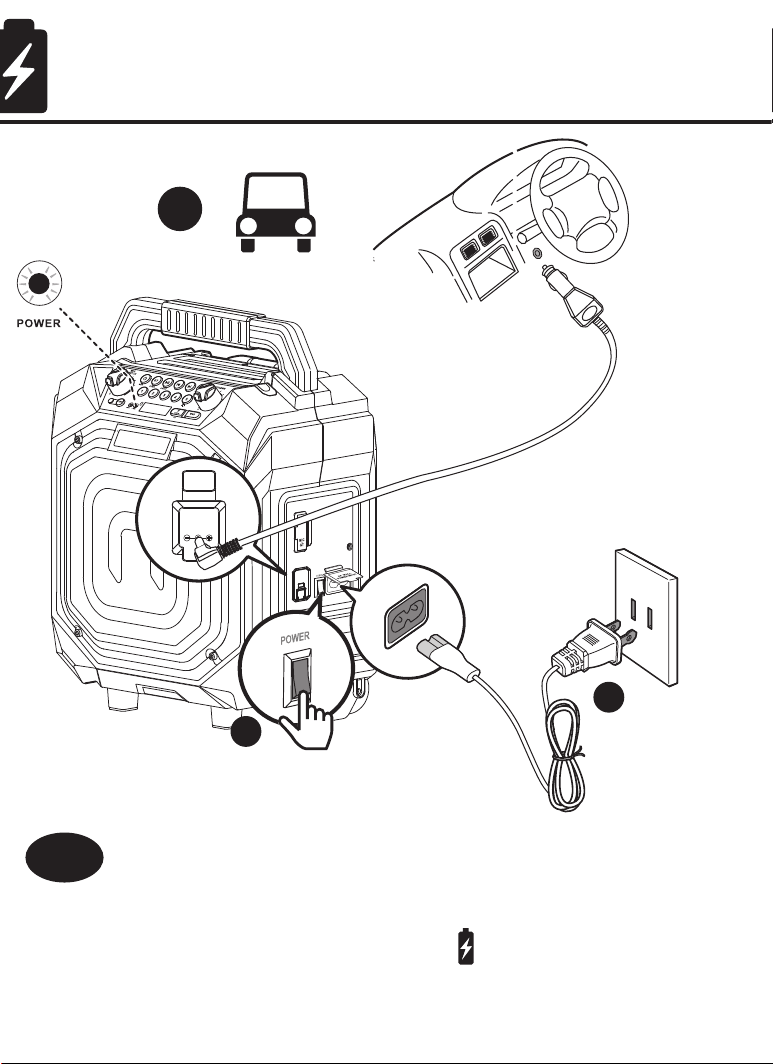
Tips: To save power, when the speaker is not
in use, always turn the power switch to the “O”
position.
While charging when the power switch is at "I"
position but the unit is not on, you need to turn the
power switch to "O" position or turn on the unit to
check whether the power indicator has turned
solid green (fully charged).
NYNE RUMBLE - QUG_RUMBLE_07_19_V1.2
1
2
OR
15VDC
IN
Use either the AC power cord or car adaptor (9-15V)
to charge the speaker until the indicator turns
solid green from red, indicating that the speaker is
fully charged.
Utilice el cable de alimentación de CA o el
adaptador de coche (9-15V) para cargar el altavoz
hasta que el indicador se vuelva de color rojo
completamente cargado.
Al cargar estando el botón de encendido en
posición “I” sin estar encendida la unidad, deberá
colocar dicho botón en posición “O” o encender
la unidad para comprobar si el indicador de
energía ha cambiado a verde fijo
(carga completada).