O'Rageous 167564 User manual

167564
Beach Shelter - 4 Hub
Customer Service:(888) 922-2336
7:00 am to 12:00 am CST (daily)
Live Chat at:www.academy.com
Email:customerservice@academy.com
(877) 579-1550 8:30am to 5:30pm Monday thru Friday,EST
(Made in Bangladesh)
----------------------OR----------------------

Warnings..................................................................................3
Parts List..................................................................................4
Assembly Instructions...........................................................5-6
Care and Maintenance............................................................7
Warranty Information...............................................................8
Note:Before beginning assembly of product,make sure
all parts are present. Compare parts with package content
list and hardware contents. If any part is missing or
damaged do not attempt to assemble the unit. Contact
customer service for replacement parts.
Page 2 of 8

Warnings
IMPORTANT SAFETY AND TIP INFORMATION
TO MAXIMIZE THE ENJOYMENT OF YOUR PRODUCT PLEASE ASSEMBLE AND USE YOUR PRODUCT
AS SAFELY AS POSSIBLE.
THE PURPOSE OF THE SAFETY ALERT SYMBOLS TO CALL YOUR ATTENTION TO POSSIBLE
HAZARDS RELATING TO THE USE AND ASSEMBLY OF YOUR PRODUCT.
THE PURPOSE OF THE TIP SYMBOL IS TO CALL YOUR ATTENTION TO SUGGESTIONS THAT WILL
ASSIST YOU IN THE ASSEMBLY/DISASSEMBLY PROCESS AND ENHANCE YOUR CAMPING EXPERI-
ENCE. WHEN YOU SEE THESE SYMBOLS, PLEASE CLOSELY FOLLOW THE INFORMATION PROVIDED.
• KEEP ALL FLAME AND HEAT SOURCES AWAY FROM THIS TENT FABRIC
• This product is made with fabric, which meets CPAI-84
• IT IS NOT FIREPROOF. The fabric will burn if left in continuous contact with any source.
The application of any foreign substance to the fabric may render the resistant properties
ineffective.
• neponaraentcudorpsihttceretonoD
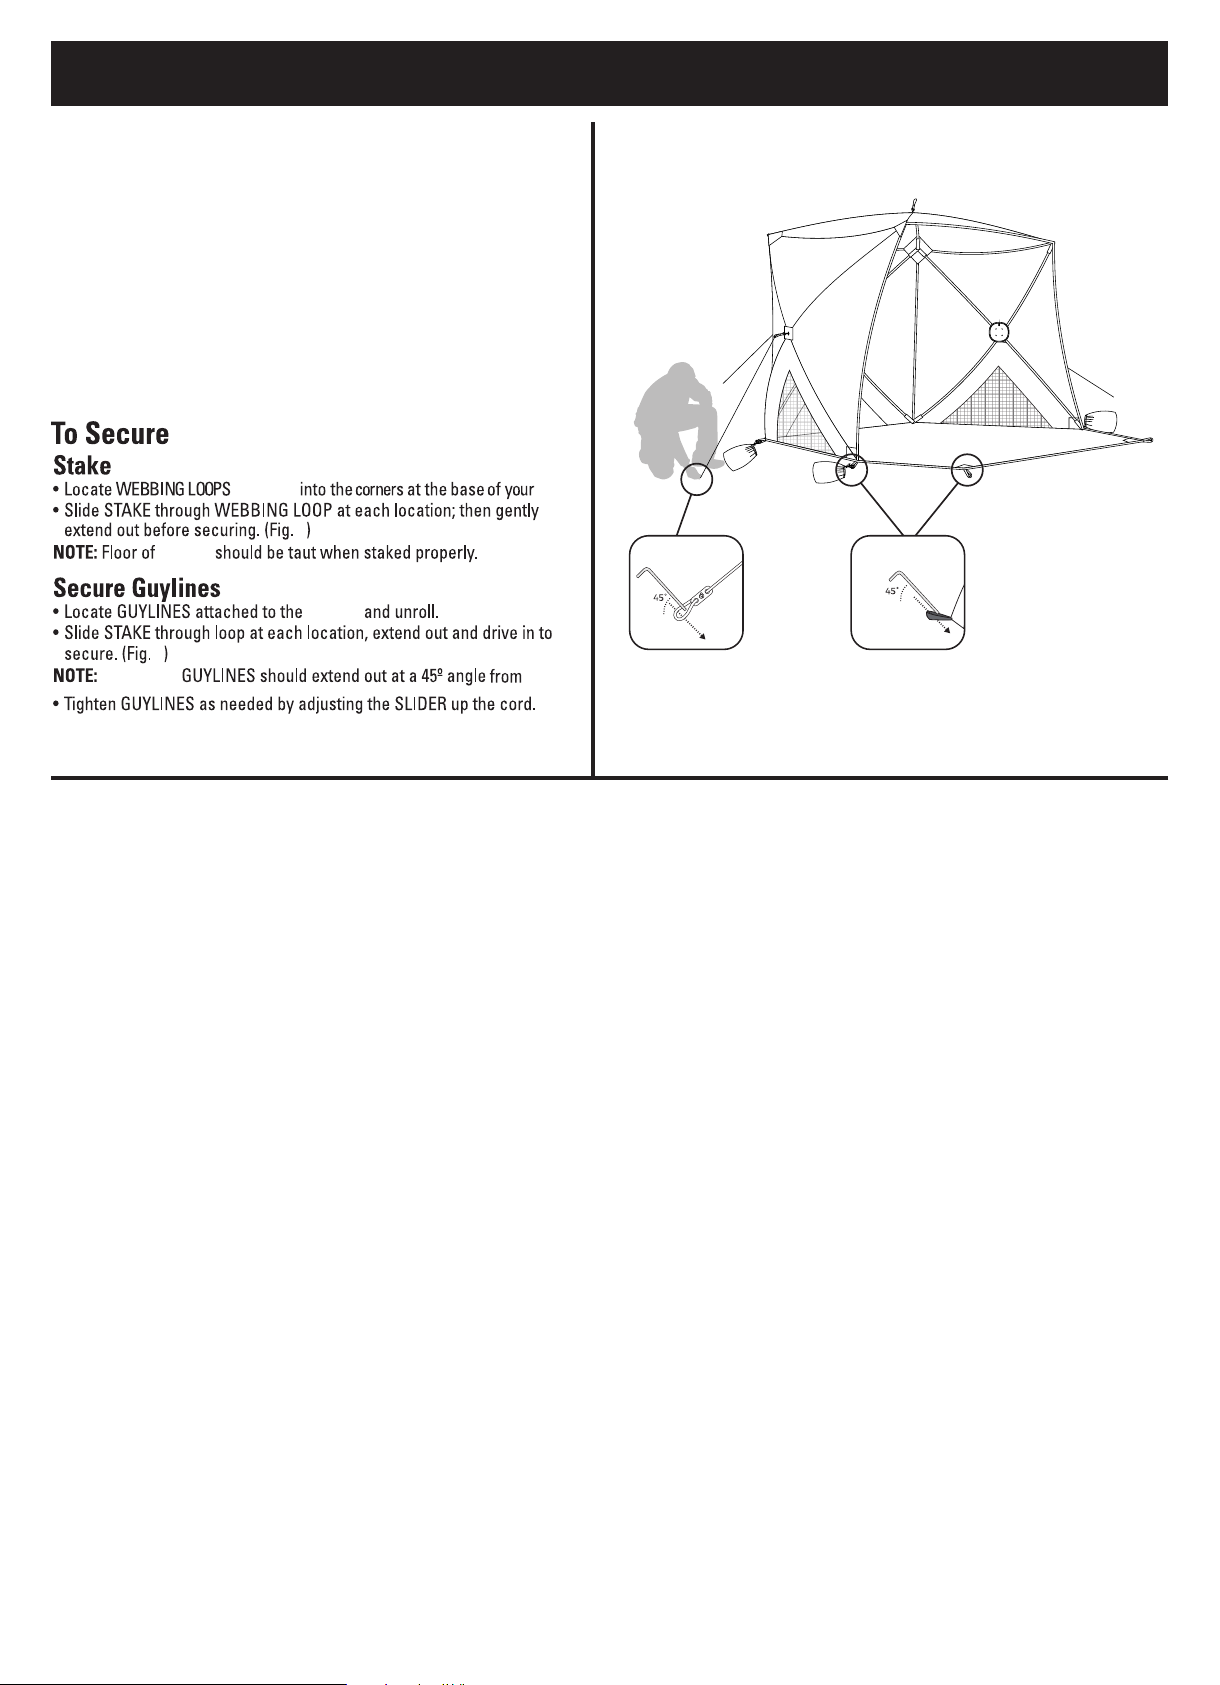
Anchor properly at all times and carefully consider the
etispmac choice.
Be aware of possible falling rocks or tree limbs, lightning strikes,
strong winds and other hazards which may cause injury to this product or it’s occupants.
• Setup is possible for one adult, however two adults are recommended. During assembly poles are
under tension. If not held in place during assembly, poles could break or up possibly
causing serious injury.
• Safety glasses may be worn throughout the assembly process as an additional precaution.
• Stoves, lanterns, candles, grills, heaters and other fuel burning devices produce carbon monoxide
and will consume the available oxygen in a tent. Use of such devices in a tent may cause
asphyxiation, carbon monoxide poisoning, death, or serious and permanent injuries.
For this reason:
• DO NOT use fuel burning devices inside or near this product.
Your failure to follow this warning may cause death or serious and permanent injury to you or
others.
ADDITIONAL NOTES:
• Our recreational products are constructed to rigid They are not made, however, for
extreme
weather, climates, or environments. abuse and extreme weather are condi-
tions that may adversely affect the structural integrity of the tent. Additional precautions
may be necessary during inclement or unexpected weather conditions.
• Here are some tips that may help during these times:
• Use guylines to help secure your structure during periods of heavy winds.
• Storms or steady rains may cause water to collect in pockets on the roof. This will add
weight,which can weaken the overall structure, causing the tent to collapse. Maintain
a watchful
eye and remove any water accumulation that may occur.
WARNING
Page 3 of 8

A
B
C
D
Carry bag
Shelter
body with attached poles
1
1
3
9
Guy rope
Steel stake
Page 4 of 8
IMPORTANT NOTES BEFORE YOU BEGIN:
• Assemble your beach shelter before venturing out to become familiar with the assembly..
• Setup is possible for one person, however two people are recommended.
• Select a clean, level area for the shelter, free of debris and sharp objects, away from a natural
watercourse.

Assembly Instructions
Page 5 of 8
WALL
WALL
Step 1:
CAUTION: Avoid pinch points when opening or
closing the shelter frame.
● Remove shelter from carry bag.
Remove the tie strap from around the shelter.
● Lay the shelter flat on the ground and check
that there is no material twisted or overlapping
the ends of any poles. Do not force shelter when
folding or unfolding. Watch for the entanglement
of poles. (Fig.1)
● Grab the webbed loop attached to the steel ring
at the center of the wall and pull outward until
the shelter wall is partially open. (Fig.2)
NOTE: The (2) side walls should be popped
open first after laying flat.
Step 2:
● Proceed by walking around entire shelter and
pulling on each wall webbed loop to pop out
each wall until all sides are popped out. (Fig.3)
● Continue to open the roof.
Roof
FIGURE 1
FIGURE 2
FIGURE 3

Assembly Instructions
Page 6 of 8
Step 3:
● Your shelter should be standing up completely.
You can now easily move your shelter to its
final position before securing with stakes and
guylines. (Fig.4)(Fig.5)
4
attached shelter.
shelter
shelter
shelter.
Shelter:
Shelter:
5
Three sides FIGURE 5 FIGURE 4

Page 7 of 8
Care and Maintenance
Shelter take down:
• Your shelter must be stored dry . One of the easiest ways to damage your shelter is by storing it
while it is wet. Storing a wet shelter as short a 24 hours in warm weather is likely to cause mildew
on the fabric coatings.
• If you must close camp in the rain, open your shelter and set it up to allow it to dry as soon as
possible. Allow dirt to dry on the fabric after a rainfall before lightly sweeping it off with a brush.
For tougher stains, spray the area with water and lightly wipe it off with a few strokes. Do not use
washer or dryer. DO NOT SCRUB THE FABRIC. ALWAYS MAKE SURE SHELTER IS COMPLETELY
DRY BEFORE REPACKING.
• This shelter is made from synthetic fabric that has been treated and is highly resistant to the sun’s
Ultraviolet (UV) light. However, no fabric can withstand prolonged exposure to sunlight.Do not leave
your shelter set up for weeks at a time. Exposure to ultraviolet rays from the sun can damage and/or
discolor the material.
• Do not spray or apply insecticide or pesticide on your shelter. It may damage UV resistant or water
repellent properties of this shelter.
• Clean the poles with a cloth and lubricate them with a silicone spray to help prevent corrosion and
keep from being gritty. This is especially important after using the shelter around salt water.
• Store the stakes in a separate storage bag. Do not pack the stakes inside the shelter.
TAKE-DOWN TIP*
● After collapsing the shelter and gathering hub style frame together, spread excess shelter material
away from frame and place it on its side. Start at the frame and roll it with pressure until it has
reduced in size. Fold the rainfly and wrap the folded rainfly around the rolled shelter.This will keep
the shelter tight and make it easier to place back into the carry bag.
● Remove all stakes from shelter and guylines, store in stake bag.
● Hold the webbed ring attached to the steel ring of the shelter at the center of the wall and push in
until the wall is collapsed.
● Hold the webbed ring attached to the steel ring in the center of one of the roof and push down until
the roof is collapsed.
● Lay the shelter flat, check and fold all the poles.
● Roll up the folded shelter.
● Pack the rolled shelter and stake bag to carry bag.

Warranty Information
This shelter has been manufactured under the highest
standards of quality and workmanship. We warrant to the
original consumer purchaser that all aspects of this shelter will
be free of defects in material and workmanship for one year
from the date of purchase. A replacement for any defective
part will be supplied free of charge for installation by the
consumer. Defects or damage caused by the use of other than
genuine parts are not covered by this warranty. This warranty
shall be effective from the date of purchase as shown in the
purchaser receipt.
This warranty is valid for the original consumer purchaser only
and excludes industrial, commercial or business use of the
shelter, shelter damage due to shipment or failure which
results from alteration, shelter abuse, or shelter misuse,
whether performed by a contractor , service company , or
consumer. We will not be responsible for labor charges and/or
damage incurred in installation, repair or replacement nor for
incidental or consequential damage.
Page 8 of 8
Table of contents
Popular Shelter manuals by other brands

Kiwi Camping
Kiwi Camping Oasis 3 quick start guide

TMG
TMG TMG-ST3050-2.0 product manual

SURF & TURF
SURF & TURF Robusta Assembly instructions

ShelterLogic
ShelterLogic Shed-In-a-Box E Series Assembly instructions

Isotra
Isotra ARTOSI CARPORT Technical manual

SURF & TURF
SURF & TURF CANOPRO LITE SHELTER 5ft x 5ft Assembly guide

Hardlife Utility
Hardlife Utility C2020 instruction manual

Storage Canopy
Storage Canopy C4060R Assembly instructions

Dunster House
Dunster House H3-GS3X6 installation manual

No Butts Bin
No Butts Bin SR1551 Assembly instructions

Project Source
Project Source 05535028 installation instructions

Dometic
Dometic Kampa AIR Shelter 200 Installation and operating manual