Oakcastle MP100 Manual
MP100 | MP3 Player
Instruction Guide
EN

Box Contents ������������������������������������������������������������� 1
Controls & Funcons �������������������������������������������������3
Instrucon Guide������������������������������������������������������ 4
Music ������������������������������������������������������������������������ 4
Video ������������������������������������������������������������������������ 6
Radio������������������������������������������������������������������������� 7
Recorder ������������������������������������������������������������������� 8
Photos����������������������������������������������������������������������� 9
Te x t �������������������������������������������������������������������������� 10
Files�������������������������������������������������������������������������� 10
Bluetooth������������������������������������������������������������������11
Pedometer ��������������������������������������������������������������� 12
Sengs �������������������������������������������������������������������� 13
Specicaon������������������������������������������������������������ 14
Warranty ����������������������������������������������������������������� 14
Safety Informaon����������������������������������������������������15
Register your product for a FREE 3-year
warranty at www.oakcastle.co.uk
Contents
3year
warranty
EN

1
EN
What’s in the Box?
Box Contents
Oakcastle MP100 MP3 Player
Earphones
USB Cable
Instructions Guide
2
EN
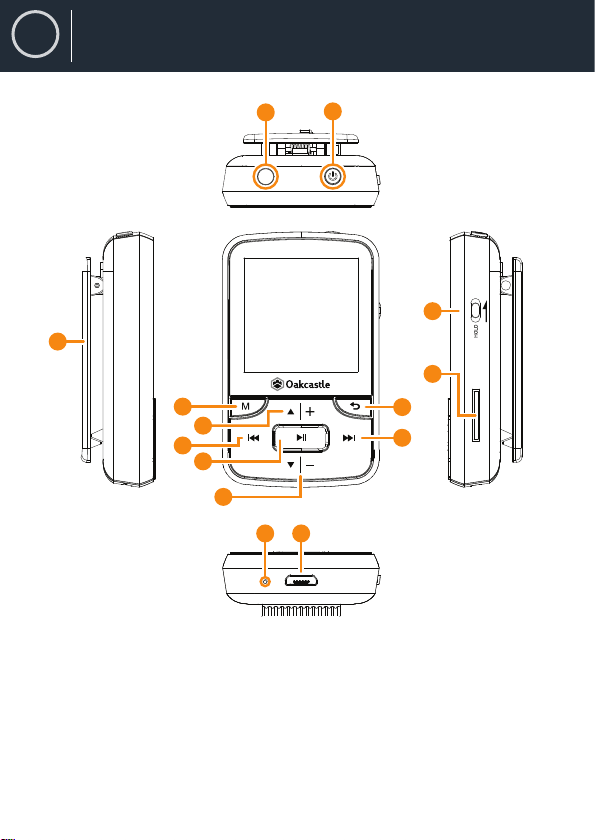
Control Buttons
1. Headphone
Jack
2. Power/Sleep
3. Clip
4. Menu
5. Up/Vol+
6. Previous
7. Play/Pause
8. Down/Vol-
9. Next
10. Back
11. Microphone
12. USB Port
13. Hold
14. SD Card Slot
Controls & Funcons
12
3
4
7
5
6
8
9
11 12
13
10
14

3
EN
Basic operation
Controls & Funcons
Power on/o
To switch on/o, press and hold the power button (Ref.).
Charging
To charge the MP100, it is recommended that the device is switched
o rst. Insert the USB power supply cable into the micro USB slot
(Ref.). You can charge the MP100 by connecting it to your computer,
or alternatively you can connect it to the mains by using a USB power
adapter (not included). When connected to your computer, you can
choose between ‘Charge & transfer’ to charge and transfer les, or
‘Charge & play’ to charge the device while you are using it. When the
battery indicator of the device shows a low battery life, charge the
device. To fully charge the device, it is recommended to charge the
device for no more than 4 hours.
File Transfer
To transfer les (audio, photo or .txt les) to the device, it is
recommended that the device is switched o rst.
1. Connect the device to your computer using the USB cable supplied
in the box.
2. Select ‘Charge & transfer’, and transfer your chosen les to the
device. Wait until les are completely transferred before ejecting
the device.
3. Before disconnecting the USB, rstly ensure the device is safely
ejected from the File Explorer options your desktop then unplug
the cable. Alternatively, press the Main Menu button (Ref.) to
disconnect.
Compatible operating systems: WIndows 7/8/8.1/10/XP/Vista/2001/Mac OS

4
EN
Music
Play your music
To play music, select ‘Music’ from the main menu. To do this, navigate to
‘Music’ on the main menu screen, then press the enter button (Ref.).
Select ‘Playlists’from the main menu, then choose between ‘All songs’,
‘Artists’, ‘Albums’, and ‘Genres’.
Create a playlist
To create a playlist, rst select ‘Playlists’from the main Music menu.
Method 1
1. Select ‘Create a playlist’. Wait for the device to load the available
songs.
2. Scroll through the list of available songs. Select a song to add to
a playlist by pressing the‘Enter’ button when the song is selected
(Ref.). The song will begin to play. While the song is playing, press
the ‘Main Menu’button (Ref.).
3. Select ‘Add to playlist’ from the menu options, then select the
playlist you would like the song to be added to. The device will ask
for conrmation. To add the song, select ‘Yes’. To cancel, select ‘No’,
or press the ‘back’ button (Ref.). Repeat the above steps to add
more songs.
Method 2
1. Play a song by selecting it from the list.
2. Press the‘Menu’ button (Ref.).
3. Select ‘Add to playlist’, then choose the playlist you would like the
song to be added to.
Instrucon Guide

5
EN
Main menu options
Create playlist - select to begin creating a playlist (up to 100 songs)
Playlists - select to play a playlist
All songs - select to view a list of all songs
Artists - select to view music by artist and album
Albums - select to view music by album
Genres - select to view music by genre
Repeat a song or Shue all songs
While playing a song, press the ‘Menu’ button (Ref.). To view repeat
options, select ‘Play mode’, then ‘Repeat’. Select your chosen play mode
from the options. Select ‘repeat le’ to repeat the song currently playing.
Select ‘Shue’ to shue all songs.
Song options
Play mode - change the play mode for music, for example repeat a
song, shue all songs or change the speed of a song.
Equalizer - choose the sound settings for the song, for example‘Rock’,
‘Funk’, ‘Hip Hop’, ‘Jazz’, ‘Classical’ and ‘Techno’.
Add to playlist - add a song to a playlist.
Remove from playlist - remove a song from a playlist.
Delete - delete a song from the device.
Bookmarks - save a song ‘bookmark’ (save a song time, to start a song
from that specic point). Once selected, the‘bookmark’ will be available
under the ‘Go to bookmark’ option.
Music
Instrucon Guide

6
EN
Video
Instrucon Guide
Upload a video
Videos can be uploaded to the device by using a computer to transfer
les to the device. Videos must be in AMV format. To convert a video to
AMV format, you can use a piece of software called AmvTransform, or an
alternative AMV converter.
Play a video
To play a video, rst select ‘Video’ from the main menu. Then select a
video from the list. The video will start playing. Press the‘Play/Pause’
button to play or pause (Ref.).
To increase or decrease the volume, press the‘volume up’ button (Ref.)
or the ‘volume down’ button (Ref.).
To rewind, press and hold down the ‘Back’ button (Ref.). Release to
resume.
To fast forward, press and hold the‘Next’ button (Ref.). Release to
resume.
Options
While playing a video, press the‘Menu’button (Ref.) to view the video
options.
Brightness - change the brightness of the screen
Repeat - select repeat options for the video
Delete video - delete the video from the device
Refresh playlist - select to refresh your available videos

7
EN
Radio
Instrucon Guide
FM Radio
To listen to FM radio, rst select ‘Radio’from the main menu. To perform
an autoscan and search for stations with a good signal, follow these
steps:
1. Ensure that the headphones are connected to the device. This is
because the headphones have an in-built antenna for receiving
radio signal.
2. From the main radio interface, press the‘Menu’button (Ref.).
3. Select ‘Auto tune’from the list of options.
4. The device will ask for conrmation. Select ‘Yes’to perform an auto
search, or ‘No’to cancel.
5. The device will search for stations with a good signal and display
them in a list. Select the station you wish to listen to, and the
station will begin playing.
Auto tune - press ‘Enter’ (Ref.) to enter auto tune mode.
FM Record - select to begin recording an FM broadcast, or listen to
previously saved recordings. Press ‘Back’ to save or delete (Ref.).
Save to preset - select to save FM stations to the list of presets.
Clear preset - select to delete FM stations from the list of presets.
FM bands - select to change the FM frequency band.

8
EN
Create a voice recording
To create a voice recording, follow these steps:
1. Select ‘Recorder’ from the main menu.
2. Select ‘Start voice recording’.
3. The device will begin to record using the built-in microphone
(Ref.).
4. Once you have nished your recording, press the‘Enter’ button to
pause/stop (Ref.). Press the ‘Back’ button then select ‘Yes’ or ‘No’to
save or delete the recording.
Options
Start voice recording - select to begin a voice recording.
Recordings library - select to view a list of your recordings.
Record Format - select to choose the format of your recordings (MP3
le or WAV le).
Record Settings - select to choose the recorder settings. Bitrate
settings enable you to change the recording bitrate between 512, 768,
1024, and 1536kbps (Kilobits per second). VOX-mode refers to voice
mode. When VOX mode is switched on, the device will only record when
the microphone detects a voice, and pause when it does not detect a
voice.
Instrucon Guide
Recorder
Table of contents
Other Oakcastle MP3 Player manuals


