OAKWORKS Spa Halo Slimline SL User manual

USER MANUAL
www.OAKWORKS.com · 717.235.6807
made in the
with US & imported
OAKWORKS®
TROLLEYS
OAKWORKS
Collection Trolleys
Halo Collection Trolleys

© Copyright 2020
OAKWORKS®, Inc.
Printed in U.S.A.
All rights are reserved. No part
of this document may be
photocopied, reproduced or
translated to another language
without prior written consent
of OAKWORKS®, Inc.
OAKWORKS®is a registered
trademark of OAKWORKS®, Inc.
Notice
The information contained within
this document is subject to change
without notice and should not
be construed as a commitment by
OAKWORKS®, Inc.
OAKWORKS®, Inc. encourages
requests for technical specifica-
tions and the like documentation to
ensure accuracy. The appropriate
documentation is available upon
request.
OAKWORKS®, Inc. shall not be
liable for incidental or consequen-
tial damages in connection with or
arising out of the furnishing, per-
formance, or use of this document
and the program material which it
describes.

TABLE OF CONTENTS
Product Use Description.............................................................................................. 1
Important Safety Instructions
Symbol Identification ........................................................................................... 1
Important Safety Instructions............................................................................... 2
Product Description & Photo
Halo Collection
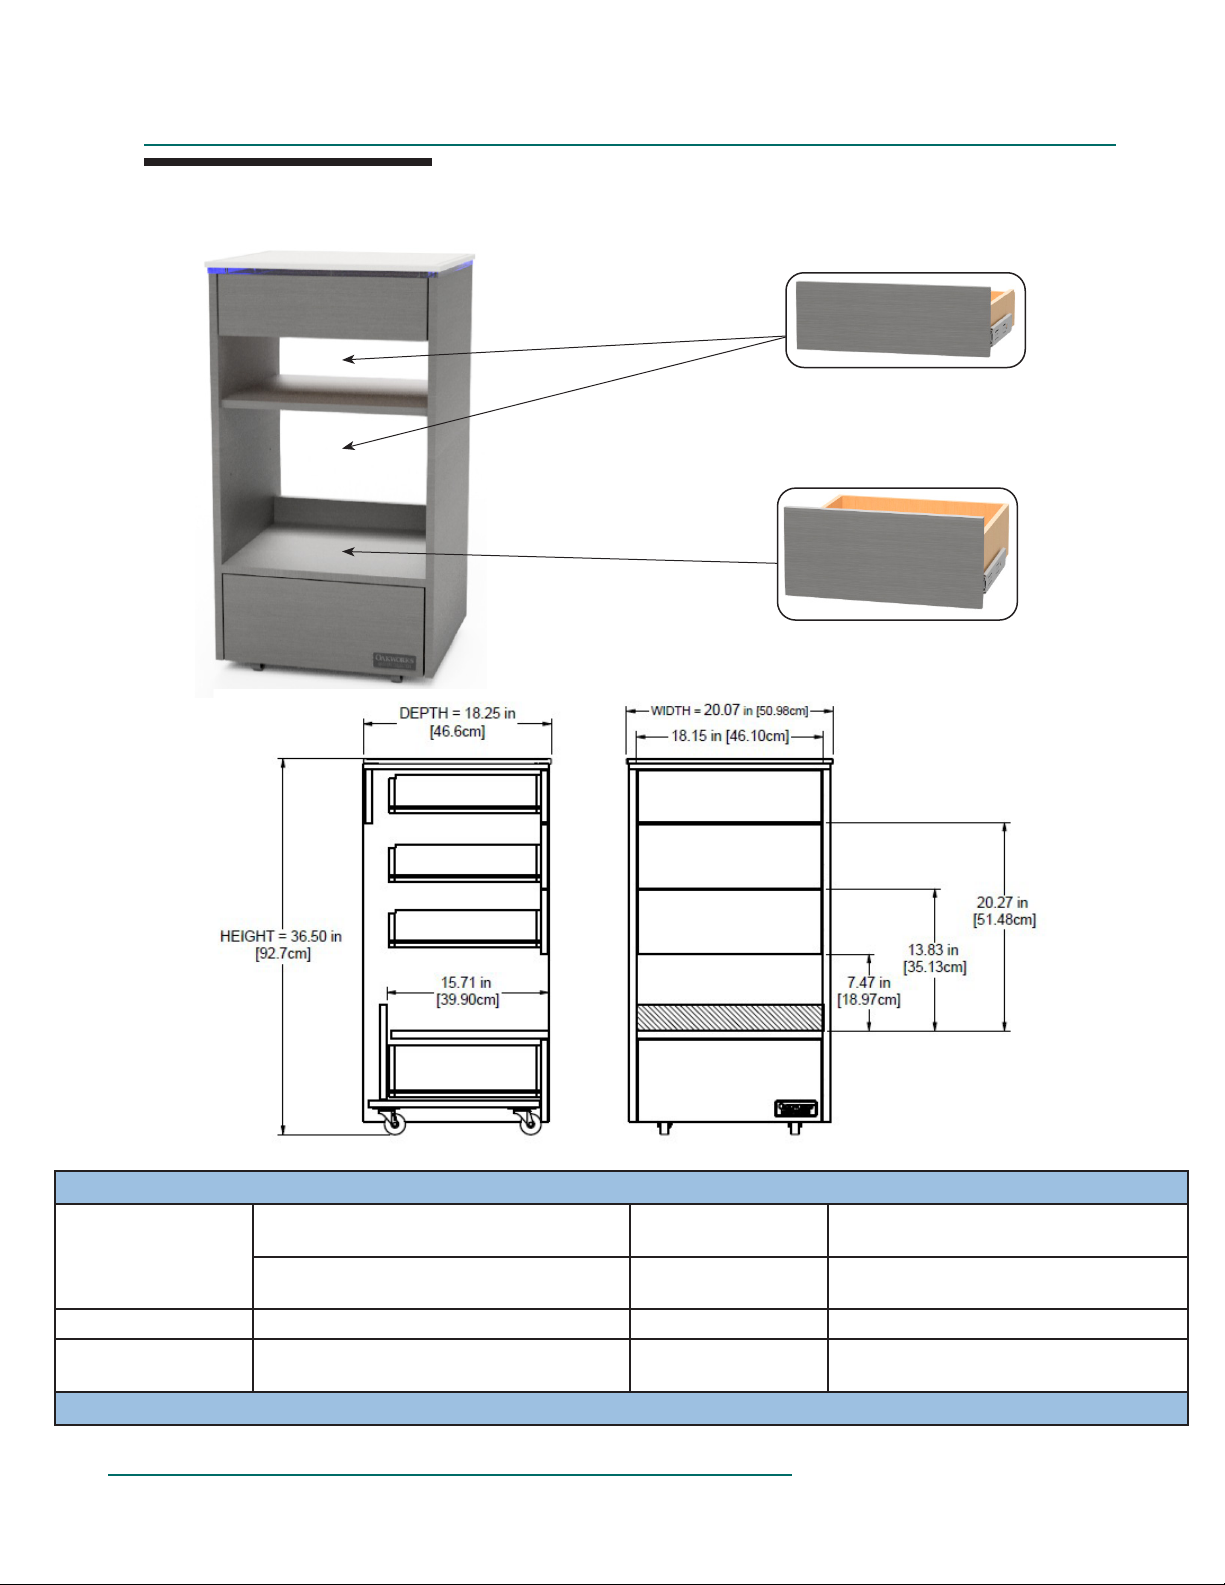
Halo Slimline - SL ....................................................................................... 3
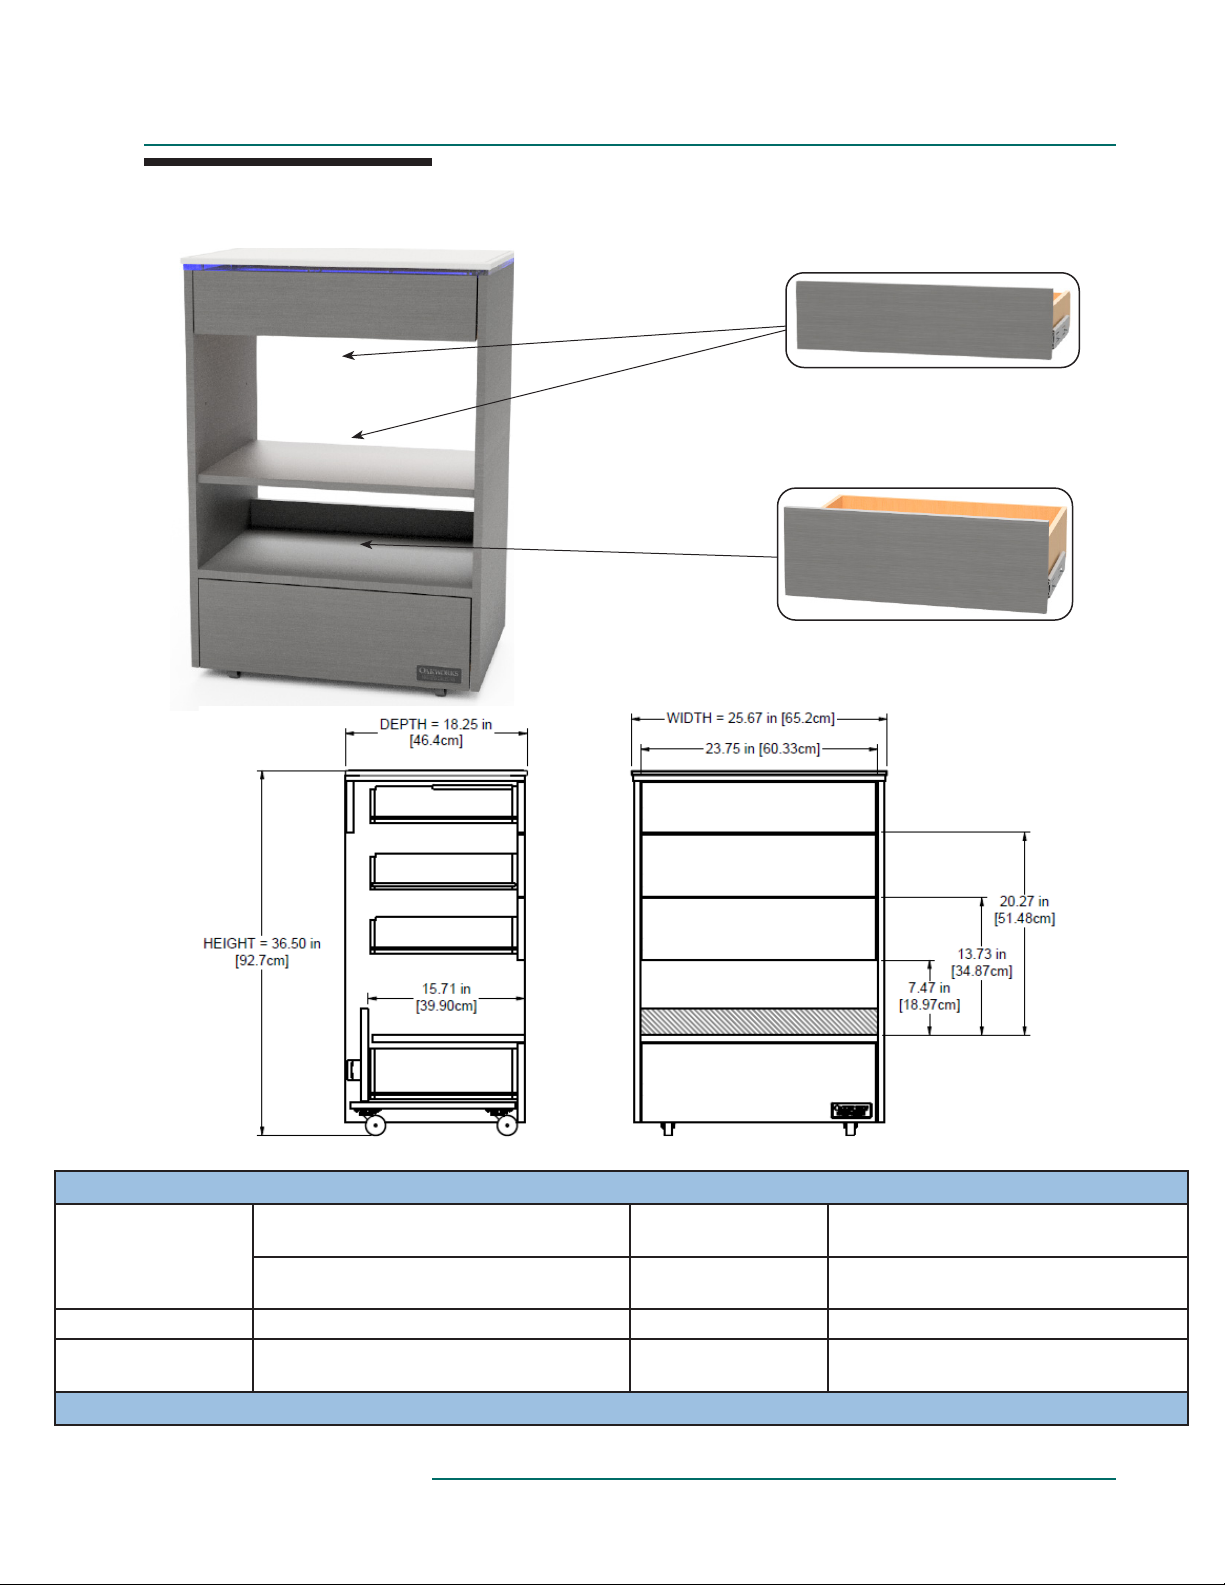
Halo Standard - SX ..................................................................................... 4
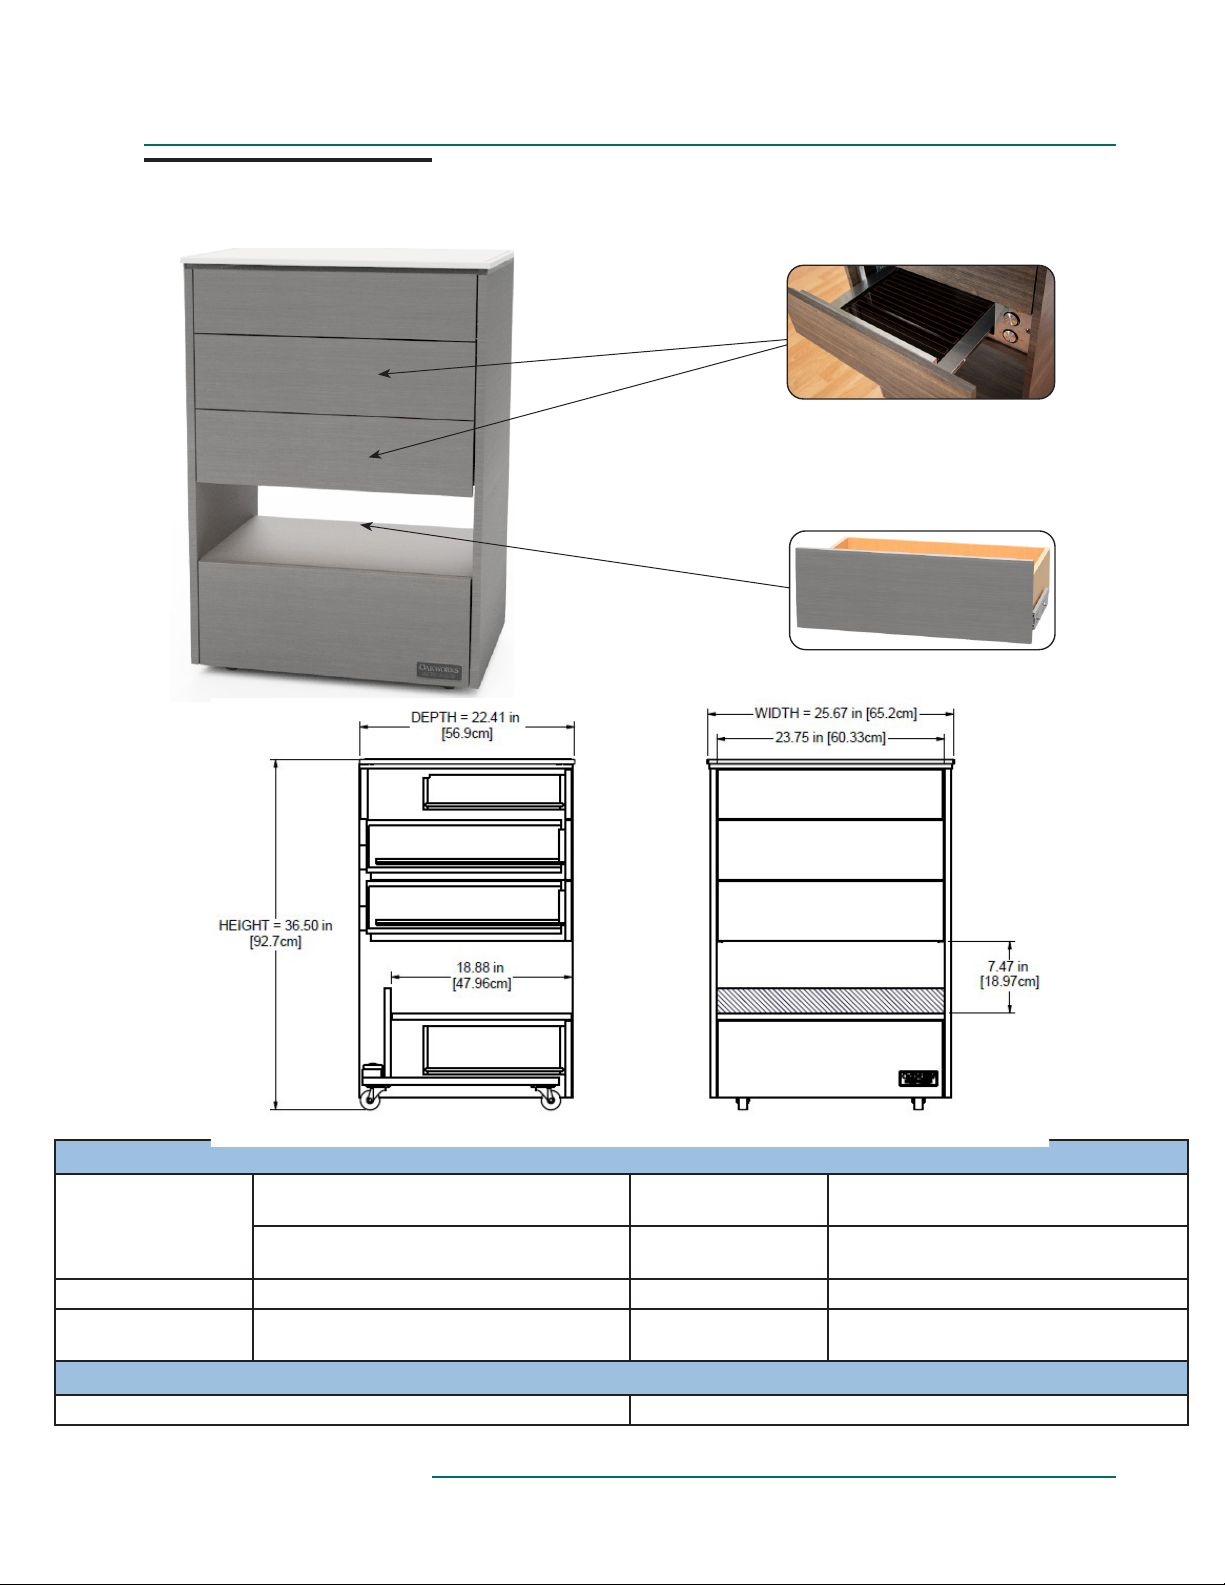
Halo 1 Warming Drawer - W1...................................................................... 5
Halo 2 Warming Drawers - W2 .................................................................... 6
Oakworks Collection
Oakworks Slimline - SL ............................................................................... 7
Oakworks Standard - SX ............................................................................. 8
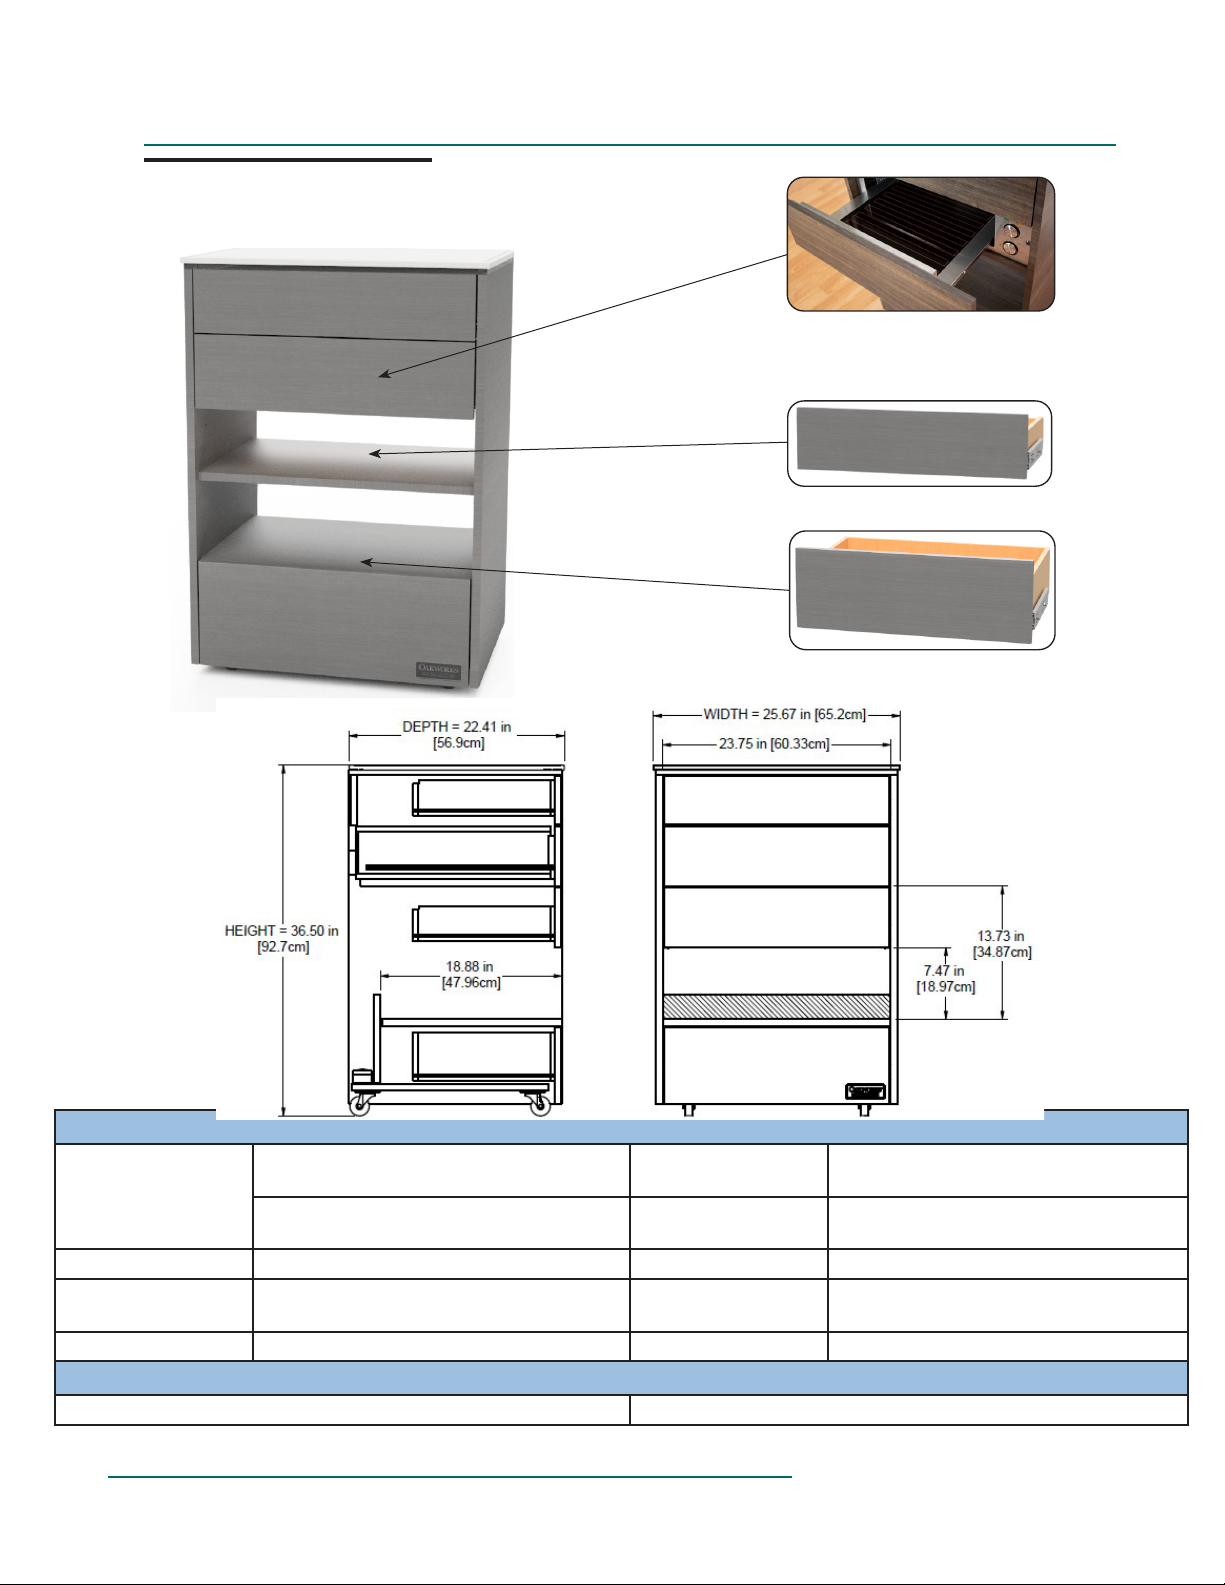
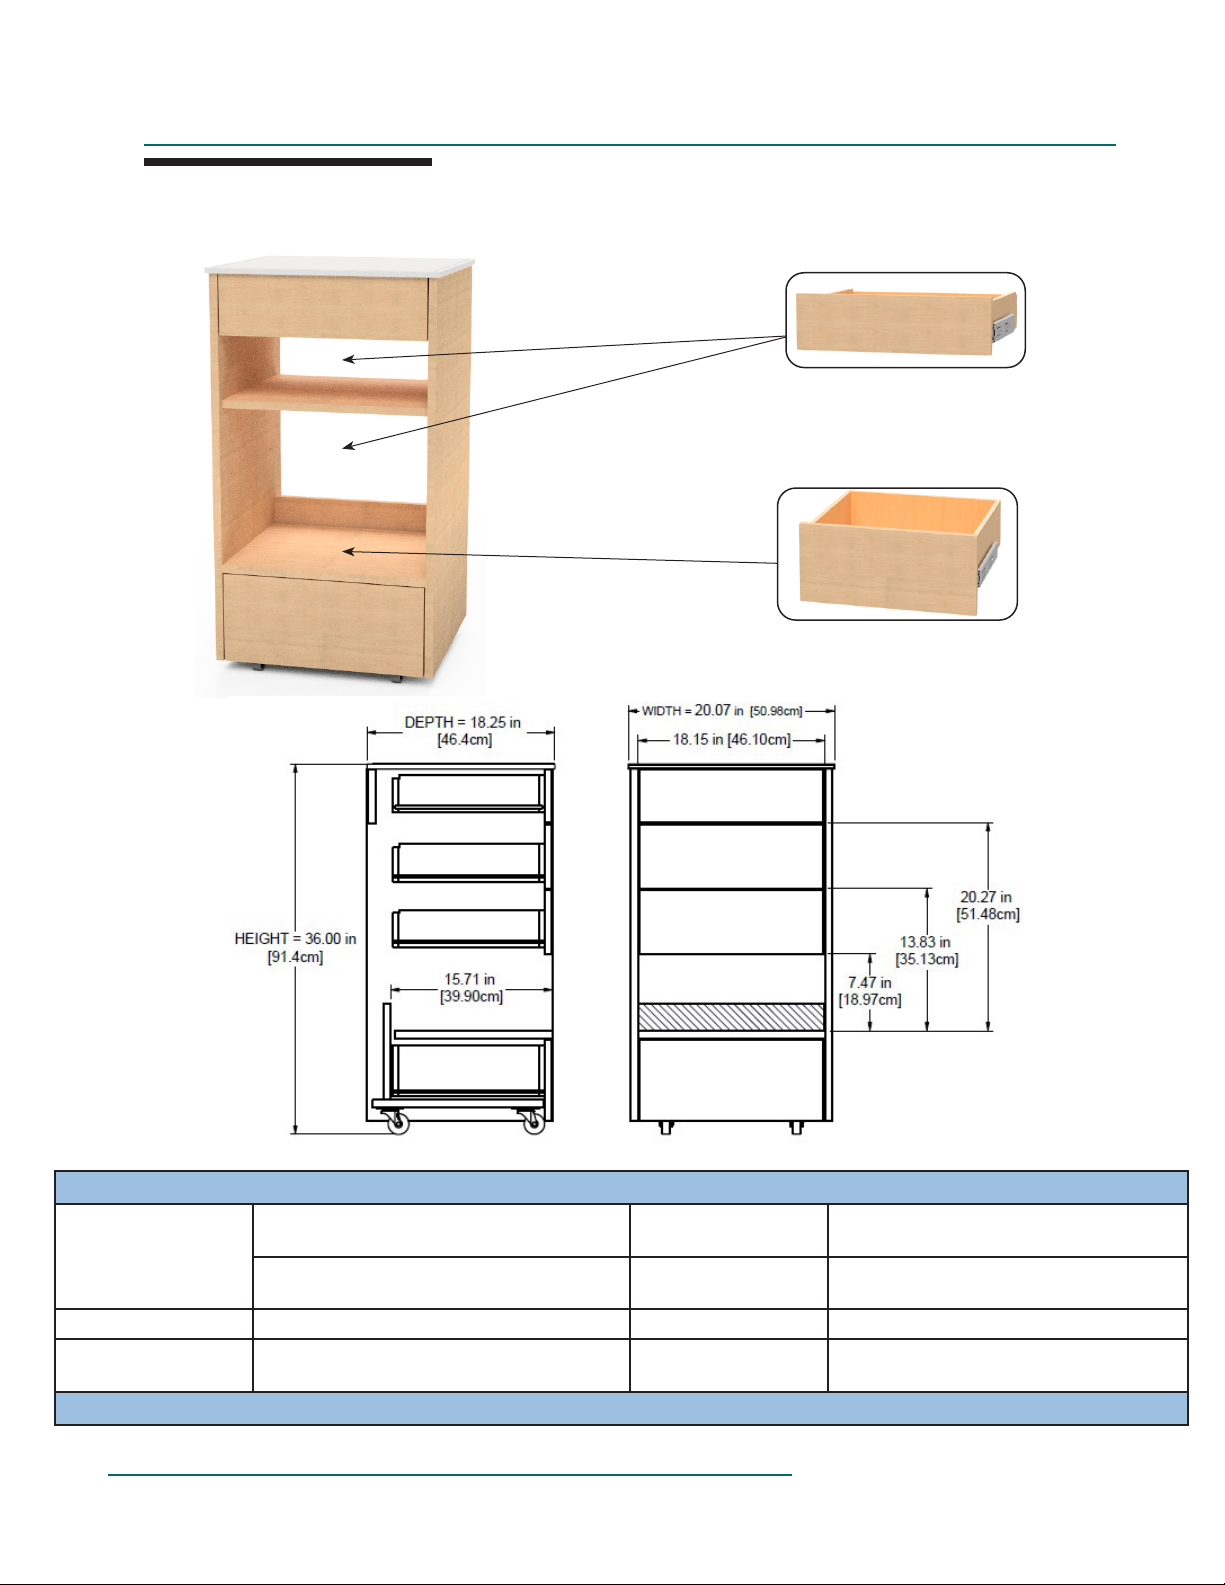
Oakworks 1 Warming Drawer - W1 ............................................................. 9
Oakworks 2 Warming Drawers - W2.......................................................... 10
Installation
Grounding ......................................................................................................... 11
Directions for Use
Adjustable Shelf Install...................................................................................... 12
Work Shelf Operation ........................................................................................ 12
Warming Drawer Operation ............................................................................... 12
Installation of Optional Hot Towel Cabi.............................................................. 13
Optional Work Light Install and Operation ......................................................... 14
Halo Collection Accent Lights Operation ........................................................... 15
Cleaning & Disinfection
Recommended Cleaners/Disinfectants .............................................................. 16
Cleaning Procedure........................................................................................... 16
Inspections ................................................................................................................ 17
Warranty Information ................................................................................................. 17
Model Number & Serial Number
Product Label Location...................................................................................... 18
Specifications
Environmental Conditions.................................................................................. 19
120 Volt Electrical Specifications....................................................................... 19
230 Volt Electrical Specifications....................................................................... 19
Contact Information ...................................................................................... back cover

PRODUCT USE DESCRIPTION / IMPORTANT SAFETY INSTRUCTIONS
1
This symbol, when used in this manual and on product labels, represents a caution
warning. Be sure to read and comply with all precautions and warnings.
This symbol, when used in this manual and on product labels, warns against an elec-
trical shock hazard. Be sure to observe and comply with all warnings.
This symbol, when used in this manual or on product labels, indicates a Protective
Earth (Ground) Terminal.
This symbol, when used in this manual or on product labels, indicates the date of
manufacture of the device.
This symbol, when used in this manual or on product labels, indicates alternating
current (AC).
This symbol, when used in this manual or on product labels, indicates direct current
(DC).
This symbol is used to indicate that the operator should consult the user manual.
This symbol indicates that when the end-user wishes to discard this product, it must
be sent to separate collection facilities for recovery and recycling.
UL 2 601-1
CSA C22.2 NO.601.1
IE C 60601-2 (2 001-09)
CUSUS
LL
II
SS
TT
EE
DD
R
UL 2 601-1
CSA C22.2 NO.601.1
IE C 60601-2 (2 001-09)
CUSUS
LL
II
SS
TT
EE
DD
R
~
----
PRODUCT USE DESCRIPTION
The product is a spa trolley for commercial use. It is intended for indoor use.
The product is intended to be used by trained professionals in a controlled environment. A review
of the following Safety Instructions is important for the safety of the operator and patient. Read all
instructions and understand this entire user manual before using the product.
The trolley should not be used in any other manner than that described within this manual. Improper
use can result in injury.
SYMBOL IDENTIFICATION

2
IMPORTANT SAFETY INSTRUCTIONS
When using an electrical furnishing, basic precautions should always be followed, including the following:
DANGER
To reduce risk of electric shock:
1. Always unplug power strip from the electrical outlet before cleaning.
2. Connect power strip to a properly grounded outlet only. See Grounding Instructions in this manual.
Electrical Shock Hazard. The power strip is mounted on the back of the product.
WARNING
To reduce the risk of burns, fire, electric shock or injury to persons:
1. Unplug from outlet before adding or removing parts.
2. Never operate this product if it has a damaged cord, if it is not working properly, if it has been dropped
or damaged, or dropped into water. Contact OAKWORKS® Inc., Customer Service before use at
717.235.6807.
3. Keep the cord away from heated surfaces.
4. Never drop or insert any object into any opening.
5. Do not use outdoors.
6. Do not operate where aerosol (spray) products are being used or where oxygen is being adminis-
tered.
7. Do not use attachments not recommended by the manufacturer.
8. To disconnect, turn all controls to the off position, then remove plug from outlet.
9. Improper connection of the equipment-grounding conductor can result in a risk of electric shock.
Check with a qualified electrician or service person if you are in doubt as to whether the product
is properly grounded.
10. Do not modify the plug provided with the product - if it will not fit the outlet; have a proper outlet
installed by a qualified electrician.
11. Do not overload drawers. Failure to adhere to storage load capacity may lead to a potential tip-
READ AND SAVE THESE

PRODUCT DESCRIPTION - HALO COLLECTION
Halo Slimline - SL
STANDARD SPECIFICATIONS
Storage
Top Drawer:
16.3” W x 13.8” D x 3” H Work Shelf Pull Out Surface:
17.9” W x 8” D
Bottom Drawer:
16.3” W x 13.8” D x 4.4” H Accent Lighting Color Changing LEDs
Moveable Four 2” Casters Power Supply Built in Power Strip
Push to Open Draw-
ers
One Touch Mechanism Adjustable Shelf 2 Positions
OPTIONS / ACCESSORIES
Optional Storage Draw-
Storage Drawer: 16.3” W x 13.8” D x
4.4” H
Storage Drawer: 16.3” W x 13.8” D
x 3” H
For electrical specs, see Specifications section.
3

4
For electrical specs, see Specifications section.
PRODUCT DESCRIPTION - HALO COLLECTION
Halo Standard - SX
STANDARD SPECIFICATIONS
Storage
Top Drawer:
21.8” W x 13.8” D x 3” H Work Shelf Pull Out Surface:
23.5” W x 8” D
Bottom Drawer:
21.8” W x 13.8” D x 4.4” H Accent Lighting Color Changing LEDs
Moveable Four 2” Casters Power Supply Built in Power Strip
Push to Open Draw-
ers
One Touch Mechanism Adjustable Shelf 2 Positions
OPTIONS / ACCESSORIES
Optional Storage Draw-
Storage Drawer: 21.8” W x 13.8” D x
4.4” H
Storage Drawer: 21.8” W x 13.8” D
x 3” H

PRODUCT DESCRIPTION - HALO COLLECTION
For electrical specs, see Specifications section.
5
Halo 1 Warming Drawer - W1
STANDARD SPECIFICATIONS
Storage
Top Drawer:
21.8” W x 13.8” D x 3” H Work Shelf Pull Out Surface:
23.5” W x 8” D
Bottom Drawer:
21.8” W x 13.8” D x 4.4” H Warming Drawer 17” W x 19” D x 3.75” H
Moveable Four 2” Casters Accent Lighting Color Changing LEDs
Push to Open Draw-
ers
One Touch Mechanism Power Supply Built in Power Strip
Shelf Removable
OPTIONS / ACCESSORIES
Towel Rack(s) Dimmable Work Light
Optional Storage Draw-
Storage Drawer: 21.8” W x 13.8” D x
4.4” H
Storage Drawer: 21.8” W x 13.8” D
x 3” H
Warming Drawer Capacity: 16L
Warming Drawer Inside Area: 17” W x 19” D x
3.75” H

PRODUCT DESCRIPTION - HALO COLLECTION
6
For electrical specs, see Specifications section.
Halo 2 Warming Drawers - W2
STANDARD SPECIFICATIONS
Storage
Top Drawer:
21.8” W x 13.8” D x 3” H Work Shelf Pull Out Surface:
23.5” W x 8” D
Bottom Drawer:
21.8” W x 13.8” D x 4.4” H Warming Drawer 17” W x 19” D x 3.75” H
Moveable Four 2” Casters Accent Lighting Color Changing LEDs
Push to Open Draw-
ers
One Touch Mechanism Power Supply Built in Power Strip
OPTIONS / ACCESSORIES
Towel Rack(s) Dimmable Work Light
Optional Storage Draw-
Storage Drawer: 21.8” W x 13.8” D x
4.4” H
Warming Drawer Capacity: 16L
Warming Drawer Inside Area: 17” W x 19” D x
3.75” H

PRODUCT DESCRIPTION - OAKWORKS COLLECTION
Oakworks Slimline - SL
STANDARD SPECIFICATIONS
Storage
Top Drawer:
16.3” W x 13.8” D x 3” H Work Shelf Pull Out Surface:
17.9” W x 8” D
Bottom Drawer:
16.3” W x 13.8” D x 4.4” H Adjustable Shelf 2 Positions
Moveable Four 2” Casters Power Supply Built in Power Strip
Push to Open Draw-
ers
One Touch Mechanism
OPTIONS / ACCESSORIES
Optional Storage Draw-
Storage Drawer: 16.3” W x 13.8” D x
4.4” H
Storage Drawer: 16.3” W x 13.8” D
x 3” H
For electrical specs, see Specifications section.
7

8
For electrical specs, see Specifications section.
PRODUCT DESCRIPTION - OAKWORKS COLLECTION
Oakworks Standard - SX
STANDARD SPECIFICATIONS
Storage
Top Drawer:
21.8” W x 13.8” D x 3” H Work Shelf Pull Out Surface:
23.5” W x 8” D
Bottom Drawer:
21.8” W x 13.8” D x 4.4” H Adjustable Shelf 2 Positions
Moveable Four 2” Casters Power Supply Built in Power Strip
Push to Open Draw-
ers
One Touch Mechanism
OPTIONS / ACCESSORIES
Optional Storage Draw-
Storage Drawer: 21.8” W x 13.8” D x
4.4” H
Storage Drawer: 21.8” W x 13.8” D
x 3” H

PRODUCT DESCRIPTION - OAKWORKS COLLECTION
For electrical specs, see Specifications section.
9
Oakworks 1 Warming Drawer - W1
STANDARD SPECIFICATIONS
Storage
Top Drawer:
21.8” W x 13.8” D x 3” H Work Shelf Pull Out Surface:
23.5” W x 8” D
Bottom Drawer:
21.8” W x 13.8” D x 4.4” H Warming Drawer 17” W x 19” D x 3.75” H
Moveable Four 2” Casters Shelf Removable
Push to Open Draw-
ers
One Touch Mechanism Power Supply Built in Power Strip
OPTIONS / ACCESSORIES
Optional Storage Draw-
Storage Drawer: 21.8” W x 13.8” D x
4.4” H
Storage Drawer: 21.8” W x 13.8” D
x 3” H
Warming Drawer Capacity: 16L
Warming Drawer Inside Area: 17” W x 19” D x
3.75” H

PRODUCT DESCRIPTION - OAKWORKS COLLECTION
10
For electrical specs, see Specifications section.
Oakworks 2 Warming Drawers - W2
STANDARD SPECIFICATIONS
Storage
Top Drawer:
21.8” W x 13.8” D x 3” H Work Shelf Pull Out Surface:
23.5” W x 8” D
Bottom Drawer:
21.8” W x 13.8” D x 4.4” H Warming Drawer 17” W x 19” D x 3.75” H
Moveable Four 2” Casters Power Supply Built in Power Strip
Push to Open Draw-
ers
One Touch Mechanism
OPTIONS / ACCESSORIES
Optional Storage Draw-
Storage Drawer: 21.8” W x 13.8” D x
4.4” H
Warming Drawer Capacity: 16L
Warming Drawer Inside Area: 17” W x 19” D x
3.75” H

The trolley come completely assembled, except for the optional work light, and ready to use. Plug the
cord into a functioning outlet that is rated for the trolley.
Arrange the power cord so that it will not create a tripping hazard. Be sure access to the plug is not
blocked for disconnecting the trolley from power.
Grounding for 120 Volt products without warming drawer:
This product is for use on a nominal 120-volt circuit and has a grounding plug that looks like the plug
shown below. See Grounding Methods - US 120V Example. Make sure that the product is connected
to an outlet having the same configuration as the plug. No adapter should be used with this product.
Grounding for 120 Volt products with warming drawer:
This product is rated for more than 15 amperes and is for use on a circuit having a nominal rating of
120 volts and is factory-equipped with specific electric plug to permit connection to a proper circuit.
Make sure that the product is connected to an outlet having the same configuration as the plug. No
adapter should be used.
Grounding for 230 Volt products:
This product is rated for less than 15 amperes and is for use on a circuit having a nominal rating
of 230 volts and is factory-equipped with specific electric plug to permit connection to a proper
circuit. Make sure that the product is connected to an outlet having the same configuration as the
plug. No adapter should be used.
WARNING
1. Improper connection of the equipment-grounding conductor can result in a risk of electric
shock. Check with a qualified electrician or service person if you are in doubt as to whether
the product is properly grounded.
2. Do not modify the plug provided with the product - if it will not fit the outlet; have a proper
outlet installed by a qualified electrician.
Correct Implementation Incorrect Implementation
Risk of Electric Shock - Connect this furnishing to a properly grounded outlet only.
DANGER
INSTALLATION
GROUNDING
Grounding Methods - US 120V Example
11

DIRECTIONS FOR USE
ADJUSTABLE SHELF INSTALL
12
For trolleys that come with a shelf, insert the provided four (4) metal dowels into the 4 corresponding
holes depending on what position the shelf will be at. Place the slots on the bottom side of the shelf
on top of the dowels to hold the shelf. To remove the shelf, reverse the previous instructions.
WORK SHELF OPERATIOIN
Each trolley comes with a work shelf located in the top drawer to extend the work surface area. The
work shelf can be pushed back to access the contents of the drawer or fully removed if not needed.
WARMING DRAWER OPERATION
Please reference the Warming Drawer Manual for operation of use.

13
DIRECTIONS FOR USE
INSTALLATION OF OPTIONAL HOT TOWEL CABI
Note: Can only be installed on specific Standard, Slimline, and 1 Warming Drawer models.
• 1 Warming Drawer Model: Remove adjustable shelf and pins.
• Standard and Slimline Model: Adjust shelf to upper position or remove with pins.
To install a Hot Towel Cabi, place the cabi in front of the trolley to confirm the trolley’s configuration
has enough space. Set cabi into the cabinet making sure the power cord is routed towards the back.
Plug the cabi into the power strip located on the back of the trolley. Your Hot Towel Cabi is ready for
use. Be sure to follow towel warmer manufacturer’s instructions.

DIRECTIONS FOR USE
OPTIONAL WORK LIGHT INSTALL AND OPERATION
The Halo Trolley Collection and Oakworks Trolley Collection offer an optional dimmable work light feature.
To install the work light, insert the work light into the slot on the back of the trolley. Make sure to align the
holes. Screw the work light bracket into the trolley using the screws provided. Plug the work light into the
power strip located on the back of the trolley.
The optional work light operates with just the touch of a finger. To turn the work light on or off, tap the top
of the work light once as shown. To dim or brighten the work light, tap and hold the top of the work light.
Release when the light is at the desired brightness. If the work light brightness is going the opposite way,
stop holding and then proceed to tap and hold. Adjust the neck of the light as desired.
14

DIRECTIONS FOR USE
HALO COLLECTION ACCENT LIGHTS OPERATION
The Halo Trolley and the Halo Slimline Trolley offer a multi-color LED light bar. Operate the light bar
with the remote as shown below to create customized accent lighting for the trolley.
Brightness +/- ON/OFF
Pause/Run
Speed +
Speed -
Auto Change
Flash On/Off
7 Color Fade
Change
3 Color Fade
Change
7 Color Jump
Change
3 Color Jump
Change
DIY KEYS
Press the DIY button once
then press the increase/
decrease button that
corresponds with it, set the
depth of color, and press
the DIY button again to
record your setting
Non-Dynamic
lighting buttons
with different colors
Custom Accent Light Bar
15

CLEANING & DISINFECTION
RECOMMENDED CLEANERS/DISINFECTANTS
16
To reduce the risk of electric shock:
- Always unplug this furnishing from the electrical outlet before cleaning.
DANGER
Reference the Recommended Cleaners and Disinfectant list (MMINML0008-EN) that came with the
table. This information can also be found at www.shop.spatable.com under product information.
All cleaners and disinfectants have the ability to degrade the upholstery to some extent. However, fol-
lowing the recommended cleaner and disinfectant list and cleaning process will provided the best care
for your table and support a long product life.
OAKWORKS® recommends a prepackaged wipe for cleaners/disinfectants to ensure best distribution
of disinfectant for the required kill time, without leaving excess residue and/or overexposing compo-
nents therefore minimizing the potential for damage to materials. Please read and follow disinfectants
manufacturers’ directions for cleaning and disinfection.
OAKWORKS® does NOT recommend the use of cleaners/disinfectants containing Hydrogen Peroxide,
Acetic Acid, or Phenolics. These chemicals can cause damage to the appearance and/or material
integrity of various components. Also, while the recommended cleaners/disinfectants list includes
products containing Quaternary Ammonium compounds (“quats”), not all products containing quats
are approved for use. Some contain additional detergents and/or surfactants which can damage some
materials.
A note on Bleach: While a 10% sodium hypochlorite (household bleach) solution (EPA No.: 5813-100
or equivalent) can be an effective disinfectant and is dilute enough to be benign to most materials, it
alone is not an effective cleaner and a separate product must be used for the initial cleaning steps of
the procedure. Because of possible chemical incompatibilities between various cleaning products and
bleach, utmost care must be taken by the user to avoid potential exposure to harmful or toxic by-prod-
ucts of the combination. Also, because bleach leaves a potentially corrosive residue as it evaporates,
it must be rinsed with clean water after disinfection.
Use of non-approved cleaners or disinfectants may lead to damage to upholstery and other
materials found on the table and will void the warranty.
CLEANING PROCESS
Follow the cleaners/disinfectant manufacturers’ directions for use. Please note that cleaning and disin-
fecting an OAKWORKS®table is a two part process. First it must be cleaned of any visible soil, then it
can be disinfected. OAKWORKS® recommends that the table be positioned in the flat position during
the cleaning process. Please follow this procedure for best results:
1. Using an approved cleaner or mild liquid soap and water, clean any visible soil off of the table,
working from the top to the bottom of the table. It is recommended that the upholstery be
cleaned at least once a week to prevent disinfectant build up.
2. Rinse with clean water and dry with a clean cloth or towel.
3. Using an approved disinfectant, thoroughly disinfectant all surfaces of the tabletop and any high-
contact areas such as handles, handsets, etc., making sure they remain wet for the disinfectant
manufacturer’s recommended contact time. Do not allow disinfectant to pool on the upholstery
after the recommended contact time.
4. Wipe off any excess liquid with a cloth or towel and clean water.
5. Dry all surfaces with a clean cloth or towel.
Avoid using writing instruments or other similar instruments around the upholstery as it can cause per-
manent staining. If this does occur, do not wipe with an alcohol based cleaner. Instead, blot the stain
with a clean cloth/ paper towel. Use a 10% bleach dilution to remove the stain. Follow this with a rinse
of clean water.

INSPECTIONS / WARRANTY
17
INSPECTIONS
RECOMMENDED REGULAR INSPECTIONS (monthly or local standard)
• Check for damage to any cables.
• Visually inspect components for obvious damage that could cause problems during operation.
RECOMMENDED PERIODIC INSPECTIONS (yearly or local standard)
• Check for damage to any cables and all visible wiring.
• Visually inspect components for obvious damage that could cause problems during operation.
• Check that all fasteners are present and fastened securely.
• Check table grounding.
• Clean unusual buildup of dirt on the table and/or parts of the table not normally cleaned on a regular
basis.
WARRANTY
View complete warranty details at www.oakworks.com
This manual suits for next models
7
Table of contents
Other OAKWORKS Spa Indoor Furnishing manuals
Popular Indoor Furnishing manuals by other brands

Tiksoja Puidugrupp
Tiksoja Puidugrupp ALEX 2VS539-106 manual

Trinity
Trinity ECOSTORAGE TBFZ-2221 owner's manual

Honey Can Do
Honey Can Do HMP-01628 Assembly

Manhattan Comfort
Manhattan Comfort 1GMCF Assembly guide

Greentouch
Greentouch Scott Living 1055VA-48-223 Assembly / care & use instructions

Evenflo
Evenflo 67010001 Product instructions