manuals.online logo
Brands
  1. Home
  2. •
  3. Brands
  4. •
  5. Oasis
  6. •
  7. Water Dispenser
  8. •
  9. Oasis POU_1RREC Series Installation and maintenance instructions

Oasis POU_1RREC Series Installation and maintenance instructions

This manual suits for next models

2

Other Oasis Water Dispenser manuals

Oasis Kalix Service manual

Oasis

Oasis Kalix Service manual

Oasis VERSAFILLER  P EBF Series User manual

Oasis

Oasis VERSAFILLER P EBF Series User manual

Oasis P8M User manual

Oasis

Oasis P8M User manual

Oasis Mirage User manual

Oasis

Oasis Mirage User manual

Oasis PACSL User manual

Oasis

Oasis PACSL User manual

Oasis BPA1SK Technical manual

Oasis

Oasis BPA1SK Technical manual

Oasis PG8ACSL User manual

Oasis

Oasis PG8ACSL User manual

Oasis PSWSA1SK User manual

Oasis

Oasis PSWSA1SK User manual

Oasis P1PVCDKY Installation and maintenance instructions

Oasis

Oasis P1PVCDKY Installation and maintenance instructions

Oasis KALIX CONTACTLESS P1CPVCDKY User manual

Oasis

Oasis KALIX CONTACTLESS P1CPVCDKY User manual

Oasis POU Instruction sheet

Oasis

Oasis POU Instruction sheet

Oasis POU2LRHK POU2LRHK User manual

Oasis

Oasis POU2LRHK POU2LRHK User manual

Oasis POU1AQ Series User manual

Oasis

Oasis POU1AQ Series User manual

Oasis BAEB1SHSK User manual

Oasis

Oasis BAEB1SHSK User manual

Oasis P1PV Series Installation and maintenance instructions

Oasis

Oasis P1PV Series Installation and maintenance instructions

Oasis Osmosis Home User manual

Oasis

Oasis Osmosis Home User manual

Oasis Waterways Estetica SAET310BLES User manual

Oasis

Oasis Waterways Estetica SAET310BLES User manual

Oasis 032725-005 Installation and maintenance instructions

Oasis

Oasis 032725-005 Installation and maintenance instructions

Oasis 504818C User manual

Oasis

Oasis 504818C User manual

Oasis POU1ACTHSK Manual

Oasis

Oasis POU1ACTHSK Manual

Oasis PCPD10EBQ User manual

Oasis

Oasis PCPD10EBQ User manual

Oasis Quasar PWEBQ User manual

Oasis

Oasis Quasar PWEBQ User manual

Oasis MAXXFILL PULSE User manual

Oasis

Oasis MAXXFILL PULSE User manual

Oasis VERSACOOLERII PAC User manual

Oasis

Oasis VERSACOOLERII PAC User manual

Popular Water Dispenser manuals by other brands

IBC Water AST0715MP-960 Installation & operating instructions

IBC Water

IBC Water AST0715MP-960 Installation & operating instructions

Lancaster Water Treatment X FACTOR LX15 Series Installation, operating and service manual

Lancaster Water Treatment

Lancaster Water Treatment X FACTOR LX15 Series Installation, operating and service manual

Elkay EMABF8 Series Installation & use manual

Elkay

Elkay EMABF8 Series Installation & use manual

Monarch Water ULTIMATE MINI AQUA HE install guide

Monarch Water

Monarch Water ULTIMATE MINI AQUA HE install guide

Haier HLM-109B instruction manual

Haier

Haier HLM-109B instruction manual

GE GXOF18G Owner's manual and installation instructions

GE

GE GXOF18G Owner's manual and installation instructions

Kenmore 625.385560 UltraFilter 650 owner's manual

Kenmore

Kenmore 625.385560 UltraFilter 650 owner's manual

Aries Hydra DI Operation & maintenance manual

Aries

Aries Hydra DI Operation & maintenance manual

Avanti WD31EC instruction manual

Avanti

Avanti WD31EC instruction manual

GE GNCF02H owner's manual

GE

GE GNCF02H owner's manual

Avanti WD360 instruction manual

Avanti

Avanti WD360 instruction manual

ProFlo PFB Series Installation & operation manual

ProFlo

ProFlo PFB Series Installation & operation manual

Frakco Travelsoft RV 2400HD Operation instructions

Frakco

Frakco Travelsoft RV 2400HD Operation instructions

Aqua Essentials Borg & Overström B4 user guide

Aqua Essentials

Aqua Essentials Borg & Overström B4 user guide

KENT 11063 Instruction handbook

KENT

KENT 11063 Instruction handbook

Calmat Plus user manual

Calmat

Calmat Plus user manual

Igloo MWC529 instruction manual

Igloo

Igloo MWC529 instruction manual

Electrolux EQALF01TXSP user manual

Electrolux

Electrolux EQALF01TXSP user manual

manuals.online logo
manuals.online logoBrands
  • About & Mission
  • Contact us
  • Privacy Policy
  • Terms and Conditions

Copyright 2025 Manuals.Online. All Rights Reserved.

INSTALLATION &
SERVICE INSTRUCTIONS
B_1RREC / B_1RREC
POU_1EC / POU_1RREC
Series Coolers
BEFORE YOU START USING THIS WATER COOLER PLEASE READ THE FOLLOWING
INSTRUCTION VERY CARREFULLY.
WARNINGS:
- THIS APPLIANCE IS NOT INTENDED FOR USE BY PERSONS (INCLUDING CHILDREN)
WITH REDUCED PHYSICAL, SENSORY OR MENTAL CAPABILITIES, OR LACK OF
EXPERIENCE AND KNOWLEDGE, UNLESS THEY HAVE BEEN GIVEN SUPERVISION OR
INSTRUCTION CONCERNING USE OF THE APPLIANCE BY THE PERSON RESPONSIBLE
FOR THEIR SAFETY
- CHILDREN SHOULD BE SUPERVISED TO ENSURE THAT THEY DO NOT PLAY WITH THE
APPLIANCE
- IF THE SUPPLY CORD IS DAMAGED, IT MUST BE REPLACED BY A SPECIAL CORD OR
ASSEMBLY AVAILABLE FROM THE MANUFACTURER OR ITS SERVICE AGENT
-THIS APPLIANCE MUST BE EARTHED
Contents:
•Technical Specification
•Pre-Delivery Inspection
•Filter Installation
•Installing the OASIS green filter system
•Cooler Installation
•General Troubleshooting Guidelines
•Accessing the Internal Chassis
•Cleaning and Sanitizing Instructions
Technical Specification:
•Product Dimensions
oHeight: 1125mm
oWidth: 318mm
oDepth: 405mm
oNet Weight:
30,5 kg Cold, Hot and Carbo model
•Electrical Specification
Model B_1RRKY
POU_1RRKY
B_1RRECKY
POU_1RRECKY
B_1RRECHSY
POU_1RRECHSY
B_RRHSY
POU_1RRHSY
Voltage 220 - 240V
50/60Hz 220 - 240V 50/60Hz 220 - 240V
50/60Hz
220 - 240V
50/60Hz
Current 0.8 A 1.2 A 2.8 A 2.4 A
Power 95 Watts 95 Watts 520 Watts 520 Watts
E – Electronic
X - Mechanical
B_1RREC / POU_1RREC Series
Installation & Service Instructions
030099-499 RevOrig pg 3 of 22 © Copyright 2014 OASIS Europe
•Wiring Diagram
•Models:
•BXRRHSY, POUX1RRHSY, BX1RRKY, POUX1RRKY
B_1RREC / POU_1RREC Series
Installation & Service Instructions
030099-499 RevOrig pg 4 of 22 © Copyright 2014 OASIS Europe
Models:
BE1RRECHSY EUR PC, BE1RRECKY EUR PC, POUE1RRECHSY EUR PC, POUE1RRECKY EUR PC,
B_1RREC / POU_1RREC Series
Installation & Service Instructions
030099-499 RevOrig pg 5 of 22 © Copyright 2014 OASIS Europe
Modele:
BX1RRECHSY EUR PC, BX1RRECKY EUR PC , POUX1RRECHSY EUR PC , POUX1RRECKY EUR
B_1RREC / POU_1RREC Series
Installation & Service Instructions
030099-499 RevOrig pg 6 of 22 © Copyright 2014 OASIS Europe
Modele:
BE1RRHSY EUR PC, BE1RRKY EUR PC, POUE1RRHSY EUR PC, POUE1RRKY EUR PC
B_1RREC / POU_1RREC Series
Installation & Service Instructions
030099-499 RevOrig pg 7 of 22 © Copyright 2014 OASIS Europe
General Information
•The B_1RREC & POU_1RREC Series coolers are designed for use with a supply of potable
water. The cooler should not be used with water supplies of unknown bacterial quality or those
that are not already fit for human consumption. The machine should only be used with a potable
drinking water supply.
•This unit is suitable for indoor use in domestic, commercial & industrial locations. They should
not be sited in locations where they may be subjected to rain or snow.
Cooling System
•This cooler is designed with a removable reservoir. The reservoir can be replaced with a
sanitised unit during routine maintenance services.
•The cold water temperature is preset at the factory at approximately 4°C (39°F) – the water
temperature is controlled by a thermostat that is located on the back of the unit. Cold water
temperatures may be adjusted via a slotted screw on the body of the control (can be accessed
through the hole in the metal finger plate on the back of the unit.). Turning this screw in the
clockwise direction will make the water colder (and vice versa).
Hot Water System
•The hot water temperature is preset at the factory at approximately 88°C (190°F) – the water
temperature is controlled by a thermostat that is located on the hot tank. Hot water temperatures
may be adjusted depending on the hot tank model.
Carbonated Water Circuit
•The carbonation level of the water is based on coldness of the water and pressure of the CO2
bottle, & the setting of the flow regulator. The carbonation level in the water can be increased by
either raising the CO2 pressure (which is adjustable in some models) or reducing the
temperature of the CO2 water, or adjusting the flow regulator (which is accessible through the
right side panel)
•Purging of the CO2 circuit is necessary at initial start up & after sanitization of the reservoir.
The purge button is located on the left side panel
Ambient Water Circuit
•The water in the ambient water circuit is not cooled - the temperature of the water will be the
same as the temperature of the water that comes out of the BOTTLE / building water supply and
B_1RREC / POU_1RREC Series
Installation & Service Instructions
030099-499 RevOrig pg 8 of 22 © Copyright 2014 OASIS Europe
the ambient room temperature. The ambient water should be flushed after long periods of non
use.
Compressor
•The compressor uses the hydrofluorocarbon refrigerant R134a which is a non-Ozone depleting
substance with a Global Warming Potential of 1,300. The compressor is controlled by an
electromechanical thermostat that controls the temperature of the water in the Reservoir.
•The compressor is equipped with an automatic reset protector that disconnects the motor from
the line in case of an overload.
•This unit is equipped with a sealed compressor that requires no additional lubrication.
Water Pipe and Fittings
•The entire internal water circuit and all the components which come in contact with water are
made from food grade approved material
Mounting Feet
•The unit is supplied with 4 mounting feet which can be used to level the cooler on uneven
surfaces.
Maintenance
•Periodically remove dirt and lint from the condenser. Inspection should be done every three
months. If cleaning is required, disconnect the power supply cord, and then clean the condenser
with a small stiff non-wire brush. Following this procedure will ensure adequate air circulation
through the condenser for efficient and economical operation.
NOTE: Under no circumstances should the cabinetry be cleaned using a water jet
•WaterGuard helps prevent foreign matter from entering the cooling tank. Its parts should be
inspected, cleaned and replaced (if necessary) at regular intervals. Operation of the cooler
without WaterGuard components in place may allow airborne dust particles to enter the cooling
tank.
•Cleaning of water contact components
oThe European Bottled Water Association recommends that water contact parts should be
cleaned and sanitised every 3 months. It is recommended that this process is carried out
by trained personnel
Water Valves:
•Control of water dispensing is achieved by means of DC electrical solenoid valves. TWO or
FOUR valves are used depending on the model – one for cold water (24Vdc), one for hot water
or ambient water (24Vdc), TWO for carbonated water (24Vdc).
Panels:
•All external molded panels are made from ABS plastic. The material used is UV resistant and
meets all CE and UL requirements for fire safety. All metal panels are made from galvanized
steel which is then painted. The galvanized coating provides increased resistance to rust and
corrosion.
B_1RREC / POU_1RREC Series
Installation & Service Instructions
030099-499 RevOrig pg 9 of 22 © Copyright 2014 OASIS Europe
CO2 bottle location
•CO2 bottle can be located in the filter compartment. To gain access to filter compartment see
relevant section in this manual. A base and Velcro strap are supplied to secure the bottle at the
installation site. Do not transport cooler with the CO2 bottle inside the filter compartment as this
could damage the cooler. The total max height of CO2 bottle that can be fitted inside the
compartment is 440mm The max diameter of the CO2 bottle is 160mm.
•Larger CO2 bottles must be installed away from the cooler
CO2 bottle regulator
•A CO2 regulator may be supplied with the cooler depending on model. This is located inside the
filter compartment
•CO2 regulators may be adjustable depending on model
•CO2 regulators may differ depending on region
Spare Parts
•Oasis International supplies spare parts for all of its watercoolers. For European service, please
check the OASIS web-site at www.oasis.ie for full illustrated parts breakdowns that give full
details of all replacement parts. For service from the United States, refer to the OASIS
International web-site www.oasiscoolers.com
Pre-Delivery Inspection:
1. Examine the packaging for signs of damage – report any damage to the carrier.
2. Remove the carton from the cooler – cut the tape and lift the carton from the cooler. Store the carton
and foam packaging for repacking the cooler prior to shipping it to the customer.
3. Remove the shipping bag from the cooler
4. Carry out a general inspection of the cooler, ensuring that :
a) There are no marks or physical damage to the cooler
b) All accessories are present
c) All wires and electrical connections are in place at the back of the cooler
d) All tubes and water connections are in place
B_1RREC / POU_1RREC Series
Installation & Service Instructions
030099-499 RevOrig pg 10 of 22 © Copyright 2014 OASIS Europe
e) That the cooler is clean and dust free
5. Install your filtration system (see relevant section in this manual)
6. Replace the shipping bag over the water cooler
7. Replace the carton over the top of the cooler and tape ends
8. The cooler is now ready for transportation to the customer’s premises
NOTE: Whenever you transport the cooler to or from your premises, you should ensure that a
shipping bag is placed over the cooler. This will prevent damage to the cabinet caused by coolers
rubbing against one another in the back of the truck or van.
Filter Installation:
The B_1RREC & POU_1RREC series coolers contain a large filter compartment that can be directly
accessed from the front of the unit.
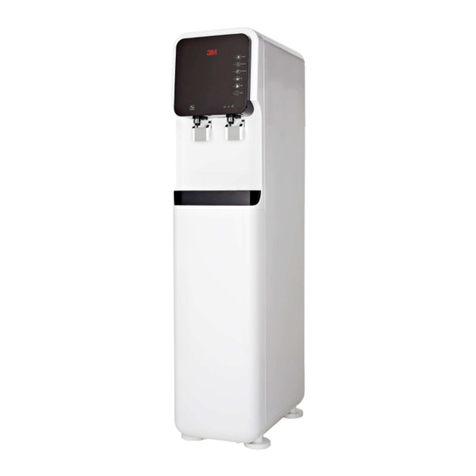
Accessing Filter Compartment
•Lift out and remove the drip tray
•Depress the clip visible through the slot in the alcove and lean the top of the door forward
•Remove the door from the cooler
•The POU water supply tube is now visible on the left hand side of the filter compartment