OBaby zeal User manual

Sign Up
PLEASE READ THESE INSTRUCTIONS
CAREFULLY BEFORE USING THIS PRODUCT
IMPORTANT
KEEP FOR FUTURE REFERENCE
Stroller Instructions

Safety Warnings Getting to know your Stroller
Hood
Secondary release
lock
Front swivel
wheel levers
Shopping
basket
Harness
Storage clip
Cup holder
Primary release
locks
Brake levers
Backrest release
Thank you for choosing Obaby. This stroller conforms to EN 1888:2012. To ensure that
your stroller is used in accordance with these instructions, please read them fully.
Your child’s safety may be affected if you do not follow these
instructions.
WARNING: A childs safety is your responsibility
WARNING: Ensure that all locking devices are engaged before use
WARNING: Never leave your child unattended
WARNING: To avoid injury ensure that your child is kept away when
unfolding and folding this product
WARNING: Do not let your child play with this product
WARNING: Always use the restraint system
WARNING: This product is not suitable for running or skating
WARNING: Any load attached to the handles will affect the stability
of the pram / pushchair
• A basket is provided for the carriage of other items up to a maximum
permissible weight of 3 kg. Where a hood parent pocket is provided,
an additional 1kg maximum permissible weight can be used within this
• This stroller is intended to carry one child from birth and up to a
maximum weight of 15kg
ROUTINE CARE & MAINTENANCE
- This stroller requires regular maintenance by the user
- It may be unsafe to use replacement parts or accessories e.g. child
seats, bag hooks, rain covers, etc, other than those approved by the
manufacturer or distributor.
- For cleaning, use only a mild detergent and warm water
- DO NOT USE BLEACH
- DO NOT USE any abrasive substances
- From time to time, check your stroller for loose screws, worn parts,
torn material or stitching. Replace or adjust the parts as needed.
Due to constant updating and improvements, some components may occasionally differ slightly from the images
shown in these instructions. We reserve the rights to change the specications of any products without prior notice.
If you need any assistance please contact your Obaby retailer from whom you purchased your product, who will take
appropriate action.
2 3
www.obaby.co.uk www.obaby.co.uk

Opening your Stroller
To open your stroller release the storage clip on the side of the stroller (g.1 & 2).
Lift the handles away from the wheels (g.3).
Using your foot push down on at the back of the stroller (g.4). Ensure the lock clicks
into place (g.5).
Folding your Stroller
Before attempting to fold your stroller
- The front wheels should be locked in place
- The basket and seat unit should be empty
- The hood should be folded
- The seat should be fully upright
To fold the stroller, release the primary lock, at the back of the stroller by lifting and
pulling up on the handle at the back of the stroller (g.7 & 8).
Next, using your foot press down on the secondary lock at the right hand side of the
stroller (g.9). Then push the handles forwards and down towards the front wheels
(g.10), until completely folded (g.11). Engage the storage clip onto the front leg of
the chassis (g.12).
g. 1
g. 4 g. 10g. 5 g. 11
g. 7
g. 2
g. 6 g. 12
g. 8
g. 3 g. 9
Lift
Lift
Press
Press
Lift
“Click”
X
X
X
WARNING: Ensure that all locking devices are engaged before use
45
www.obaby.co.uk www.obaby.co.uk

Fitting and Removing the Front Wheels
g. 13 g. 14 g. 15
Using the Front Swivel Wheels
To lock the swivel wheels, rst ensure the front wheels are facing forward inline with the
chassis, then lift the lever up (g.16).
To put the wheels in swivel mode, push the lever down on the front of each front wheel
(g.17 & 18).
g. 16 g. 17 g. 18
Adjusting the Backrest
Applying the Brakes
Lock
Release
Release
Lock
To t the front wheels, push the wheels onto the front legs until they click into place.
To Remove, squeeze both clips together whilst pulling the wheel off the leg.
g. 19 g. 20 g. 21
“Click”
g. 22 g. 22a g. 23
Squeeze
To recline the backrest, squeeze together both levers and lower backrest to the desired
height (g.22).
To put upright, simply push the backrest to the desired height (g.23).
To lock the brakes fully, push down on each brake lever using your foot (g.19).
To release the brakes, lift each brake lever using your foot (g.20).
Apply the brake before putting your child into the pushchair.
Apply the brake when the pushchair is stationary.
6 7
www.obaby.co.uk www.obaby.co.uk

Fitting and Removing the Hood
Adjusting the Hood
g. 24
g. 27
g. 29a
g. 25
g. 28
g. 29b
g. 26
g. 29
g. 29c
To open or close the hood, pull or push the hood as shown above. (g.27-28).
To open the visor, simply pull out from inside the hood (g.29)
To extend the hood, rst unzip the rst section of the hood (g.29a). Then pull hood
forward and down until fully extended (g.29b-29c). To close do the reverse.
g. 30
g. 33
g. 31
g. 34
g. 32
g. 35
g. A
Using the Harness
Press
‘D’ Ring
To t the hood, place the hood on the chassis, inline with the seat unit. Clip the hood
into each side of the chassis (g.24). Attach using hook and loop tape around chassis
(g.25). To remove the hood, press to release the clips (g.26).
Waist
Strap
Crotch
Strap
Shoulder
Strap
Clasp
Harness
Positions
Lower
Inner
Inner
Outer
Outer
Outer
Upper
To fasten the harness, clip each chest strap onto the waist
strap (g.30) and insert both fasteners on the waist strap
into the clasp on the crotch strap (g.31 & 32).
To release the harness, press the centre of harness clasp
(g.33).
Adjust the harness length using the buckles on each strap
(g.34).
‘D’ Ring
The ‘D’ rings highlighted are provided for tting a separate
harness complying with BS 6684 (g.35).
When using the safety harness from birth, it may be necessary to use the lower holes for
the shoulder strap and the inner holes for the waist straps and crotch strap.
Higher holes for the shoulder strap and outer holes for the waist straps and crotch strap
should be used when your child is of a suitable size. (See g.A)
WARNING: Always use the crotch strap in combination with
the waist belt
89
www.obaby.co.uk www.obaby.co.uk

g. 36 g. 42
g. 44
g. 39
g. 37 g. 43
g. 45
g. 40
g. 38
Adjusting the Calf Rest
To adjust the calf rest press the levers either side of the seat and lift or lower to the
correct position (g.36-38).
To reverse the liner use the zips provided. Flip over liner and re-attach using both zips.
(g.42-43).
To t the cup holder, locate holder over xing on frame and slide down.To remove do the
reverse of the above. The cup holder can be tted to either side of the frame.
(g.39-40).
Press
10 11
www.obaby.co.uk www.obaby.co.uk
Cup holder
Reversible Footmuff

Sign Up
OPTIONAL
PLEASE READ THESE INSTRUCTIONS
CAREFULLY BEFORE USING THIS PRODUCT
IMPORTANT
KEEP FOR FUTURE REFERENCE
Carrycot Instructions
12
www.obaby.co.uk
g. 46 g. 47 g. 48
Fitting the Raincover
To t the raincover, place the raincover over the handles of the stroller and allow the
raincover to drape over the front of the stroller. (g.46)
Secure in place using the hook and loop straps onto the front legs of the stroller
(g.47 & 48).
WARNING: When using the raincover, regularly check your child has adequate
ventilation and is not overheating.
Unless it is raining, the raincover should be removed.

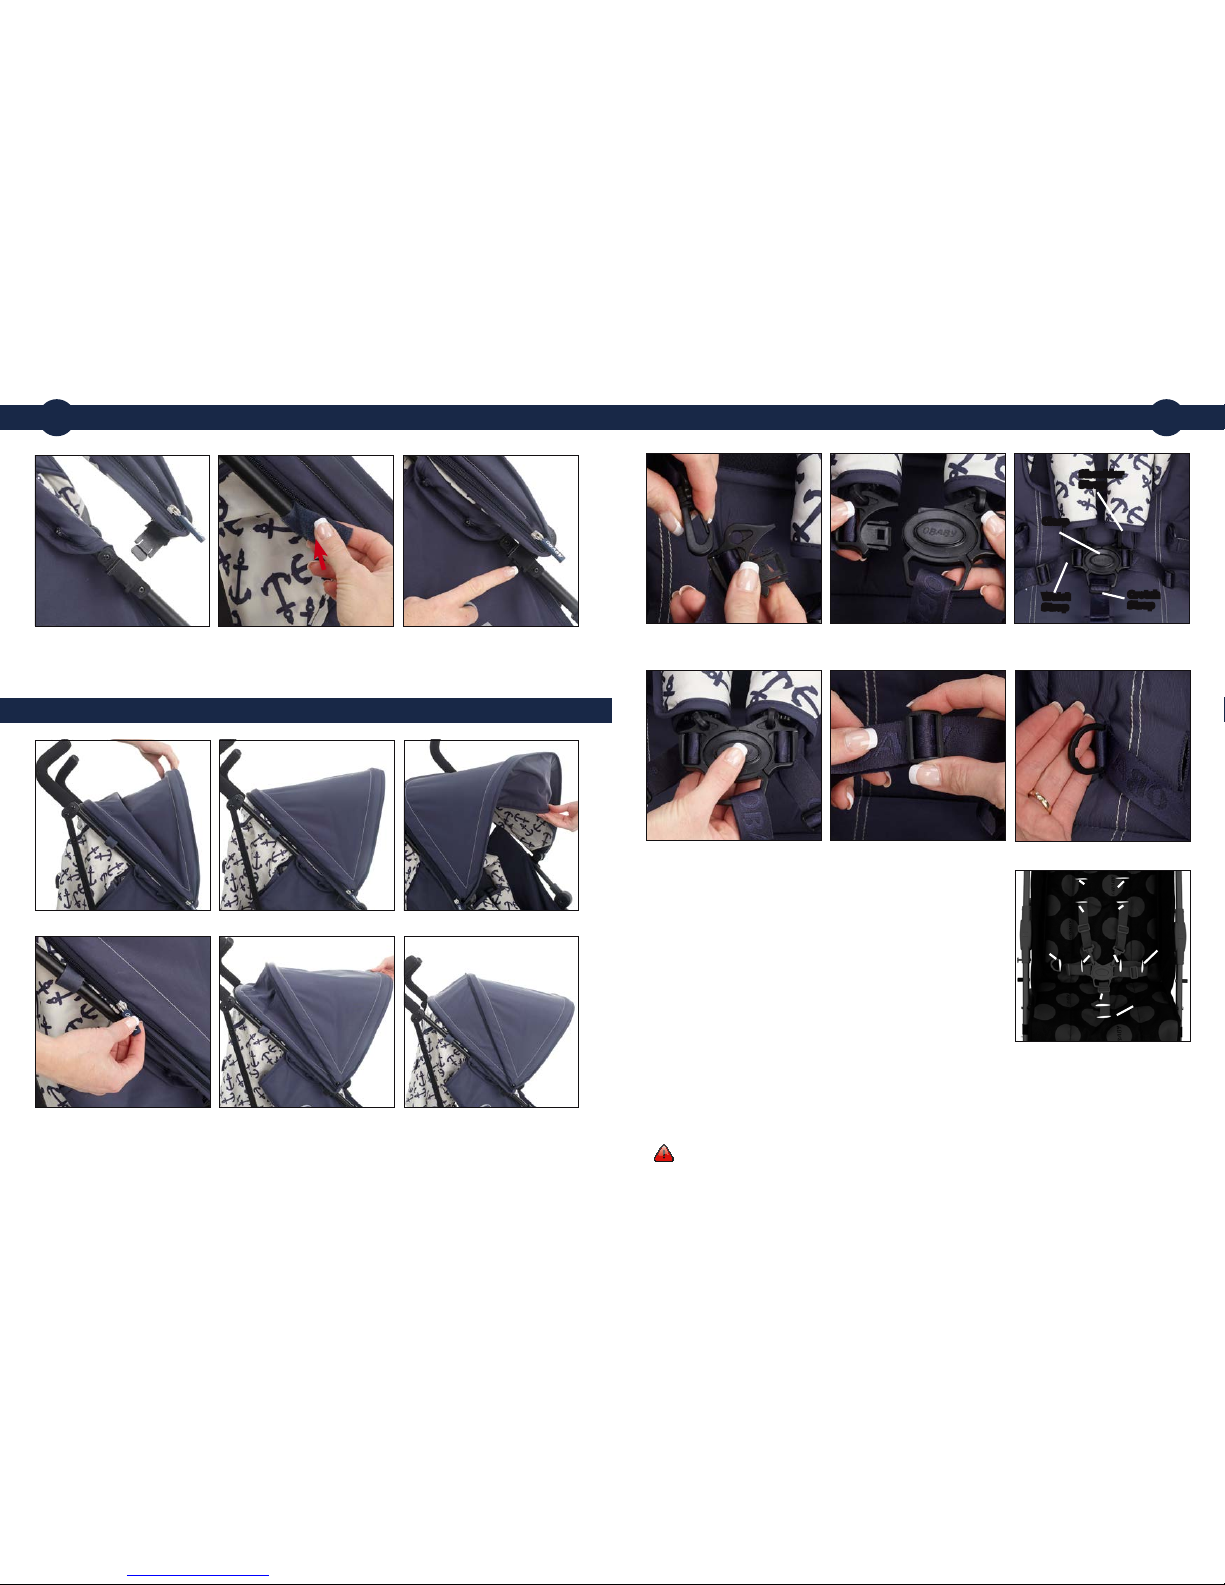
Getting to know your Carrycot
Apron
Top insert
Bottom insert
Apron
Side inserts
Left Right
Wedge
End support rods
Carrycot shell
Wedge
Carry handle
Chassis clasp
Chassis press stud
Safety Warnings
Thank you for choosing Obaby. This carrycot conforms to BSEN 1466:2014.
To ensure that your carrycot is used in accordance with these instructions, please read
them fully.
Your child’s safety may be affected if you do not follow these
instructions.
WARNING: This product is not suitable for a child who can sit up
unaided
WARNING: Do not let other children play unattended near the
carrycot
WARNING: Do not use if any part is broken, torn or missing
WARNING: Do not leave your child unattended
WARNING: Never use the carrycot on a stand
WARNING: Do not add a mattress thicker than 30mm
WARNING: Do not use this product as a bed, your child may become
tangled in straps and suffocate.
WARNING: Check that the carrycot is correctly engaged before use
• Use only on a rm, horizontal level and dry surface
• Be aware of the risk of open re and other source of strong heat, such
as electric bar res, gas res, etc., in the near vicinity of the carrycot
• The carrycot, including handle and bottom, should be inspected
regularly for signs of damage and wear
ROUTINE CARE & MAINTENANCE
- This stroller requires regular maintenance by the user
- It may be unsafe to use replacement parts or accessories e.g. child
seats, bag hooks, rain covers, etc, other than those approved by the
manufacturer or distributor.
- For cleaning, use only a mild detergent and warm water
- DO NOT USE BLEACH
- DO NOT USE any abrasive substances
- From time to time, check your carrycot for loose screws, worn parts,
torn material or stitching. Replace or adjust the parts as needed.
Due to constant updating and improvements, some components may occasionally differ slightly from the images
shown in these instructions. We reserve the rights to change the specications of any products without prior notice.
If you need any assistance please contact your Obaby retailer from whom you purchased your product, who will take
appropriate action.
14 15
www.obaby.co.uk www.obaby.co.uk

g. 49
g. 52
g. 55
g. 50
g. 53
g. 56
g. 51
g. 54
g. 57
Assembling the carrycot
To assemble the carrycot, rst unzip the three zips on the outer sides of the carrycot.
(g.49).
Then insert the two side boards on the left and right of the carrycot, ensure the wider
end of the board is towards the head of the carrycot and the chassis clasp is on the
outside (g.50 & 51).
Feed the chassis clasp straps through the slot in the fabric (g.52).
Insert the top board (note: this is the larger of the two boards) in the slot at the head of
the carrycot (g.53).
Insert the bottom board (note: this is the smaller of the two boards) in the slot at the
foot of the carrycot (g.54).
Then insert the rods into both the head and the foot of the carrycot (g.55). Be sure to
feed the rods into the pocket at either side of the carrycot (g.56). Secure the rods in
place with the hook and loop tape (g.57).
Zip up the three zips (g.49).
g. 58 g. 59 g. 60
Attach the apron to the carrycot shell using the zip (g.58). Secure the top of the apron
in place with the hook and loop tape and press stud on either side (g.59 & 60).
16 17
www.obaby.co.uk www.obaby.co.uk
Assembling the carrycot
Using the apron

g. 61
g. 64
g. 67
g. 70
g. 62
g. 65
g. 68
g. 71
g. 63
g. 66
g. 69
g. 72
Fitting the carrycot
Before tting the carrycot to the chassis, rst attach the wedge to the underside of the
carrycot (g.61-63).
Then on the stroller, fully recline the backrest (see page 7) and reverse the hood
(g.64-66). - See page 8 (g.24 & 26) for how to t and remove the hood.
Lower the carrycot on to the chassis (g.67).
Secure in place by rst attaching the press studs, at the foot of the carrycot to the
chassis. Feed the press studs through the slot in the seat fabric (g.68) and attach to
the chassis in place of the seat strap press studs (g.69).
Then secure the head of the carrycot using the straps. Feed the straps around the chassis
then clip the clasp together (g.70). Pull the strap tight (g.71).
g. 73 g. 74 g. 75
1918
www.obaby.co.uk
Assembling the carrycot
Using the raincover
To t the raincover, place the raincover over the handles of the stroller and allow the
raincover to drape over the front of the stroller. (g.73)
Secure in place using the hook and loop straps onto the front legs of the stroller
(g.74 & 75).
WARNING: When using the raincover, regularly check your child has adequate
ventilation and is not overheating.
Unless it is raining, the raincover should be removed.

Sign Up
OPTIONAL
Car seat
adaptors
Car seat
release buttons
Car seat
adaptor release
For safety warnings, care and maintenance please refer to the instruction manual
provided with your car seat.
Getting to know your Travel System
PLEASE READ THESE INSTRUCTIONS
CAREFULLY BEFORE USING THIS PRODUCT
IMPORTANT
KEEP FOR FUTURE REFERENCE
Travel System Instructions
21
www.obaby.co.uk

Fitting the Car Seat on the chassis
To put the car seat onto the chassis, rst fully recline the backrest on the stroller
(see page 7).
Then t the car seat adaptors to the chassis, ensure the release levers are towards
the front wheels and locate the securing lever over the peg on the chassis (see arrow)
(g.76). Clip into place with the lever (g.77).
Lower the car seat onto the adaptors (g.78), ensure it clicks into place on both sides
(g.79).
To remove the car seat from the chassis, either press the release buttons on either side
of the car seat and lift the car seat up, away from the adaptors (g.80-81), or remove
the car seat adaptors from the chassis (g.77) and lift the car seat and adaptors up,
away from the chassis.
g. 76
g. 79
g. 77
g. 80
g. 78
g. 81
“Click”
“Click”
Lift
Lower
WARNING: Ensure that all locking devices are engaged before use
2322
www.obaby.co.uk
www.obaby.co.uk

Table of contents
Other OBaby Stroller manuals

OBaby
OBaby Condor 4s User manual

OBaby
OBaby Disney Winnie The Pooh Buggy User manual

OBaby
OBaby Tour User manual

OBaby
OBaby Atlas V2 Stripe User manual

OBaby
OBaby ZeZu Multi Tandem User manual

OBaby
OBaby Atlas Plus User manual

OBaby
OBaby Minnie Circles User manual

OBaby
OBaby Triple User manual

OBaby
OBaby Zoma 4 Wheeler User manual

OBaby
OBaby Aura User manual

OBaby
OBaby Chase 4 Wheeler Pramette User manual

OBaby
OBaby Apollo Plus User manual

OBaby
OBaby Apollo User manual

OBaby
OBaby Cobra User manual

OBaby
OBaby Tiny Tatty Teddy User manual

OBaby
OBaby Smiling Mickey Edge User manual

OBaby
OBaby Atlas Vintage User manual

OBaby
OBaby Atlas V2 User manual

OBaby
OBaby ZeZu Pramette User manual

OBaby
OBaby Monty User manual