DE
TrayFix-10-S, TrayFix-10-L, TrayFix-16-S, TrayFix-16-L
Produktbeschreibung
Rinnenbefestigungsset
für die Montage von Gitterrinnen
und Kabelrinnen
z. B. auf Flach dächern (mögliche
Rinnentypen: siehe Technische Daten). Geeignet für
Windlasten nach Eurocode 1: DIN EN 1991-1-4.
Bild :
Befestigungsstopfen
Klemmstück
FangFix-Stein
Kantenschutz für FangFix-Stein
Allgemeine Sicherheitshinweise
– Vor der Montage die Windlast gemäß Eurocode 1: DIN EN
1991-1-4 berechnen und das System entsprechend auslegen.
– Bei der Montage von TrayFix können Hände und andere
Gliedmaßen gequetscht werden. Handschutz und Sicher-
heitsschuhe tragen.
– Montage nicht bei Gewitter durchführen.
TrayFix montieren
ACHTUNG Beschädigungsgefahr!
Je nach Untergrund können FangFix-Steine, zu
Beschädigungen am Untergrund führen. Bautenschutz-
matten unter FangFix-Steinen auslegen.
Gitter- bzw. Kabelrinne mit Klemmstück und Befestigungs-
stopfen z. B. mit einem Hammer auf FangFix-Stein befes-
tigen.
Maximale Stützabstände einhalten (s. Belastungsdiagramm
der verwendeten Rinnentypen gemäß Planerkatalog)!
Maximale Rinnenbreiten (siehe Technische Daten) einhal-
ten. Bei breiteren Rinnen zwei Steine nebeneinander oder
versetzt verwenden.
Deckel montieren (Optional)
WARNUNG Erhöhte Windlast!
Der Einsatz von Deckeln auf Gitter- und Kabelrinnen
kann die Windlasten erhöhen. Den Einsatz von Deckeln
bei der Berechnung der Windlast gemäß Eurocode 1:
DIN EN 1991-1-4 berücksichtigen.
Deckel auf Gitter- bzw. Kabelrinne montieren.
EN
TrayFix-10-S, TrayFix-10-L, TrayFix-16-S, TrayFix-16-L
Product description
Tray fastening set
for mounting mesh cable trays
and
cable trays
, e.g. on flat roofs (possible tray types: see
„Technical data“). Suitable for wind loads according to
Eurocode 1: DIN EN 1991-1-4.
Figure :
Fastening plug
Clamping piece
FangFix block
Edge protection for FangFix block
General safety information
– Before installation, calculate the wind load according to Eu-
rocode 1: DIN EN 1991-1-4 and design the system according-
ly.
– When installing the TrayFix, hands and other limbs may be
crushed. Wear hand protection and safety shoes.
– Do not carry out mounting work during a storm.
Mounting the TrayFix
ATTENTION Risk of damage!
FangFix blocks can cause damage to the substrate,
depending on the type of the substrate. Lay protective
mats under FangFix blocks.
With a clamping piece and fastening plug, fasten the
(mesh) cable tray to the FangFix block, e.g. using a ham-
mer.
Observe the maximum support spacings (see load diagrams
of the tray types used, according to the planner catalogue)!
Maintain the maximum tray widths (see „Technical data“).
In the case of wider trays, use two blocks next to each
other or offset.
Mounting the cover (optional)
WARNING Increased wind load!
Using covers on mesh cable trays and cable trays can
increase the wind load. Take the use of covers into
account when calculating the wind load according to
Eurocode 1: DIN EN 1991-1-4.
Mount the cover on the mesh cable tray or cable tray.
ES
TrayFix-10-S, TrayFix-10-L, TrayFix-16-S, TrayFix-16-L
Descripción del producto
Juego de fijación
para el montaje de bandejas de rejilla
y bandejas portacables
p. ej. en cubiertas planas (tipos de
bandejas posibles: véanse los datos técnicos). Apropiado
para cargas de viento según el Eurocódigo 1: DIN EN
1991-1-4.
Imagen :
Tapón de fijación
Fijación a pared y central
Bloque de hormigón FangFix
Cantonera para el bloque de hormigón FangFix
Indicaciones generales de seguridad
– Antes del montaje calcule la carga de viento según el Euro-
código 1: DIN EN 1991-1-4 y diseñe el sistema de forma co-
rrespondiente.
– Durante el montaje de TrayFix pueden quedar aplastadas
las manos y las extremidades. Lleve protección de manos y
zapatos de seguridad
– No realice el montaje durante una tormenta.
Montaje de TrayFix
ATENCIÓN ¡Peligro, riesgo de dañar componentes!
Dependiendo de la superficie, los bloques de hormigón
FangFix pueden ocasionar daños en ella. Coloque
esteras debajo de los bloques de hormigón FangFix.
Fije la bandeja de rejilla o la bandeja portacables al blo-
que de hormigón FangFix con la pieza de sujeción y el
tapón de fijación utilizando, p. ej., un martillo.
¡Respete las distancias máximas entre soportes (véase el
diagrama de carga de los tipos de bandejas utilizadas según
el catálogo de proyectistas)!
Respete las anchuras máximas de bandeja (véanse los
datos técnicos). En caso de que las bandejas sea más
anchas, ponga dos bloques de hormigón uno al lado de
otro o de forma escalonada.
Montaje de la tapa (opcional)
ADVERTENCIA ¡Carga de viento elevada!
El uso de tapas en las bandejas portacables o bandejas
de rejilla puede aumentar la carga del viento. Tenga en
cuenta el uso de tapas al calcular la carga de viento
según el Eurocódigo 1: DIN EN 1991-1-4.
Monte la tapa en la bandeja de rejilla o en la bandeja por-
tacables.
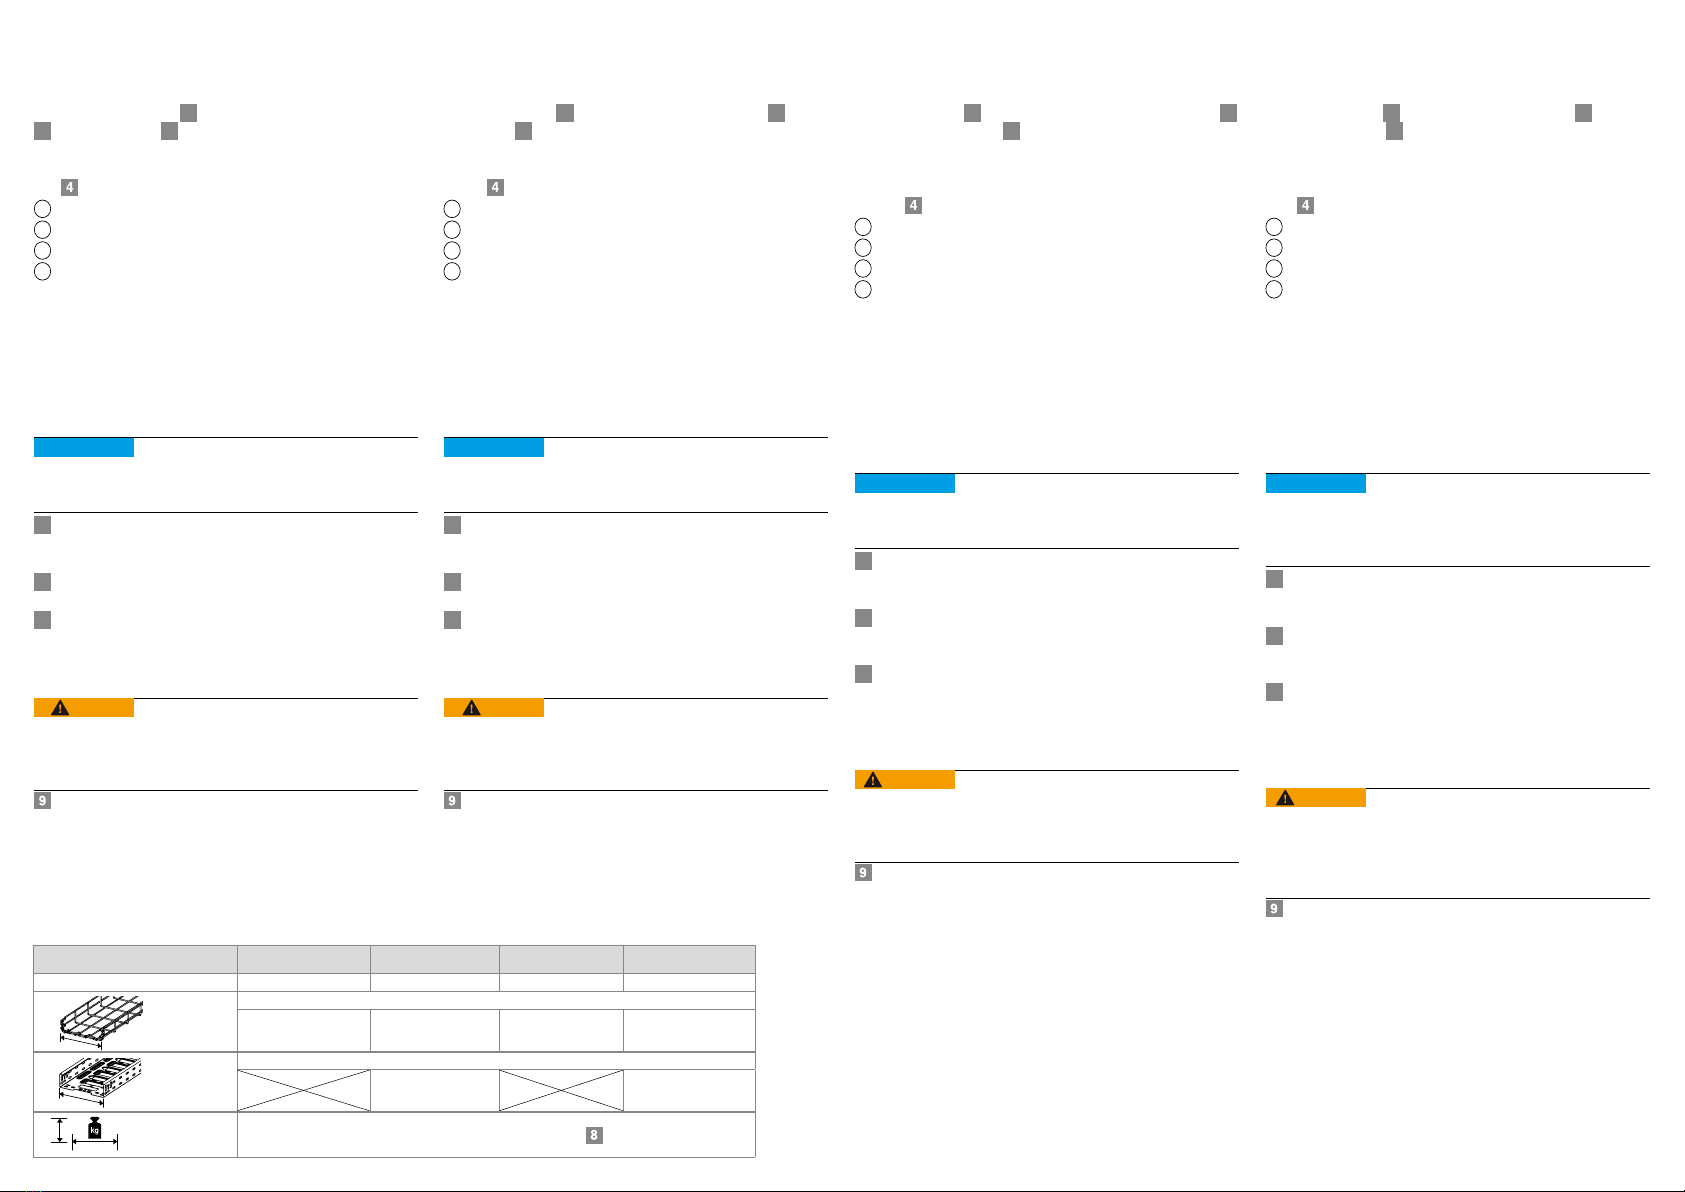
Technische Daten / Technical data / Datos técnicos / Технические характеристики
TrayFix-10-S TrayFix-10-L TrayFix-16-S TrayFix-16-L
Art.-Nr. / item no. 5403102 5403101 5403099 5403098
GRM
100 - 400 mm 100 - 400 mm 100 - 600 mm 100 - 600 mm
MKSM, SKSM, IKSM
100 - 400 mm 100 - 600 mm
Bild / figure / Imagen / Рис.
RU
TrayFix-10-S, TrayFix-10-L, TrayFix-16-S, TrayFix-16-L
Описание продукта
Набор креплений
для монтажа решетчатых
и
кабельных лотков
, например на плоских крышах
(возможные типы лотков: см. «Технические характеристи-
ки»). Подходит для зон ветровой нагрузки согласно
Еврокоду 1: DIN EN 1991-1-4.
Рис. :
Крепежная заглушка
Зажим
Шайба FangFix
Кольцо для защиты кромок шайбы FangFix
Общие правила техники безопасности
– Перед монтажом рассчитайте ветровую нагрузку со-
гласно Еврокоду 1: DIN EN 1991-1-4 и спроектируйте си-
стему соответствующим образом.
– При монтаже TrayFix возможно защемление рук и дру-
гих конечностей. Носите защитные рукавицы и защитную
обувь.
– Запрещается проводить монтаж в грозу.
Монтаж TrayFix
ВНИМАНИЕ! Опасность повреждения!
Использование шайб FangFix может привести к
повреждению основания, на которое шайбы
опираются. Используйте защитную подложку под
шайбы FangFix.
Закрепите решетчатые и кабельные лотки с зажимом
и крепежной заглушкой на шайбе FangFix, например,
при помощи молотка.
Соблюдайте максимальные опорные расстояния (см.
диаграмму нагрузки для используемых типов лотков со-
гласно каталогу проектировщика)!
Выдерживайте максимальную ширину для лотков (см.
технические данные). При установке более широких
лотков используйте две шайбы рядом друг с другом
или со сдвигом.
Монтаж крышки (опция)
ОСТОРОЖНО Повышенная ветровая нагрузка!
Использование крышек на решетчатых и кабельных
лотках может повысить ветровые нагрузки.
Учитывайте применение крышек при расчете
ветровой нагрузки согласно Еврокоду 1:
DIN EN 1991-1-4.
Установите крышку на решетчатый или кабельный ло-
ток.


