Ocean Reef GSM User manual


WARNINGS, CAUTIONS, NOTES
Pay special attention that is accompanied by these symbols:
AWARNING indicates a procedure or situation that, if not avoided,
could result in serious injury or death to the user.
ACAUTION indicates any situation or technique that could cause
damage to the product, and could subsequently result in injury to the
user.
ANOTE is used to emphasize important points, tips, and reminders.

Rel 8.1. October 2009
OCEAN REEF
GSMTM - GSM DCTM - GSM DATTM - M101A
OWNER’S MANUAL
INDEX
Chapter 1 Introduction
Chapter 2 Description of the GSMs and M-101A Units
Chapter 3 Attaching the GSMs to a Full face Mask or
Integrated System
Chapter 4 Installing the battery
Chapter 5 Checking before use
Chapter 6 Basic Instructions
Chapter 7 Instructions for underwater communication
Chapter 8 Precautions
Chapter 9 Guarantee
Chapter 10 Technical Characteristics
IMPORTANT INFORMATION
Congratulations on purchasing an Ocean REEF underwater com unit.
This manual contains the instructions for the entire unit’s functions as well
as warnings in relation to using the OCEAN REEF GSMs / M101A
underwater communication system. These must be read carefully before
using the equipment.
WARNING!
Continue to breathe while surfacing from a dive even if you are
listening to the communications unit. Lung expansion injuries may result if
you ascend while holding your breath. DO NOT STOP BREATHING
WHILE SURFACING FROM A DIVE.
If you are going to speak while diving you should take in a larger than
normal breath. ALWAYS MONITOR YOUR PRESSURE GAUGE.
Before attempting to use this device in open water you must practice using
the unit in confined water (such as a pool).
Chapter 1
INTRODUCTION
The Ocean REEF communication system is lightweight and compact. The
frequency it uses is compatible with other communication systems on the
market.
In the present manual GSMs are the available models of GSM:
GSM Global Submarine Messenger
GSM DCTM Double Channel
GSM DATTM Digital Activation Transmission
The GSMs are a wireless underwater communication receiver/transmitter
using ultrasound. The GSMsswitch on automatically (as does the M-101A
model) when immersed in water. You can speak to your partner by
pressing the transmission button. The system is attached to the Neptune
masks by NACS (see forward).
1

GSM(gray color)
GSM DCTM(black color)
GSM DATTM Models
Side View
.M-101A Model
(yellow color)
Side View
Fig. 1
Front View for
GSM - GSM DCTM - GSM DATTM
and M-101A
Fig. 2
NACS slot
(Strap slot for M101A
only)
speaker
antenna
2
Battery housing
On/Off switch
contacts
Microphone cable
antenna
Transmission
Button
Microphone
GSM
GSM DAT TM
GSM DC TM
The M-101A is a receiver unit. It may be attached to any type mask of
goggles.
The communication range for the various models extends to about 200
meters (600 feet) and to a depth of 40 meters (120 feet).
(This may vary due to salinity, particulate, water temperature and noise level
in the water)
The OCEAN REEF underwater communication system uses the standard
UCF (32768 Hz frequency)

Rel 8.1. October 2009
3
Chapter 2
DESCRIPTION OF THE GSMs and M-101A UNITS
Figures 1 and 2 provide a description of the parts for the GSMs and M101A.
Chapter 3
ATTACHING THE GSMs TO A FULL FACE MASK OR INTEGRATED
SYSTEM
The GSMs can be attached to any of the major full-face
masks available on the market if equipped with a female
DIN connection for the transmission and microphone button
and two quick connections. For optimum functioning we
recommend using the unit on Ocean REEF Neptune
masks, as the unit’s acoustic characteristics are designed
to suit these masks.
HOW TO INSTALL THE NACS TM (Neptune Adjustable Communication
Support)
Hold the NACSTM as pictured with the transparent stationary part to the left
and the black rotating part to the right.
Remove the o-ring from the notch at the end of the black rotating part of the
NACSTM (see drawing).
Slide the GSMs onto the NACS TM .
Replace the o-ring on the notch at the end of the black rotating support.
The left middle strap (of the octopus strap) must be positioned over the
rotating support.
Attach the NACSTM to the mask by positioning the holes of the transparent
part over the black buttons of the clamping band and pressing. These buttons
are the same ones that hold the protective shield when the mask is not in
use. Make sure the protective shield is removed prior to attaching the
NACSTM to the mask.
The black rotating part of the NACSTM has a vertical rotation angle of 25°.
After wearing the mask you will find the most comfortable angle for you. If
you prefer to move the GSMs closer or father away from your face, simply
slide the GSMs over to the selected position and move the o-ring to a
different notch.
The use of the NACSTM allows for a more comfortable wearing of the mask
and best strap adjustment.
The GSMs must be always used with the NACS.
NACS is a patented product of Ocean REEF.

4
INSTALLING THE MICROPHONE
The GSMs use a dynamic microphone, ”D-Mic” encapsulated and protected
by a hydrophobic membrane (see fig. 4).
The microphone allows dependable clear
reproduction of the human voice. It removes
unnecessary noise such as the noise of
bubbles being exhaled from the mask.
The D-Mic microphone uses a hydrophobic membrane that allows air to pass
through while protecting the microphone from water. This membrane also
reduces the “muffling” effect allowing a phonic performance that is very high.
Another characteristic of the hydrophobic membrane is its mechanical
strength. The D-Mic, shown in figure 4, is fitted with a membrane that is
designed to handle pressure of more than 14.7 PSI. If the membrane
ruptures, the microphone will flood causing transmission to cease.
Remember, the Neptune masks are designed to operate under “balanced”
pressure. If the mask is removed underwater the microphone WILL NOT
suffer any damage. However, continuing to dive WITHOUT the mask sealed
on the face the microphone may be damaged if the limits, indicated above,
are exceeded. (In relation to the depth at which the mask was removed).
Ascending must be done in accordance with the dive tables or dive computer
to avoid decompression problems. The communicator and microphone
should be rinsed with fresh water (immersed, not a strong “jet of water”) after
each dive and should be placed in a well ventilated area that is not exposed
to direct sunlight to dry.
PROCEDURE FOR THE ASSEMBLING OF A PTT & D-MIC MICROPHONE
• unscrew the communication port plug (COMMUNICATION), insert the
PTT & microphone through the mask into the “communication” port
with the hydrophobic membrane facing the visor.
• If the membrane is turned the wrong way, facing the mouth, phonic
performance will be diminished. Check that the microphone is in the
position shown in figure 8. Move the microphone so that it does not
interfere with the diver’s lips or the pressure compensation bracket.
The D-MIC is supplied with a “flexible contacts protective band”.
The band avoid the interaction of the mouth with the D-MIC connectors.
fig. 5
fig. 4
fig. 6

Rel 8.1. October 2009
ATTACHING M101A TO A GOGGLE
Connect the M101A to the left or right side strap of the goggle as indicated
in Figure 3. Make sure that the strap sits entirely inside the strap housing on
the M101A. Check that the M101A slides freely on the strap.
Chapter 4
INSTALLING THE BATTERY
All the models work with a conventional 9V alkaline battery.
Do not use manganese batteries.
(1) Unscrew the two screws on the cover and remove the cover and cap with
its O-ring.
(2) Remove the dead battery from the main compartment.
(3) Install a new battery in the compartment, making sure that the polarity is
correct (see label on the inside).
(4) Clean and lubricate the O-ring. Reposition the cap as indicated in figure
9. The cap MUST face the right direction. The flat side of the battery cap
must be on the rear side (when wearing the mask with the GSM) in order to
get a good seal.
(5) Holding the cap in position, position the cover and screw the two screws
in place until they are tight. DO NOT OVER-TIGHTEN the screws!
5
fig. 3
fig. 8
fig. 7
membrane
fig. 9a
Flat side
fig. 9b

6
When the battery has been installed, check that the battery housing and
O-ring are clean. The O-ring must always be lubricated with a thin layer of
silicone lubricant.
A screwdriver for GSMS/M101A assembling/
disassembling is provided in the com unit package.
If the GSMS or M101A are not going to be used for a while, the
battery should be removed. The cap must be stored into the battery
compartment (figure 11). This will ensure that the unit will work properly for a
longer period of time.
Chapter 5
CHECKING BEFORE USE
GSMs and M-101A
Once the battery has been installed and you have checked that the cap and
cover have been closed properly, dampen your fingers and touch the two
screws (On/Off switch contacts) and activate the polarity circuit. You will hear
a “beep” indicating activation.
Run another finger along the antenna. You will hear a “zzzzzz” type sound
coming from the speaker.
Try to bring the antenna transducer near the antenna on a Digital M105 unit,
or the antenna on a GSMs unit (about 5 cm / 2 inches), keeping your fingers
on the On/Off contacts. You should also be able to hear the communication
when the unit is not immersed in water.
If you hear a repeated “beep” (about every 30 seconds) this means that the
battery is running low. Change it.
WARNING
fig. 11
O-ring
fig. 10
screws
cover
cap
battery housing
Screw protection
WARNING

Rel 8.1. October 2009
GSMs
In addition to the above, check that the microphone is installed correctly,
following the instructions above. Try moving the unit near the antenna
transducer on the Digital M105 unit, or the antenna of a GSMs or M101A
unit (about 5 cm/ 2 inches) Press the activation switch, keeping your
fingers on the two On/Off controls. You should hear a "beep" that lasts
about 1 second.
Begin speaking while holding the button down. Any units near your GSMs
should pick up your voice. This test can be carried out without the unit
being immersed in water.
Put on a full-face mask so that it seals properly.
Check that there are no leaks between the edges and your face. The
GSMs speaker should be very close to your ear. Check that the reception
device is not too far from your ear.
Handle the microphone carefully.
Chapter 6
BASIC INSTRUCTIONS
The GSMs and M101A units are activated for reception as soon as they
are immersed in water, and they turn off a few seconds after they dry out.
When they are switched on, this is confirmed by a "beep".
M-101A Model
Listen to your friends who are diving with GSMs units, or those out of the
water, using M105 Digital units.
GSM DAT TM (Digital Activation Transmission)
The GSM DATTM unit is equipped with an automatic transmission
activation, which allows the user to speak without keeping the microphone
button pressed down.
To activate the DAT you simply need to push and release the button
quickly, at which point, a series of impulses are sent out keeping the GSM
transceiver automatically on for 30 seconds.
Then it will return to the receiving mode for 20 seconds with a series of
impulses in a different tone from the first. This cycle on 30 – 20 – 30
seconds goes on until the button is pressed again for at least 1 second to
return to the manual mode or until the batteries are exhausted.
This feature is extremely important in that it allows “hands free”
communication especially in a “diver emergency” or if a diver is
experiencing difficulty.
GSM DC TM
The GSM DC™(code 33122) underwater transceiver unit incorporates
the latest innovation in underwater ultrasonic 2-Way Radio communication;
featuring a digital driver for vocal message equalization, an automatic
system for activating (DAT) transmission and a double transceiver
channel. The GSM DC™can be used on the OCEAN REEF Full Face
Masks, preferred, or on other Full Face Masks equipped with a standard
DIN female connection. Underwater communication technology is
7

8accomplished with ultrasound and is started by a PTT, Push To Talk,
microphone button, which must be pressed to activate transmission and
released to receive. The standard frequency (channel one) is the same for all
units, so it is possible to talk directly with any other GSM DC™, GSM
DAT™, GSM, M-101A receive units, surface M105 Digital, M105 DC & M100
units and all previous surface systems (M103 - M104 - M105). The GSM
DC™sound qualities depend both on the D-Mic microphone and the
microprocessor (DSP), which takes the digitalized vocal message and filters
out unwanted noise caused by exhaust air bubbles or vibrations of the mask,
particularly of the visor.
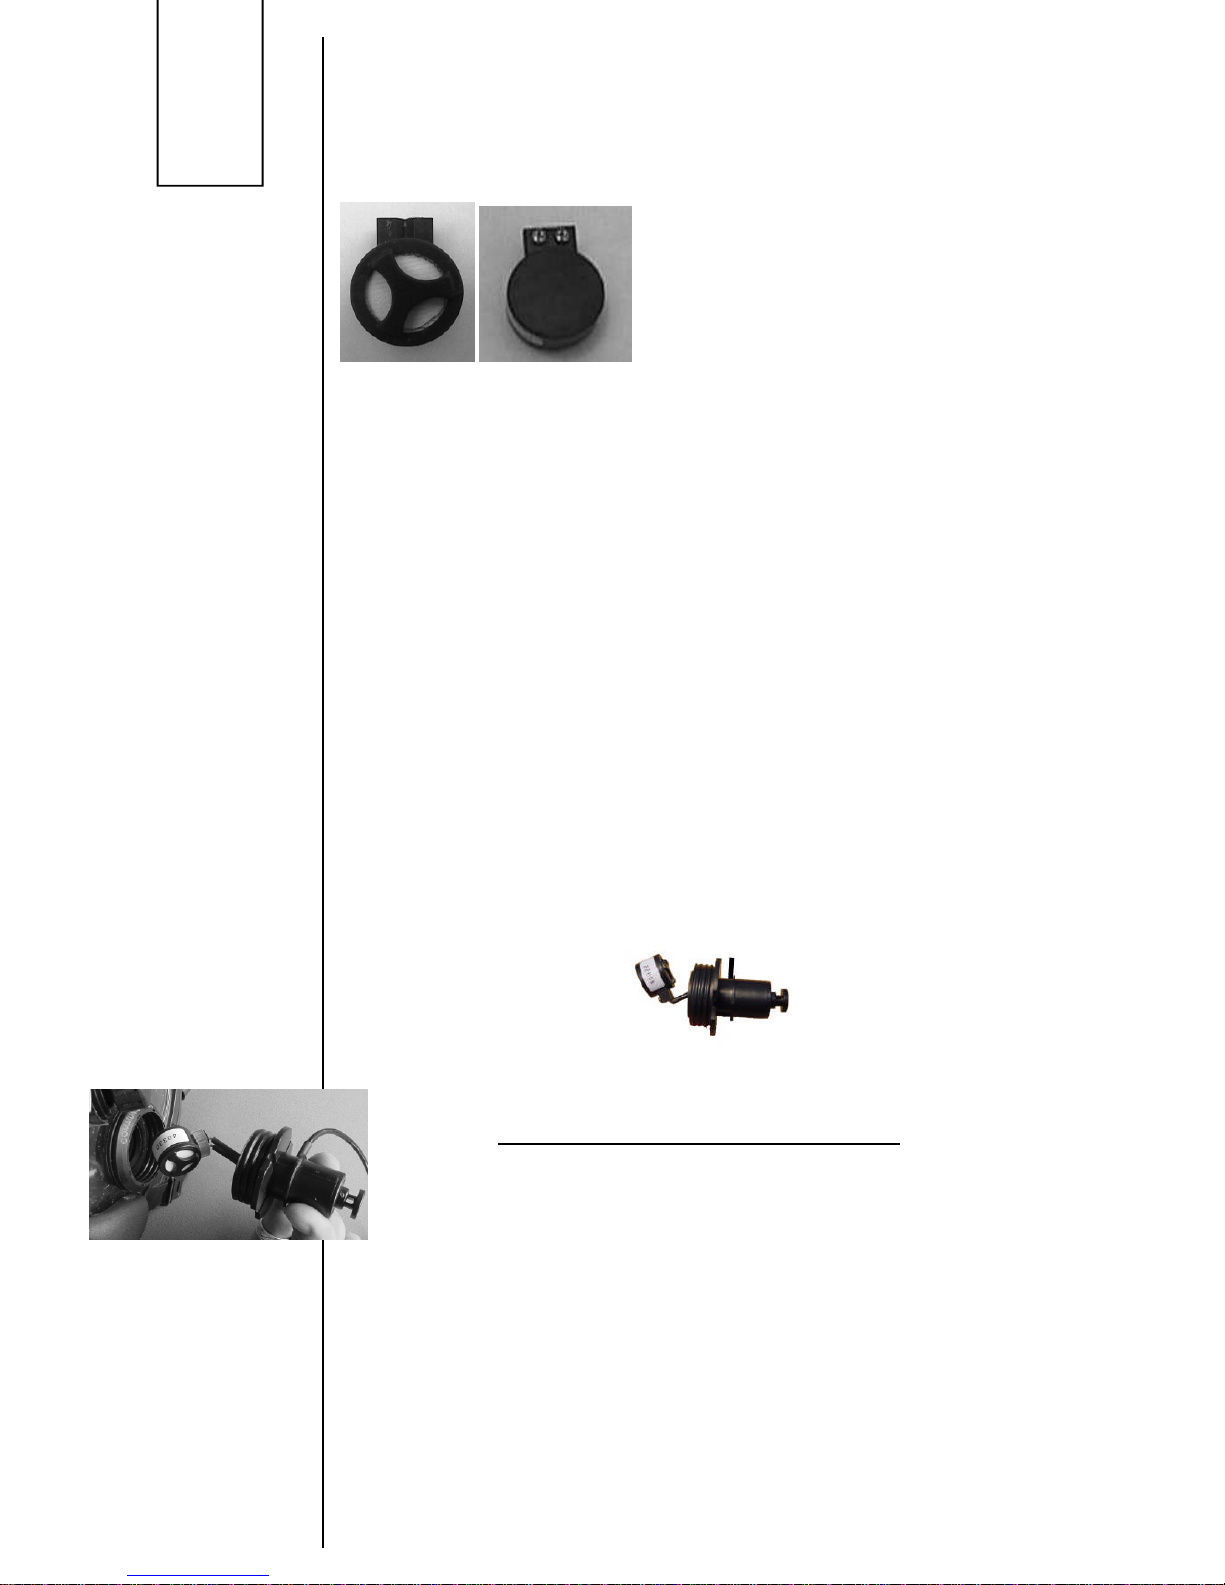
The GSM DC™has two buttons.
The “A” button (see picture) activates the manual mode transmission.
Pressing the button – you are able to transmit, releasing the button you may
receive.
The “B” button activates and de-activates the automatic transmission mode:
DAT™. Pressing the button A and B it is possible the change the frequency
channel. The unit is equipped with 2 transceiver channels, and at any time
you change the channel you will ear a recorded message informing you of
what channel you are activating (channel one - channel two)
The double channel allows two different diver groups to operate in the same
area, limiting the interference between them. The channel 2 improves, if
necessary the operations range without reducing the battery autonomy.
Chapter 7
INSTRUCTIONS FOR UNDERWATER COMMUNICATION
• When speaking to other divers, remember that they are diving. It is best to
attract their attention before sending a message.
• Talking and listening while underwater requires practice. With experience,
divers will become more proficient in the use of the communications system.
• Speak slowly, and pronounce each word clearly. Only speak after having
sent a call impulse by pressing the button on the microphone. It is advisable
to practice in a swimming pool before using the device in open water.
• Bubbles, and especially, small air bubbles, that are in contact with or near
those communicating reduce the transmitting power. When using the unit in
swimming pools or in highly oxygenated water, coat your antenna in silicone
lubricant. This will make it more difficult for the air bubbles to adhere to it.
• Obstacles such as rocks may reduce your communication range.
• When breathing out (exhaling), reduce the emission of bubbles as far as
possible (WITHOUT STOPPING EXHALING WHEN RESURFACING).
Bubbles cause noise or ultrasonic base signals.
• It is normal to receive a background signal like clutter. Movement of sand
and pebbles on the seabed, marine motors, cetaceans, and other sources
can create vibrations in the water that give rise to a range of ultrasonic waves
that can be picked up by the GSMSTM or the M101A.
• When using the device in shallow water, you may experience difficulty
communicating because:
Transmission
Buttons
(A)
(B)

Rel 8.1. October 2009
9
• (1) The surface is full of air bubbles formed by the waves.
• (2) The sand under water is causing ultrasonic noise due to the waves.
Chapter 8
PRECAUTIONS
·Do not use solvents (such as dilutents) to clean the unit. They can cause
irreparable damage. Only use neutral detergents.
·Use running water to remove the seawater from your M-101A or GSMs after
use. The system must be kept completely dry and in good condition.
·Do not twist the microphone cable on the GSMs.
·Do not expose the unit to direct sunlight.
·Do not leave the unit in your car.
·Do not keep the unit in places that are too hot or too cold, such as near air
conditioners.
·Do not keep the unit near magnetic fields.
·Do not allow it to fall or be knocked around.
·Replace the battery when it is running low. When not using the unit for
extended periods of time, remove the battery from its housing to prevent
damage.
·Only use 9V alkaline batteries. Install them in the battery housing, ensuring
that they are of the correct charge and polarity. Do not activate the polarity
circuit using metal wires or pieces of metal.
·Make sure there is no dirt, debris or water in any part of the unit, especially in
the battery housing or under the O-ring. If any dirt, debris or water is found,
remove it.
·When replacing the battery check the O-ring for damage. If it is damaged,
replace it. The O-ring must be lubricated with a thin layer of silicone lubricant.
·Do not dismantle or repair this unit yourself.
·Follow the instructions for correct maintenance of the microphone and
battery housing, given in previous chapters.
·If the battery compartment should be flooded, remove the battery, rinse the
compartment with fresh water and leave to dry. Remove any debris, and
clean the gold plated contacts, then install a new battery. If the unit does not
function, check the state of the microphone (only on GSMs units).
·Routinely clean the microphone contacts and check the integrity of the
hydrophobic membrane and the casing. If the microphone is flooded, it
CANNOT BE recovered and must be replaced.
·Do not touch the hydrophobic membrane with any sharp objects that may
damage it.
Chapter 9
GUARANTEE
(1) OCEAN REEF communication units are guaranteed to be free of
material or manufacturing defects for a period of 24 months from the
time the unit is purchased. For the duration of the guarantee, the
Company’s responsibility is limited to replacement of any parts that
are defective in our opinion, and that have not been used incorrectly or
handled negligently. The unit must be returned to the outlet from which
it was bought, along with the warranty card. The cost of transport is to
be prepaid by the customer.
(2) Even during the guarantee period, this guarantee shall not be valid
where:

10 · Damage was caused by incorrect handling or carelessness.
· Damage was caused by the unit falling after it was purchased.
· Damage caused by fire, earthquake, floods, lightning, or other natural
disasters, pollution or electrical charges.
· The warranty card is not produced.
· Our name, the date of purchase, and the seller’s name do not appear
on the warranty card.
GSM GSM DC M101A
Code 33105 33122 33107
Type Wireless ultrasonic Wireless ultrasonic Wireless ultrasonic
Activation automatic automatic automatic
Transmission PTT – Press To
Talk PTT Press To Talk – or
Digital Activation Trans-
mission
Receiver only
Receiving Automatic Automatic Automatic
System type H-SSB H-SSB H-SSB
Frequency 32.768 kHz 32.768 kHz = channel 1
41.000 kHz = channel 2 32.768 kHz
Working range (*) 200 Mt. /600 feet 200 Mt. /600 feet 200 Mt. /600 feet
Rated depth (**) 40 Mt. / 120 feet 40 Mt. / 120 feet 40 Mt. / 120 feet
Powered by 9v alkaline 9v alkaline 9v alkaline
Autonomy (total) 30 hours 9 hours 30 hours
Low battery auton-
omy (after alarm
starts)
1h 1 hours 1h
Low battery alarm 1 beep every 30
seconds under
6.8v
1 beep every 30 seconds
under 7.5v 1 beep every 30
seconds under 6.8v
Automatic Trans-
mission Activation
(DAT)
no yes no
Transmission / re-
ceiving cycle no Yes with DAT (30 sec-
onds transmit mode + 20
seconds receive mode)
no
Squelch Automatic Automatic Automatic
Weight with batter-
ies 370 grams 370 grams 290 grams
(*) The operating distance is effected by obstacles, air bubbles, thermo-clines, temperature
and salinity.
(**) Does not include other depth limits that may be applied.

Rel 8.1. October 2009
Problem possible cause action
1Theunitdoesnotswitchon Thebatteryismissing,thecontacts Insertachargedbattery.
areisolated,thebatteryisdead Removeisolationcaps
2“Thepolarityisinverted. Insert thebatterycorrectly
3“Thecontacts arebroken. Sendforservicing.
4“Batterycompartmentflooded Removewater,rinse withfresh
water,leavetodry.
LubricatetheO-ring.Clean
Contacts.Insert new battery.
5Batterycompartmentflooded O-ringdirty,incorrectlypositioned CleantheO-ring,lubricate
orbroken Withsiliconelubricant.Ifbroken,
replace.Proceed asperpoint4.
6 “ Capbroken Replace thecap–proceedasper
point4
7 “ Seatingsforcoverscrewsbroken Sendforservicing
8 “ Maincasingbroken Sendforservicing
9 Theunitswitchesonand Microphonefloodedordefective. Changethemicrophone.
receivesbutdoesnottransmit
(GSM)
10 “Microphonecontactsdisconnectedor Cleanthecontactswithfreshwater,
dirty thensandandlubricate.
11 “Cablebetweenmicrophoneand casing Sendforservicing
broken
12 Theunitdoesnotreceive Thetransmissionunitisnotworking Tryanothertransmissionunit
13 “Speakerorinternalcomponents Sendforservicing
defective
14 Theunittransmitscontinually Callbuttondefective Sendforservicing
(GSM)
15Notpossibletoswitchto Stickingofbottons Cleanwithfreshwater
channel2
16 “ Defectivebuttons Sendforservicing
11

12 OCEAN REEF
GSM - GSM DCTM - GSM DATTM - M101A
GUIDA ALL’USO
INDICE
Capitolo 1 Introduzione
Capitolo 2 Descrizione delle Unità GSMs ed M-101A
Capitolo 3 Montaggio del GSMs su Maschera Granfacciale o integrata
Capitolo 4 Installazione della batteria
Capitolo 5 Controlli prima dell’utilizzo
Capitolo 6 Istruzioni base
Capitolo 7 Istruzioni per la comunicazione subacquea
Capitolo 8 Precauzioni
Capitolo 9 Garanzia
Capitolo 10Caratteristiche tecniche
INFORMAZIONI IMPORTANTI
Complimenti per l’acquisto di una unità per la comunicazione subacquea
Ocean REEF Qui di seguito vengono descritte le funzioni e gli avvertimenti
relativi all’utilizzo dei comunicatori subacquei GSM e M101A. Vi
raccomandiamo di leggerle attentamente prima dell'uso.
• Durante la risalita, nel corso di una immersione, se vengono utilizzati mezzi
di comunicazione e si è in ascolto, si deve continuare ad espirare
regolarmente per evitare danni fisici da sovra estensione polmonare. Non
smettete di respirare mentre risalite verso la superficie.
• Se parlate in immersione , potreste consumare un maggiore quantitativo
d’aria. Controllate sempre la pressione della bombola.
• Prima di tentare di utilizzare il dispositivo in acque aperte (mare, lago,
fiume, ecc.), dovete approfondirne il funzionamento e la comunicazione
facendo pratica in piscina.
Capitolo 1
INTRODUZIONE
Il sistema di comunicazione Ocean REEF è leggero di dimensioni compatte
ed utilizza lo standard UCF32 (frequenza 32768Hz).
In questo manuale troverete i seguenti modelli di GSM:
GSM Global Submarine Messenger
GSM DCTM Double Channel
GSM DATTM Digital Activation Transmission
Il GSM è una ricetrasmittente subacquea senza fili (ad ultrasuoni). Si attiva
automaticamente, come il modello M-101A, non appena entra in acqua
ponendosi nella modalità di ricezione.
Potete parlare con il vostro partner (dotato di GSM o M 101A o con la
superficie tenendo premuto il pulsante per la trasmissione.
ATTENZIONE

Rel 8.1. October 2009
I GSM vengono installati sulle maschere Neptune tramite il NACS™,
Neptune Adjustable Communicator Support (vedi seguito)
L' M-101A è una unità ricevente che può essere fissata al cinturino della
maschera convenzionale.
Il raggio di comunicazione di questi modelli si estende sino a circa 200 metri
e sono impiegabili sino ad una profondità di 40 m (varia a seconda della
condizioni del mare ed al livello di rumore).
Capitolo 2
DESCRIZIONE DELLE UNITA' GSM ed M-101A
Per la descrizione delle parti costituenti le unità GSM ed M-101A si vedano
le fig. 1 e 2
13
Modello GSM(grigo)
GSM DCTM (nero)
Vista laterale
Modello M-101A
(colore giallo)
Vista laterale
Fig. 1
Vista frontale commune a
GSM - GSM DCTM - GSM DATTM
and M-101A
Fig. 2
Sede per NACS
(sede per cinturino
solo per M101A )
altoparlante
antenna
Sede batteria
Contatti accensione
Cavo del microfono
antenna
Pulsante di
trasmissione
Microfono
GSM
GSM DAT TM
GSM DC TM

Capitolo 3
MONTAGGIO DEI GSM SU MASCHERA GRANFACCIALE O INTEGRATA
I GSM possono essere installati sulle principali maschere gran facciali
disponibili sul mercato purchè dotate di una connessione DIN femmina per il
pulsante di trasmissione e due attacchi rapidi per NACS™.
Per un’ottimale funzionamento ne consigliamo tuttavia l’utilizzo sulle maschere
Neptune Ocean REEF sulle cui caratteristiche acustiche è stato accordato.
Il NACS™(Neptune Adjustable Communicator Support)
consente un confortevole collegamento del GSM alla vostra
maschera.
Rimuovete l’o.r. fissato alla estremita’ della forcella.
Inserite la forcella del NACS™nella guida del GSM .
La rotaia di scorrimento deve essere rivolta verso il capo.
Riposizionate l’ OR nella tacca estrema della forcella .
Fate passare l’estremita’ del cinturino mediano di sinistra sopra la forcella
basculante del NACS™e premendo leggermente fissate la forcella basculante
del NACS™sui due supporti presenti sulla reggetta della maschera e che
sostengono lo schermo protettivo (rimuovete lo schermo prima di fissare il
NACS™).
Il NACS™ha una angolo di rotazione verticale di circa 25 gradi. Dopo aver
indossato la maschera trovate l’inclinazione piu’ confortevole e se desiderate
tenere il GSM in una posizione piu’ avanzata , spostate l’OR di blocco dello
scorrimento su un’altra tacca .
L’uso del NACS™permette una piu’ confortevole vestizione della maschera e
consente una migliore regolazione del cinturino.
NACS™e’ un brevetto Ocean REEF.
14

Rel 8.1. October 2009
INSTALLAZIONE DEL MICROFONO
I GSM utilizzano un microfono dinamico “D-Mic”
incapsulato e protetto da membrana idrofoba
(vedi fig. 4) .
Questo microfono permette una riproduzione
fedele e chiara della voce umana, cancellando
parte del rumore di fondo indesiderato
generato , per esempio, dalle bolle d'aria espirata. Il D-Mic usa una
membrana idrofoba attraverso la quale l’aria può traspirare. Tale
membrana riduce al minimo, pur proteggendolo dall'acqua, la
schermatura del vero e proprio microfono consentendo delle rese foniche
molto elevate. La membrana idrofoba ha una sua propria, caratteristica
resistenza meccanica. Il D-Mic è dotato di membrana con resistenza
superiore ad 1 bar. La rottura della membrana comporta l'allagamento del
microfono con conseguente cessazione delle funzioni di trasmissione
dell'unità. E' bene ricordare che la maschere Neptune operano in equi-
pressione; pertanto la rimozione delle stesse sott'acqua NON PROVOCA
alcun danno al microfono. Tuttavia se si prosegue la discesa con la
maschera NON indossata il microfono può essere danneggiato al
superamento dei 10metri di discesa (limiti relativi alla quota dove viene
rimossa la maschera). La risalita con maschera NON indossata deve
essere eseguita ad una velocità non superiore a quella raccomandata
dalle norme per evitare incidenti da decompressione.
Alla fine di ogni immersione, si raccomanda di risciacquare il
comunicatore ed il microfono con acqua dolce (non in pressione)
lasciandoli asciugare in un luogo ventilato, non esposto alla luce diretta
del sole.
PROCEDURE PER IL MONTAGGIO DEL PULSANTE PTT E DEL
MICROFONO D-Mic
•svitare il tappo dall’attacco laterale di sinistra marcato “communication”.
•inserire il pulsante PTT e il microfono nell’attacco laterale sinistro della
maschera con la membrana idrofoba rivolta verso il visore.
• Se si sbaglia il verso orientando la membrana verso la bocca la resa
fonica peggiorerà. Controllare che il microfono sia nella posizione della
fig. 7. Evitare che il microfono interferisca con le labbra o con il blocco di
compensazione.
Il D-Mic viene fornito con una banda protettiva elastica che evita
interazioni dirette tra le labbra e i contatti del microfono.
15
fig. 4
fig. 6
fig. 5

MONTAGGIO DELL' M101A (unità ricevente) su una maschera
subacquea convenzionale
Seguendo le indicazioni della Fig.3 collegare l’M101A al cinturino della
maschera . Prestare attenzione che il cinturino si trovi interamente all'interno
della guida portacinturino presente sul M101A.
Verificare che l’M101A scorra liberamente sul cinturino.
Capitolo 4
INSTALLAZIONE BATTERIA
Tutti i modelli funzionano con una convenzionale batteria alcalina da 9V.
Non utilizzate batterie al manganese.
(1) Svitare le due viti poste sul coperchio e rimuovere il coperchio ed
il tappo con l'o.r.
(2) Rimuovere la batteria scarica dal comparto principale.
(3) Installate una nuova batteria nello scomparto assicurandovi che
la polarità sia corretta. (vedere etichetta all'interno)
(4)Inserire il tappo dopo aver pulito ed ingrassato l’ OR seguendo le
indicazioni di fig. 9. Il tappo ha un verso di montaggio.
(5)Tenendo compresso il tappo posizionare il coperchio e riavvitarlo con
le due viti e rondelle in dotazione sino a quando non si sente
resistenza. NON STRINGERE troppo forte le viti!
16
Fig.3
membrana
fig. 8
fig. 7
fig. 9a
Lato piatto
fig. 9b

Rel 8.1. October 2009
Quando installate la batteria, controllate che il vano di quest’ultima e l’OR
siano puliti. L’O-ring deve essere sempre lubrificato con un sottile strato di
grasso siliconico.
Nella confezione del GSM/M101A è compreso un cacciavite per l’apertura/
chiusura del vano batterie.
Quando le unità GSM o M101A non vengono utilizzate è bene, dopo aver
svitato il coperchio inserire al posto della batteria il tappo con l'o.r., e
riavvitare il coperchio (vedi fig.11) . Tale operazione è finalizzata a
preservare nel tempo la perfetta funzionalità della guarnizione e delle
pareti dell'unità di comunicazione.
Capitolo 5
CONTROLLI PRIMA DELL’UTILIZZO
GSM ed M-101A
Dopo aver montato la batteria ed aver controllato la perfetta chiusura del
tappo e del coperchio che ne chiudono il compartimento, toccate con le
dita inumidite le due viti (contatti di accensione) e attivate il circuito di
polarità. Sentirete un “beep” di attivazione. Strofinate l’antenna con un altro
dito. Sentirete un sfregolio, tipo “zzzzzz”, proveniente dall’altoparlante.
Provate ad avvicinare l'unità al trasduttore di antenna dell' M105 Digitale o
all'antenna di un GSM (5 cm circa) mantenendo le dita sui due contatti di
accensione. Dovrete poter sentire anche in aria la comunicazione.
Se sentite un "beep" ripetuto (circa ogni 30 secondi) vuol dire che la
batteria si sta esaurendo. Cambiatela.
17
fig. 11
ATTENZIONE
O-ring
fig. 10
screws
cover
cap
battery
Screw protection
ATTENZIONE

GSM
Oltre a quanto sopra, assicuratevi che il microfono sia montato
correttamente come da precedenti istruzioni Provate ad avvicinare l'unità al
trasduttore di antenna dell' M105 Digitale o all'antenna di un GSM o M
101A (5 cm circa) . Premete il pulsante di attivazione, mantenendo le dita
sui due controlli di accensione dovete sentire un "beep" di circa 1". Tenendo
sempre premuto iniziate a parlare. Le unità prossime al vostro GSM
dovrebbero ricevere la vostra voce. Tale prova può essere eseguita in aria
Indossate la maschera gran facciale in modo che vi sia una perfetta tenuta.
Assicuratevi che non vi siano perdite fra i bordi e il viso. L’altoparlante del
GSM dovrebbe aderire all’orecchio. Assicuratevi che non vi sia una distanza
eccessiva tra il dispositivo di ricezione e l’orecchio.
Trattate con cautela il microfono.
Capitolo 6
ISTRUZIONI BASE
GSM ed M101A si attivano nella condizione di ricezione non appena
entrano in acqua e si spengono dopo pochi secondi
all'asciutto.L'accensione è confermata da un "beep" .
Modello M-101A
Ascoltate I vostri compagni di immersione equipaggiati con GSM o in
superficie operanti con l'unità M105 Digital M105 DC o M100.
Modello GSM DATTM (Digital Activation Transmission)
Questa unita’ GSM e’ dotata dell’attivazione automatica di trasmissione
(DAT™) che consente all’utilizzatore di parlare senza dover tener premuto
il pulsante del microfono.
Per attivare il DAT™è sufficiente premere e rilasciare rapidamente il
pulsante. Viene emessa una sequenza di impulsi che conferma l’avvio della
trasmissione. Con le mani libere si puo’, a questo punto, parlare …
Per ritornare nella condizione di ricezione bisogna premere per almeno 1” il
pulsante del microfono e rilasciarlo.
Il ciclo di trasmissione automatica si interrompe comunque dopo 30” con
una sequenza di impulsi di tonalita’ diversa rispetto all’attivazione.
A questo punto l’unita’ entra in un ciclo di ricezione di 20” dopodiche’ si
ripete l’iniziale sequenza di impulsi e si ritorna in trasmissione automatica.
Questo ciclo di 30” – 20” – 30”……continua sino alla disattivazione (vedi
prima) o all’esaurimento delle batterie.
Potete quindi comprendere come puo’ risultare utile per segnalare
subacquei in difficolta’ o in rischio di perdita di conoscenza.
Il DAT™e’ utile dove e’ necessario avere ambedue le mani libere. E’ bene
non abusare dell’uso per evitare troppe sequenze di impulsi in immersione
che possono generare confusione o disagio
Se la disattivazione non e’ eseguita in modo appropriato (compressione del
pulsante troppo rapida) il DAT™si riattiva riemettendo la consueta serie di
impulsi.
Fate pertanto attenzione a ripetere l’operazione mantenendo il pulsante
premuto per almeno 1” secondo per poi rilasciarlo.
18
This manual suits for next models
3
Table of contents
Languages:
Other Ocean Reef Conference System manuals