6
Operating Instructions and Parts Manual 27167
10/18
2018 OEM®
FUEL PRESSURE
TEST KIT
• When key-on-engine-off fuel pressure is within
manufacturers’ specification, proceed to Step 8.
• To safely disconnect Fuel Pressure Test Kit, proceed to
Step 9.
8. Start engine and let idle.
• If vehicles fuel system uses a vacuum actuated
(compensated) fuel pressure regulator then fuel
pressure should drop approximately 3-10 psi,
depending on manifold vacuum.
• If vehicles fuel system uses a fuel pressure regulator
without a vacuum port then fuel pressure should remain
constant during both key-on-engine-off and idle.
• Read fuel pressure from dial face.
• If fuel pressure is not within manufacturer’s specification,
service vehicle according to vehicle service manual.
• When repair is completed and idle fuel pressure is now
within manufacturer’s specification, then proceed to
Step 9.
9. Turn Ignition Key OFF.
10. Verify that 6 Ft. bleed-off hose is still in an approved
container for fuel.
11. Fully DEPRESS and HOLD the pressure relief button
until dial face pointer is resting on stop pin.
12. Shake bleed-off hose to make sure that all fuel went
into approved container.
13. Remove gauge hose.
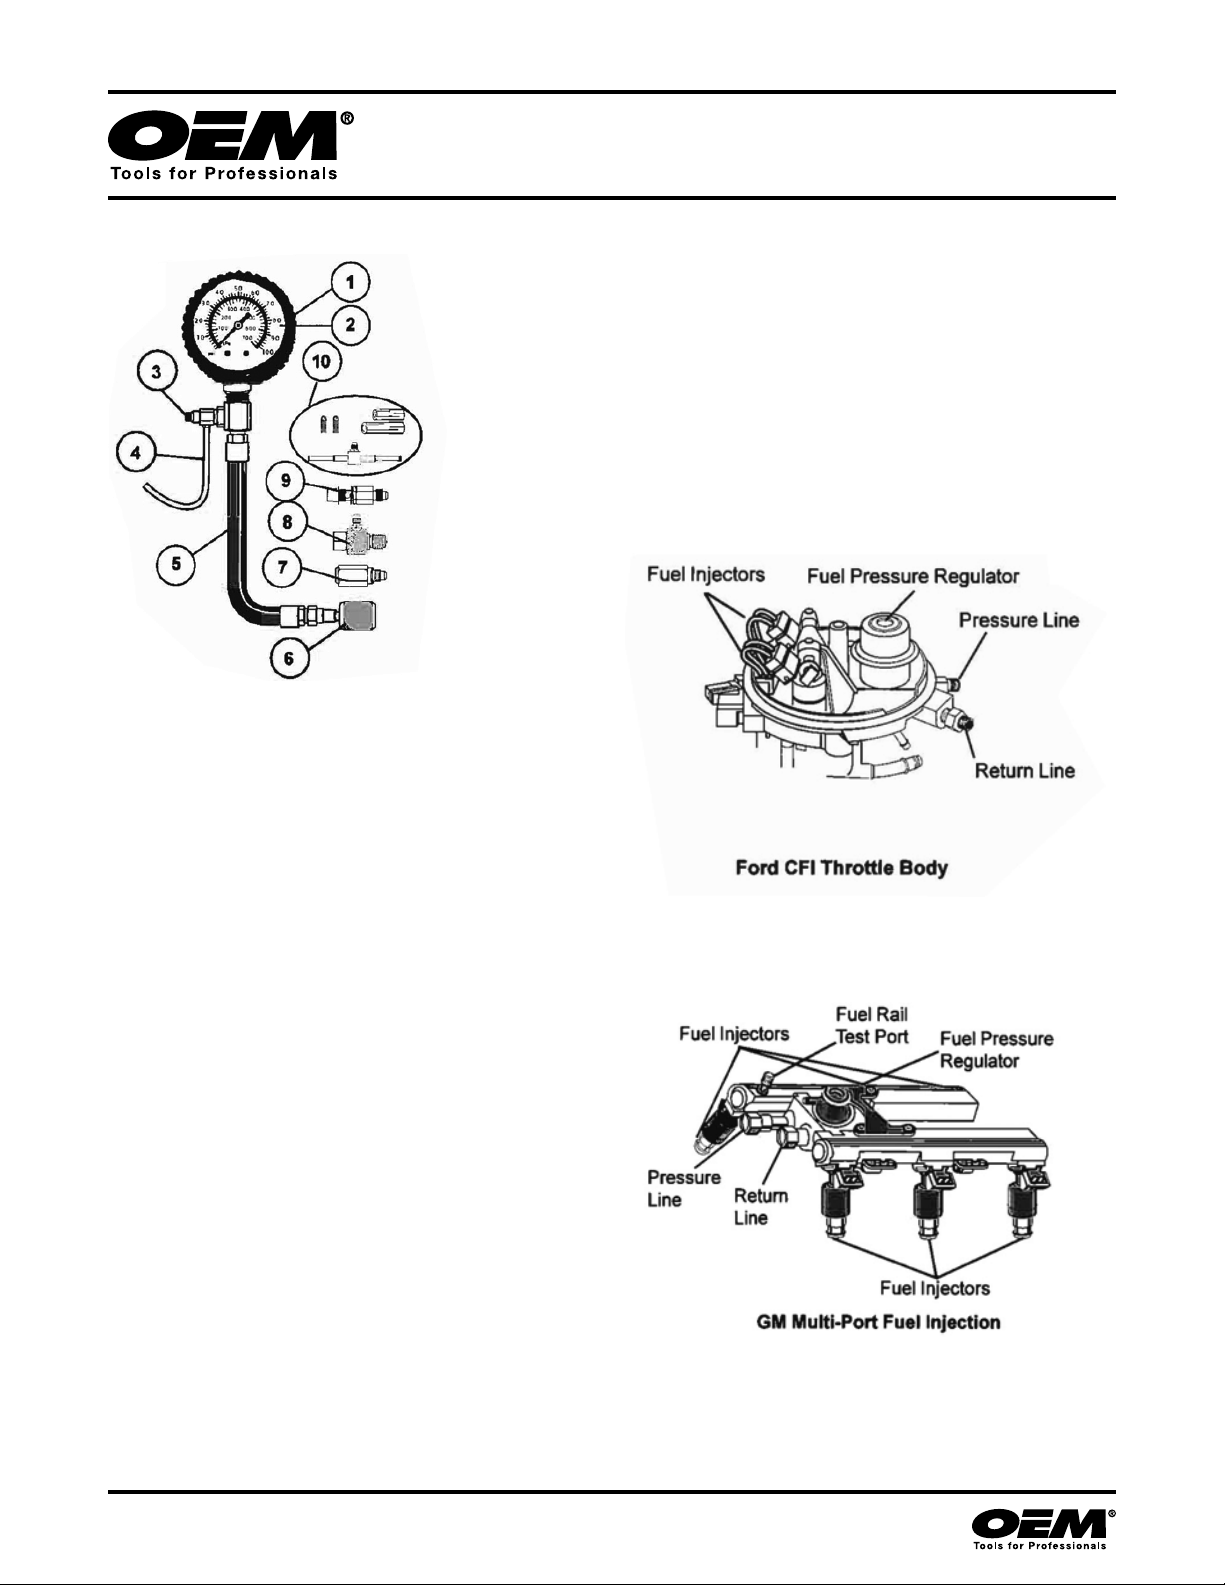
FOR CHRYSLER/GM VEHICLES WITH TEST PORT:
• Wrap a shop rag around fuel rail test port in case a small
amount of fuel drips out while unscrewing test port
adapters.
• Unscrew Chrysler/GM test port adapter from fuel rail test
port and reinstall the Test Cap.
• Wrap a shop rag around Chrysler/GM test port adapter
so any fuel dripping from gauge hose is absorbed.
• Remove bleed-off hose from approved fuel container and
hold gauge hose over container so any remaining fuel
will drip into container.
FOR FORD/LINCOLN/MERCURY VEHICLES WITH
TEST PORT:
• Wrap a shop rag around fuel rail test port in case a small
amount of fuel drips out while unscrewing test port
adapters.
• Unscrew Chrysler/GM test port adapter from Ford test
port adapter.
• Wrap a shop rag around Chrysler/GM test port adapter
so any fuel dripping from gauge hose is absorbed.
• Remove bleed-off hose from approved fuel container and
hold gauge hose over container so any remaining fuel
will drip into container.
• Unscrew Ford test port adapter from fuel rail test port
and reinstall the Test Cap.
FOR GM TBI VEHICLES WITHOUT A TEST PORT:
• Place shop rag under GM TBI adapter in case a small
amount of fuel drips out while unscrewing.
• Disconnect Gauge Hose and wrap a shop rag around so
any fuel dripping from hose is absorbed.
• Disconnect fuel lines from GM TBI adapter and wrap with
shop rag so any fuel dripping from adapter is absorbed.
• Reconnect fuel lines as described in vehicle service
manual.
FOR IMPORT AND SOME DOMESTIC VEHICLES
WITH A BANJO BOLT CONNECTION:
• Wrap a shop towel around banjo bolt connection while
removing bolt.
• Disconnect hose and pressure gauge assembly from
banjo bolt test adapter.
• Wrap a shop towel around end of gauge hose. Hold end
of gauge hose over approved container to catch any
remaining fuel.
• Loosen banjo bolt adapter and remove adapter and
gaskets.
• Re-install vehicle’s fuel bolt with new gaskets on either
side of banjo. Install fuel bolt finger tight, then wrench-
tighten to specifications given in service manual.
• Check for leaks.
FOR IMPORT AND DOMESTIC VEHICLES WITH
RUBBER HOSE CONNECTIONS:
• Place a shop towel under dual manifold test adapter.
• Disconnect hose and pressure gauge assembly from dual
manifold adapter.
• Wrap a shop towel around end of gauge hose. Hold end
of gauge hose over approved container to catch any
remaining fuel.
• Loosen hose clamp securing vehicle’s rubber fuel line
to dual manifold adapter. Disconnect fuel line from
adapter.
• Loosen hose clamp securing dual manifold adapter hose
to vehicle. Disconnect adapter from vehicle.
• Reconnect vehicle’s rubber fuel line to original location.
• Securely tighten hose clamps on vehicle’s fuel line.
• Check for leaks.