OLDE MIDWAY P600 User manual

Page | 1
6oz Popcorn Popper
INSTRUCTION
MANUAL
P600/P650

Page | 2
READ ALL INSTRUCTIONS BEFORE USING YOUR POPCORN MACHINE.
RETAIN THIS MANUAL FOR FUTURE REFERENCE.
•
This is not a toy. Please keep away from children.
•
Use only on a grounded outlet.
•
Do not use popper for anything other than its intended purpose.
•
Take proper safety precautions when using this machine.
•
Do not use outdoors or near water.
•
Do not leave machine unattended while powered on.
•
Do not touch hot surfaces. Always use handles or knobs to operate.
•
Always place popper on a secure, level, stable surface.
•
To avoid any risk of electrical shock, do not immerse cord or plug in water.
•
Do not operate the machine if damage to cord or plug is present.
•
Unplug main power cord from outlet while not in use and before cleaning.
•
Allow hot parts to cool down before moving or cleaning.
WARNING
Misuse of this machine may result in serious injury.

Page | 3
Parts List
Main Unit
Kettle
Popcorn Accessories
Popcorn Bags
** 60‐Watt R20 Light Bulb (not shown) also included. **
We recommend two people for cart assembly.
Rubber Feet
(A) ‐2pc
Support Legs
(B) ‐2pc
Support Stand
(C) ‐2pc
Wheels
(D) ‐2pc
Horizonal Supports
Base
(E) ‐2pc
Horizonal Supports
with Screws
(F) ‐2pc
Cabinet Base
(G) ‐1pc
Cabinet Front
with Door
(H) ‐1pc
Note: Identify and locate all parts and hardware necessary to operate this item.
If your model does not include the cart, skip to page 10.

Parts List (cont.)
Page | 4
Cabinet Back
(I) ‐1pc
Working Platform
(J) ‐1pc
Working Platform
Brackets (Large)
(K) ‐2pc
Push Handle
(L) ‐1pc
Handrail
Brackets (Small)
(M) ‐2pc
Handrail
(N) ‐1pc
HARDWARE
Screwdriver (1pc) & Wrench (2pc) also included.
Wheel Bolt M8x1
(O) ‐2pc
Nyloc Nut M8
(P) ‐2pc
Nut M8
(Q) ‐12pc
Washer
(R) ‐18pc
Bolt M8x60
(S) ‐4pc
Bolt M8x35
(T) ‐2pc
Bolt M8x16
(U) ‐8pc
Screw M4x8
(V) ‐8pc

Parts List (cont.)
Page | 5

Popcorn Cart Assembly
Page | 6
STEP 1:
Screw one of the RUBBER FEET (A) into the bottom of each
SUPPORT LEG (B). Tighten both rubber feet.
STEP 2:
Insert one WHEEL BOLT (O) into the bottom holes
located on each side of the SUPPORT STAND (C). NOTE:
Insert bolt from the inside out. Secure wheel bolts with
one NUT (Q) on each side. Tighten with wrench.
STEP 3:
Hang one WHEEL (D) onto one WHEEL BOLT (O) and
secure with one NYLOC NUT (P). Tighten with wrench.
Repeat step for second wheel. Note: Do not
overtighten. Make sure both wheels spin freely.
STEP 4:
Attach both HORIZONTAL SUPPORTS ‐ BASE (E) to
the same SUPPORT STAND (C) using two BOLTS (T)
each with one WASHER (R). Tighten with wrench.
STEP 5:
Insert two BOLTS (U), each with one WASHER (R),
into each SUPPORT LEG (B). Attach SUPPORT LEG (B)
to the SUPPORT STAND (C) on the opposite side of
the wheels. Tighten with wrench.

Popcorn Cart Assembly (cont.)
Page | 7
STEP 6:
Insert both HORIZONTAL SUPPORTS ‐ WITH
SCREWS (F) into the grooves at the ends of each
SUPPORT STAND (C), as shown.
STEP 7:
Insert the CABINET BASE (G). Note: Place the
lipped side facing down. Line the cabinet base
up between the SUPPORT STANDS (C).
STEP 8:
Confirm the CABINET BASE (G) is locked
in place. Secure the SUPPORT STANDS (C)
using the SCREWS (V), as shown. Tighten
screws with screwdriver.

Popcorn Cart Assembly (cont.)
Page | 8
STEP 9:
Note: Before assembling the front and
back panels, determine which side you
want the cabinet door facing.
Insert the CABINET FRONT (H) and
CABINET BACK (I). Secure both panels to
the SUPPORT STANDS (C) with SCREWS
(V), as shown. Tighten screws with
screwdriver.
STEP 10:
Remove the pre‐assembled screws from
the PUSH HANDLE (L). Attach one of
the WORKING PLATFORM BRACKETS
(K) to one end of the handle.
Insert the WORKING PLATFORM (J) to
the same bracket using the pre‐installed
posts. Insert the screw and tighten.
Repeat steps above to attach the
remaining bracket on the other side.

Popcorn Cart Assembly (cont.)
Page | 9
STEP 11:
Remove the pre‐assembled screws from the HANDRAIL
(N). Attach one of the HANDRAIL BRACKETS (M) to one
end of the handle. Insert the screw and tighten.
Repeat step above to attach the remaining bracket on the
other side.
STEP 12:
Using four BOLTS (U), WASHERS (R) and NUTS (Q), install
the assembled WORKING PLATFORM on the right side of
the cart (same side as wheels).
STEP 13:
Using four BOLTS (U), WASHERS (R) and NUTS (Q), Install
the assembled HANDRAIL on the left side of the cart
(opposite the wheels).

Initial Setup Instructions
Page | 10
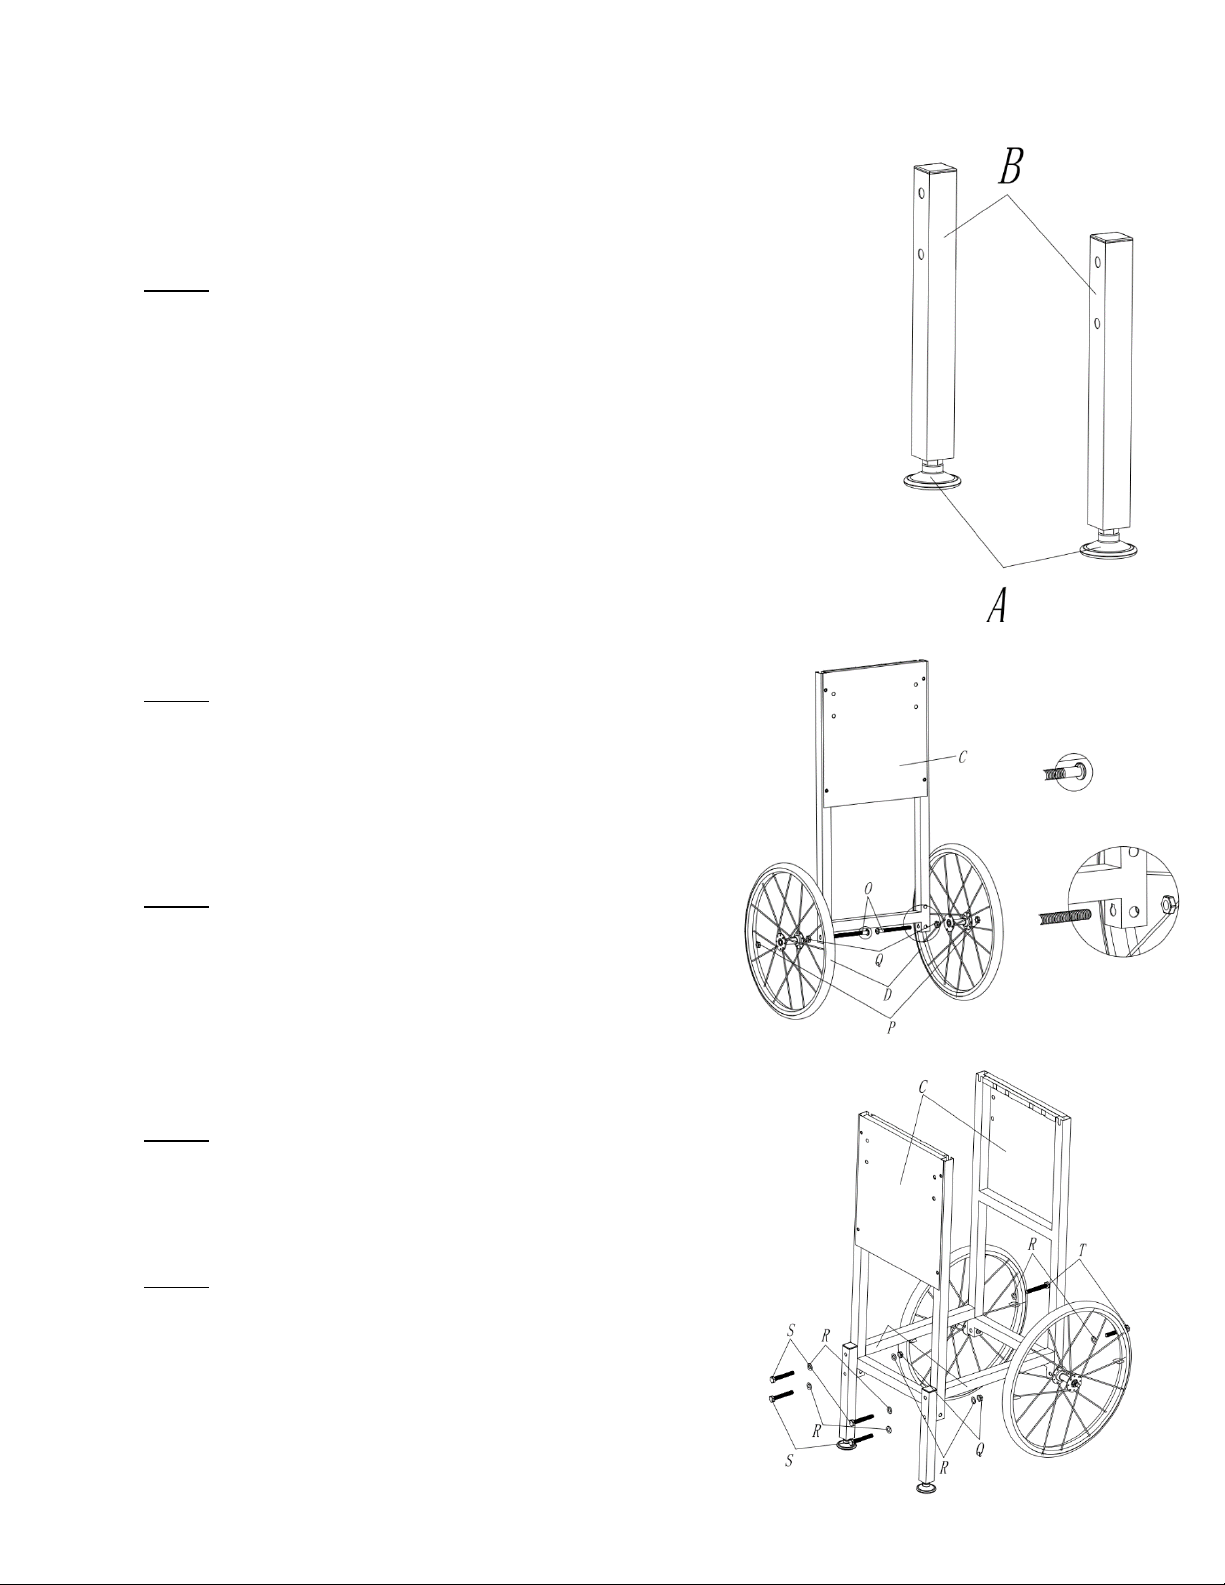
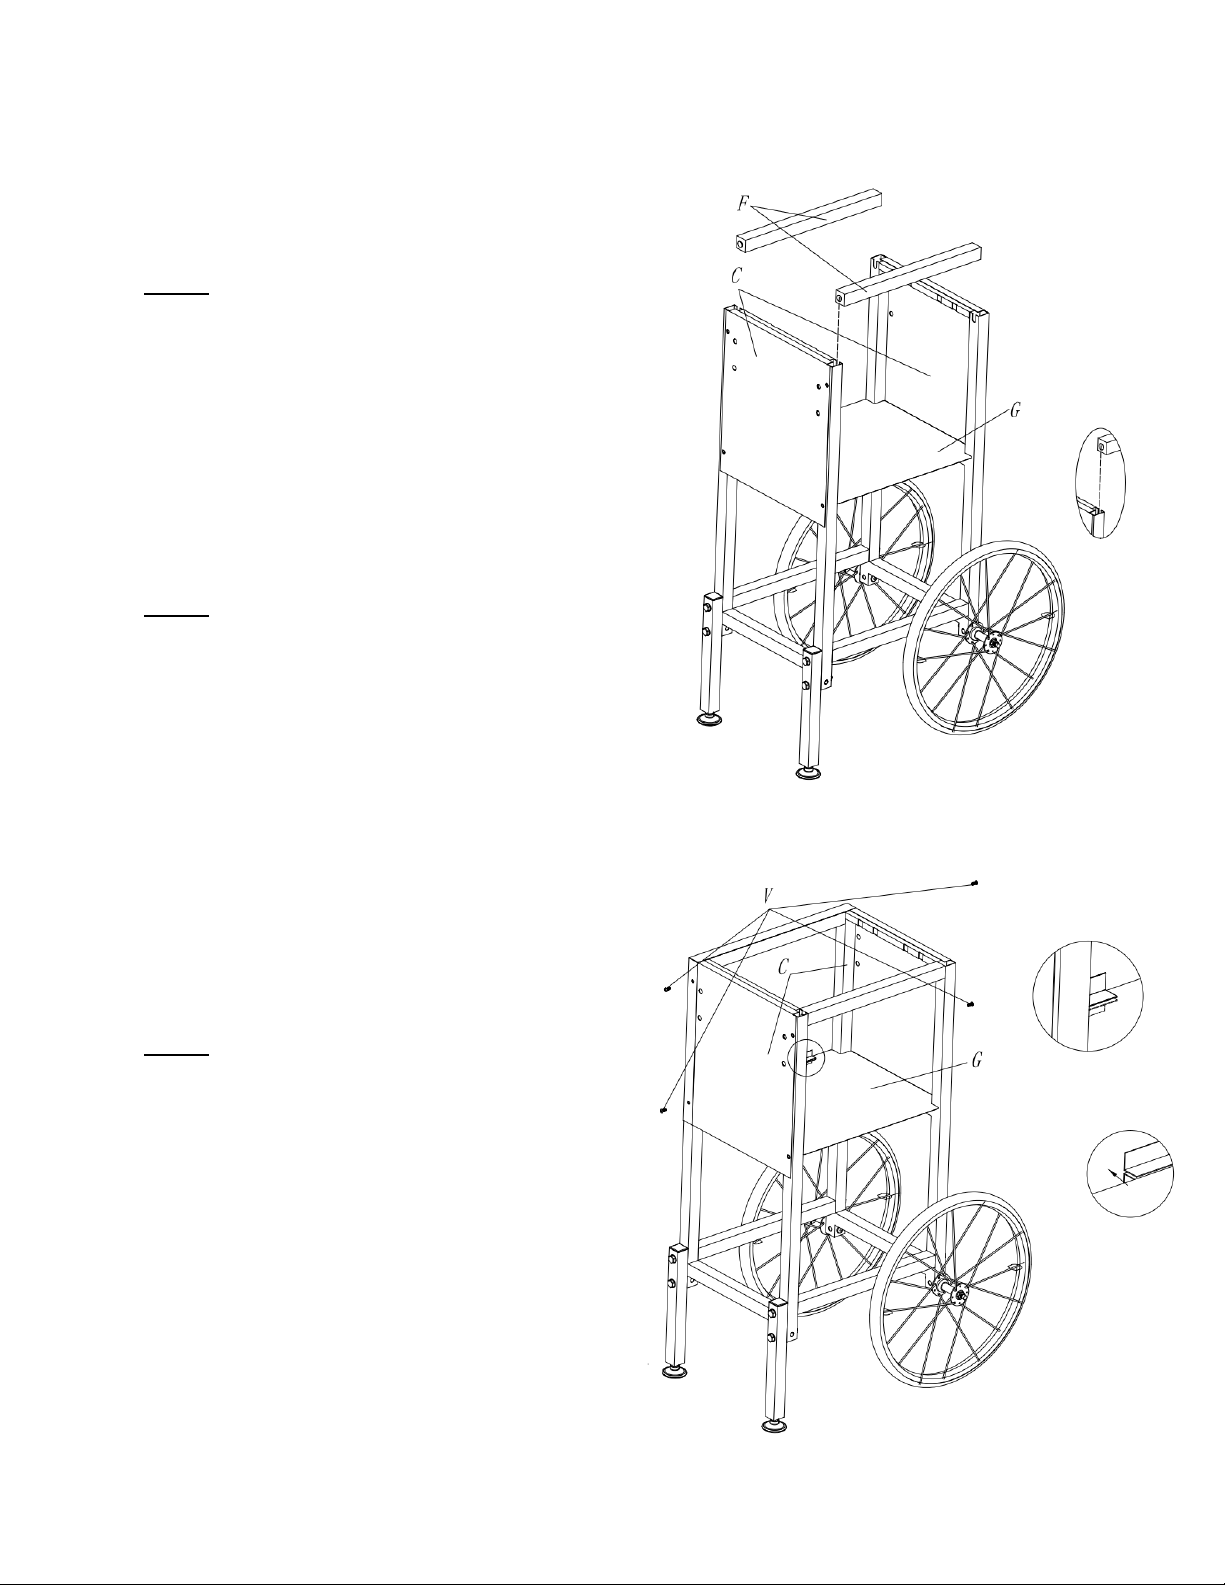
1. Set popcorn popper on a level, dry surface. Gently squeeze the sides of the Olde Midway
front metal panel to detach, then remove all packing material and wipe inside of kettle and
popper with a dry cloth. DO NOT use harsh cleaners or abrasive chemicals. After the initial
setup, maintain a regular care and maintenance plan.
2. Place kettle top onto the brackets. Slide the stirrer through the spacer and kettle top, then
screw clockwise into the gearbox. (Fig. 1)
3. Place the kettle onto the support bracket, while holding, insert the hinge pin through the
kettle and support bracket. (Fig. 2) Insert the cotter pin through the end of the hinge pin to
lock kettle into place (Fig. 3)
4. Connect the power plug from the bottom of the kettle into the outlet on the machine's
ceiling. (Fig. 4) Note: Never plug this cord directly into an electrical outlet.
Fig. 1 Fig. 2 Fig. 3 Fig. 4
Controls
WARM: Turns the warming light on an off.
KETTLE: Turns the kettle on an off, and
activates the stir function.
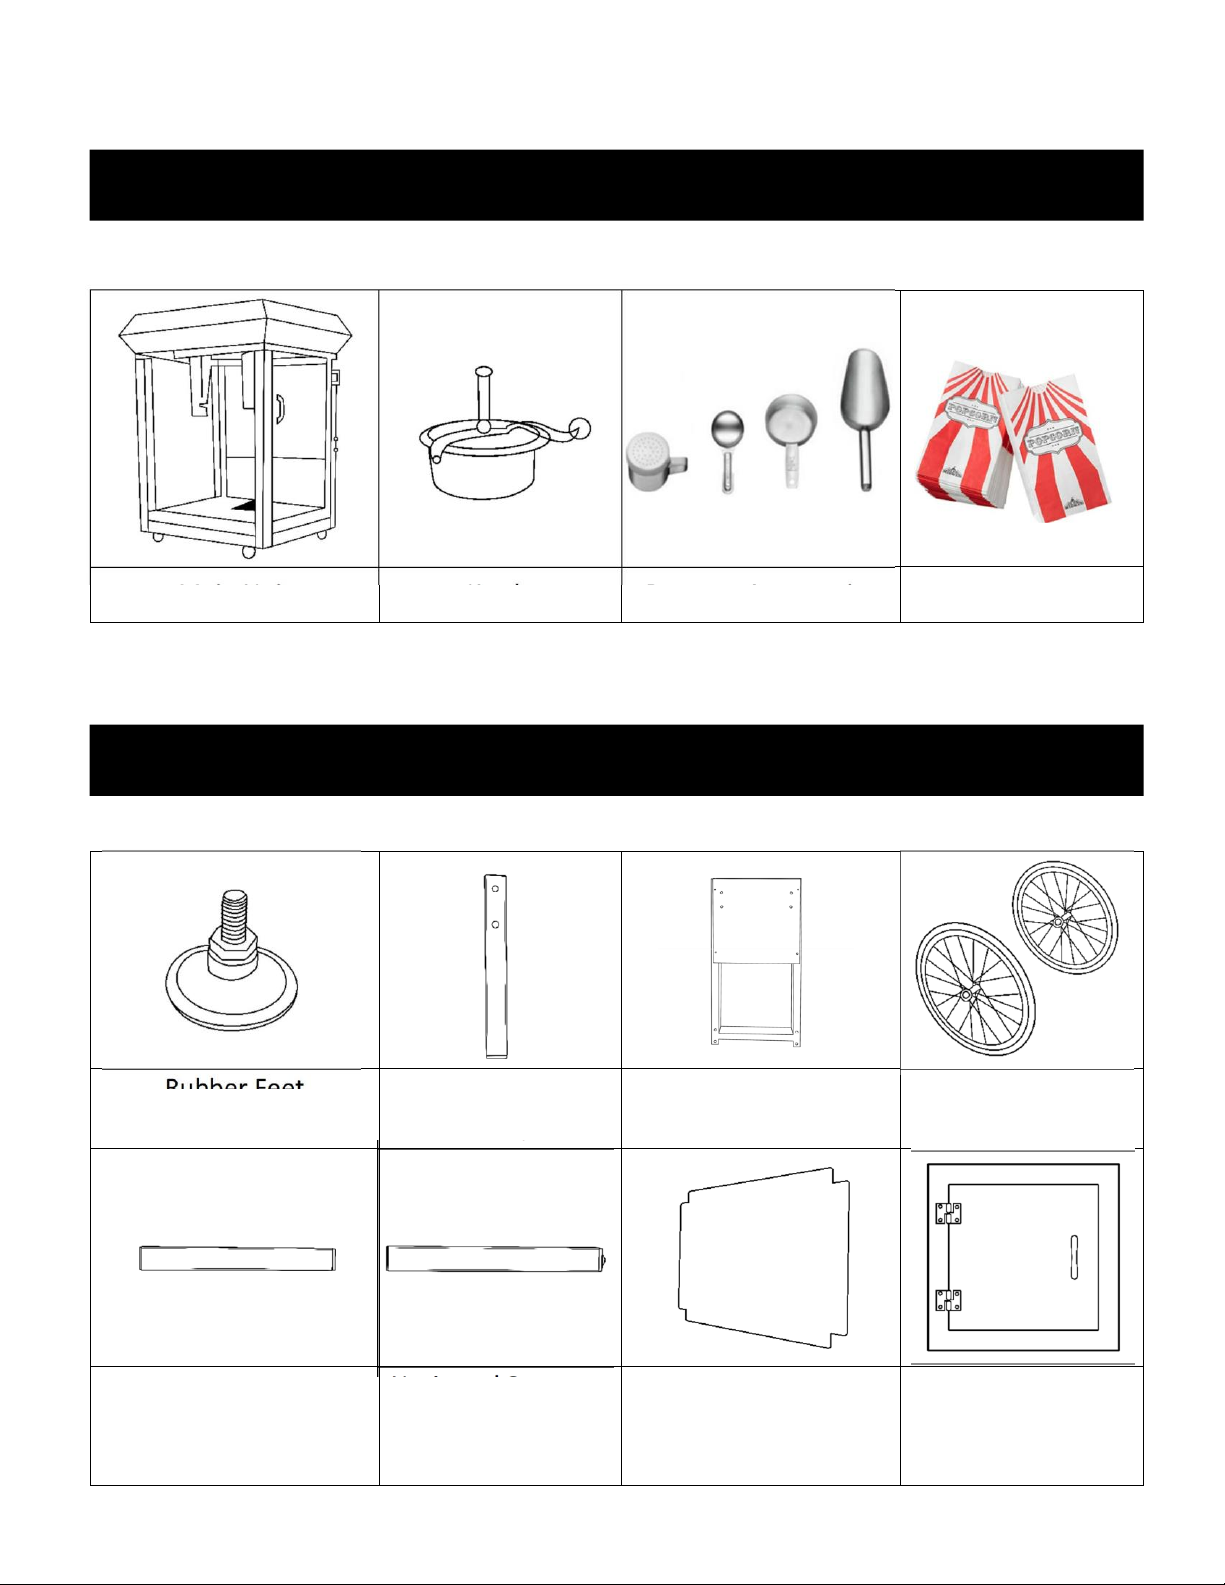
Accessories
Salt 1 Tbsp Kernel Popcorn
Shaker Measure Scoop Scoop

Operating Instructions
Page | 11
Press KETTLE Button Add Oil Add Kernels Dump Kettle
STEP 1: Plug into a grounded 120v electrical outlet only. If using an extension cord, make sure it’s out
of the way to prevent tripping.
STEP 2: Push WARM switch on. Push KETTLE switch on. Lift lid up with the handle and attach to
magnet on the ceiling. Immediately add oil (1 Tbsp per ½ cup kernels), and up to 1‐1/2 kernel
scoops (3/4 cup) of popcorn kernels. Close lid. Allow to heat for 3‐4 minutes. DO NOT HEAT KETTLE
WITHOUT OIL.
STEP 3: Close the glass door carefully. Popcorn should begin popping in 2‐3 minutes.
STEP 4: When popping has stopped, push the KETTLE switch off. (Fig.3). Do not add seasoning or
toppings into kettle.
STEP 5: Gently rotate the roller arm on the kettle to release kettle and dump popcorn. CAUTION!
KETTLE AND LID ARE HOT! Leave the WARM light on to warm the popcorn until served.
STEP 6: Turn all controls off and unplug popper.

Seasoning Recipes
Page | 12
It is recommended that the machine and kettle be cleaned after each use when the popper has cooled.
However, waiting to clean after a few popping sessions is acceptable.
•
Make sure all controls (WARM, KETTLE) are OFF and the popcorn machine is unplugged and cool.
•
Clean all surfaces with a dry or damp cloth or sponge. NEVER immerse the kettle or any other
part of the machine in water.
•
Do not use abrasive chemicals or cleaners on any part of the machine.
•
Clean and dry thoroughly before any extended storage period.
Advanced Kettle Cleaning Technique
1.
After the machine has completely cooled for several hours add a small amount of hot water
(no detergents) into the kettle.
2.
Place a towel in the bottom of the unit with a large bowl on top (make sure bowl is large
enoughto collect all water from the kettle).
3.
Turn on WARM and KETTLE, then bring water to boil for 1 to 2minutes.
4.
Turn off KETTLE and WARM and carefully pour out water into
bowl. [CAUTION: KETTLE AND WATER WILL BE HOT!]
5.
Repeat 2 to 3 times for best results.

Seasoning Recipes
Page | 13
Bacon Parmesan
1/2 cup iodized salt
1/4 cup cooked bacon bits
1/4 cup grated parmesan cheese
Combine and sprinkle over popcorn, then toss.
Pizza
1 tablespoon Parmesan cheese
1/2 teaspoon dried oregano
1 pinch of red pepper flakes.
Sprinkle over popcorn, mix well.
Italian
1 tablespoon basil
1 tablespoon parsley
1/2 teaspoon garlic salt
1 teaspoon popcorn salt (or fine grain salt)
2 tablespoons olive oil
Combine and drizzle over top of served popcorn.
Caramel Marshmallow Drizzle
1/2 cup brown sugar
1/2 cup salted butter
10 marshmallows
Melt butter and sugar in sauce pan, add
marshmallows, stir until melted. Immediately
drizzle over popcorn.
Cinnamon Sugar
2 teaspoons sugar
1/4 teaspoon ground cinnamon
Sprinkle over warm popcorn.
Spicy Sriracha
1 tablespoon melted butter
1 teaspoon sriracha
Mix and drizzle over popcorn.
Taco
1/8 teaspoon coriander
1 teaspoon minced dried onion
2 teaspoons chili powder
2 teaspoons onion powder
1 teaspoon paprika
1 teaspoon garlic powder
1/2 - 1 teaspoon salt
1/2 teaspoon cumin
Combine in bowl and sprinkle over popcorn.
Pumpkin Spice
3 tablespoons unsalted butter, melted
2 tablespoons packed light brown sugar
1 teaspoon pumpkin pie spice
1 Pinch of Salt (optional)
1/2 teaspoon instant espresso powder (or finely
ground coffee grounds)
Combine all ingredients and drizzle over popcorn,
mix well.
Zesty Ranch
1 tablespoon onion powder
1/2 teaspoon garlic powder
1 tablespoon dried dill
1 tablespoon dried parsley
1 teaspoon sea salt
1 teaspoon ground black pepper
Combine and sprinkle onto served popcorn.
Everything Bagel
1 tablespoon poppy seeds
1 tablespoon sesame seeds
1 tablespoon dried minced onion
1 tablespoon dried minced garlic
salt, to taste
Sprinkle over popcorn.
Cajun
4 tablespoons melted butter
1 tablespoon Cajun seasoning
1 teaspoon grated lemon zest
1/4 teaspoon cayenne
2 chopped scallions
Combine, drizzle over popcorn, season with salt.
Cookies & Cream
10 chocolate and cream sandwich cookies
8oz White chocolate bar or chips
Melt white chocolate according to package
directions, sprinkle with finely crushed sandwich
cookie crumbs, let set a few minutes and serve.
Mix measurements suggested for 8-16 cups popped corn, according to taste.
This manual suits for next models
1
Table of contents
Other OLDE MIDWAY Kitchen Appliance manuals
Popular Kitchen Appliance manuals by other brands

Tricity Bendix
Tricity Bendix CSI 3302 Operating and installation instructions

Beko
Beko BKK 2110 IM user manual

CASO DESIGN
CASO DESIGN KM 1200 Chef operating manual

Emeril Lagasse
Emeril Lagasse FOREVER PANS quick start guide

saro
saro Bain-Marie ECO 160 operating instructions

Narita
Narita NPC-1205 instruction manual