Olympia 6111 User manual

Digital Cordless Telephone
Operating Instructions
01.09.2003 en/en
6111
6112


Contents
www.olympia-life.com
OPERATING
INSTRUCTIONS iPage
Introduction 1........................
Important Safety Notes 1...........................
Exemption from Liability 1.........................
Intended Use 1....................................
Installation 2.........................
Package Contents 2...............................
Positioning the Base Station and Charging Station 2
Connecting the Base Station and Power Plug 2.....
Connecting the Charging Station 3.................
Inserting the Batteries / Attaching the Belt Clip 3....
Features 4...........................
Features 4........................................
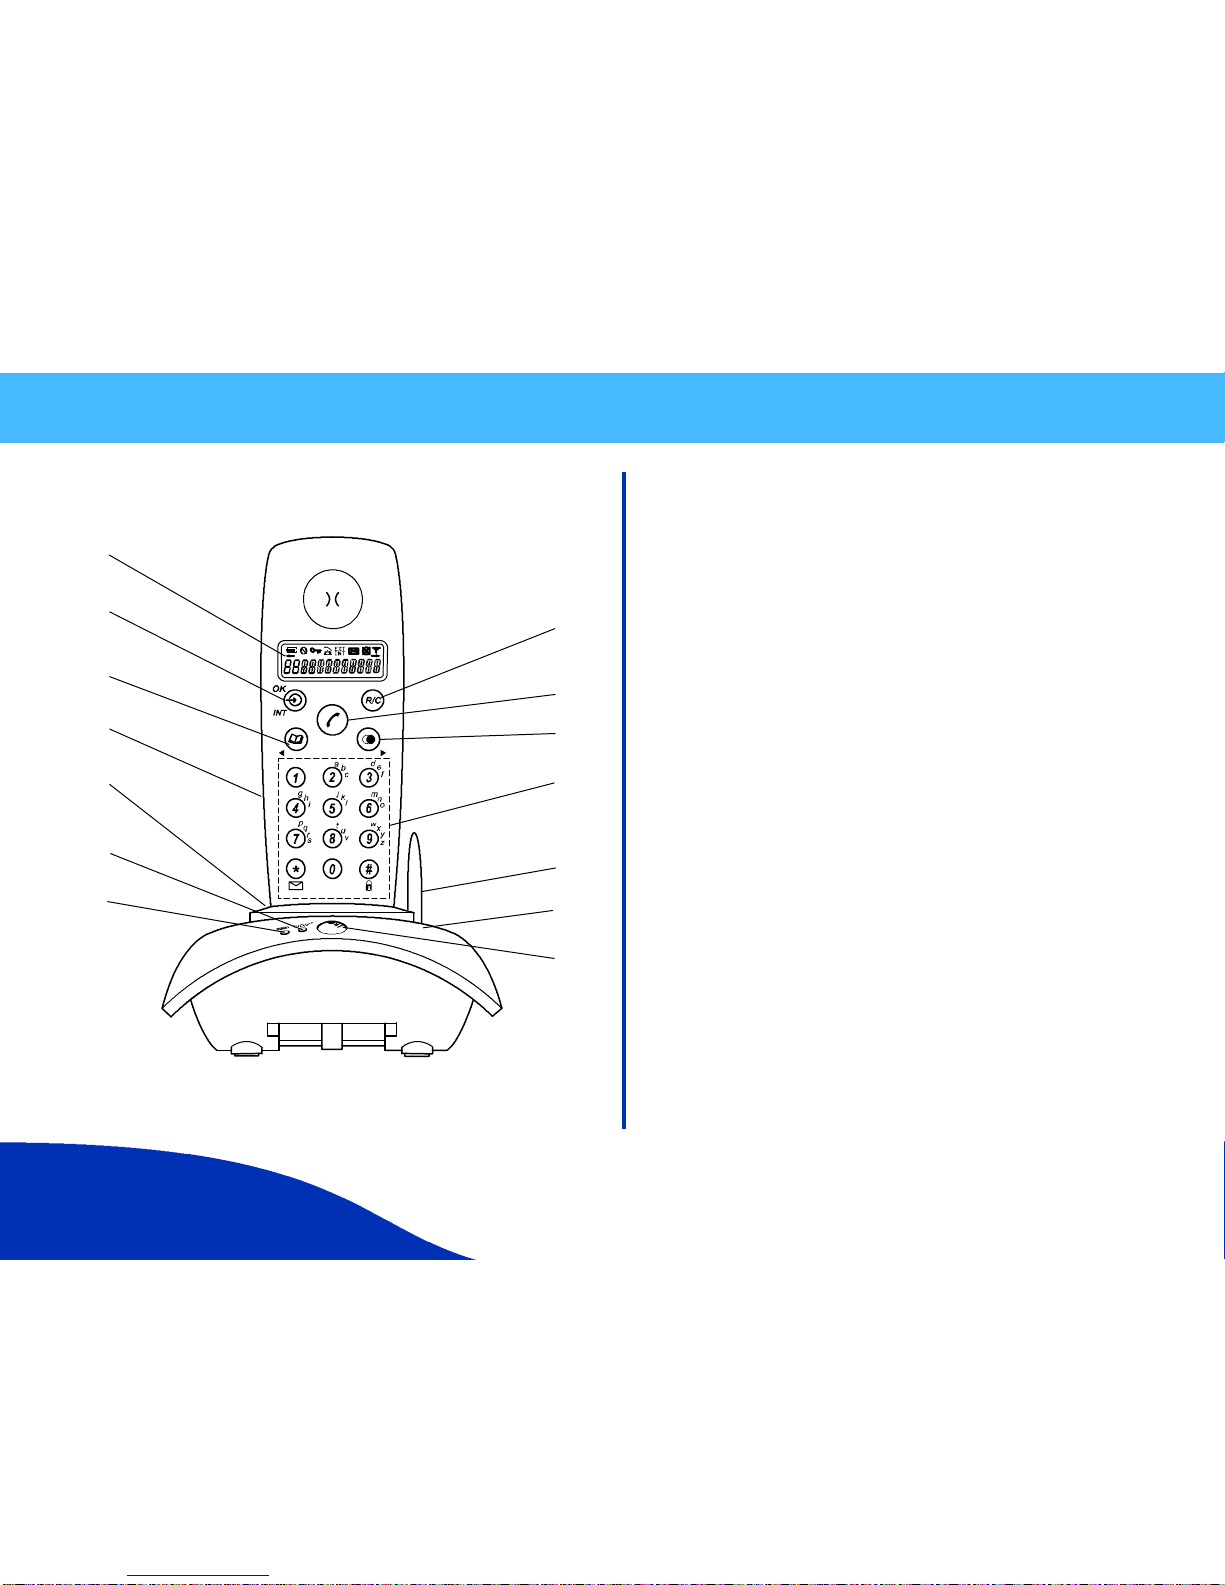
Operating Elements and Indicators 5...
Menu Structure 6.....................
Telephone Operation 8...............
Switching the Handset On/Off 7...................
Selecting the Language 7..........................
Using the Telephone 7............................
Making external calls 7........................................
Direct dialing 7.............................................
On--hook dialing 7...........................................
Dialing with a prefix 8..........................................
Making internal calls 8.........................................
Taking calls 8.................................................
Handset is in the base station 8...............................
Handset is not in the base station 8............................
Muting the microphone 9.......................................
Changing the receiver volume 9.................................
Putting a call on hold 9.........................................
Redialing 10..................................................
Redialing, receiver on--hook 10................................
Redialing, receiver off--hook 10................................
Transferring a call 10..........................................
Quick Dial Memory 11.............................
Storing entries (Function 1) 11...................................

Contents
OPERATING
INSTRUCTIONS
www.olympia-life.com
iiPage
Editing/Deleting entries 11......................................
Dialing from the quick dial memory 11............................
Handset Settings 12...............................
Changing the ringing volume and melody
(Function 2) 12.............................................
Activating/Deactivating the key tone (Function 3) 12................
Activating/Deactivating automatic call answering
(Function 4) 12.............................................
Changing the base station ringing volume and melody
(Function 5) 12.............................................
Setting the flash time (Function 6) 13.............................
Changing the dialing mode (Function 7) 13........................
Changing the PIN code (Function 8) 13...........................
Registering additional handsets (Function 9) 14....................
Deleting handsets (Function 0) 14................................
Activating/Deactivating the key lock 14...........................
Base Station Functions 15.........................
Paging the handsets 15........................................
CID Services 15...................................
CID -- caller identification 15....................................
View caller log 15.............................................
Deleting CID entries 15........................................
Warning tones 16.............................................
Warranty / Accessories 17.............
Warranty 17.......................................
Accessories 17....................................
Technical Modifications 18............
Conformity of the telephone to the EU directives is con-
firmed by the CE symbol.
The corresponding Declaration of Conformity can be
viewed or downloaded from www.olympia-life.com.

Introduction
www.olympia-life.com
OPERATING
INSTRUCTIONS 1Page
Important Safety Notes
Please observe the following to ensure reliable operation of the telephone:
SRead this manual thoroughly and observe the operating
instructions and information provided.
SPlace the base station on a non--slip surface and lay the
connection cables so they cannot be the source of an accident.
SDo not expose the equipment to extreme temperatures or high
relative humidity and protect it from direct sunlight and dusty
conditions.
SClean the equipment with a soft, damp cloth. Do not use any
solvents or aggressive cleaning agents.
SOnly connect approved accessories.
SOnly use the power plug supplied.
SNever open the unit. Opening the unit annuls claims under the
terms of guarantee and exposes the person to the risk of an
electric shock.
SRepairs to defective units should only be carried out by service
centers recommended by the sales outlet.
SWe recommend removing the batteries if the equipment is not to be
used for longer periods.
SOnly replace the batteries with types recommended by us. Dispose
of defective batteries according to the applicable local laws (not in
household waste). We assume no liability for damage caused by
using the equipment for unintended purposes.
Exemption from Liability
We cannot guarantee the information which relates to the technical
properties or that contained in this document is correct. The product and its
accessories described in this document are subject to constant
improvement and further development. For this reason, we reserve the right
to modify components, accessories, technical specifications and related
documentation of the product described herein without notification.
Intended Use
This telephone is designed for telephoning within a telephone network. Any
other use is considered unintended use. Unauthorized modifications or
reconstruction not described in this manual are not permitted.

Installation
OPERATING
INSTRUCTIONS
www.olympia-life.com
2Page
Package Contents
Model name
6111 6112
Base stations 1 1
Handsets 1 2
Power plugs 1 2
Telephone line 1 1
Batteries, type AAA, Micro 2 4
Charging station -- 1
Belt clip 1 2
Operating instructions 1 1
Please check the contents of the package carefully. If anything is missing
or shows signs of transport damage, do NOT put the telephone into
service! In such a case, contact either your sales outlet with the purchase
receipt or the OLYMPIA Service Center directly.
Note: Keep the equipment packaging so that it will not be damaged in the
event of transport.
Positioning the Base Station and
Charging Station
Place the base station and charging station in an easily accessible location.
Ensure that they are set down on stable, level, non--slip surfaces. In
addition, ensure that the equipment is set down where all the necessary
cables can be laid in such a way that nobody can trip over them. Do not
position the base station and the charging station in the direct vicinity of
other electrical apparatus, such as microwave ovens, PCs or HiFi
equipment.
Do not expose the base station or charging station to direct
sunlight. Protect the base and charging stations from getting
wet. They must not be placed in rooms subject to condensation
development, corrosive vapors or high concentrations of dust
(e.g. cellar rooms, garages or winter gardens). The ambient
temperature must be between 0 _C and 35 _C.
Connecting Base Station and Power
Plug
Connect the plugs to the corresponding sockets in the base station (they
cannot be connected incorrectly because the sockets and plugs are
designed to prevent reverse poling). Lay the cable under the telephone to
the rear. Plug the telephone line in socket F of the telephone connection
socket. Insert the power plug in the power outlet. The base station is now
ready to operate.

Installation
www.olympia-life.com
OPERATING
INSTRUCTIONS 3Page
The base station is not equipped with a power switch. Ensure
that a mains power outlet is close by and that the power plug is
easy to access. Check that the voltage specified on the power
plug corresponds with that supplied by local power network.
Connecting the Charging Station
Insert the power plug in the socket on the underside of the charging station.
Insert the power plug at the other end in the power outlet. The charging
station is now ready to operate.
Inserting Batteries / Attaching Belt Clip
Open the battery compartment by sliding the cover down.
Insert two AAA batteries in the compartment, ensuring correct polarity.
The handset does not work if the wrong batteries are inserted.
It is also possible that the handset could be damaged as a
result.
Replace the cover on the battery compartment and slide it on until it locks in
place. Place the handset in the base station. An acoustic acknowledgement
is issued and the charging indicator signals the charging process has
started.
Note: Allow the batteries to be charged for 14 hours without interruption the
first time they are charged. When possible, only remove the handset from
the base station when the charging process has been completed. This
ensures optimum operation.
Attach the belt clip by pressing it from behind over the back housing panel
and inserting the tabs in the slots provided. The clip is slightly flexible and
snaps audibly into place.

Features
OPERATING
INSTRUCTIONS
www.olympia-life.com
4Page
Features
We are very pleased that you have purchased this highly sophisticated,
cordless telephone which is equipped with the following features:
Sdigital, cordless, easy--to--use telephone complying to
DECT/GAP standards
Salphanumeric LC display
Squick dial memory for 10 call numbers
Sprefix dialing
Sredialing the last call number
SCID function for 10 calls
Smicrophone muting function
Sacoustic battery and range warning signals
Skey lock
Sautomatic call answering on/off
Skey input tone on/off
S9 incoming call ringing melodies
Sthree--level ringing volume control
Sthree--level receiver volume control
Spaging function from base station to handset
Soperation of up to 2 handsets
SDTMF, PULSE
Sup to 100 hours standby
Sup to 10 hours continuous call time
Soperation with 2 standard AAA batteries (Micro, NiMH)
Ssecurity code

Operating Elements and Indicators
www.olympia-life.com
OPERATING
INSTRUCTIONS 5Page
1
2
3
4
7
8
9
12
13
14
5
6
10
11
1 R key // Clear key
2 Take call // End call key
3 Redial // Scroll to the right // Enter pause
4 Digit keys with letter imprint
5 Antenna
6 Base station
7 Paging key (call handset)
8 LED: Battery charging indicator
9 LED: Flashes for incoming calls
Lights up for external calls
Flashes when there are new calls in the CID memory
10 Handset holder (can be turned in the base station)
11 Handset
12 Quick dial memory // Scroll to the left
13 OK key (confirmation) // Activate settings // Internal call
14 Display
bIndicates the battery charge status
XFlashes in the case of incoming external call
YFlashes in the case of incoming internal call
WIndicates that the key input lock is active
SIndicates that microphone muting is active
VIndicates that the ringing tone is switched off
OLights up when the handset is registered on the base. Flashes if
there is no radio communication contact
<> Indicates that the call number is longer than can be displayed //
Indicates that scrolling is possible
Ryz
{Indicates that incoming calls have been received on the CID
memory

Menu Structure
OPERATING
INSTRUCTIONS
www.olympia-life.com
6Page
NO. FUNCTION COMMENT
1STORE MEM SELECT 0-9 ENTER NO To store max. 10 call numbers
2HS RING [ ] [- ] [-- ] [---] MELODY 1-9 Set ringing tone volume and melody
on handset
3BEEP ON / OFF Key input acknowledgement tone
on/off
4AUTO ON / OFF Automatic call answer
5BS RING [ ] [- ] [-- ] [---] Set ringing tone volume and melody
on base station
6FLASH TIME 100, 250, 600 Set flash time
7DIAL MODE TONE / PULSE Set dialing mode
8CHANGE PIN ENTER PIN NEW PIN REPEAT Change PIN (default setting = 0000)
9REGISTER Register handset on base station
0DELETE HS Delete the handset from base station
uLANGUAGE DEUTSCH/ENGLISH Select language for display texts
Note: The functions can be selected in various ways.
The basic condition, however, is that the handset is on--hook, i.e. no outside line has been dialed.
1. Press the OK key and navigate using the arrow keys.
2. Press the OK key and then enter the number of the function. You automatically access column three of this table.

Telephone Operation
www.olympia-life.com
OPERATING
INSTRUCTIONS 7Page
Switching the Handset On/Off
1. When the handset is inserted in the
base station or charging unit, it
switches on automatically and starts to
charge up.
Selecting the Language
Two different languages are available for selection for each handset.
Proceed as follows to select a language:
1. Press the :key and then B.
2. To confirm the selection, press the :
key.
3. Press the Bkeyasoftenas
necessary to select the language.
4. To confirm the selection, press the :
key.
LANGUAG
E
bO
ENGLISH
bO
Using the Telephone
Making external calls
There are two ways to dial a number, namely direct dialing or on--hook
dialing.
Direct dialing
1. Press the Akey and wait for the
dialing tone.
2. Enter the telephone number and
complete the call.
3. Press the Akey to end the call.
030123456
bLXO
On--hook dialing
1. Enter the telephone number.
2. Press the ;key to delete any
incorrect entries and correct them.
3. Press the Akey. The number entered
is dialed and a connection established.
Carry out the conversation.
030123456
030123456
4. Press the Akey to end the call.
bLXO
bO
Note: If the OLYMPIA telephone is connected to a PBX system, it may be
necessary to insert a dialing pause. To do this, press the C(P) key after
the digit, e.g. 0, for an outside line.

Telephone Operation
OPERATING
INSTRUCTIONS
www.olympia-life.com
8Page
Dialing with a prefix
The memory segment 0 can be used, for example, to store a frequently
used access code number.
1. Press the 0key for two seconds, the
stored access code number appears.
How to assign numbers to memory
segments is described in the section
“Quick Dial Memory”.
01234
2. Add the call number and press the A
key.
bO
Making internal calls
If more than one handset is registered on the base station, internal calls
can be made free of charge.
1. Press the :key for two seconds.
The other handset rings.
2. The person receiving the call must
press the Akey on the handset to
take the call and carry out the
conversation.
bLYO
Note: If an external call is received during an internal call, short acoustic
signals are issued (call waiting).
Taking calls
When an external call is received, all the handsets registered and the base
station ring. EXT flashes in the handset display and, if configured, the
telephone number of the caller appears (network--dependent). The
incoming call LED on the base station flashes. In the case of an internal call
or on pressing the Paging key on the base station, INT flashes in the
handset display.
Handset is in the base station
1. Take the handset from the base station;
a connection is automatically
established (when the AUTO function
is active).
2. Press the Akey when the AUTO
function is deactivated. Carry out the
conversation.
3. Press the Akey to end the call.
03012345
03012345
bLRO
bLRO
Handset is not in the base station
1. Press the Akey. Carry out the
conversation.
2. Press the Akey to end the call.
03012345
bLRO

Telephone Operation
www.olympia-life.com
OPERATING
INSTRUCTIONS 9Page
Muting the microphone
1. Press the :and 2keys in order to
mute the microphone during a call.
2. Press the :and 2keys again to
reactivate the microphone.
03012345
bLXSO
Changing the receiver volume
1. Press the :and 1,2or 3keys
to adjust the volume of the receiver
during a call.
Putting a call on hold
If the telephone is connected to a PBX network, it is possible to put calls on
hold and call other subscribers or to forward calls.
1. Press the ;key to put the call on
hold.
2. Dial the number of the extension
required (e.g. 23).
3. Press the ;key once more to take
the call back again
or
the Akeytoforwardthecalltothe
extension number dialed.
23
bLXO
Note: The above information can vary according to the PBX network used.
Therefore, refer to the relevant information in the PBX network documents.

Telephone Operation
OPERATING
INSTRUCTIONS
www.olympia-life.com
10Page
Redialing
The telephone stores the last call number dialed.
Redialing, receiver on--hook:
1. Press the Ckey; the last call number
dialed is displayed. 03012345
2. Press the Akey. The number is
dialed. Carry out the conversation.
bO
Redialing, receiver off--hook:
1. Press the Akey and wait for the
dialing tone.
2. Press the Ckey; the number last
dialed is displayed and automatically
redialed.
Carry out the conversation.
03012345
bLXO
Transferring a call
It is possible to transfer a call to other handsets which are registered on the
same base station.
1. Press the :key for approx. two
seconds.
2. The external caller is kept on hold. As
soon as the person with the other
handset takes the call, press the A
key at any time to transfer the call.
3. If the handset contacted does not
answer, press the :key again for
two seconds to take the call back.
03012345
bLXO
Note: The call can be transferred from the handset user currently
connected to the external caller at any time. The external caller cannot hear
any conversation between the handset users.

Telephone Operation
www.olympia-life.com
OPERATING
INSTRUCTIONS 11Page
Quick Dial Memory
Your OLYMPIA telephone can store up to 10 entries in the quick dial memory.
Store numbers frequently used in order to be able to dial them quickly and
easily.
Storing entries (Function 1)
1. Press the :key twice and select a
memory segment (0--9).
2. Enter the call number and confirm the
entry by pressing the :key.
1-STORE MEM
SELECT 0-9
bO
ENTER NO
bO
bO
Editing/Deleting entries
1. In order to edit or delete telephone
numbers which have been stored,
press the Bkey and the relevant
memory segment number.
2. Delete the digits by pressing the ;
key and enter the new ones.
030 12345
bO
030 54321
bO
STORE TO
bO
3. Enter the existing or new memory
segment number and confirm by
pressing the :key.
Note: If a memory segment should be deleted, simply delete all the digits
without entering any new ones.
Dialing from the quick dial memory
1. Press the Bkey and the enter the
number of the relevant memory
segment. The call number appears
immediately in the display.
2. Press the Akey and carry out the
conversation.
03012345
bO
03012345
bLO

Telephone Operation
OPERATING
INSTRUCTIONS
www.olympia-life.com
12Page
Handset Settings
Changing the ringing volume and melody
(Function 2)
1. Press the :and 2keys. [---]
bO
MELODY 1-9
bO
2. Use the arrow keys Bor Cto select
one of the three volume settings
provided and then press the :key to
confirm the selection.
3. Use the arrow keys Bor Cto select
one of the nine melodies provided and
then press the :key to confirm the
selection.
Note: Instead of using the arrow keys, a direct selection can be made by
pressing the respective digit key.
Activating/Deactivating the key tone (Function 3)
Key input can be confirmed by an acknowledgement tone.
1. Press the :and 3keys. BEEP ON
bO
2. Press the :and 3keys again to
deactivate the key tone feature. BEEP OFF
bO
Activating/Deactivating automatic call answering
(Function 4)
The automatic call answering function enables the incoming call to be taken
immediately the handset is removed from the base station. It is not
necessary to press the call key after removing the handset from the base
station.
1. Press the :and 4keys. AUTO ON
bO
2. Press the :and 4keys again to
deactivate the automatic call answering
function. AUTO OFF
bO
Changing the base station ringing volume and
melody (Function 5)
Note: The procedures for changing the ringing volume and melody for the
base station is the same as for the handset. The procedure is activated by
pressing the :and 5keys.

Telephone Operation
www.olympia-life.com
OPERATING
INSTRUCTIONS 13Page
Setting the flash time (Function 6)
When an external call has been taken, use the R key to put the call on hold
or forward it to another extension. Various flash times can be set for this
purpose.
1. Press the :and 6keys. 100
bO
2. Press the Bor Ckey to select one
of the three flash times (100, 250,
600 ms).
Changing the dialing mode (Function 7)
The dialing mode used can be selected between the dialing pulse (PULSE)
and dual--tone multi--frequency (TONE) modes.
1. Press the :and 7keys. TONE
bO
2. Press the Bor Ckey to switch
between PULSE and TONE.
Changing the PIN code (Function 8)
1. Press the :and 8keys. ENTER PIN
bO
2. Enter the PIN
(default setting is 0000)
and press the :key to confirm the
entry.
3. Enter the new PIN and press the :
key to confirm the entry.
PIN----
bO
NEW PIN
bO
REPEAT
bO
4. Repeat the entry and press the :
key to confirm the entry.
Note: If you lose or forget your PIN code, our service personnel can
provide help.

Telephone Operation
OPERATING
INSTRUCTIONS
www.olympia-life.com
14Page
Registering additional handsets (Function 9)
Each additional, compatible handset must be registered on the base
station. Up to two handsets can be registered on each base station.
1. Press the :and 9keys.
2. Press the Paging key on the base
station until the acknowledgement
melody is heard.
SEARCHING
bP
3. Enter the PIN
(factory setting is 0000).
PIN----
bP
bO
4. Confirm by pressing the :key.
Note: After a connection has been established, the flashing antenna
symbol lights up constantly.
Deleting handsets (Function 0)
Handsets which have been registered can be deleted or deregistered.
1. Press the :and 0keys. ENTER PIN
bO
2. Enter the PIN
(factory setting is 0000). The handset
with which the deletion was performed
remains registered; the other handset
is always the one deleted.
PIN----
bO
----
bO
3. Confirm by pressing the :key.
Activating/Deactivating the key lock
In order to prevent a number being dialed by mistake, it is possible to
activate the key locking function.
1. Press the #key for two seconds. bW O
2. Press the #key again for two
seconds to deactivate the key locking
function.
bO

Telephone Operation
www.olympia-life.com
OPERATING
INSTRUCTIONS 15Page
Base Station Functions
Paging the handset
If the handset has been misplaced, it is possible to call all the handsets.
The handsets ring ten times until any key is pressed.
1. Press the Zkey on the base station.
CID Services
CID -- caller identification
If the CID service is available to you (more information is available from
your service provider), the telephone automatically stores the last ten
incoming calls.
View caller log
1. If the handset is on--hook, press the
*key for two seconds. 01 03012345
bO
2. Press the Bor Ckey to scroll
through the list.
3. Press the Akey to dial the
subscriber directly. 03012345
bLO
Deleting CID entries
1. Press the *key for two seconds.
2. Press the ;key for two seconds. ERASE?
bO
3. Press the Bor Ckey to select
whether only the current number or all
the numbers should be deleted.
CONFIRM
bO
4. Press the :key.
01 03012345
bO

Telephone Operation
OPERATING
INSTRUCTIONS
www.olympia-life.com
16Page
Warning tones
Observe the following warning tones issued by the handset:
Key tone: Is always issued when a key is pressed except when
the BEEP (acknowledgement signal) has been deacti-
vated.
Low battery
charge: If there are no more bars inside the battery symbol, a
warning tone is issued which prompts the user to
charge the battery.
Confirmation of
input: Is always issued when a setting or selection is con-
firmed.
Range: Is always issued when the handset is used too far from
the base station. The flashing antenna symbol indica-
tes that there is no longer a connection between the
handset and base station.
This manual suits for next models
1
Table of contents
Other Olympia Cordless Telephone manuals

Olympia
Olympia 681X Series User manual

Olympia
Olympia OL3020 User manual

Olympia
Olympia COP 24201 User manual

Olympia
Olympia fun User manual

Olympia
Olympia OL2400 User manual

Olympia
Olympia DECT 5000 User manual

Olympia
Olympia Cool User manual

Olympia
Olympia CDP 24201 User manual

Olympia
Olympia OL5800 User manual

Olympia
Olympia 6101 User manual