Olympia OL3020 User manual

OLYMPIA®OL3020
OWNER’SMANUAL
MANUALDELUSARIO

OL3020 User Manual 2
Copyright
© 2004, Wave Industries Ltd. All Rights Reserved.
Reproduction, adaptation, or translation without prior written permission is
prohibited, except as allowed under the copyright laws.
First Edition: June 2004
Trademark Information
Olympia®is a registered trademark of Olympia International Holdings Ltd.
InfoGlobe®is a registered trademark of Wave Industries, Ltd.
Disclaimer
The information contained in this document is subject to change without notice.
Wave Industries makes no warranty of any kind with respect to this information.
Wave Industries shall not be liable for any direct, indirect, incidental,
consequential, or other damage alleged in connection with the furnishing or use of
this information.
Printed in China

OL3020 User Manual 3
TABLE OF CONTENTS
IMPORTANT SAFETY INSTRUCTIONS..................................................................5
SAFETY INSTRUCTIONS FOR BATTERY PACK...................................................7
Part I Cordless Phone Operation.....................................................................8
1 Cordless Phone Features.....................................................................................8
2 Handset Caller ID Features.................................................................................8
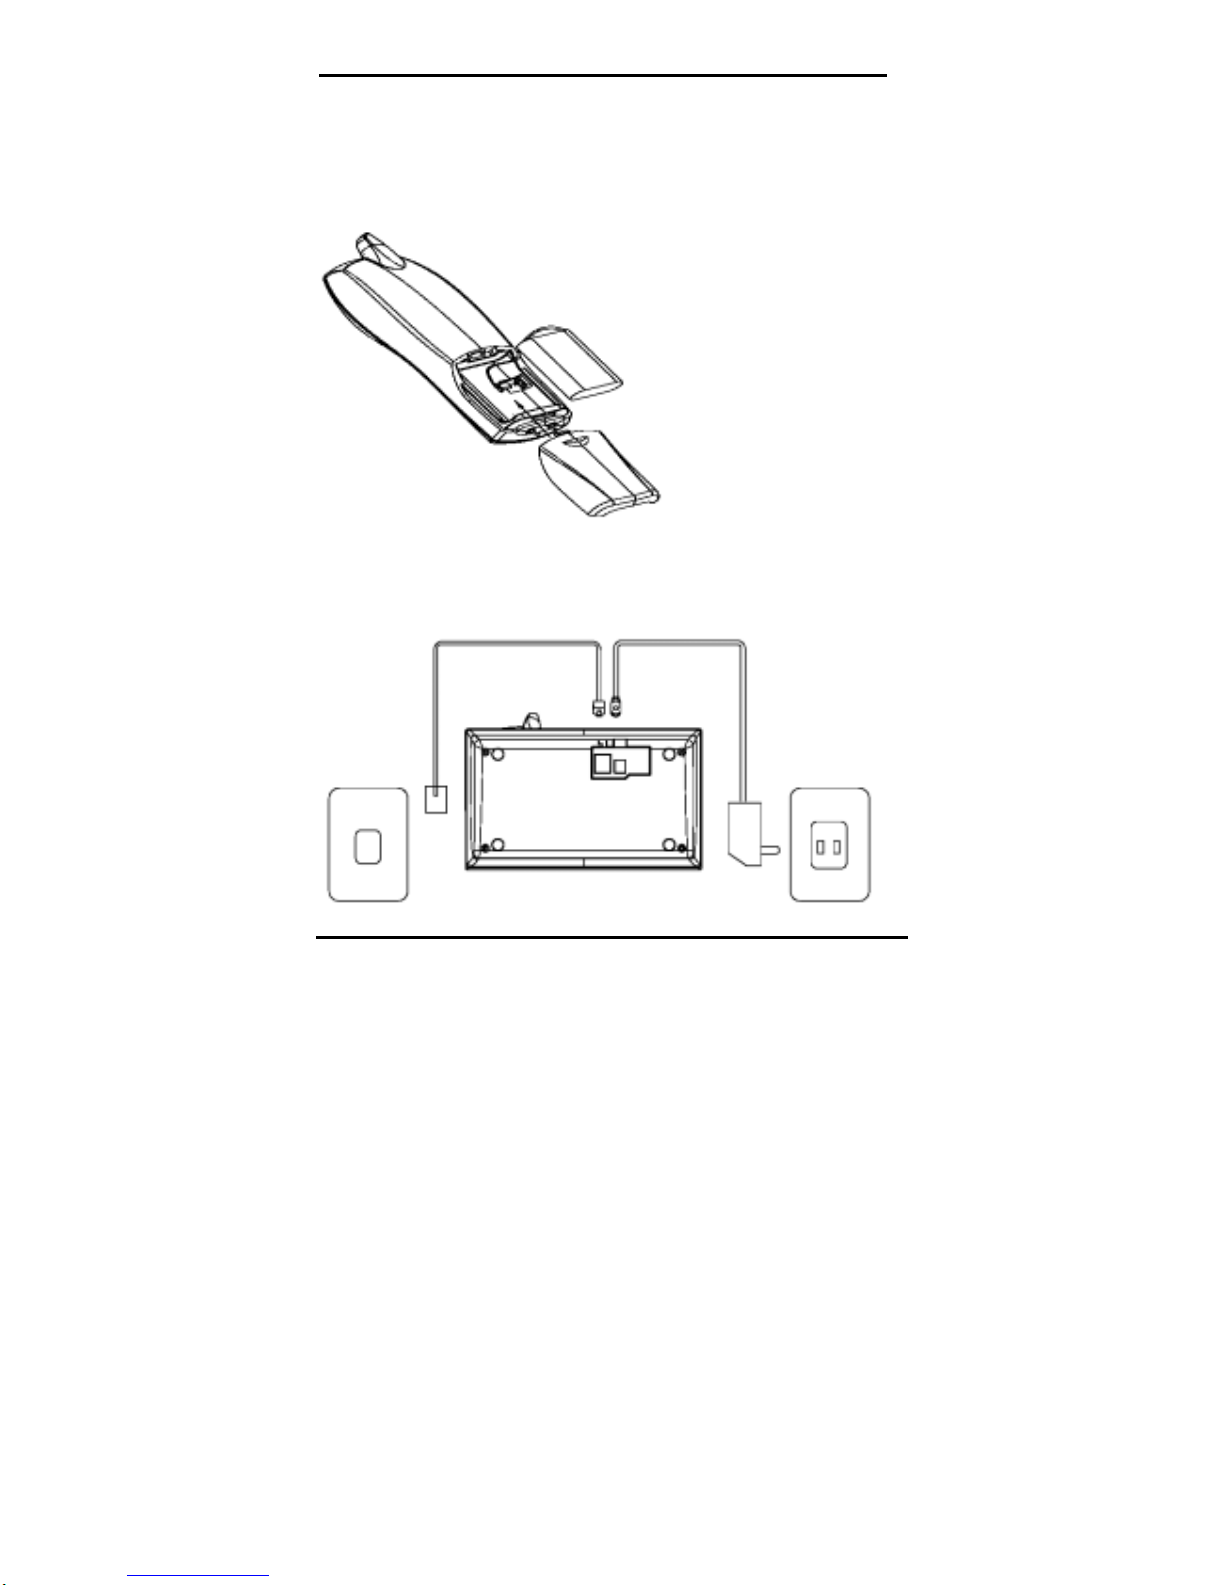
3 Set Up.................................................................................................................9
4 Handset – Quick Programming Guide................................................................9
5 Installation and Charging of the Battery Pack ..................................................10
6 Layout of Keys and Indicators..........................................................................11
7 Powering Up.....................................................................................................12
8 Answering Calls ...............................................................................................12
9 Make a Call ......................................................................................................13
10 Terminate a Call ...............................................................................................13
11 Short Paging (To Locate the Handset)..............................................................13
12 Long Paging .....................................................................................................13
13 Selecting System Language..............................................................................14
14 Setting Local Area Code...................................................................................14
15 Setting Tone/Pulse (Preset to Tone) .................................................................14
16 Setting RINGER ON/OFF................................................................................15
17 Setting Date & Time.........................................................................................15
18 Setting Display Contrast...................................................................................15
19 Caller ID Operation - Handset..........................................................................17
20 Visual Message Notification - Handset ............................................................24
21 Speed Dial Memory (0…9) ..............................................................................25
22 Pre-dialing ( Handset OFF ) .............................................................................28
23 Redial with Handset OFF .................................................................................29
24 Dialing Digits ...................................................................................................30
25 Call Timer.........................................................................................................30
26 Battery/Voltage Low Detection........................................................................31
27 Mute ...............................................................................................................31
28 Changing Volume.............................................................................................31
Part II InfoGlobe Operation...........................................................................32
1 InfoGlobe Features ...........................................................................................32
2 InfoGlobe Control Keys ...................................................................................32
3 Getting Started..................................................................................................33
4 Normal Standby Mode......................................................................................33
5 Pre-programmed Messages...............................................................................34
6 Demonstration Mode ........................................................................................35
7 Time & Date.....................................................................................................36
8 Daylight Saving Time.......................................................................................37
9 Personal Messages............................................................................................37
10 Erase All Memories..........................................................................................39

OL3020 User Manual 4
11 Caller ID...........................................................................................................39
12 Setting Timer On/Off........................................................................................41
13 Troubleshooting the InfoGlobe.........................................................................42
Part III Consumer Information ....................................... 错误!未定义书签。

OL3020 User Manual 5
IMPORTANT SAFETY INSTRUCTIONS
BEFORE USING YOUR TELEPHONE EQUIPMENT, BASIC SAFETY
PRECAUTIONS SHOULD ALWAYS BE FOLLOWED TO REDUCE THE RISK OF
FIRE, ELECTRIC SHOCK AND INJURY TO PERSONS, INCLUDING THE
FOLLOWING
1. Read and understand all instructions.
2. Follow all warnings and instructions marked on the product.
3. Unplug this product from the wall outlet before cleaning. Do not use liquid
cleaners or aerosol cleaners. Use a damp cloth for cleaning.
4. Do not use this product near water, for example, near a bath tub, wash bowl,
kitchen sink, laundry tub, in a wet basement, or near a swimming pool.
5. Do not place this product on an unstable cart, stand, or table. The product may fall,
causing serious damage to the product.
6. Slots and openings in the cabinet and the back or bottom are provided for
ventilation. To protect it from overheating, these openings must not be blocked or
covered. The openings should never be blocked by placing the product on the bed,
sofa, rug, or other similar surface. This product should never be placed near or
over a radiator or heat register. This product should not be placed in a built-in
installation unless proper ventilation is provided.
7. This product should be operated only from the type of power source indicated on
the marking label. If you are not sure of the type of power supply to your home,
consult your dealer or local power company.
8. Do not allow anything to rest on the power cord. Do not locate this product where
the cord will be damaged by persons walking on it.
9. Do not overload wall outlet extension cords, as this can result in the risk of fire or
electric shock.
10. Never push objects of any kind into this product through cabinet slots as they may
touch dangerous voltage points or short out parts that could result in a risk of fire
or electric shock. Never spill liquid of any kind on this product.
11. To reduce the risk of electric shock, do not disassemble this product. Instead,
when some repair work is required, take the unit to a qualified technician. Opening
or removing covers may expose you to dangerous voltages or other risks. Incorrect
reassembly can cause electric shock when the appliance is subsequently used.
12. Unplug this product from the wall outlet and refer servicing to qualified service
personnel under the following conditions:
i) When the power supply cord or plug is damaged or frayed.
ii) If liquid has been spilled into the product.
iii) If the product has been exposed to rain or water.
iv) If the product does not operate normally by following the operating
instructions. Adjust only those controls that are covered by the

OL3020 User Manual 6
operating instructions because improper adjustment of other controls
may result in damage and will often require extensive work by a
qualified technician to restore the product to normal operation.
v) If the product has been dropped or cabinet has be damaged.
vi) If the product exhibits a distinct change in performance.
13. Avoid using a telephone (other than a cordless type) during an electrical storm.
There may be a remote risk of electrical shock from lightning.
14. Do not use the telephone to report a gas leak in the vicinity of the leak.

SAFETY INSTRUCTIONS FOR BATTERY PACK
CAUTION:
Danger of explosion if battery is incorrectly replaced. Use only an Olympia Phone
approved battery pack in the handset of your Cordless Telephone. To reduce the
risk of fire or injury, always do the following when replacing, discarding, or
charging the battery. When handling the batteries, be careful not to short the
battery with conducting materials such as rings, bracelets, and keys. The Battery
or conducting material may overheat and cause burns. Use only the following type
and size of battery pack:
FOR HANDSET UNIT:
GP60AAAH3BMXZ 3.6V 600mAh GPI INTERNATIONAL LIMITED
CONTAINS NICKEL-METAL HYDRIDE BATTERY.
BATTERY MUST BE RECYCLED OR DISPOSED OF
PROPERLY
1. Do not dispose of the battery in a fire. The cell may
explode. Check with local codes for possible special disposal instructions.
2. Do not open or mutilate the battery. Released electrolyte is corrosive and may
cause damage to the eyes or skin. It may be toxic if swallowed.
3. Exercise care in handling batteries in order not to short the battery with conducting
materials such as rings, bracelets and keys. The battery or conductor may overheat
and cause burns.
4. Charge the batteries provided with or identified for use with this product only in
accordance with the instructions and limitations specified in this manual.
5. Observe proper polarity orientation between the battery(ies) and battery charger.
6. Do not mix old and new batteries in this product.
7. Do not mix batteries of different sizes or from different manufacturers in this
product.
SAVE THESE INSTRUCTIONS
OL3020 User Manual 7

OL3020 User Manual 8
Part I Cordless Phone Operation
1 Cordless Phone Features
1. 5.8GHz/900MHz, 40 channel auto scanning operation
2. Manual channel selection
3. 65536 random security codes
4. Last number redial (32 digits max.)
5. Page in base unit to locate the handset (short and long page)
6. Temporary touch tone (pulse to tone dialing)
7. Tone / Pulse dialing mode selection in handset
8. Ringer ON /OFF selection in handset
9. 10-number speed dial memory in handset (up to 16 digits per phone no.)
10. Flash key for call waiting and call transfer - 600ms.
11. 3-level Volume control
12. Pause key (pause time is 4 seconds)
13. Low battery warning tone
14. Backlit LCD Display
15. Auto Answer when Handset is removed from cradle
16. Any key answer
17. Redial & CID transfer to memory (up to 16 digits long)
2 Handset Caller ID Features
1. Caller ID and Call Waiting ID compatible
2. CID memory stores up to 64 names and numbers
3. 3-line Handset display
4. Total call counter
5. New call LED indicator on handset
6. Repeat call indication (LCD icon)
7. 3-language options (English, Spanish & French)
8. Scroll review of CID records
9. Selective erase / ‘Erase All’ functions
10. Real time clock (date & time)
11. Private/ out-of-area indication
12. LCD display contrast control (6 levels - default at 3)
13. ‘Smart Dialing from Caller ID
14. ‘Battery Low’ indication on the Handset display

OL3020 User Manual 9
3 Set Up
Connect the power supply to an electrical outlet and base unit.
Remove the handset battery cover and connect the battery back. Replace cover.
Charge the handset for at least 10 hours before using your phone.
Connect the modular phone cord to a live phone jack and the base unit.
4 Handset – Quick Programming Guide
Initial Setup (or any time the phone is powered up)
SET LANGUAGE will appear on the display.
Press #. ENGLISH or SPANISH or FRENCH is displayed. Press
▲/* or ▼/#to set the desired language; then press MEM.
AREA CODE ? is now displayed. If you live in a 7 digit local dialing area, enter your
Area Code. If you live in a 10-digit area for local dialing, enter 000 for the Area Code,
then press MEM.
SET T/P? T (Set Tone/Pulse) is now displayed. Press ▲/*or ▼/#to change the
dialing mode, then press MEM.
RINGER ON (or OFF) is now displayed. Press ▲/*or ▼/#to change the ringer mode,
then press MEM.
DATE/TIME is displayed. Press digits or ▲/* or ▼/# to adjust date and time, then
press MEM.
CONTRAST ▲▼ is displayed. Press ▲/*or ▼/#to adjust the display contrast, then
press MEM.
PROGRAMMING IS COMPLETE!!
Returning to program mode after you have initially programmed your Handset
With the Handset in the idle (Off) mode, press and hold MEM. SET LANGUAGE
will appear on the display. Follow the steps listed above, or press MEM. repeatedly to
find the feature you wish to program. Once you program the desired feature, press
MEM repeatedly to exit programming (CONTRAST is the final programming option
prior to exiting programming mode).

5 Installation and Charging of the Battery Pack
1. Open the battery compartment by sliding the cover down.
2. Plug the Battery Pack connector into the Handset battery socket. Place the battery
pack and wires in the compartment.
3. Close the battery compartment.
4. You may change the face panel with one of the color options provided.
5. Plug the power and telephone cords into the corresponding jacks on the bottom of
the Base.
6. Run the cords through the channels provided.
OL3020 User Manual 10

7. Connect the telephone line cord into the telephone wall jack, and the power supply
into a live power outlet. Make sure the outlet is near the Base, easily accessible,
and not controlled by a switch.
8. Place the Handset in the Base. The Handset and Base communicate with each
other automatically. This process may take a minute.
9. Leave the Handset in the Base for 10 hours so that the battery pack is fully
charged.
10. The CHARGE indicator on the Base glows when the Handset is charging.
Maximum talk time on a full charge is 4 hours. Maximum standby time on a full charge
is 5 days. Your results may be somewhat less that these maximums.
6 Layout of Keys and Indicators
OL3020 User Manual 11

OL3020 User Manual 12
Key Functions (refer to illustration page 9)
1. Earpiece
2. LCD Display
3. Vol. DOWN / CID Dialing
4. Channel / Clear
5. Scroll UP
6. Redial / Pause
7. Mic. Mute
8. Microphone
9. New Calls Indicator
10. Talk / End
11. Vol. UP / Delete
12. Flash
13. Dialing Keys
14. Scroll DOWN
15. Memory / Programming
16. LEFT
17. DOWN
18. SELECT
19. UP
20. RIGHT
21. Page
22. Charge Contacts
23. Charge / In Use
24. InfoGlobe
7 Powering Up
1. After the battery pack is installed in the Handset and the Base Unit is powered up,
the Handset should be placed in the cradle of the Base Unit for charging and
setting a new security code.
2. Each time the Handset is placed on the cradle of the Base Unit, the Base will
generate and transmit a new security code to the Handset.
3. The completion of a successful security code transfer operation will be indicated
by a flash of the ‘In Use’ LED on the Base Unit and a beep generated by Handset.
4. In the event you do not receive the visual and audible indicators, check to ensure
the Base is powered and the battery pack is connected. Return the Handset to the
Base cradle.
8 Answering Calls
1. The incoming call is signaled by a ringing sound from the Handset and by the

OL3020 User Manual 13
blinking of the Base Unit’s ‘In Use/Charge’ LED. The Handset’s ‘New Call’
LED also blinks during ringing.
2. When the Handset is in the cradle, simply pick it up to talk. It will automatically
answer the call. The ‘TALK’ button will be disabled for 5 seconds. This is the
Auto Answer feature.
3. When the Handset is away from the Base Unit, press the ‘TALK’ button on the
Handset. You can also press any number key 0-9, *or #to answer the call. This
is the Any Key Answer feature. The ‘In Use / Charge’ LED turns on after the
connection is successful.
4. If the communication link cannot be established within 8 seconds, three error
beeps will be heard from the Handset to indicate communication has failed.
9 Make a Call
1. Each new call must begin by pressing the ‘TALK’ button on the Handset. It will
scan for a clear channel of communication. At the same time, ‘TALK’ will be
shown on LCD display.
2. If the communication link is not established within 8 seconds, there error beeps
will be heard from the Handset to indicate communication has failed.
3. You can dial the phone number first, then press TALK (this is called pre-dial); or
press TALK first, then dial.
10 Terminate a Call
1. To terminate a call, press the ‘TALK’ button; -OR-
2. Place the Handset in the cradle; the call is then terminated.
3. Your Handset will emit an error beep if it cannot receive an acknowledgement
from the Base Unit. In this case, put the Handset back in the cradle to make sure
the call has been terminated.
11 Short Paging (To Locate the Handset)
1. Press the ‘PAGE’ key on the base unit. ‘PAGING’ will be shown on the LCD
display and the Handset will emit 3 short beeps, followed by a 1-second pause,
then 3 short beeps.
12 Long Paging
1. Press and hold down the ‘PAGE’ key on the Base Unit. ‘PAGING’ will be shown
on the LCD display and your Handset will beep. If you hold the button for 5
seconds, the page will be extended to 60 seconds.
2. Press any key on the Handset to stop paging.

13 Selecting System Language
OL3020 User Manual 14
1. There are 2 ways to access ‘SET LANGUAGE’ mode:
1) ‘SET LANGUAGE’ will appear on the LCD when your phone is charged for
the first time or powered up after it has been without power for an extended period;
-OR-
2) During idle (on hook) mode, press and hold ‘MEM.’ until ‘SET LANGUAGE’
appears.
S E T L A N G U A G E
2. Setup mode begins with language selection. Your phone offers 3
languages - English, French and Spanish. Press ‘▼/#’ or ‘▲/*’ to choose
the desired language and then press the ‘MEM.’ key to confirm. After
confirmation, ‘Area Code ?’ will be displayed.
3. 14Setting Local Area Code
0 0 0
A R E A C O D E ?
1. If you dial 7 digits to make a local call, you need enter your 3-digit area code.
The digits will shift to the left one by one as you enter them. If you dial 10 digits
to make a local call, enter ‘000’ (if it is not already programmed for ‘000’).
2. Press ‘MEM.’ key to confirm. After confirmation, ‘SET T/P ? is displayed.
15 Setting Tone/Pulse (Preset to Tone)
S E T T / P ? T

1. The current setting (T or P) is displayed.
2. Press ‘▼/#’ or ‘▲/*’ to select the desired setting, and the display will update the
current setting: ‘SET T/P? T’‘SET T/P? P’‘SET T/P? T’……..
3. Press ‘MEM.’ to confirm. After confirmation, you will enter ‘RINGER’
setting.
16 Setting RINGER ON/OFF
R I N G E R O N
1. The current RINGER ON/OFF setting is displayed.
2. Press ‘▼/#’ or ‘▲/*’ to select the desired setting, and the display will update to
the current setting: ‘RINGER ON’‘RINGER OFF’‘RINGER ON’
3. Press ‘MEM.’ key to confirm. After confirmation, you will enter
DATE/TIME setting.
4. 17Setting Date & Time
1 0/3 0
PM
10:00
DATE / TIME
1. Press the appropriate digits to enter first the time and then the date.
2. To change the AM/PM setting, press any digit.
3. Press ‘▼/#’ or ‘▲/*’ to skip forward or backward.
4. Press ‘MEM.’ key to confirm. After confirmation, you will enter CONTRAST
setting.
18 Setting Display Contrast
OL3020 User Manual 15
C O N T R A S T 56

OL3020 User Manual 16
1. Press ‘▼/#’ or ‘▲/*’ to set the desired contrast.
2. Press ‘MEM.’ key to confirm. After confirmation, the display returns to standby.
During programming, Press ‘CHAN’ to return to idle mode. Or, if no key is
pressed for 20 seconds, you will be returned to idle mode.
Display contrast can also be set by pressing ‘FLASH’ during standby (idle) mode:
3. Press ‘▼/#’ or ‘▲/*’ to set the desired contrast.
4. Press ‘MEM.’ to confirm. After confirmation, the display returns to standby
mode.

19 Caller ID Operation - Handset
Display:
12-character text line
12-digit number line
1 2 3 4 5 6 7 8 9 0 1 2
tA B C D E F G H I J K L u
NEW
CALL88 RPT 18:88 PM
AM 1 8/8 8
N
ew-Call /
Call counter
R
epeat call
indicator
N
ew Voice
M
essage
indicator
Clock
Clock ticker
D
ate
N
EW CALL
I
NDICATOR
VIP
The Handset
Display
What is its purpose?
12-character text
line
For display of callers’ name, system prompts (CID and
phone), call timer, dial number.
12-digit number
line
1. Display caller’s number (CID), or
2. Display dialed digits (phone).
New-call / Call
counter
Shows the amount of calls / new calls in standby mode
Example: # of old calls: CALL 18
# of new calls: NEW CALL 9
Repeat Call icon Lights on to indicate that the displayed call arrived more
than once.
Clock 1. Shows the real time clock (AM/PM format), or,
2. The time stamp of a CID record.
Clock ticker Blinks when real time clock is being displayed.
Date 1. Shows the date (month/date format), or,
2. The date stamp of a CID record.
OL3020 User Manual 17

CID related
button
Descriptions
DEL 1) Erase a single CID record in CID browser.
2) Erase all CID records in standby mode.
‘▼/#’ and ‘▲/*’ Scroll up and down through your CID records.
CHAN When on hook, returns screen to idle mode.
CALLS Redial CID number in CID browser.
NEWCALL indicator – Located at the top right corner of the Handset, a blinking red
light will alert you to new/unread Caller ID records stored in memory.
Note1: All display illustrations in the document will be in English. However, the actual
appearances of the screens will vary according to the language selection during
start-up (English, Spanish or French).
Note2: If the unit receives more than 64 calls, the oldest CID information will be erased
(except VIP calls).
1. RECEIVING CALLS
i. When Caller ID is activated, the Telephone Company sends the caller’s
telephone number (and name, if available) and the call’s date and time
between the first and second rings. The device receives and displays this
information for each call and updates the display with the current date and
time. The NEW CALL indicator will flash. Once you review all new CID
records, the NEW CALL indicator turns off.
N
EW CALL
4
1 1/0 1
9
H
--
J
5
N
--
10:00
7 8
AM
H
O
6
I T
3
NEW
CALL
S M
1
2
2
ii. The display also indicates if caller information is not available or
intentionally blocked by the sender:
OL3020 User Manual 18

1 0/3 0
PM
10:00
N O C A L L E R I D
1
NEW
CALL
1 0/3 0
PM
10:00
C I D B L O C K E D
1
NEW
CALL
iii. After 20 seconds, the display returns to standby mode, showing ‘NEW CALL
XX where XX is the number of new calls. NEW CALL LED blinks until you
review all new CID / Call Waiting ID records.
Note: If the received CID number is 10 digits long, and the first three digits match with
the area code that you have programmed, the LsCD shows the last 7 digits only
(area code will be omitted). See Setting local area code.
2. REVIEWING NEW CALLS
i. In standby mode, with the ‘NEW CALL’ indicator flashing, pressing ‘▲/*’
or ‘▼/#’, the LCD displays the latest new call information.
4 09
1 0/3 0
J
5
N
-- 8
PM
7
10:00
H
O
6
NEW
CALL
IM
1
2
HT
--3
S
1
ii. Repeatedly press ‘▲/*’ or ‘▼/#’ to review all new call information in the
order of receipt until the LCD displays ‘END NEW CALL’ and the ‘NEW
CALL’ indicator stops blinking.
OL3020 User Manual 19

DLLC A
W
ENN
E
iii. If the received call information is same as any of the existing new calls, the
‘RPT’ icon will be on to indicate REPEAT CALL. The most recently arrived
CID will be saved attached with a new date / time stamp. The older record
will be deleted. After you review this call, the ‘RPT’ icon will turn off.
iv. If you do not review other calls for 20 seconds, the time and date will be
displayed, and the call counter will show the total number of new calls
including those already reviewed.
PM
10:00
5
1 0/3 0
NEW
CALL
* Press ‘CHAN.’ to return to standby (idle) mode.
* No activity for 20 seconds will return the display to standby mode.
3. REVIEWING OLD CALLS
i. In standby mode, press ‘▲/*’ or ‘▼/#’ to review old call information from
the oldest to the newest (‘*’ button) or from the newest to oldest (‘#’ button).
4 09
1 0/3 0
J
5
N
-- 8
PM
7
10:00
H
O
6
CALL
IM
1
2
HT
--3
S
1
ii. When the end of the list is reached, ‘END’ is displayed.
N
-- E--D
OL3020 User Manual 20
Table of contents
Other Olympia Cordless Telephone manuals

Olympia
Olympia 6101 User manual

Olympia
Olympia COP 24201 User manual

Olympia
Olympia CDP 24201 User manual

Olympia
Olympia OL6815 User manual

Olympia
Olympia 6111 User manual

Olympia
Olympia fun User manual

Olympia
Olympia DECT 5000 User manual

Olympia
Olympia CHILL Instruction sheet

Olympia
Olympia OL2400 User manual

Olympia
Olympia Cool User manual